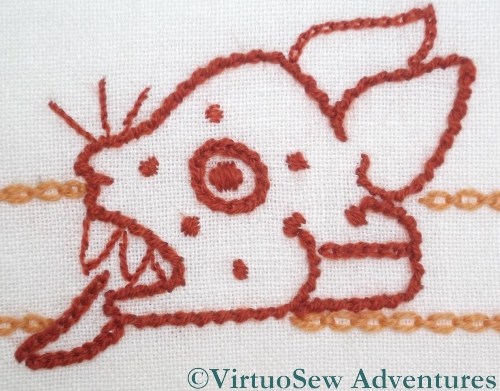
First Layer Completed
I did comment that the laid and couched work romps along, and once I got going, it really didn’t take long at all to finish the first layer.
In the interests of being sure of having enough thread to complete the Dragon, I used two shades of rust-coloured wool for his body. The underlayer of surface satin stitch is worked using two strands – making it possible to blend the threads – while the couching stitches are worked using a single strand.
Looking once more at Tanya’s Dragon on the Flickr Group, I realise that I’ve not quite followed her stitching angle in all places. but I’m very happy with how the first layer turned out.
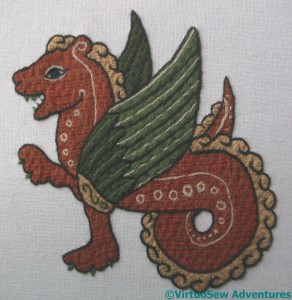
Detail Added
Once the first layer is done, there are details to be added.
And my goodness, what details!
There was a slight false start, because the creamy-white was too light, the wrong texture, and simply looked wrong.
Since the details are worked in split stitch, the necessary unpicking was a severe trial. However, the combination of a pair of tweezers and my brand new embroidery scissors from Ernest Wright and Sons Ltd (bought when I heard of them following a BBC article) made it as easy as it could be (still not very easy, though!).
I finally picked a creamy shade, lighter than pale yellow I used for his crest, but in the same family. It turned out really well, and even his green teeth don’t detract from his charm. He looks a very genial fellow, and I’ve named him Rusty.
I’ve been tagged in a round the world blog hop by Penny of ArtJourney, and while this post is a lot more “abstract” than my usual posts, it is always interesting to think about your own work in a different way. So thank you Penny, for giving me the opportunity!
1. What am I working on?
Er.. How long have you got? My long term project is the Dreams of Amarna, but at the moment I’m also following the Opus Anglicanum Stitch A Long, and now the weather is closing in, I will soon be back to the Crazy Canvaswork Cushion. That doesn’t include, of course, random little projects that I pick up and put down occasionally, or new techniques I try, but don’t find an immediate use for..
-
-
Rough Layout of the first panel
-

-
Wings In Laidwork
-
-
Two Thirds Done
2. How does my work differ from others of its genre?
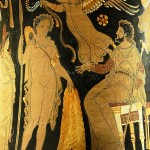
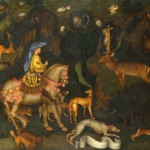
I tend not to stick to a single type of embroidery, so there is a lot of cross-fertilisation between the styles of embroidery I use, and the way in which I use them. However, unlike a lot of similarly eclectic embroiderers, I rarely work anything truly abstract: there’s usually a story somewhere at the back of any piece I work. Two more long term projects I have plans for when Dreams of Amarna is done are panels relating to The Golden Fleece and The Conversion of Placidus. In fact, the Conversion of Placidus is bubbling at the back of my mind at the moment; I had a tour of Flag Fan with Francis Pryor a couple of weeks ago (fabulous, by the way, for anyone with any interest in prehistory!), and I’m desperate to include the kingfisher I saw there…
-
-
Jason bringing the Fleece to Pelias. Photo by Jastrow (2006) Public Domain Licence
-
-
Pisanello “Vision of St. Eustace” in The National Gallery, London
3. Why do I write/create what I do?
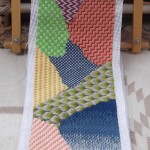
Because I love it. Embroidery is the medium in which I choose to respond to stories, ideas – or domestic opportunities. Many of my “non-literary” projects are worked with our house in mind – like the Firescreen, the chair seats, or the Finnish table runner.
-
-
Jacobean Style Fire Screen
-

-
Finished Chairs
-
-
Table Runner Hemmed
4. How does my writing/creating process work?
It varies very much with the project in question. For the Dreams of Amarna, I have read and re-read the book “Nefertiti Lived Here” by Mary Chubb, I have visited the Egypt Exploration Society and the Petrie Museum, the Treasures of Tutankhamun exhibition and Discovering Tutankhamun at the Ashmolean and I have taken a course in working with metal threads. In fact, the idea was bubbling in the back of my mind for ten years before I even set a stitch!
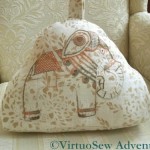
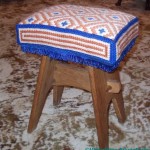
In contrast, projects like the Elephant Doorstop, the Stones of Venice Footstool, or the Knot Garden are much more improvisatory!
-
-
Finished Doorstop
-
-
Finished Footstool
-
-
The Canvaswork Knot Garden
5. Tag – You’re It!
Of course, if I don’t tag someone, the Blog Tour would come to an abrupt halt… So, ladies – Tag, you’re It!
- Janice, who blogs at Dancing With Sunflowers, was one of the first people to encourage me to start to a blog, and to welcome me to the world of blogging. She crafts thoughtfully using a range of techniques, many of which I know I wouldn’t be good at, so I have the greatest admiration for her.
- Jules has recently started a new blog, Needle and Pen, since she felt that her earlier blog no longer allowed space for her changing interests in craft and art. I’m going to be very interested to follow the development of her new adventure.
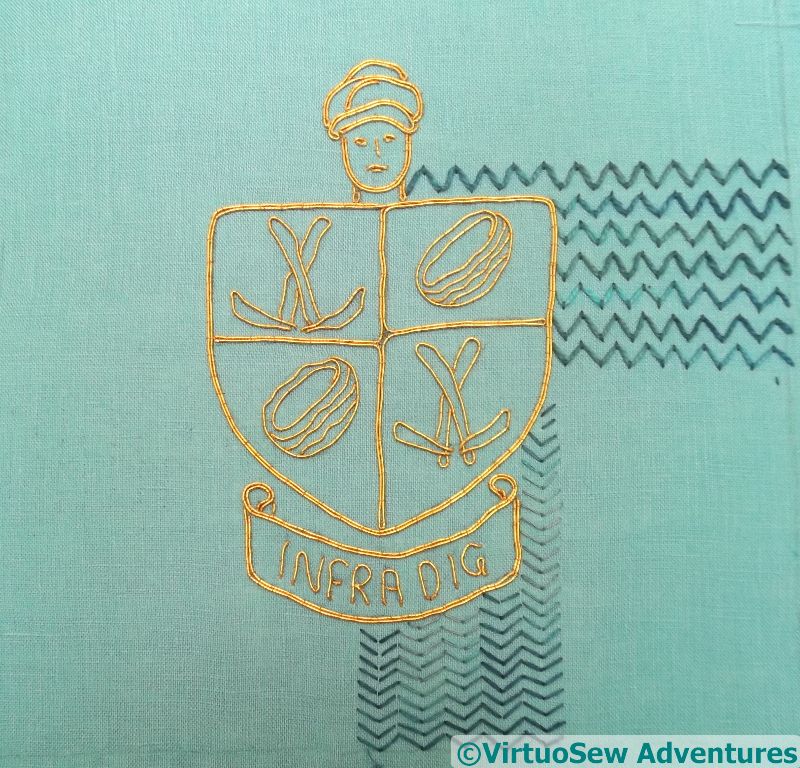
The goldwork on the Crest for the Dig went rather quickly, and I found myself running straight into a brick wall. I narrowed my background choices down to two, and then stopped. I’ve even extended the patches of trial background, and propped the frame up to stare at.
Two Background Choices
The arrowhead stitches create a subtle effect; patchy ripples, almost here-and-then-gone-again. Rather like Amarna, in fact – it’s thought the city was inhabited for less than thirty years.
On the other hand, the pearl cotton cloud stitch variation is more reminiscent of the rippling paint pattern that originally inspired me. The variegated thread helps to stop the background pattern from being too solid and monolithic.
Choices, choices….
In fact I took the frame to my parents’ house, last time I visited, and said plaintively “Help!”
We stared at it, talked about it, and finally decided that the pearl cotton variation on Cloud Filling Stitch is the way to go. It’s more in keeping with the idea of the doodle that inspired this design, the thread is closer in scale to the scale of the gold thread, and it’s also a better reflection of the ripple pattern I want to bring to mind.
I’m also considering how I’m going to edge the panel of stitching. At the moment, my ideas include lucetted cord or a flat kumihimo braid. The lucetted braid might be too narrow, but on the other hand I’ve only ever done one piece of kumihimo braid, so that would be rather a leap into the unknown!
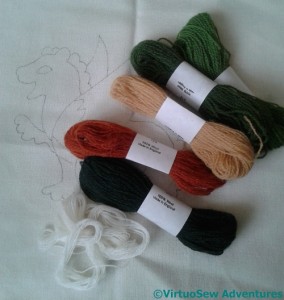
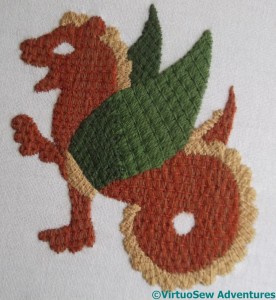
Thread For Dragon StitchALong
Do I really need another project to fit in, I wonder?
Well, yes, I think I do. Over on her blog, Opus Anglicanum, Tanya Bentham is running a medieval stitchalong, and quite simply, when she showed us a picture of the dragon she’d designed for us, I fell head over heels in love. He’s absolutely adorable, and I really didn’t care that I’m running short of time in any one week to do anything at all!
I decided not to buy a kit, since I have more wool thread than I know what to do with (remember my stash-busting canvaswork?), but I did buy some of the wool fabric Tanya suggested, and then rifled through my stash. Most of the wool is Appletons, but the creamy-white for highlights is a remnant of something rather smoother and silkier.
Maybe I’ll make some progress with the stash-busting, after all!
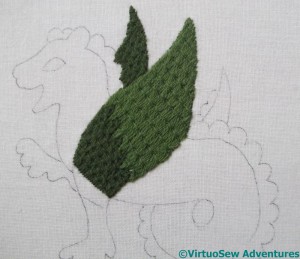
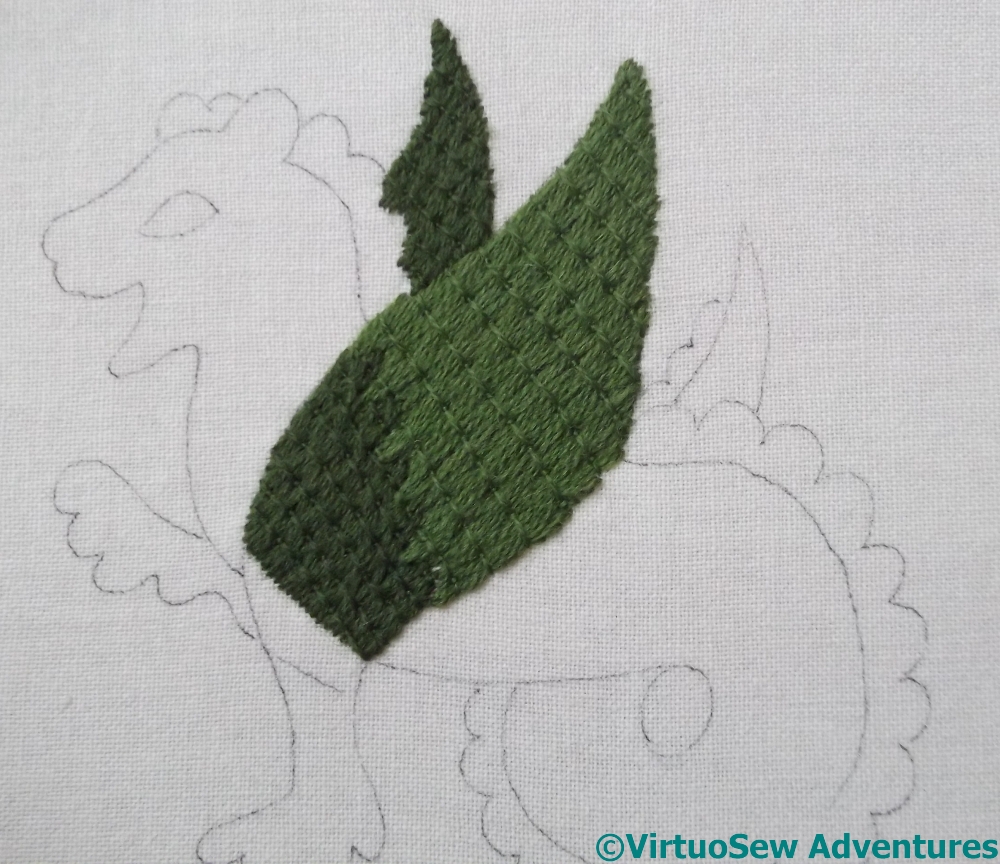
Wings In Laidwork
As it happens, I’m trailing slightly behind the stitchalong – and my blog is trailing behind my progress, because I’ve been enjoying stitching too much to stop and write about it.
The “colouring in” element of the design is worked in laid and couched work, which consists of three layers, in modern terms – surface satin stitch, with long couching stitches at right angles, which then in turn are tied down at intervals. Furthermore, it fairly romps along, which makes a lovely change after all that painstaking or nué earlier in the year!
There are several people taking part in the the stitchalong, not all of them bloggers, so Sue set up a Flickr group so that we could encourage one another..

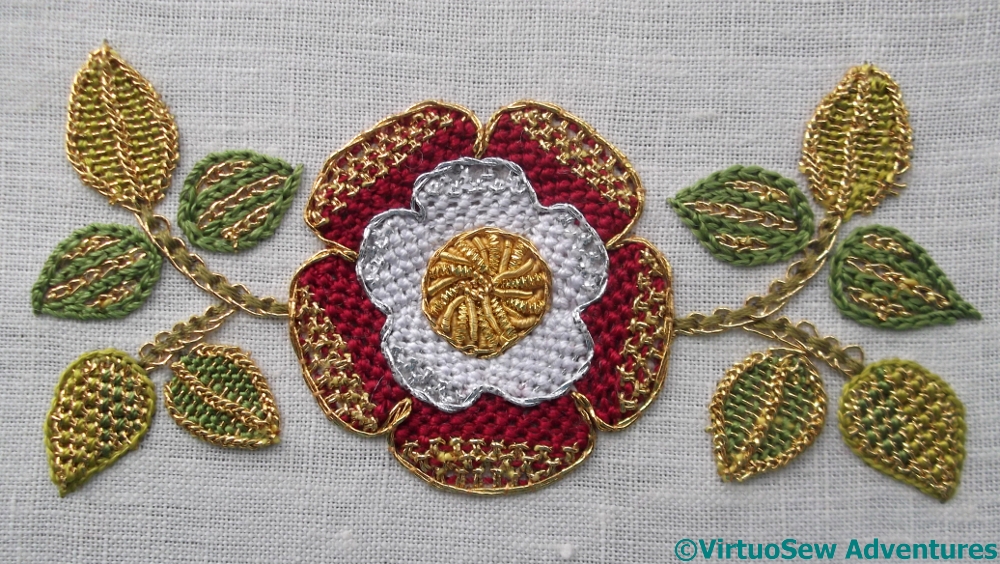
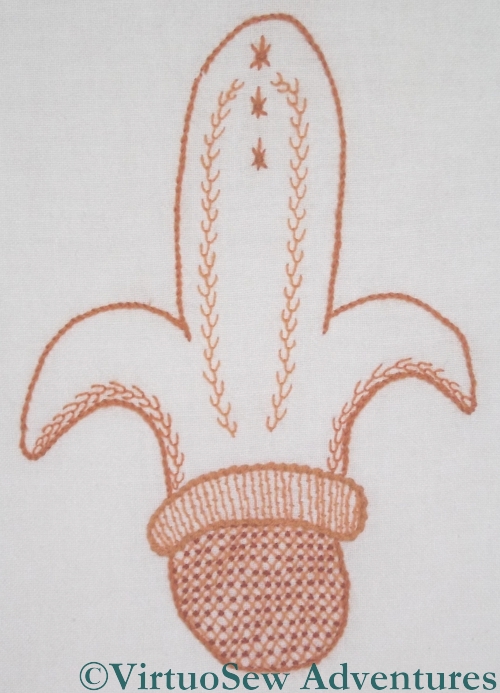
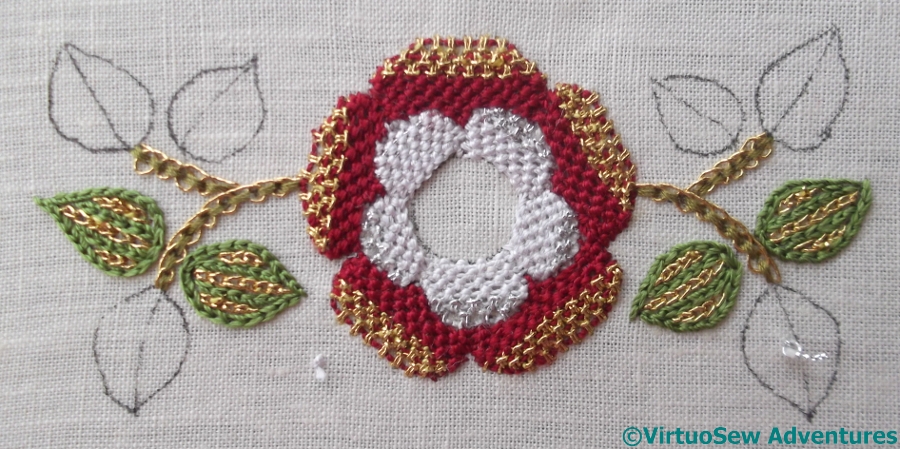
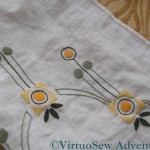
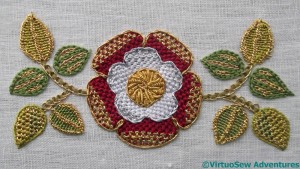
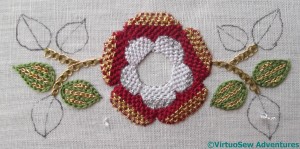
Tudor Rose Leaves
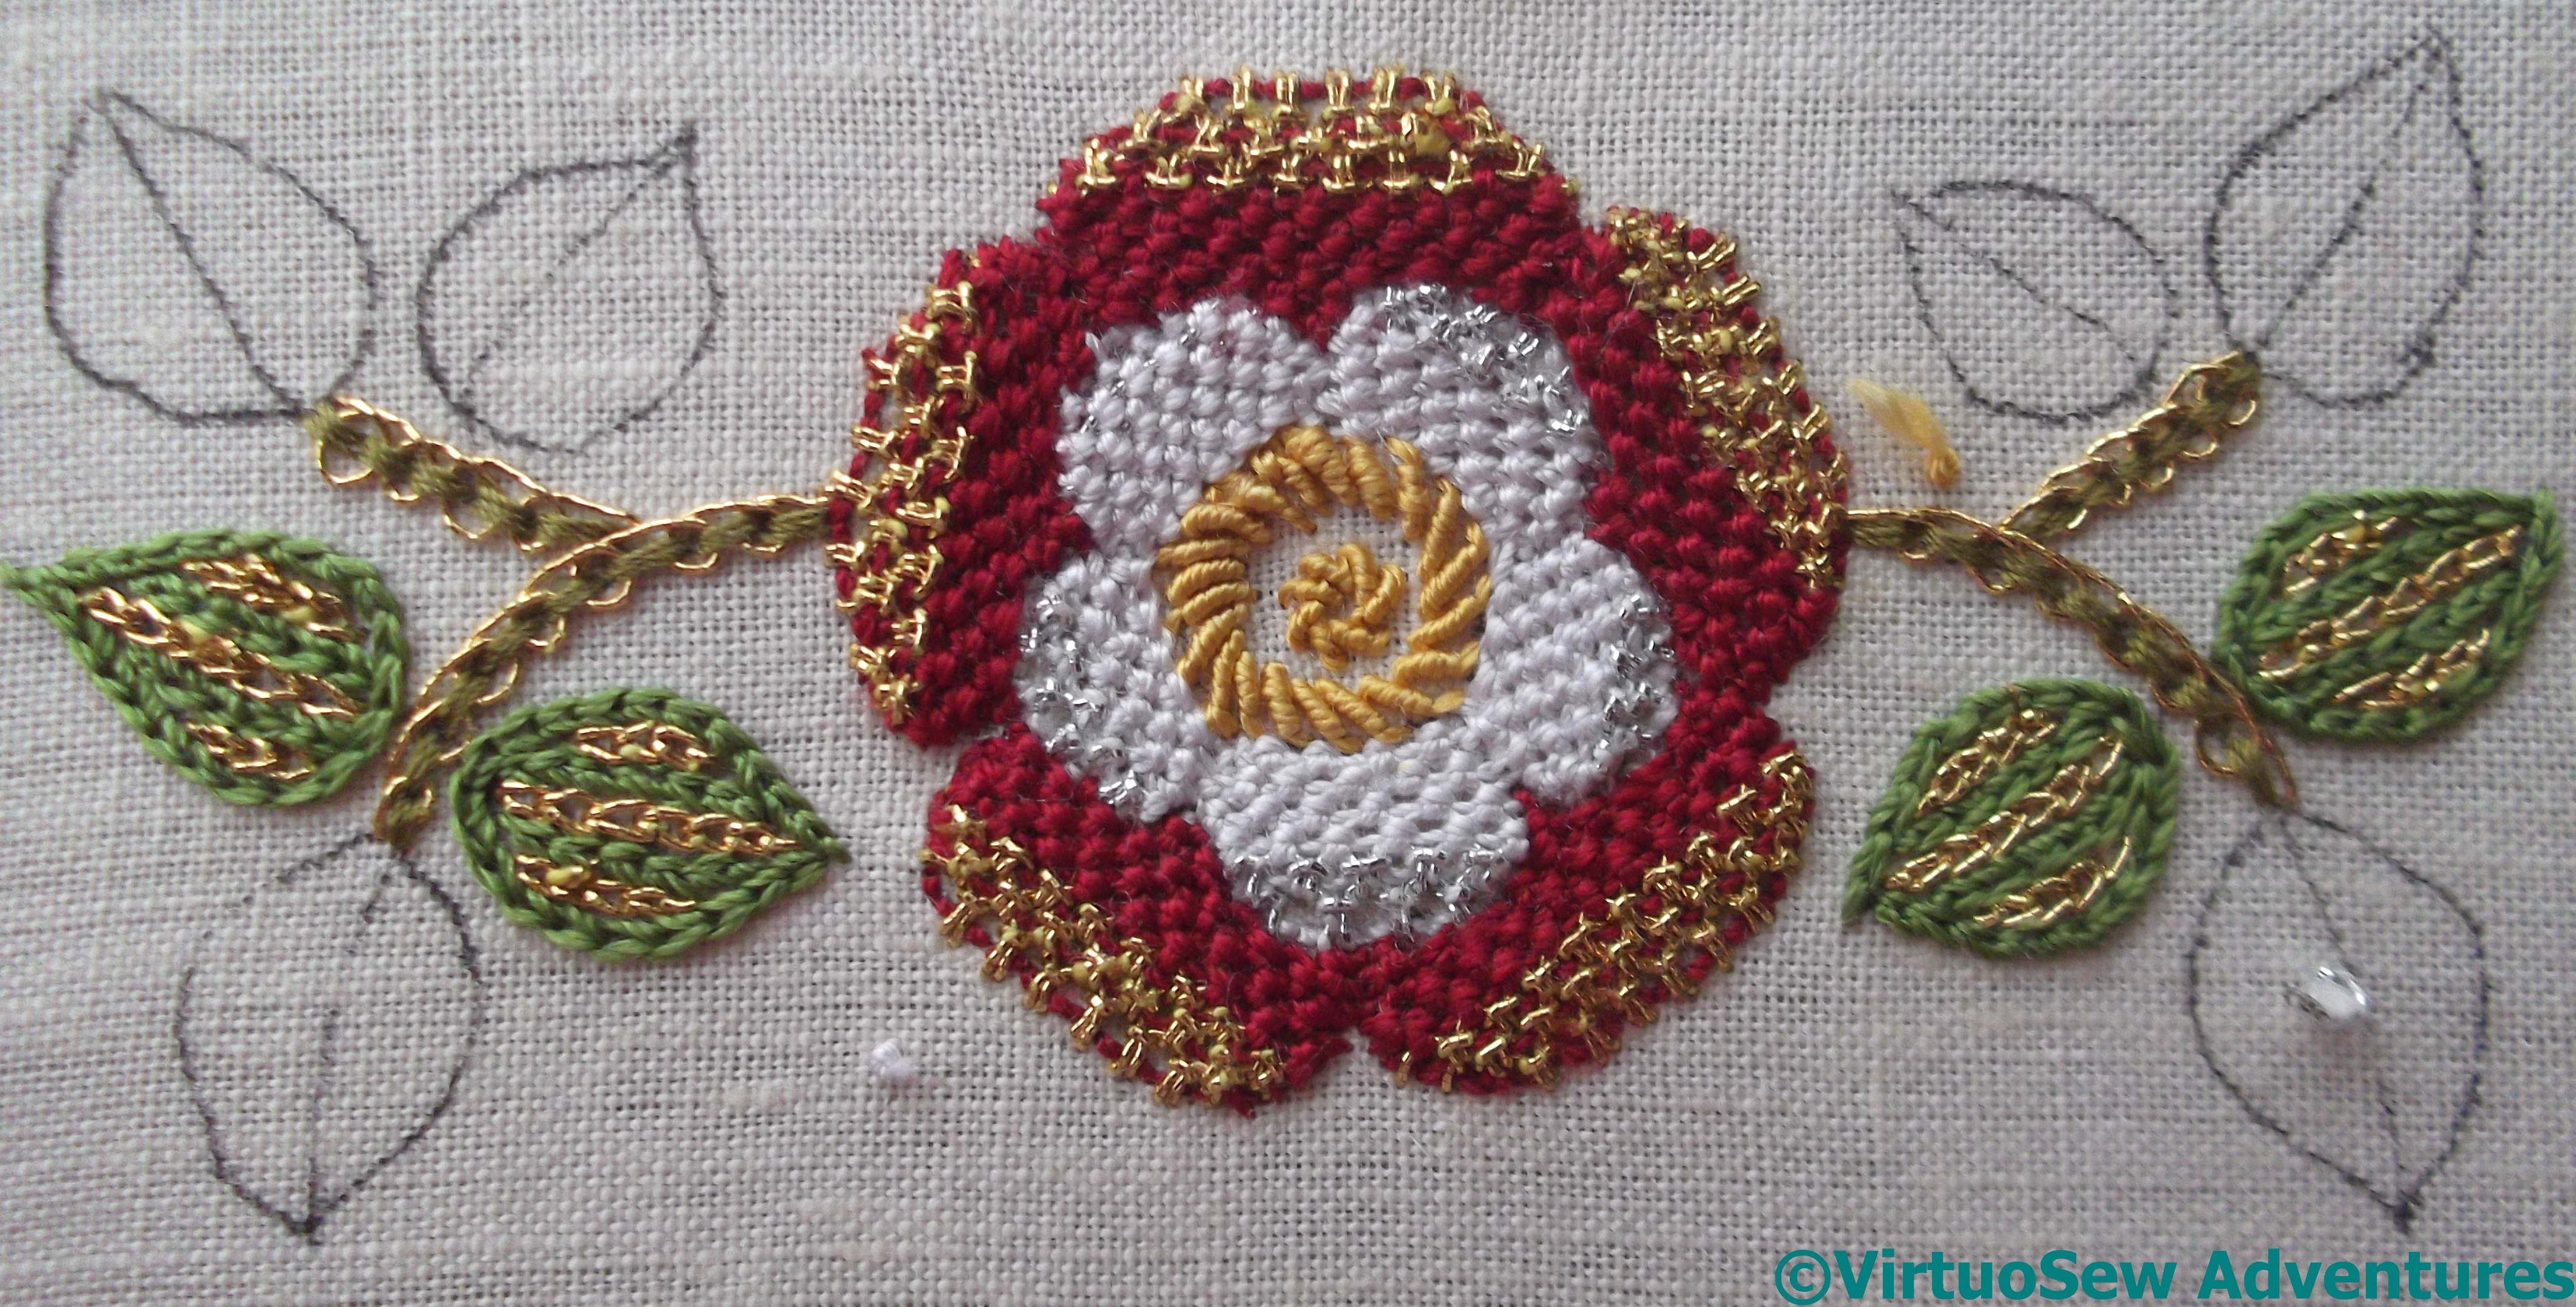
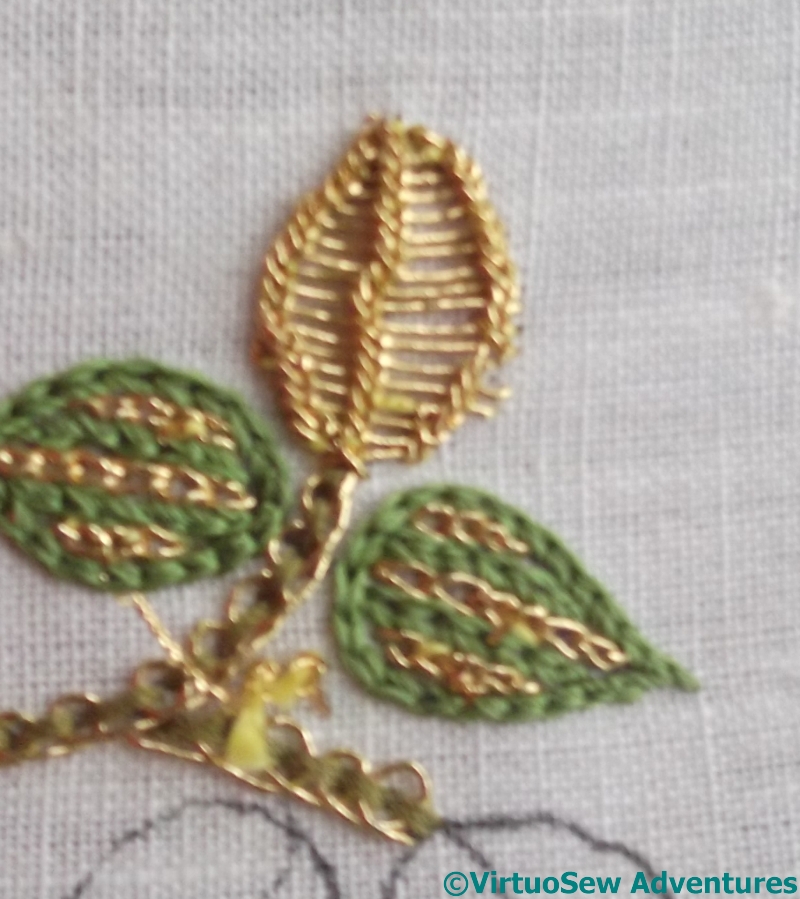
The work on the Tudor Rose continues.. The stitches used for the leaves are what I really wanted from this course, as I am hoping that they will help me to create elements in the Dreams of Amarna – the ancient Egyptians were as keen on bling as the Tudors!
Zoom in on the picture to the right and you will see that there are four different combinations of metal and silk threads.
- The stem – whipped back stitch
- Alternating silk and metal chain stitches
- Ceylon stitch with silk thread woven through it
- Up and down buttonhole stitch with silk threads overcast through it
It was very hard to weave through the Ceylon Stitch – I didn’t pack the threads as tightly as Tricia’s instructions show, even after four leaves (two on each side). I think it would be easier in some of the applications I intend, though, because I am expecting at least some of them to have straight edges!
The overcasting through the Up and Down Buttonhole stitch was tricky to start, but once I’d got it started it was fairly straightforward – and a lot of fun.
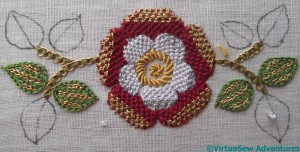
Tudor Rose Finished
The final element of the piece was the pearl purl and check purl in the centre. That was quite fiddly, and I am not sure that I worked the initial layer of bullion knots in silk in such a way as to make the layer using metal threads easy to do. I have much more practice to do to get my metal thread work to the level I saw at the Eye of the Needle Exhibition in the Ashmolean Museum a few weeks ago.

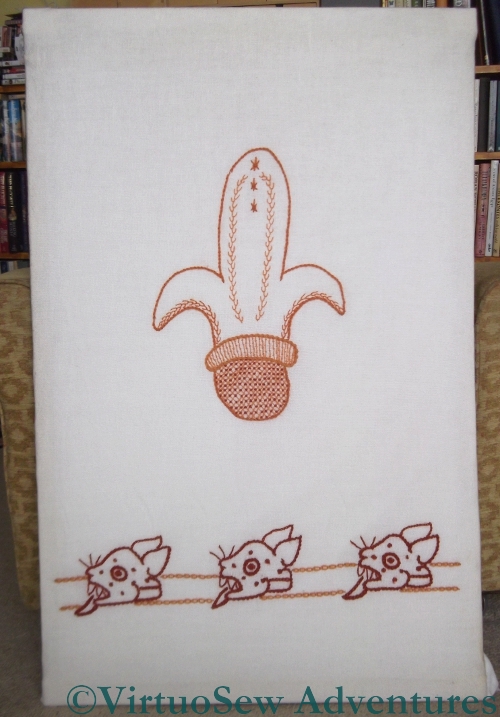
Aztec Hall Blind
Our predecessors in our current house had a somewhat flamboyant decorative style, and we still haven’t replaced the Aztec inspired wallpaper in the hall. If the combination of terracotta and ochre makes it dark, that same colour combination also makes it seem warm, which in a draughty, 100-year-old house is a consummation devoutly to be wished. Especially since my Geordie friends tell me I’m “nesh” (translation: excessively susceptible to cold)!
Since it’s also Grade II listed, we can’t simply double glaze, so the first winter after we moved in, my mother suggested reviving the idea of “blackout blinds”, padded to reduce the draught. With my usual knack for complicating a perfectly simple project, I embellished the hall blind with an Aztec inspired embroidery in rusty coloured wools on a coarse cream linen.
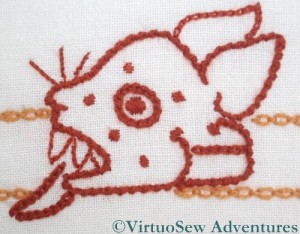
Jaguar Head
I started with the Jaguar’s Head frieze across the bottom. The main outlines are in twisted chain stitch, and the spots and the eye are in rough satin stitch. The background lines in the lighter shade are in my favourite Cable Chain Stitch.
I enjoyed working the jaguars. The simplicity of the stitching and the rather stark line drawing combined to create something that was very easy to do.

Central Motif
Unfortunately I then lost my nerve. The jaguars alone could easily have created all the effect I wanted, but the expanse of bare fabric unnerved me slightly and I filled it with another motif.
There’s more going on in this one – feather stitch and star stitches, jacobean trellis couching and burden stitch (running vertically instead of horizontally).
I may yet unpick all that section and wash the fabric again to pull the threads back into line..
Although, as it stands, it provides a salutory reminder, every time I go past, that more isn’t necessarily more !

Trialling Backgrounds
I had several very useful comments after my last post, but they all (understandably!) failed to take into account my overall plan for this project.
So, a quick re-cap, for the benefit of everyone who hasn’t (unlike me) been thinking about the Dreams of Amarna for the last twenty years. I first wrote about this in March 2010, but I first started thinking of an embroidery project inspired by the book “Nefertiti Lived Here” a good fifteen years before that!
I thought about various ideas for the Amarna embroidery for a good five or ten years, on and off, but then it finally came together in about 2008 during conversations with my cousin. In fact I started this blog partly in order to give myself a push, and to make sure that I kept at it.

Left Layout

Right Layout
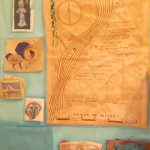
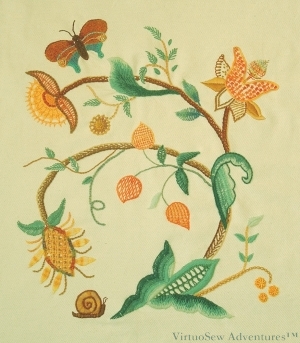
My idea at the moment is for two large panels, which will be colour-blocked as mirror images of one another using sandy colours (for the desert) and turquoise (for the faience used so often in ancient Egypt).
The sandy panels are about 35 centimetres by 50 centimetres, and getting the right proportions for the turquoise will be very important.
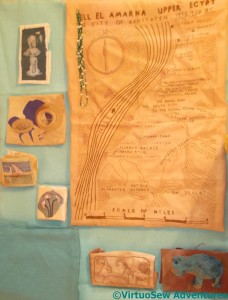
Rough Layout of the first panel
These panels will be overlaid with a gauze layer, screen printed with the heads of Akhenaten and Neferetiti. I have already done some experiments with screen printing on gauze, and I know that not only will it be rather tricky to find the right gauze, but working out how to hang it is going to be a real challenge. The gauze overlay means that colours that are subdued may not show strongly enough – in fact some of my early pieces for the project may end up being mounted as standalone pieces, for that very reason.
This post, from earlier this year, gives you a very rough idea of how the layout may look.
The Antelope Frieze and the Felucca may both turn out to be too inspidly coloured to show through.
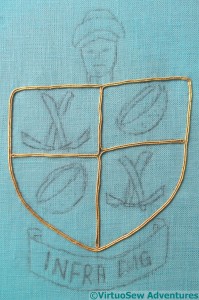
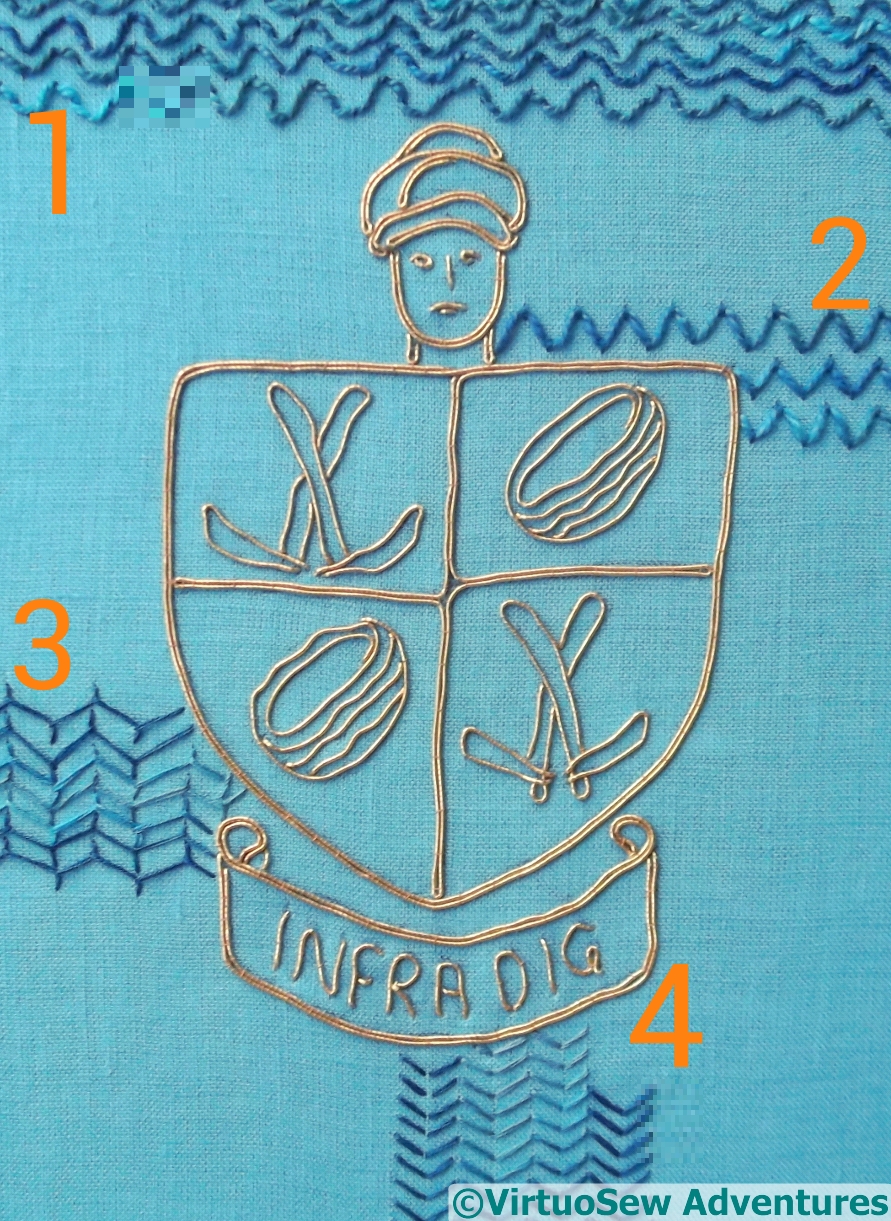
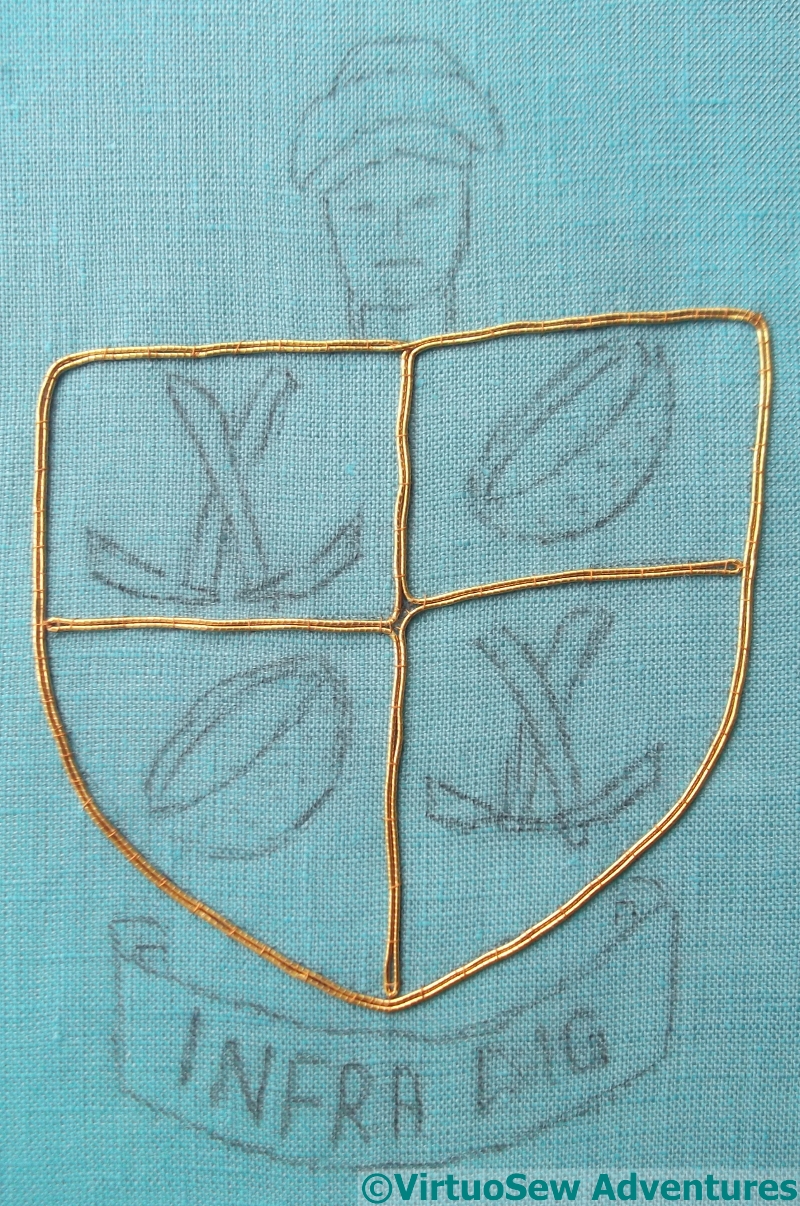
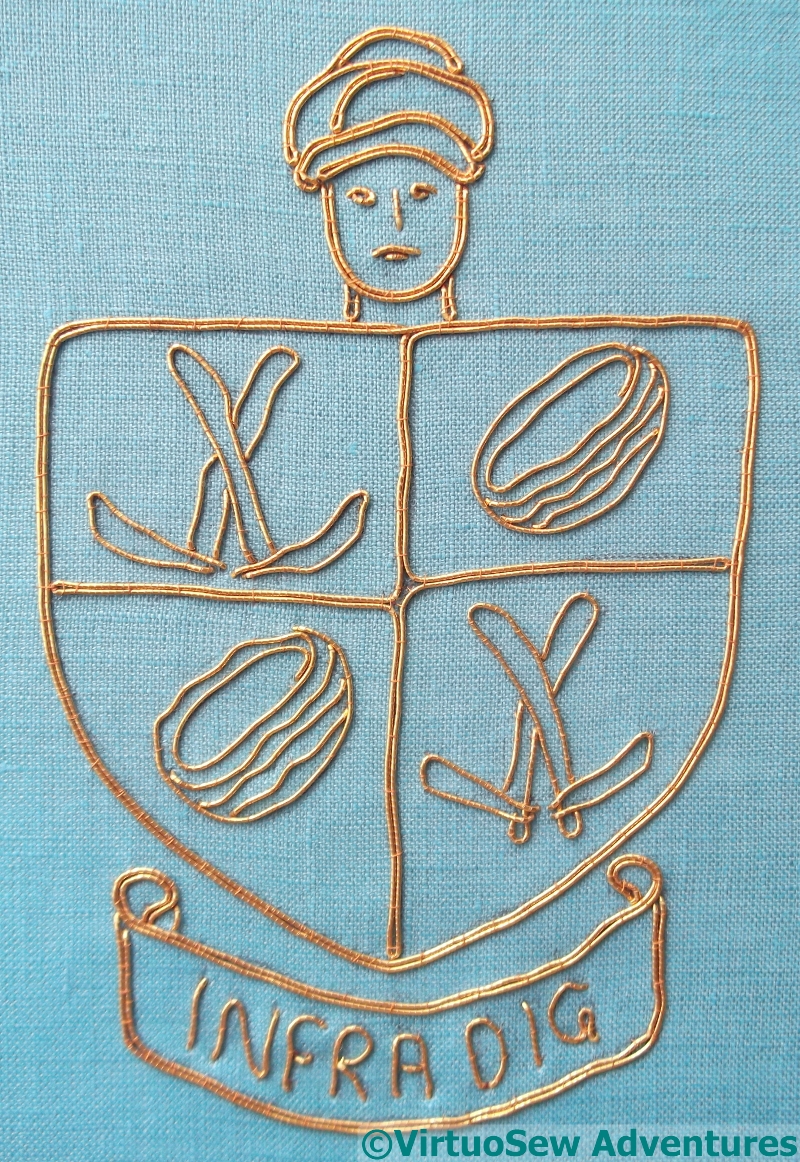
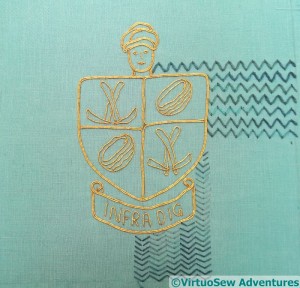
Working On Crest
The sensible first stage for the Crest was to do the goldwork. First of all, I’m not at all sure how I am going to do the background, so I should concentrate on the bit I’ve decided on. Secondly, I was a little worried that I might not have enough gold thread of the type I wanted to use…
That being the case, I decided that rather than giving each line a stop and a start, I would try to keep the lines going. That has meant a lot of thinking had to go into getting all the double lines right, and a bit of a fiddle at the central crossing point!
In the interests of both contrast and economy, the charges – motifs, in non-heraldic language – and the motto will use only one line of gold, but the shield, the Gufti’s head, and the scroll will use double rows to help pull it out from the background.

Goldwork Done
The goldwork of the Gufti’s head doesn’t have quite the same sense of life as my original sketch, but I am very pleased with how the folds of the turban turned out.
The charges – crossed touriehs (mattocks) and rush baskets (used to carry the spoil away) – have turned out well too. I was concerned that I might need to create a woven effect on the baskets, but now I look at the finished goldwork, I think it is enough to create the effect I am looking for.
The motto is a little uneven, but after all, it recalls Pendlebury just doodling something over dinner, and while drawing and sketching were vital skills for archaeologists – in fact they still are – I doubt he would have put the care into a doodle that he put into recording a trench!
Trialling Backgrounds
That didn’t take very long, did it. Suddenly I realise that I should have thought it out a bit better before I started. There’s a rippling pattern sometimes seen on plaster which I would like to recall in the background. It’s a simple pattern, but I think it could be effective – if I can get it right. In order, the trials I have done here show:
1 – Variegated Pearl cotton following a ricrac “stencil”, couched as invisibly as possible using a single strand of stranded cotton.
2 – Variegated Pearl cotton in a variation of cloud filling stitch that creates a ripple effect instead of the usual diamond pattern.
3 – Variegated Stranded cotton in rows of open cretan stitch, using three strands.
4 – Variegated Stranded cotton in Arrowhead Stitch.
I’ve discounted the first and third possibilities, but I’m still staring thoughtfully at the other two.
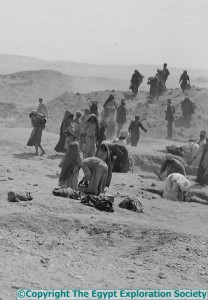
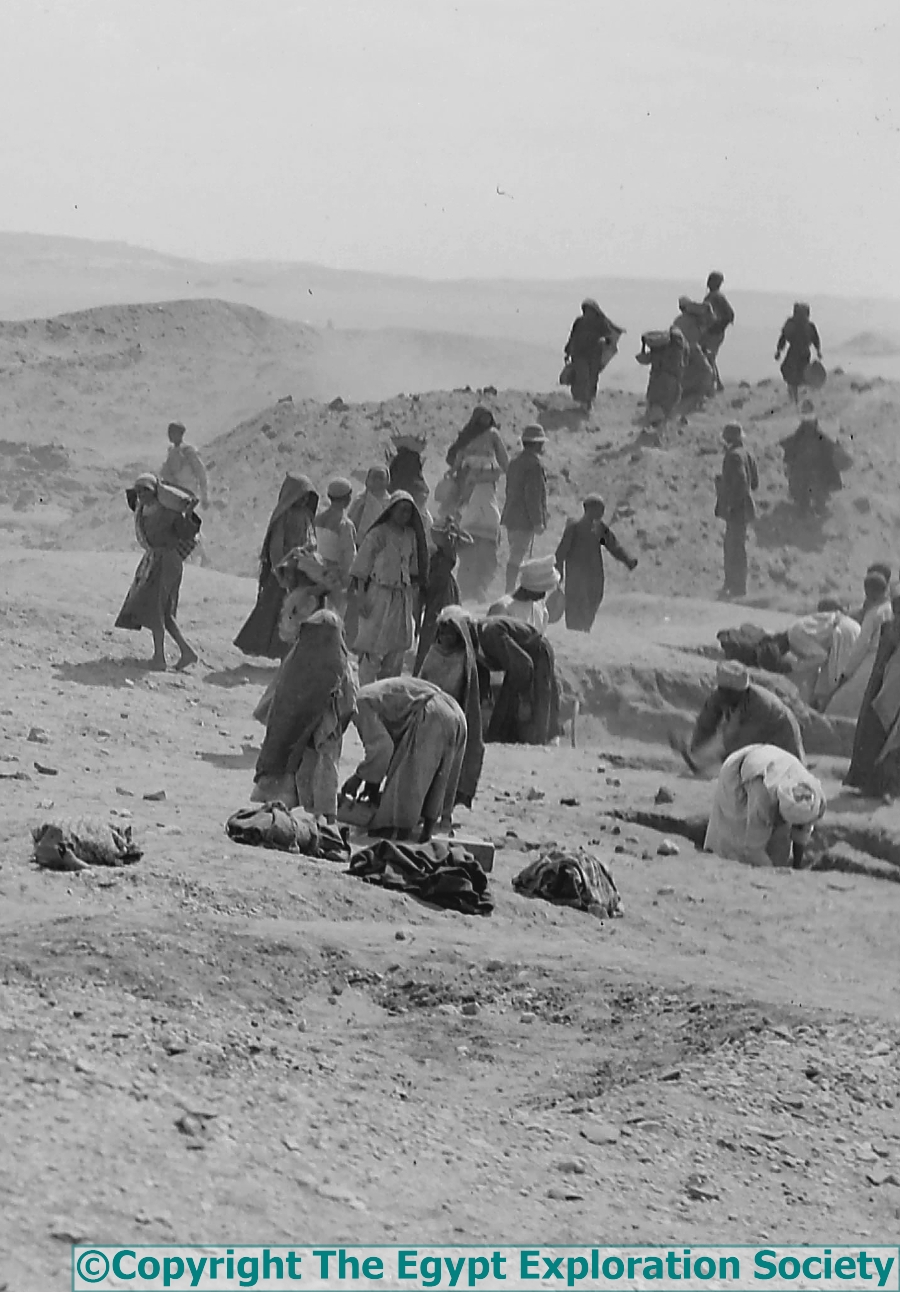
Cropped Section of the Scene at the Dig
Copyright The Egypt Exploration Society
Having completely redesigned the idea and the thrust of the second of the two background panels, I have to design the actual image I will use.
This image is cropped from a photo of the excavation from that wonderful collection of photos that The Egypt Exploration Society has allowed me to use as reference material for this project, and rather than using it just as it is, I’m going to alter it and maybe even add people to it…
There’s a lovely shape and pattern here, but the overall proportions of the picture don’t match those of the Map of Amarna, and they must. I need to make the design taller, without leaving myself with too much empty space top or bottom. A certain amount of empty space can be filled with stitching, but since this isn’t an abstraction of reality – like the map – but a representation of a moment in time, I need to be a bit more careful about what I do and how I represent everything, including the ground.

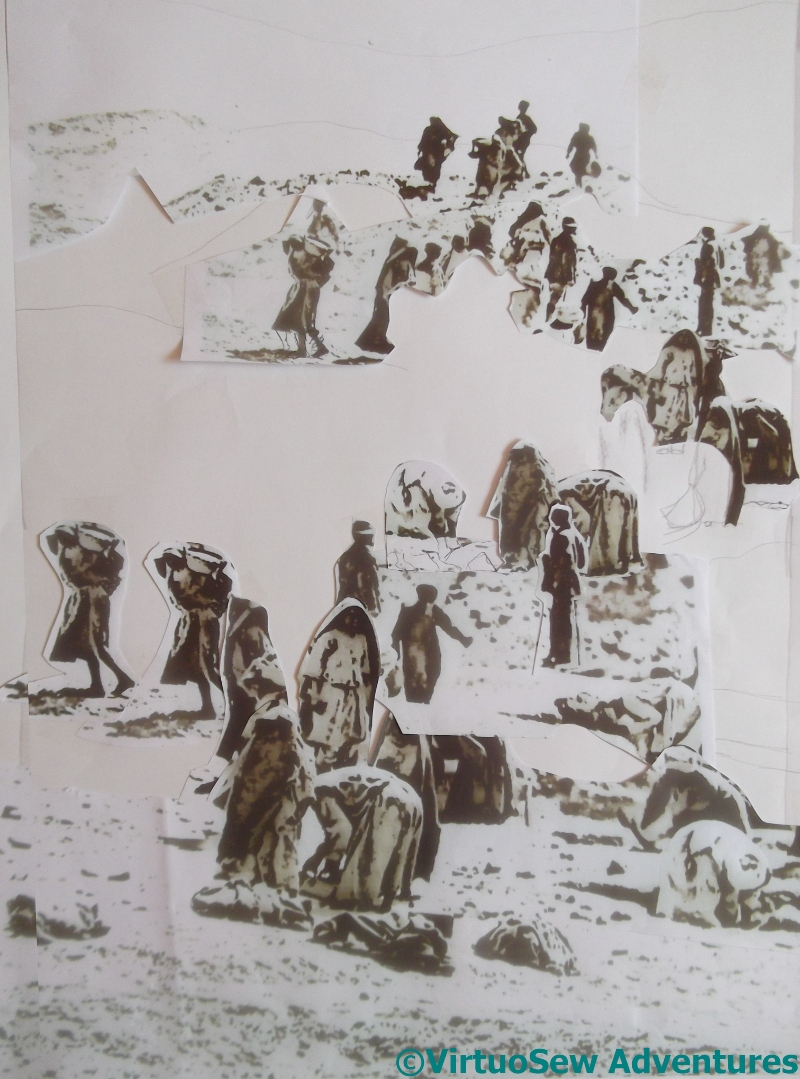
Draft Of Excavation Design
Here is the intermediate stage. I tweaked the contrast on the original photo and printed it out at a couple of different sizes, then my mother and I had an orgy of primary school paper collage, arranging and re-arranging groups of people to create a slightly busier, taller, picture of the excavation.
The next stage is to reinstate detail where I need it. The blobby effect of the reduced level of detail is just what I needed while planning the pattern of the excavation, but although the finished embroidery won’t have a high level of detail in most of the figures, I’m not sure that the lack of detail is in the right places…
This is not proving quick to develop!
What with one thing and another – largely to do with the Hittite Amulet and the consequent overdose on metal threads – the Tudor Rose has been snoozing quietly in a boxfile for months, not drawing attention to itself.
Spot The Mistake!
I’ve decided, however, that it’s time it got finished, so that I can move on to other things, and the first step was to complete the white and silver petals of the rose. I was puzzled and confused when I did my first petal after the break, because it didn’t present the same appearance as the other ones. Can you see why?
I’m going to leave it like this, to remind me to pay attention next time…
Bullion Knots Done
The next stage was to work the bullion knots in the centre. I’ve decided (again, not quite following the order of stitching in the instructions) that I’m going to leave the cut pieces of purl until everything else is done, so having done the bullions – with varying degrees of success, I admit! – I moved back to the leaves.
So, onward and forward, as my Grandad used to say…
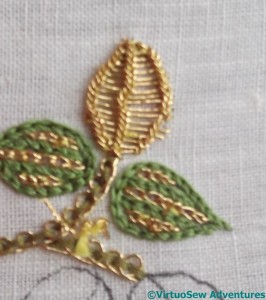
First Stage Leaf
Some of the leaves are worked in Ceylon Stitch which is then woven through using the silk thread. Those of you who were reading my blog when I was working on the Tudor and Stuart Goldwork Masterclass may recall that I found Ceylon Stitch something of a trial. Working it in leaf shapes really doesn’t make it any easier!
There are three more of these, two each to be woven into with different colours of green Soie Perlée. Tricia says to pack the weavings in as tightly as possible.
We’ll just have to see how that turns out, won’t we…