
Tag: The Excavation
Planning Titles for the Excavation
You may remember that I was a bit concerned about ensuring that the View of the Excavation properly balances the Map. When I got the Map out again it was much more emphatic than I had remembered.
Eeek!
Then came a suggestion that if I gave it a title – at the bottom, rather than the top – it would add visual weight, and the presence of lettering on both would enhance the sense of a conversation between the pieces. I liked that idea, so I started making plans.
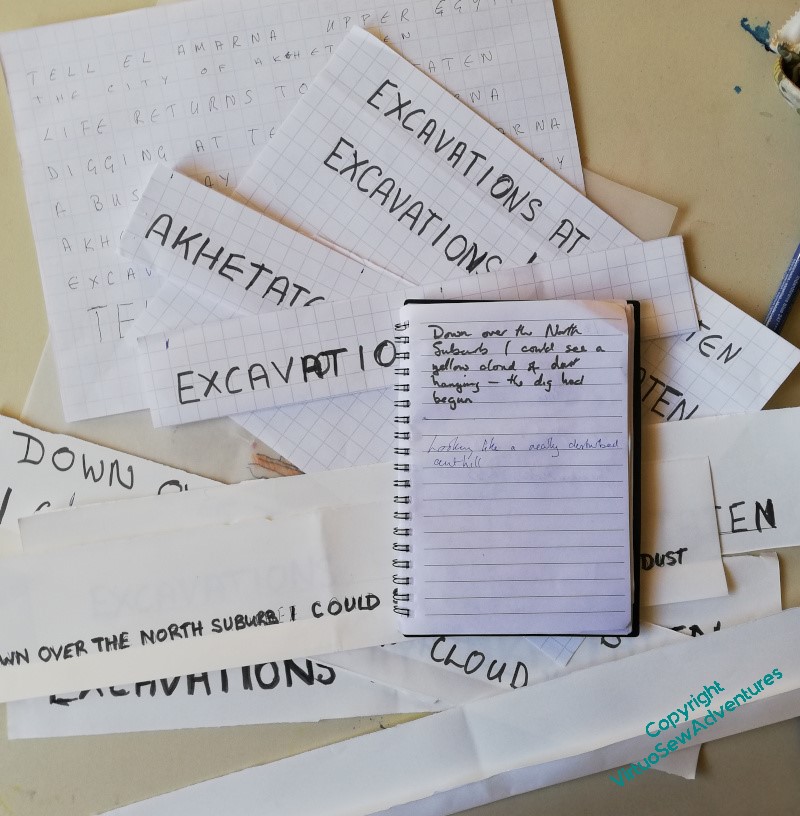
I started with a single large title, but the Map has title and subtitle, so I thought, maybe what I need is title and surtitle. Furthermore, I thought, the surtitle should be in Mary’s words. I’m sure she would approve of my foregrounding of the artifacts and the Egyptians, both ancient and modern, but had she not written so enchanting a book, I would have missed out on years of delightful adventures in embroidery. So, that gave me a perfect excuse to curl up with the book, notebook by my side, which enabled me to feel I was making progress while I was fading in and out of focus with Covid.
Since I’m not at ease with lettering, once I had chosen – or at least half-chosen – my text, it required a whole lot of squared paper and letter counting, and a depressingly uncolourful desk for a while, as I tried to bring it all together. This is the Very Unglamorous side of planning and creating. I’m getting better at it as I learn and invent more techniques to help myself pull my ideas together, but it is still very much the part of inspiration that isn’t inspiring!
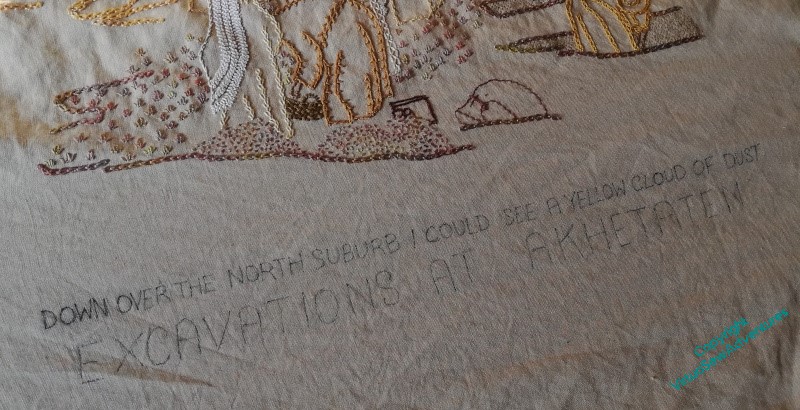
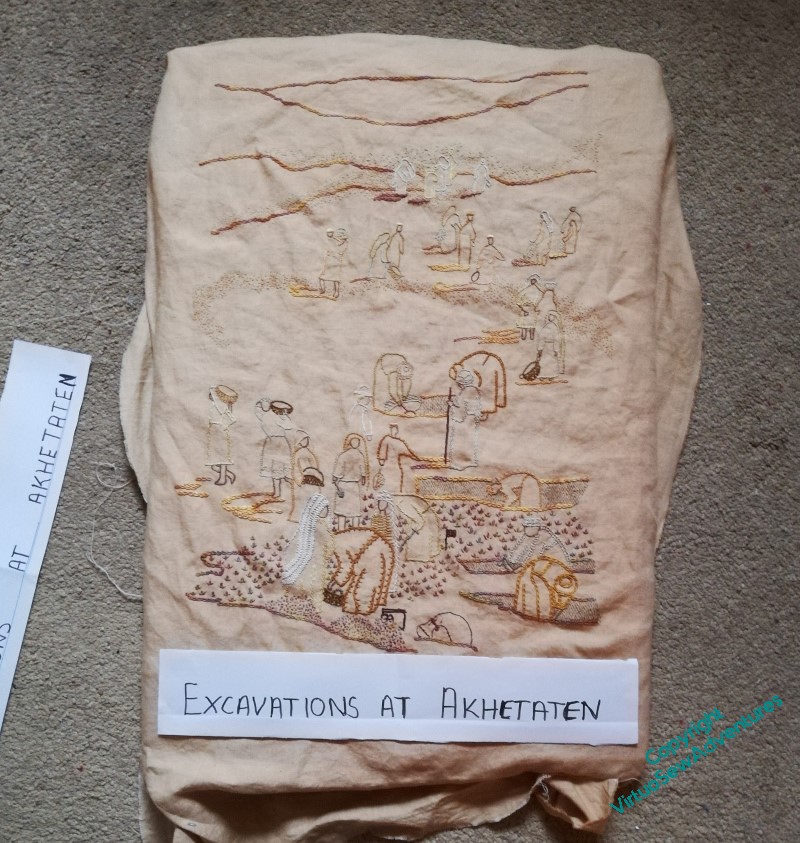
Finally, I chose my extract: “Down over the North Suburb I could see a yellow cloud of dust”, in the smaller capitals of the subtitle, and “Excavations at Akhetaten” in the larger capitals, and transferred it by prick-and-pounce. Progress!
Beginning the additions to the Excavation

There will be a lot to do, I think, to bring the Excavation up to balance the Map properly. In my usual fashion, I will sneak up on this, doing what seems obvious and then waiting to see what seems necessary.
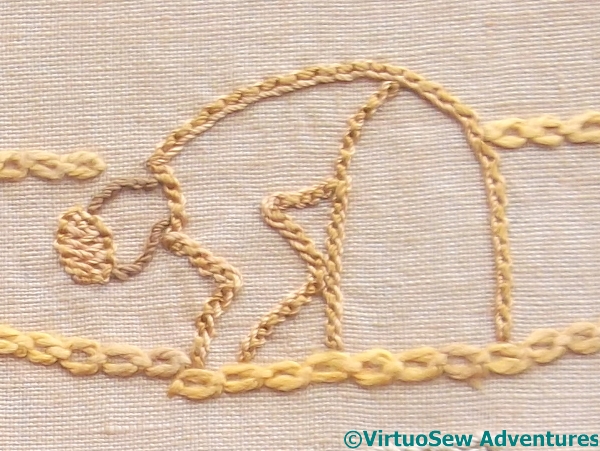
The first thing that was obvious was that something should be done to point up the idea of the trenches being dug. Row upon row of vertical running stitches seemed to me to suggest the walls of a trench – maybe not accurately, since the book suggests more of an open area excavation. The photographs I used as my source for this, however, suggested that there were at least a few individual trenches.
The next obvious element was a dust cloud to suggest activity stretching into the distance. Tiny random seed stitches in two or three shades of stranded silk were, again, the obvious choice, although I do wonder, now, whether those will be sufficiently emphatic when I set the panels side by side again.
As I believe I’ve already mentioned – random stitching is really quite difficult to achieve!
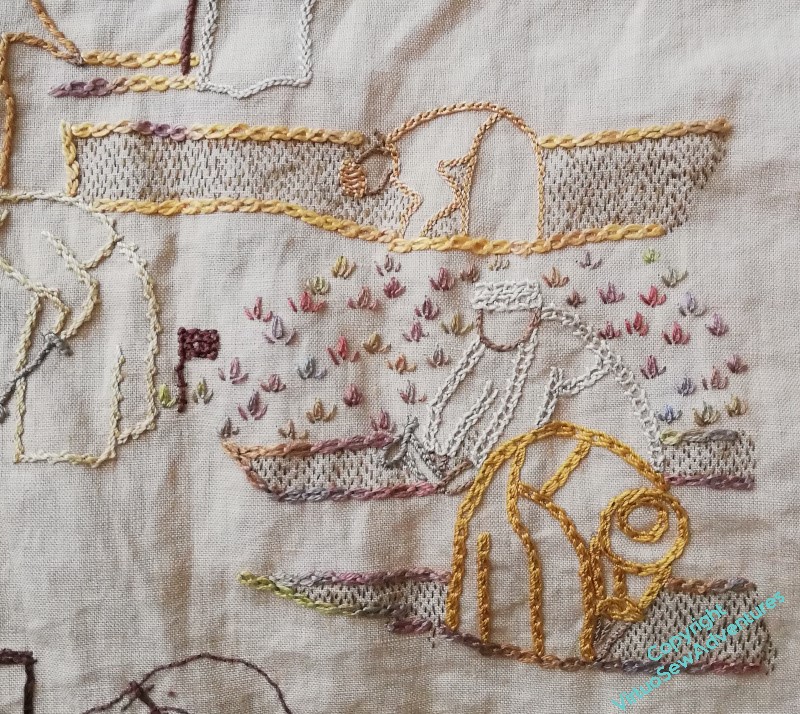
At this point I decided it needed much more “weight” at the bottom of the image, and chose to use tête de boeuf stitch (upside down to resemble a plant) as I did originally on the Map to suggest the cultivation on the far side of the river. These tête de boeuf stitches are much bigger than the ones on the map, using two strands of the variegated silk thread, and I’m going to spread them right across the breadth of the panel towards the bottom.
The View of the Excavation Finished…
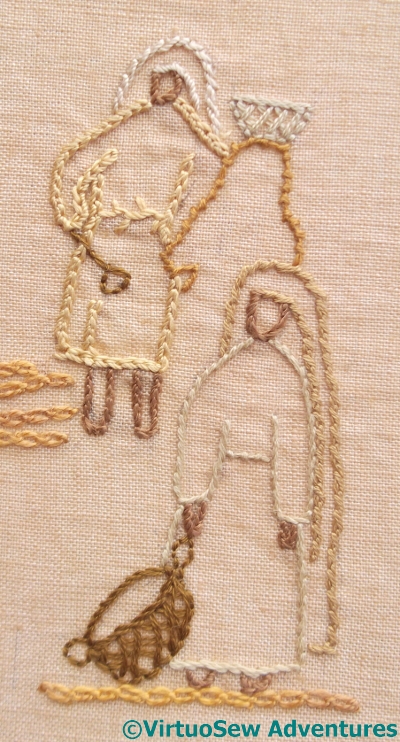
Foreground Group
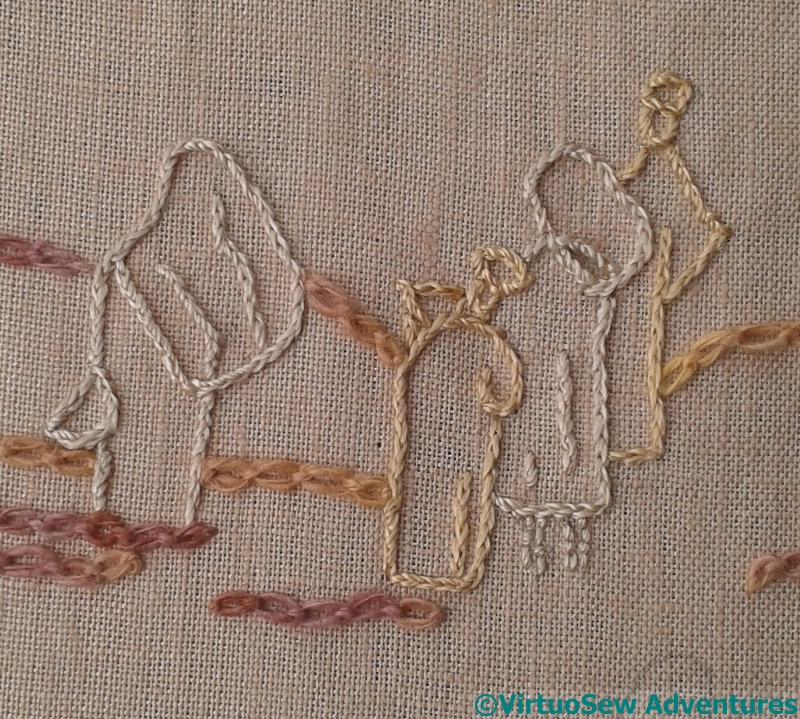
The last group took a lot of stitching, restitching, unpicking and restitching. I couldn’t seem to get any of it right, and there are one or two bits I’m still not 100% sure about, even now…
The pale figure, bending over beside the little flag is in Spanish Knotted Feather Stitch, and the nearer bending figure is in Mountmellick Stitch. I was surprised that it was quite so hard to find suitably broad line stitches for the purpose; when you’re looking for characterful narrow stitches, you can only find broad ones, and when you’re looking for broad ones, by some strange alchemy only narrow ones catch your eye…
View Of The Excavation
The creamy white headscarf ran through Crested Chain Stitch (no!) and several stitches I hated so much I didn’t even record them, before I finally settled on three rows of Braid Stitch.
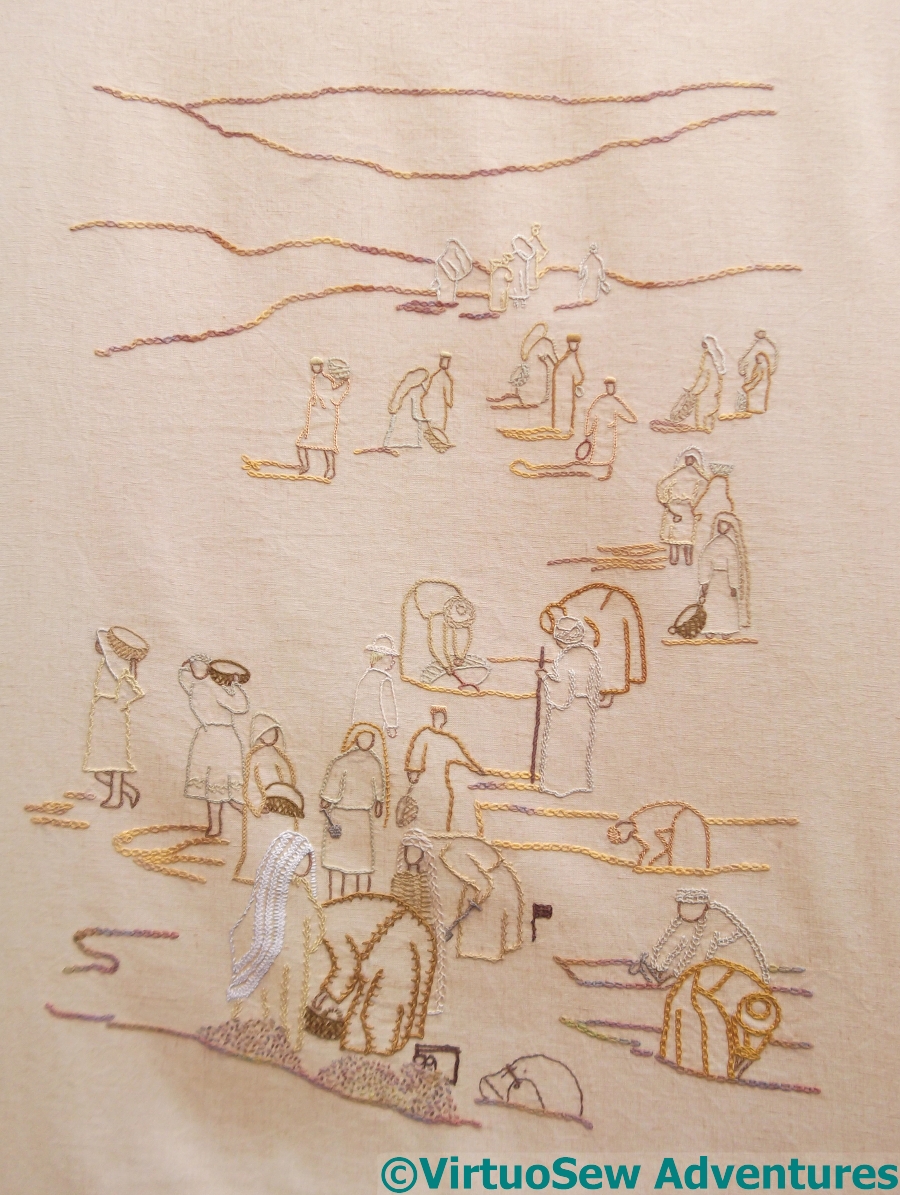
So at last, after much fiddling around, the View Of The Excavation is finished.
I’m fairly happy with it, actually. The trail of people into the distance creates a pleasing pattern, and I think that the alternation of the colours works well. Furthermore, as I wished, the Egyptian labourers and supervisors are the stars. There is a European, but he’s mostly concealed by the others.
There may be a few tweaks – not least I have yet to make sure that it works as a counterpoint to the Map of Amarna – but I think that at last it is finished for the time being!
Still More on the View of the Excavation

Supervising A Trench
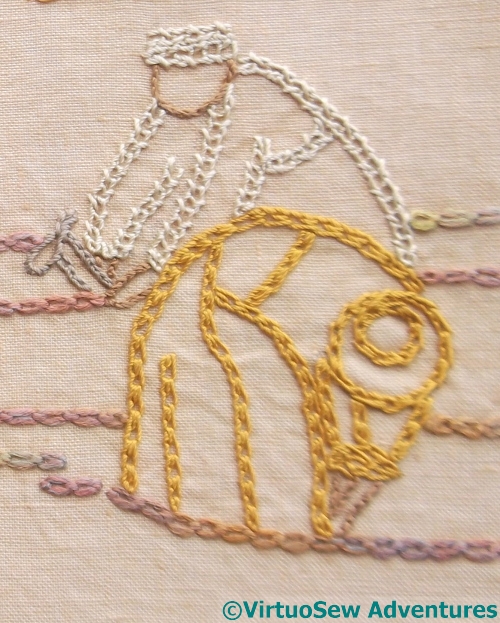
As I got nearer the foreground figures, I tried to pick broader stitches, or at least stitches that were a bit more emphatic. This group was great fun to do, starting with the Gufti with his staff of office (Portuguese Knotted Stem!). The Gufti’s robe is Feather stitch, as are some of the twists of his headgear. I concentrated very hard on keeping the stitches even and close so that the “density” of the stitch would be maintained. The one in dark gold is in double interlaced back stitch, except for the top of the headgear, and the waistline – those are whipped backstitch. The other one is in one of the Elizabethan stitches from Jacquie Carey’s book.
I had fun with the supervising excavator – the brim of his solar topee is the Hungarian Braid chain, and I reversed the direction of the chain stitch for the peak of the crown. He’s also the only one with fair hair and pinkish skin, and I dressed him in a pale, tailored jacket.
The two at the front are another mixture of stranded silk, stranded cotton, and round silk thread. The golden veil is coral stitch, and the tunic below it is stranded silk chain stitch, and the dark golden tunic is stranded cotton and twisted chain stitch. I’m trying to make choices of stranded or round yarn that will suit the stitch.
Two Diggers
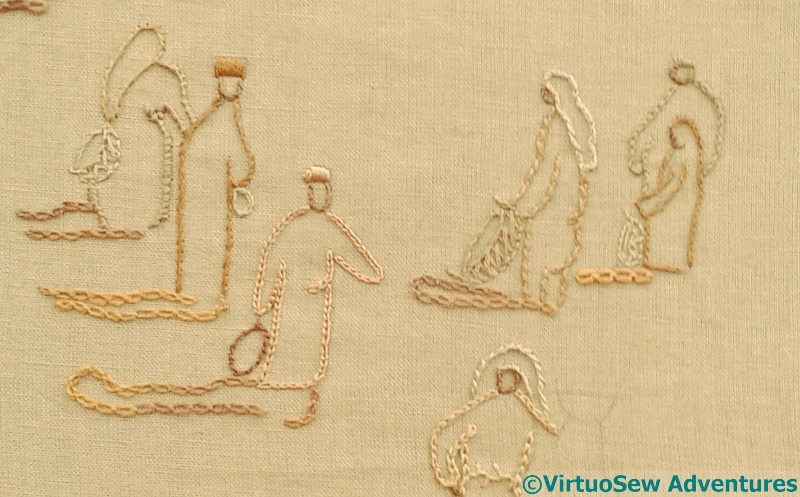
I worked these two diggers on World Embroidery Day – which I hadn’t even known existed until the day before, so I was very glad I was able to sit and stitch!
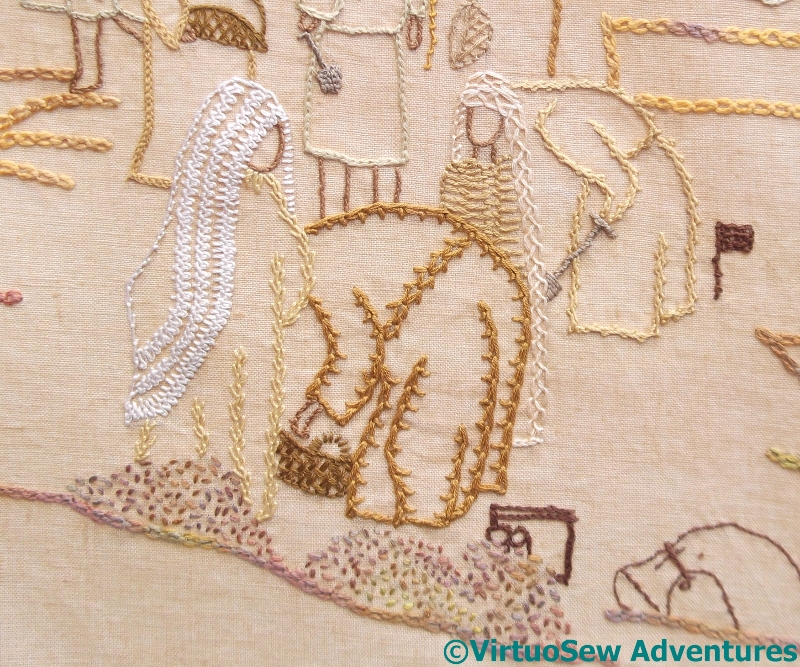
I went back to my Edith John books for these two. The front one is in Shell Chain stitch, which I first used on the Circle Skirt. I won’t say it’s a favourite, but I have rather taken to it, and it creates an interesting effect.
The one behind is a very peculiar stitch, a combination of twisted chain stitch and open chain stitch. It creates a very square appearance, with the twisted chain alternating from side to side of the open chain, and it is called, rather predictably, Open Twisted Chain Stitch.
More people on the View Of the Excavation
Closer Group..
Having decided I needed to Have Courage and Dive In, I realised that maybe sneaking up on this panel was the way to go. Unless I immediately hated an experiment, I didn’t take it out – and sometimes not even then. Sometimes you need to stare at the thing that is wrong to work out Why, before you can even think about What Else.
This group are in the middle distance, close enough that some details are beginning to be visible. At the same time, I didn’t want to make the detail too detailed, if you follow me. Coral stitch, fairly closely spaced, forms the outline of the middle figure, and the tunic of the furthest is in reverse chain stitch.
I find that reverse chain is much easier than ordinary chain stitch to work when the fabric is in a frame, and this panel was in and out of the hoop, depending upon the stitch and the mood I was in. As I do more and more embroidery, I’m beginning to find it easier to keep a sensible tension without a frame, but then the baskets were easier in a frame!
On His Own
Getting still closer, there was this fellow, all alone in his own little trench. I wonder what he’s found?
He’s worked in Pekinese Stitch, using one colour for the back stitch, and another for the interlacing. His hat is double interlaced back stitch in the same threads – round silk threads from Mulberry Silks, like the central figure in the top group. The others are in a mixture of stranded cotton, stranded silk, and another of the Mulberry Silks yarns.
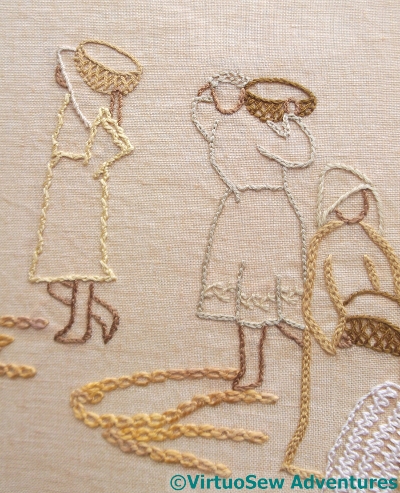
Clearing Spoil
I’ve only just realised that the design involved remarkably few people taking spoil away from the trenches, but at least there are two. I put a border on the tunic of the middle person, using a rather interesting blanket stitch variation from one of my Edith John books. The most distant person was in Portuguese Knotted Stem stitch, which is one of my longest-standing favourite stitches, and the girl at the front is Hungarian Braided Chain stitch, which is one of my newest favourite stitches.
Have Courage, and Dive In!
Trials
I mentioned when you last saw the “View Of The Excavation” that I was rather anxious (for which, read: positively panicky!), because I’d been staring at it, on and off, for weeks, and found myself completely lacking in ideas and inspiration. I hadn’t the vaguest idea where to start, and I was even beginning to wonder whether I ever would. Since I still knew I wanted to do it, this was a bit of a problem…!
Finally, I screwed my courage to the sticking-point, and decided that the thing to do was to just dive in, playing with the stitches, and not necessarily expecting to like them the first time. My Twitter followers became accustomed to pensive tweets, wondering whether I liked something or not…
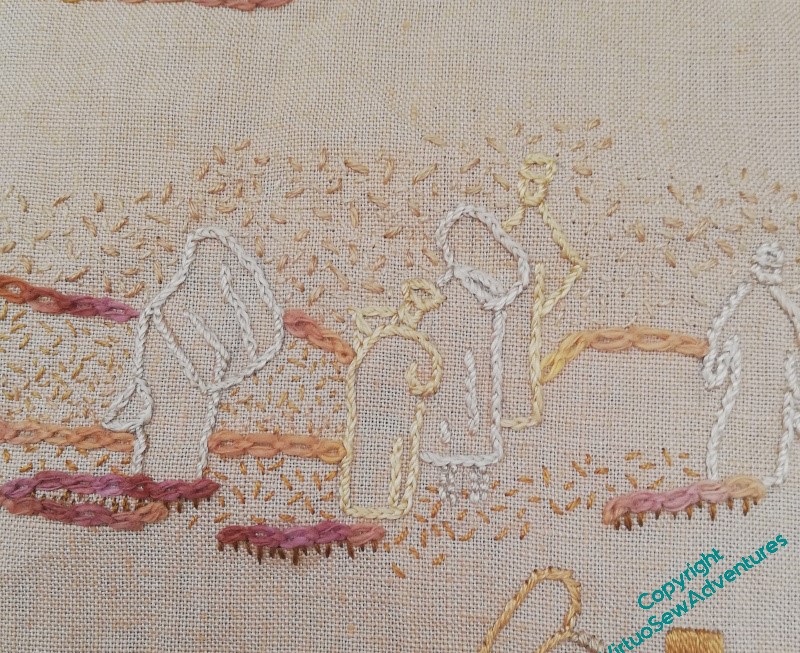
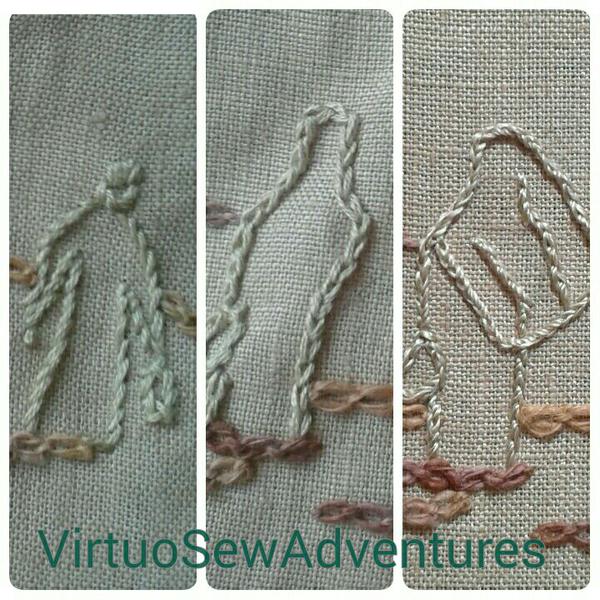
Very Distant People
Gradually, a vague sense of a system, or at least a pattern of stitch choices, began to emerge. The most distant figures were outlined using a single colour and a single stitch for each figure.
In fact, in this group, there are only two colours, and only the one stitch – split stitch, which is very good at providing a slim, unobtrusive, but definite line. If anything, there may be more lines in here than I really need, but true to my decision not to second-guess myself, I’ve left it for now, and when I have finished the whole panel, I’ll review everything again, just to be sure…
Distant Group
For the group in the middle distance, I began to use a greater variety of stitches and colours, even within each person.
One element which remains the same throughout the panel is the baskets. All of the baskets are worked to create a criss-cross, woven effect, except that the stitches in different directions aren’t interwoven. This helps to make them a little more fuzzy, and worn-in.
The people are worked with stem stitch, reverse chain stitch, twisted chain stitch, and even rope stitch, which is a knot stitch, but with the knot hidden by an arm of thread. I’m beginning to hope that I might be pleased with this when I’ve finished it!
Beginning to stitch the Panel of the Excavation
Finding The Ground
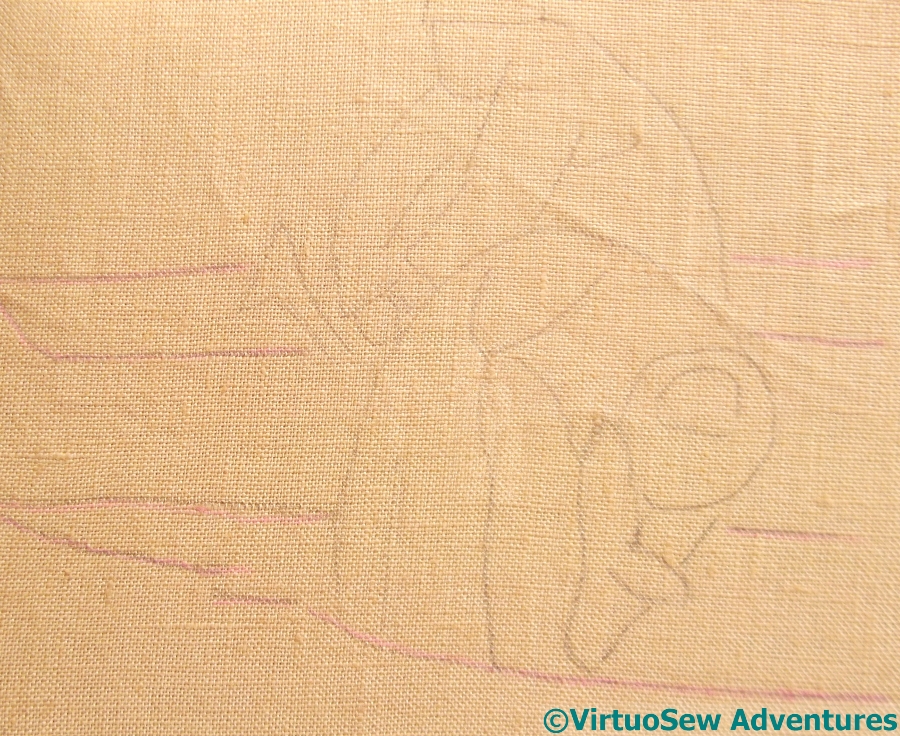
When I first looked at the picture of the Excavation, I realised that when I had only a small section on view, I was finding it hard to work out what was ground and what was human, so my first action was to go over the ground lines again, using a pinkish quilter’s pencil. It helped a little…
I decided next that if I could get the lines for the ground stitched, it should make decisions about stitching the humans easier. And those decisions need to be made a great deal easier, because since I transferred the design onto the fabric, I’ve stared at it, on and off, for weeks, wondering frantically how I was even going to start on it. I don’t usually suffer from this sort of bewilderment, so I’m in a terra incognita, here.
Not At All Sure
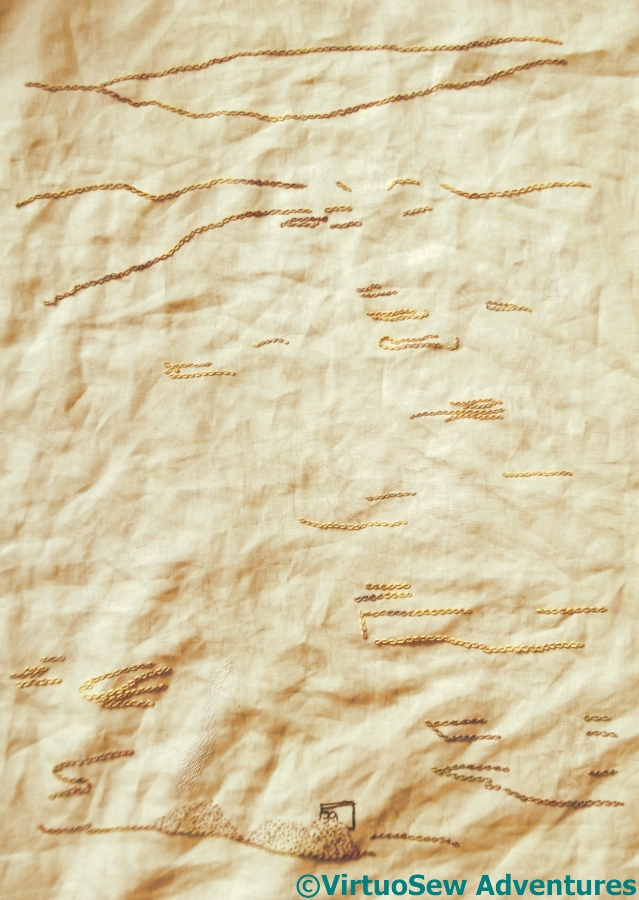
And truthfully, this isn’t as much help as I hoped. I’m working in the hand, because I find a lot of the basic stitches easier that way, and I am expecting it to be worked largely in line stitches.
The lines that have been stitched are all the ones in the design that indicate the ground surface (or, in the front, trenches and spoil heaps). There’s not enough structure here to help hold the panel together as I’m working on it, so I am going to have to think a little harder, work out a system for the people, and possibly completely rework the ground when I’ve done the people.
I know I can’t expect all my projects to flow as easily as did “Loading the Felucca”, but I really had hoped for a little less head-scratching and a little more stitching!
Beginning on the panel of the Excavation
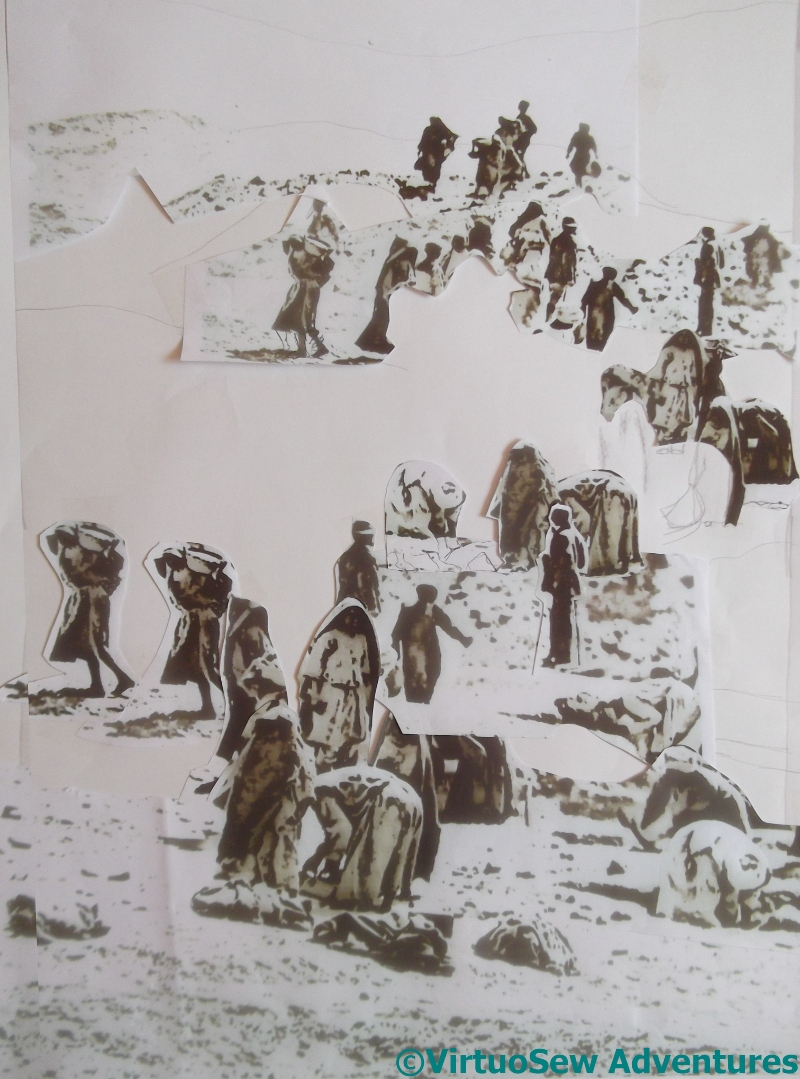
Draft Of Excavation Design
When you last saw the Excavation design, I had a rather blobby draft image, created with scissors, glue, and paper, and loosely based on one of the Egypt Exploration Society photographs. The pattern of shapes creates a pleasing effect, but there was more to do..
There followed the process of turning the design idea, layout, call-it-what-you-will, into an embroidery design. I outlined it onto tracing paper, took the tracing away from the paper, stood back and wailed.
None of the lines – taken from this image, I remind you – made sense.
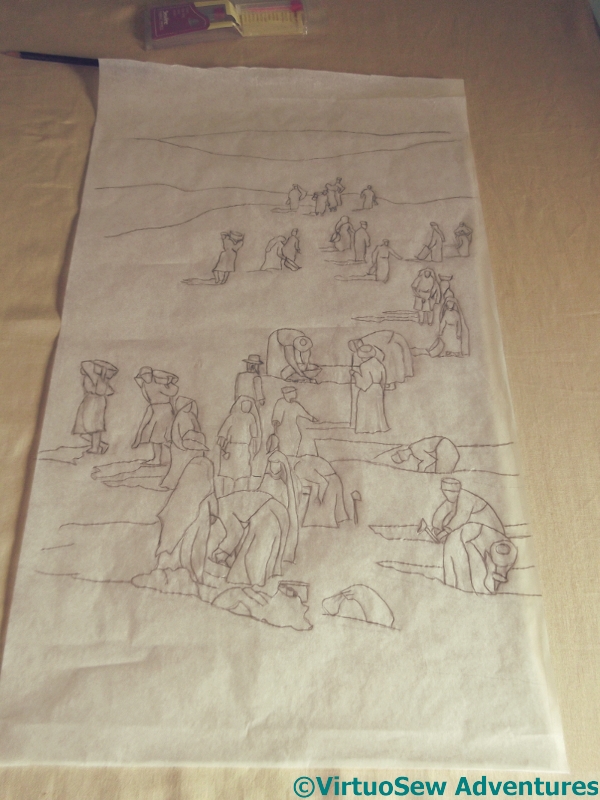
Transferring The Excavation
Fortunately my mother (an artist, remember, with a much better understanding of figure drawing than I!) came to my rescue, emphasising some lines and removing others, tweaking and balancing the figures, and then finally I got the design transferred onto a piece of the sandy coloured linen.
Now I have to invent my stitched version, based on the lines transferred, but quite possibly inventing others as I go.
At the moment I haven’t the vaguest clue where to start, so this may be another case of “set it up and stare at it”.
I seem to do a lot of that!
The Panel of the Excavation
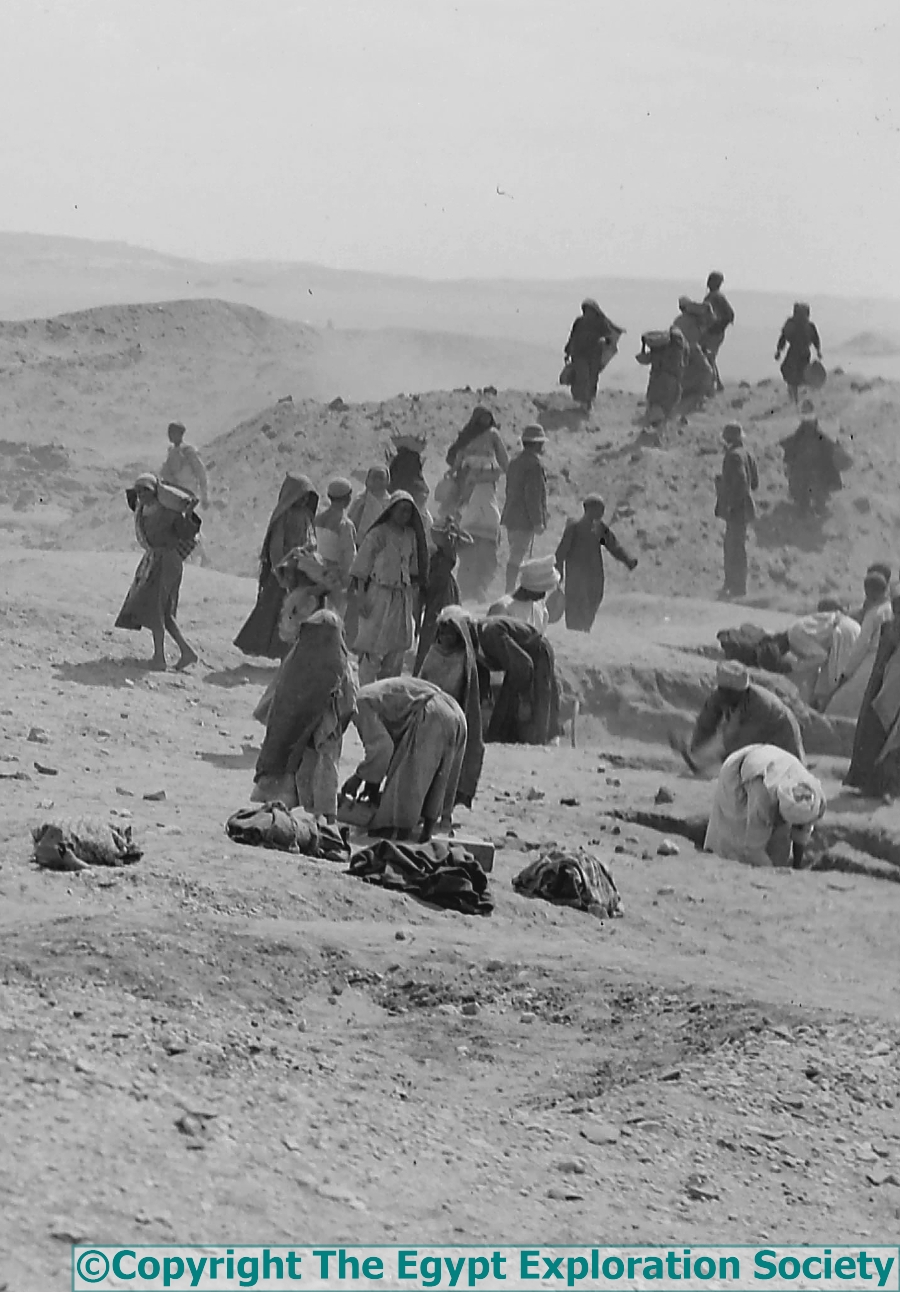
Cropped Section of the Scene at the Dig
Copyright The Egypt Exploration Society
Having completely redesigned the idea and the thrust of the second of the two background panels, I have to design the actual image I will use.
This image is cropped from a photo of the excavation from that wonderful collection of photos that The Egypt Exploration Society has allowed me to use as reference material for this project, and rather than using it just as it is, I’m going to alter it and maybe even add people to it…
There’s a lovely shape and pattern here, but the overall proportions of the picture don’t match those of the Map of Amarna, and they must. I need to make the design taller, without leaving myself with too much empty space top or bottom. A certain amount of empty space can be filled with stitching, but since this isn’t an abstraction of reality – like the map – but a representation of a moment in time, I need to be a bit more careful about what I do and how I represent everything, including the ground.
Draft Of Excavation Design
Here is the intermediate stage. I tweaked the contrast on the original photo and printed it out at a couple of different sizes, then my mother and I had an orgy of primary school paper collage, arranging and re-arranging groups of people to create a slightly busier, taller, picture of the excavation.
The next stage is to reinstate detail where I need it. The blobby effect of the reduced level of detail is just what I needed while planning the pattern of the excavation, but although the finished embroidery won’t have a high level of detail in most of the figures, I’m not sure that the lack of detail is in the right places…
This is not proving quick to develop!