
Tag: applique
A Finish To Celebrate (not mine!)
You may recall that my mother was embroidering details and edgings on an appliqu bedcover for herself.
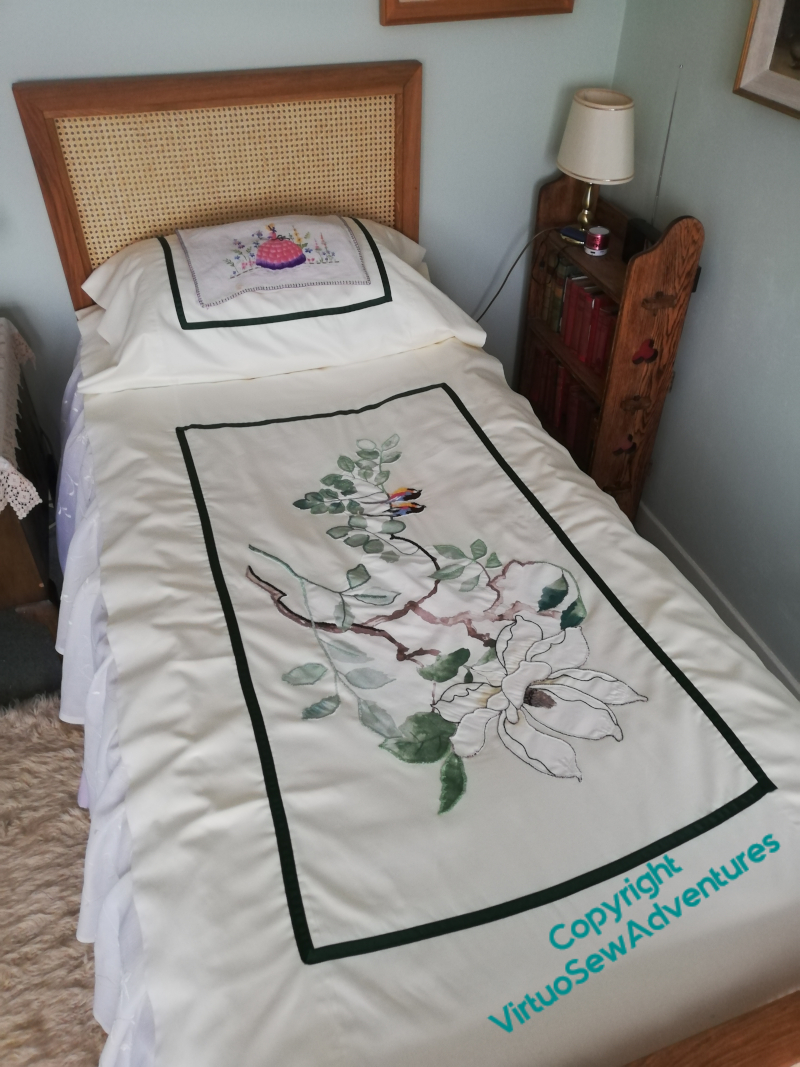
It’s finished!
The slightly more marked colours and edgings make sense of it as a response to the curtains, rather than a random slice of curtain material, and the crisp green ribbon frame confines and sets it off rather nicely.
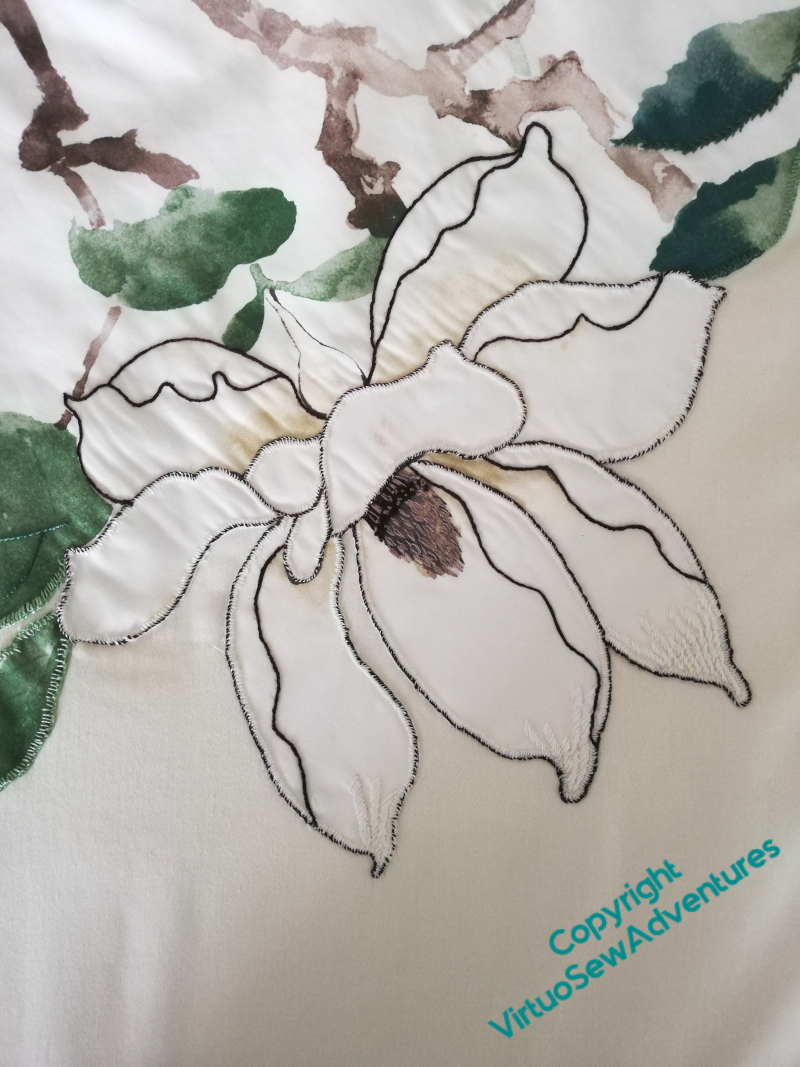
She occasionally asked for my advice, but I can’t say she needed it. This is the only point, I think, at which I made a material contribution to the finished piece. The fabric was lamentably keen to fray, so all raw edges needed covering, and this large flower would have looked very clunky with dark blanket stitch.
White blanket stitch, whipped along the outside edge, however – that worked!
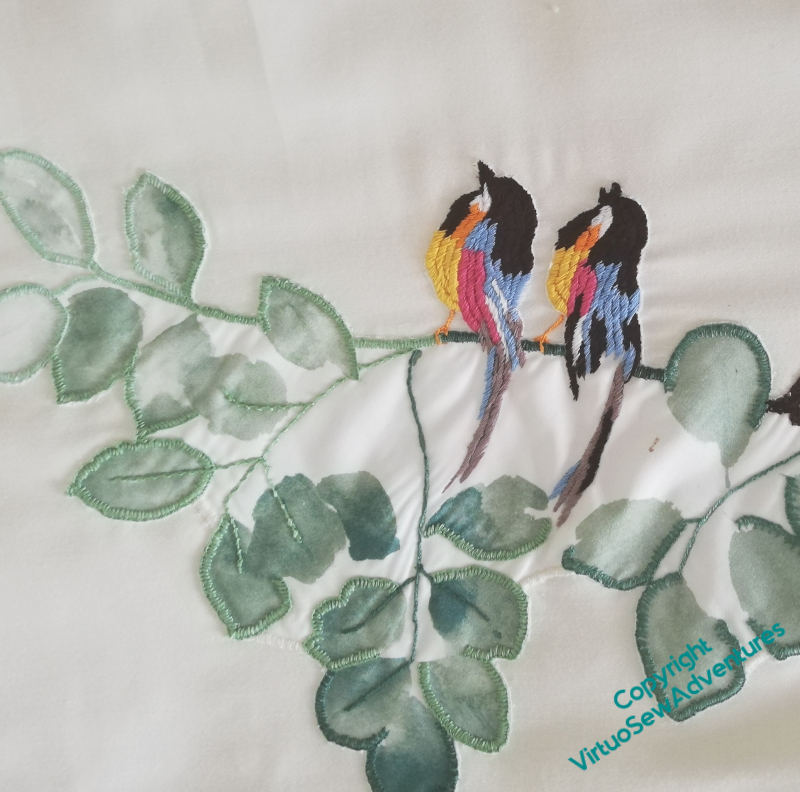
The stitching for the birds was inspired by something Grandmama did, and does look quite feathery, somehow.
It’s always satisfying when a plan comes together, even when it isn’t one of mine!
Returning to my projects, however, Episode 46 of Slow TV Stitchery is now live, in which are discussed the Delights of Stash and the Perils of OverEngineering.
Variations on a theme, 2
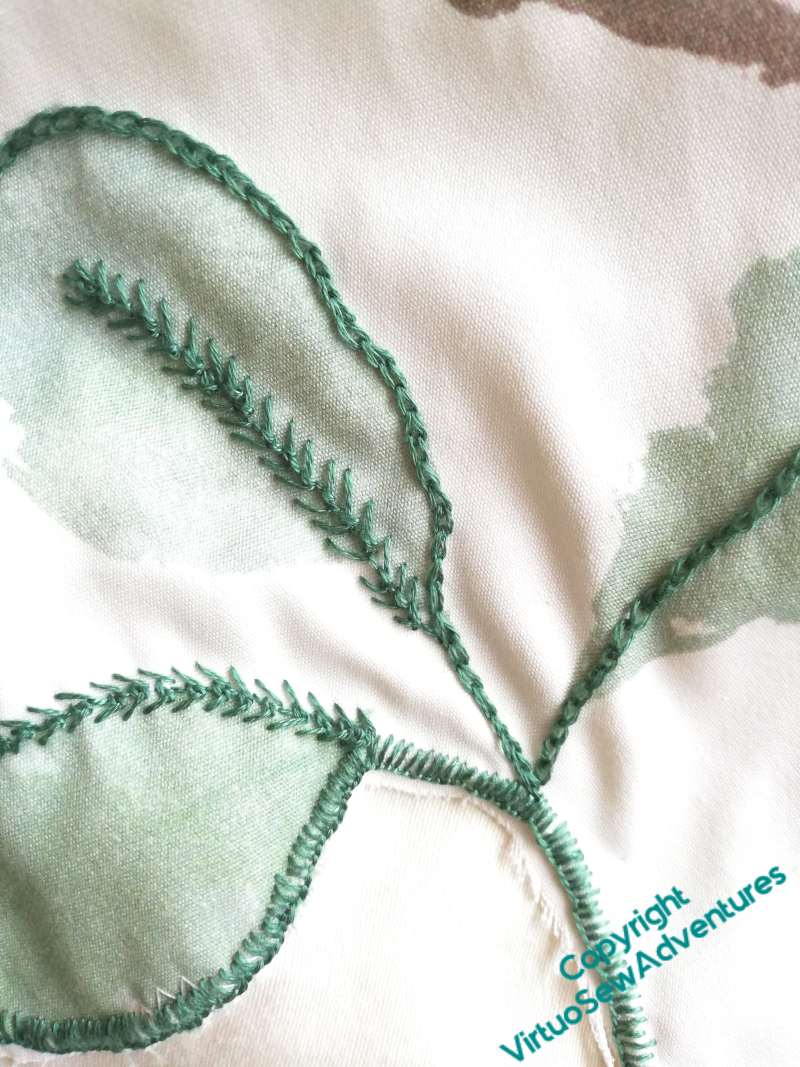
There’s plenty of variety in the stitching on the bedcover, although the choice is limited to those that can control a fabric much inclined to fray.
You can see here some close blanket stitch, nested feather stitch, and chain stitch used to add details.
The interesting thing that my mother has found as she’s worked on this one is that the spashy, “watercoloury” feel of the original print is becoming something slightly blockier, and more like an oil painting or a pastel. Since as a painter, oils are her first love, I suppose we shouldn’t be surprised…!
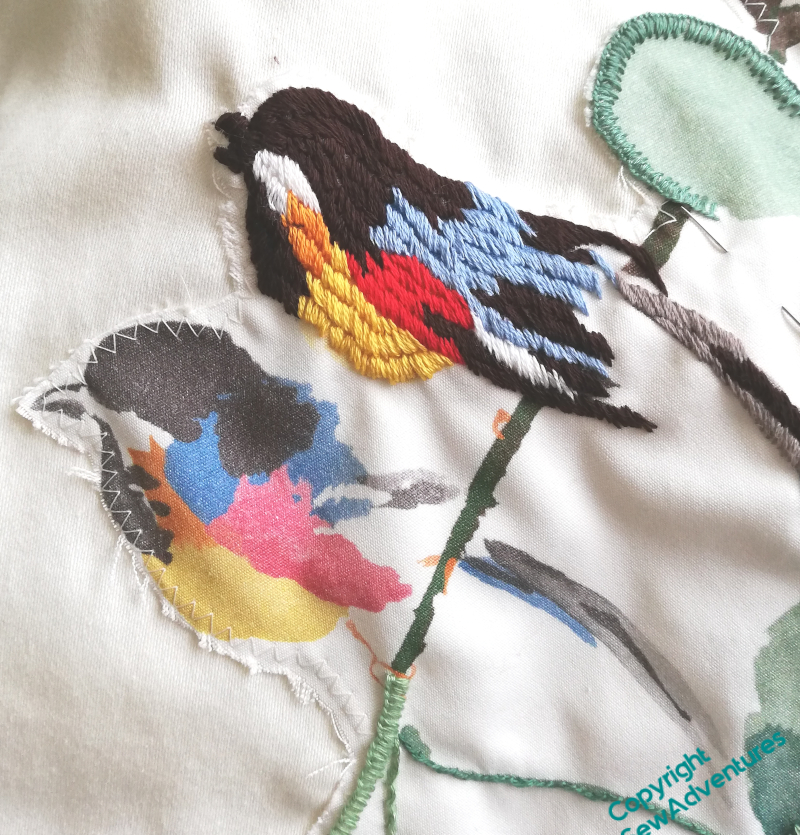
The birds, here, are a case in point. The slanted satin stitch seems to me an effective cross between feathers and brush strokes, and make for an emphatic motif. We looked hard at this photo, and then went rummaging in both of our stashes for more pinkish reds. It’s safe to suggest that there’s some unpicking ahead…
And while that is in progress, I can report that Episode 26 of SlowTVStitchery is now live! It concerns the distinction between bugs and features, and the siren call of shiny new projects – something we all know about, I think!
Variations on a theme, stage 1
It’s always mildly disconcerting to find myself consulted for advice, but as I inherited Grandmama’s enthusiasm as well as her skill, perhaps I shouldn’t be surprised.
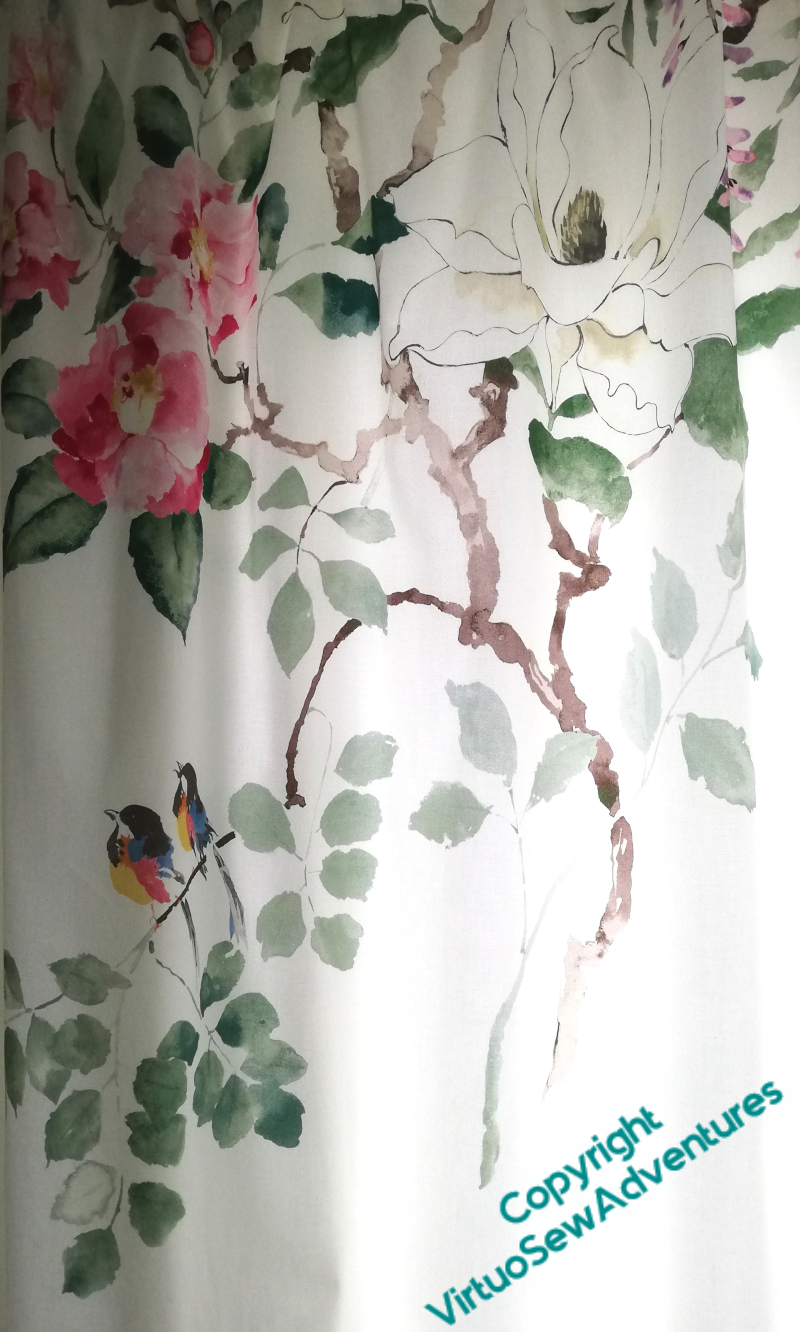
This is the curtain material in my mother’s bedroom. The print is big, light, and painterly, with the small, vividly coloured birds to stop it becoming saccharine. There was enough left for her to make a cushion for the blanket box, and to make an applique of some of it to put on the bedcover.
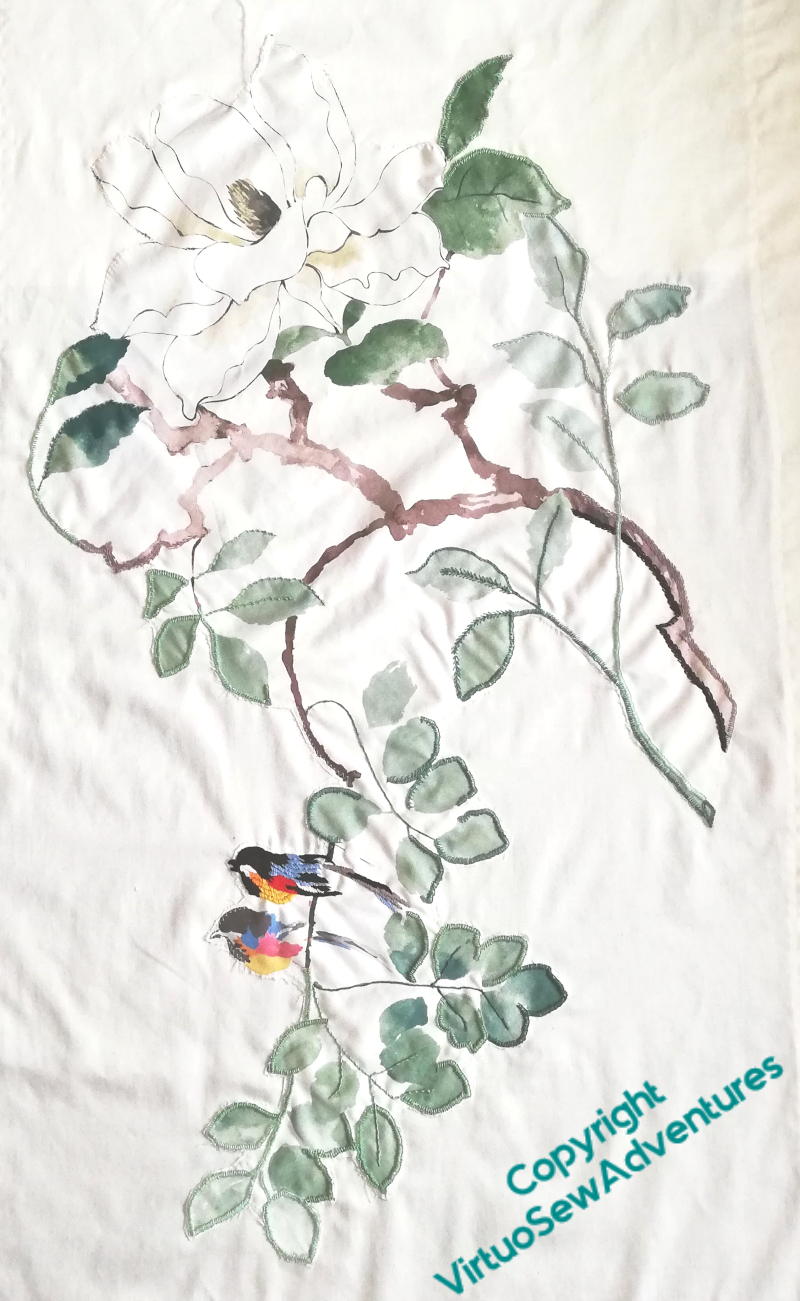
This is the section she’s applied. She wasn’t, originally, intending to do very much to it, and asked me to suggest a few interesting line stitches for the odd detail (portuguese knotted stem, double feather, chain, twisted chain…). Then, however, it revealed itself to be a demon for fraying.
No, seriously. It doesn’t look it – it’s a cotton satin, closely woven – but it started to prove truly infuriating.
So, suddenly, every raw edge has to be either machine satin-stitched (which didn’t appeal), turned under (likewise) or Properly Covered.
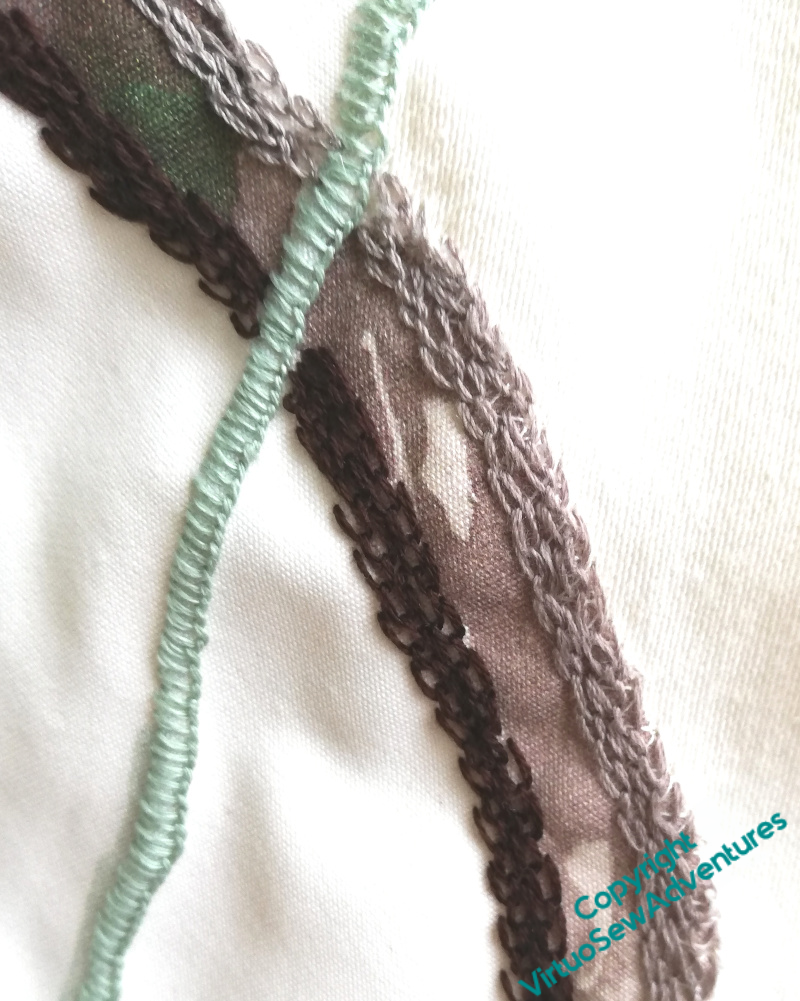
We fished out a variety of suitable threads, and she got started.
As you can see, in some cases she’s not just followed the line of an edge, but decided to add some further details. The blanket stitch line started off following an edge, but would have looked simply silly if she’d stopped when it started careering across the print, so she carried on.
For those craving more SlowTV Stitchery, Episode 21 is now up, in which is considered false starts and the avoidance (or not) thereof..
A Delight from the Past
Applique Tablecloth
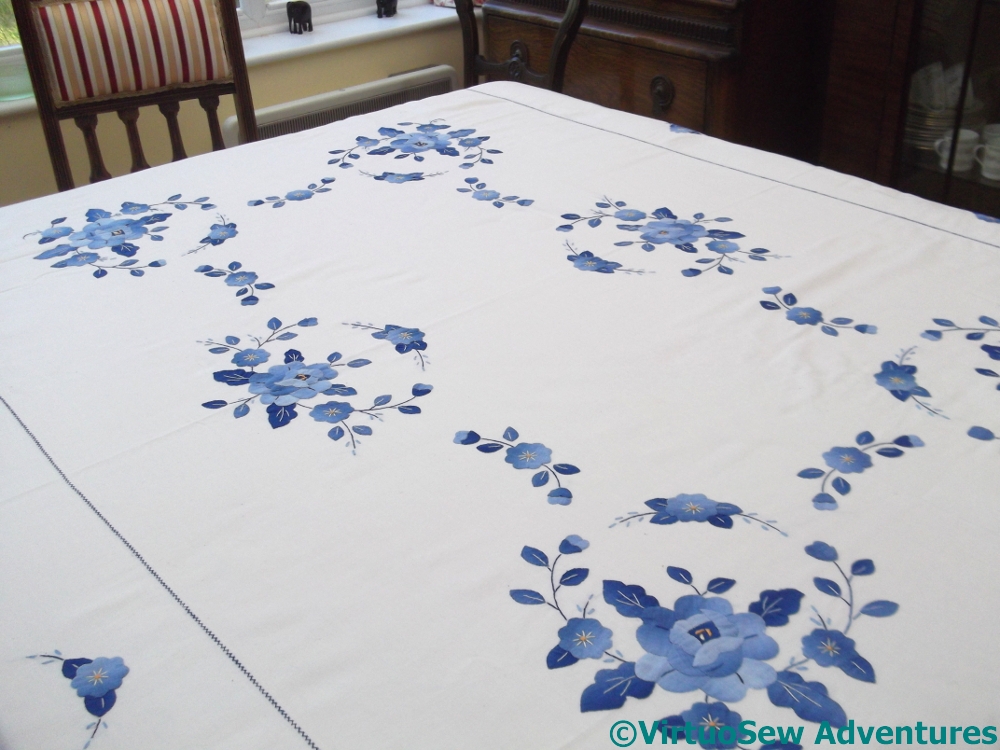
This is one of the most cheerful and striking tablecloths I have ever seen. It belongs to my cousin, who found it in an antiques centre, and brought it home to cherish.
It is crisp, and bright, and beautifully made, definitely by hand, and with some very ingenious Making Do. The lines of stitching marking out the edge of the central section are in a fine herringbone stitch, and in the case of the short ends they cover a join. Obviously the fabric wasn’t wide enough to achieve the length needed, so additional fabric was added at either end, and the joins camouflaged with stitching. This is just exactly the sort of trick suggested in some of my collection of “The Needlewoman” from the Thirties.

Applique Rose
And this close up shows even more. I wondered at first whether this might be an example of bias binding used decoratively – another popular technique in the Thirties and Forties, and mentioned in several of my older books on needlecrafts.
Looking more closely, however, we don’t think so. The fabric used for the applique is rather finer than I would expect bias binding to be, and besides, there’s the unevenness of the colour.

Applique Tendril
That unevenness, although nicely graduated, is rather straight-edged, too. My cousin and I found ourselves wondering whether the pieces for the applique had been cut from the best bits of an old, sun-damaged piece of fabric, maybe a curtain-lining, or something similar.
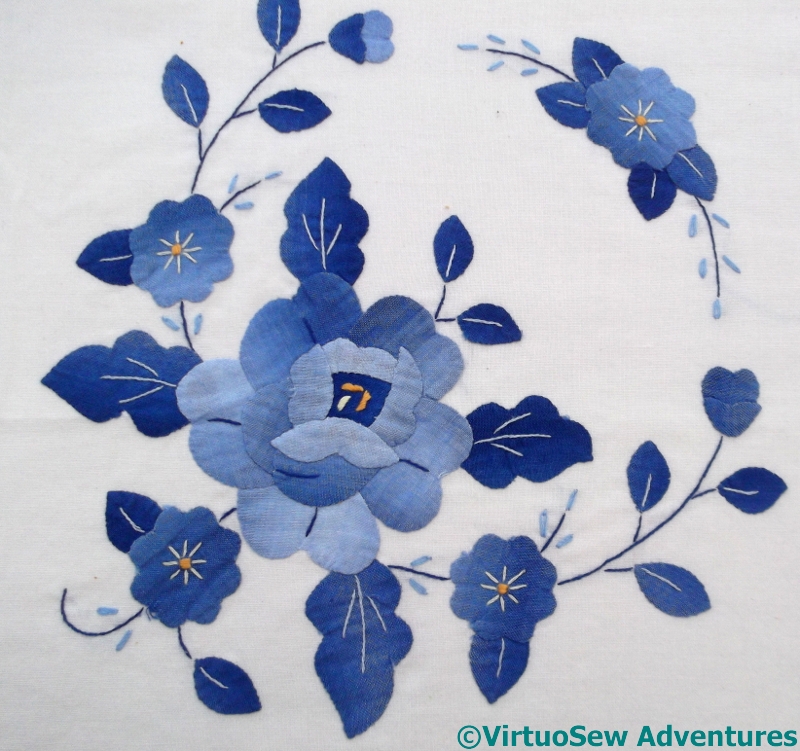
Corner Motif
If it is, it is absolutely the most striking case of making a silk purse out of a sow’s ear that I have ever seen in my life.
The selection of the dark and light pieces of fabric, and the way that the large blocks of colour in the applied sections are lifted and highlighted by very delicate embroidery – and just enough of it – speaks of a very accomplished needlewoman indeed.
It is utterly enchanting.
Final Details on Loading The Felucca – for now!
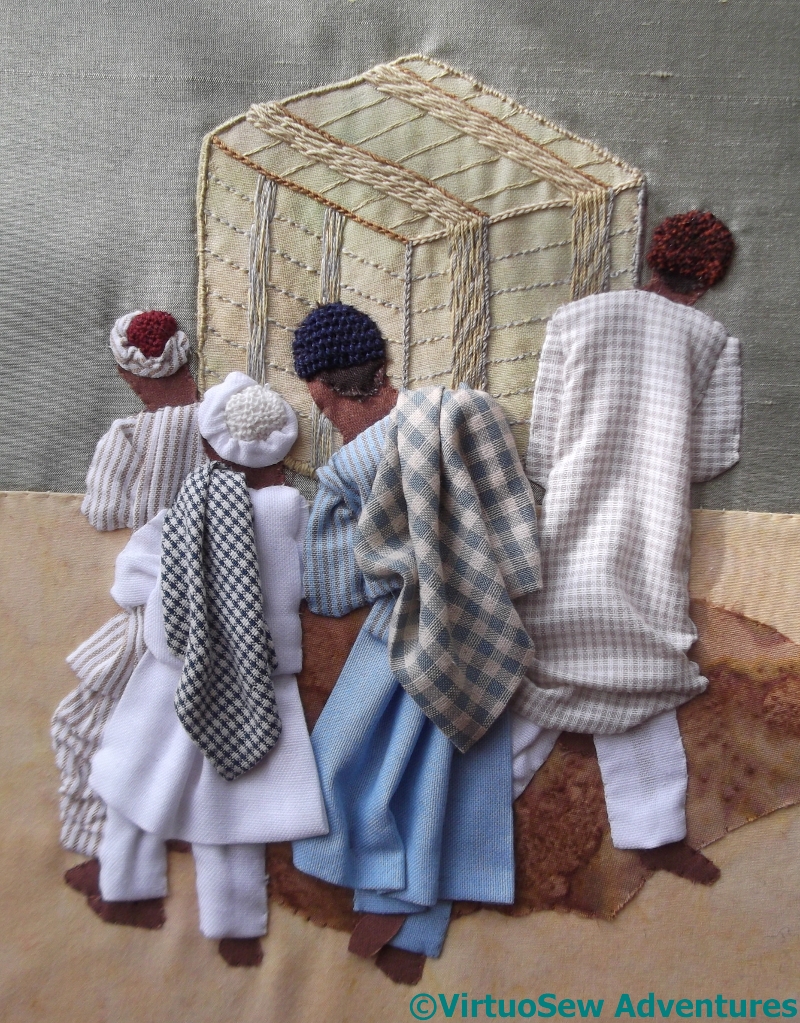
Comparing Hats
Woolly Hat
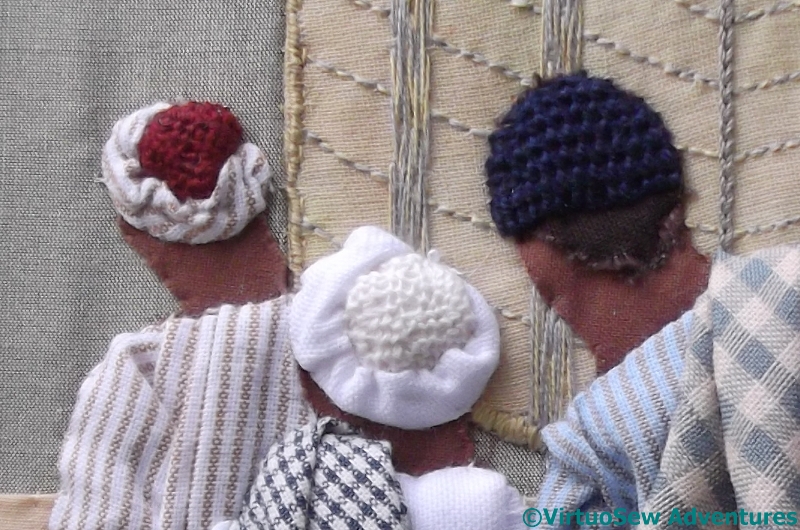
Both of the labourers on the right have a small piece of dark brown cotton attached to their heads to give the impression of hair.
Two of the hats (the ones on the right) are turban-like things with a central section and a twist of fabric, and you’ve seen them before. They were really very successful, but the other two labourers seem to be wearing knitted or crocheted caps. Somehow trellis stitch didn’t seem quite right, so in this case I’ve used detached buttonhole stitch with return, in navy blue pearl cotton.
The final hat is much woollier. I used a heathered worsted yarn and trellis stitch. I have a few doubts about this one, but for now I’m content with it.
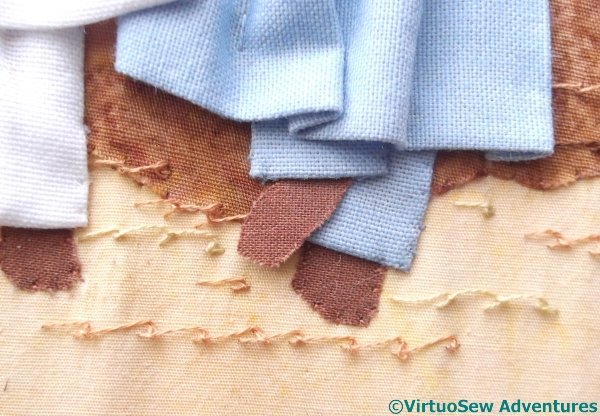
Foot Dangling Over Sand
I was concerned that the dark cotton and the light background cotton were too distinct, and made too much of a contrast. My first efforts to break up the surfaces were not as successful as they might have been, but in due course I arrived at the solution – rows of scroll stitch using a single strand of thread, in tones that lie between the two extremes.
I’ve left the little foot unattached, dangling over the sandy surface and seeming to poke out of the trouser leg just as it should.
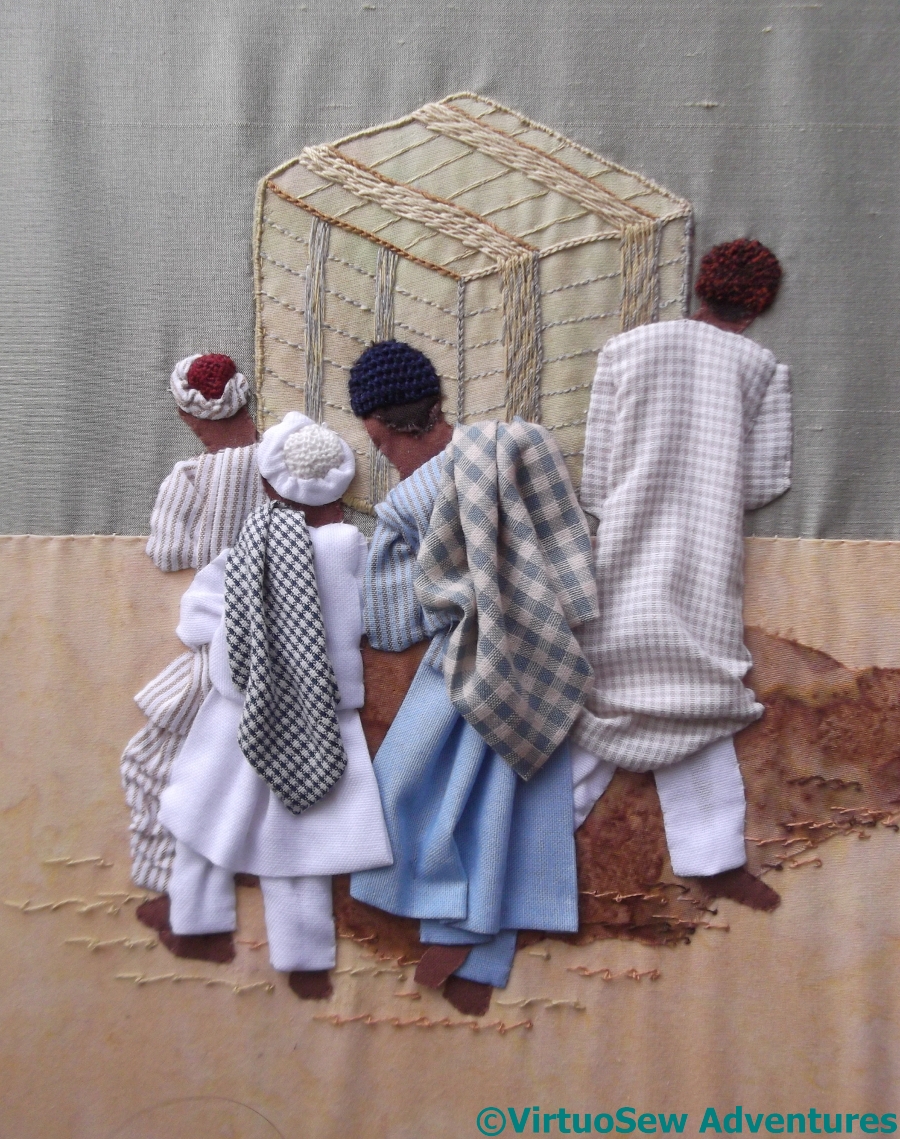
Finished I Think
And behold the (nearly) final version.
I think there is just enough of the scroll stitch, and the packing case has almost the right level of detail to make sense, but not so much as to attract more attention than it should. The people have worked, if anything, even better than I hoped they would.
I’m going to wait until I know where in the Dreams of Amarna the piece is going to live – either as a patch on one of the main panels, or as a stand-alone, separate panel – before I do any more. At the moment, I don’t know what more to do, or how to do it, and until I do know, I’m not risking the success I’ve already had.
The Fourth Labourer
 Finally, after all that trouble with the Third Labourer, I moved on to the fourth.
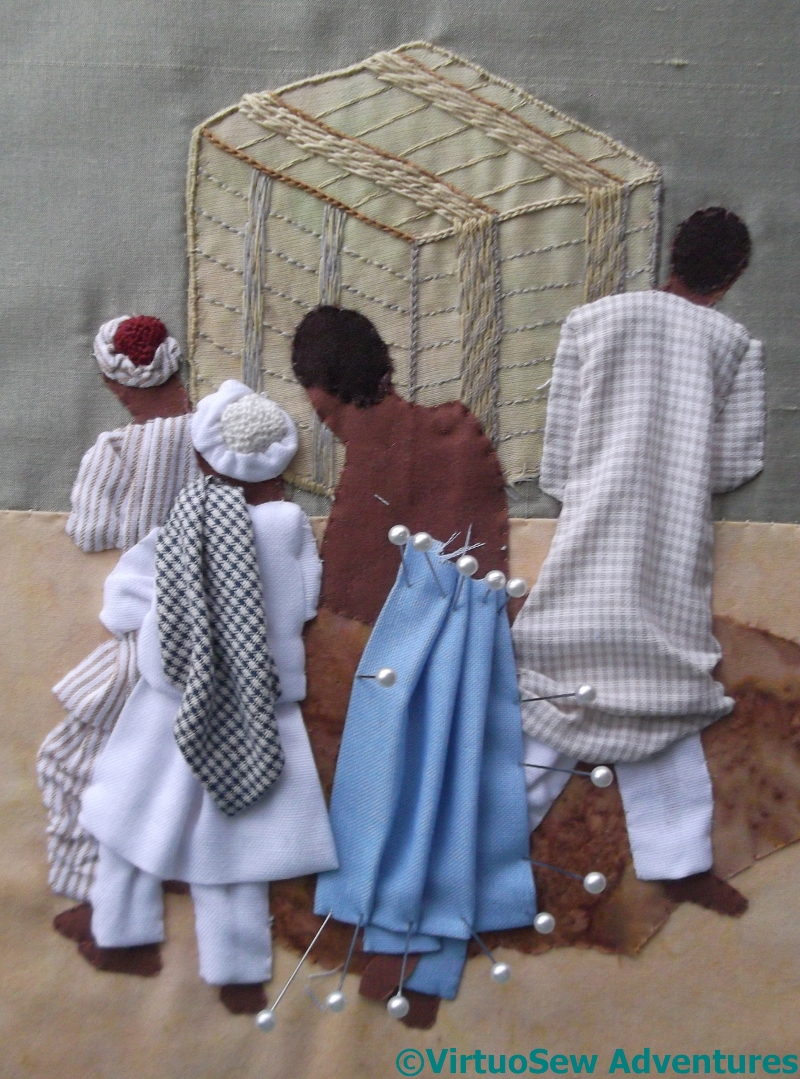
After some playing around with colours, I decided to dye some of the fabrics I’d bought to clothe these fellows (Bahama Blue, if anyone wants to know!). It proved to me that some of the fabrics which I had expected to be cotton weren’t, but that doesn’t matter in this context. This project is going to be a positive riot of different materials!
You can see that I made considerable use of pins to control the fabric and keep the pleats in something resembling order, holding the fabric to be ironed, and simply leaving it while I thought about the next stage.
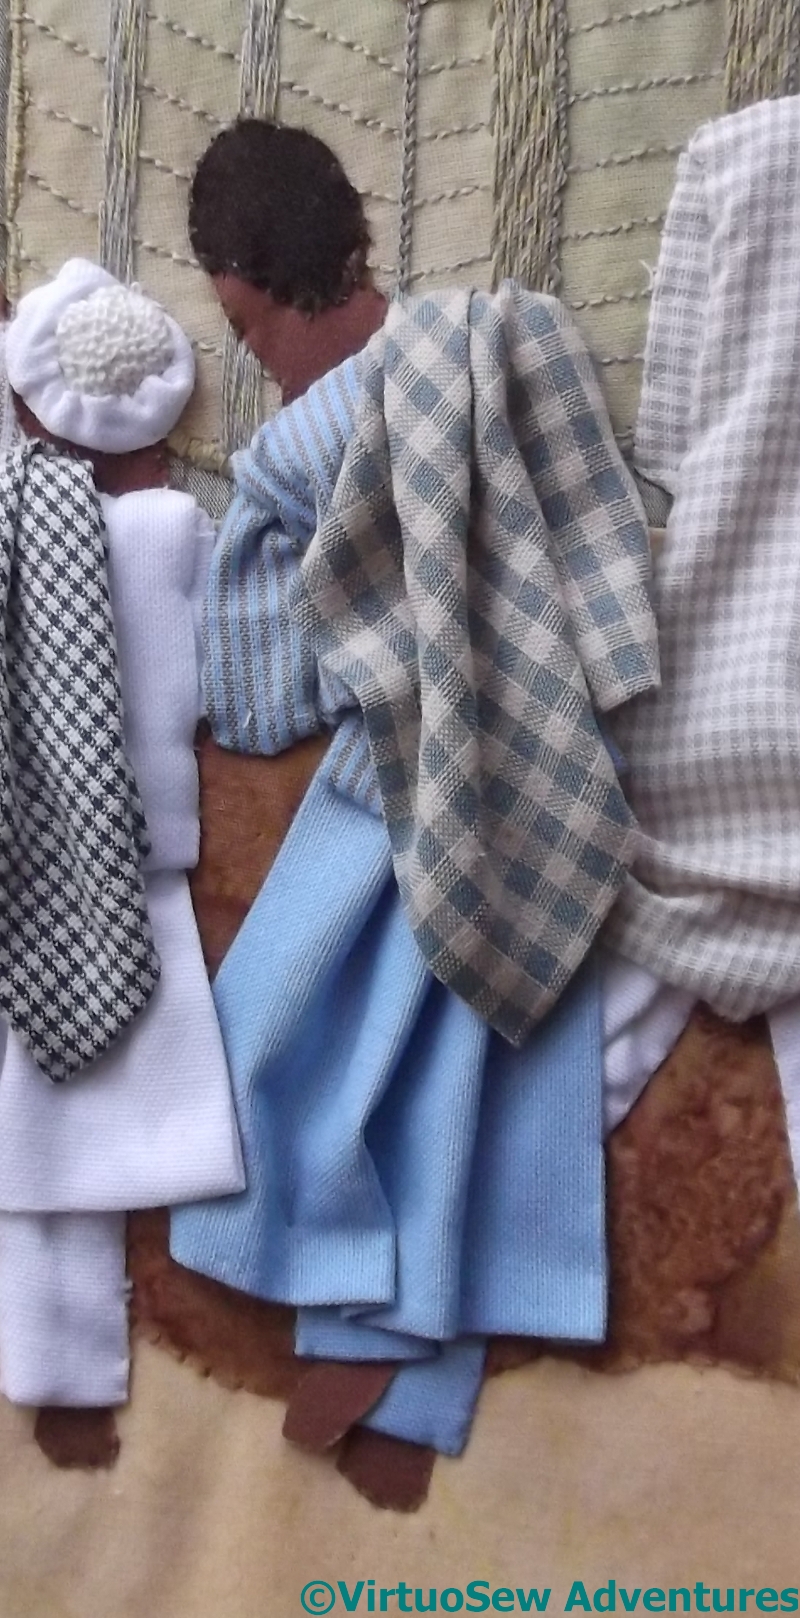
Fourth Labourer Finished
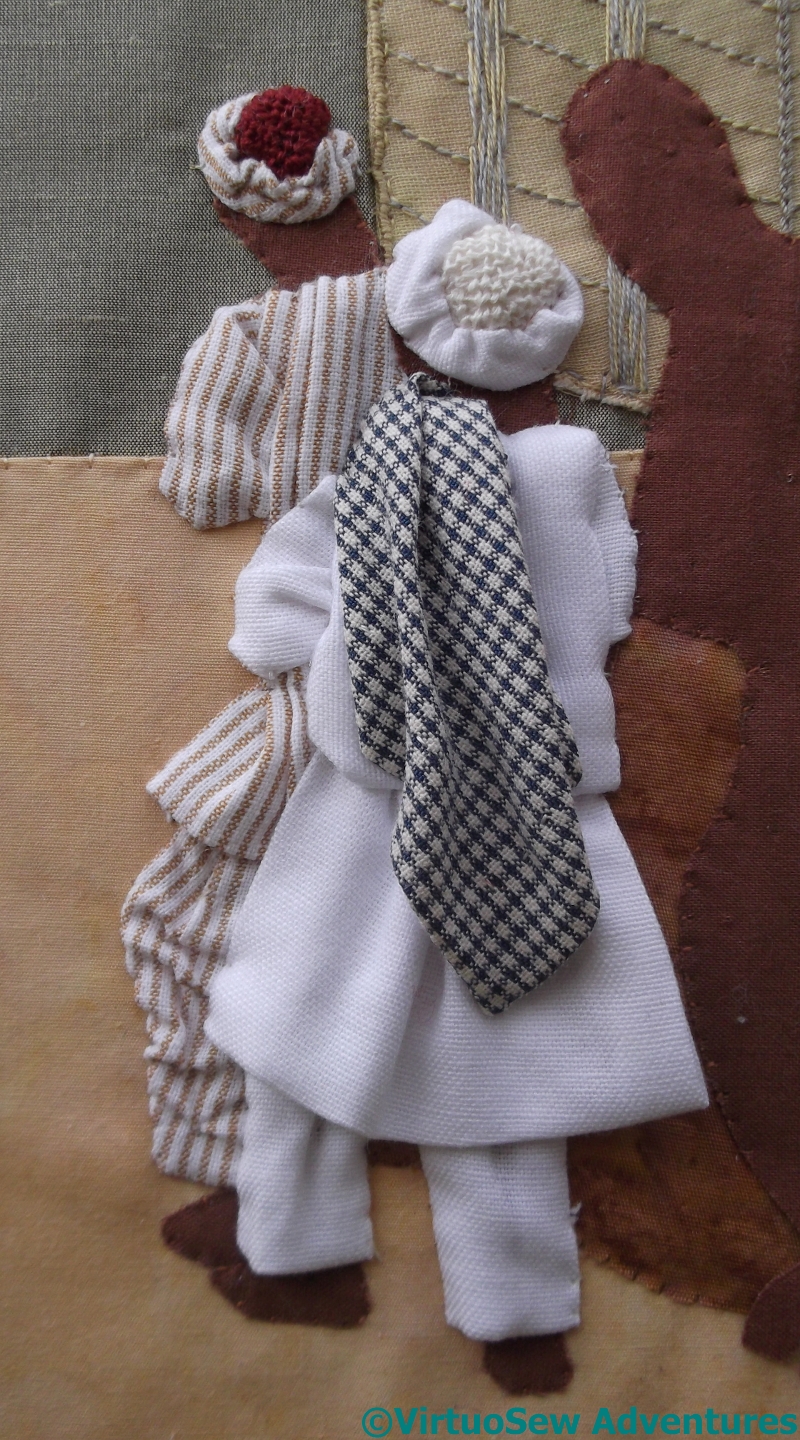
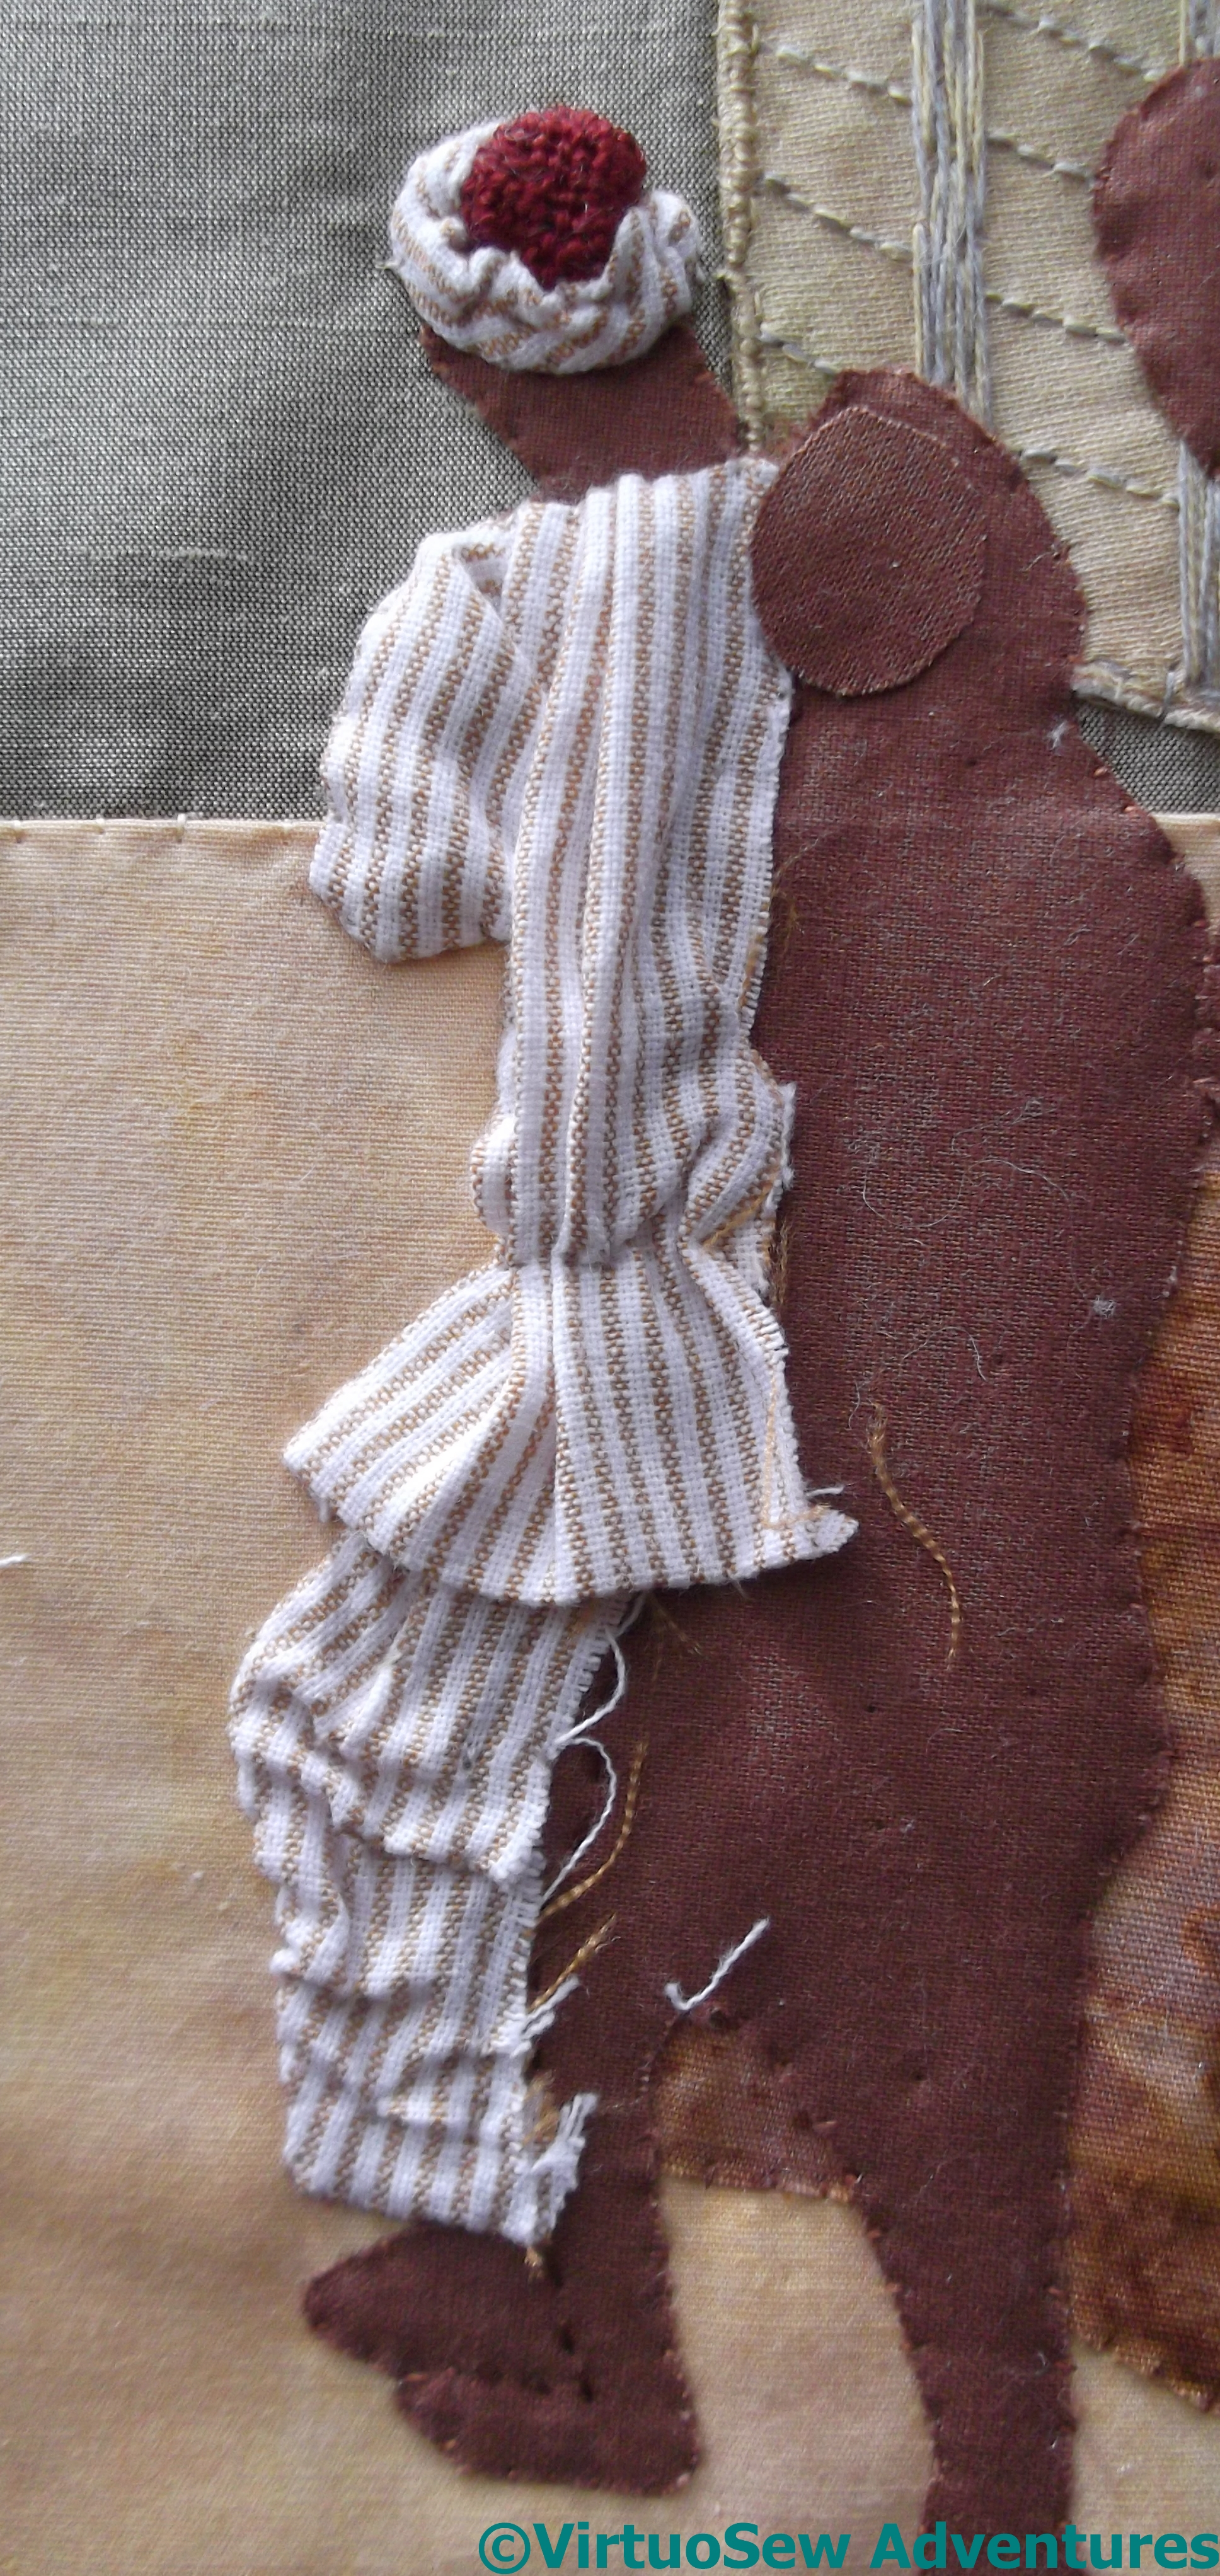
The stripy fabric for this fellow’s shirt is the same as the stripes on the first one, overdyed with the blue, and the bold blue check was overdyed with a stony beige colour, to try to make it look a little dusty. It barely made any difference, but sometimes “barely” is good enough.
I’m very pleased with the way the folds suggest the raised leg, and the turned in sections of the tunic create some bulk for the shoulders.
And, though I say it myself, I think the folds of the shawl (if that’s what it is) are an absolute triumph. They are secured in a few places, but I defy you to find the stitches, even if you zoom in on the picture, and I’ve avoided crushing any of folds.
Yet Something Is Missing
The basic figures are now completed, and I’m really rather pleased with how they’ve turned out, but I do feel as though there may be some details missing.
More staring and thinking required…
The Third Labourer
Beginning The Third Labourer
The mini-iron has been very helpful in turning and pressing the edges of the fabric pieces – sometimes before they’re applied, and sometimes afterwards, but at first I was very surprised to find myself wielding it left-handedly, more often than not. Then a little further thought, and it made sense – the difficult part is controlling the fabric, so naturally I would use my better hand.
First of all I started on the middle figure, forgetting that he is the nearest to the camera. So I stopped working on him – leaving his trouser bottoms in place – and moved on to the figure on the right.
Then the pleated drape cause me a great deal of trouble. Then I wasn’t sure about the left leg. Then I realised that I’d used the checked fabric I was intending for the overshirt.
More unpicking. Grr!
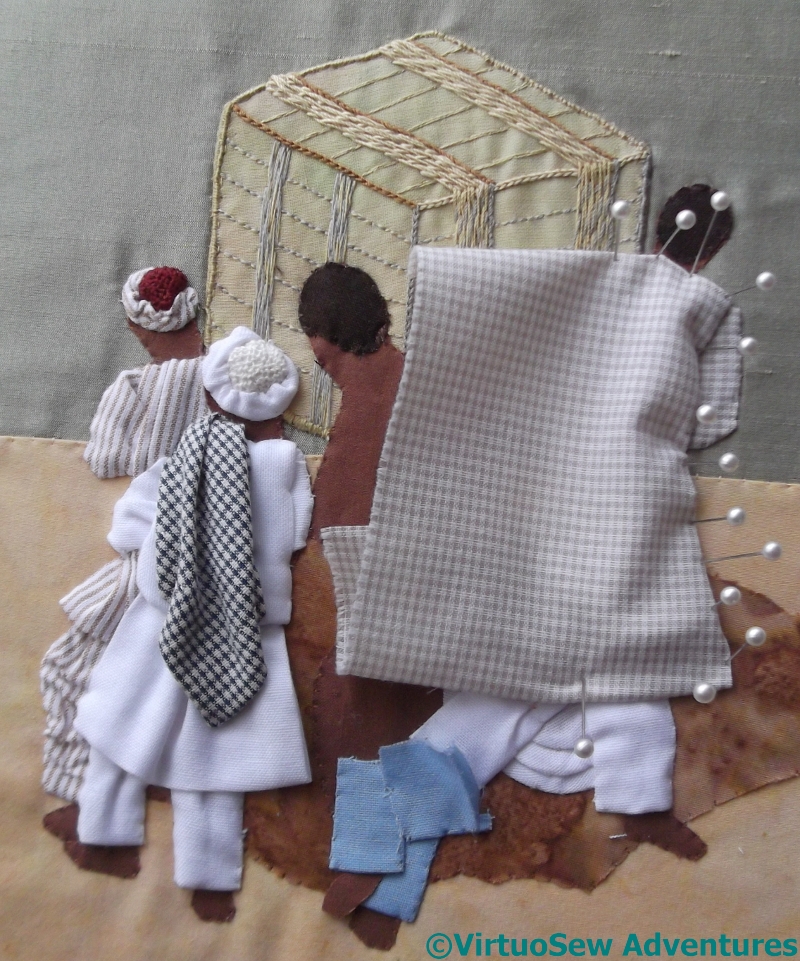
Pinning Third Labourer
I reinstated the trousers and the drapery in white fabric and then started trying to fit the overshirt.
I’ve been making extensive use of that set of pins that Karen Ruane sent me (thank you again, Karen – they’ve been invaluable!) as I try to work out how to make the overshirt sit properly.
In this case, however, having pinned and stitched, and unpicked and pressed and restitched, I decided I still had some reservations.
Still more unpicking.
Grr yet again!
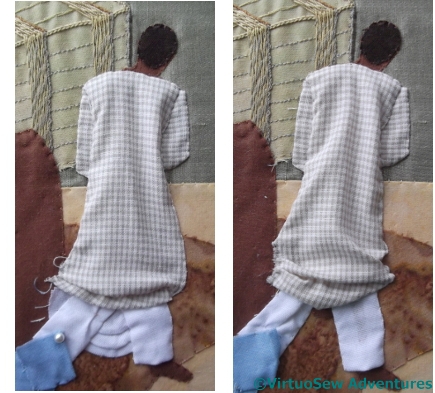
Spot The Differences!
So after much more puzzling and unpicking and re-stitching, I think I’m happier now. I’ve reduced the bulk in the left shoulder, removed the drapery, which is in the photo but didn’t “read” well in the applique, and reworked the overshirt.
Again.
None of the lower edges have been caught down, which I hope will help create the proper effect of garments that can move around a body. That does mean, of course, that I will have to be very careful not to crush the final piece when I’m storing it, but I do think it will be worth the effort!
Dressing the Second Labourer
Using The Mini-Iron
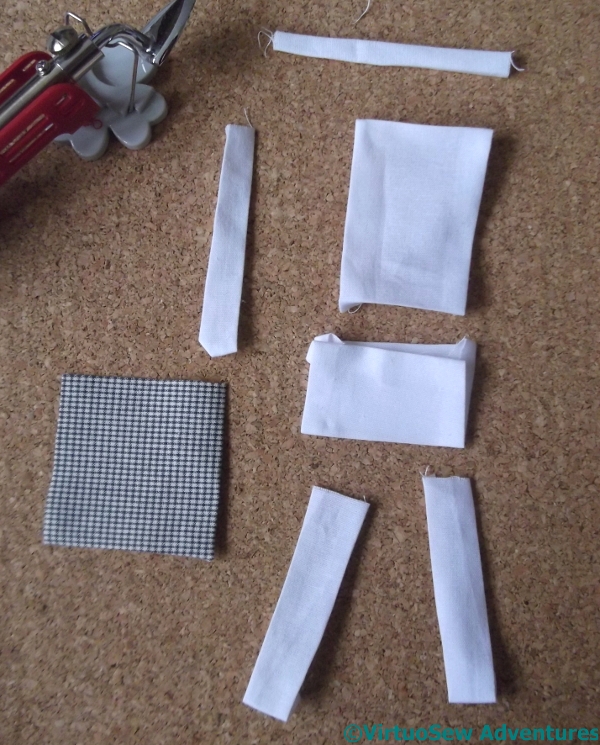
Since I decided after dressing the first labourer that using rectangles of fabric was the way to go, when I started on the second I began by cutting out every bit that I expected to need.
That meant:
two pieces for the legs, a piece for the body of the top, a piece for the section of the top below the waist, a piece for the turban, a piece for the sleeve, and a piece for the cloth thrown over the shoulder.
I bought myself a mini-iron to make the job of folding in the edges easier, lighter, and less perilous. Fortunately there are two more labourers to dress, so I will have plenty of time to improve my skill!
Two Labourers Clad
The trick to a successful applique is the order in which the elements are layered.
So in this case, the first pieces are the trousers. They are stitched down each side, and tweaked in the middle to create some impression of a body underneath. The bottom edges aren’t held down, so in storage this piece may be a bit delicate.
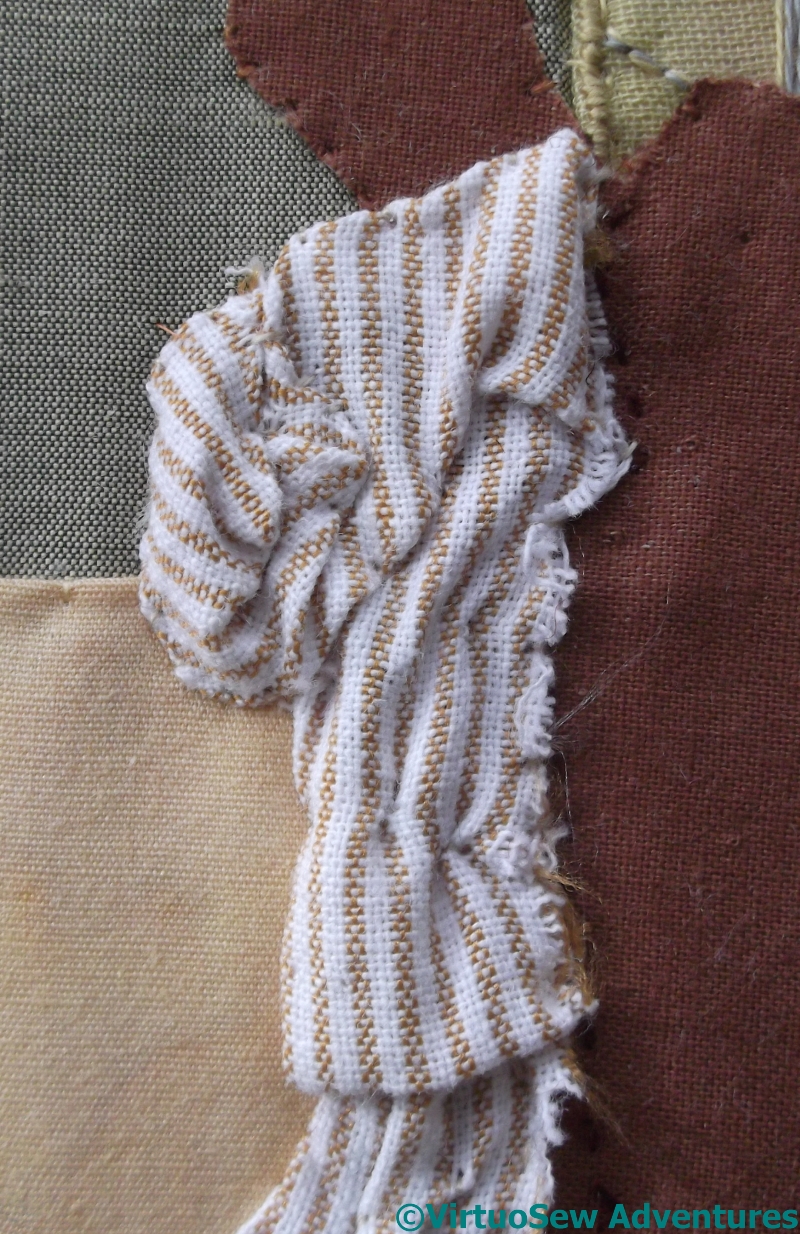
The turban is done in just the same way as the first one, but this time I used a cream linen thread for the central disc.
The sleeve was next, and then the “skirt” of the top, which is gathered to give it a sense of bulk. It is tethered by the underlayer, but not attached at the bottom edge. The right-hand edge isn’t tethered, either, because in due course the Third Labourer’s clothing needs to fit underneath..
Finally, there was the body of the top, and the fabric thrown over the shoulder. I don’t understand why he didn’t use it to pad his shoulder against the packing case, but the photo says he didn’t!
Dressing the First Labourer
Unsuccessful Attempt
Having stared thoughtfully at the people, I cut out some clothing shapes out of one of my pieces of quilting cotton, and started trying to create folds in them as I attached them to the fabric.
The trousers were tricky, but not impossibly so. The jacket, or top, or whatever it is, brought me to an abrupt halt.
Dearie, dearie me.
That didn’t work at all, did it.
The bulk and the folds are all in the wrong places. He’s certainly crumpled, but it isn’t the right sort of crumpled! And don’t even get me started on how difficult it was. I felt as though I was all fingers and thumbs – it was almost as bad as working with glue!
Cue much muttering, unpicking, and rethinking.
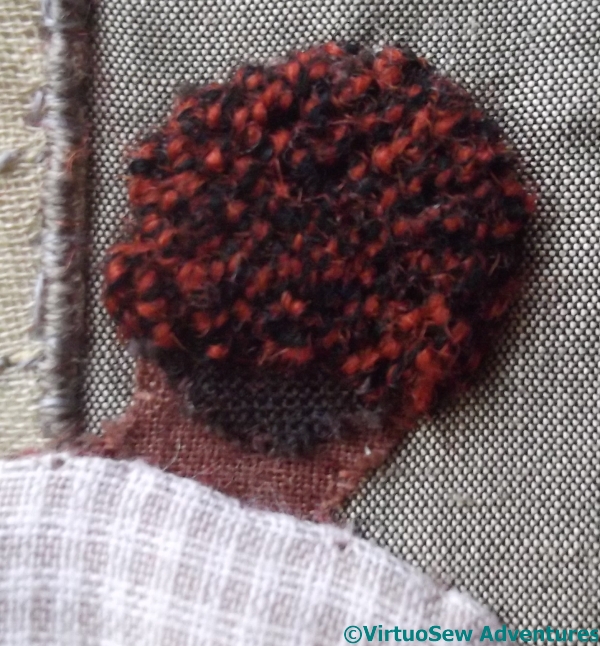
Turban Completed
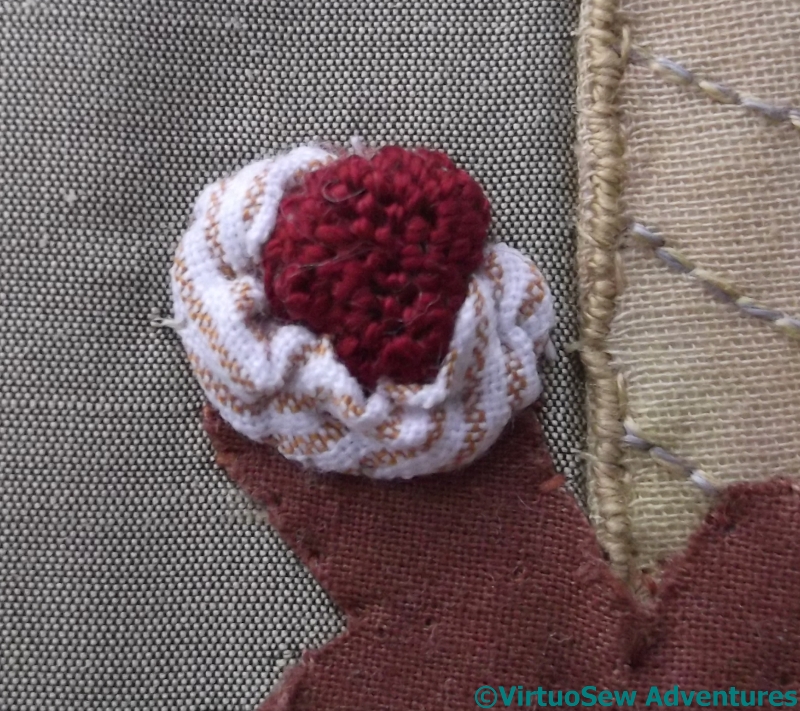
While I was thinking, I had a go at the turban.
The textured deep crimson is a circle of trellis stitch, a densely knotted needlelace stitch I’ve used a lot in my various Thistle Threads courses. The thread is silk, from a bag of “odds and ends” from Mulberry Silks. I cut out a circle of the fabric I’d stitched and gathered it to create a crimson bobble.
The cotton around it is a narrow tube of the fabric I was using, tucked under the crimson bobble at either end, and held down with odd little stitches to create the effect of folds.
First Labourer Clad
That worked. It also gave me a thought. There seems to be very little shaping in the garments we see in the photos from the dig – not least, in such a hot climate, loose, airy, voluminous clothing is likely to be a lot more comfortable!
So the next version of the labourer’s clothing was made, essentially, by cutting out a series of rectangles and applying them separately. In this case, there was only one rectangle for the sleeve, and then another for the body. It’s been gathered in to create a loosely bloused waist, and left flat and unfinished on the inner side where it will be covered by the next labourer’s clothing.
I think this has worked a great deal better. I might even be able to bring my imagined picture almost fully to life!
I’ve also added another layer for the face of the second labourer. There won’t be much of it visible, but the first labourer’s clothes are supposed to be behind it, so the addition was necessary.
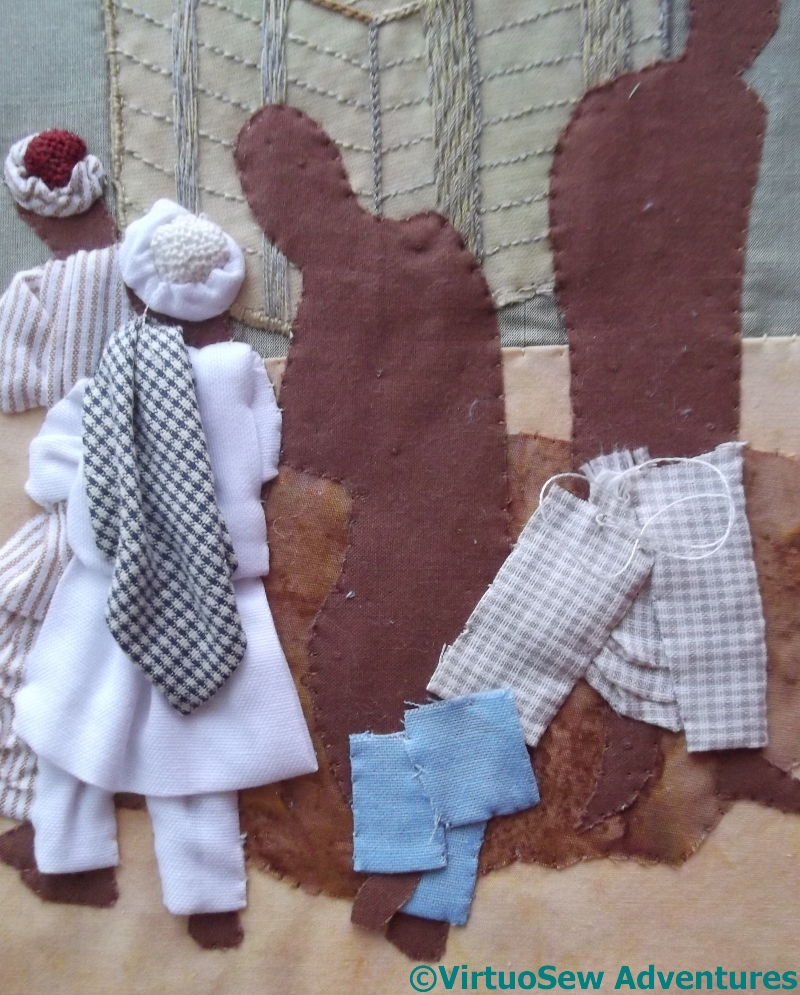
Beginning the People
Stabilising the People
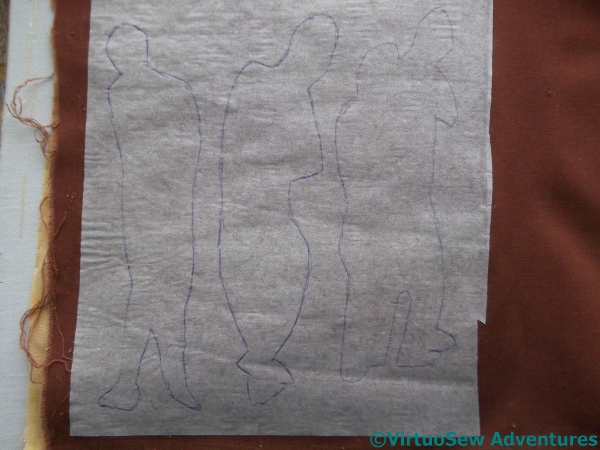
Once the packing case was in place it was time to put the people on. I’ve used iron-on transfer adhesive to stabilise the cotton fabric for the people. It isn’t likely that I will make use of the adhesive, but at least the tracing paper on the back allowed me to draw outlines of the people to cut out.
There was a brief pause while I made quite sure that I had traced the people the right way round to ensure that when I put them on, the fabric side would be uppermost and not the glue side, then I cut them out..

People Attached
Attaching the people was fairly straightforward, using single strands of silk pulled from a bundle of odds and ends. I even tacked them in place with silk – which just shows how cavalier I have become since working with metal threads and Gilt Sylke Twist!
Very little of these cotton people will show once I’ve dressed them. They are there for two reasons – because I felt that it would be easier to do that dressing if I had some sense of the bodies beneath, and because I know from working on the Camberwell Panel that small bits are hard to place precisely, especially in conjunction with other small pieces. Since the people are inside their clothes, putting the heads and feet on last would put them out of kilter in comparison with everything else.
I have cut and left unattached one foot of one of the people because I need to put a trouser leg behind it, and roughly stitched a line between the two people I’ve cut out as a single piece of fabric. That should help me to ensure that when I dress the furthest of them, I don’t use more fabric than I need, or create a finished, turned edge that adds thickness where I don’t want it.
Now I need to stare thoughtfully at the photograph for a while and work out just how to approach the next stage.