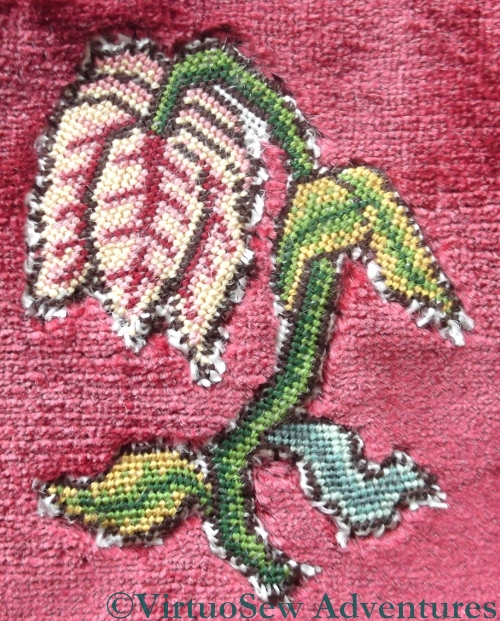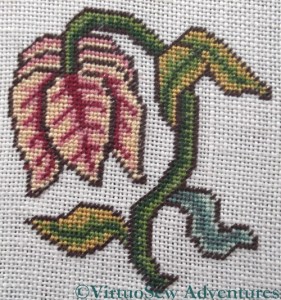
Tulip Stitched
I’ve now finished the tent stitch on the Tulip Slip Needlework Nibble.
I had a minor epiphany about halfway through, when I realised that in this particular case, absolute accuracy in colour placement isn’t really necessary. I’m not trying to create a picture which will look all wrong if every stitch isn’t exactly as charted. Tricia has created a stylised design which we are then going to use to learn the technique of working with tent stitch slips. So in minor details, the Tulip is not exactly as charted, but I doubt anyone will notice!
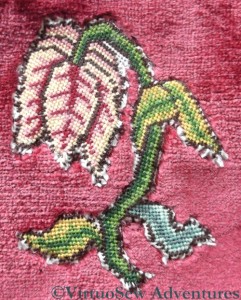
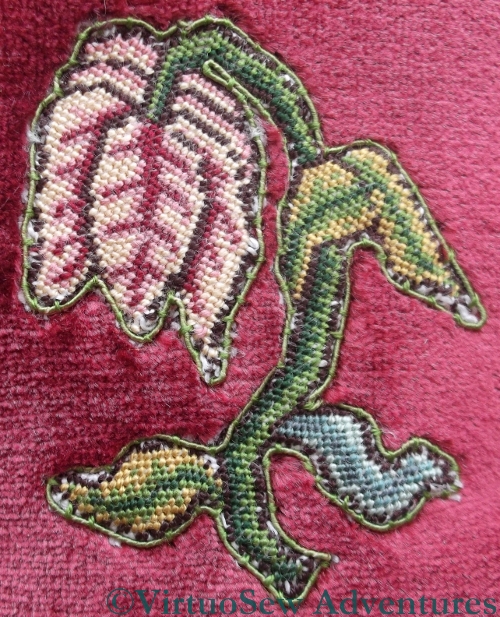
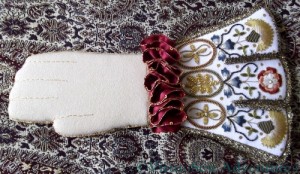
Tulip Applied
The next stage was to cut out the slip, and attach it to the velvet, turning the edges under as far as possible. I didn’t think this would be easy, and it wasn’t. Since linen for counted work is quite widely-sett (that is, the set up of the warp and weft allows a little air between the threads), it’s also rather prone to fray, and rolling the threads under with a needle turned out to be a slightly hairy experience.
On top of that – we all know that velvet “creeps”, don’t we? I unpicked and re-positioned the slip twice, and ended up pinning it firmly in place, regardless of the risk to my stitchery. I’m pleased to report that there seems to be no lasting damage…
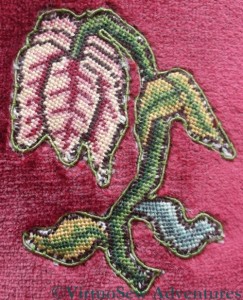
Tulip Edged
The final stage before assembling the pincushion (that will be another post!) was to edge the slip with silk gimp. The green gimp matched one of the green silk threads, so I used a single strand to couch it down. Except that the various fabrics were sturdy enough to make it quite an effort to stitch through them, this enterprise proceeded as planned. The instructions showed the slip simply outlined as a single piece, rather than having any details of outlining each separate section.
In real life, the slip doesn’t look as ragged around the edges as it does in close up!
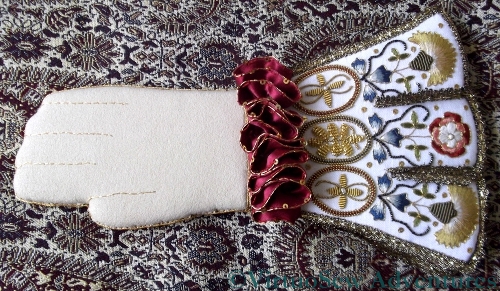
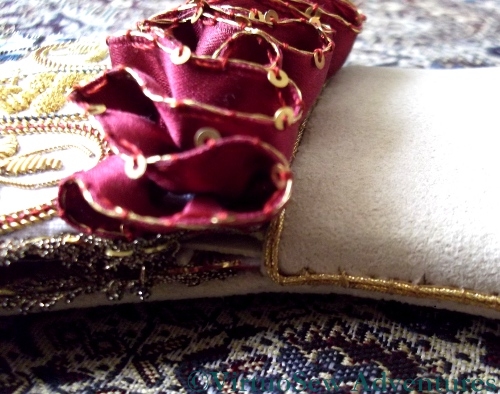
Floral Glove Needlecase Finished
At long last, after much trial and tribulation, and after completely shredding my fingers because no matter how hard I try I simply cannot use a thimble, I have finally completed the finishing on the Floral Glove Needlecase.
I’m very pleased with it, and not just because it is finished. It is my first attempt at “historical embroidery”, the first time I have used many of the techniques, and the assembly of the final piece involved my bête noire, glue.

Textures In Floral Glove
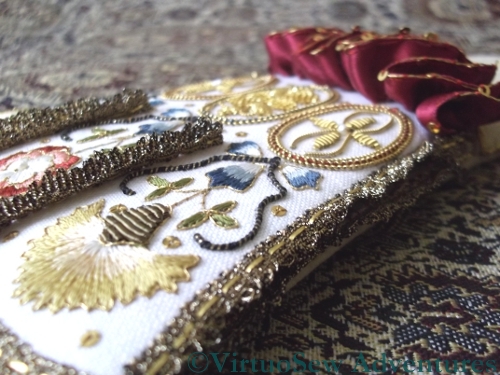
The finishing has been full of little details, the spangles decorating the fabric, the gold lace edging the two cuff pieces, the gold-and-spangle edging we added to the silk ruffle. Then the gold twist suggesting the fingers on the hand of the glove, and two rows of gold cord covering the join between the upper and lower pieces.
I love the variety of textures in this piece, the silk thread, the purls, pearl purls, lizardines and spangles. Then there’s the ultrasuede (another material new to me!) and the silk ruffle, and the brocade inside.

Closeup Of Finishing
And I’m only about six months late in finishing it, after all!
I keep looking across at it, and thinking “Did I do that? Really?”
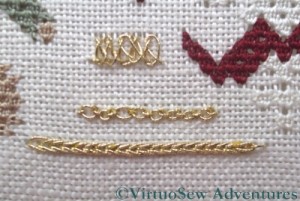
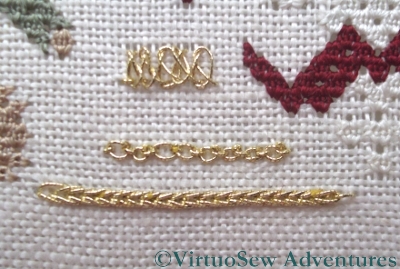
More Goldwork On The Sampler
I’ve been doing more work on the metal thread embroidery on the Spot Sampler. The photograph shows (top to bottom) Braid Stitch, Cable Chain Stitch, and Heavy Chain Stitch.
I’ve used the real metal thread and the Japanese needle for all of them, which may have been a mistake. At the very least, the Japanese needle is a tool that I’ve not got to grips with, and which has had unanticipated side-effects on my technique!
As you can see, Heavy Chain Stitch worked beautifully. There are only a couple of places where the thread has broken and shows the core, and it has created a beautifully smooth and glimmering line.
With the Cable Chain Stitch, I think I need more practice in keeping the tension correct when using a “stab-stitch” technique, which is necessary because Japanese needles are short. This stitch is one of my favourites, but it was actually quite a struggle here, precisely because I couldn’t take up a piece of fabric on the needle as I usually do.
This was even more the case with the Braid Stitch. In fact it is worse than that. It wasn’t clear when I was stitching it, but now I see this section enlarged in the photo, it’s pretty clear that I’ve actually got myself into a dreadful tangle with a couple of my braid stitches. I need to pick up my practice cloth, fish out all my books, and try again. And yet I know I can work this stitch beautifully – I worked it on the logo for the Teddy Bear Cot Blanket, and for the Prince’s Bow on the Persian Fantasy!
Rigging The Camberwell
At last I could get started on the rigging. I was hoping to get it right as far as it went, although I don’t imagine it is as complex as the real thing. The thread is a medium weight matte cotton thread in a mid toned grey. Essentially each piece of rigging is a single long straight stitch. The connections across the spars are made using a simple figure of eight knot, which interlaces across the spar. This creates the suggestion of a connection, without trying to give great detail.
I used some brown net to represent the shadows on the quayside (railings, I imagine, although the photo doesn’t give that much detail), and stitched another set of catching stitches just inside the quayside edge.
The cotton tape is simply there to give me an approximate idea of where the border is going to go, and thus the true extent of the design.
While I was doing this, I was also thinking – and discussing with my Client – the form that the border would take. We finally settled on a “Dedication” in Morse Code embroidered on to petersham ribbon.
That’s a lot of dots (French Knots) and dashes (Bullion Knots)!
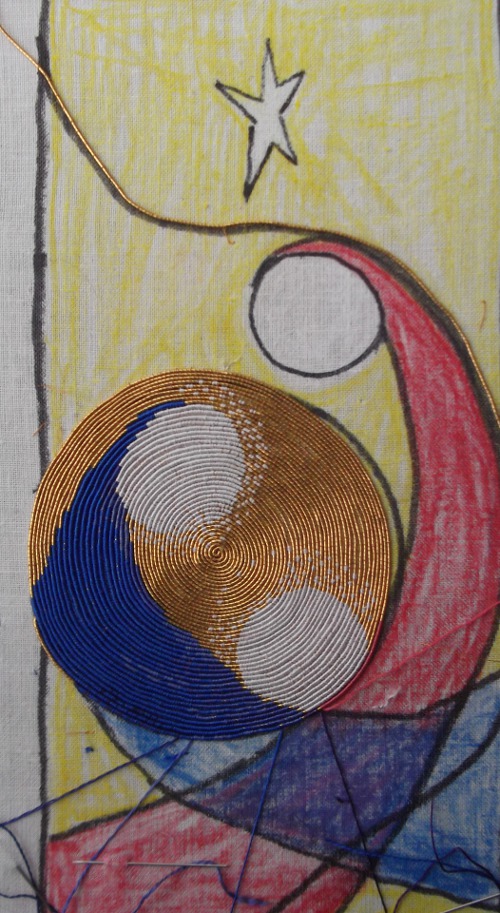
Two Milestones Passed
I’ve been making good progress on the Christus Natus Est panel. I’ve had to re-stretch the fabric, which involved taking out all of the pins, and reinstating them. The stitching is much easier again now!
I’ve reached the point at which I decided to end the spiral, which has gone over the outline I originally drew for the panel but now delineates the new left-hand edge. This is rather an important stage, since apart from anything else just following the spiral was an easy thing to do, whereas now – as the gold thread along St. Joseph’s back is hinting – I’m moving on to the part in which I need to create a flowing effect which is linear rather than spiral. The points at which the gold changes direction, and the way in which the lines run will make or mar the design, I think.
I’ve also worked a little more on the Christ Child’s halo. If you zoom in on the picture, I hope you will see that there is now a gap, an incomplete pattern in the halo where I’ve outlined it to come back and fill it in later. I felt it was more useful – and more important – to work out where the edge was to be than to keep the infill going.

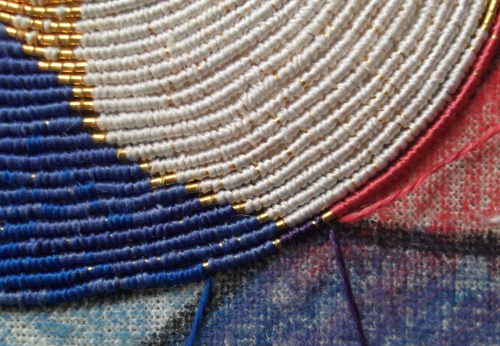
Close Up - All Colours
The close up shows the blue of the Virgin’s robe, the first hint of red of St. Joseph’s robe, and the combination of white and purple that represent the Christ Child. As someone hinted in the early comments on this project, this is a very addictive technique. I find myself trying to finish “just one more row” before the light fails, and muttering discontentedly when I have to stop.
It may even be finished in time to be used as the family Christmas card!

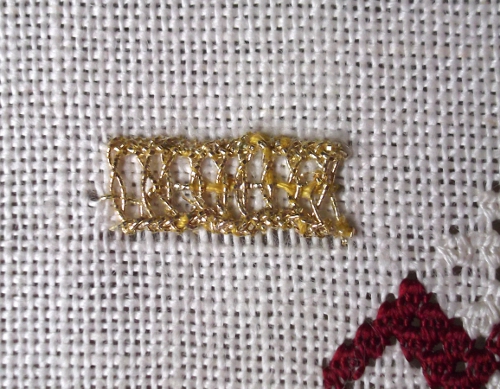
Interlaced Ladder Stitch In gold Thread on the Spot Sampler
I finished the silkwork on the Spot Sampler some time ago, but then ran into a problem, largely one of priorities. There have been so many other things I fancied trying, and so I’ve been working on the Amarna Map, the Christus Natus Est Panel, and a whole host of others. I’ve also been feeling just a bit jumpy about the real metal threads, and wanted to wait until I was feeling settled enough to read the instructions and make sense of them.
I have at last made a start, though. I even managed to thread my Japanese needle with thread from the Real Metal Thread Pack that arrived in the post a few weeks ago. Perhaps the practice thread I was using was quite simply fractionally too thick for the eye of the needle.
I started with Interlaced Ladder Stitch – which wasn’t necessarily the best or easiest starting point, but it is area number one on the chart! I’m a little disheartened that the gold thread has broken up quite as much as it has, here, but I’m leaving it there for now to act as a basis for comparison as I do other stitches. I’m going to try using even shorter lengths, and maybe even use a stiletto or similar tool to keep loops open while I pull the thread through.

Table Runner from The Needlewoman Magazine
I worked on this very early in my embroidering career. The design comes from a free transfer in one of the Needlewoman Magazines my Grandmama gave me (September 1934, since you asked!), and I worked it to go with the curtains in my bedroom which were a wonderful Regency strip in red and gold. It’s a table runner – I used it on my dressing table – and it is very nearly two feet long.
The original article to accompany the transfer described several different colourways and a whole range of sketches of suggested uses. There was the idea of sprigging (organdie) curtains with the single motif, embroidering a sunshade, a bag (linen), a luncheon set, gloves, embellishment on the brim of a hat, even on a nightdress or slip (silk of course!). Sometimes I wish I had lived in the Thirties!
I used some fine linen – essentially altar linen, a fine even-weave, nothing fancy, and embroidered it using pearl cotton. As you can see from the close up, pearl cotton really was rather too heavy for the fabric, but then I liked it at the time, and if you don’t like what you’re doing, it tends to take longer to finish.
Motif Close Up
I should have had the courage of my convictions and worked the French Knots as seed stitches (I hated French Knots at the time – possibly because I wasn’t very good at them). There are only three stitches – straight stitch, stem stitch, and French Knots, so it was very easy and simple to work.
I simply had to keep going at it. That’s when I discovered that I’m not very happy doing repetitive embroidery!
And – in case you are interested – although the linen was old when I worked the embroidery, it has in fact outlasted the bedroom curtains… They don’t make fabric like that anymore!
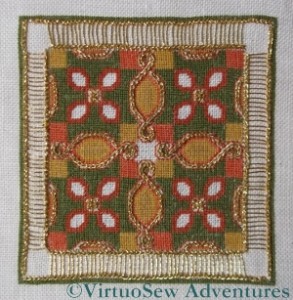
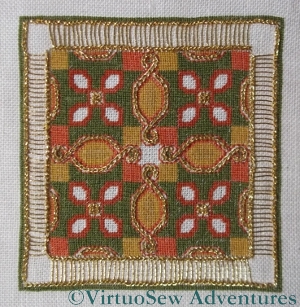
First Stage Of Border
I’m making reasonably good progress with the Tudor Pincushion which is part of the Tudor and Stuart Goldwork Masterclass. The silkwork was finished a while ago, and now there are several different isolated stitches, and a continuous border.
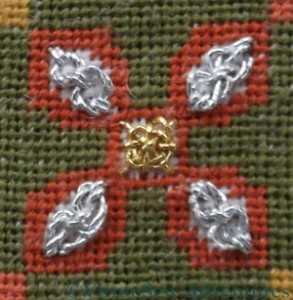
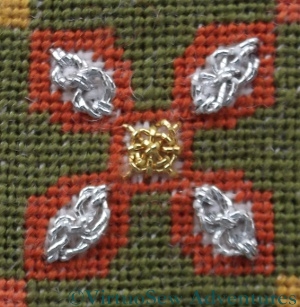
Silver Guilloche Close Up
I’m not using the real metal thread for this. I rather like the rich, vibrant colour of this thread, wrapped around a cotton core, and as I am planning to create a sort of winter “corner decoration” using all of my historical embroidery pieces, there is something positive to be said for the idea of using as many different shades of gold and silver as I can to create a really rich, varied impression.

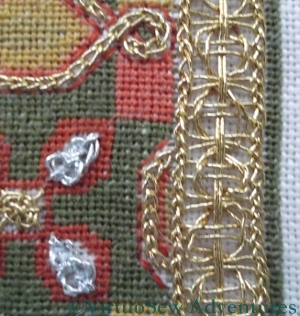
Border Close Up
The small sections of silver Guilloche Stitch have worked well, although I still have reservations about my gold Spider’s Web stitches, especially when I look at close-up photos of them!
The border is a Guilloche Stitch variation worked on a Ladder Stitch base. As it turned out, I didn’t get quite the right number of rungs on the ladders, so rather than being a neat continuation of the Guilloche Stitch, the corner elements are rather improvisatory.

Tudor Pincushion - Almost Finished
This doesn’t worry me. At the moment, I am still waiting for the instructions for the central ornamental stitch, and if, by the time I have that stitch, I’ve decided that I really must redo it, I will do so then. By that time I will be still more practised at working with metal threads, and it should go more swiftly and easily.
In the meantime, I can go on to play with more new stitches, and even, perhaps, start work on the real metal threads to add them to the Spot Sampler!
Progress on Christus Natus Est
Recently I was sent a link to a page discussing Russian embroidered icons. It seems that for all we think of icons as purely painted pieces, embroidered icons aren’t new – it is simply that their relative fragility and the length of time it takes to create one have made them very much rarer.
As I can testify. There have been many hours already that have gone into this piece, and I’m not sure that the progress made is really all that clear. Still, the spiral is nearly touching the side (I’m going to cover all the black lines, because I’m not entirely sure how this will be mounted or framed), and in fact it won’t be long before I have to consider how the non-spiral lines will flow. If you go back and look at the design as I showed it in this earlier post, you will see there is an extra black line flowing from St. Joseph’s head towards the top left corner, and another in the bottom right. These lines are to change the direction of the lines of the gold in order to bring more life into the design, but now I have done some of the work I wonder whether the lines are in the right place.
There is also the section of the Virgin’s cape running up over her head where I have for now followed the line as drawn, but wonder whether I should perhaps in this one instance follow the line of the gold to maintain the clarity of the abstract shape. If I do that, it will provide some justification for using a line along the back of St Joseph’s head and cloak as one of the new lines for the gold.
In other words, more thinking needed!
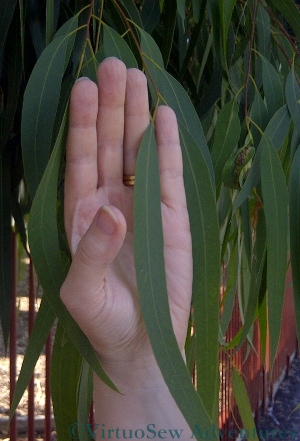
Eucalyptus Leaves
One of the hallmarks of Australian Embroidery, as shown in the magazines, is a willingness to mix techniques and “play”. So while I have no idea of how I am going to show the Rosella, I’ve been thinking in terms of creating a background of tessellated Eucalyptus leaves, one way or another. There are several ways this could be achieved, which would be to some degree in the spirit of what I have read, and I still haven’t worked out which to use. Although I hate working samples, I may have to do so this time, as I haven’t the faintest idea whether they will work!
- For example, the simplest, once I’ve developed and charted a tessellation, would be to work the background on canvas, using complete coverage. That might be a little dull..
- Another possibility would be to use a painted canvas or to overlay the canvas with gauze, and then just work the leaf shapes themselves and leave everything else un-stitched. I like that idea, but I think it will need playing with, to get the right gauge of thread to provide suitable coverage and at the same time not puncture the gauze too obviously. I won’t be able to unpick it either, so stitching it might be a nervy business!
- Then there is the possibility of using waste canvas over a felt or a linen background fabric, so I can chart the tessellation without being stuck with canvas as the whole background.
- Finally – although this is well outside my usual range of stitching – I could create cut-outs of the leaf shapes and sandwich them between layers of gauze, with minimal stitching to hold them in place.
Gosh. When I sat down to write this, the last couple of ideas hadn’t come to me at all! That’s one of the unanticipated benefits of blogging, because in sitting down to explain what I am doing, or planning, I concentrate so much more on the subject that I get even more ideas, and what’s more, I’ve got them written down, so when I actually get to that part of the project, I have my notes – often illustrated notes! – to help me reconstruct my ideas.
It would be nice to work this while I’m actually in Australia, using Australian sourced materials, so I think I need to spend more some time planning the project before our next visit.