
Tag: Floral Glove Course
The Floral Glove Needlecase is Finished!
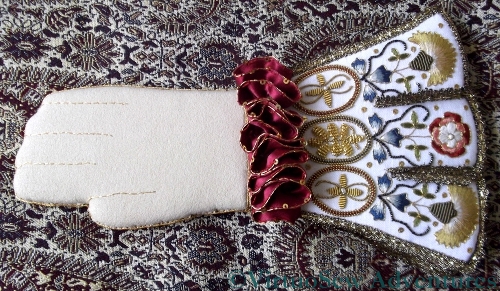
Floral Glove Needlecase Finished
At long last, after much trial and tribulation, and after completely shredding my fingers because no matter how hard I try I simply cannot use a thimble, I have finally completed the finishing on the Floral Glove Needlecase.
I’m very pleased with it, and not just because it is finished. It is my first attempt at “historical embroidery”, the first time I have used many of the techniques, and the assembly of the final piece involved my bête noire, glue.
Textures In Floral Glove
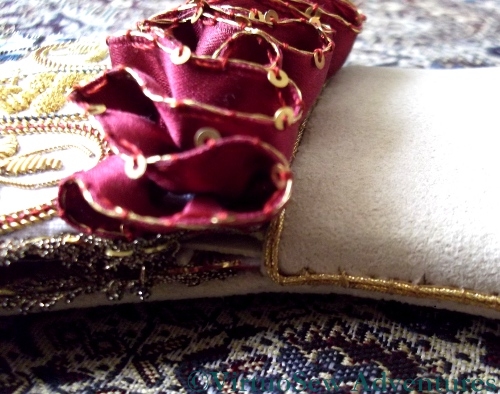
The finishing has been full of little details, the spangles decorating the fabric, the gold lace edging the two cuff pieces, the gold-and-spangle edging we added to the silk ruffle. Then the gold twist suggesting the fingers on the hand of the glove, and two rows of gold cord covering the join between the upper and lower pieces.
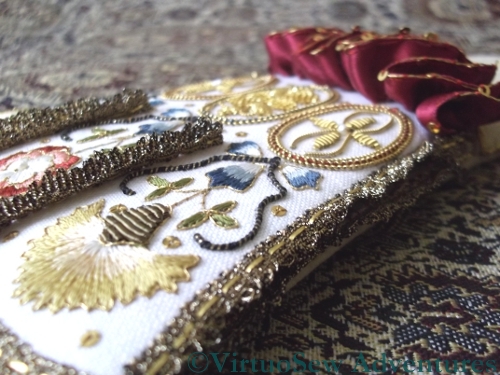
I love the variety of textures in this piece, the silk thread, the purls, pearl purls, lizardines and spangles. Then there’s the ultrasuede (another material new to me!) and the silk ruffle, and the brocade inside.
Closeup Of Finishing
And I’m only about six months late in finishing it, after all!
I keep looking across at it, and thinking “Did I do that? Really?”
Floral Glove Needlecase Course

More Floral Glove Finishing Work
It’s been a long time since I posted about the Floral Glove Needlecase. For a variety of reasons I lost momentum once it came to the finishing of the piece, but I do intend to get it finished. I don’t know what I will do with it when it is finished – I can’t imagine being able to bring myself to use it! – but I will get it done (can you hear the determination in my voice?).
So, with my new-found spirit of determination, here I am, laying out various pieces while I re-read the instructions for the nth time (where n tends to infinity!) and try to work out where, precisely, I had got to…
The silk brocade gauntlet at the back has pockets for tools, and there is an ultrasuede-covered base that will keep the final piece from slipping around too much.
My next two tasks are to attach some gold lace to the brocade cuff shape, and to lay some gold couching lines on the last piece of ultrasuede to create the top surface of the glove. I’m taking it a bit at a time, because looking ahead was what stopped me in my tracks last time!
Floral Glove Needlecase Course Month Five
The Cuff of the Floral Glove Needlecase
I’ve had an exasperating time with the Floral Glove Needlecase since you saw it last, what with unpicking and reinstating the gold lace (fx: growl!), and wrestling with the silk ribbon ruffle, which had to be gathered up and attached across the bottom in a sort of squiggle.
However, when I finally got all that sorted out, I screwed my courage to the sticking-point, gathered my wits, picked up my glue-pot, took a deep breath and finished assembling the separate ornamental cuff of the Floral Glove Needlecase.
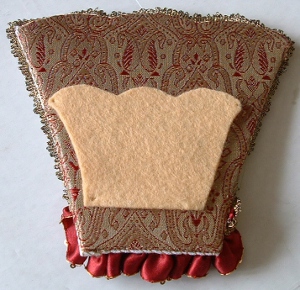
The Back of the Cuff
So here is the cuff lining. I know that the felt isn’t centred. I was sure that it was on the brocaded silk, but by the time I had tweaked and stretched and glued, that was the best I could do. As someone who is clumsy and awkward with glue I would have prefered a slightly wider margin of fabric around the card shape, which would have made it easier for me to handle.
The front and the back (stretched over batting, heavy interfacing, and light card) are attached to one another by overcast stitching. I used a strand of one of the silk threads from the embroidery – that seemed the best way of being consistent with the materials used.
Now, as I’ve said before, I’m not good with glue and scissors, so I was worn out when I finished, and I know it isn’t perfect, but it does look pretty good, especially from a reasonable distance!
At this point Tricia’s instructions say – I kid ye not! – “Sit back and admire!“.
So I did.
Floral Glove Needlecase – Second Stage of Finishing
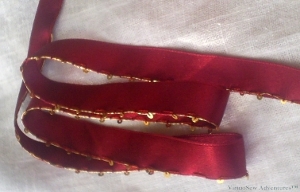
Silk Ribbon - First Stage
There is a sparkly ruffle between the cuff and the hand on the Floral Glove Needlecase, and of course we have to make it ourselves. You can’t go to your local needlework shop and say “Half a yard of Elizabethan glove trimming, please” with any prospect of success!
So the trim is composed of a length of double-sided silk ribbon, with Gold Twist and spangles whip-stitched down one edge.
The silk ribbon is wonderful stuff to play with, smooth and supple, and with just enough body not to flop. The idea is to ensure that the spangles all end up on the same side of the ribbon as each other and as the Gold Twist, and I think I managed it (not without the occasional tweak!).
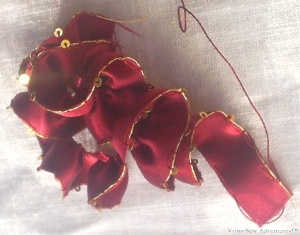
Silk Ribbon Gathered into a Ruffle
Then, we run a gathering thread down the other side and pull it up to make a ruffle. It looks wonderfully exuberant, doesn’t it, and I haven’t even set it into the shape it needs to fill on the project. Tricia suggests leaving that stage until the various unseen bits of backing are all assembled and shaped, and since I need to buy some fabric glue before moving to that stage, that is exactly what I am going to do.
Completing this fairly simple task took me most of an afternoon. But then, no one ever said embroidery was quick!
Floral Glove Needlecase – beginning the Finishing Process
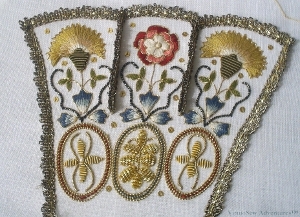
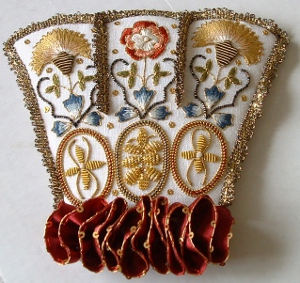
Floral Glove Needlecase - Gold Lace added
I’ve been prevaricating on the finishing process for the Floral Glove Needlecase, because it will involve glue, and I’m clumsy with that sort of thing.
I’ve worked very hard on the embroidery, I’m quite pleased with most of it, and I don’t want to fall at the last hurdle!
Finally, however (largely because I’ve been blogging about it and felt I should finish what I started!) I’ve screwed my courage to the sticking point, printed out the instructions and promised myself I would read everything twice before starting any stage of it.
That’s one of the effects I hoped blogging would achieve – providing encouragement to finish things properly. So I think we can count that as a success, can’t we!
What you see here is stage one of the fifth month’s instructions – adding the gold lace to the edge and around the tabs. This has actually been fairly simple, in that the lace has loops on the straight edge, and the whole thing is done with a single length. No joining ends to worry about, just making sure that the lace is neatly attached along the line, carefully controlled at the corners, and back-to-back on the lines separating the tabs.
I’m pleased with this. In real life it has a lovely sparkle and – yet again – the addition of further embellishment seems to have brought it to life even more.
Dreams of Amarna – The Faience Hippopotamus, Second Stage
The reason I am calling this poor fellow an experiment is that I’m working him in long and short stitch. I have said that working on the Floral Glove Needlecase project has been illuminating and that I am warming to long and short stitch – well, we’ll see what I think when I’ve worked an entire piece in long and short stitch!
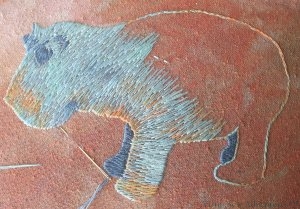
Half Done Hippo
In the meantime, here he is, half done. The darkest and lightest shades are ordinary stranded cottons, but the middle three use overdyed threads. One of them shades from turquoise blue to russett, and the others are both fairly subtle variations on a dark and a light turquoise.
I am using two strands, with one of them turned end-to-end in comparison with the other. I’ve never done this before, but it means that the shading of the overdyed colours is slightly more spread out and more subtle than it would be if I left them both as they came off the skein. It also means that the twist in one strand runs counterwise to the twist in the other so one strand shortens during stitching. I’ve chosen not to mind about that, but if you did happen to mind I think the way to achieve the same effect would be to buy two skeins and start them at different points in the cycle of colours.
I’m also working in slightly untidy sections of the body, with two or three needles ready to go, depending upon the colour I need. I’m using long stitches, and aiming to cover the fabric beneath without packing the stitches too closely.
I’m really pleased with this so far. The colours are working well, and the variations will give a bit of modelling without attempting to create a needle painting.
Floral Glove Needlecase – The Finishing Kit
Finishing Kit for the Floral Glove Needlecase
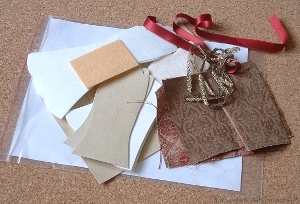
Another gentle thump through the letterbox and the Finishing Kit for the Floral Glove Needlecase has arrived.
Neatly die-cut pieces of card, interfacing, and fabric, lengths of ribbon and lace… It all looks rather promising, doesn’t it!
The first thing I need to do (I’ve looked at the instructions online but not quite got as far as printing them out) is to embellish the ribbon with gold thread and spangles. I am learning from this project that the layering of intricate detail and embellishment can be hugely successful; even when you think something is as ornate as it needs to be, sometimes it looks better with more.
That doesn’t work with fashion – I remember coming across this some years ago. Even now I survey myself critically in the mirror before going out, to see whether I need to remove an accessory. And this is a link to the picture referred to in the post.
Floral Glove Needlecase Embroidery Finished!
Floral Glove Needlecase - the embroidery finished (I think!)
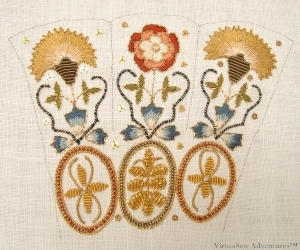
At least I think it must be. I think the next two months involve the finishing process – adding trims and making the needlecase itself.
I’ve finally got the idea of how the purl should work. It needs to be cut fractionally longer than the distance it is to cover, so as to produce a very slight – a very slight! – curve. This results in a slightly less scrappy look, because the ends of the “beads” of purl aren’t so obvious. It’s not easy to cut accurately – at least, I didn’t find it so, but where I got it right, the sections look much better.
Adding the spangles makes a surprising difference to the final effect – they are so tiny and delicate you don’t expect them to make much difference, but the fragile sparkle really enhances the final effect.
I’m not going to go back and redo the bits that aren’t quite perfect. It will be useful to have the reminder of what I should be aiming for beside the reminder of what I should try to avoid! I’m pleased with what I’ve produced and – although it may not be obvious from the photo – I can see that I have improved over the course.
Floral Glove Needlecase – More Progress
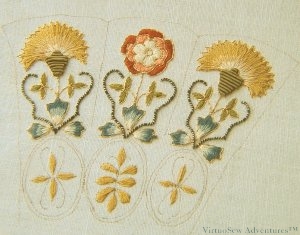
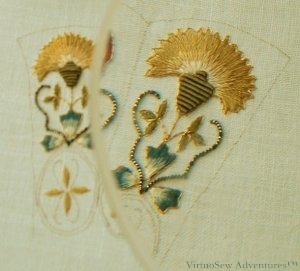
Floral Glove Needlecase - progress
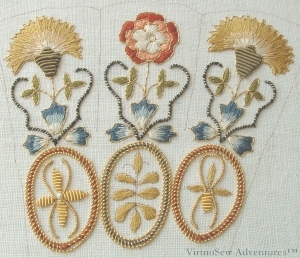
It became clear as I was working on the medallions that I was having more trouble with this than I had with the silk work or couching the Elizabethan Twist, so I thought I would give a sort of “interim report”.
The medallions are outlined with three couched rows of slightly stretched purl purl or lizardine, one of which is wrapped with silk. That in itself was fairly hair-raising (it sounds so simple, but believe me, it isn’t!), and yes, I know that the outlines aren’t perfect and you can see the joins, but they did get neater. The man who said “The more I practice the better I get” was onto something!
The tendrils are slightly stretched lizardine again – stretched by a different amount, just to make sure we paid attention! Then the silk of the motifs is covered with couched lengths of purl, like the calyxes of the carnations. It is surprisingly difficult to cut this stuff accurately – the instructions say to use an old pair of embroidery scissors, which I did, but I find myself wondering whether a sharp craft knife would do the job better. Certainly there would be less chance of crushing the thread. Purl is very fine wire, wound spirally around a former, and when the scissors crush it, the ends are bent out of shape and catch on the thread as you try to thread it through. Since purl is attached by threading it like a bead, this isn’t ideal; even waxing the thread only helps some of the time.
It’s astonishing to see the difference made to the medallion on the left when I added the seed pearl in the centre. I thought it looked neat and finished as it was, but adding the pearl brought the whole thing to life. Now there’s a lesson worth remembering – a small change can make a huge difference to the impression given by a piece. At least embroiderers can undo some of their additions. If you add something to a watercolour that turns out to be a mistake, there’s nothing you can do about it!
Still, I do think I am beginning to get the hang of it. Now it will be interesting to see whether I’ve slid all the way back to the start, or whether, when I continue on the next medallion, I retain some of the improvement I made yesterday.
Floral Glove Needlecase – Month Three Finished!
Month Three Finished
So, making progress here. All the silkwork is outlined in Elizabethan Twist, carefully following the suggested paths so as to have the smallest possible number of ends to sink.
Then the calyxs of the two carnations are covered with Olive smooth purl, cut to size and treated like a bead. This was fairly tricky because it was easy for the end of the purl (which is a very fine wire, coiled up) to catch on the silk thread being used to sew it down. In fact for the second calyx, I waxed the thread, which made the whole experience less fraught! I notice I didn’t quite get all the lengths or maybe spacings right for the first calyx, but for now I shall leave it as it stands.
Then I couched the striped thread curlicues. Again it was tricky to place the black couching thread where it would disappear into the thread being couched, but I think a few tweaks with a needle will fix that!
Through A Glass Clearly
Finally, I thought I would show what a difference a magnifier makes. As I think I have said before, it is the change in size that terrifies. I began by stitching without a magnifier and was reasonably happy doing so. I just felt that it would be a useful additional tool, especially given some of the other projects I have in mind.
My eyes become accustomed to regarding the magnified view as normal, then when I stop for a cup of tea, I push the magnifier to one side to have a “proper” view. At which point there’s a small squawk and my husband asks what’s wrong. “It’s gone all tiny”, I say, “Don’t tell me I stitched that!”. After the said cup of tea, ordinary views reassert themselves and it doesn’t seem quite so astonishing.
Which is really just as well. We don’t embroider to scare ourselves, after all!