Egyptian Patterns
When I was working on my Master’s Degree, I came across this reference to dyeing in Egypt, as described by Pliny the Elder in his “Natural History”:
In Egypt, too, they employ a very remarkable process for the colouring of tissues. After pressing the material, which is white at first, they saturate it, not with colours, but with mordants that are calculated to absorb colour. This done, the tissues, still unchanged in appearance, are plunged into a cauldron of boiling dye, and are removed the next moment fully coloured.
It is a singular fact, too, that although the dye in the pan is of one uniform colour, the material when taken out of it is of various colours, according to the nature of the mordants that have been respectively applied to it: these colours, too, will never wash out.
Thus the dye-pan, which under ordinary circumstances, no doubt, would have made but one colour of several, if coloured tissues had been put into it, is here made to yield several colours from a single dye. At the same moment that it dyes the tissues, it boils in the colour; and it is the fact, that material which has been thus submitted to the action of fire becomes stouter and more serviceable for wear, than it would have been if it had not been subjected to the process.
Pliny the Elder, The Natural History, Book 35, Chap.42
Now, Pliny the Elder was writing long after Akhenaten’s time, indeed after Egypt became part of the Roman Empire, but plant dyes were already known in 18th Dynasty Egypt, so I am going to assume that mordanting was also known.
I simply have to try this!
I’m not going to try to use Egyptian plant dyes – I think it will be quite challenging enough as it is – but I need to do some research to discover what colours can be obtained by different mordants from a single dyestuff, then work out how to apply the mordant in patterns in such a way as to ensure that it works.
And then do it. It would make a fabulous video, wouldn’t it, dipping a white cloth into a vat and getting multicoloured cloth out again!
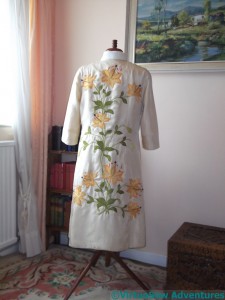
Tiger Lilies – Long View
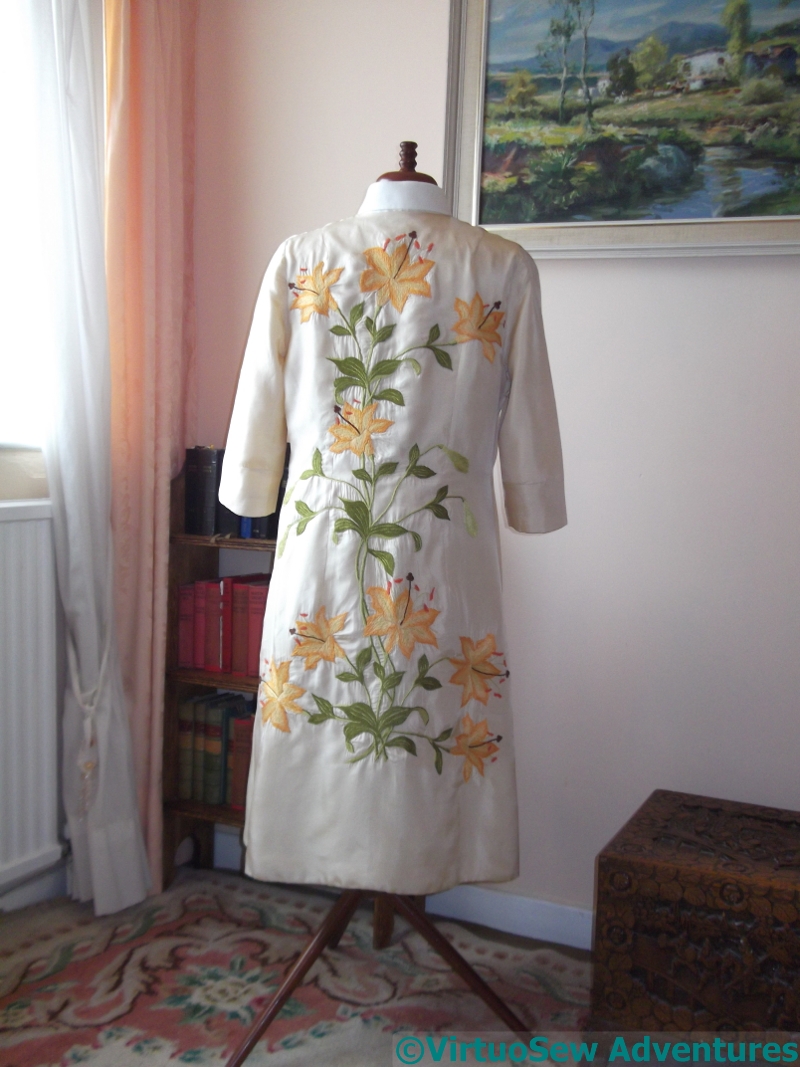
This rather fabulous coat was a collaboration. My mother made it for herself to wear at a friend’s wedding in the early nineteen-sixties, and when she began to run out of time, Grandmama stepped in and stitched like a whirlwind to get it finished!
The original outfit was a silk dress and coat combination, a very simple sheath dress, and this edge-to-edge, three-quarter sleeve coat. The front is completely unadorned, because, after all, at a Church wedding people will mostly see each other from the back!
The design of Tiger Lilies is from a transfer. Actually, we think it was three of the same transfer, cut and put together to create a design that fit the coat back. After the darts had been put in…

Tiger Lilies – A Flower
I’ve seen a few cream running stitches which suggest to me that, rather than using the transfers as transfers, the design was stitched through the paper. Given the sensitivities of silk, that was probably very sensible!
The embroidery is worked in stranded cotton. It’s all very simple stitchery, long and short stitch, stem stitch, French Knots, and a few buttonhole wheels.
It relies for its effect not on complexity of stitching, but on the colour and pattern combination.
If I’m going to be picky, the silk was a bit light for the stitching – although the puckers may be a result of years and cleaning, as I can’t imagine Grandmama, after Miss Hunter’s training, would have stitched with such tension, and no more would my mother, after Grandmama’s training!
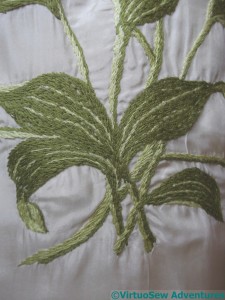
Tiger Lilies – Leaves
Grandmama also contributed assistance in making a pillbox hat, ornamented with swirls of gauze to match the colours, and then they painted a pair of shoes (Rayne, no less!) and a handbag (Marks and Spencer, alas) to match the green gloves which were bought new. A three-strand green stone bead necklace completed the outfit, and my mother remembers receiving a lot of compliments, at that occasion, and several others later.
Many years later still, when I was in the Upper Sixth, with a pale orange sheath dress underneath, I wore this for the Founders Day Service at school. We went into town afterwards, and my goodness, how people jumped to serve us!
Regrettably the coat fits neither my mother nor myself these days, and we’re wondering what to do with it…
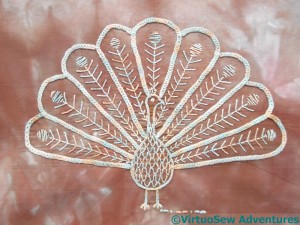
Fine Feathers
Some time ago, I worked on a few designs vaguely inspired by crewelwork, which I submitted to a few companies, none of whom took them. I hadn’t stitched any of them, because I would have used the preferred thread of the company that intended to produce them, but I’ve wanted to…
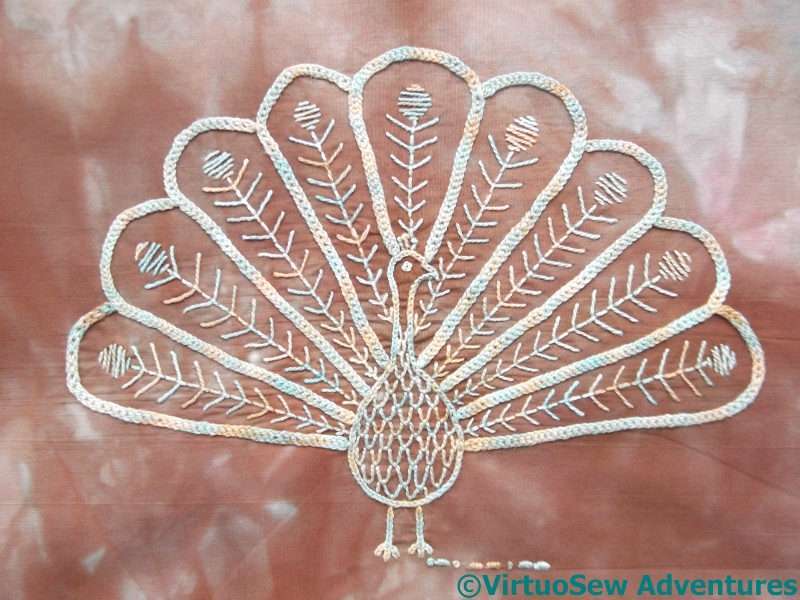
So when I had another hiatus of inspiration with the Dreams of Amarna, I rummaged for a thread that would work nicely with this over dyed fabric, and had a go. When I originally planned this design, I used peacock colours – blue and green, but I felt that it would be more interesting to work with a single, overdyed thread on the overdyed fabric.
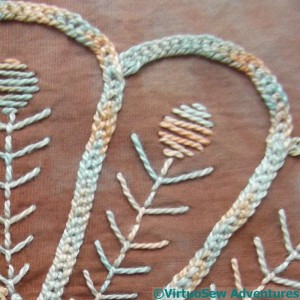
Fine Feathers – Detail
I chose to use Hungarian Plaited Braid stitch for most of the outline. The more I use this stitch, the more I like it. It’s richly textured but at the same time creates a fairly smooth effect, and while – as in this case – it works beautifully in a perlé type thread, it can be very successful, if a little trickier to work, in stranded cotton.
Fly stitch alternating with back stitch gives a bit of lightness to the tail feathers, and I borrowed the idea of the dragon’s scales from Kai Lung of the Golden Hours to create the effect of the down on the peacock’s breast.
I’ve signed him – the Morse code by his feet – but now I’m not at all sure what to do with him!
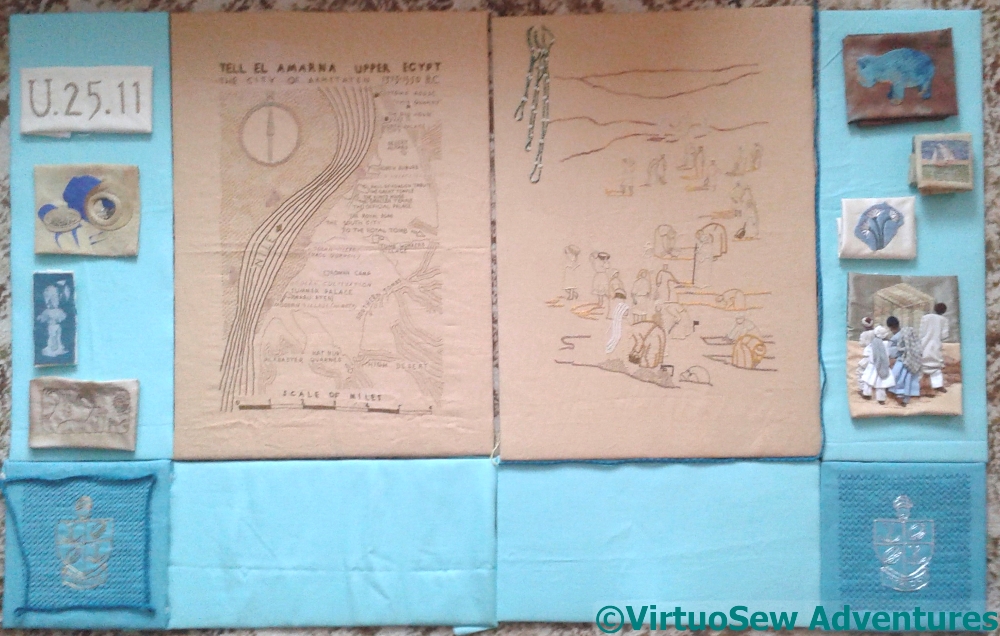
Layout Trial
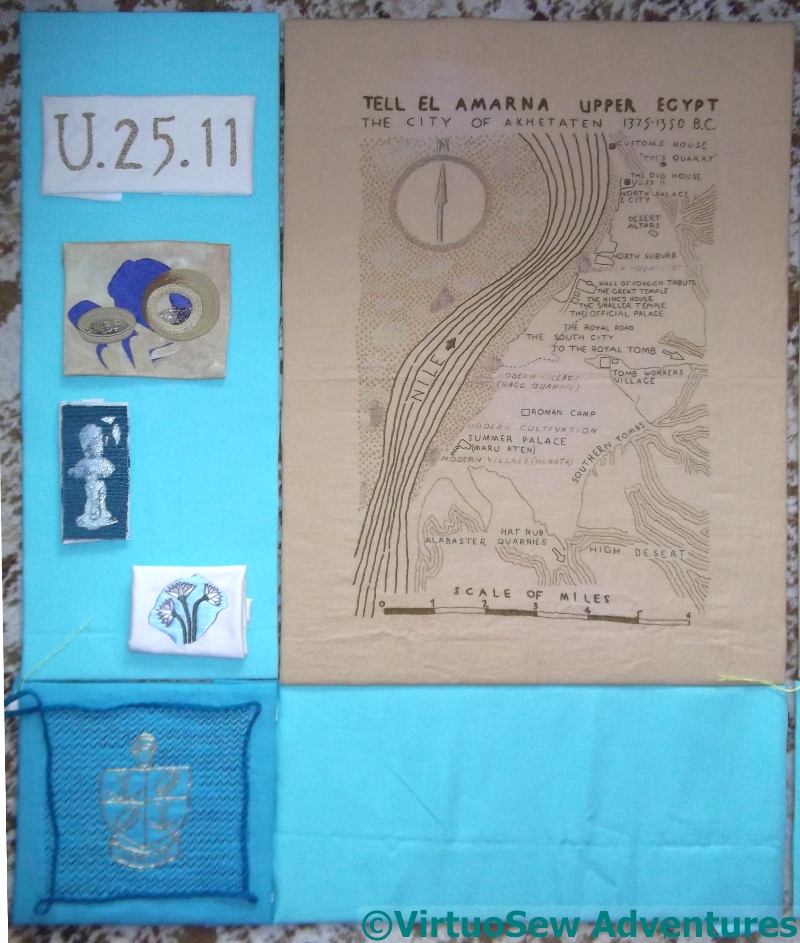
Once I’d finished the View of the Excavation, I thought it would be a good idea to see whether the whole Dreams of Amarna project was even remotely on the right track, so I got some mount board cut, and taped the Map and the Excavation around their boards, the two Crests around theirs, and then cut some of the pale turquoise linen for the rectangles around the edge. Then I burrowed into my box of the finished patches and bits – including a couple of yards of kumihimo braid and some beading – and started trying to arrange them to see whether it was going to work.

Panel One
I think it may be working! The colour blocks work beautifully, although the arrangement of the patches I arrived at for the picture above is better than the one in these.
I need to find somewhere else to use the purple-blue of the shadow on the Crock of Gold patch, and the dark fabric behind the Faience Hippotamus.
The Kumihimo braid was intended to frame the Crest for the Dig panels, but I think it works better in the second panel when I used it to edge the Excavation. So I guess I have to braid some more!
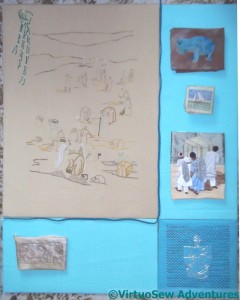
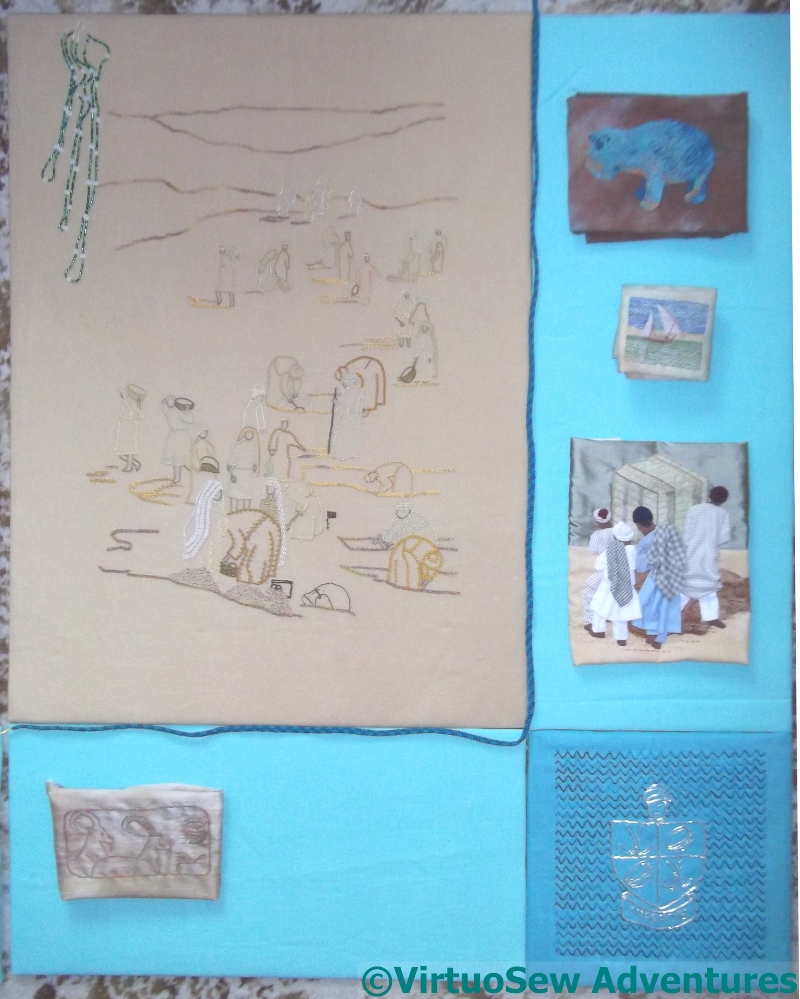
Panel Two
I do think I need to put some texture in to the background of the Excavation. It will help to balance the texture in the Map, and it will create a bit more variation in colour.
Loading the Felucca looks good, and makes a great punctuation mark. The Daisy Beads – well, that’s not the final arrangement – I just need to work out what will be.
And I need to go back to my notebook of ideas, and pick some more patches to do.
However, I do think it is going to look good.
Eventually!
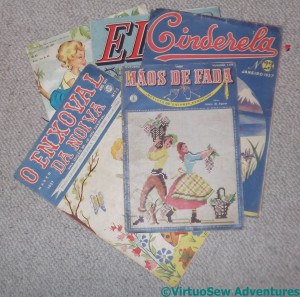
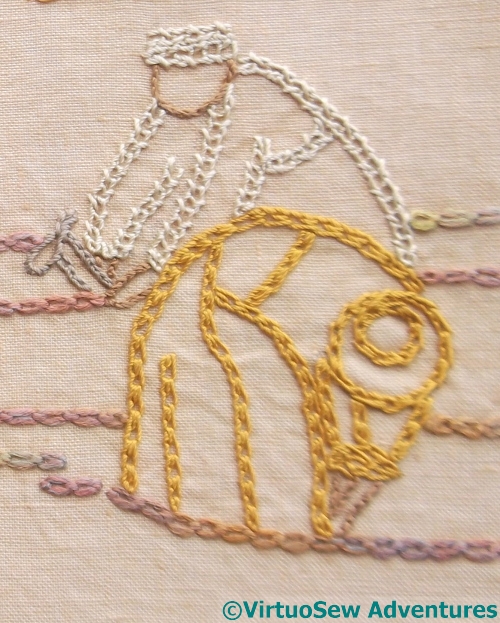
Portuguese Patterns
Recently we had a visit from some Portuguese friends, who we last saw when we were in the Azores. They had obviously remembered my delight when I found the embroidery shop in the main square at Punta Delgarda, because for their hostess gift, as well as bringing some coffee and olive oil, they brought a set of vintage Portuguese sewing and embroidery patterns!
Although they look like magazines, each one is in fact a large sheet that unfolds to provide drawn-out patterns for a multitude of types of embroidery, including surface embroidery, appliqué, cutwork and drawn thread work, some of it crisp and simple, some of it bright, colourful and really quite ornate. Suggested applications for the designs appear as well, so next time my inspiration flags (er, and I’ve finished the Azorean Cutwork!), I will be able to leaf through these to refresh it!

Another Pattern
The coffee was presented in this paper bag, which is printed with a design that our friends told us is inspired by a traditional embroidery pattern from northern Portugal. They said they were disappointed not to have found some embroidery for me, but in some ways, I think this is even better.
One of these days I will be able to play with this design, and maybe reinterpret this traditional style in my own way.
I’m looking forward to that!
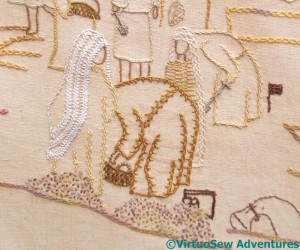
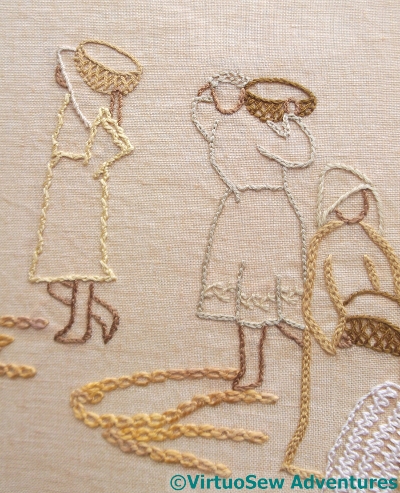
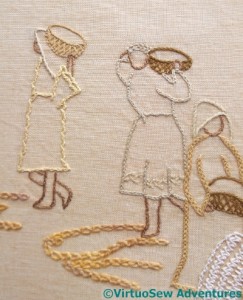
Foreground Group
The last group took a lot of stitching, restitching, unpicking and restitching. I couldn’t seem to get any of it right, and there are one or two bits I’m still not 100% sure about, even now…
The pale figure, bending over beside the little flag is in Spanish Knotted Feather Stitch, and the nearer bending figure is in Mountmellick Stitch. I was surprised that it was quite so hard to find suitably broad line stitches for the purpose; when you’re looking for characterful narrow stitches, you can only find broad ones, and when you’re looking for broad ones, by some strange alchemy only narrow ones catch your eye…
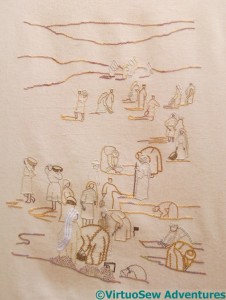
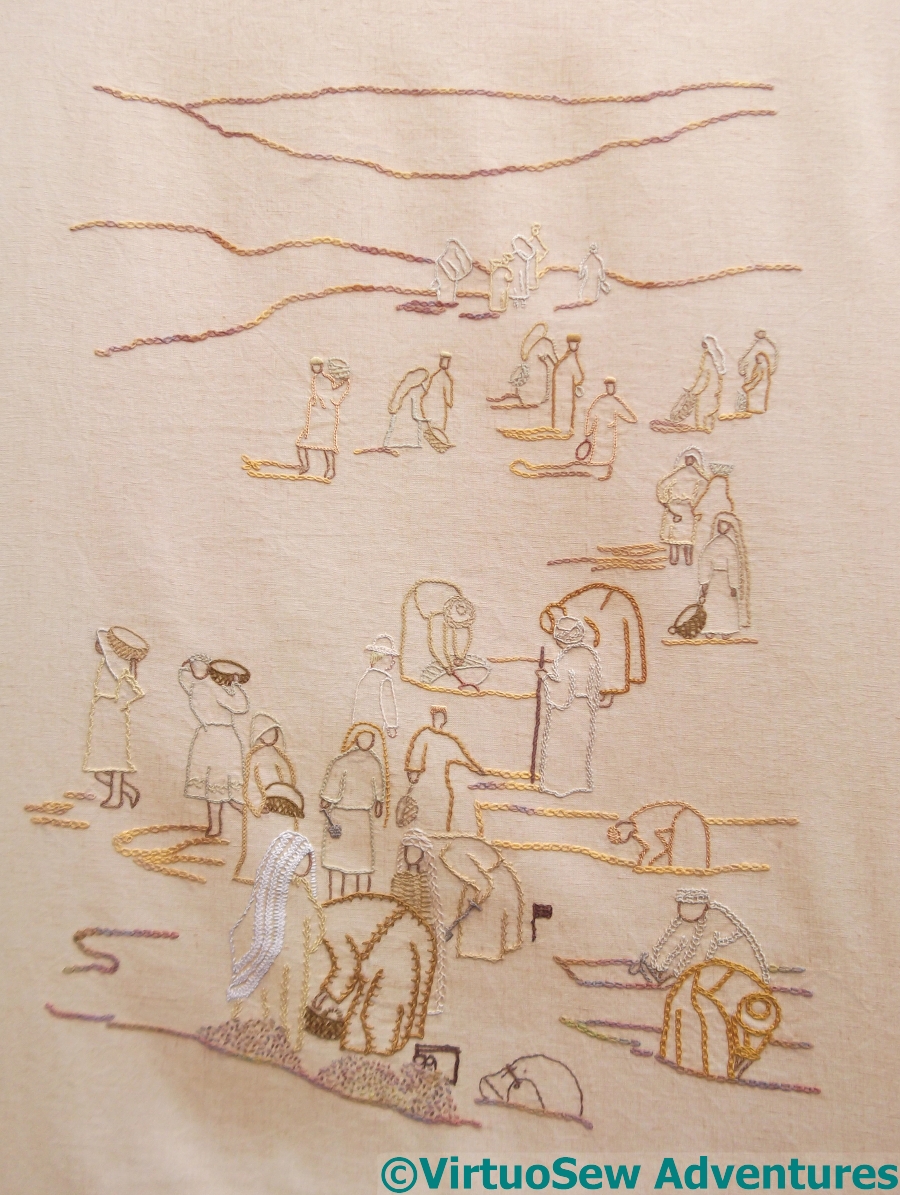
View Of The Excavation
The creamy white headscarf ran through Crested Chain Stitch (no!) and several stitches I hated so much I didn’t even record them, before I finally settled on three rows of Braid Stitch.
So at last, after much fiddling around, the View Of The Excavation is finished.
I’m fairly happy with it, actually. The trail of people into the distance creates a pleasing pattern, and I think that the alternation of the colours works well. Furthermore, as I wished, the Egyptian labourers and supervisors are the stars. There is a European, but he’s mostly concealed by the others.
There may be a few tweaks – not least I have yet to make sure that it works as a counterpoint to the Map of Amarna – but I think that at last it is finished for the time being!
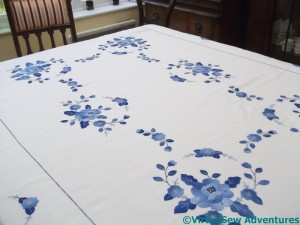
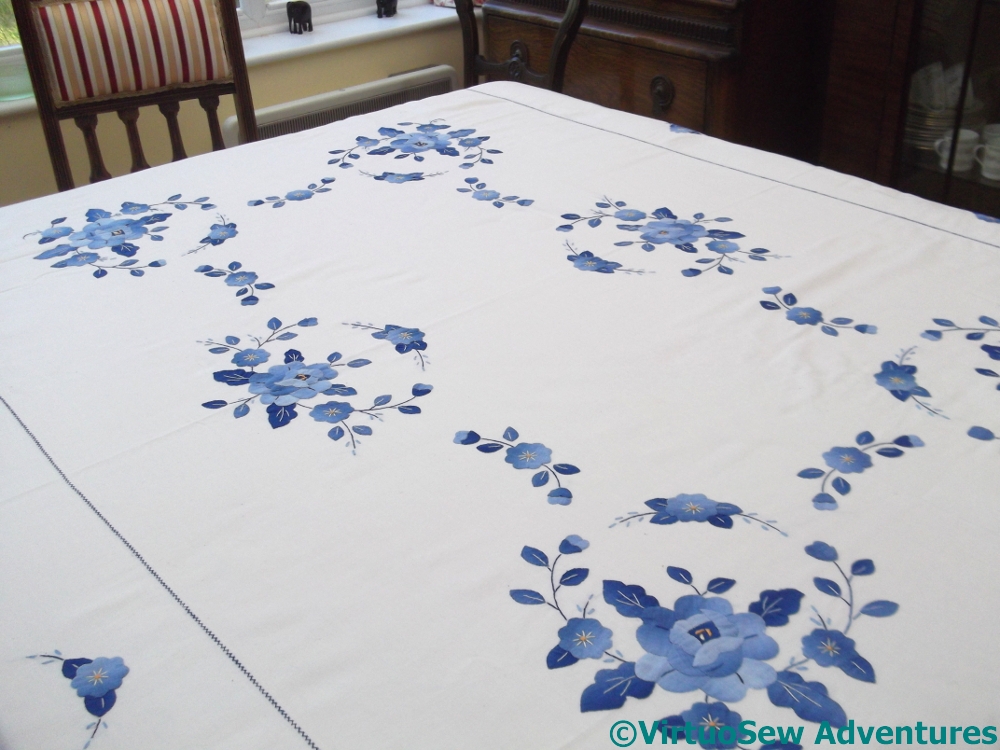
Applique Tablecloth
This is one of the most cheerful and striking tablecloths I have ever seen. It belongs to my cousin, who found it in an antiques centre, and brought it home to cherish.
It is crisp, and bright, and beautifully made, definitely by hand, and with some very ingenious Making Do. The lines of stitching marking out the edge of the central section are in a fine herringbone stitch, and in the case of the short ends they cover a join. Obviously the fabric wasn’t wide enough to achieve the length needed, so additional fabric was added at either end, and the joins camouflaged with stitching. This is just exactly the sort of trick suggested in some of my collection of “The Needlewoman” from the Thirties.
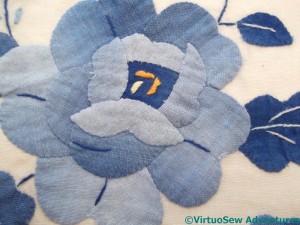
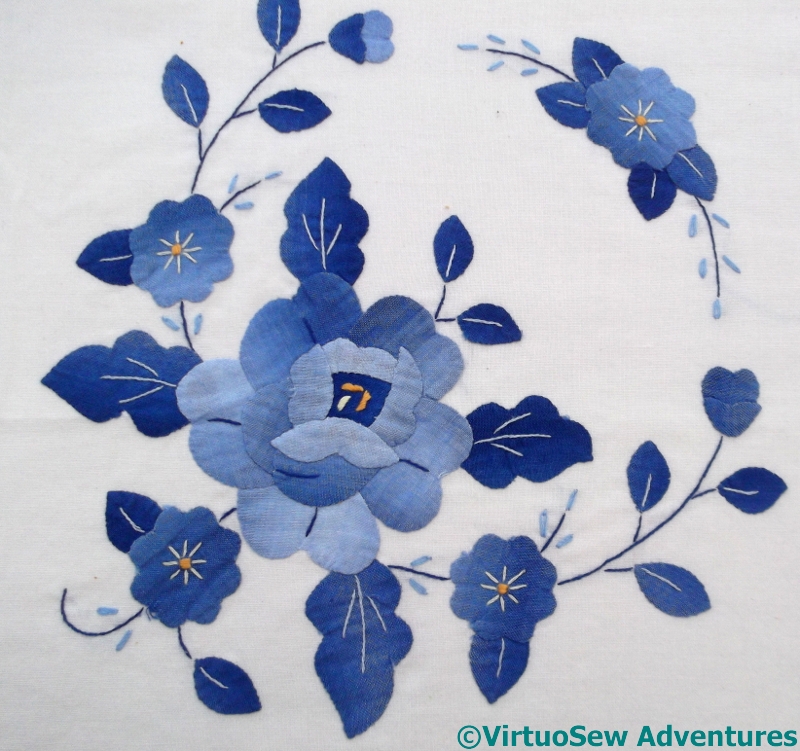
Applique Rose
And this close up shows even more. I wondered at first whether this might be an example of bias binding used decoratively – another popular technique in the Thirties and Forties, and mentioned in several of my older books on needlecrafts.
Looking more closely, however, we don’t think so. The fabric used for the applique is rather finer than I would expect bias binding to be, and besides, there’s the unevenness of the colour.

Applique Tendril
That unevenness, although nicely graduated, is rather straight-edged, too. My cousin and I found ourselves wondering whether the pieces for the applique had been cut from the best bits of an old, sun-damaged piece of fabric, maybe a curtain-lining, or something similar.

Corner Motif
If it is, it is absolutely the most striking case of making a silk purse out of a sow’s ear that I have ever seen in my life.
The selection of the dark and light pieces of fabric, and the way that the large blocks of colour in the applied sections are lifted and highlighted by very delicate embroidery – and just enough of it – speaks of a very accomplished needlewoman indeed.
It is utterly enchanting.

Supervising A Trench
As I got nearer the foreground figures, I tried to pick broader stitches, or at least stitches that were a bit more emphatic. This group was great fun to do, starting with the Gufti with his staff of office (Portuguese Knotted Stem!). The Gufti’s robe is Feather stitch, as are some of the twists of his headgear. I concentrated very hard on keeping the stitches even and close so that the “density” of the stitch would be maintained. The one in dark gold is in double interlaced back stitch, except for the top of the headgear, and the waistline – those are whipped backstitch. The other one is in one of the Elizabethan stitches from Jacquie Carey’s book.
I had fun with the supervising excavator – the brim of his solar topee is the Hungarian Braid chain, and I reversed the direction of the chain stitch for the peak of the crown. He’s also the only one with fair hair and pinkish skin, and I dressed him in a pale, tailored jacket.
The two at the front are another mixture of stranded silk, stranded cotton, and round silk thread. The golden veil is coral stitch, and the tunic below it is stranded silk chain stitch, and the dark golden tunic is stranded cotton and twisted chain stitch. I’m trying to make choices of stranded or round yarn that will suit the stitch.

Two Diggers
I worked these two diggers on World Embroidery Day – which I hadn’t even known existed until the day before, so I was very glad I was able to sit and stitch!
I went back to my Edith John books for these two. The front one is in Shell Chain stitch, which I first used on the Circle Skirt. I won’t say it’s a favourite, but I have rather taken to it, and it creates an interesting effect.
The one behind is a very peculiar stitch, a combination of twisted chain stitch and open chain stitch. It creates a very square appearance, with the twisted chain alternating from side to side of the open chain, and it is called, rather predictably, Open Twisted Chain Stitch.
I’ve been hit by a fit of the tidy-ups and spent a couple of days rifling through some shelves to try to make more sense of them, and I’ve found a couple of things I’ve not seen in years…
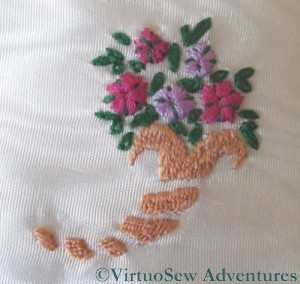
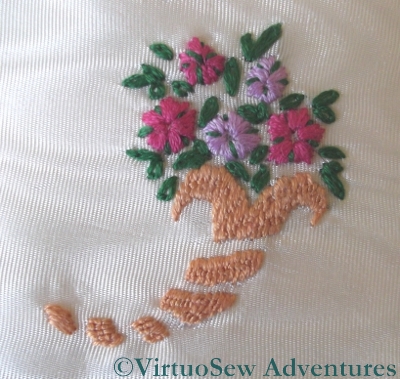
Cornucopia Of Flowers
This little cornucopia of flowers is rather cute. I found it in a nineteen seventies book about needlecrafts, which is rather a surprise because I don’t think it is a very nineteen-seventies sort of design – and some of the others really were! I’ll try to find the book to tell you what it was called. It’s the same book that I found the girl and her doll described in this post about another forgotten project.
In a fit of masochism (I can’t think of any other reason!) I worked it on watered silk, which is very closely woven and was a severe trial. I had to use sharps rather than my usual embroidery needles! The flowers are satin stitch (I was gradually getting over my aversion!), the leaves lazy daisy, and the sections of the cornucopia itself are in Roumanian stitch, which creates just enough roughness of texture to be interesting.
I think that now I have found it again I shall mount it on a round or oval card (like the Glittering Snail) and add it to the winter decoration corner.
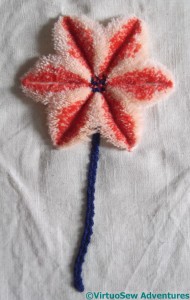
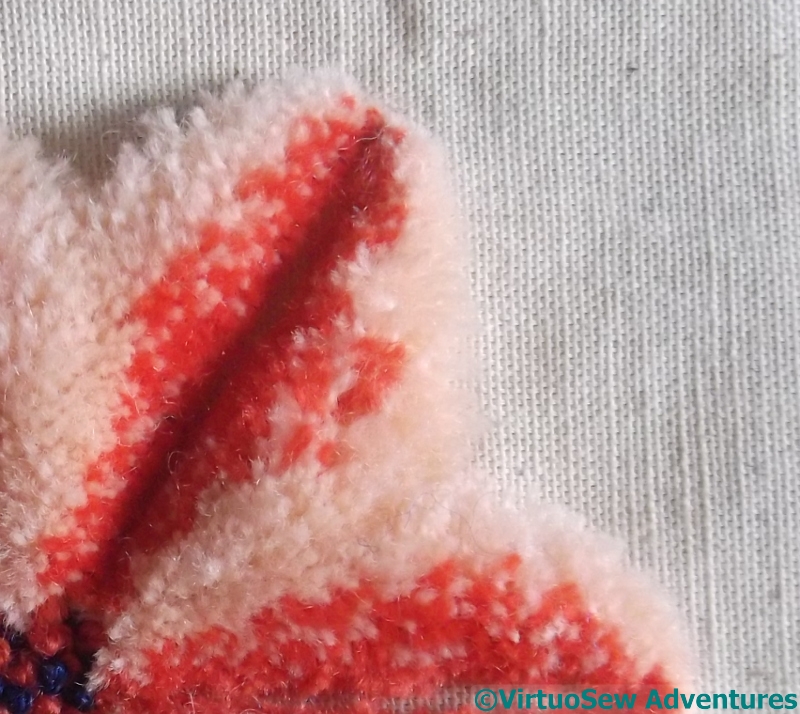
Finished Woolwork
I wrote about this woolwork experiment in 2011, and the last time you saw it, the metal template was still in place. I found it in a box of fabrics that might make good backgrounds, but clearly all I had done was to fill in the centre, add a desultory stem, and sit back and stare at it. Unfortunately, I’m none the wiser as to what to do with the completed piece, or what I might do with the technique…
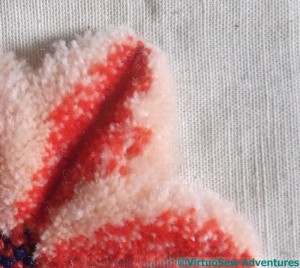
Close Up Of Woolwork
Doesn’t it look wonderfully woolly, though!

Closer Group..
Having decided I needed to Have Courage and Dive In, I realised that maybe sneaking up on this panel was the way to go. Unless I immediately hated an experiment, I didn’t take it out – and sometimes not even then. Sometimes you need to stare at the thing that is wrong to work out Why, before you can even think about What Else.
This group are in the middle distance, close enough that some details are beginning to be visible. At the same time, I didn’t want to make the detail too detailed, if you follow me. Coral stitch, fairly closely spaced, forms the outline of the middle figure, and the tunic of the furthest is in reverse chain stitch.
I find that reverse chain is much easier than ordinary chain stitch to work when the fabric is in a frame, and this panel was in and out of the hoop, depending upon the stitch and the mood I was in. As I do more and more embroidery, I’m beginning to find it easier to keep a sensible tension without a frame, but then the baskets were easier in a frame!
On His Own
Getting still closer, there was this fellow, all alone in his own little trench. I wonder what he’s found?
He’s worked in Pekinese Stitch, using one colour for the back stitch, and another for the interlacing. His hat is double interlaced back stitch in the same threads – round silk threads from Mulberry Silks, like the central figure in the top group. The others are in a mixture of stranded cotton, stranded silk, and another of the Mulberry Silks yarns.
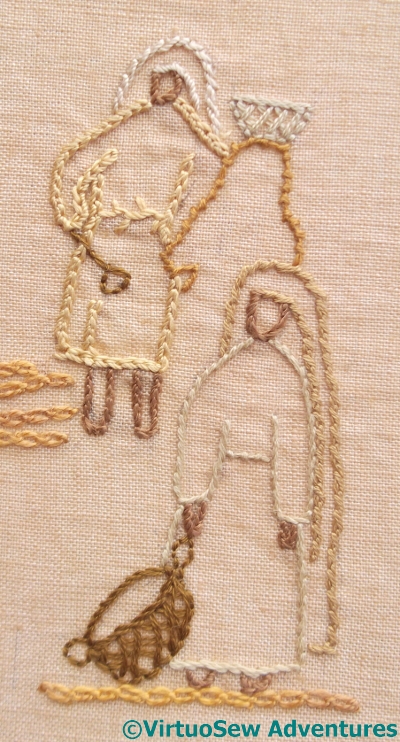
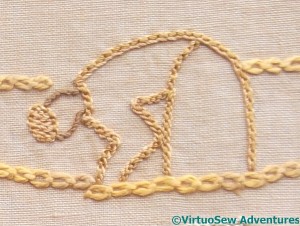
Clearing Spoil
I’ve only just realised that the design involved remarkably few people taking spoil away from the trenches, but at least there are two. I put a border on the tunic of the middle person, using a rather interesting blanket stitch variation from one of my Edith John books. The most distant person was in Portuguese Knotted Stem stitch, which is one of my longest-standing favourite stitches, and the girl at the front is Hungarian Braided Chain stitch, which is one of my newest favourite stitches.