
About Rachel
View all posts by Rachel
More on the Packing Case
A New Approach
Having unpicked my experiments, I decided on a new approach..
Actually, a digression here. A lot of people talk of test-stitching, by which they mean trying something out, but not on the real thing. I did that with all those goldwork stitches in the Tudor and Stuart Goldwork Masterclass, but as a general rule, my experiments do happen on the project itself. As much as anything else, this is because it is the interaction between the fabric, the design, and the thread that I am experimenting with, and if I take one of those out, I’m not testing what I need to test. I have a picture in my mind of the effect I want to achieve, but it is rarely detailed enough for me to know what to do at every point before I even begin. Instead, I rely on the project to tell me what it wants next, and while some projects are sullen (they know who they are!) others are talkative beyond belief. This one, so far, occupies the middle ground!
Top Surface
End of digression.
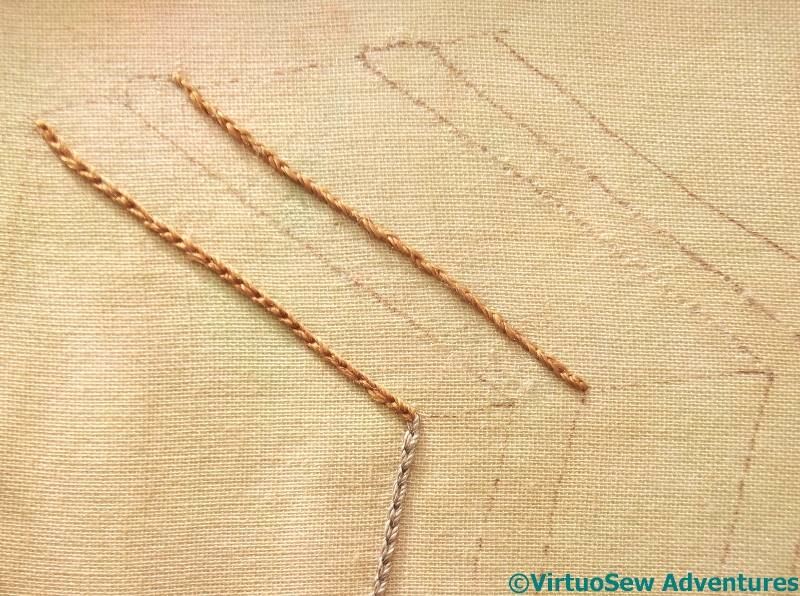
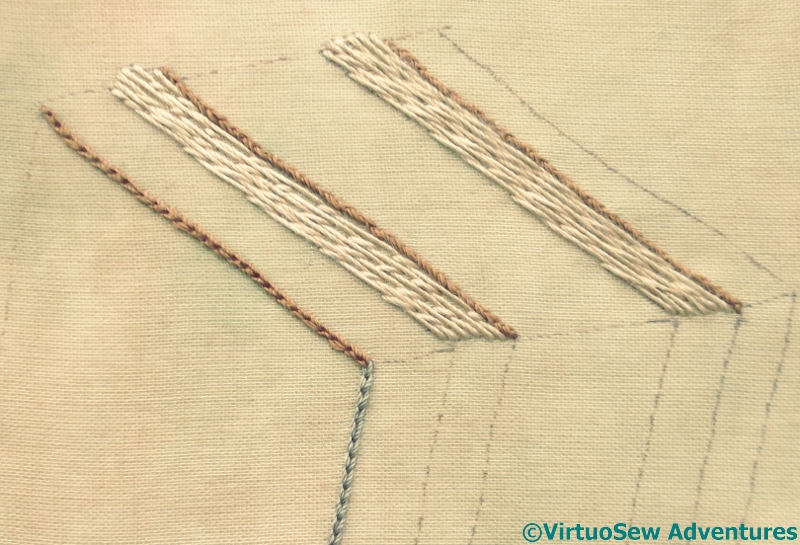
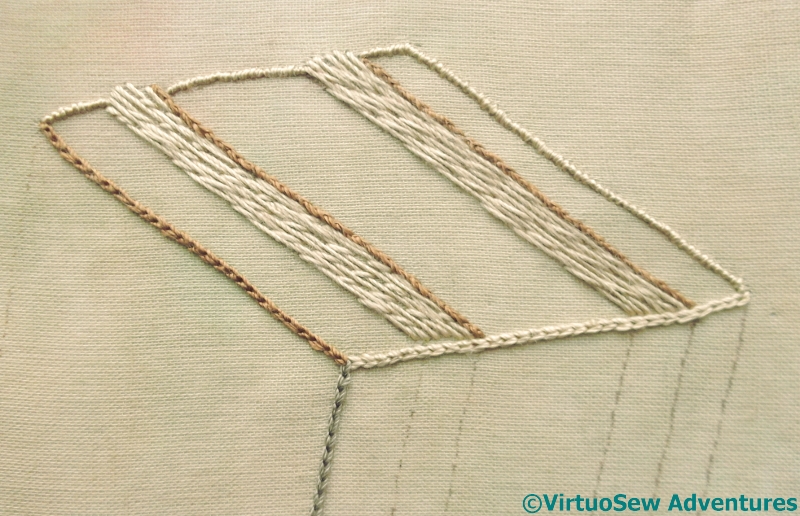
Since I had decided on how I was going to work the reinforcing boards, I decided that it might – possibly! – make sense to work some of the dark shadows to help me with their edges. I’m using the warm brown as the dark edge on the top surface, to keep the sense of bright sunshine, and the greyish colour for the front surface which is in a more even shadow. I will be combining the grey and the yellow in the reinforcing boards to help confirm that effect.
Top Edges
I also need to make sure that all the edges are clear and won’t fray. A packing case holding delicate antiquities should be a solid looking object, not one suggesting that even a gentle tug will take it apart! Just to give that sense of solidity, I have worked an overcast trail along each of the top edges that will be cut, whereas the edges that are within the piece of fabric are worked in reverse chain stitch. So far..
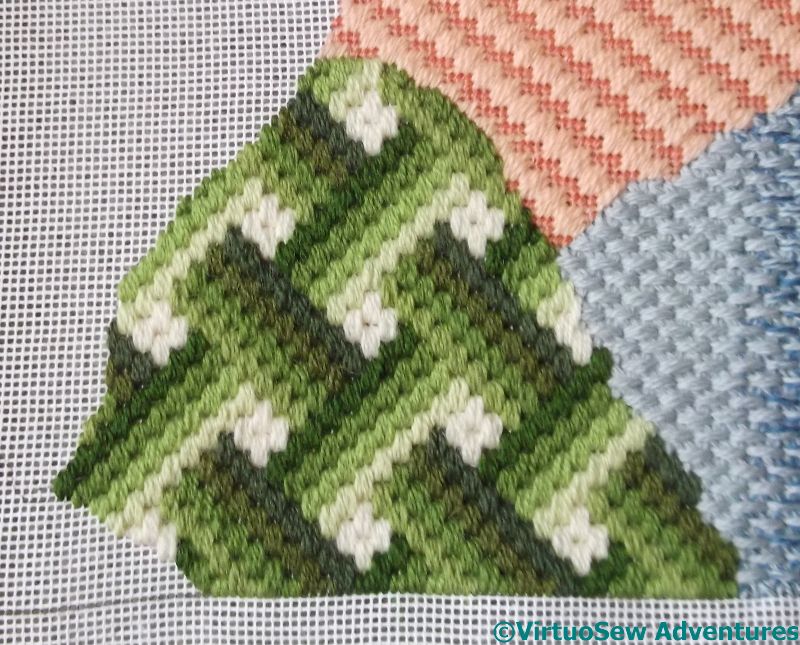
Crazy Canvaswork Cushion – Part 8
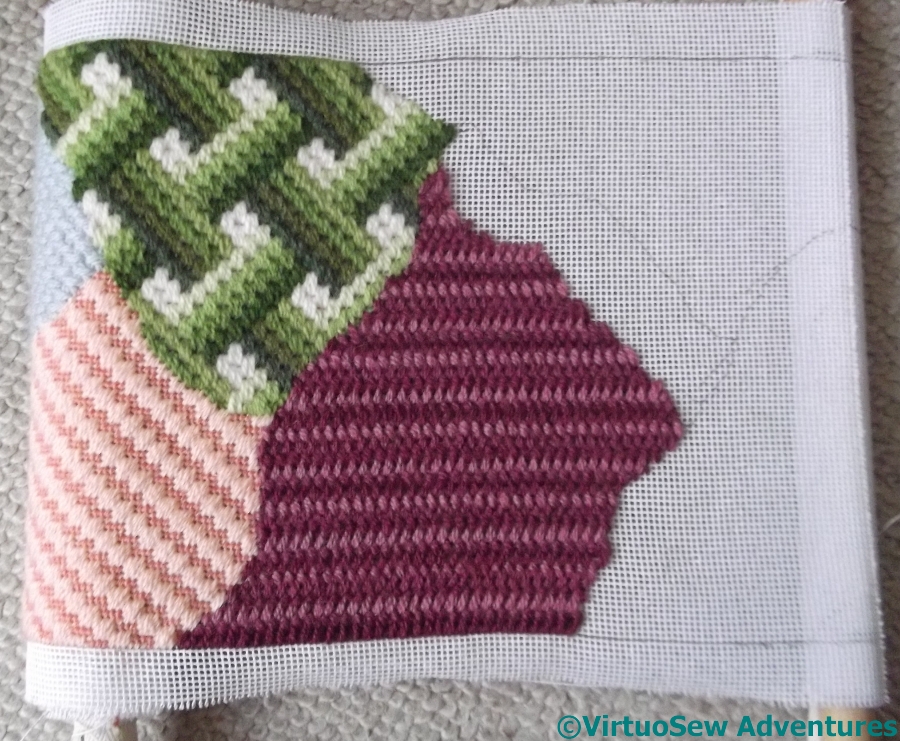
Section Twelve
Moving on…!
I’ve made something of a principle of alternating the types of stitch as I progress along the Crazy Canvaswork Cushion, so as far as possible a crossing stitch is followed by a diagonal stitch, and a diagonal stitch by a straight stitch. This is part of my strategy for making an abstract, random piece slightly less random, and more under control.
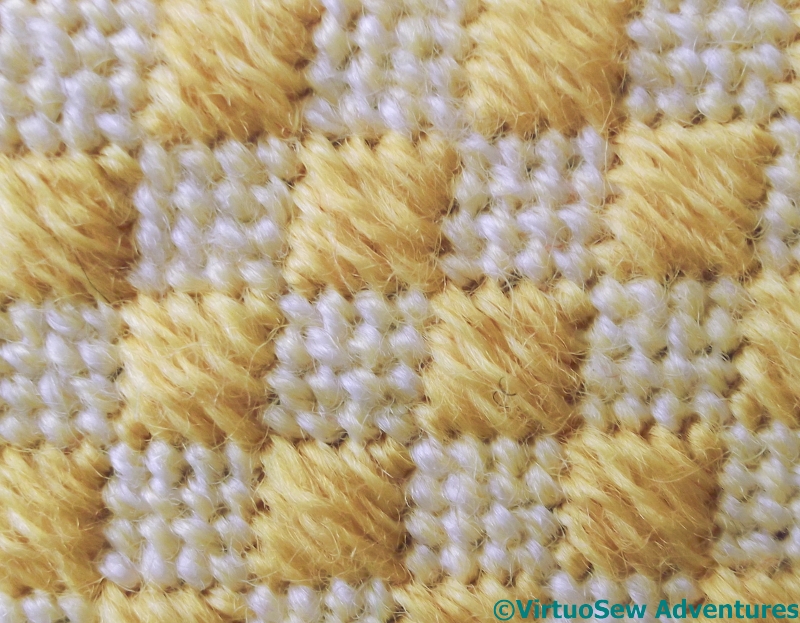
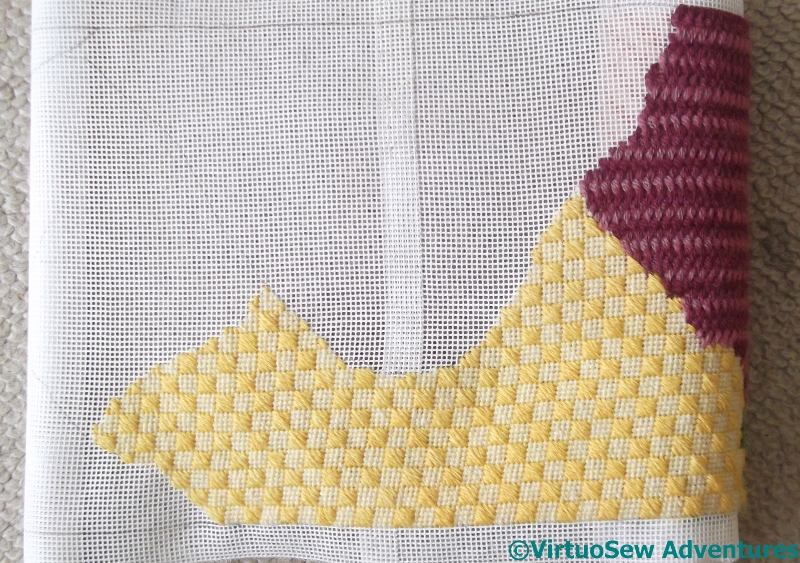
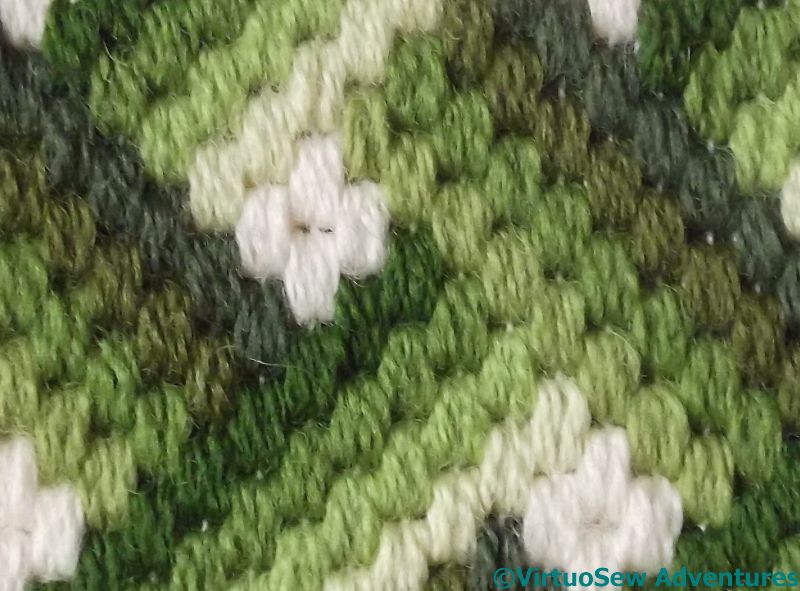
Chequer Stitch
In this case I also needed a sturdy stitch that would help to confirm the “weld” of the canvas, since although it had been tight when I first worked it, the pieces of canvas moved against each other as I worked the earlier sections.
I picked Chequer Stitch because it alternates squares of tent stitch – which will control the two layers of canvas very firmly – with squares of diagonal straight stitches.
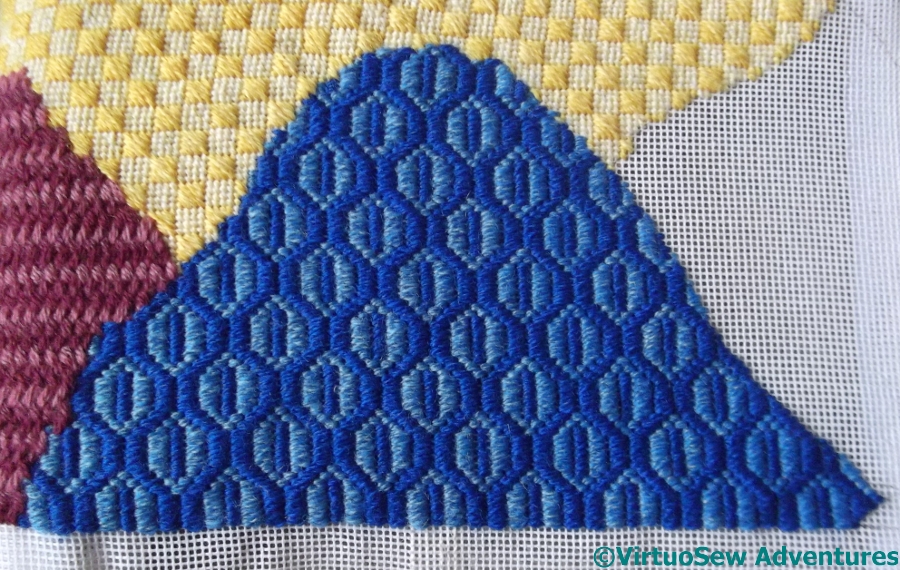
Section Thirteen
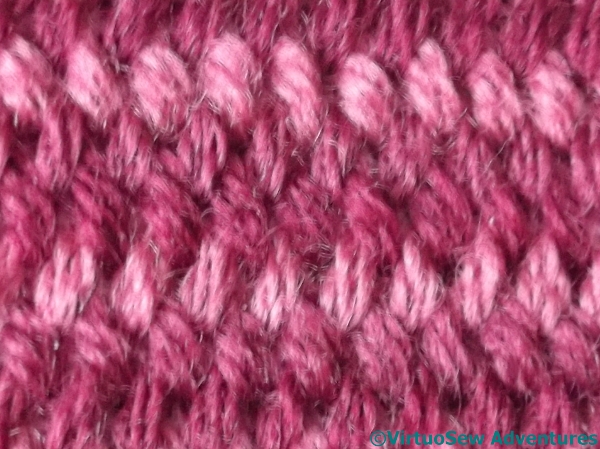
Section Thirteen is actually a fairly simple Bargello lozenge pattern. I realise – rather late – that this may be the only place in the cushion in which I have used a straight stitch pattern, with the straight stitches oriented parallel with the long sides of the cushion. I am going to have to hope that this doesn’t make the section stick out like the proverbial sore thumb when I finally unroll the whole thing!
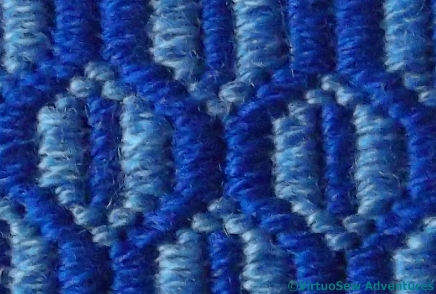
Bargello Lozenge
I found the Lozenge pattern in the “Dictionary of Canvaswork Stitches”, by Mary Rhodes, which I must have picked up in a second-hand shop somewhere, and a quick look inside shows it was a library book before that. It’s marked “Copyright 1980”, but I think there is a rather 1970s feel to this pattern. Thank goodness I didn’t choose to work it in brown!
More progress on Loading The Felucca
Testing Placement
While I was working on the packing case, which is the first embellished section I will be applying, it occurred to me that for those occasions when the light was a little marginal (grey-ish yellow is a difficult colour to stitch in poor light!) I could perhaps prepare a layer that would be applied to provide the shadow on the ground.
I traced the approximate shape and used the tracing as a pattern piece. The fabric is – as are most of them – a cotton from one of the plethora of quilting and patchwork stands I visited during last year’s Harrogate Knitting and Stitching Show. The print gives a sort of scrunch-dyed effect that I thought might help to create the appearance of broken, shadowed ground.
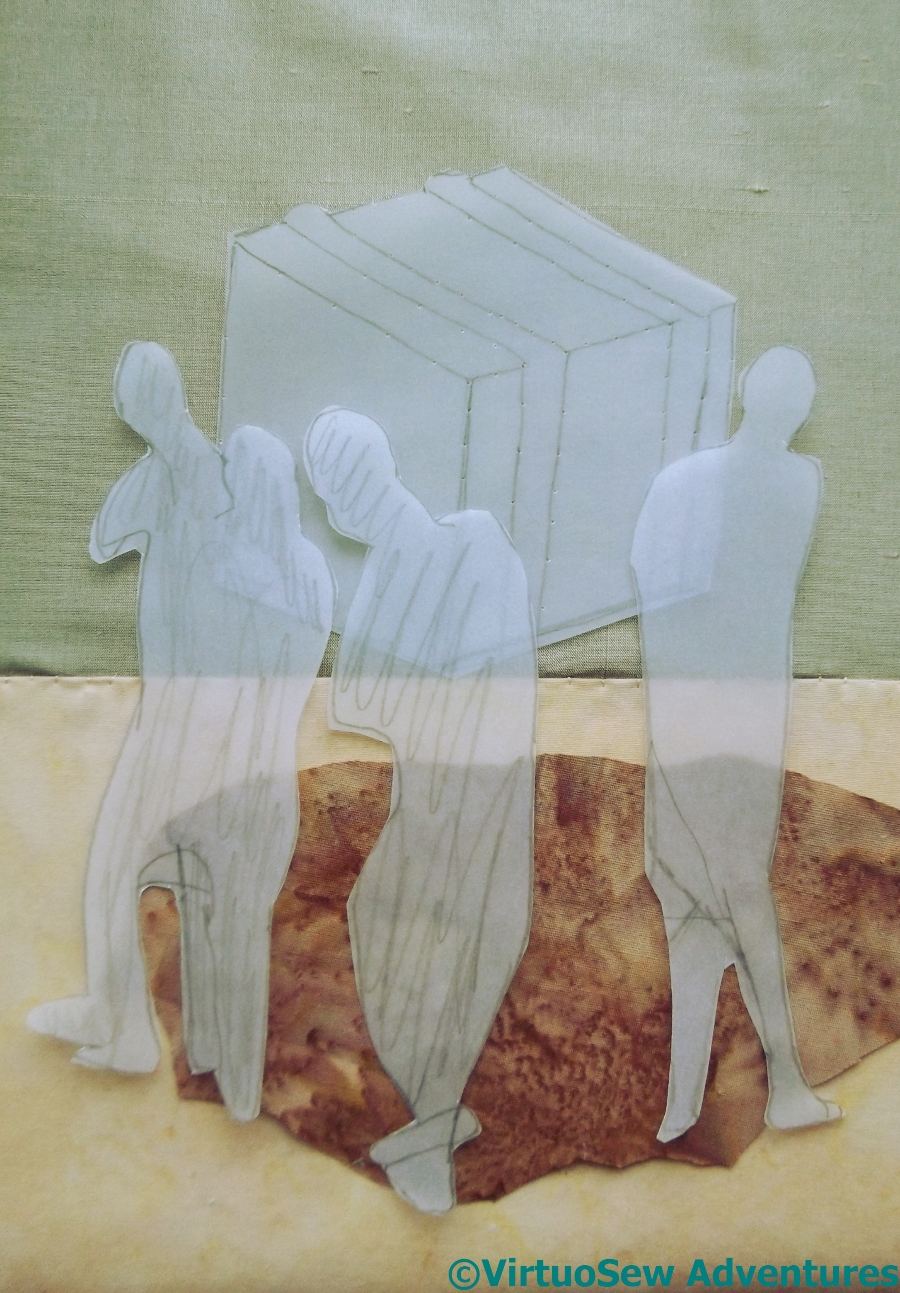
Then I realised that placing it sensibly demanded that I bear in mind the other main pieces. I’ve cut out the tracing I used for the packing case, and the forms I intend to use for the people, and spent a bit of time juggling the positions of each element.
The people, by the way, are not supposed to proper people shaped from an artist’s model. Some of the shapes have extra legs, and one of them is two people blended into one. They will be differentiated by their clothing, or at least so I hope!
Shadow Attached
As it happens, attaching the shadow didn’t take as long as I expected. I decided that edging the fabric with blanket stitch would create a hard edge which would counteract the idea of the shadow going over broken ground. I may even choose to add stitching to break up the edges even more when the figures are in. I have learnt over the past few years not to overdo detail on one section of a piece like this until I have some sense of how the whole thing is going to turn out!
I am expecting to crop this piece very close, to concentrate attention on the figures and their burden, but I learnt with the Camberwell that it is easier to have some leeway around the edges of my project!
Loading the Felucca – starting on the packing case
Decisions Decisions
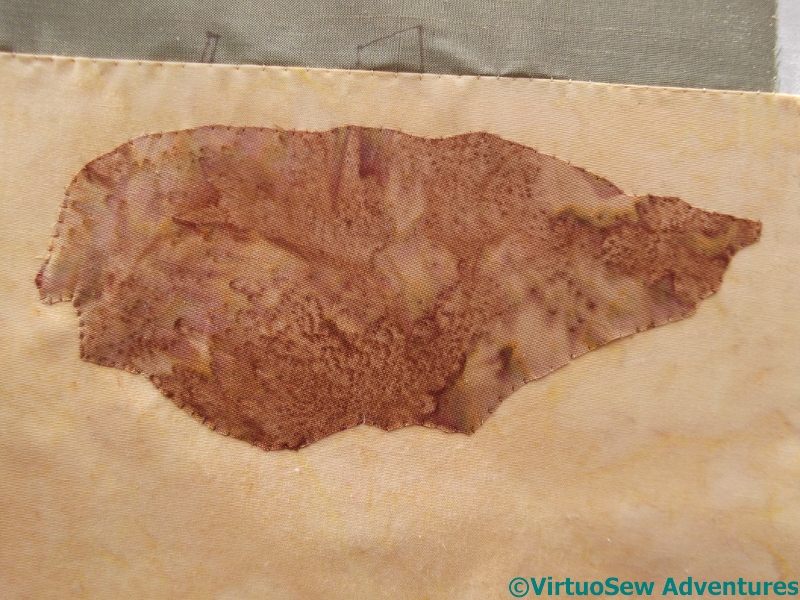
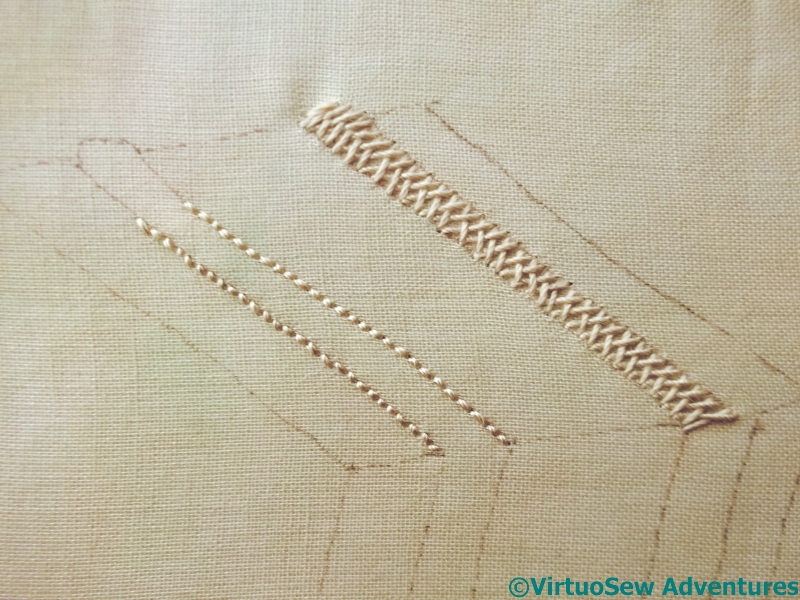
Since appliqué is a layered technique, I had to work forwards from the most distant object. For this subject – once the background was in place, that was the packing case.
The first thing I had to do was to work out how I was going to represent the lengths of wood running as bracing all around the box. My first thought was to use reverse herringbone stitch, as I did for the contour lines on the Map of Amarna, but as I was stitching it I became less sure.
I worked the other band in ordinary herringbone stitch, then sat back and frowned at the frame for a while.
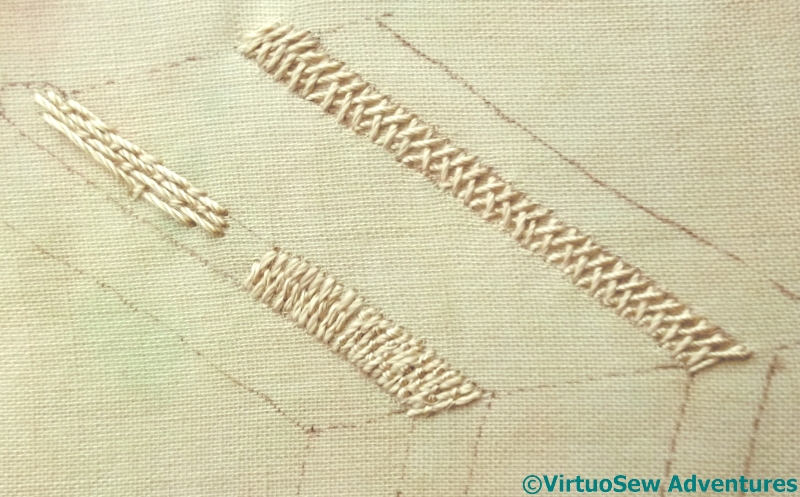
Still More Decisions
The result of my frowning cogitations was that I decided that I definitely didn’t like the reverse herringbone stitch, and wasn’t totally happy with the standard herringbone stitch either.
I tried variations on couching stitches – Bokhara Couching and Roumanian Couching, in the lower half of the nearer band – and was no happier.
Just as well I enjoy these puzzles, isn’t it!
Finally it occurred to me that the grain of the wood would be running lengthwise in these pieces of wood, while in the planks that make up the box, the grain would appear to run across the box. The stitching I had tried had given the impression of the grain running across the bracing struts. So I tried Bokhara Couching again, but running lengthwise.
That’s better, I think, but the next task is all that unpicking.
Tudor Rose Turned Into a Panel

Tudor Rose (Finally) Finished
At long last I got a chance to finish up and turn the Tudor Rose into a little mounted panel. I got a local framing shop to cut me two pieces of acid free mount board, and mounted it over one of them, with a little padding to bring it to life. Then I covered the other (also with wadding) with some upholstery fabric that happened to be to hand, and overstitched the two boards together.
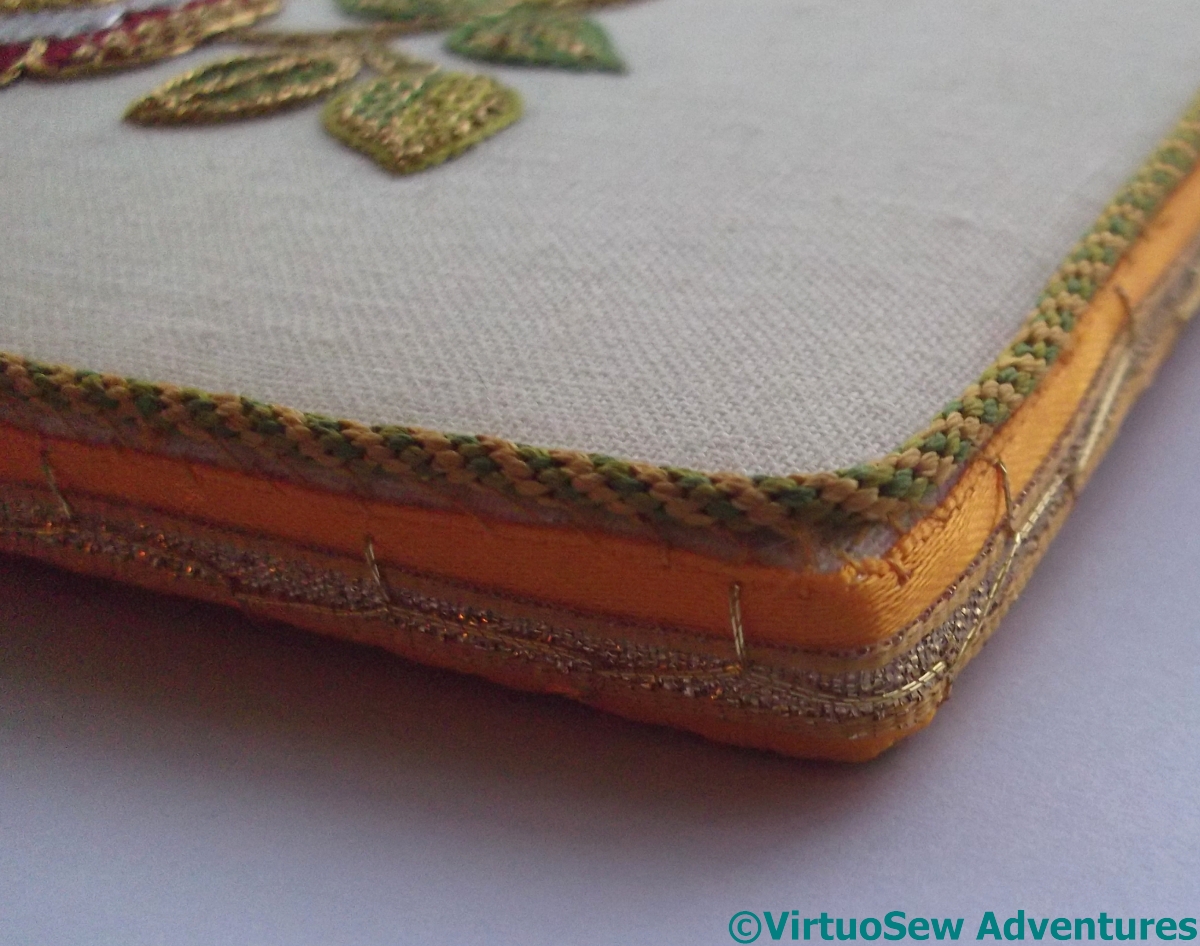
View Of Edges
I covered the overstitching with a ribbon trim left over from when I finally mounted Christus Natus Est (whoo-hoo, some stash busting achieved!) and then, at some length and not without difficulty, attached a fine kumihimo cord around the front edge of the panel to frame it nicely.
It will go in that famed (and so far, still mythological) Winter Decoration Corner that I keep on talking about – when I finally create it.
Loading the Felucca
Loading The Felucca
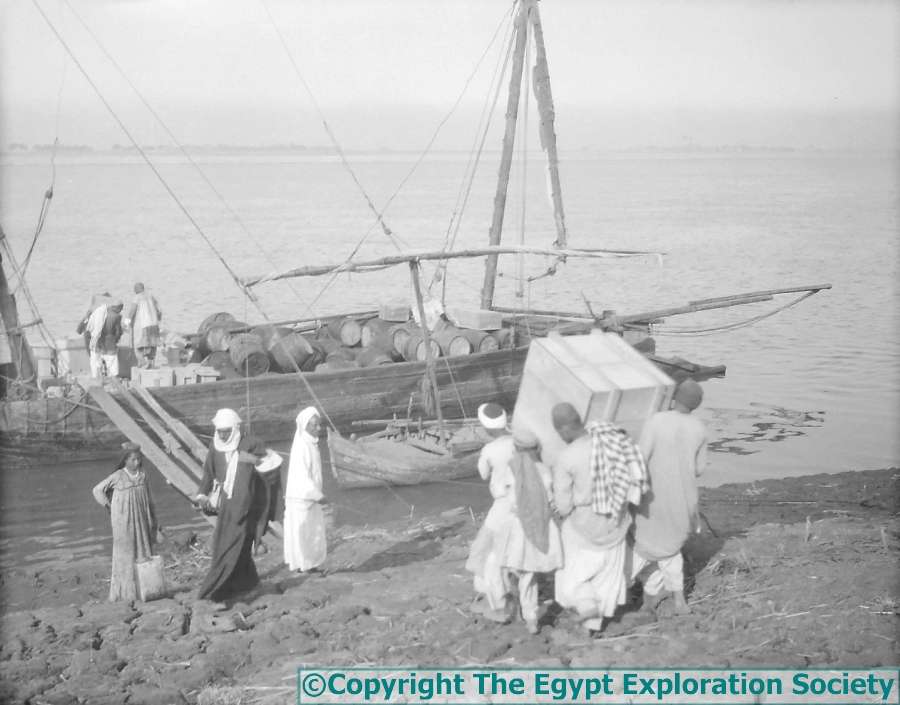
Here is another one of the photographs from the Egypt Exploration Society that I would like to represent in some way.
The expedition felucca was loaded with all the excavated finds and taken to Cairo so that the Cairo Museum Director could choose what would be retained for their collection. The carpenter spent weeks making special boxes to carry the more delicate finds, like Hatiay’s carved door lintel, and a large section of decorated wall plaster (more things for me to embroider!). Then everything had to be loaded on to the felucca…
First Layer
I’ve decided to concentrate on the group carrying the packing case. Partly this is because the whole photograph is a little confusing and difficult to decipher in places, and partly because they rather drew my eye, and I want to experiment with appliqué. What I hope to do is “dress” each figure, so the folds of the fabric I use creates the folds in the garment. I have no idea whether this will work, but if I don’t try I will never know!
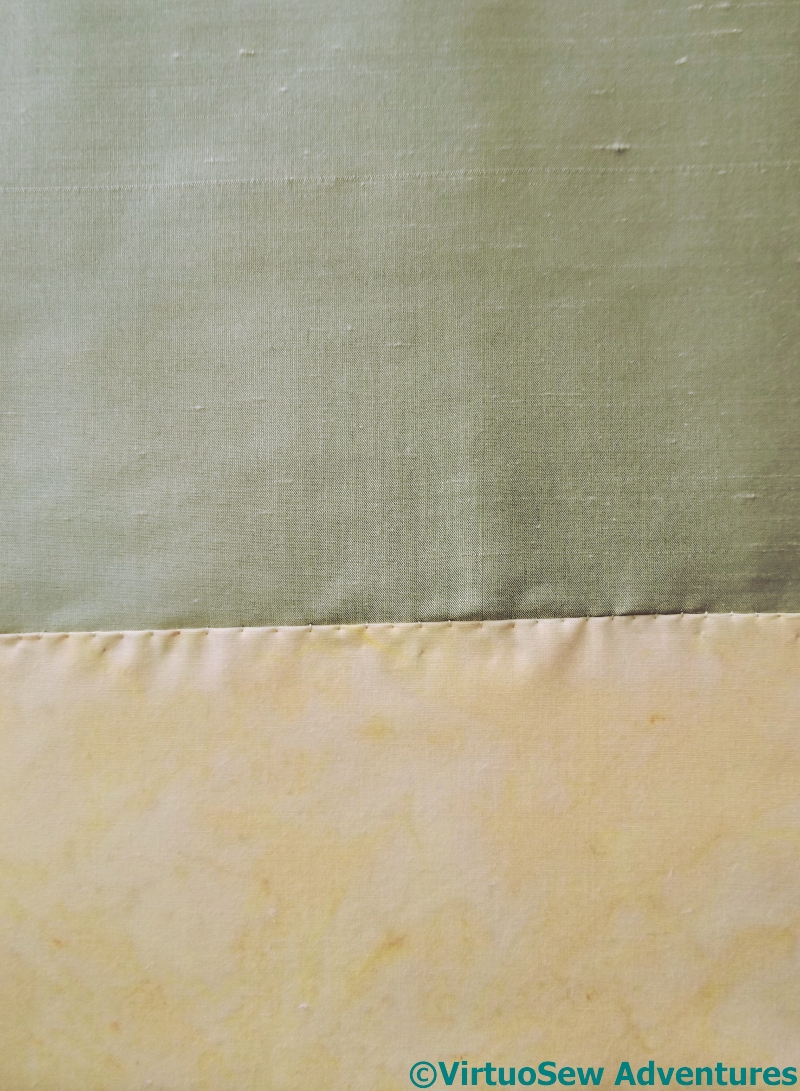
Last time I was at the Harrogate Show I found myself in unfamiliar territory, frequenting the patchwork stands, in search of suitable fabrics for the ground and the clothes. I’ve used a piece of silk dupion from The Silk Route for the river. It’s a pale grey-green, and I think I will have to find somewhere else to use it to pull it into the overall design properly, but it has a lovely subtle sheen that looks quite watery. I’ve attached it around the edges using strands pulled from the weft, because I have nothing else suitable. The ground is a sandy cotton, doubled because I could see the silk through the first layer, and attached using a single strand of stranded cotton from my stash.
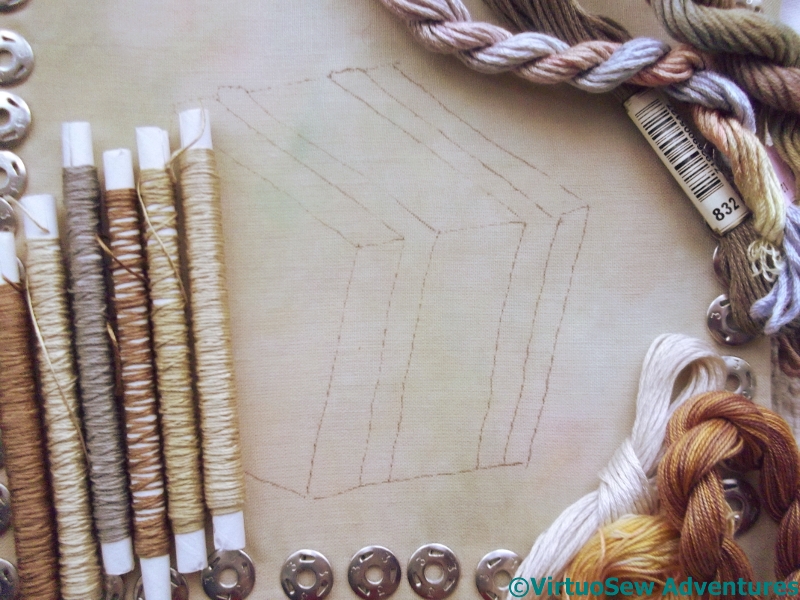
Threads For Packing Case
You last saw the fabric I chose for the packing case being used as the background for the Crock of Gold Hoard. It’s a flimsy overdyed turban cotton which won’t take much stitching without reinforcement, so I’ve backed it with a layer of white cotton to give it a bit more body.
Then I had a wonderful rummage in my stash, and pulled out a selection of silk and cotton threads to play with. The tubes are Mulberry Silks threads (also last seen in the Crock of Gold Hoard), and I’ve also laid out a linen thread, two Stef Francis stranded silks, and a couple of miscellaneous threads from I-Know-Not-Where.
This should be fun!
Crazy Canvaswork Cushion – Part 7
Section Ten
It has been ages since you saw the Crazy Canvaswork Cushion – I got stuck and fed up with it and threw it aside in a huff, but since I’ve now sorted out the frustration I can cry “Onward and forward!” and show you Section Ten, which against my original idea, mentioned in Part Six, of choosing a horizontally striped pattern, I chose a basketweave bargello pattern. This is a pattern I have been longing to use and never had a use for.
Basketweave Bargello Pattern
What hadn’t quite registered with me was the scale of the pattern. It’s easy to work, although getting the colour progression right is a little tricky when you’re stash-busting!
I did maintain the orientation of the dark to light in both of the colour sections, but I wonder whether the light squares are too light. One of the advantages of this project is that it will give me references in the future to help me to remember what I need to think about when I choose to use some of these stitches and patterns.
Section Eleven
Section Eleven was the problem that caused me to make disgusted noises and set the whole thing aside. I started the section using and interlocking and crossing stitch, but it didn’t cover the canvas thoroughly enough, I didn’t enjoy working it, and it was using a lot of thread. Now, I want to use up as much of my thread as possible, but I also want the shapes and sizes to balance nicely.
All of this made me downright grumpy with the whole thing.
Plaited Stitch
Finally, over Christmas (having packed everything else away so I would have to solve the problem!) I unpicked the stitch I didn’t like, and started again, leafing though my books of stitches and patterns. Finally, I chose Plaited Stitch. It creates the horizontal stripes I had first thought of for Section Ten, but it is a diagonal stitch, so it contrasts with the Section Ten I finally did, and it is a crossed stitch, which contrasts with the diagonal stitches and straight bargello stitches of sections Nine and Ten.
Gabrielle, the Christmas Angel – Part Two
And now, the Finale…
Gabrielle’s Wings – first stage
“Angels need wings. I have never made big wings before, only gauzy ones, so these grew a bit like Topsy! I had, fortuitously, a ball of crochet cotton which exactly matched Gabrielle’s dress, but I had already used crochet to make the lace on the overdress. Needlelace seemed an option if I could find a suitable former to hand. Wire proved to be too thin, and the thread slipped about, so in the end I made a frame from one strand of the plastic coated wire of electric cable. Yes, I know you can buy purpose made formers but I wanted to do it now.
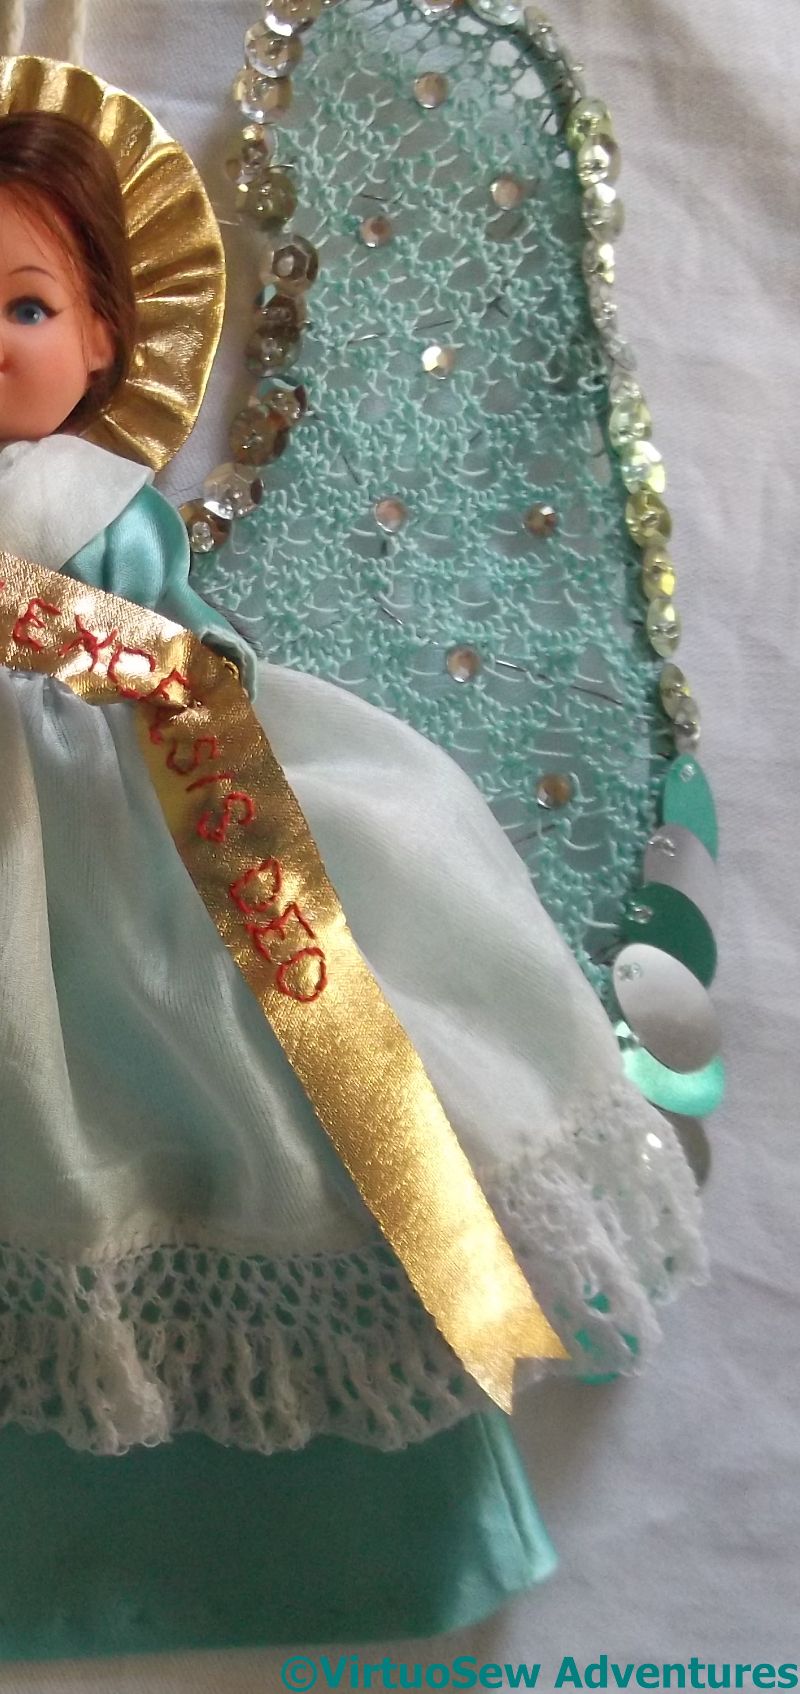
Sequins, crystals, and wire support
After drawing the shape on heavy card, and arriving at a good shape was an interesting exercise in its own right, I couched on the wire at widely spaced intervals, then covered the wire and its plastic coat in blanket stitch using my turquoise crochet cotton. Not only did this cover the wire but it provided a anchor for the needlelace itself. I used pea stitch at first then increased the number of loops in each group first to five and then to seven to add “weight” towards the lower edge. I hadn’t provided a former across that edge as I didn’t want it to be rigid, but needlelace requires just such an edge! A single thread helped a bit but a piece of applied crotchet finally did the trick.
She looked balanced, if a bit subfusc for Christmas, so I added sequins, left over from one of Rachel’s childhood projects, mainly cup-shaped but the lower ones are long ovals to suggest pinions. Again, the colours, turquoise and silver, were a perfect match. Some people have all the luck. Rachel added crystals to increase the “bling”. The halo is a cardboard former covered with cloth of gold. I used the gathered side to suggest an aura of radiating holiness and backstitched a banner “Gloria in excelsis Deo” in red on cloth of gold, too.”

Gloria In Excelsis Deo
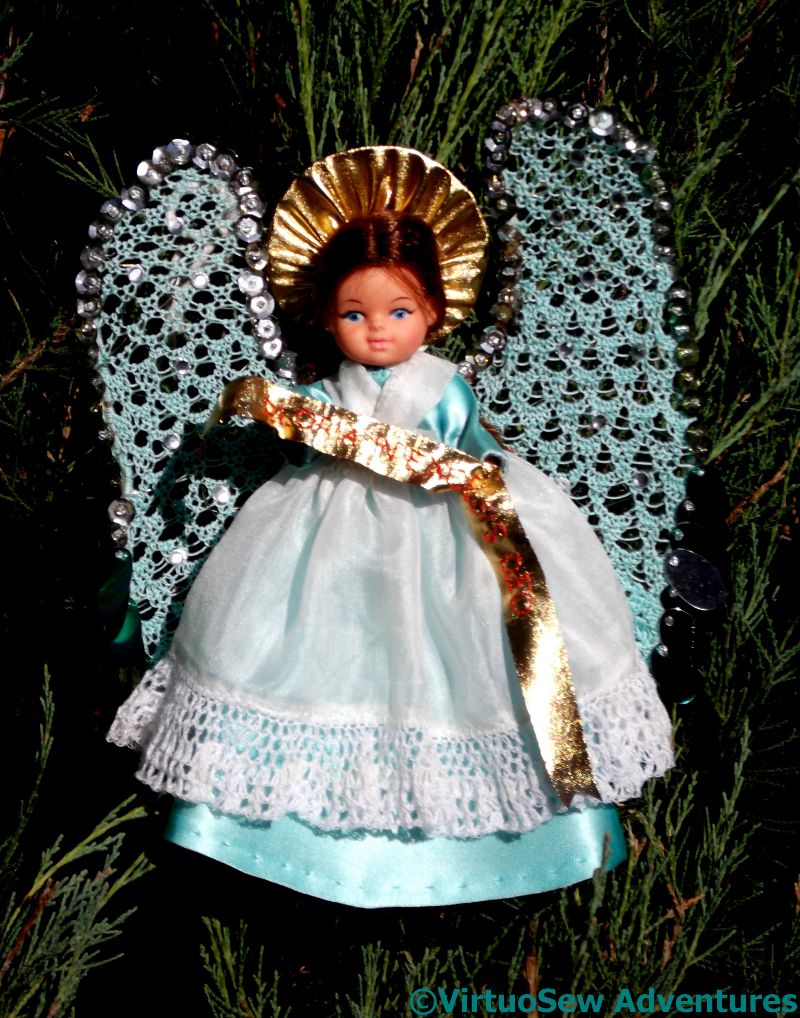
We timed our photography just right, too – the last sunny day of Autumn, before the weather turned thoroughly nasty on us…
Outside, hanging from a fir branch in the garden, Gabrielle made a remarkably effective member of the heavenly choir.
Gabrielle, the Christmas Angel – Part One
Gabrielle, the Christmas Tree Angel
Lest you imagine my talent for complex projects sprang out of nowhere, I have asked my mother to write a couple of guest posts about one of hers – Gabrielle, the Christmas Tree Angel. Gabrielle figured on our Christmas cards this year, and she took nearly a year because she was being improvised as she went along.
—
“Looking at my collection of crochet hooks, I decided that I needed to do something quickly if I wanted to use the smallest one before my eyesight made it too difficult. I am becoming increasingly long sighted as the years progress, and my myopic Impressionist wonderland is receding. Coincidentally, it was Christmas tide, and we had just rejuvenated Bethlehem. (Ask Rachel!) A Christmas Angel for the top of the tree seemed the next proper project.
Gabrielle herself is one of Rachel’s dolls, rediscovered when we were tidying the loft. She is just the right size for our Christmas tree. A rummage through my stash of cloth provided enough satin, a beautiful turquoise, and a square of fine silk which had been the Virgin’s veil when we made a crib one year using Rachel’s dolls as the cast.
To make the dress I cut out a cross shape wide at the top and bottom narrowing towards the crossing place out of the turquoise satin. The cross piece itself, which formed the sleeves, was short and narrow. I hemmed the cuffs and a small opening for her head before folding bottom to top and sewing the side seams.
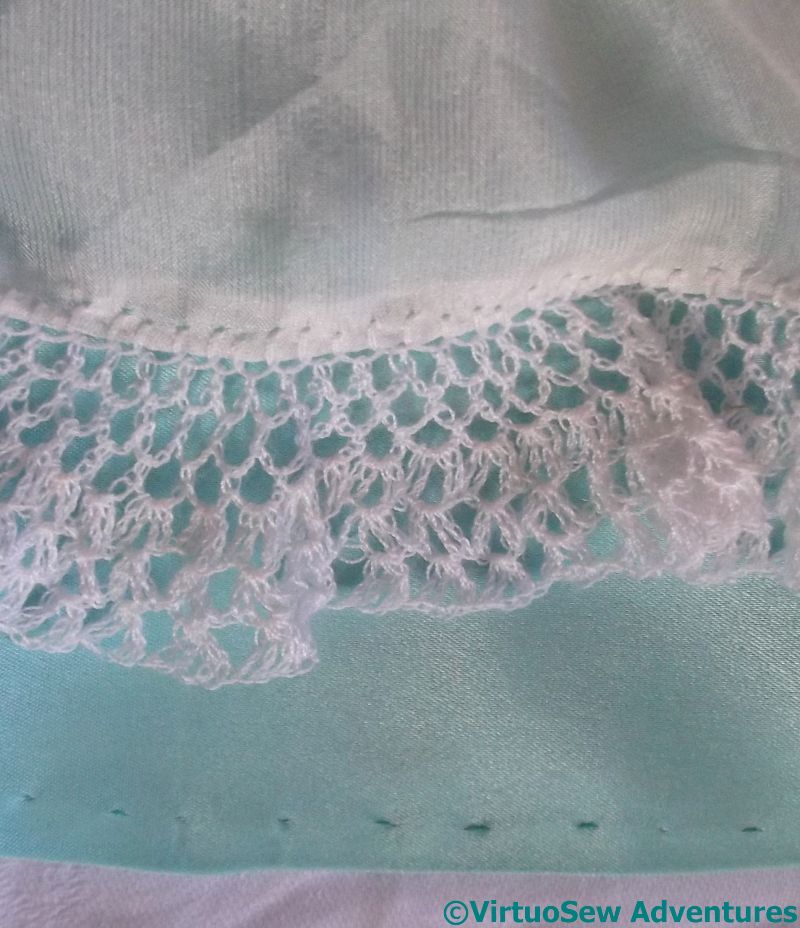
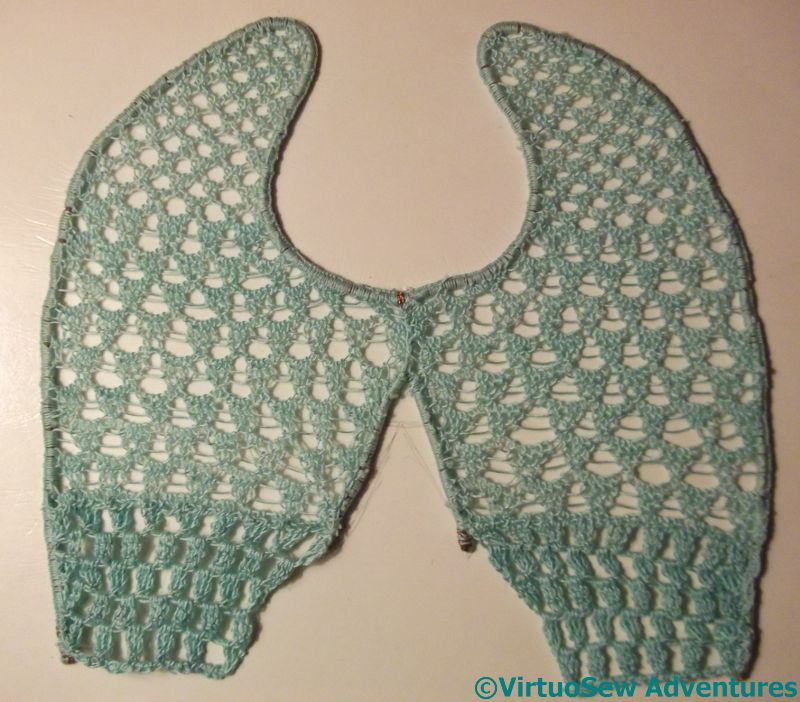
Lace Edging in sewing machine thread
Next I tackled the silk over-dress. A line of open blanket stitch along the selvedge gave me a base for the crochet work I so wanted to do. Again, I used ordinary sewing thread and kept the design simple. It was surprisingly easy to work. In no time I had a sizeable length of delicate lace.
The original intention had been to make a cottar such as altar boys used to wear, but the very small size and filmy silk made my stitching look crude. Instead I used two pieces of folded silk over the shoulders fastened lightly to the satin and covered the raw ends with the very gathered edge of my lace bordered silk. It looks more like a pinny, but billowing satin displays the lace beautifully.”
More Laid and Couched work – The Unicorn
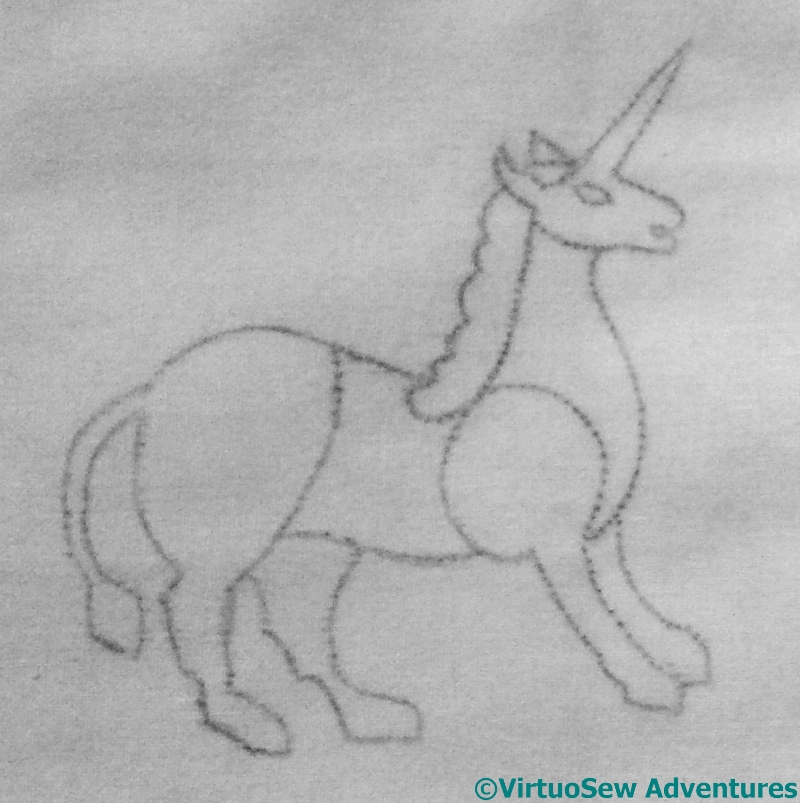
The Unicorn
I enjoyed working Rusty and Spots in the Opus Anglicanum Stitchalong so much I decided I wanted to do some more laid and couched work.
I rummaged around in my heraldry books and online for medieval unicorns (for a quadruped) and swans (for something winged), and produced something of a synthesis. Some of the medieval unicorns had leopard feet, and one of them had a curly, piggy tail. Mine has vaguely leopardly feet, and a lion’s tail. I’ve sized him so that he fills the same space as did Spots.
It occurred to me that I may want to work medieval creatures in the corners of the Vision of Placidus, when I get that far. I was going to use Rusty, Spots, and their friends, but then I realised that in that context, it would be more appropriate to the story of conversion to use the symbols of the Evangelists – the winged ox, ram, man, and eagle.
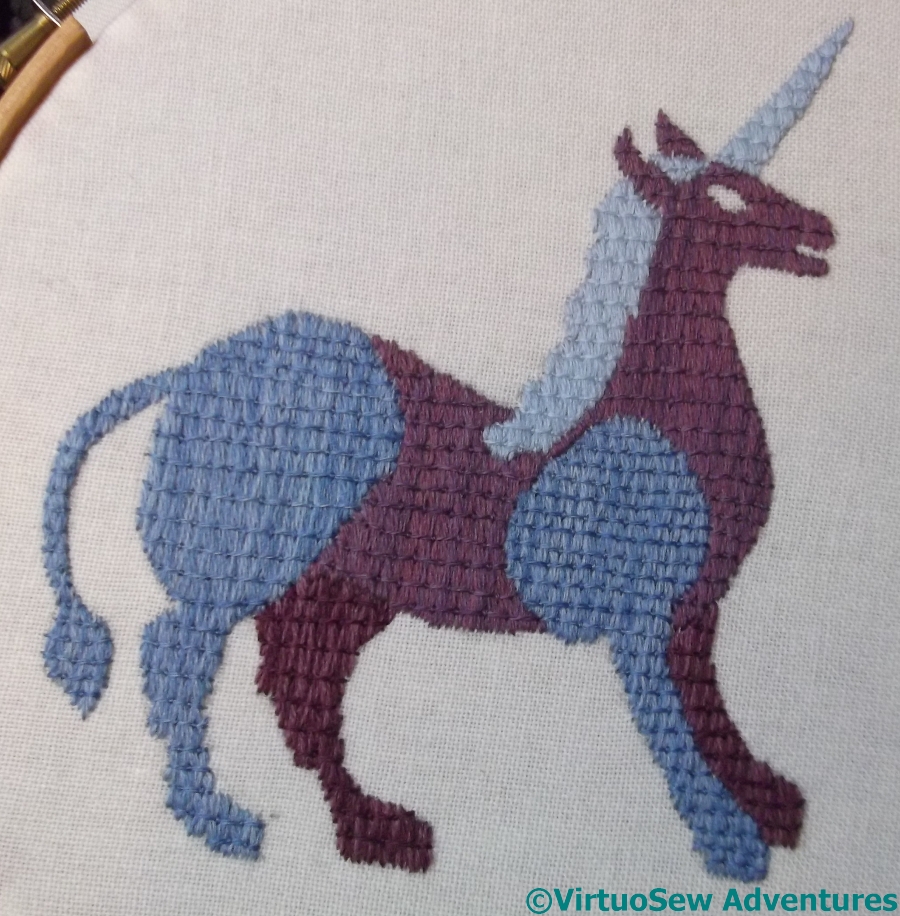
Unicorn – the first layer
So I’m still not sure what I will do with these present creatures when they are done..
Since I am using existing stores here, and I wasn’t sure I would have enough of the colours I used for Rusty and Spots, I moved on to a different colour range – purples and blues. These aren’t the slightly fluffy Appleons wools I used for the other two, but are rather smoother, softer version.
Again, I’m stretching out the colours by threading two colours in the needle for the underlayer. And my goodness, doesn’t it grow quickly!