
Tag: apparel
The Red Panel on the Nefertiti Shawl – Part Two

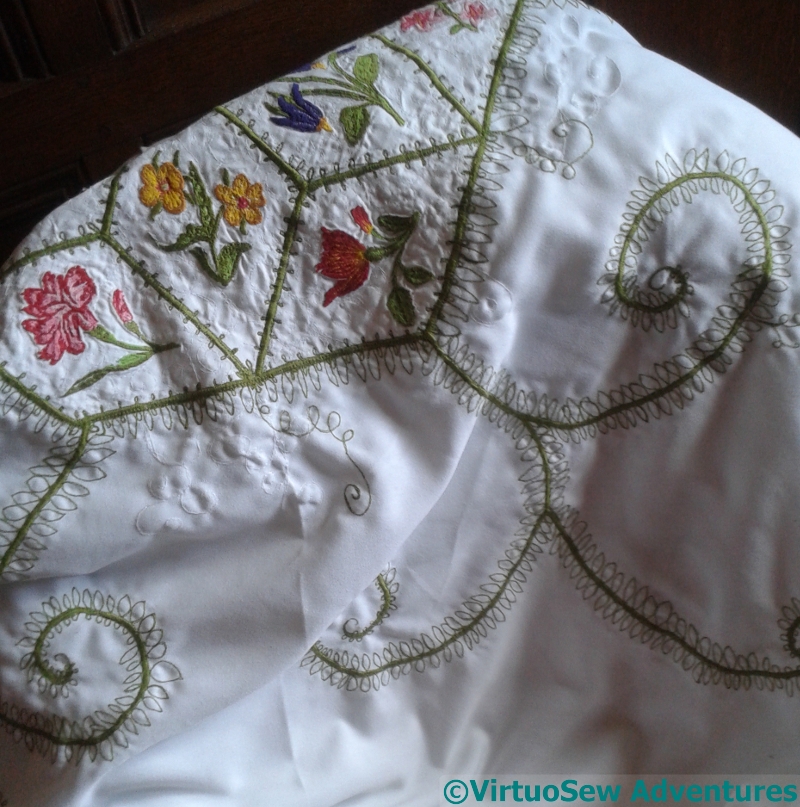
More circles..
Moving on to the next set of stitches…
The circles weren’t perfectly drawn, so the slightly wonky appearance of perspective is partly owing to that. The lighter coverage is Cretan Stitch. I often have trouble using cretan stitch in my more figurative projects, so I’m hoping that being reminded of it will help me to find uses for it in future. Up and Down Buttonhole stitch is an old favourite, as long term readers will know. I’ve done it more neatly, but I always enjoy stitching it.
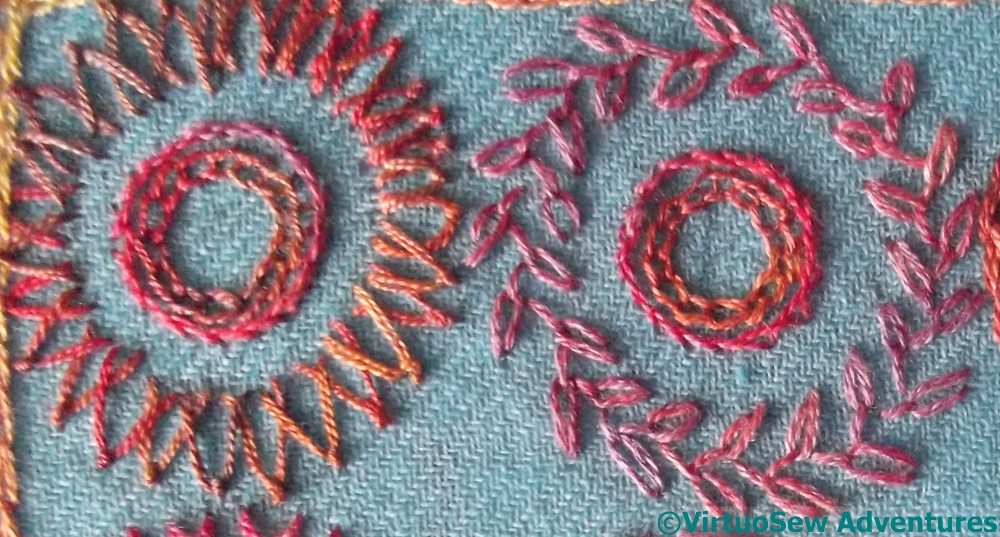
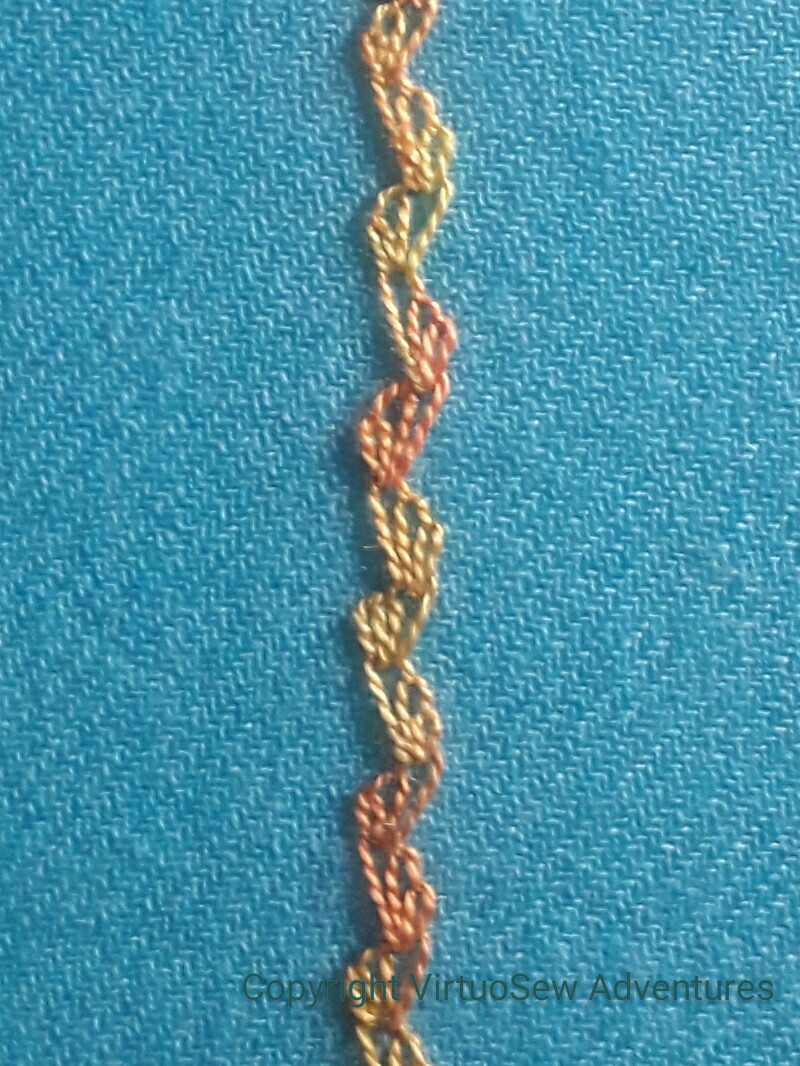
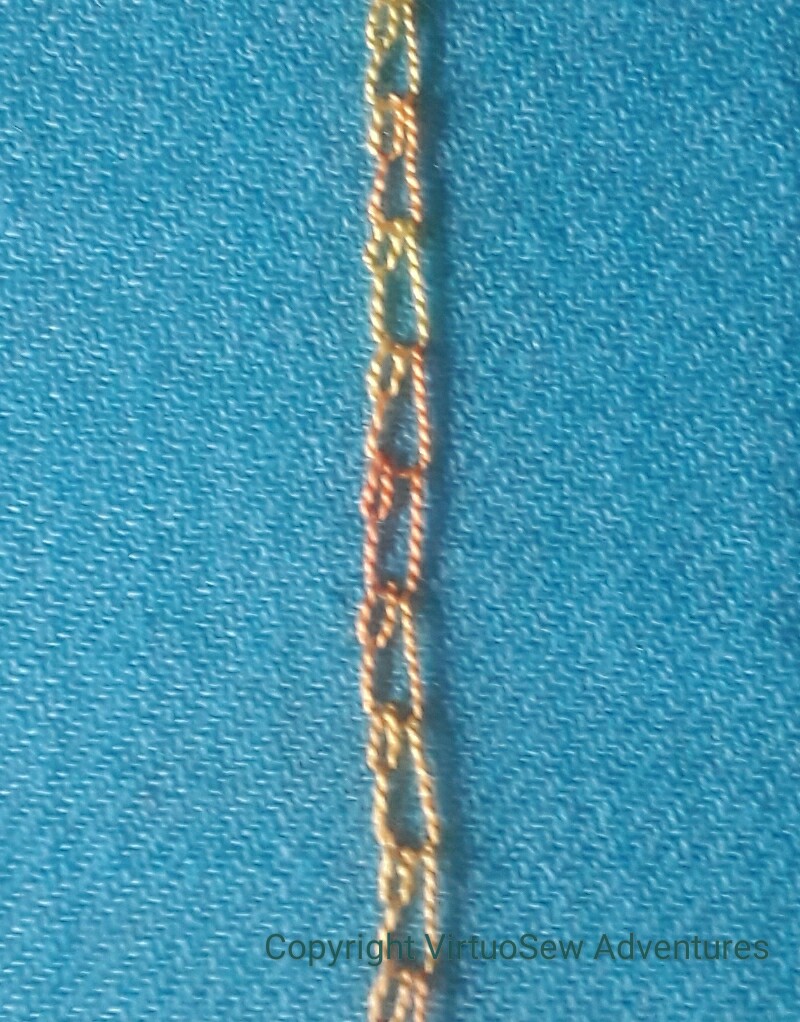
Still More Circles
This pair was actually among the last to be finished. Italian Border Stitch can be described as a fly stitch with a French Knot instead of a straight stitch. First I did a single row, and it looked a bit thin, so I added a second layer. Much better!
The second circle is in Chained Feather Stitch. This one curves well around the circle, and has something of the feel of a victor’s laurel wreath about it. Maybe an omen for me finally finishing the Dreams of Amarna in the next year?
The Red Panel on the Nefertiti Shawl – Part One
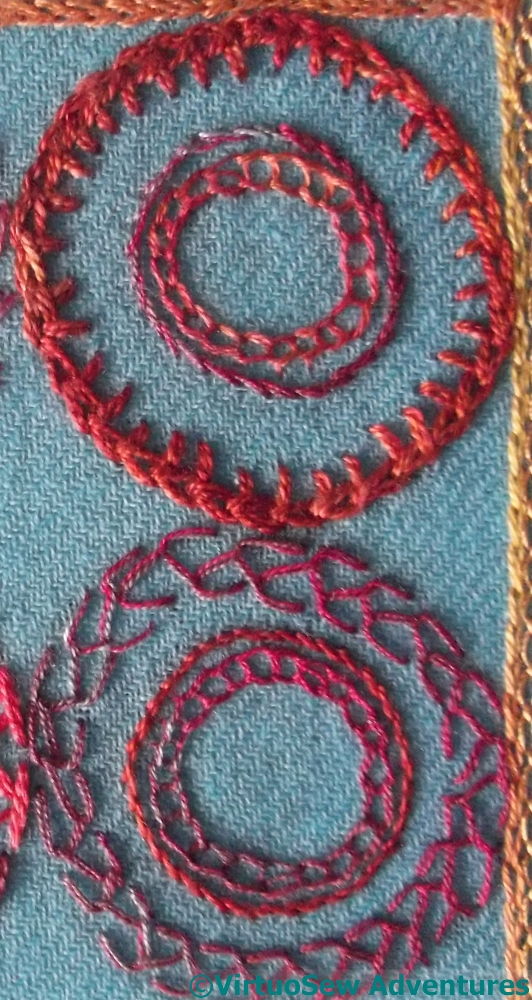
Two circles
Once the colour scheme was sorted out, I decided that I was going to try my usual trick again. There are elements of the panel which will be the same, and other elements which will change. The combination ensures that there is interest everywhere, but rhythm and similarity to help the eye rest.
So, the two inner circles are open chain stitch for the innermost one – at about the largest scale at which open chain stitch works without decoration, which is tiny! – and simple stem stitch. Furthermore, the open chain stitch always uses the thread used for the outermost circle, and the stem stitch counterchanges to a different weight and tone of thread.
The first circle here is done in Chained Blanket stitch using a silk perle in a warm russett-y red. Chained blanket stitch is one I’ve rarely used, but I’ve decided I like it. It produces a strong edge, and a pleasing texture. The second circle is in a rather finer silk thread, with a blueish tone – counterchange again, you see. This time I used Closed Feather stitch, which is one of the old faithfuls…
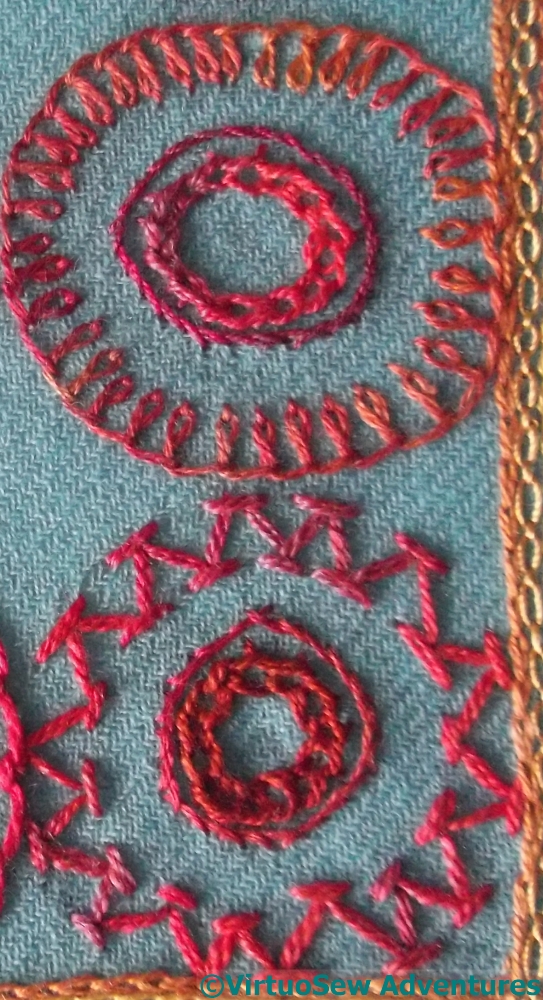
Two more circles
The next two continue the theme…
The outer circles are in Basque Stitch (top), which is another stitch with a family resemblance to chain stitch and blanket stitch, this time using two strands of stranded silk, and Chevron Stitch, in another silk perle. Chevron Stitch is an old friend, but as you see, it doesn’t run happily around curves – or at least, not curves as tight as this.
Still, the counterchanges of russet against burgundy, thick against thin thread, same stitches against new stitches, all seem to be working so far…
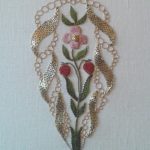
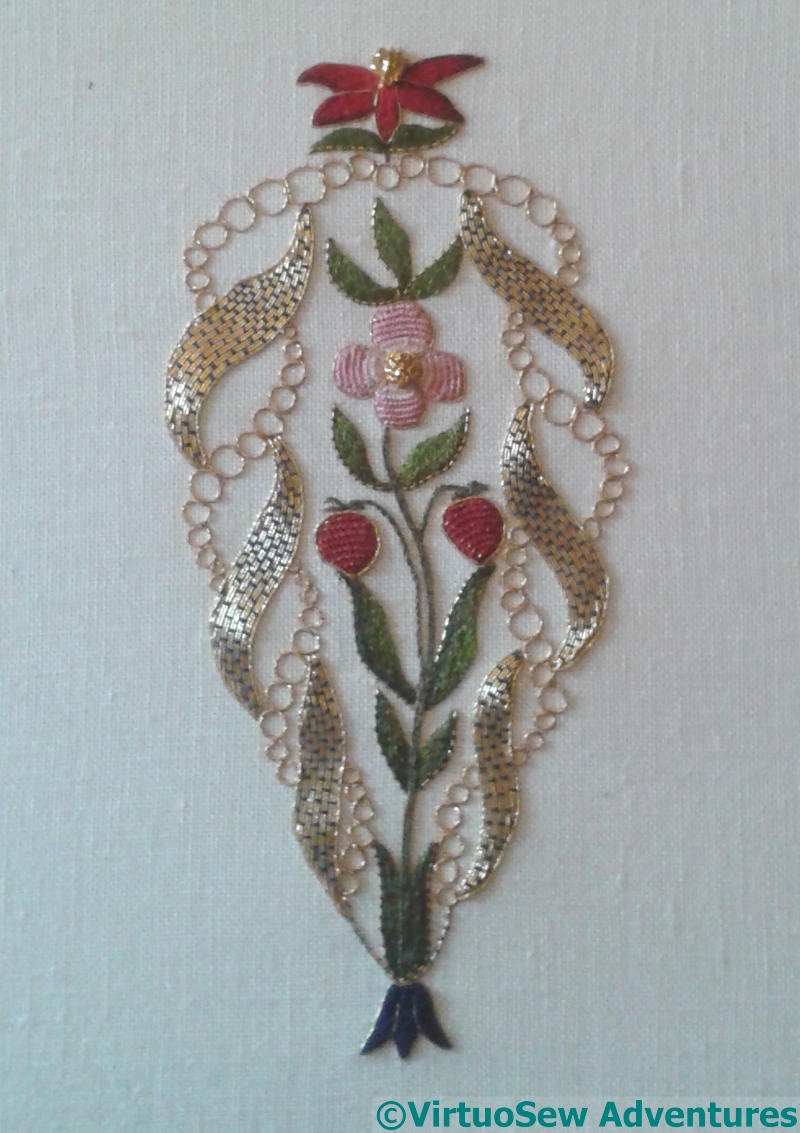
Playing with brooches again
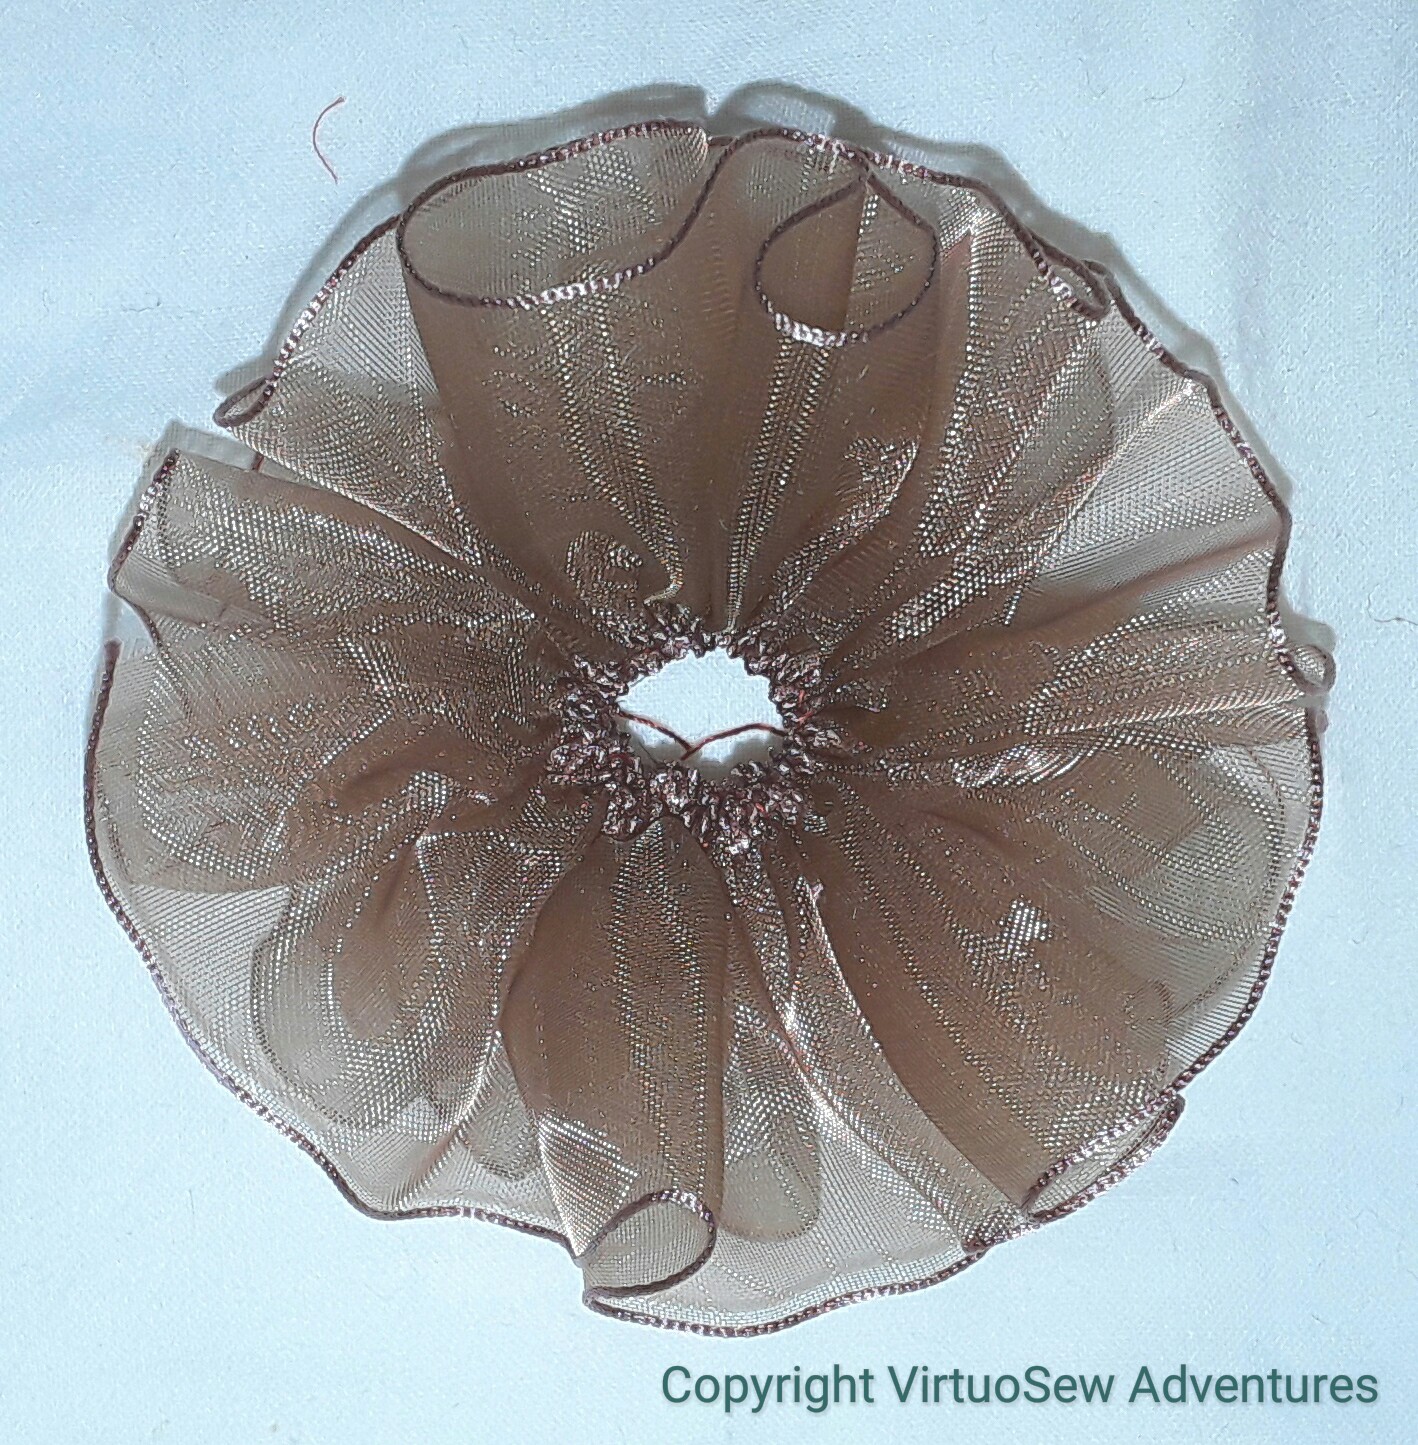
Gauze Spiral
I was very taken with a length of gauze ribbon i found when I was rummaging for bits of teal fabric, and spent an idle moment or two running a gathering thread along one edge. I wasn’t at all sure where I would go from there, but as I pulled the gathering thread up the ribbon settled naturally into a tight spiral reminiscent of an Elizabethan ruff. Hmmm. Promising!
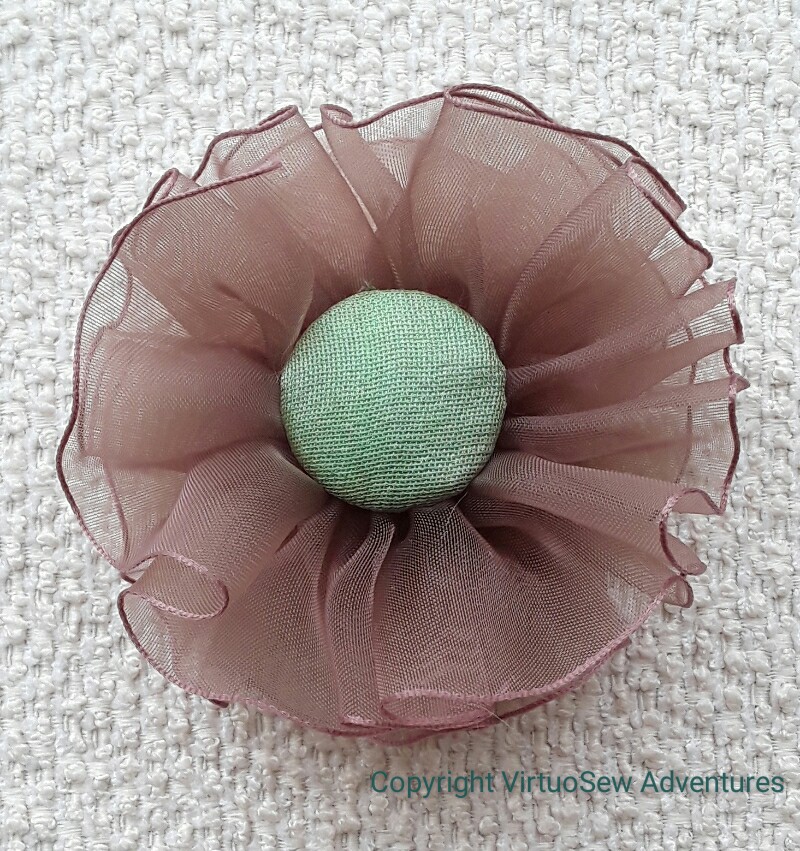
In the end, I covered another self-cover button with two layers of a rather gorgeous silk fabric which I originally bought for my mother to line a bookbox she made for a fine binding of “The Wind In The Willow”, and created a cross between a winner’s rosette and a new species of flower.
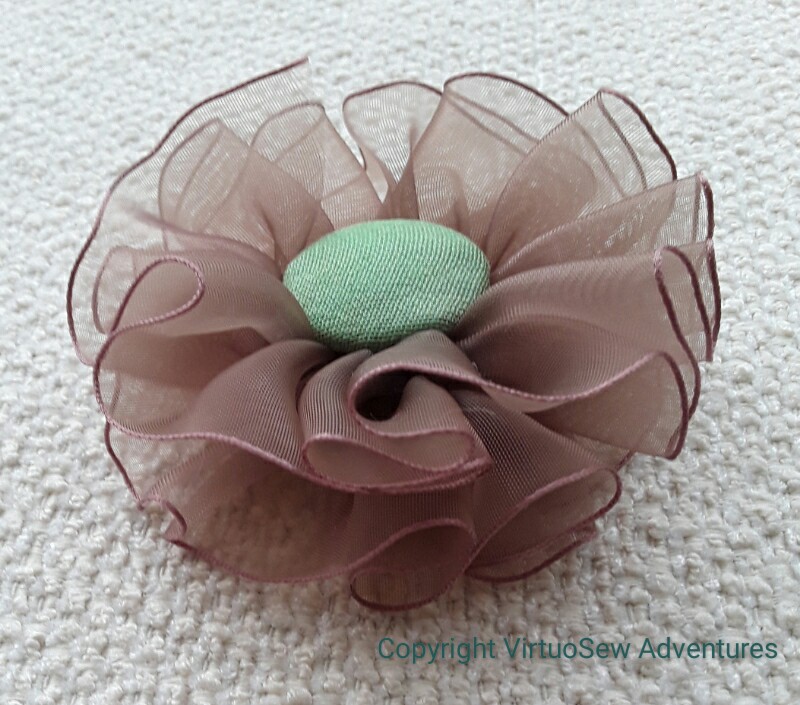
I think it will be fun to wear, but the real delight is the ruffle… It has “loft”, and a gentle glimmer, both from the gauze and from the silk button. More of a spring than an autumn piece, with that light spring green and and the gauzy ruffle, but I’ll look forward to the treat!
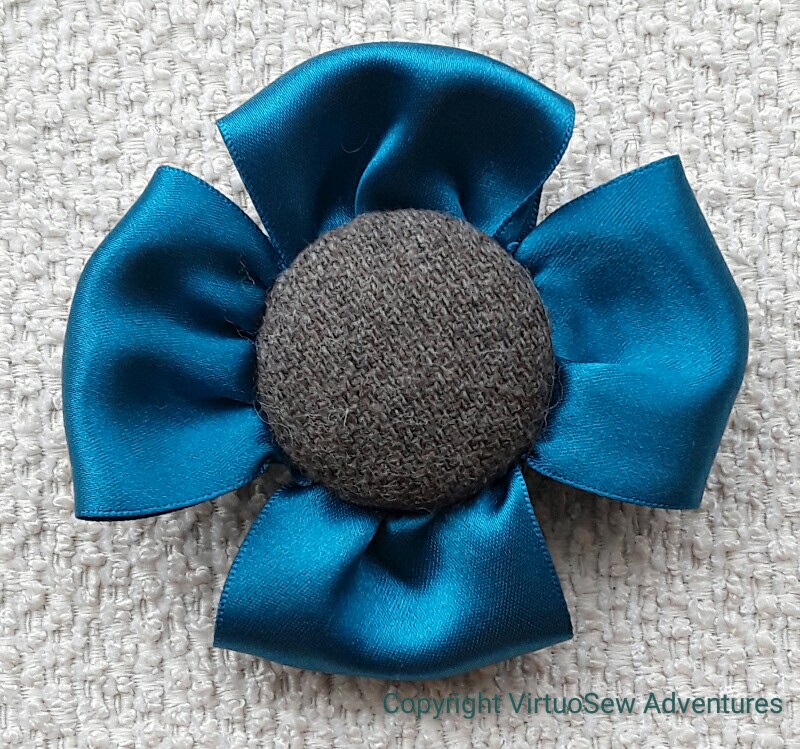
Satin and Tweed
Talking of unnatural flowers….
What I would really like to do is think of something else to do with the tweed fabric in the centre of this. It was cut off a pair of trousers which were too long for me, but it is a nice fabric and I want to create something fun with the scraps.
Thinking caps on, then…
Progress on the Nefertiti Shawl – the frame
Golden Border
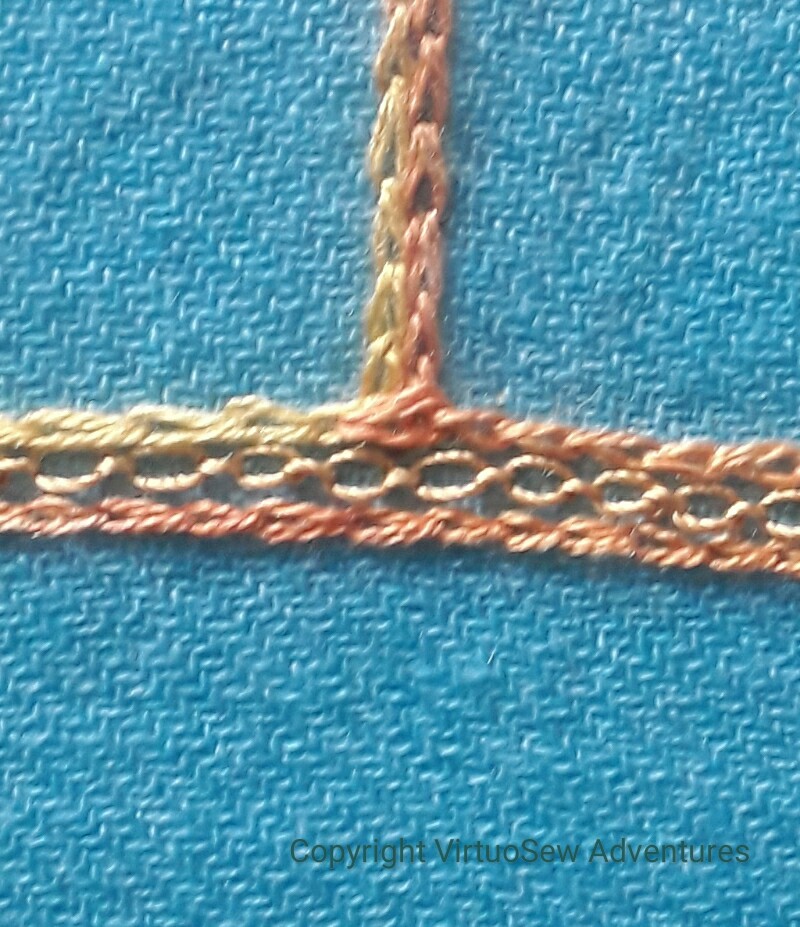
The internal borders of the Nefertiti Shawl, outlining the various coloured blocks, turned out to be fairly easy, as they were part of the inspiration that struck me when I was laying out the pashmina to transfer a design to it. The threads are all silk, with a soft perle used for the chain stitch. The vertical internal borders ended up as two rows of chain stitch, which should define the coloured blocks nicely.
The horizontal border consisted of two rows of chain stitch, in the same variegated silk thread, bordering a single row of cable chain stitch in a much shinier silk thread, which turned out to have a mind of its own. It kept trying to tie itself in knots, it twisted into snarls, and it unwrapped itself when I tried to finish off ends. But it looks lovely!
Wavy Chain Row
My design ideas put two lines of gold on either side of the coloured blocks that I’ve taken from Nefertiti’s crown. I didn’t want to do them the same, so I decided to make the rows nearest to the coloured blocks slightly wider. Then I had a wonderful rummage in my books of stitches and chose to take the opportunity, since the rows are straight, to use the Wavy Chain Stitch I found when I was doing the Circle Skirt and couldn’t get to curve. It works beautifully on the straight!
Shell Chain Row
The outer lines, I decided should be narrower. Shell Chain Stitch seemed to fit the bill perfectly. It belongs to the same family – chain stitch – but produces a light, almost textured effect.
Having made all my decisions, it became a matter of sitting quietly, doing miles of chain stitch variations. The coloured panels will follow later…
Making Brooches
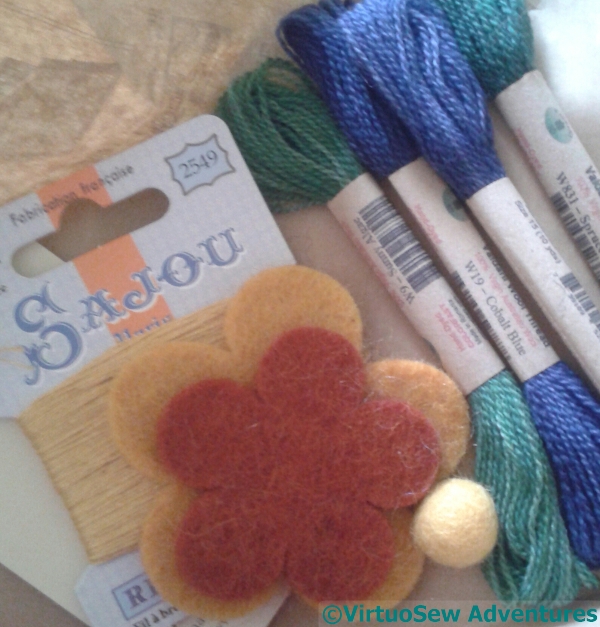
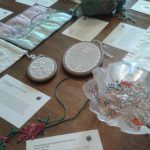
Haul from L’uccello
Those who follow me on Instagram may recall that I posted a picture of goodies acquired from L’uccello, on Swanston St in Melbourne, when I was there over the summer. Since I went in with no particular end in view, I was completely bewildered by the range of possibilities I found, so I didn’t buy very much, but now I know where to find them, I will do my homework in advance!
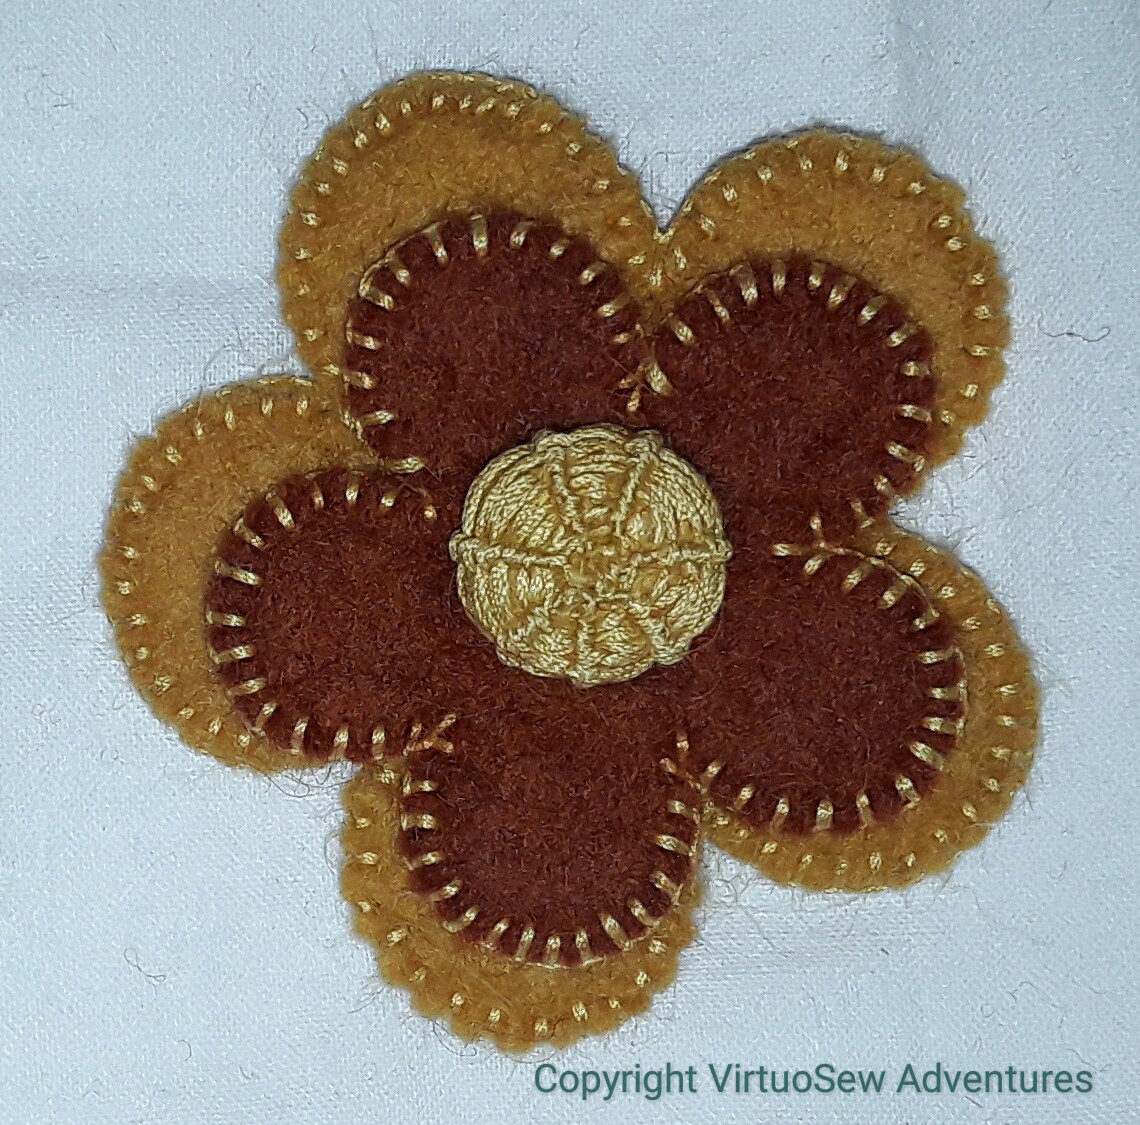
Felt Flower
When I came home, vague and somewhat jetlagged, I sat and played with the felt and thread (a cotton from Sajou, a brand I’ve heard of, but never used before) that I’d bought, blanket stitching the felt shapes I had bought, and then attaching the felt ball using a whipped spider’s web stitch, pulled tight to flatten the ball slightly into the stacked shapes, and made a brooch. It works well, and there’s a lovely shine from the cotton.
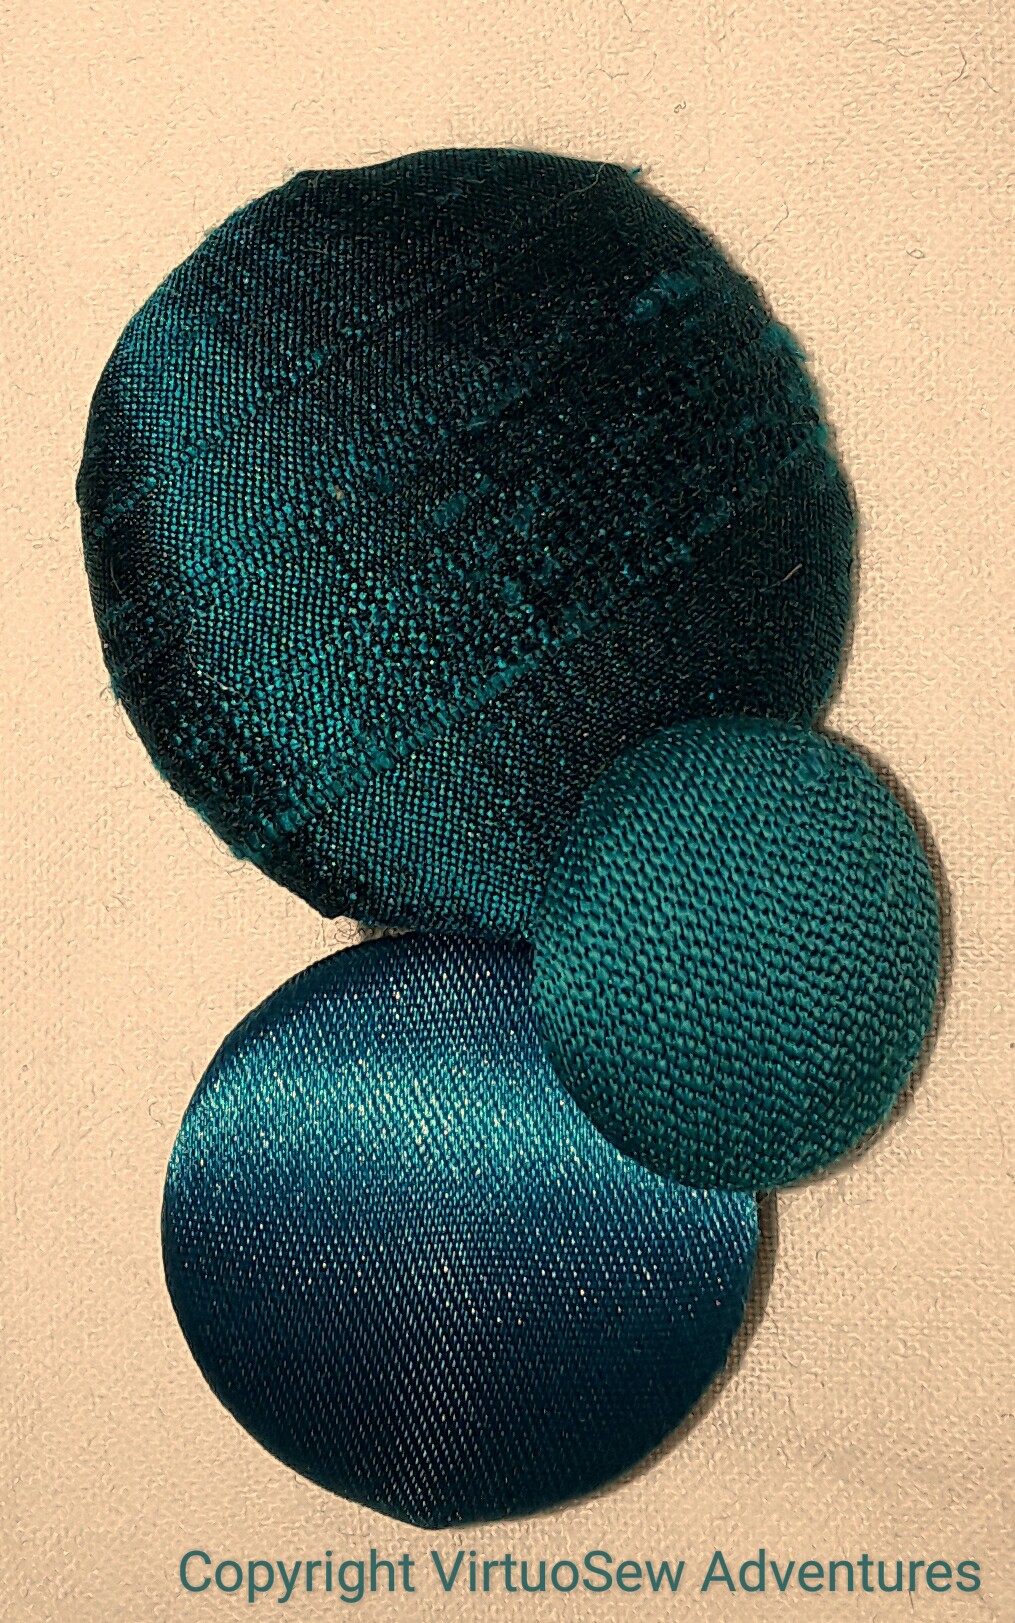
Teal Circles
I enjoyed myself so much (somewhat to my surprise, as small, fiddly projects don’t go well with jetlag!), I started thinking of other brooches I might make. You may have noticed that I love Teal, in almost all shades, so my next effort was to cover different sizes of self-cover buttons with different teal fabrics. In fact the most difficult thing here was to devise a backing that might help to stack the buttons as I wished them to be stacked. In the end, I created a roll of felt, and sewed the buttons to that. The finished brooch looks a lot better than in the photo, which has killed off the colour.
Visit to Chawton House
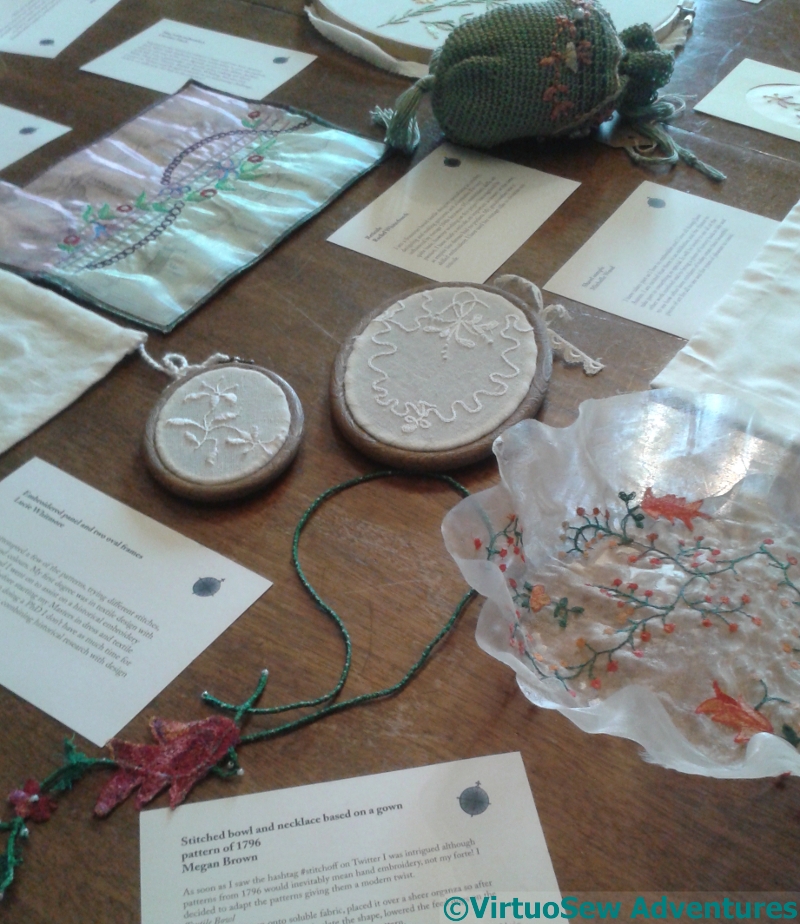
The Stitch Off
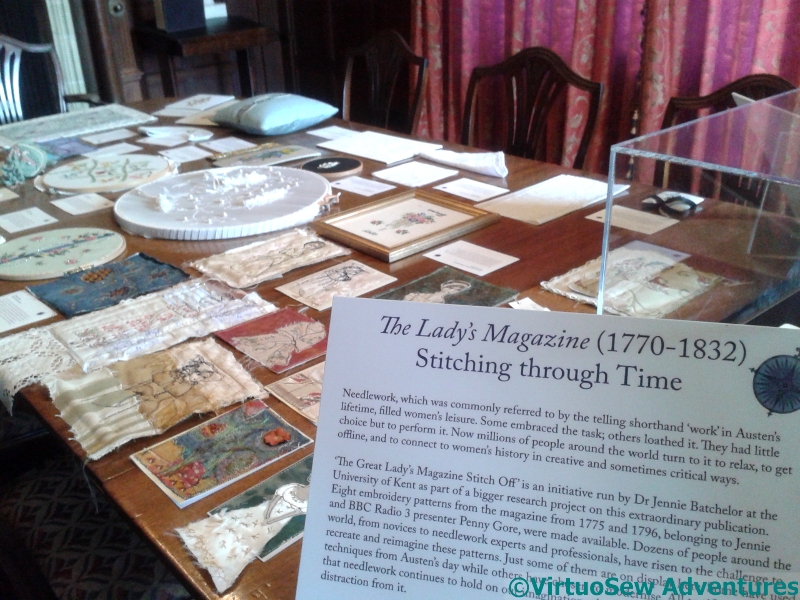
You may recall that I’ve written several times about the Great Lady’s Magazine Stitch Off. A good many of us found our Twitter timelines more fun and more colourful for several months, while we played with the designs and watched each other play with them. Some of those pieces (including my pashmina) then went on display at Chawton House Library, as part of their exhibition “Emma At 200“.
And last week, I finally got to Chawton House to see the Exhibition!
-
- Panel Stitched by Penny Gore
-

- Tablecloth stitched by Elizabeth Emmens-Wilson
-
- Panel stitched by Mary Martin
Chawton House itself is interesting, but instead of being simply a respectable country residence, it now houses a library which is a genuine scholar’s resource, as well as containing displays about women writers and even one about Jane Austen’s publisher (a man she described, in a letter to her sister Cassandra, as “a rogue, but a civil one“).
-
- More glories….
-
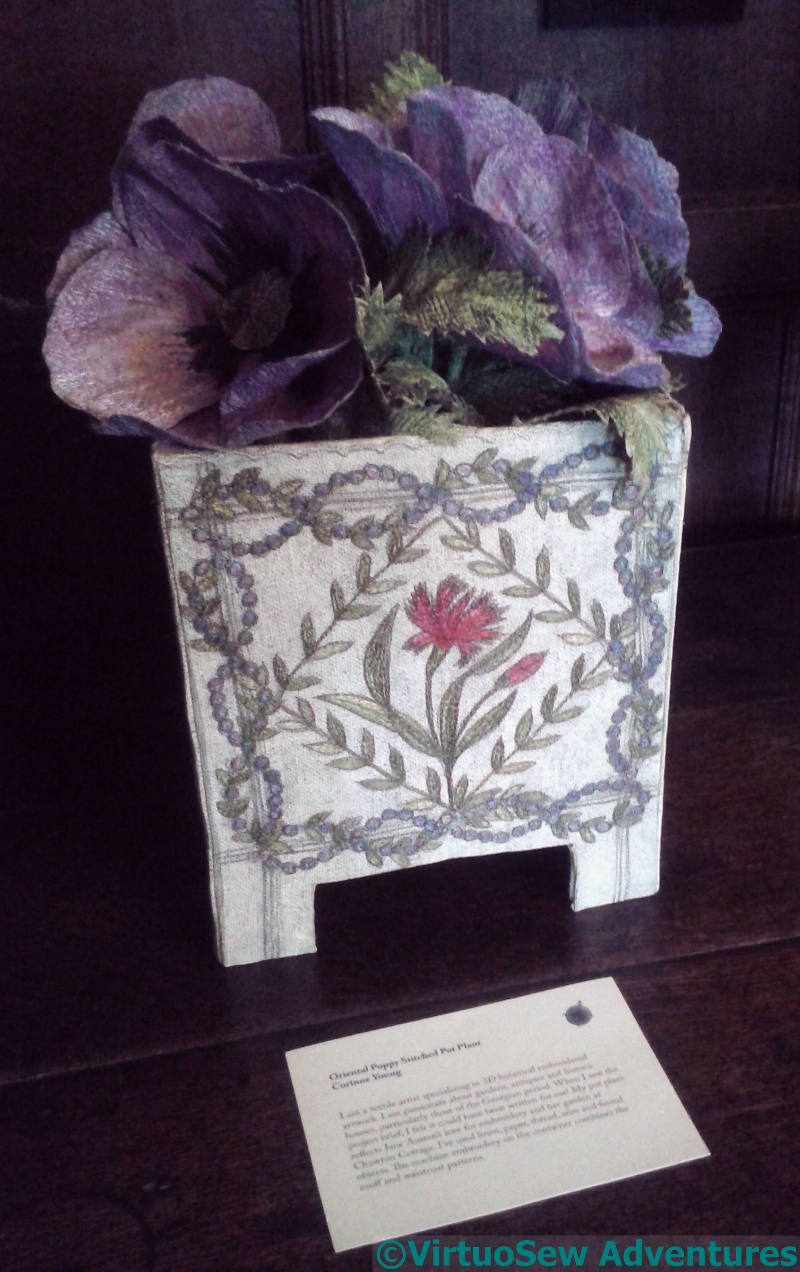
- Pot and Pot Plant by Corinne Young
-
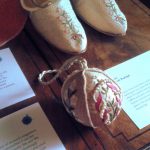
- Kissing Ball and Shoes
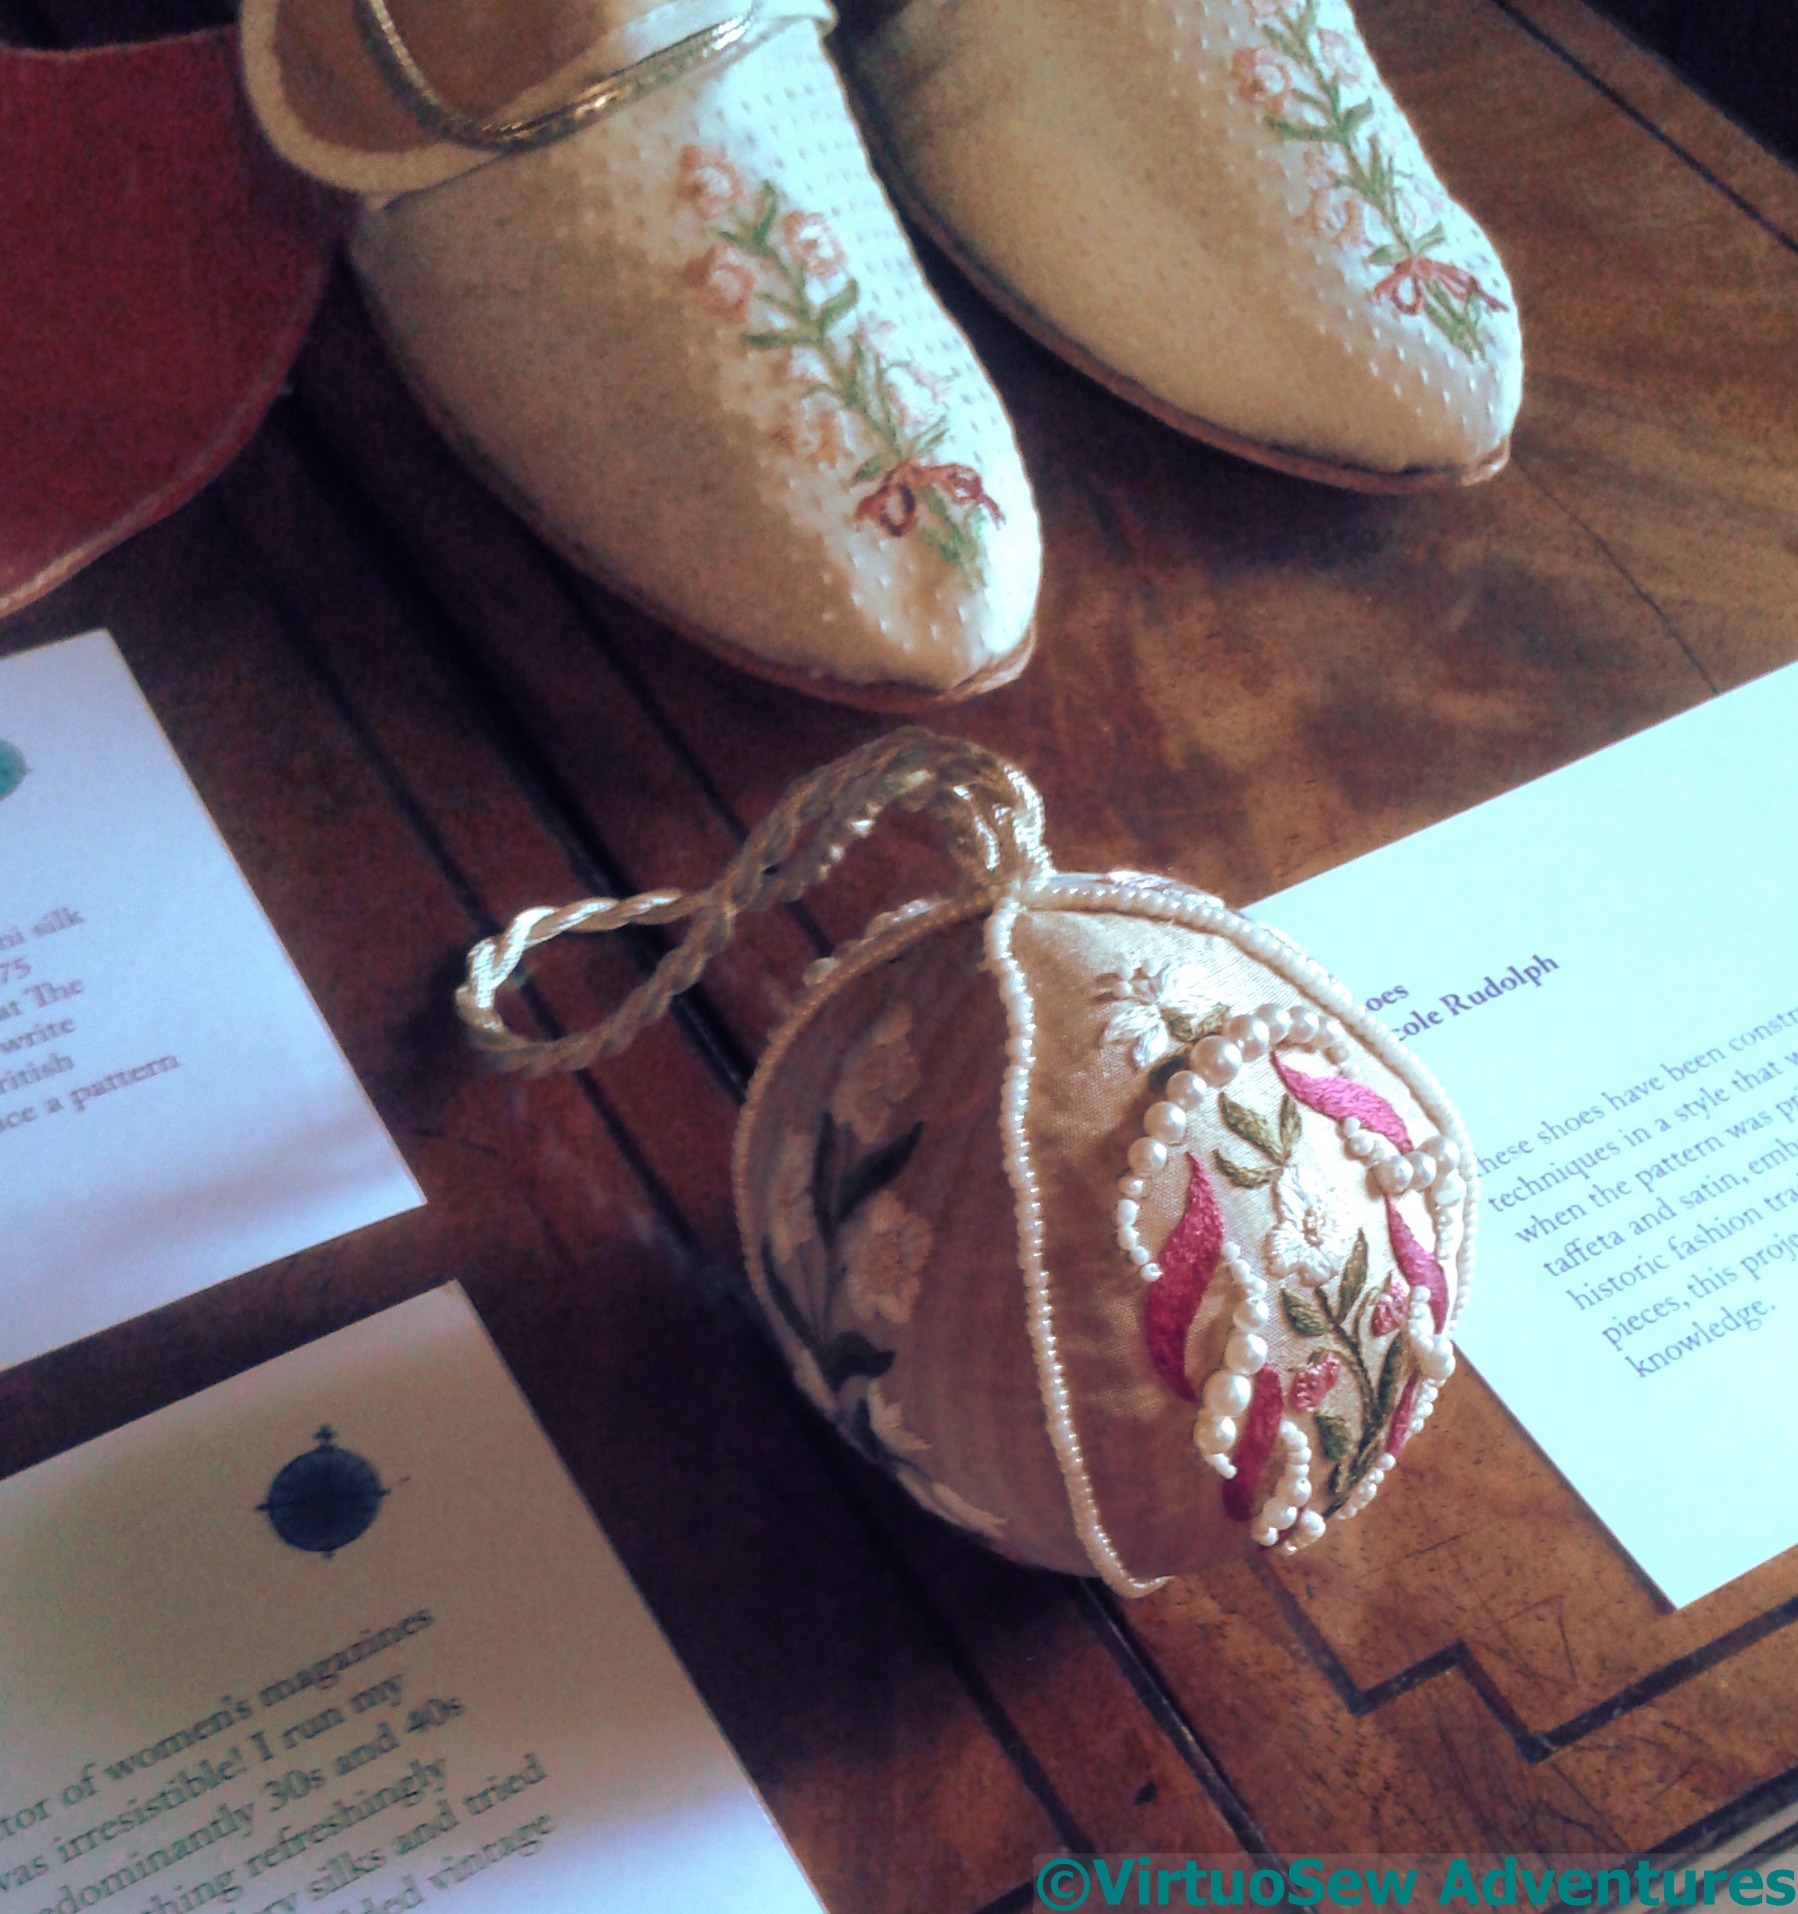
And a wonderful, oak-panelled room, full of Stitch Off delights. I was particularly pleased to find that everyone’s pieces looked better than when I saw them on Twitter, accompanied by apologetic indicators of Where I Went Wrong. There were exquisite renditions in period-appropriate techniques and materials, and there were completely different pieces using modern techniques and materials, some even machine stitched using computer controlled sewing machines, some finished pieces, and some simply presented, either laced over card or even still in the hoops they may have been worked in. They all looked wonderful – a real treat!
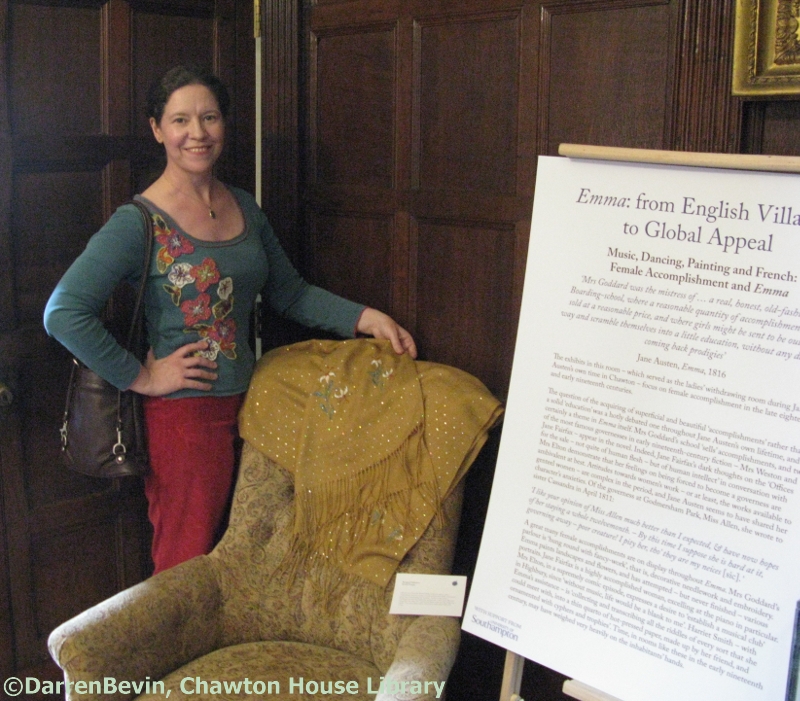
Me with my pashmina, photographed by Darren Bevin
And I found my pashmina, draped over a chair….
The photograph was taken by Darren Bevin, the librarian at Chawton House Library, and has already appeared on Twitter. We missed a trick, in fact – I should have picked it up and swept it around my shoulders, as I will when I get it back again!
Favourite Summer Suit
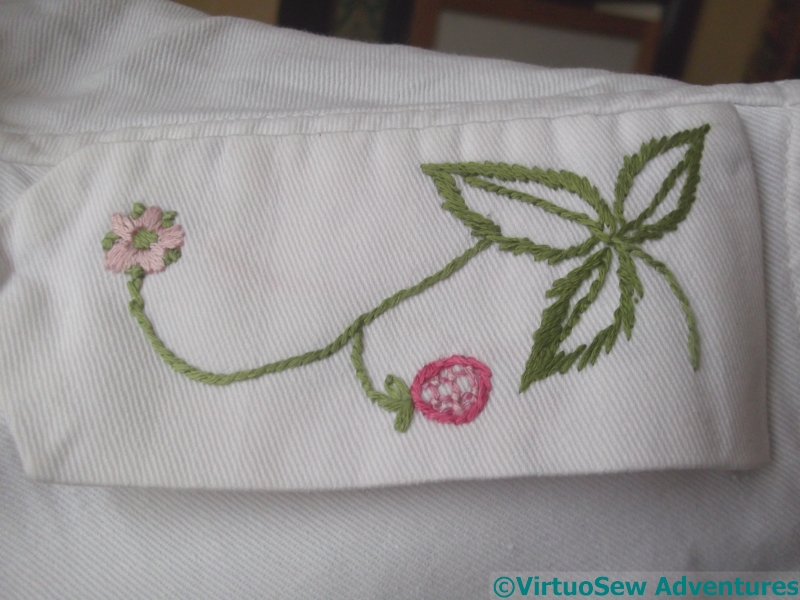
Epaulette of the Strawberry Suit
When the summer comes, some women turn to shorts and vest tops, some go for swishy skirts and gypsy-boho tops. I have a third option – to turn to my grandfather’s old tropical uniforms, which are in lovely sturdy cotton drill softened by all those years of washing, and very nearly indestructible. I’ve dyed two sets, and painted paisley patterns on one of those, but I’m completely outclassed by my mother, who embroidered one set when I was a child.
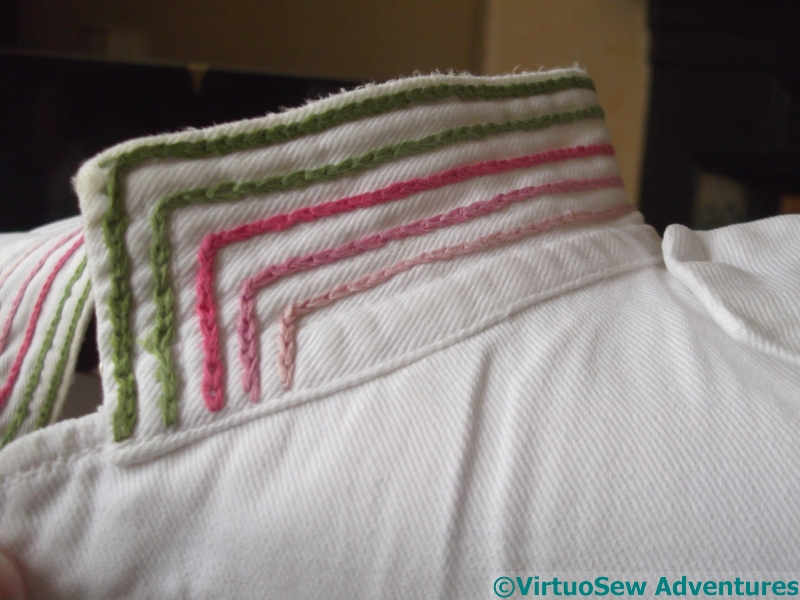
Collar Details
The designs are based upon very stylised strawberries, strawberry leaves, and flowers. The jacket has short sleeves, epaulettes, and a standing collar, decorated with rows of chain stitch using all the colours used elsewhere in the design. The usual uniform buttons were replaced with vibrant pink mother-of-pearl effect buttons, which make the whole thing markedly more frivolous-looking..
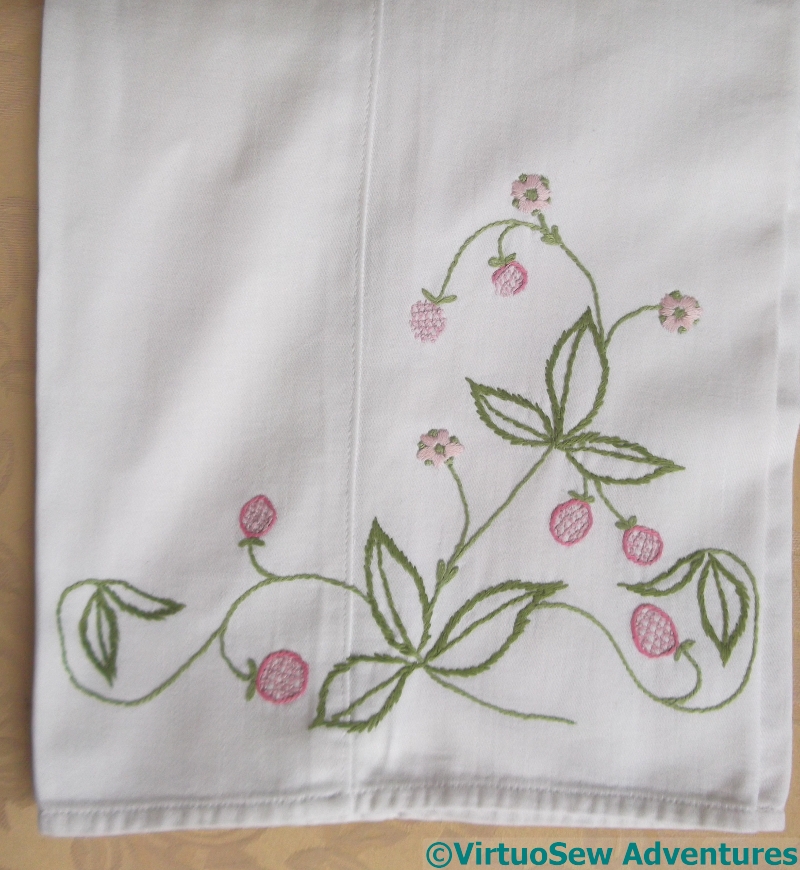
Trouser Embroidery
Most of the embroidery is near the hem of the trousers. The strawberries are worked in trellis couching, and the rest of the embroidery is in stem or satin stitch.
I have memories of thinking my Mam looked fabulous in it when I was a child – so much so that I wrestled it from her a few years ago, and feel fabulous myself, every time I wear it.
What I don’t recall is what my Grandfather thought of the transformation…
Suddenly Re-Thinking
Drawing Design
I bought the turquoise pashmina with the intention of working one of the Stitch-Off designs on it, but as I was playing around with colours, I had a sudden thought…
It’s an absolutely gorgeous faience colour, so why don’t I choose colours inspired by my Dreams of Amarna project. And while I’m about it, create a design inspired by those patterns I’ve been playing with…
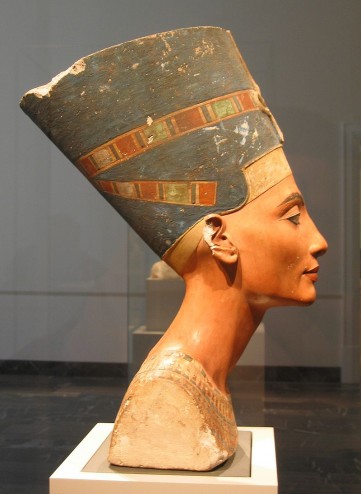
That famous bust of Nefertiti
In the end I’ve decided to take my inspiration from that famous bust of Nefertiti, discovered by Ludwig Borchardt in 1912. It would therefore have been known to Mary Chubb. This picture is a Creative Commons-licensed image I found online, but in this particular case, all I wanted it for was to check on the distribution of small and large segments and colours.
So that’s garnet or carnelian coloured sections, lapis-coloured sections and jade-coloured sections, all outlined in gold. In this case, I don’t want to use metallic thread, so the gold will be rendered in golden-yellow.
Choosing Colours
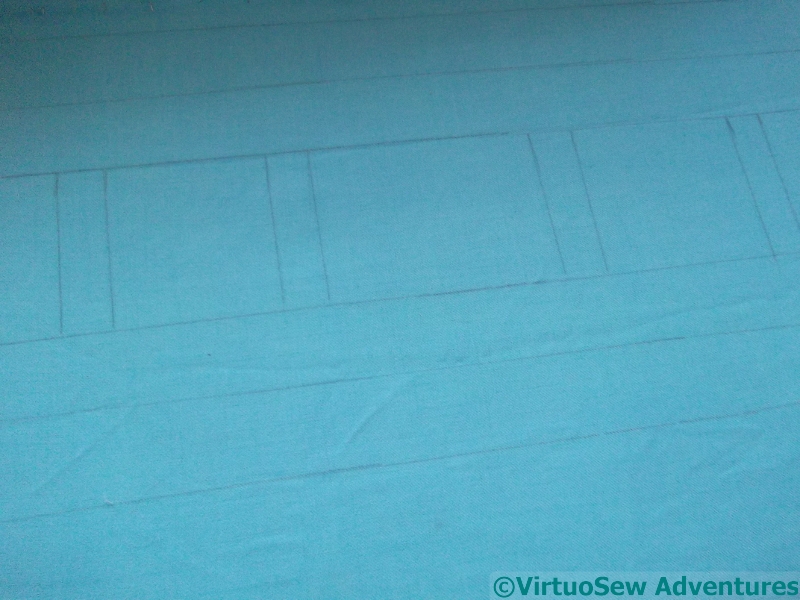
I’ve been working on making a design printing and transferring board, so I pinned out the end of the pashmina I want to embellish on the board, and simply drew straight lines as a guide.
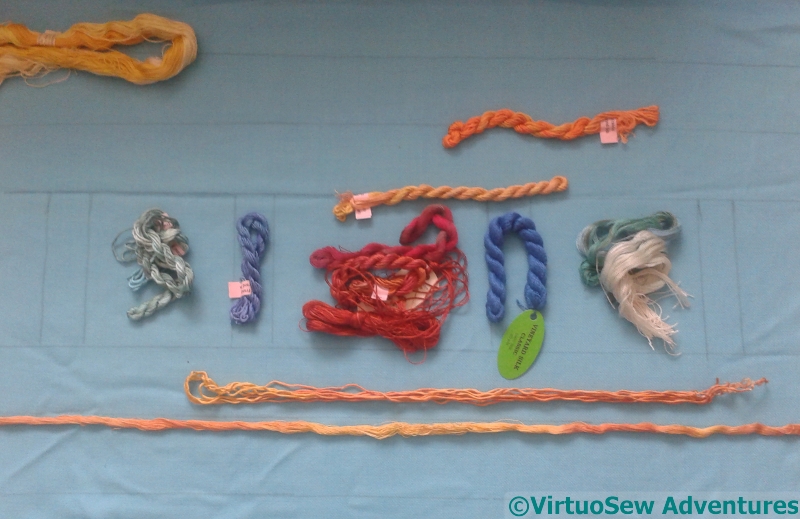
Then I had a wonderful time fishing out jewel-coloured silk threads.
All I need now is some idea of the stitches I intend to use!
The Great Lady’s Magazine Stitch-Off – 3
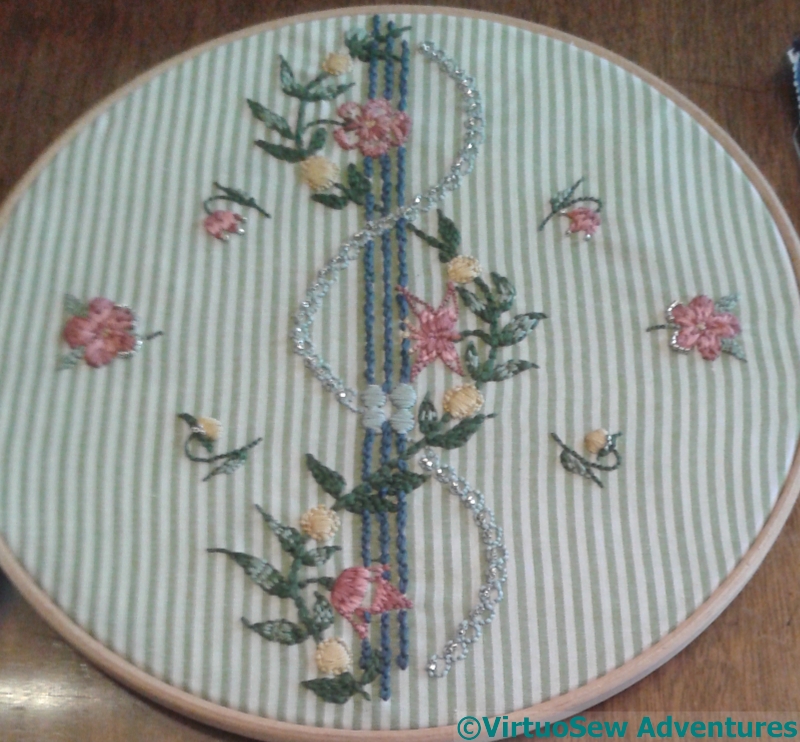
The Small Motifs end of the pashmina
If I were writing a report card for myself, I would write: Rachel has made a good attempt, but continued application is required to produce excellence.
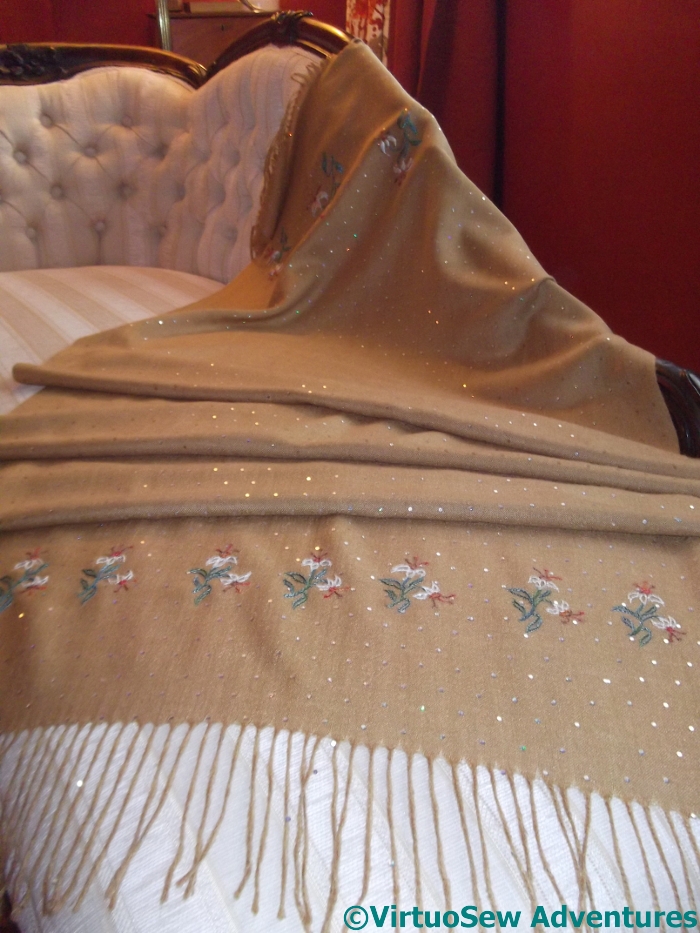
Finally, after much muttering, wrangling, and stitching, I have finished the pashmina I decided to embellish as a part of the Great Lady’s Magazine Stitch-Off. I’ve washed it (carefully, by hand) and pressed it (carefully, on a cool wool setting) and photographed it draped over my parents’ settee, which isn’t the right period, but does make a lovely backdrop..
Time alone will tell whether it is a practical piece that I enjoy wearing and don’t spend all my time repairing, but for now I am pleased. Although I must admit, rather more of the little paillettes flew off in the course of the stitching than I was expecting. It will only be dotty in patches!
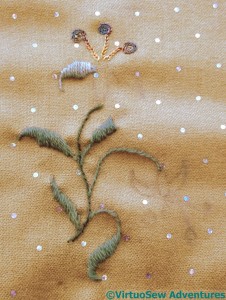
Small Motifs
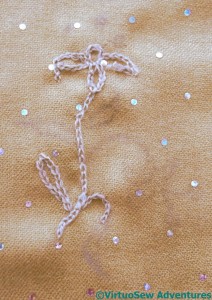
One end has a row of motifs, all the same size, and worked purely in outline. Primarily I have used stem stitch, although split stitch and chain stitch both make an appearance, too.
The small motifs were fairly quick to stitch, and didn’t require much self-discipline because I could see the progress I was making. I’m not good at repeated motifs – I lose interest quickly – so this was very good news.

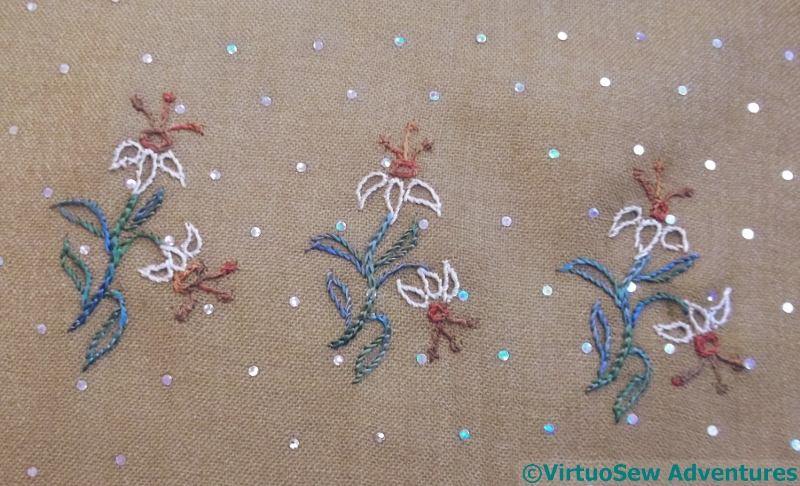
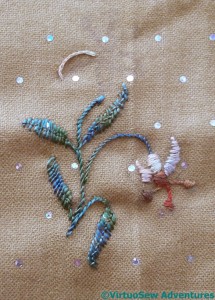
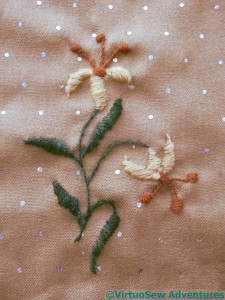
One of the large motifs
At the other end, the motifs are larger – in two different sizes in fact, two larger ones interspersed with three slightly smaller.
The larger motifs used a wider combination of stitches. Stem stitch for the stems – naturally! Satin stitch for the petals, worked over a split stitch outline, and using three strands of the stranded silk thread instead of two. It might have been better to use four, in terms of the coverage, but that would entail larger holes in the fabric, and I wasn’t willing to do that.
The leaves are worked in Romanian Couching, using the couching stitch to create a vein up the centre. Since the green thread is an unspun, indeed untwisted floss silk, it spread nicely. It has also got a mind of its own and unstitches itself unless finished off with great thoroughness.
One of the reasons the researchers wanted to extend the stitch-off project was to see whether they would gain any insights from it into the lives and work of the readers of The Lady’s Magazine. One thing I’m sure they will be reminded of anew is that the designs may be the same, but the treatments so different as to render them almost unrelated in appearance.
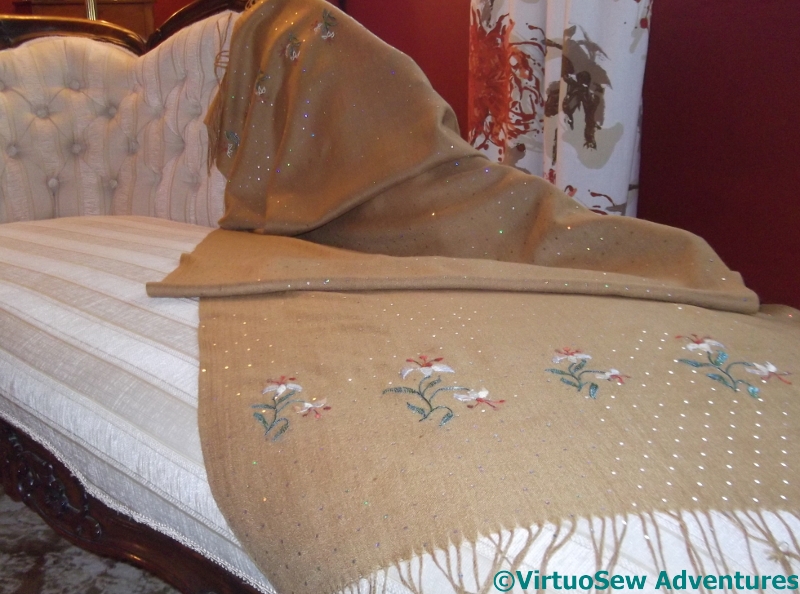
The Large Motifs end of the pashmina
As I said in my earlier post, I have a renewed respect for any lady who embroidered her own silks and muslins, but I should also highlight something I believe we are inclined to forget. I’m sure the general standard of embroidery was good – it was an expected accomplishment, after all, – but I don’t believe it was all as breathtakingly exquisite as what we see in some surviving pieces.
Textiles were extremely valuable until quite recently. They were reused, altered, left as bequests. The pieces that remain are either fortunate accidents of history (a forgotten trunk in an attic, say) or they were so remarkable as to be treasured. Embroidery worked at home for a day dress or other garment would have been worked quickly so that it could be worn, and in due course the dress cut down into something else, and finally, no doubt, sent for rags. The little aprons which protected expensive wool and silk dresses had to survive the washing of the day – pounding in a tub of boiling water – and again, when they could no longer be made respectable, became cleaning rags.
I wrote an entire post about transferring designs, but again, drawing was an expected and widespread skill. Many of the readers may have simply copied the design freehand onto their fabric, unconcerned about pinpoint accuracy, aiming only to provide an approximate guide for their needle. These are skills no longer as widespread, and we trust ourselves less than they would have done.
This isn’t evidence of one of my finest hours, but it is a perfectly competent piece of work, perhaps in the traditions I have just described, of work done quickly for a particular occasion or event. I am going to send it to Chawton House as a contribution to their exhibition celebrating the 200th anniversary of the publication of Jane Austen’s “Emma”.
Great Lady’s Magazine Stitch-Off – 2
Medici Yarn
Gumnut And Filament Silk
Sigh.
The pashmina, when it arrived, was a lovely caramel colour, with rather unanticipated silver spots on it, and it was a good deal flimsier than I was expecting. The others I have are all in fairly sturdy twill weaves. In truth, I’m not sure that would be easier, and if I ever finish this one, I may choose to find out..
Regular and long term readers of my blog will be aware that I have a thing about scale – scale of thread, scale of stitch, scale of weave. I’ve even discovered – much to my surprise – that the dreaded Plaited Braid Stitch isn’t always easier when it’s stitched wider and longer. So it will be no surprise that I spent a bit of time playing with various different threads to see what I thought of them, before settling on a final choice.
Silk – Filament And Stranded
Gumnut And Appletons
Scale isn’t the only concern, either. The right texture and sheen matter as well.
In the end I have settled on silks. The Medici yarn might have worked if I had had more of it, but I don’t think it is even made any more. The Appletons crewel wool was too heavy, and the Gumnut yarns (although I love them) somehow didn’t settle in comfortably.
Now I have to unpick my experiments and get started. I already have a newfound respect for any lady of the period who embroidered her muslin dresses, or her silk gauzes. There’s a story that Jane Austen embroidered a muslin dress with satin stitch spots, and the mere idea gives me cold shivers!
Although I doubt they had to contend with stuck-on paillettes!