
Tag: Stitch-Off
A scarf called Anthea
Just recently, I have been feeling rather bereft of the sort of simple embroidery that passes the time pleasantly. I’ve been assembling the Amarna pieces, and while they certainly engender a sense of achievement, it has not been relaxing. I had a couple of periods in the offing when a bit of stitching in public was in order, so I was looking for something that could be worked in the hand, with a minimum of materials.
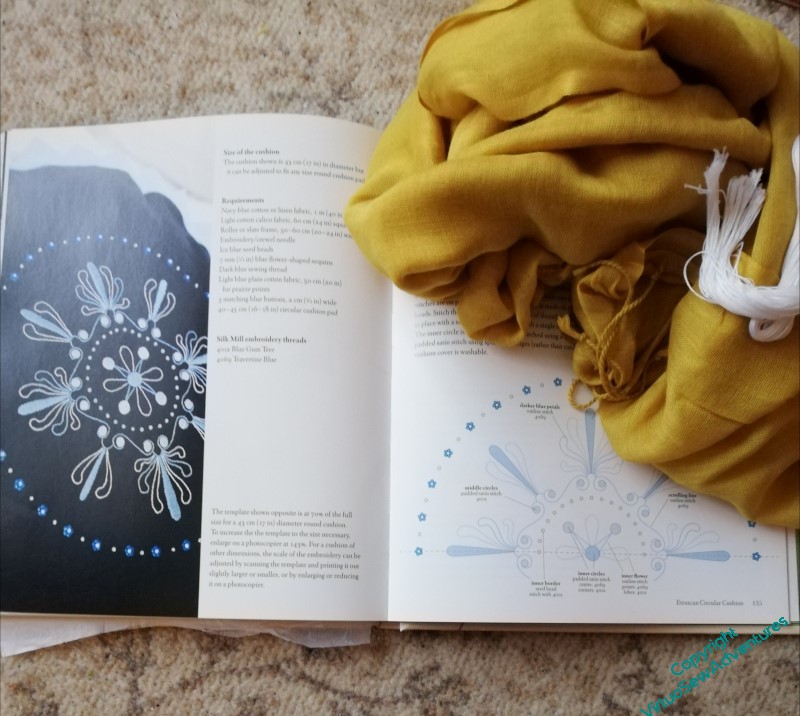
In one of my favourite Georgette Heyer novels, “The Unknown Ajax”, the heroine (Anthea) is seen, in one tiny incident, following instructions from “The Mirror of Fashion” to make a reticule (handbag) in the shape of an Etruscan vase, so when I was leafing through “Jane Austen Embroidery” in search of inspiration for a quick, easy to carry project, and my eye lit on a circular design inspired by an Etruscan design from The Lady’s Magazine of around 1808, it leapt out at me.
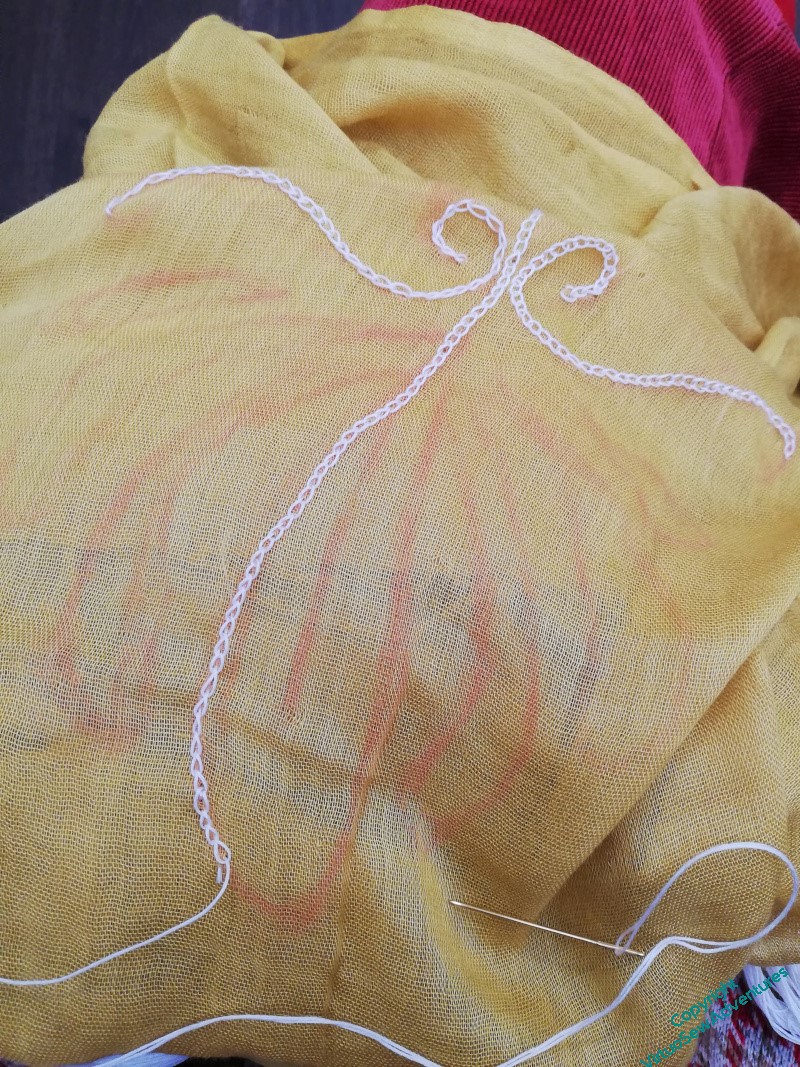
But I have a scarf, not a cushion, so the adapted pattern is going to readapted, and what’s more, this is just a little something to remind me that I really do love embroidery. I’ve been spending so much time on finishing the Dreams of Amarna pieces, that I’ve done almost no real embroidery for months, and I miss it. So this is simple, sketched on by eye, not seeking perfection, just, if anything, charm. I’m going back to what I learnt from the Great Lady’s Magazine Stitch Off, drafting by hand and trusting myself to make something that is as close to accurate as I need it to be.
And indeed, with just a needle and my thread (white cotton floche), I was able to travel very light, and sit quietly stitching in the places where I needed to be present but not unoccupied, stewarding an exhibition and waiting in waiting rooms. It attracted attention, of course, but that merely offers the opportunity to evangelise on the pleasures of embroidery.

Since I didn’t even take scissors, I wasn’t able to finish lines of stitching which would take less than a length of the floche, but I can come back to that. I’ve also decided that I’m going to stitch the same pattern (approximately) on the other end of the scarf. I’m fond of this sort of goldeny mustardy colour, and it will be very cheering to wear when I’ve finished it!
My apologies, Anthea – when I’ve finished her, of course!
Another relic of the Stitch Off
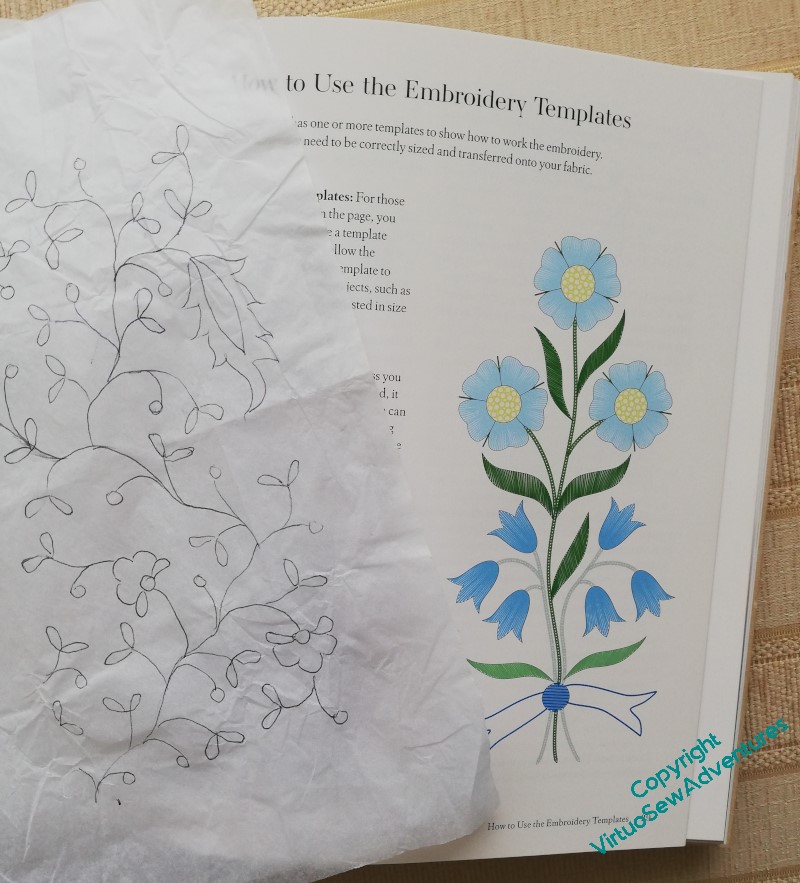
My first outing with my lorgnettes told me that the canvaswork case was wonderfully protective, but not terribly practical for those occasions when I wanted to fish them out and put them back, so I am trying again. This time I’m aiming for a little drawstring bag. When I was casting around for an idea for the design, among other things I leafed through my copy of “Jane Austen Embroidery”. I traced one of the more complicated designs, and then realised that I wanted to use that for something else, and thought again.
I went back to some of the thoughts I had when we were doing the Great Lady’s Magazine StitchOff, and decided that since it is a small and limited project, it seemed to me that freestyling the embroidery would be fairly low risk.
I tacked out the outlines of the bag, weighted the book open so I could see the drawing of one of the sprig patterns, and went rummaging among my threads.
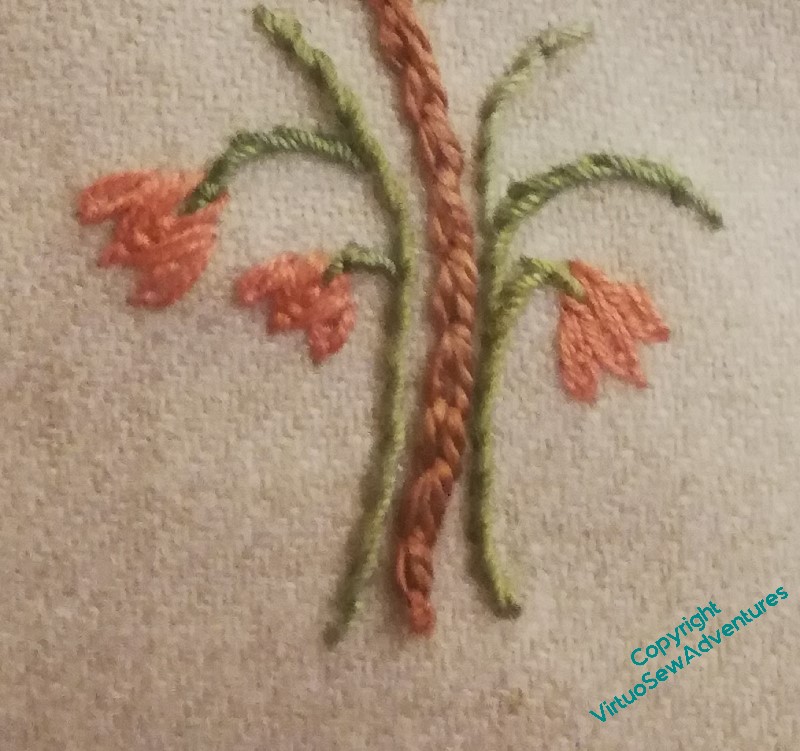
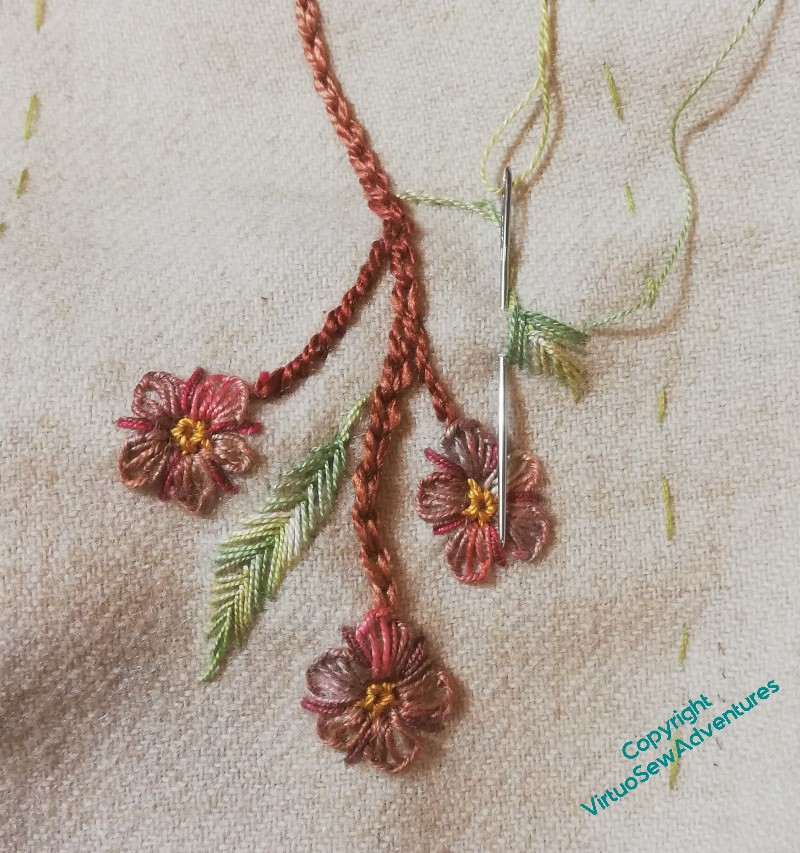
I’ve made use of some linen threads from Stef Francis, and some silk threads from I-know-not-where, and the stitches are mostly very simple: chain stitch, stem stitch, fishbone stitch.
When it came to the bell-shaped flowers at the bottom, I didn’t want to use satin stitch, and I spent some time racking my brains to come up with an alternative. Finally, inspiration came from two long-ago projects, Kai Lung and the Persian Fantasy Screen, and it occurred to me to use nested fly stitches. Then I only had to decide whether to use a double thread or a single thread, but as soon as I tried one of each, it became pretty clear which to choose!
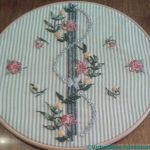
Finished Stitch Off Traycloth
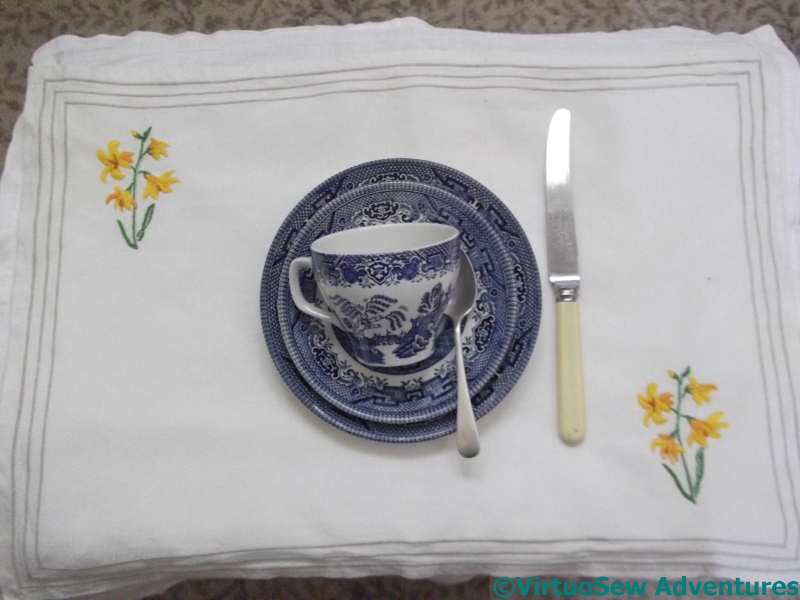
StitchOff Traycloth
So here is the completed traycloth, laid on a convenient tray and assisted by the hand-me-down cutlery (from my grandparents) and the hand-me-down Willow Pattern (from my cousin). We were very entertained (and very pleased for them!), when going around a stately home last year, to find that Willow Pattern was the servant’s hall crockery, although I don’t know quite why.
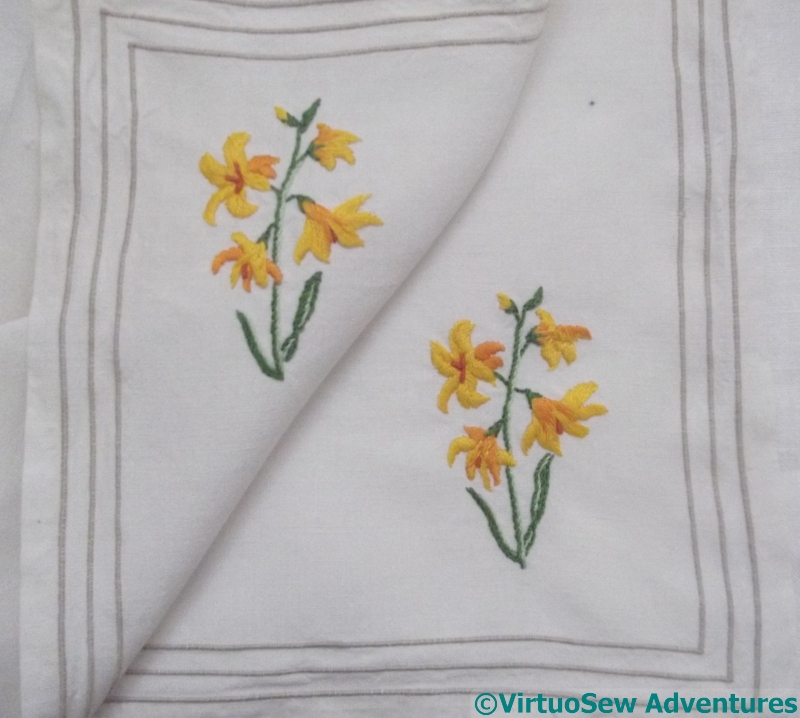
Traycloth Elements
I didn’t attempt to stitch the two motifs identically. The original sketch of the patterns didn’t look identical, and to my mind that form of perfect repetition is overrated in any case. This shot also shows the machined “satin stitch” border, of three very narrow bands. I suspect they may be padded in some way because the bands are very heavily ridged.
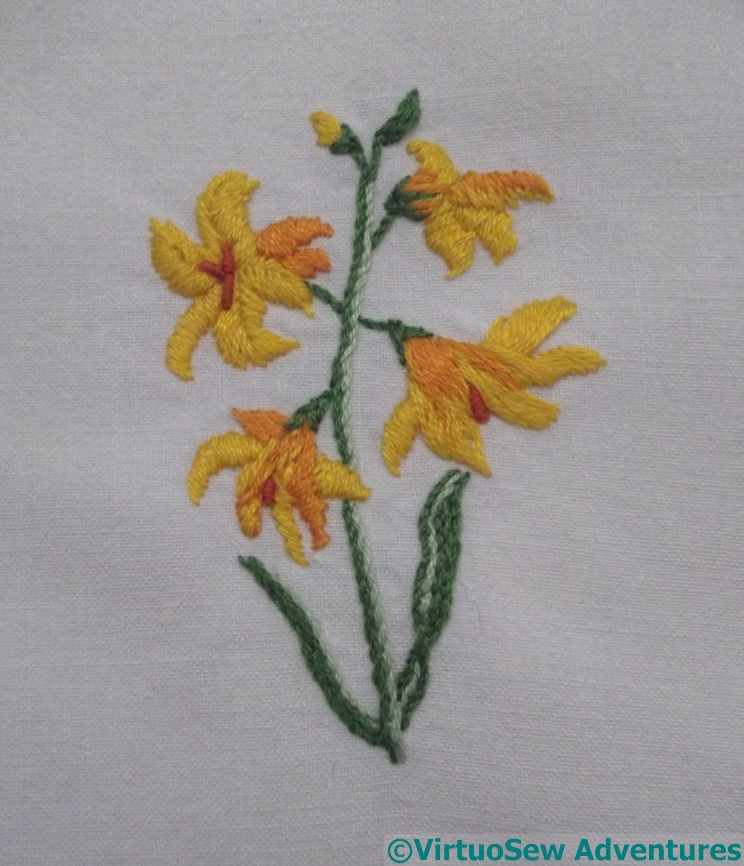
StitchOff Motif
I chose to use very few colours – a yellow, two oranges, and two greens. The stitchery is simple, too, stem stitch and satin stitch, with bullion knots for the stamens. I don’t much like doing bullion knots (a holdover from early attempts) but sometimes they are simply and unarguably, the right stitch for the job.
They didn’t take long, and the completed traycloth does have a very cheering look to it!
Visit to Chawton House
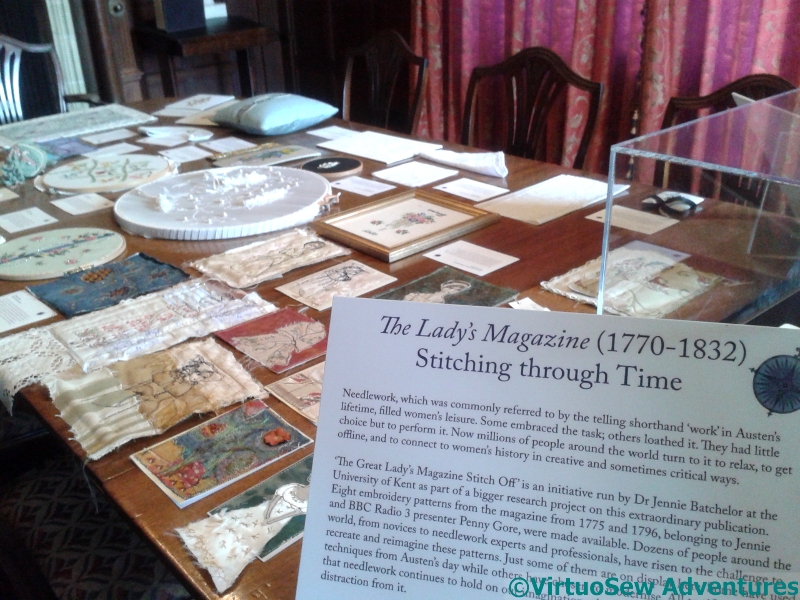
The Stitch Off
You may recall that I’ve written several times about the Great Lady’s Magazine Stitch Off. A good many of us found our Twitter timelines more fun and more colourful for several months, while we played with the designs and watched each other play with them. Some of those pieces (including my pashmina) then went on display at Chawton House Library, as part of their exhibition “Emma At 200“.
And last week, I finally got to Chawton House to see the Exhibition!
-
- Panel Stitched by Penny Gore
-

- Tablecloth stitched by Elizabeth Emmens-Wilson
-
- Panel stitched by Mary Martin
Chawton House itself is interesting, but instead of being simply a respectable country residence, it now houses a library which is a genuine scholar’s resource, as well as containing displays about women writers and even one about Jane Austen’s publisher (a man she described, in a letter to her sister Cassandra, as “a rogue, but a civil one“).
-
- More glories….
-
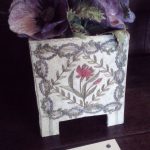
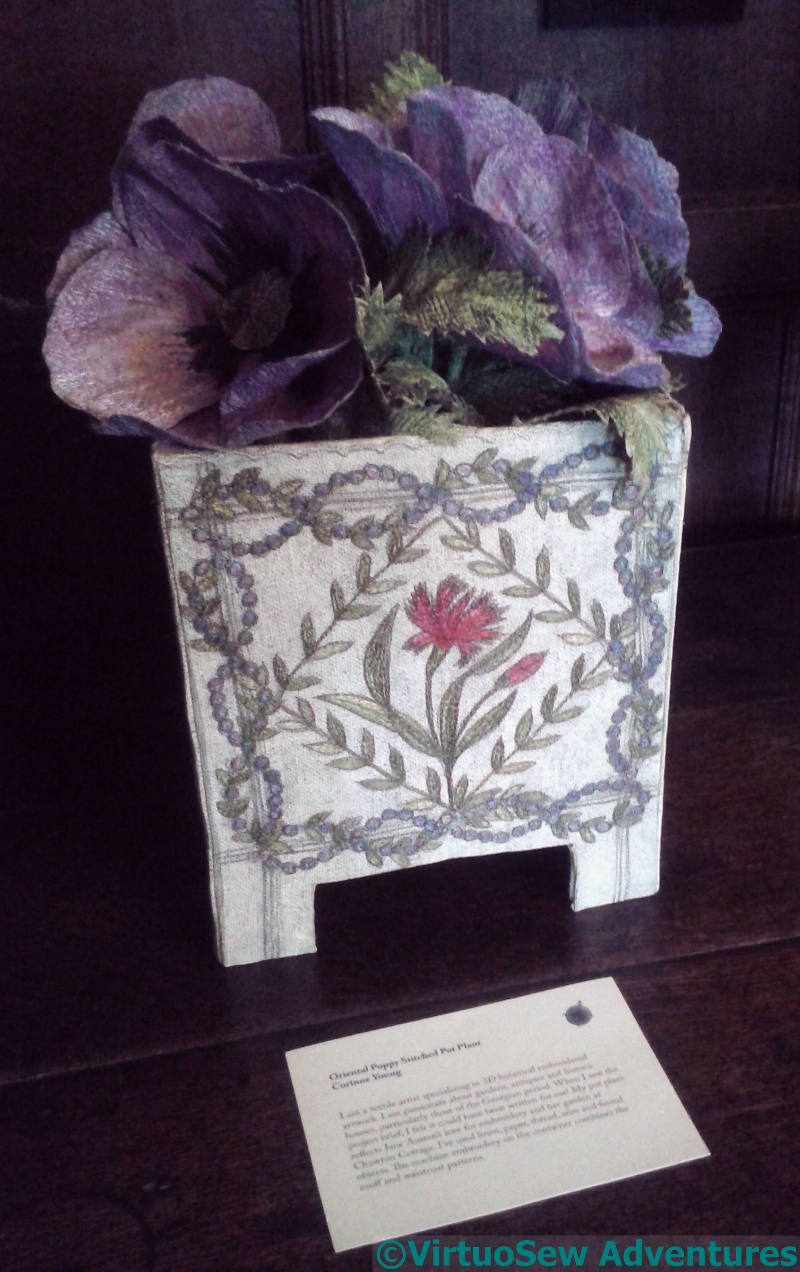
- Pot and Pot Plant by Corinne Young
-
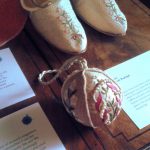
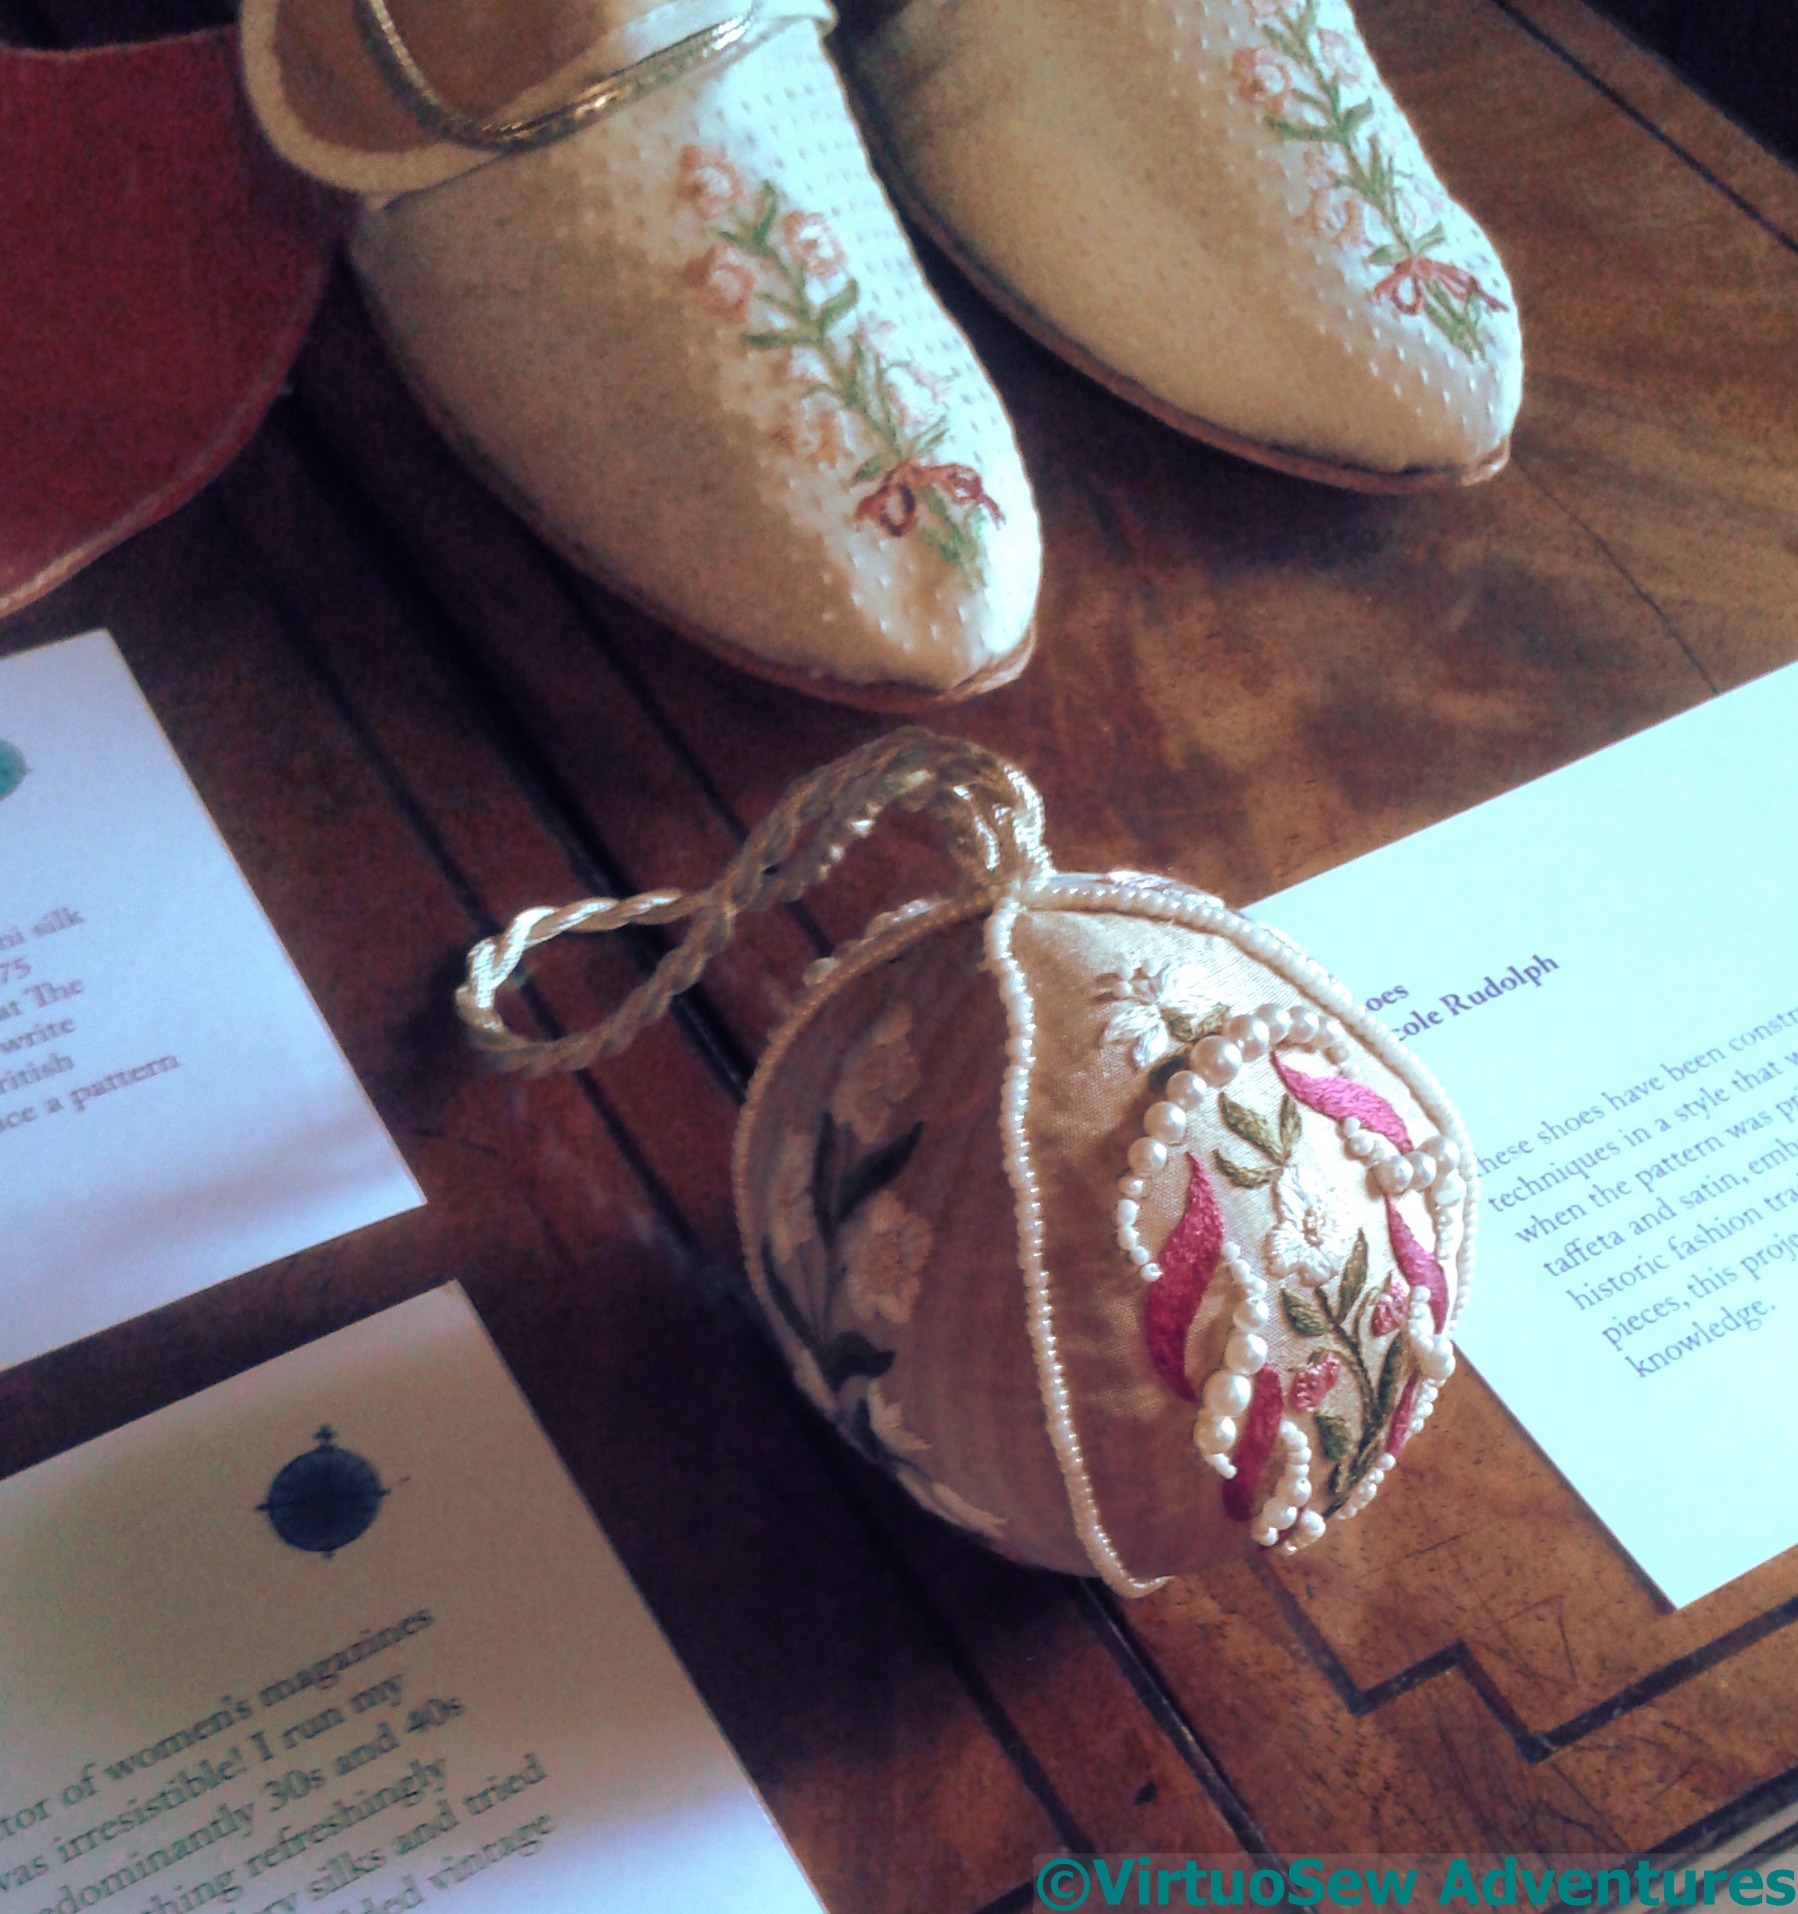
- Kissing Ball and Shoes
And a wonderful, oak-panelled room, full of Stitch Off delights. I was particularly pleased to find that everyone’s pieces looked better than when I saw them on Twitter, accompanied by apologetic indicators of Where I Went Wrong. There were exquisite renditions in period-appropriate techniques and materials, and there were completely different pieces using modern techniques and materials, some even machine stitched using computer controlled sewing machines, some finished pieces, and some simply presented, either laced over card or even still in the hoops they may have been worked in. They all looked wonderful – a real treat!
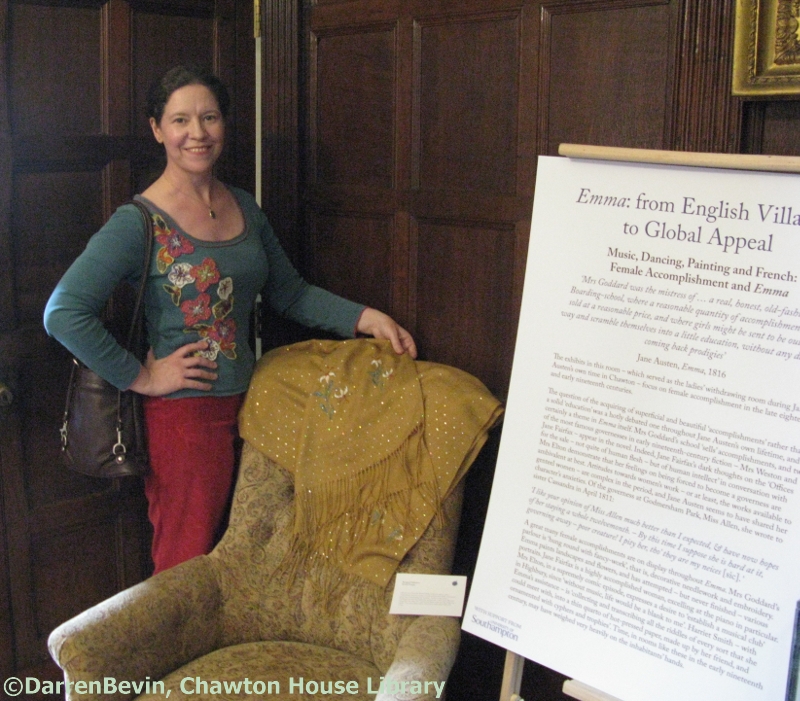
Me with my pashmina, photographed by Darren Bevin
And I found my pashmina, draped over a chair….
The photograph was taken by Darren Bevin, the librarian at Chawton House Library, and has already appeared on Twitter. We missed a trick, in fact – I should have picked it up and swept it around my shoulders, as I will when I get it back again!
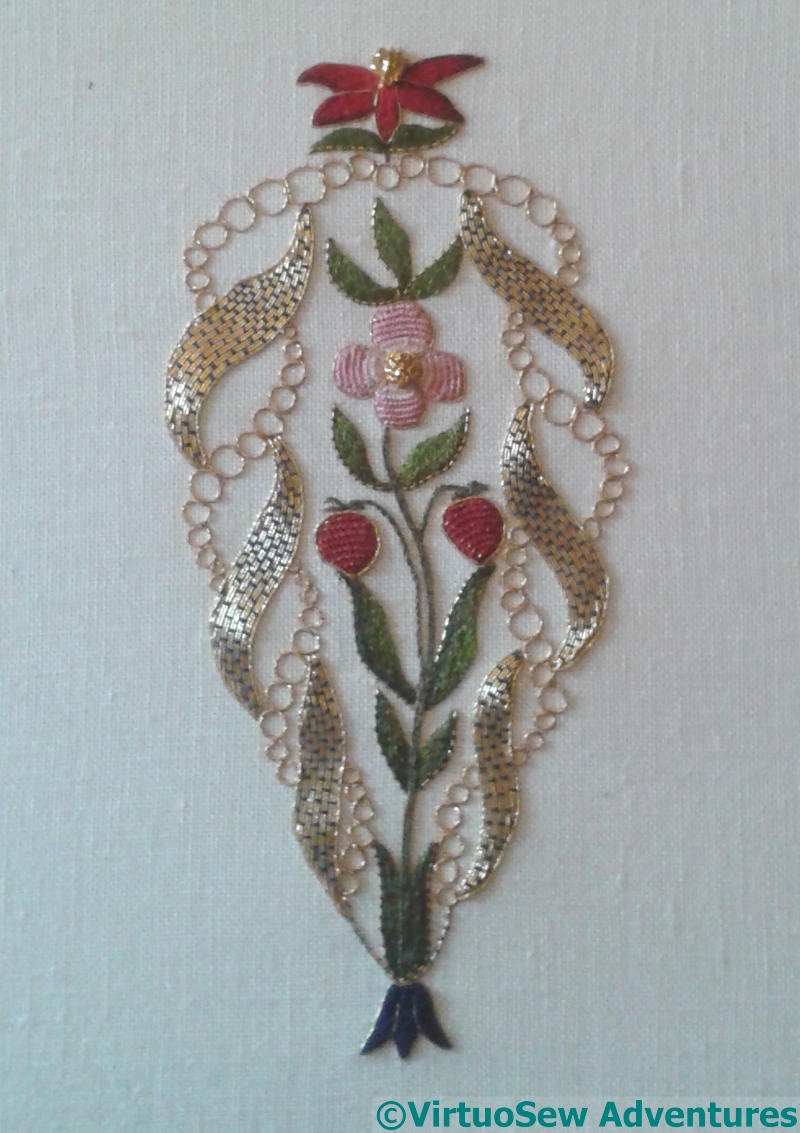
Suddenly Re-Thinking
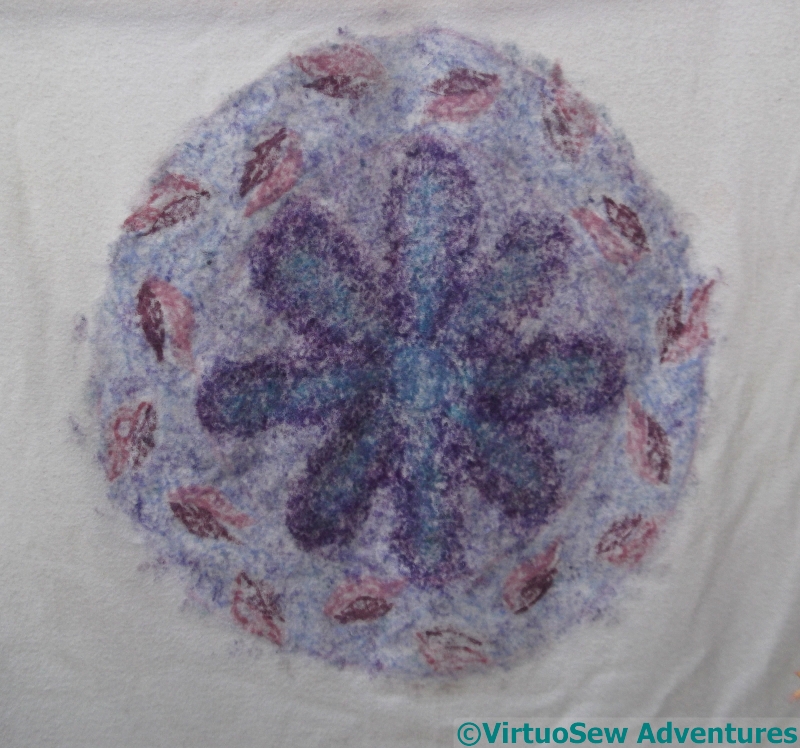
Drawing Design
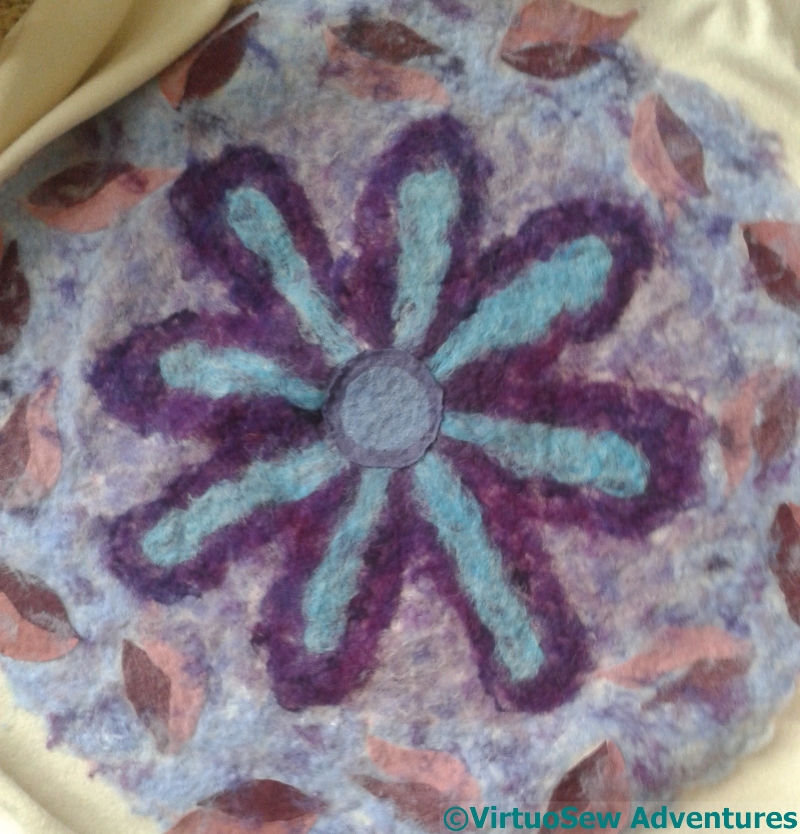
I bought the turquoise pashmina with the intention of working one of the Stitch-Off designs on it, but as I was playing around with colours, I had a sudden thought…
It’s an absolutely gorgeous faience colour, so why don’t I choose colours inspired by my Dreams of Amarna project. And while I’m about it, create a design inspired by those patterns I’ve been playing with…

That famous bust of Nefertiti
In the end I’ve decided to take my inspiration from that famous bust of Nefertiti, discovered by Ludwig Borchardt in 1912. It would therefore have been known to Mary Chubb. This picture is a Creative Commons-licensed image I found online, but in this particular case, all I wanted it for was to check on the distribution of small and large segments and colours.
So that’s garnet or carnelian coloured sections, lapis-coloured sections and jade-coloured sections, all outlined in gold. In this case, I don’t want to use metallic thread, so the gold will be rendered in golden-yellow.
Choosing Colours
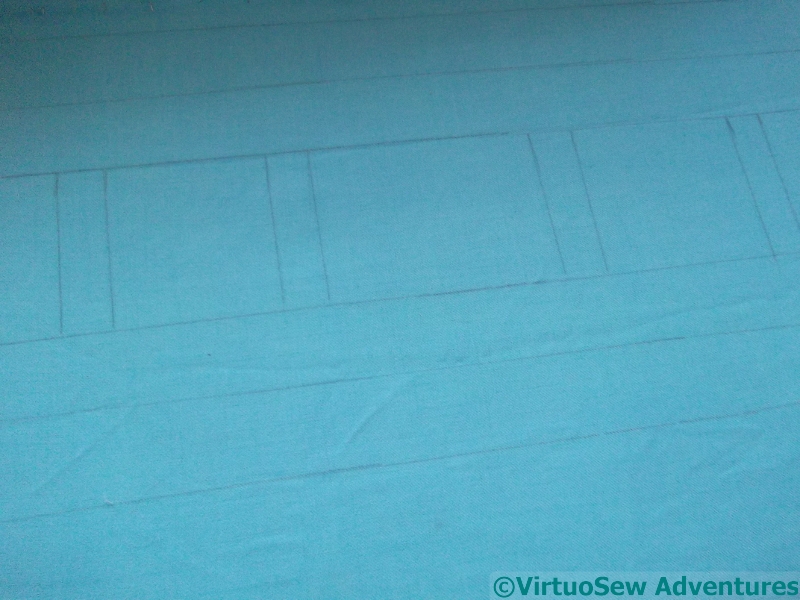
I’ve been working on making a design printing and transferring board, so I pinned out the end of the pashmina I want to embellish on the board, and simply drew straight lines as a guide.
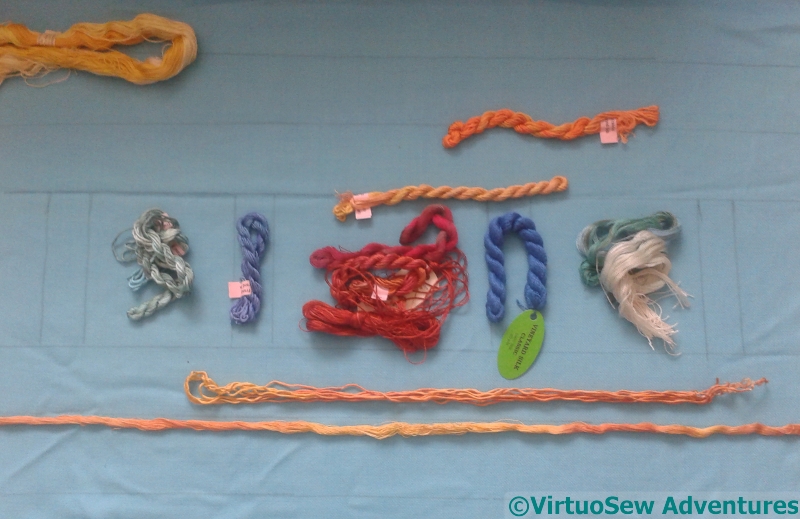
Then I had a wonderful time fishing out jewel-coloured silk threads.
All I need now is some idea of the stitches I intend to use!
A Pause In The Modern Stitch Off
From The Back
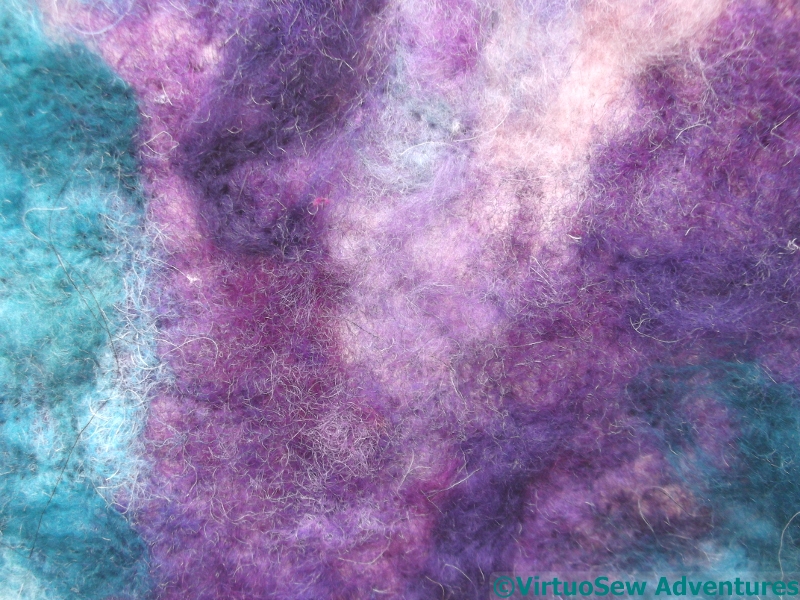
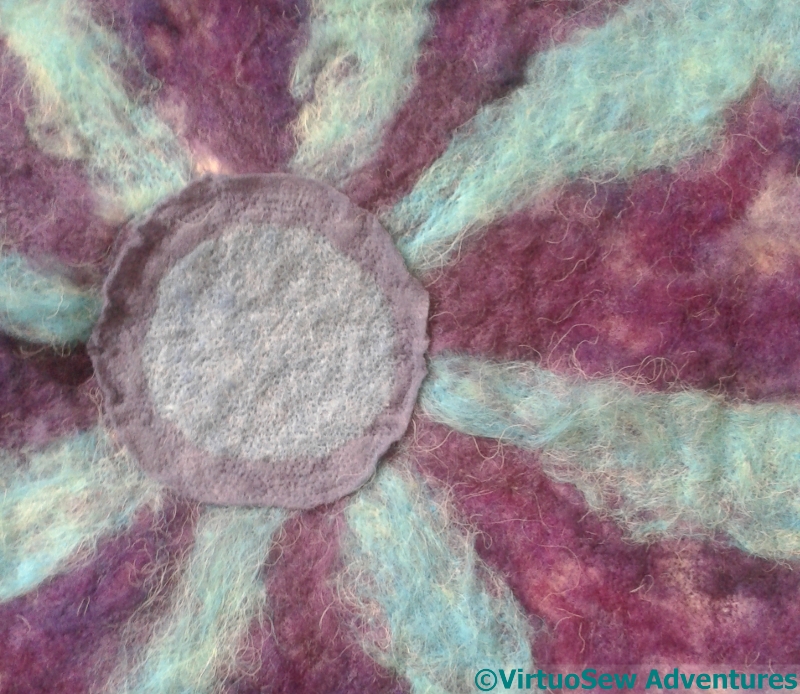
I’ve reached a sort of sticking point with the Modern StitchOff project, so I’ve decided to pause and think about it.
I took the blanket outside (all four and three-quarter pounds of it!) and hung it on the washing line to stare at, and photograph for you.
This is the reverse side – that is, the side you don’t see when sitting at the embellisher, trying not to break needles.
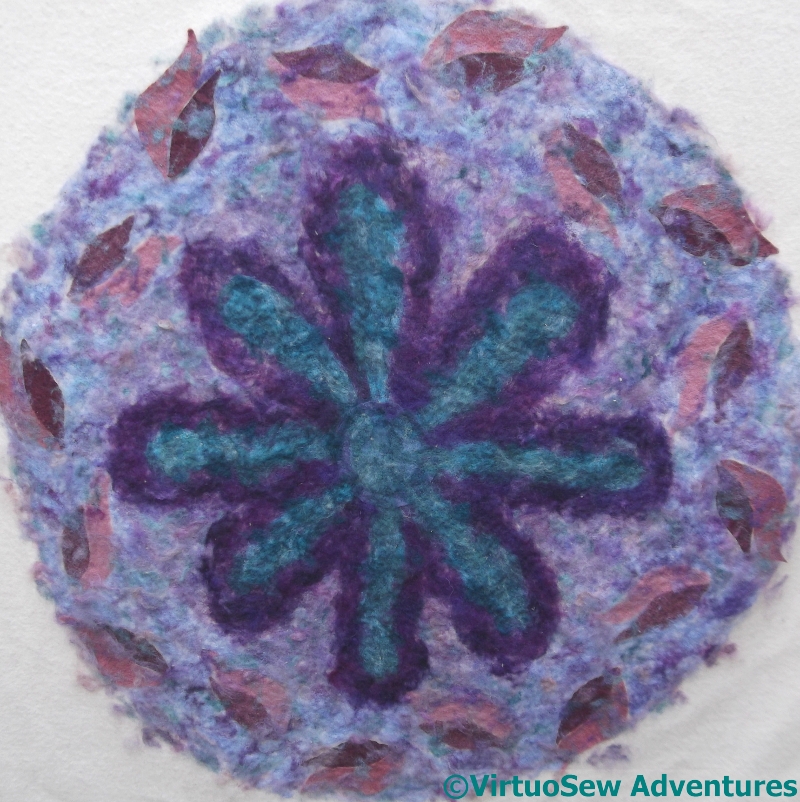
From The Front
This is the front. It can be quite fluffy – the hexagonal net keeps fibre in place while embellishing, but at the cost of sometimes failing to realise it hasn’t been firmly enough attached. I’m learning that I need to make a first pass with the net, trying to be thorough, but then take off the net and go over the same area again.
I’m also noticing that although I used two different types of felt for the leaf shapes, and they behave differently under the needles, the effect on front and back is sufficiently similar that in future I will pick the felt which felts easily (if you follow me!).
-
- Detail – Back
-
- Detail – Front
The reverse has a rather intriguing spotty effect. When there’s only one layer of embellishing it is easy to see that it is one tiny dot of colour for every needle (which makes sense!). The front varies rather more, sometimes flat and densely textured by the needles, sometimes fluffy and fly away.
My challenge now is to work out how to extend the colour and texture to the rest of the blanket, and then to decide, do I add some lines of roving, and if so, how. Although if anyone suggests using a hand-embellisher, my howls of outrage will be heard by NASA’s “Juno”!
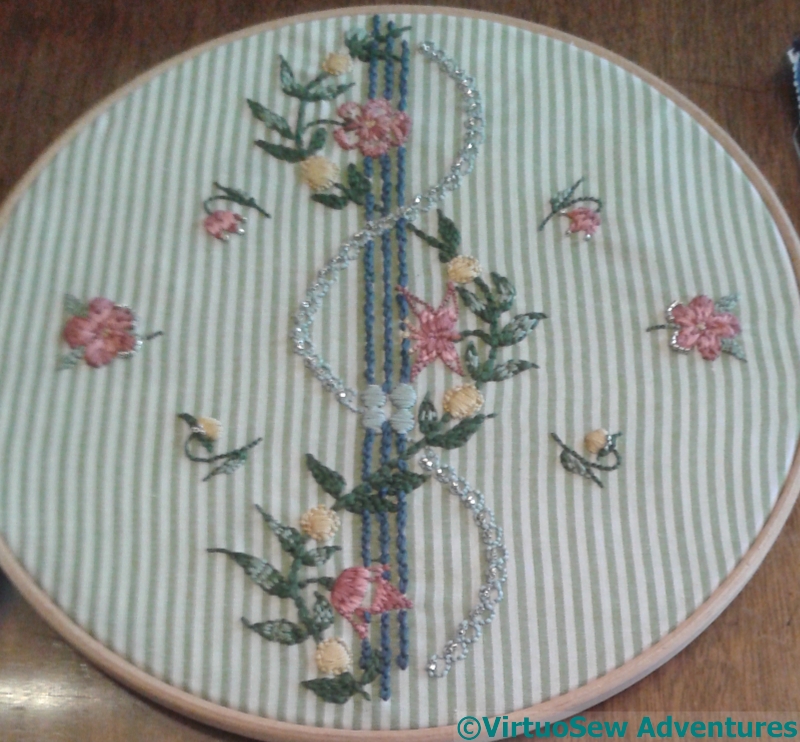
Lady’s Magazine Stitch Off – A Traycloth
Don’t Do This
One of the few things that made being poorly tolerable when I was a small child was the way my food arrived – on the good china, on a tray, covered with a traycloth. A hand embroidered traycloth, no less!
It wasn’t enough to encourage me to malinger, I hasten to add. But anything to give the invalid a lift…
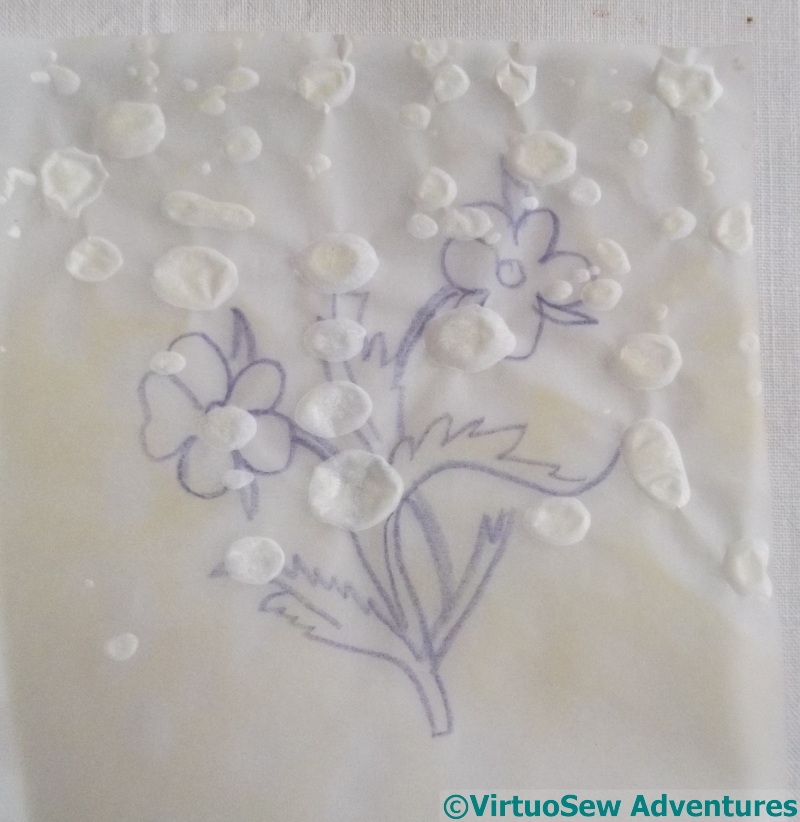
Not surprisingly, the family stock of traycloths is somewhat reduced since those days, many of those traycloths having disintegrated after long and faithful service, so I though that I would use some of the flower sprays found among the Lady’s Magazine Stitch Off patterns to embroider some more.
I decided to make my own transfers, and promptly discovered a forgotten hazard that I should have added to that post on Transferring Designs. Whatever you do, if you are using a steam iron, Switch Off The Steam! Not only is the transfer not usable again, it didn’t work the first time!
Flower Spray
Once I’d got the steam switched off, things improved, and I got two sprays transferred onto diagonally opposite corners of a traycloth I found lying around, unadorned. It’s linen, too, so I’m amazed it has taken me this long to embellish it!
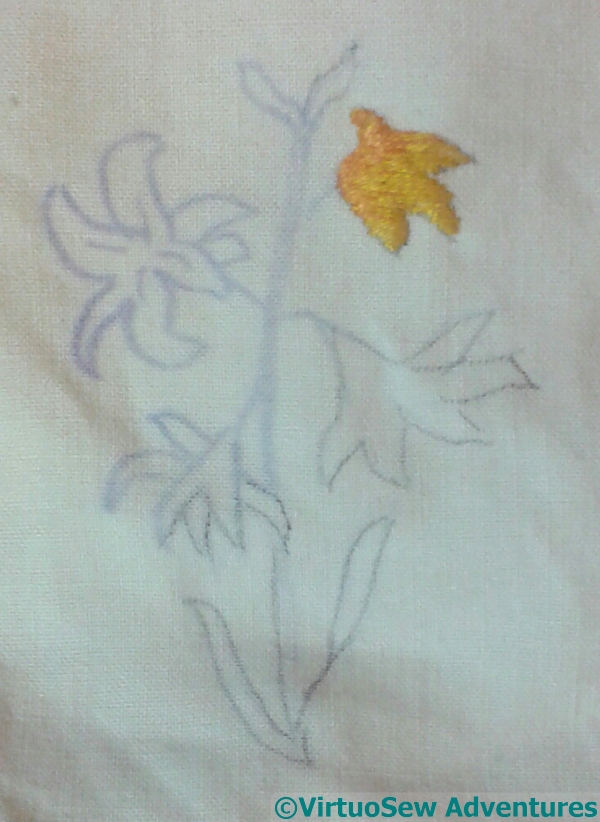
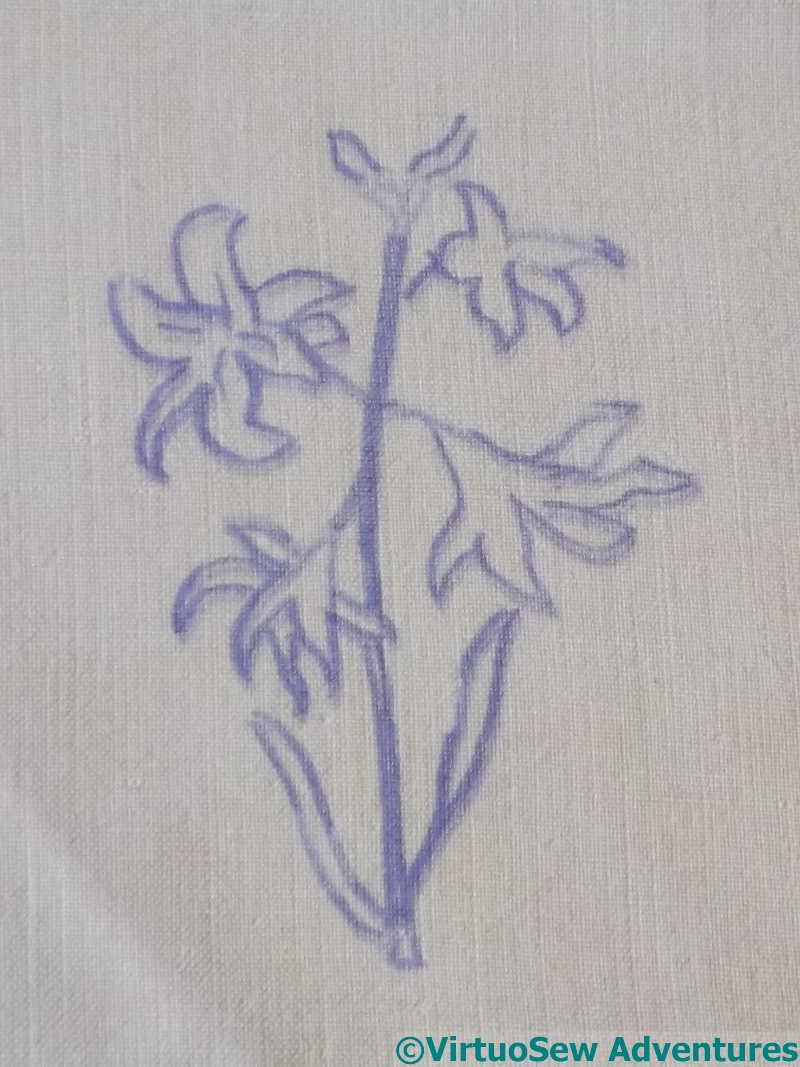
Starting The Spray
I’m no botanist, so I can’t hazard a guess at the flower this is intended to be. It may not be intended as anything up a pretty combination of shapes, of course, in which case any eccentricities of stitching are unlikely to matter very much..
I’ve decided to go for some bright, cheerful yellows – to cheer up any invalids who might see it!
Modern Stitch-Off Adventure – 4
Spare Needles
I’ve been gradually accumulating the skills needed to wrangle my embellisher successfully. It was worth buying the extension table that fits around the arm of the machine – that began to make the whole thing seem possible.
Using the net to hold down the fibres made a huge difference, and so did piling up props to keep the weight of the blanket from pulling on the needles. The props then worked better again when I covered them, and the table, with a slippery plastic tablecloth to stop them getting caught up.
I’ve also found that on my wooden sewing table, the embellisher “walks” with the vibration of its movement. Two layers of heavy batting on the table seem to have fixed that particular alarming problem, and then I bought some spare needles (20 of them!) and relaxed a little, which made it easier not to jerk at the fabric and break needles.
Fibre And Felt
So what with one thing and another, I’m beginning to feel as though I might be getting to grips with the embellisher!
I’m also beginning to learn which fabrics work. Obviously, the hexagonal net gets shredded and doesn’t get pulled into the fabric. Dense commercial wool felt doesn’t felt in well, in fact it seems to pull itself back out again; but real wool tweed and the lofty “pre-felt” pieces felt in like a dream, and end up looking almost as though they were part of the fabric.
Medallion
The fibres seem to remain quite lofty and furry, even after being fairly thoroughly felted in, although the merino becomes flatter than some of the other fibres. The more I work with the embellisher, the more I realise that there is rather more to it than meets the eye!
A lot more….
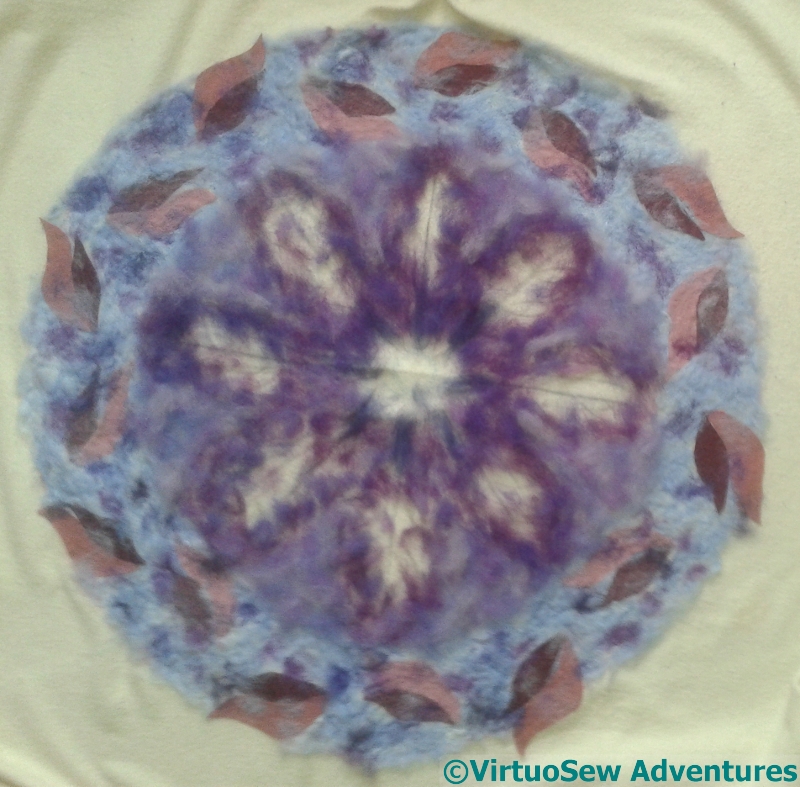
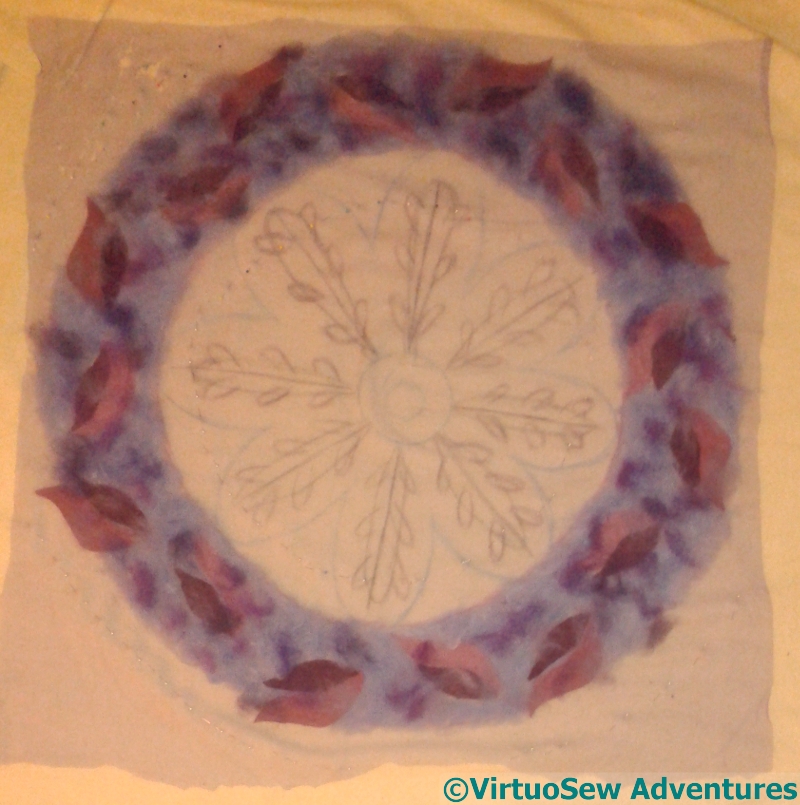
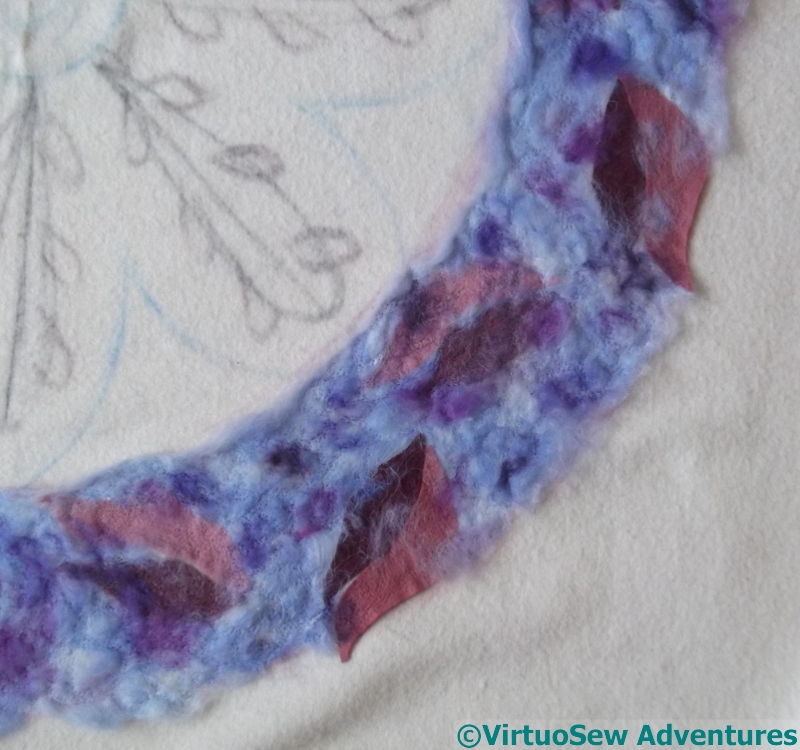
At the moment, the colours aren’t quite working, but my next stage is to start to add details, and tweak the colours a bit. I need to add the teals and greens that are part of the fabric pattern that gave me the colour-scheme, and also help some of the edges and lines of the pattern to come to life..
Back View
But I might also choose to use the back… The spotty, “dithered” effect is very like the overall effect of the fabric I’ve mentioned, so I need to consider whether to continue adding to what is at present the “front”, or to start adding tweaks to the “back”.
If it is still the back…!
Modern Stitch Off Adventure – 3
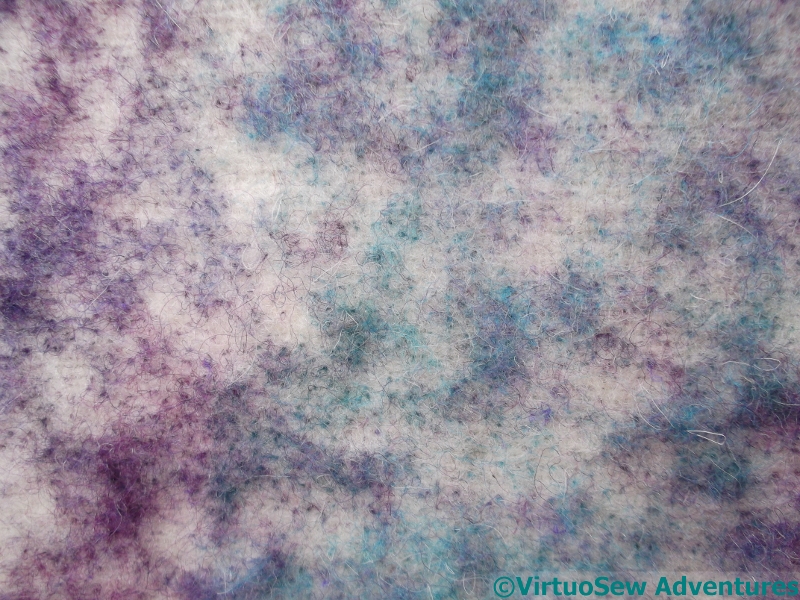
More Blends
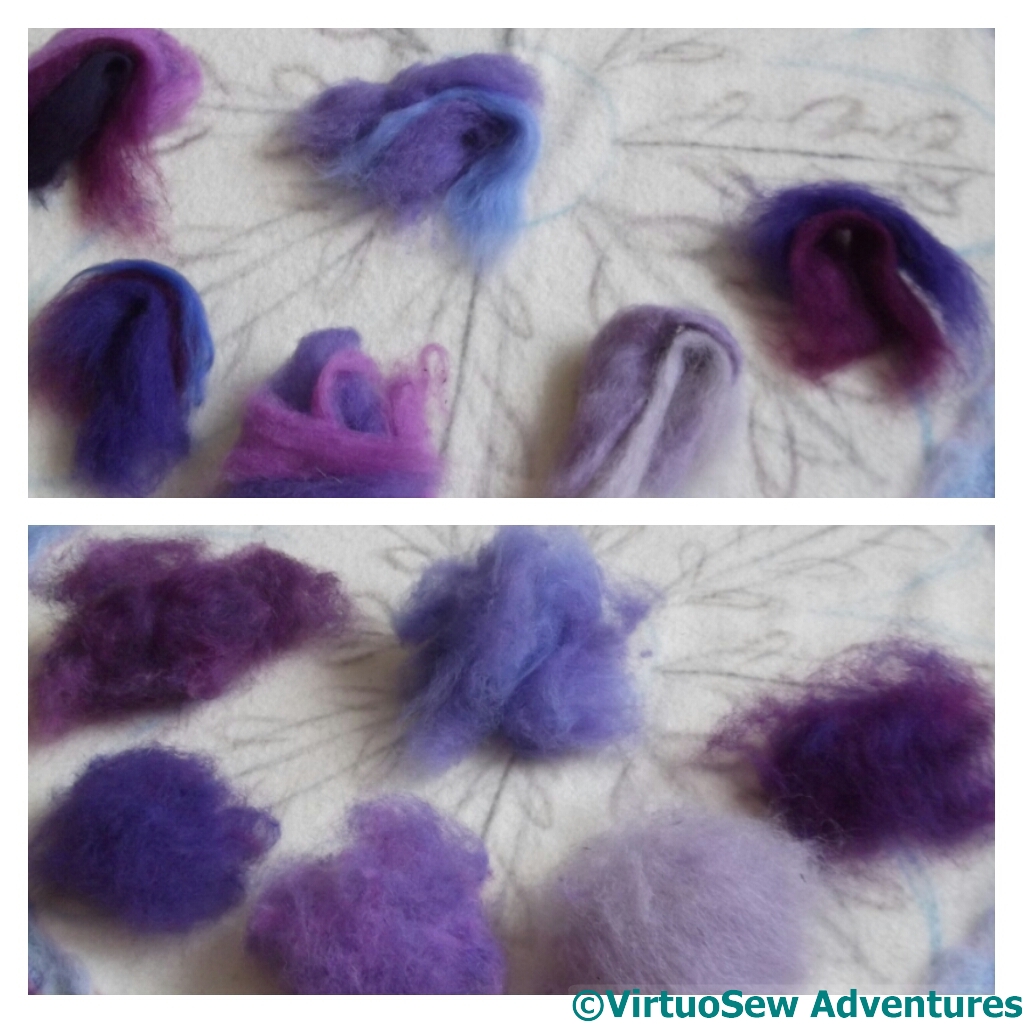
I mentioned in the first post about this project that I was planning to use what are technically referred to as “intimate blends” of fibres to create a more subtle colour range. If you click on the picture you will get a better sense of the varieties I am putting together.
If I were planning to spin these blends, I wouldn’t start from here. Some of the colours are lovely silky-smooth, long staple, Falklands merino, and others, labelled “Nepal Wool” in my local shop, are short staple, and very curly and springy. I’ve even got some very wiry undyed Devon and Cornwall Longwool, bought last Autumn at the Lost Gardens of Heligan (go, if you get a chance: we had a wonderful day out there!). So the characteristics are very different, and that matters quite a lot with yarn, although there is a way to do almost anything if you have the time to make it work. It matters less with felting, so some of my blends would make my spinning master splutter something like “Didn’t I teach you anything?”.
Beginning Central Section
Fortunately, what I am attempting is based entirely on the colours.
The blanket became very unwieldy at this point. I’ve since found the label and discovered it weighed four and a quarter pounds before I even began!
However, that wasn’t really the problem. I didn’t want to have pins within the area I was working, because they’d be certain to get caught up and cause more breakages (by the action of what my father refers to as the Law of Maximum Cussedness). The central section is about two foot in diameter, so a lot of as-yet-unattached fibre was rather more free to move under the netting than I would have wished. Furthermore, because of this I was finding myself tensing up and pressing harder on the foot pedal, and that was when I would get out of sync and break a needle or two.
Modern StitchOff Adventure – 2
Second Layer Of Circle, with net in place
Hexagonal net laid over the fibres helps to keep them from around the “foot” for want of a better word, of the embellisher. I’ve pinned it down, inside and outside the ring, and spent a lot of time struggling with a piece of blanket which seems to get larger every time I go back to it.
The challenge with an embellisher is to move the fabric when the needle unit is up, because if the needle unit is down when the fabric moves, needles get broken.
And I can assure you, they break. Eight, I think, by the end of my first serious day of using my embellisher.
The blanket got heavier and more unwieldy, but by the end of the day I was beginning to feel I might be getting the hang of it.
Early Stage Outer Circle
This might be in part because my sewing table was gradually accreting some props. I covered it with plastic tablecloth, to help the material slide, and stretched the plastic tablecloth over a clothes horse.
That in turn helped to raise the main weight of the blanket – the bit I wasn’t working on – so that it was no longer dragging down on the section I was working on.
I even piled up some of the blanket on the windowsill, and I do rather wonder what anyone passing by might have thought of the net curtains swishing tempestuously with no person in sight!
Shredded Net
What was definitely not feeling better by the end of the day was that hardworking and hapless net. It doesn’t get felted in – that’s why it’s such a useful addition to the armoury of the user of an embellisher – but it does get pretty thoroughly shredded. This may be in part because I’m not yet experienced enough to know when I can dispense with it, or it may be because I’m working on small parts of the piece at once because it is so big and heavy.
Fortunately I bought a couple of yards of it, for precisely this purpose!