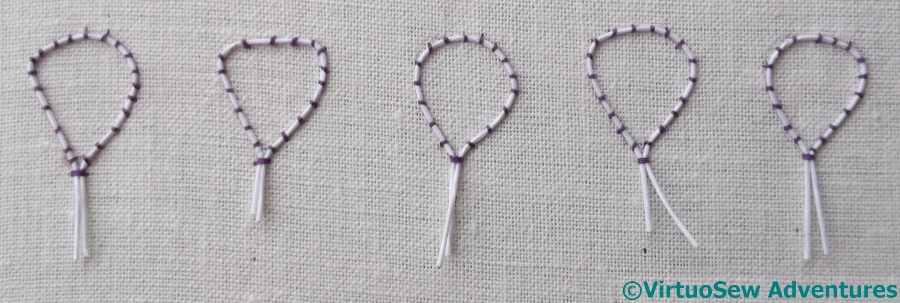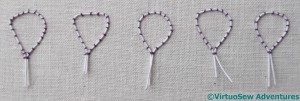
First Petals Wired
In her book, Mary Chubb describes the sort of frustrating experience that many language learners will recognise, in which a word completely useless for present practical purposes somehow sticks in the mind, while the immediately useful and necessary words just don’t. In her case, she says that while the Arabic word for “bread” required constant effort to remember, for some reason the word for “violet”, transliterated in her book as “banafsiga”, in her words “perched, fragrantly and effortlessly in my brain from the start“.

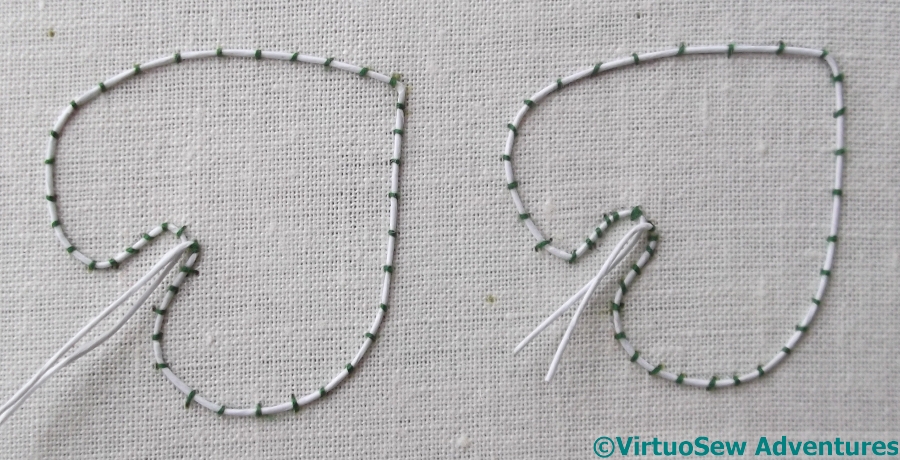
First Leaves Wired
Naturally, I’m going to have to do some violets to represent the experience, and I’ve decided to do them in stumpwork. I’ve done a little raised embroidery – I suppose those fellows Loading The Felucca count, and there’s always the Kiwi – but wired stumpwork is new. I won’t claim to be approaching it full of trepidation, because no-one would believe me, but I certainly have no idea which bits I will find easy and which I will find hard.
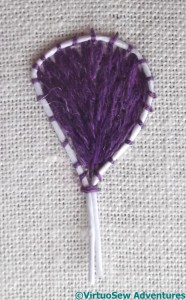
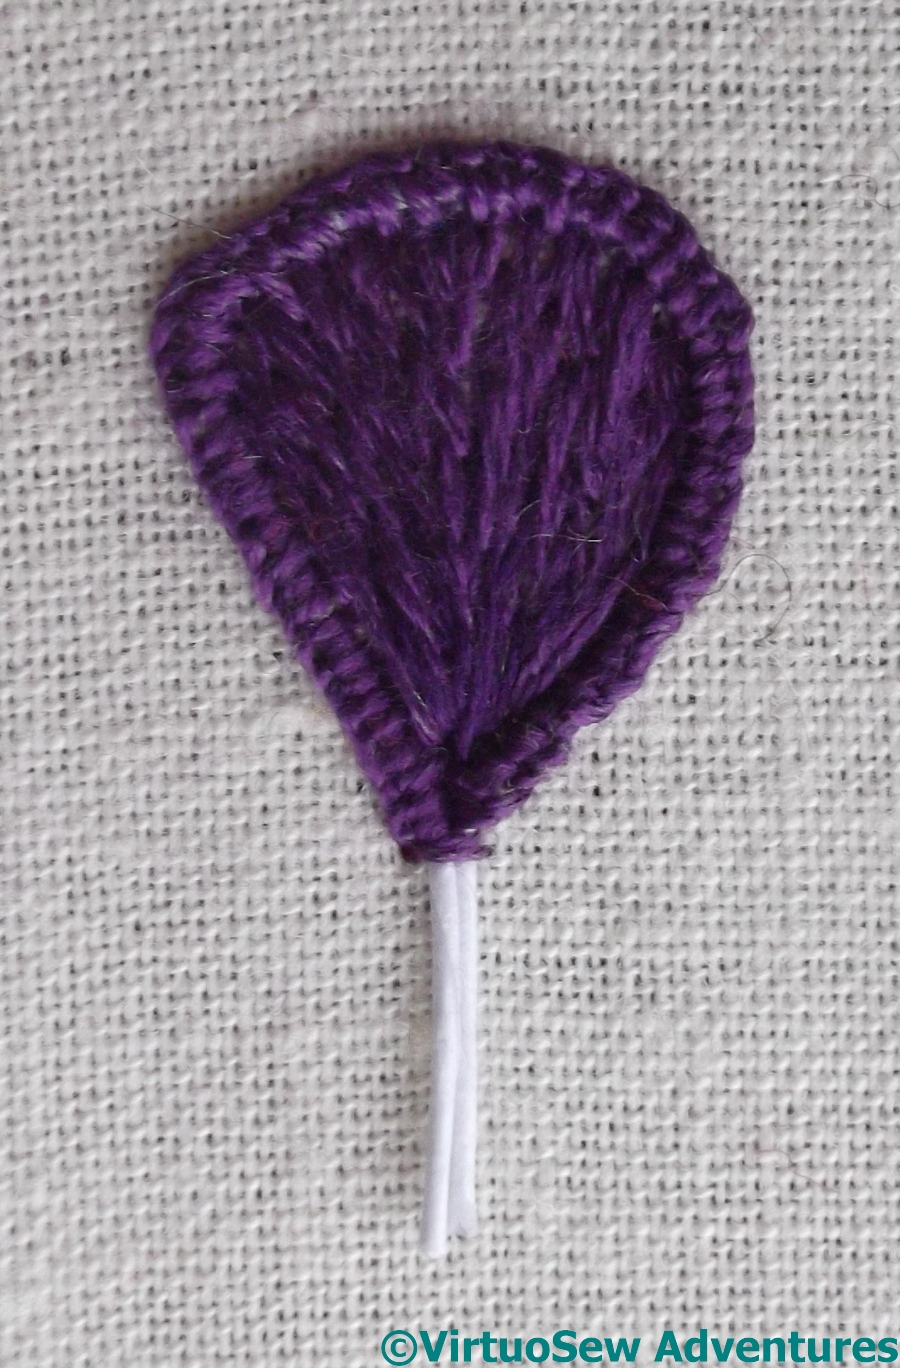
First Filled Petal
Actually, as it turned out, the first difficulty lay in working out what a violet should look like. I wanted the simple, old-fashioned violets that Mary, brought up in the early twentieth century, might have known, and my image sources online kept on introducing African Violets, which apparently aren’t the same thing at all.
In the end, following a suggestion from a Twitter friend, I went rummaging on the RHS website, and found a complete rundown on viola odorata, which told me it has five petals, heart-shaped leaves, and is “mat-forming”, which I take to mean it spreads out rather than up. I don’t know how many flowers or leaves my bunch will have in it, so I’m expecting to do more than I need and pick the best.

Edge Covered
I’m using ordinary stranded cotton on this occasion (“Gosh“, I hear you cry, “What happened to all the eccentric yarns you use?“, to which I reply, “There’s paper-covered wire in there – what more do you want?“), and in this first flower, I’m going to use two strands for the embroidery. If I think it looks a bit chunky, I can always move on to single strand for subsequent flowers.
Thus far, I’m rather enjoying it. I may yet move on from these violets to the wired needlelace rose I saw in a Needlecraft magazine twenty-five years ago, and never got around to…

Trials
I mentioned when you last saw the “View Of The Excavation” that I was rather anxious (for which, read: positively panicky!), because I’d been staring at it, on and off, for weeks, and found myself completely lacking in ideas and inspiration. I hadn’t the vaguest idea where to start, and I was even beginning to wonder whether I ever would. Since I still knew I wanted to do it, this was a bit of a problem…!
Finally, I screwed my courage to the sticking-point, and decided that the thing to do was to just dive in, playing with the stitches, and not necessarily expecting to like them the first time. My Twitter followers became accustomed to pensive tweets, wondering whether I liked something or not…
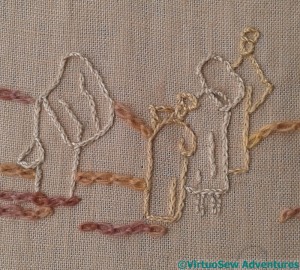
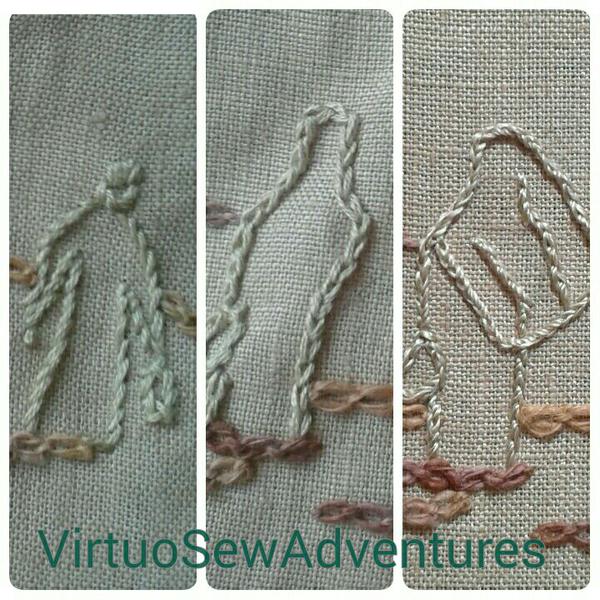
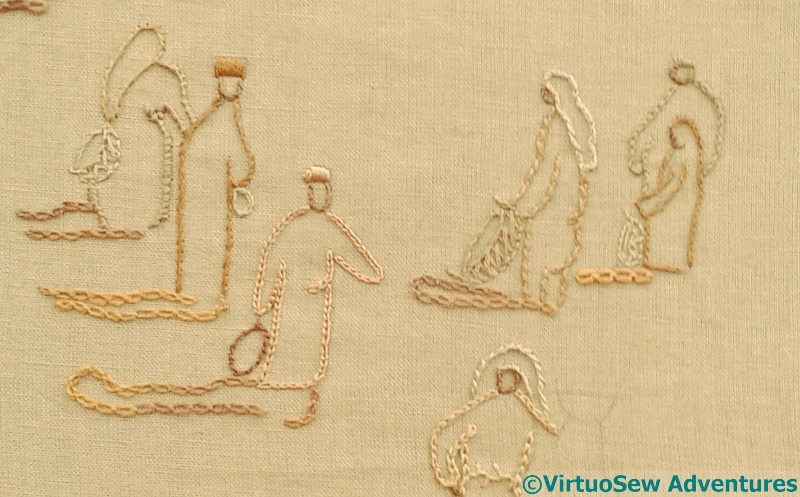
Very Distant People
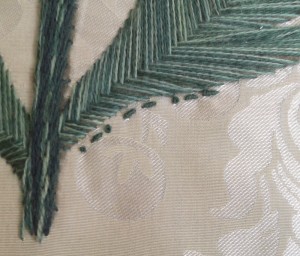
Gradually, a vague sense of a system, or at least a pattern of stitch choices, began to emerge. The most distant figures were outlined using a single colour and a single stitch for each figure.
In fact, in this group, there are only two colours, and only the one stitch – split stitch, which is very good at providing a slim, unobtrusive, but definite line. If anything, there may be more lines in here than I really need, but true to my decision not to second-guess myself, I’ve left it for now, and when I have finished the whole panel, I’ll review everything again, just to be sure…
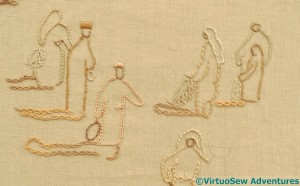
Distant Group
For the group in the middle distance, I began to use a greater variety of stitches and colours, even within each person.
One element which remains the same throughout the panel is the baskets. All of the baskets are worked to create a criss-cross, woven effect, except that the stitches in different directions aren’t interwoven. This helps to make them a little more fuzzy, and worn-in.
The people are worked with stem stitch, reverse chain stitch, twisted chain stitch, and even rope stitch, which is a knot stitch, but with the knot hidden by an arm of thread. I’m beginning to hope that I might be pleased with this when I’ve finished it!
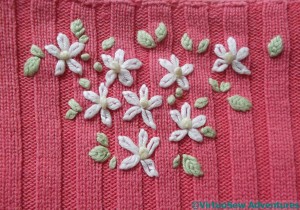
Back Of Top
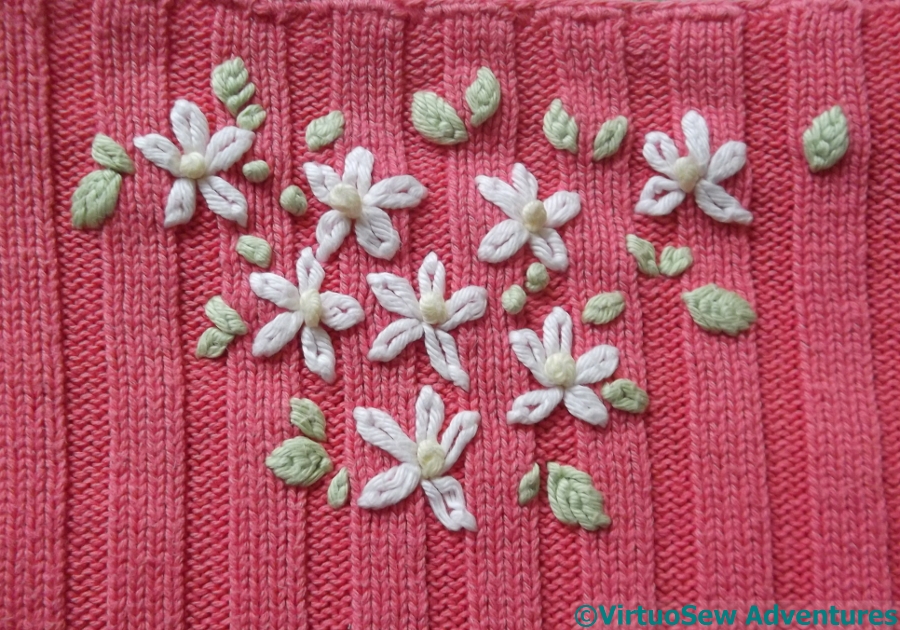
Since summer is here (supposedly!) I’ve changed to summer clothes. Pink is not usually my colour, but I found this top in a charity shop and it goes beautifully with the crepe skirt I was wearing that day.
However, I got slightly twitchy fingers and improvised some embellishment for it. The top is knitted in quite a heavy cotton, so the embroidery is in soft embroidery cotton, and it’s very, very simple.
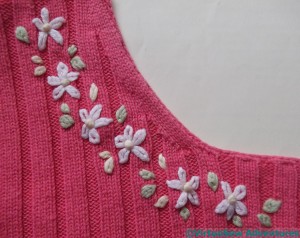
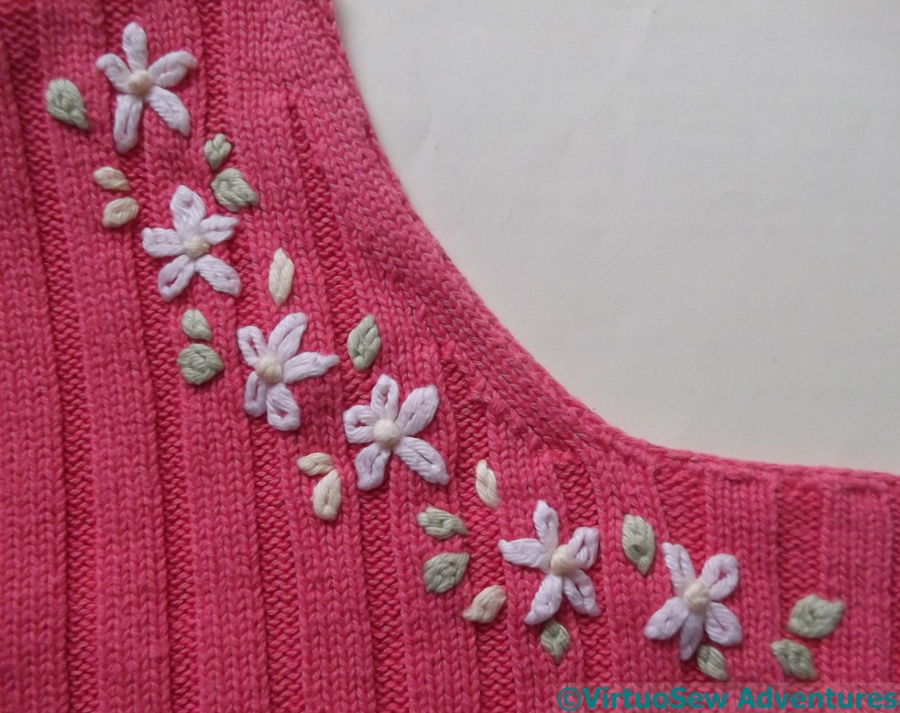
Side Front A
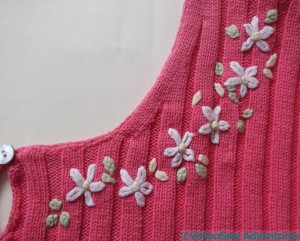
Side Front B
Only three colours – white, pale yellow and pale green. And only three stitches – Lazy daisy petals, French knot buds and flower centres, and leaves made of nested fly stitches. I didn’t attempt to make the sides at the front identical or symmetrical, only to make the front appear balanced, and when I’m wearing it, it does. The ribbed knit of the top made stitching tricky at times, since I was trying to avoid piercing the thread, but perfection is overrated, especially for a casual top.
The little spray of flowers at the back does get seen (by others!), because although I have long hair, I almost always wear it pinned up; but of course the frustrating thing about embroidering the back of a dress or top is that you never get to catch sight of it unexpectedly and get the chance to think “I did that!”.
Never mind, like the contrast lining or facing, I still know it’s there…
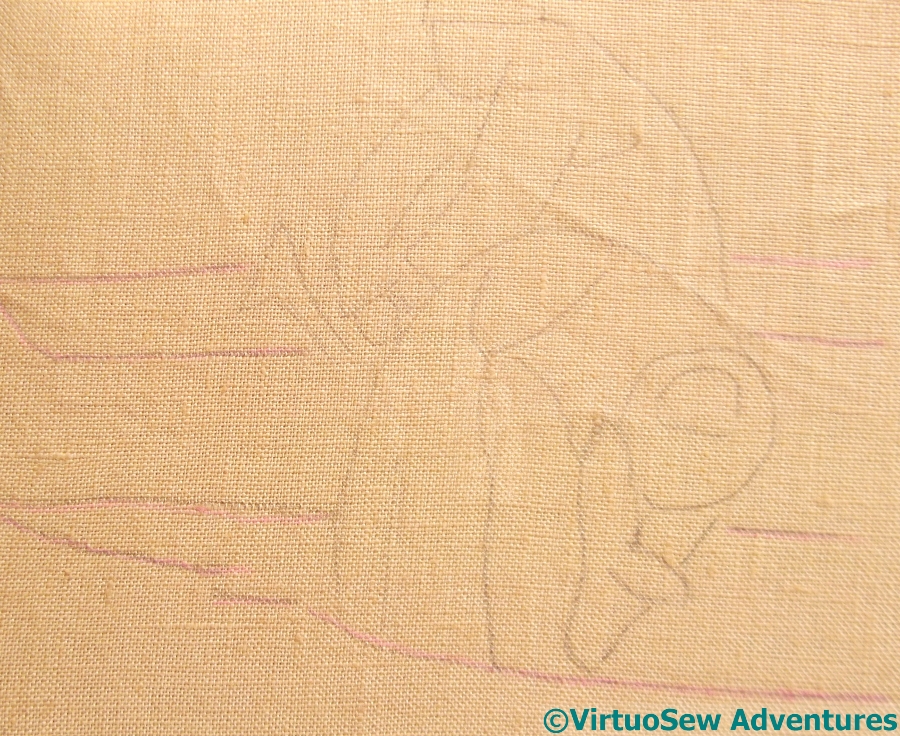
Finding The Ground
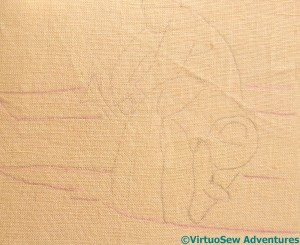
When I first looked at the picture of the Excavation, I realised that when I had only a small section on view, I was finding it hard to work out what was ground and what was human, so my first action was to go over the ground lines again, using a pinkish quilter’s pencil. It helped a little…
I decided next that if I could get the lines for the ground stitched, it should make decisions about stitching the humans easier. And those decisions need to be made a great deal easier, because since I transferred the design onto the fabric, I’ve stared at it, on and off, for weeks, wondering frantically how I was even going to start on it. I don’t usually suffer from this sort of bewilderment, so I’m in a terra incognita, here.

Not At All Sure
And truthfully, this isn’t as much help as I hoped. I’m working in the hand, because I find a lot of the basic stitches easier that way, and I am expecting it to be worked largely in line stitches.
The lines that have been stitched are all the ones in the design that indicate the ground surface (or, in the front, trenches and spoil heaps). There’s not enough structure here to help hold the panel together as I’m working on it, so I am going to have to think a little harder, work out a system for the people, and possibly completely rework the ground when I’ve done the people.
I know I can’t expect all my projects to flow as easily as did “Loading the Felucca”, but I really had hoped for a little less head-scratching and a little more stitching!

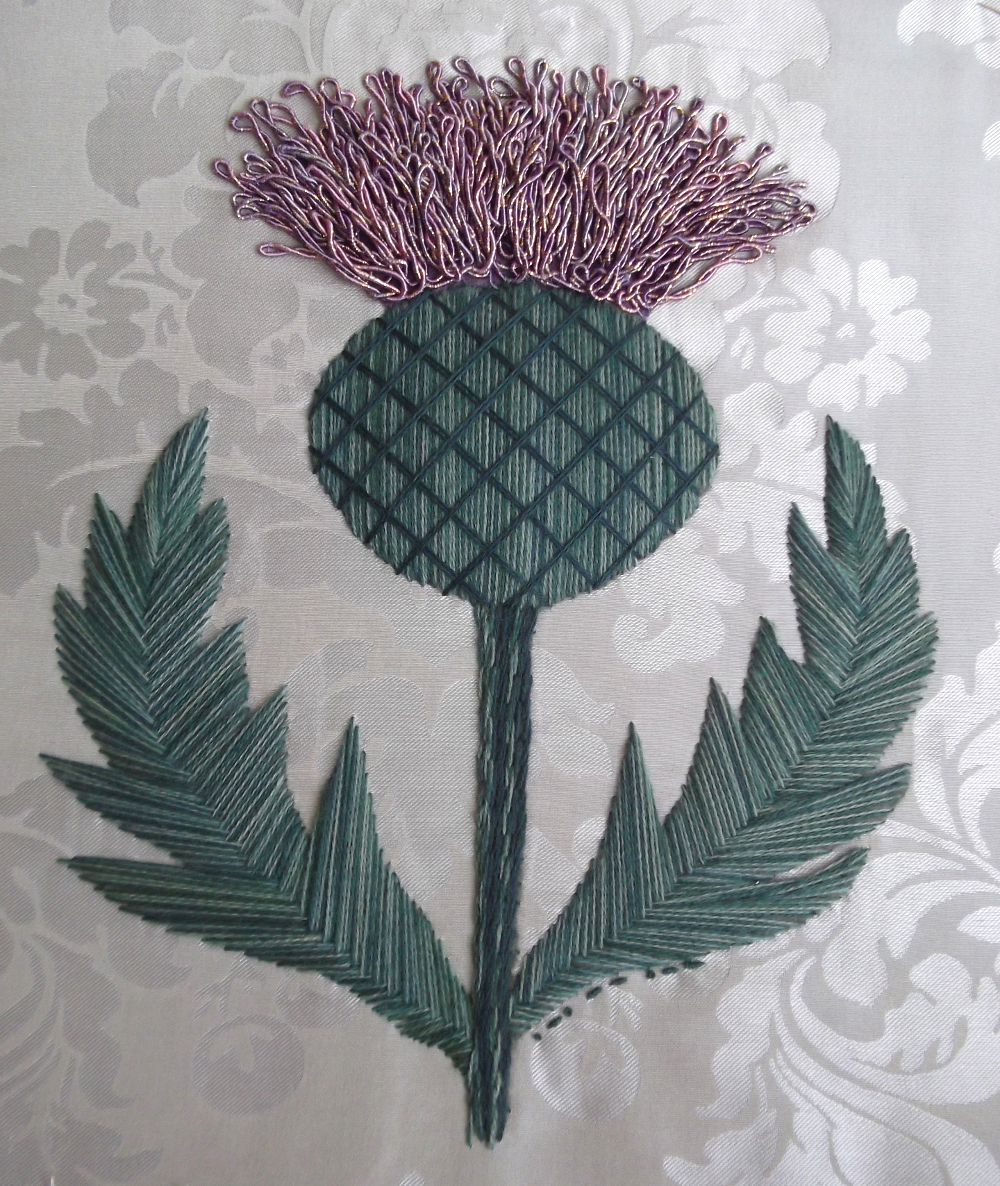
Thistle Finished
Well, I decided in the end to unpick the silk pearl purl. I was extremely disappointed about that, because the whole idea of this project was to provide an underlayer for the pearl purl.
On the other hand, I do think it turned out rather well. The gold and viscose gimp makes a beautifully tangled, almost “fluffy” head – there’s something like 10 metres in that head, an entire skein of thread, uncut, and twisted back on itself in little one-inch fronds.
Even if I did feel as though I was using my pins more like a windlass!
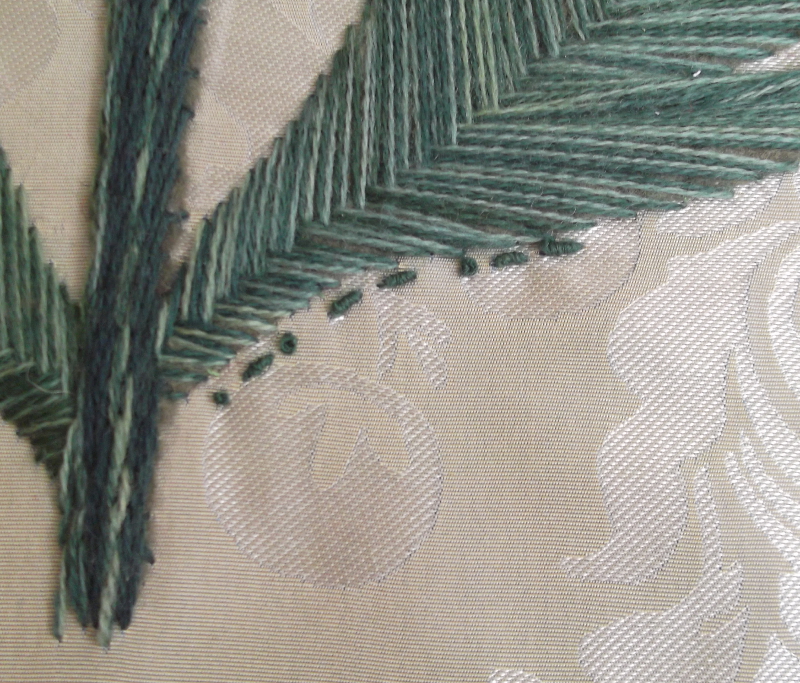
The three shades of green wool break up the otherwise rather monolithic leaves and I’m very pleased with my fishbone stitch variation. I took care to make sure the two strands I was using lay side-by-side rather than twisting up, but in truth that wasn’t much of a problem.
Thistle Signed
The stem I worked in raised stem stitch band, incorporating rather more of the dark thread, and trying to make sure that I didn’t catch any odd bits of the felt – harder than it looks!
Finally, having decided that my planned embellishments (the silk pearl purl) were blemishes rather than embellishments, I took them out (cautiously) and signed with my usual Morse Code initials…
I didn’t have any plan for this piece, but I’m so pleased (in spite of my disappointment!) that I’m quite seriously considering framing it up.
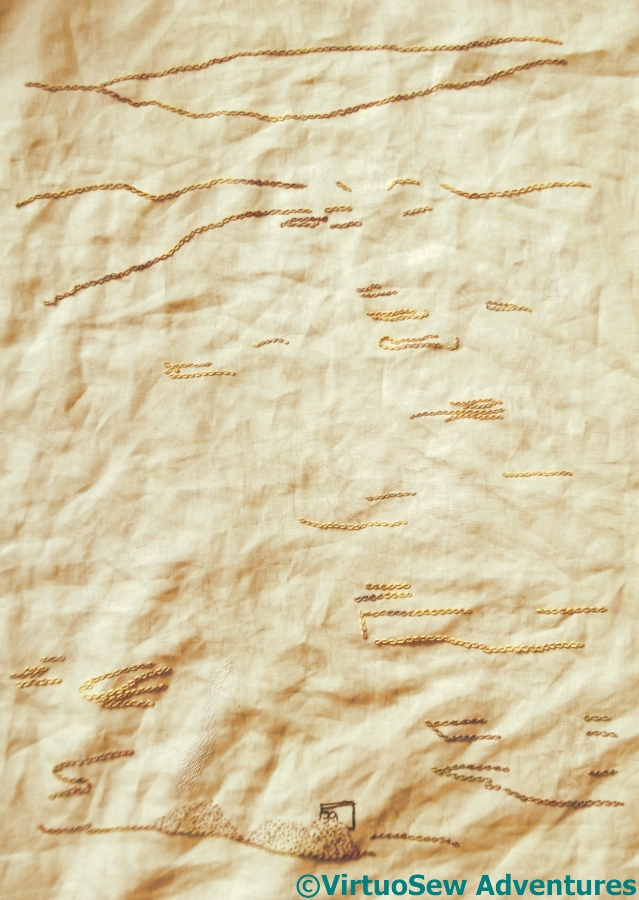
U.25.11 Detail
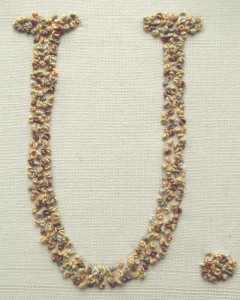
The whole idea of this patch is to recall an incident that Mary Chubb describes, in which sand adhered to a freshly-typed page, creating “a rather pretty embossed effect”. In the end, I chose the grid reference of the Expedition House, where the team lived during the digging season.
I used a selection of silk threads from Mulberry Silks, from a colour family called “Old Cotswold”, which I’ve also used for the panel showing the Crock of Gold Hoard. It included a russet, a mid-grey and a very pale greyish-white as well as several sandy colours.
I used all of the colours this time, and discovered that the threads are not all the same, some being finer than others. That’s perfect in this case – some of the grains of sand would be finer than others, and I could accentuate or reduce the differences by using more or fewer wraps in my French Knots. I think it looks really very sandy indeed!

U.25.11 Typed In Camelback In A Sandstorm
It took a remarkably short period of time. And what’s more, considering that I’m not really a fan of French Knots (I never could get the hang of them when I began embroidering), I rather enjoyed it. Although I must admit, it was beginning to get quite tricky, what with all those layers of thread. I swapped over to a sharp needle and even that was a struggle!
Still, that’s another piece completed…

Sandy Stitching – click to open in a browser tab and run the animation
And, as a bonus – an animation. This was put together by Simon Walters (@cymplecy on Twitter), using some photos I provided. I’m impressed with what he produced, considering that I didn’t take the pictures in a very controlled environment, and it will give you some idea of the view I had as I built up the effect, colour by colour
Thank you, Simon!
The whole idea of the sampler on the case is to have a few reminders of stitches I haven’t done before, or use only rarely…
First stitches
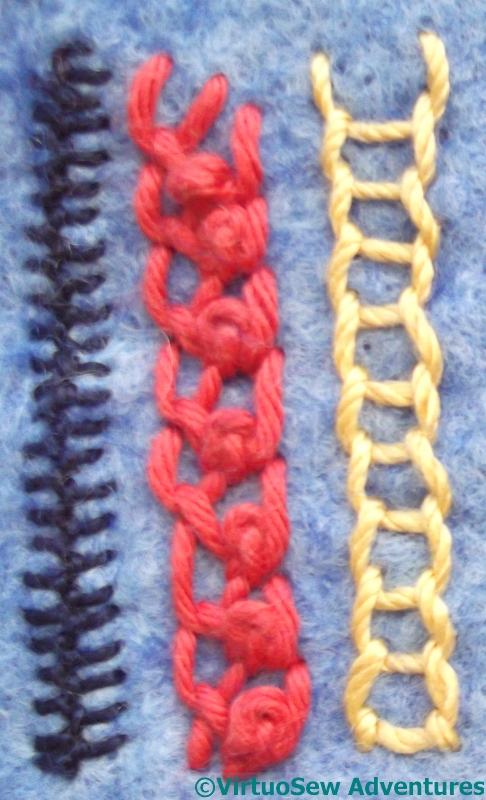
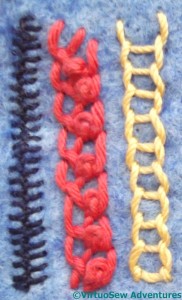
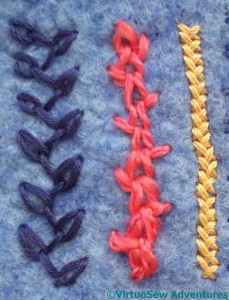
The first row was Fishbone Stitch in navy blue pearl cotton. I wanted something definite to create the edge of the panel. It was a little tricky to stitch on the soft pre-felt, but as I soon remembered – that would be true of all of them!
Next, Mountmellick Thorn Stitch in reddish-pink cotton. I’ve only used this once before, on the Jacobean Work Panel, largely because I have not found a suitable application. I enjoyed it, though, and now the stitch will be before my eyes more regularly, maybe I will find one…
Open Chain Stitch is an awkward stitch. In Barbara Snook’s “Embroidery Stitches”, she says it is best used as the basis for further ornamentation, such as single chain stitches across the bars. and I think you can see why. I used a pale yellow pearl cotton. I like the thread, but the stitch is one that needs more work!
Second Stitches
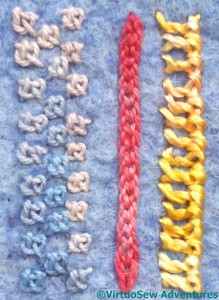
Next, Sorbello Stitch, worked in overdyed blue mercerised cotton. I’ve used this stitch before, to work the modern villages on the Map of Amarna, but at this larger scale the form and texture of the stitch is easier to see.
Hungarian Braided Chain Stitch has become one of my favourite stitches since I used it for the Silken Crane and the Antelope Frieze. This version uses an overdyed pink/red pearl cotton. It does show colour variations nicely!
Bonnet Stitch is a new one for me. I am absolutely sure that yellow rayon is not what the stitch was developed for, but it worked rather well, and I enjoyed it.
Third Stitches
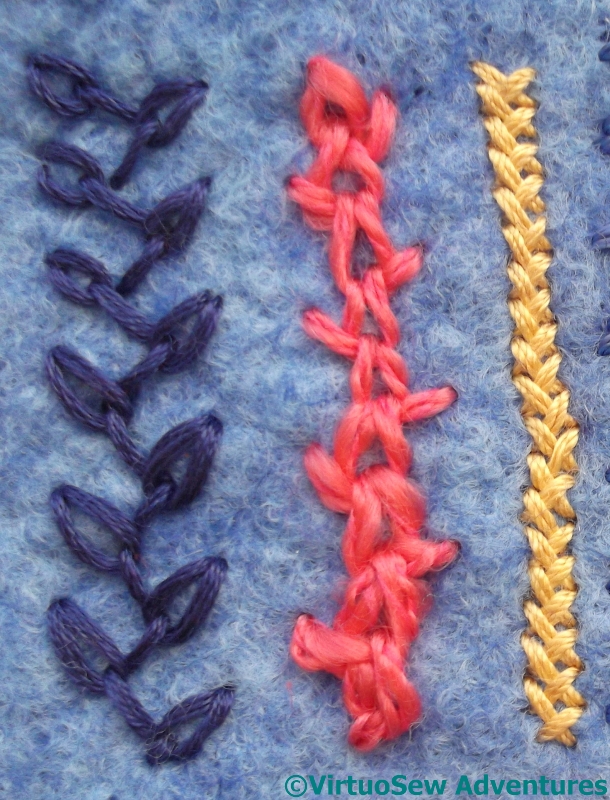
I chose Feathered Chain Stitch next because I wanted something fairly wide, and fairly open. The navy stranded cotton makes a strong central axis for the panel.
Petty Chain Stitch is a new one for me. I found it in one of the books by Edith John that I have. She named it after the student who created it by accident when she confused the instructions for two stitches – immortality of a sort, I suppose! I’ve used a pinkish wool slub, doubled to even out the thickness. I’ll try to remember to use this again, in a less textural thread. I think it could prove useful.
The Herringbone Stitch, I chose because I wanted something narrow. You will have noticed I’ve tried to create a rhythm of stitch widths, although it isn’t a repeating pattern as such. The golden pearl cotton has a lovely shine.

Fourth Stitches
Up and Down Buttonhole Stitch is another old friend. The challenge with this blue overdyed rayon floss was not in the stitching, but in wrangling the fifty or so metres that joyously tangled themselves as soon as I untied the skein!
I’ve never used Butterfly Stitch before, either. I’m not sure that the textured pinkish cotton does it the best service, but it creates an interesting effect.
Feather Stitch is harder to stitch well than you might think. The de-twisted gold rayon cord certainly didn’t make life easy, but it helps create an emphatic stop at the end of the panel.
An Extensive Collection
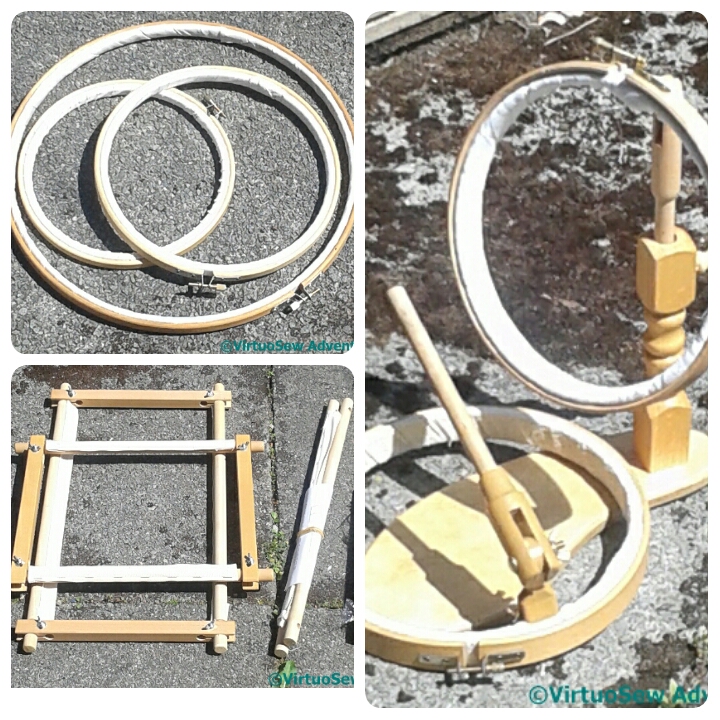
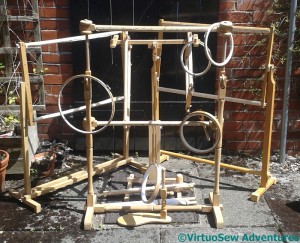
My mother and I are planning a panel for next year’s Christmas Cards, and I went in the loft recently in search of an embroidery frame of a suitable size.
I brought down every bit of wood that looked vaguely embroidery-frame-like, and spent a puzzled hour or so putting them together.
And got a very nasty shock. I’m quite sure I didn’t buy all of these.
Do they breed?

An assortment of frames
Actually, in my own defence – some years ago a local embroideress died, and her daughter wanted to give away all of her stash and equipment. Preferably all at once, to one person.
So I toddled off, burdened with I-didn’t-know-quite-what, and – not needing any of it at the time – put it in the loft. Then life got very busy and I didn’t get around to doing the stocktake I’d intended.
Until now.
And the most galling thing of all is that not one of those frames is big enough for the project we have in mind!
One of the reasons Mary Chubb was sent out to Egypt with the Expedition was to ease the administrative burden in London by bringing the administration of the dig under control. In the nineteen twenties, of course, typing was not the mundane skill it has become, and although there was a typewriter in the Dig House, the excavation directors were not skilled in its operation, producing typed reports that looked, in Mary’s words, “as though they had been typed on camelback in a sandstorm”. The first task when a report arrived had always been to retype it into a more legible format so that no-one other than the secretaries would have to struggle to decipher it.
When she is out in Egypt, she soon discovers that some of the difficulties are not easily surmountable, even by an experienced typist. Sand adheres to the damp ink left by the typewriter ribbon, creating “a rather pretty embossed effect”, which sadly she isn’t always in the mood to appreciate, especially when dragged away from difficult, painstaking typing of lists to help with the excavation of delicate finds..
Text Laid Out
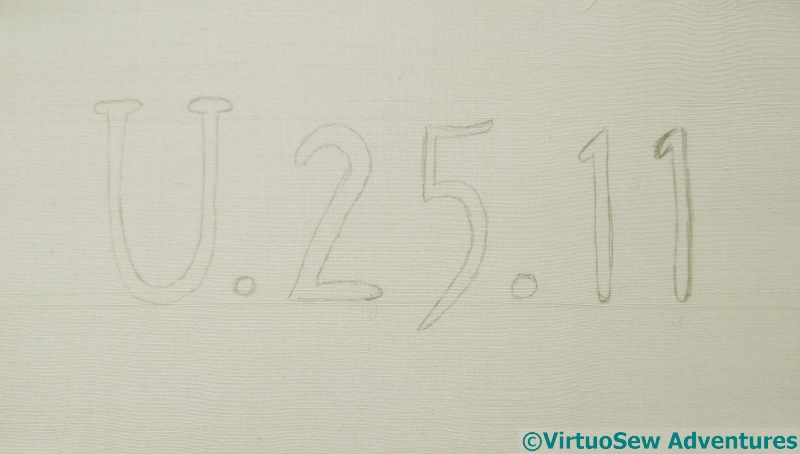
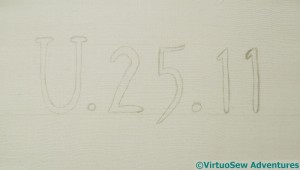
It was easy enough to work out how to represent the sand sticking to the paper – close-packed French knots in a mixture of sandy colours – but not so easy to decide what text to use. Maybe “faience”, a commonly used material for jewellery and ornaments? The names of the expedition members? References ascribed to finds?
In the end I settled on “U.25.11”, which was the site grid reference for the Expedition House, which was built up on the remains of an original house of the Amarna period. I don’t, of course, know precisely which typewriter Mary used, so I have sketched onto the fabric something that looks a little bit like typescript. It isn’t exactly right, but the letter and digit forms have been sketched from looking at the letters in a typescript we recently found, of an article my father wrote in the 1960s. My whole family is going to be involved in this project, whether they like it or not, and by whatever circuitous route I may devise…

With Inspiration
Here is something else I completed while I was recovering from Loading The Felucca, pictured with the two gifts from Alison that inspired my colour choices, a pincushion and a needlecase in English Paper Piecing. Considering that I selected my colours from stash, I think they have a surprisingly similar “feel”.
Some of you will recall that a couple of years ago I made a case to hold a wooden stiletto and mellor as a gift for my cousin. I’ve finally got around to making a case for three bone stilettos and a wooden mellor for myself!
I’ve included several stitches I haven’t done before, or use only rarely and I’ll write about those later.
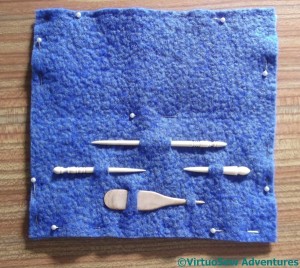
Tools In Place
It was a little tricky to find a suitable layout for the tools, but I finally decided I liked this one. I’ve blanket stitched the edges together, now, and I intend to needlefelt the layers together, just as I did with the other one.
When I find my needlefelting tool, which has gone Absent Without Leave!