
Category: General Embroidery
More Canvaswork Inspired By Clarice Cliff
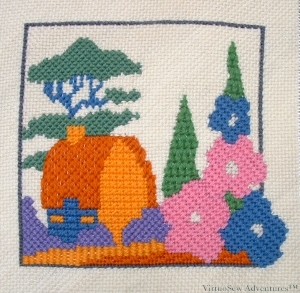
Canvaswork Hollyhock House
Emboldened by the combination of fun and applause (admittedly only from my parents at that point!), I moved on to the “Hollyhock House” design from the series of Designs Inspired by Clarice Cliff.
Again in two versions, and again I haven’t photographed the tent stitch cushion.
Hungarian Stitch is another of my favourites, and you will notice that there is still more Cashmere Stitch, Diagonal Mosaic Stitch and Upright Cross Stitch. I chose to work the poplar-like trees in a Sheaf Stitch variant, which I think was not hugely successful, but an interesting experiment. The background is Linen Stitch (diagrammed on my post about The Lady By the Lake) as it doesn’t obtrude, but it does cover the canvas thoroughly.
At some point soon I should find a suitable thread for the outlines and then finish these two. Then I can turn them into cushion panels or something and move on…
A Bear Called Paddington
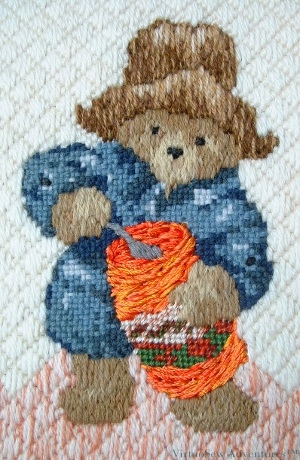
A Bear Called Paddington
I’ve always had rather a weakness for Paddington Bear, and this painted canvas caught my eye a few years ago, hanging up in a market stall in Leeds when we were visiting friends. Immediately I saw in my mind’s eye how almost every section could be worked, starting with using rayon thread for the jar of marmalade. In fact, as I recall, the part of this canvas that gave me the greatest difficulty was the choosing a stitch for the background!
Paddington’s duffle coat is worked in Linen Stitch using ordinary tapestry wool, and his fur is worked in Appletons wool using a sort of random, closely packed long and short stitch. Looking at this piece analytically for the first time since I worked it, I’m really quite pleased with how the Linen Stitch works for the dull woolly fabric of the coat, and how believable the fur has turned out to be.

Paddington's Face
I’m also very pleased with how different the hat looks. It too is worked in long and short stitch, but I used longer stitches and Paternayan Persian wool. The difference lies in thickness of the individual strands and the different level of sheen – Persian wool strands are rather thicker and have a lovely muted sheen, whereas the Appletons wool produces a slightly duller surface. The tapestry wool, of course, is almost completely matte.
Look at that little face! The only thing I missed is a smudge of marmalade on his nose..
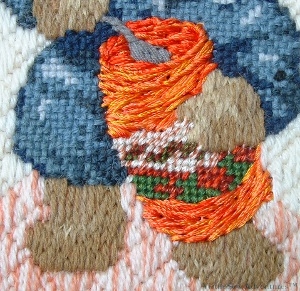
Paddington's Marmalade Jar
Then there is the jar of marmalade that first caught my eye in the first place. I worked that using six strands of rayon, mixing orange, red, and yellow strands in the needle, and working rows of stem stitch around the jar. It looks much glossier and stickier in real life!
Finally, after much head-scratching and puzzling, I worked the background in a slightly enlarged version of Hungarian Stitch, using Persian wool. I blended a second colour into the base to give a sort of grounding section so that Paddington wouldn’t be suspended in mid-air. I can’t think why the designers didn’t do that, as when I was a child (I’m assuming this was really intended for children and not for grown-ups!) I would have been rather worried by the character not having any ground beneath their feet!
The Lady By The Lake – another early project
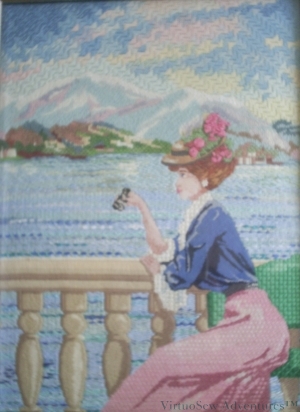
The Lady By The Lake
This was another early project. It was a DMC painted canvas, which was clearly intended to be done in tent stitch using tapestry wool. As it is eighteen inches by nearly two feet, that would have driven me wild…
I bought it almost entirely because I thought I could see a way to get the folds in the dress to appear the right shades without using as many colours of thread, and I wanted to experiment. So I used a bordered Hungarian Stitch, worked in three shades of pearl cotton and combining them to create the impression of five shades in the skirt. It worked!
The blouse is also pearl cotton, this time Linen Stitch, which is effectively the back of Basketweave Tent stitch put on the front. It produces a very solid, durable background and I’ve used it on cushion projects in the past.
Linen stitch in canvaswork
The only drawback is that it takes so long to do. I’ve diagrammed it here because I can’t find it online, and I’ve found it such a useful stitch myself. It is worked diagonally, just like basketweave tent stitch.
The face and arms were worked in petit point, separating the double threads to create single thread canvas, and worked in stranded cottons (blended). The hair (she didn’t have such glorious chestnut hair on the painted canvas itself) is also blended stranded cottons, worked in a sort of long and short stitch. The hat has spider’s web stitch roses on it.
I changed the wooden, slatted backed bench of the canvas into a padded one so that I could do the upholstery in Reversed Mosaic Stitch. The lake itself took ages to do – row after row of darning stitch using all sorts of ribbons and threads, including some truly ghastly knitting acrylic which would have made a dreadfully uncomfortable jumper, but made a very good lake surface, with that slight sparkle you get when there’s just enough breeze to move the water.
The sky and clouds are all Milanese Stitch, worked in blended Persian yarns with three strands in the needle. It works, but now I’ve read Terry Pratchett I’m afraid it makes me think of the sky above “gnarly ground” in “Carpe Jugulum” – not such a peaceful thought!
Tudor and Stuart MasterClass Stitches – Month Six Stitches
Last time, I found the stitches rather tricky in the gold thread and tried them in pearl cotton afterwards to see whether that made them easier. I’m not sure it did, as a matter of fact, but it did show me that the relative scale of fabric and thread would also influence not only the appearance of the stitch, but also the experience of stitching it.
Cross Shaped Guilloche Stitch in pearl cotton
So this time I started with pearl cotton. I can’t say it was markedly easier, especially the Cross Shaped Guilloche Stitch Variation. This time I think the thread was too heavy for the stitch at the scale permitted by the fabric, and furthermore it turns out that both of my practice cloths may be plain weaves, but they are not in fact proper evenweave fabrics, even if they look as though they should be.
I counted very carefully, but somehow it looks as though it should be enclosed in a rectangle and not in a square. It also looks rather a tangle!
Guilloche Stitch Variation in pearl cotton
The Guilloche Stitch Variation here is in fact the one I have seen in some of my books on embroidery stitches, although those have been somewhat simplified by comparison. Still, I can imagine using it to create a braid effect, and I’m sure that I will think of something to use the cross-shaped variation for, once I’ve had a bit more of a play, and tried to find the right scale of thread to fabric.
Month Six Stitches In Gold Thread
So, finally, here are the stitches in the gold thread. It’s harder than you might think to keep the thread in order, and in the end I decided to make a virtue of my difficulties and in the Guilloche Stitch variation I’ve got two of the sections showing a close, tight version of the wraps, while the other three are looser and more loopy.
In the Cross Shaped Variation, again I thought I had counted carefully, but again it didn’t come out quite square. I think I might try again but doing the stages in a different order so see whether that helps me in any way. I also found myself, in spite of all my efforts and in spite of having the instructions beside me, getting the thread wraps weaving over where they should have gone under and under where they should have gone over.
More practice needed, that’s for sure!
In fact, it occurs to me that there is a lot to be said for practising each of the stitches on the actual cloth before putting it in place on the sampler. Just as a final check. . .
A view from my bookshelf. . .
Two Of My Books
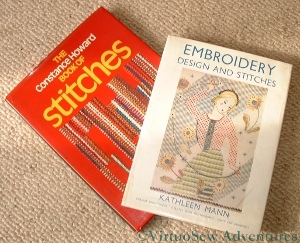
Like so many of us, I have probably several shelves’ worth of books about embroidery scattered around the house. Some of them never make it back to the shelves because they are always beside me as I work (Barbara Snook’s “Embroidery Stitches” and Yvette Stanton’s “The Right Handed Embroiderer’s Companion“), some of them are put aside for study when I have leisure (when will I learn?), but the rest of them are shelved (not all in the same place) ready to be pulled out to give me entertainment and pause for thought.
One of those is Kathleen Mann’s “Embroidery Design and Stitches”, first published in 1937. Kathleen Mann trained at the Royal College of Art, but went to teach at The Glasgow School of Art, at about the time this book was published. Looking at the stitch diagrams and the design ideas she presents, they are very much of the Thirties, of a particular modern, exuberant style that occasionally is found in the designs in that stack of The Needlewoman Magazine that I inherited. So it is not surprising that in the text I find her bewailing the fact that so much of the embroidery of that time was backward-looking, expressions not of modern sensibility but of indebtedness to the past. Certainly if you look at some of the “Jacobean work” designs in The Needlewoman, some of them are rather stiff, dark and charmless. A little oppressed by scholarship, perhaps, like some of the authentic performance practitioners in the early music movement (for an antidote to that problem, if you like baroque music but don’t take it too seriously – get to a performance by Red Priest!).
When I look at “Constance Howard’s Book of Stitches“, further along the shelf, I find the stitch samplers illustrating it also speak vividly of their time – in this case the 1970s. Strong, bold, and abstract, often using heavy fabrics and threads – certainly much heavier than would have been used in the Thirties – and not quite so “careful”. Perhaps, more accurately I should say – the embroiderer clearly has a good technique, but chooses for the purposes of her sampler to vary the size and shape of some of her stitches, sometimes rather chaotically.
Then again, I have been reading one of Jill Paton Walsh’s “Imogen Quy Mysteries”, in which part of the plot turns on the dating of antique patchwork quilts from both the pattern and the fabrics used (print styles can be dated).
Suddenly I find myself thinking – what are we doing? What am I doing? If someone were to look at my embroidery in thirty, forty years’ time, how will it appear to them? Stiff, derivative and uninspired? Or will it speak of the times in which it was made? What is it that is characteristic of our time? When we look at a film made in the Eighties, we don’t need to see the end credits or look it up on IMDB.com to know that it was made in the Eighties, yet at the time, had we seen it, the clues we now use wouldn’t have registered at all.
Of course, we can learn an enormous amount about embroidery and embroiderers by studying and replicating past work. I don’t think Kathleen Mann would have disapproved of that, and I certainly don’t. I enjoy the exuberance of Jacobean work, and I am fascinated by the two online university courses I am following.
But it is an interesting question for all of us who create anything, all the same. Is my work modern, current, inspired by the past, or is it hidebound by the past, backward looking, a pale imitation of past glories?
Jacobean Work Panel
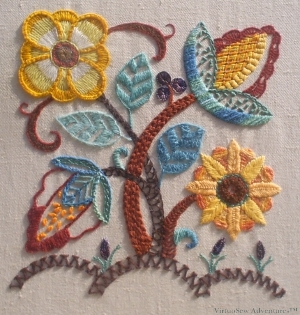
Jacobean Panel
This design is from a transfer I picked up in a hurry a few years ago so as to have something to stitch while on holiday. It went swimmingly for a while and then ran into a brick wall and I have only just finished it.
The threads are wool and cotton, with a little bit of rayon. I intended the panel as a companion for my Jacobean Firescreen, so the colours of teal, brown and gold more or less chose themselves. There aren’t as many overdyed threads as I sometimes use, but that allows me to experiment all the more with the stitches.
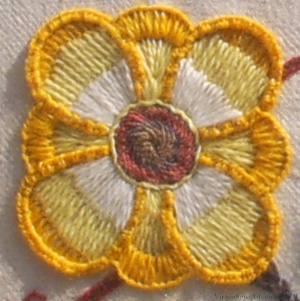
Jacobean Panel Close Up 1
Since I picked it up again, I’ve used it to play with some of the stitches which are new to me that I found in my copy of Yvette Stanton‘s Right Handed Embroiderer’s Companion. The whole thing became much more fun at that point!
So here, for example, the centre of the flower is worked in Spiral Trellis Stitch. I used a single strand, round thread overdyed in rust brown and purple, and although it was hair-raising to stitch, because I felt I was twisting myself in a spiral at the same time, I think it is rather successful. It’s not perfect, but I’ll do better another time, and I do think it looks rather good!
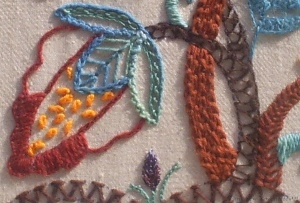
Jacobean Panel Close Up 2
The dark brown rather lacy stem is worked in Mountmellick thorn stitch – another new one. Here I used one strand of a three-stranded cotton yarn. I think it would look better in a slightly heavier yarn, but it was fun to do and I will use this stitch again. The calyx of the strange fruit shows two of my favourite stitches – Cable Chain and Portuguese Knotted Stem.
I’m not entirely content with either of the flowers, but as I’m not sure why I shall leave well alone. Both of them have been unpicked at least twice, and I don’t want to wear out the fabric… Still, now it’s finished, I enjoyed working this!
Quietly Persevering
Adding The Fringe
I’m in the very last stages of a very long running commission here. It’s one of the reasons my reading of blogs has been sporadic of late – I’ve been working very hard on this!
Anyway, the last stage is to add fringing all around the edge – some six metres of fringing, which is why it isn’t happening all in one go – although we will need the dining room table again soon (I don’t have a studio – I only wish I did!). And I am using the pins I won in a giveaway on Karen’s blog recently – thank you, Karen, they are working very well for this!
I’ve learnt a lot from this project about managing, planning and specifying a commission. In particular, unless you can be guaranteed no disturbances, life has a tendancy to throw in the odd curve ball and suddenly progress slows to a crawl. It took over a year to find a suitable fabric that my client and I both liked, and over six months to find the fringing. Fortunately I haven’t had a hard deadline – my client wants it finished suitably and not rushed. That makes life much easier!
I also discovered that I have a tendancy not to work on what I want to work on, unless I can put forward an over-riding reason why I should. “I’m being paid” works, but so does “I want to write it up for my blog” (now I have a blog, that is!) or “I’m learning something here”. What hasn’t worked – until recently – is “I’m enjoying it”.
Still, it’s within eyeshot of being finished, now. Another day on the fringing, and then I shall take some photos from the right side before presenting it to my client. I’ll post those after she has seen it!
Stripes!
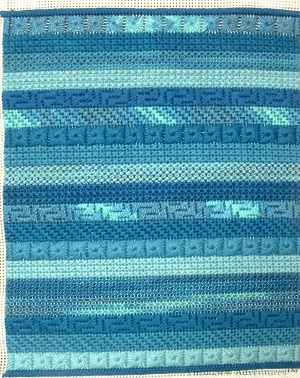
Stripes in canvaswork
This panel of canvaswork was originally intended to make a case for my husband’s beloved Psion palmtop computer. Alas, by the time I finished it, the Psion was no longer working.
The starting point was a wonderful Watercolours thread, graduated in shades of blue (not blue for a boy, blue for a redhead!), to which I added toning shades in soft embroidery cotton. It seems that this thread is not made any more, which I think is a pity. It used to provide a good alternative to tapestry wool, especially for those who don’t like working with wool in the summer, and – provided the right base fabric is chosen – a reasonable heavy but matte thread for surface embroidery. Almost all the threads now available are mercerised, and thus have a slight shine – but sometimes we don’t want any sheen on our stitches at all!
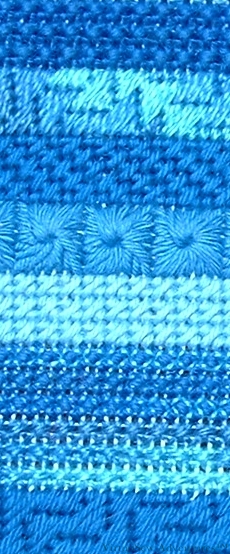
Stripes - Detail
I rotated through several different stitches, as well as the different colours, and made sure that the second layer in the fine Wildflower thread overlaid a different base colour each time. There were five threads (Watercolours plus four soft cotton) and six stitches, which ensured that they cycled round. The stitches I chose were Milanese, Diagonal Mosaic, Eye (not pulled), Mosaic, Rice (using the Wildflowers thread for the second layer of stitches) and Double Cross Stitch.
The full size piece shows how the position of the colour changes is different in each stitch, as well as showing the veiled effect of different colours each overlaid by the variegated thread in the different panels of Rice Stitch. For that reason it is a very interesting needlepoint panel, but I still have a completely finished and neatly-worked canvaswork sampler looking for an occupation!
Quick update on the Spot Sampler
Spot Sampler Fabric
I miscounted some of the stitching on the central motif of the Spot Sampler we are doing in the Tudor and Stuart Goldwork Masterclass – cue much muttering and swearing – so when I had convinced myself that I really did need to unpick it and re-stitch it, I was rather anxious. Some fabrics never recover from the first stitching, and I felt that there was a very good chance that the pulled Queen stitches would be pretty much impossible to recover. Furthermore, Queen stitch is the most difficult to unpick that I have ever had to wrestle with. Especially at this scale. I ended up using a laying tool and a seam ripper, with my heart in my mouth in case I cut something I shouldn’t.
And yet look at it. It’s hard to tell where the stitching was, and even unpicking with the laying tool hasn’t done much harm. I’m very impressed, and greatly relieved.
Same Thread, Different Stitch
I also noticed something in stitching the beginning of the bargello section I started while I was thinking about restitching the central motif. The lowest row of the bargello section and the Queen stitches just beside it are worked with the same colour. The differing light reflectance on a straight and uninterrupted stitch, in comparison with an angled stitch which is interrupted by a tyeing stitch has actually made about two or three tones difference in the colour as it appears. I knew about this effect, but it is the first time I’ve seen it demonstrated quite so clearly.
This sampler is teaching me a good many things in addition to the stitches!
Did You But Hear My Lady..?

A Lovely Lady
The Lady in the Garden, again came from a transfer, and was stitched as a companion to the Peacock, and a homage to Grandmama’s Lady. Unlike Grandmama, I made no effort to provide the lady with lovely graduated ruffles – if I am honest, because I really didn’t think I would finish them if I tried! Instead her dress is sprigged with flowers (in Sorbello stitch, which was rather fun!) and only ruffled around the hem.
Because I conceived of the Lady and the Peacock as a pair, I emphasised the flower colours around the lady, and worked some elements of her dress in one of the blues I used for the peacock.
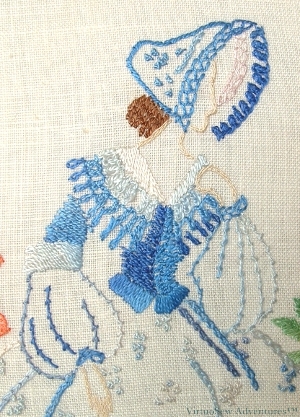
Lady - Close Up
The inside edge of the bonnet is ornamented with Rosette Chain stitch, while the outside is edged with closed feather stitch. This would also have been an ideal opportunity to use bonnet stitch, but I didn’t think of it in time! I also used Rosette Chain Stitch for the ruffles on the the lady’s collar. I like to use a variety of stitches – the trick is not to use so many that the eye becomes bewildered. Using a basic stitch and its variations is one way to maintain some sense of uniformity, as is keeping a small colour palette.
The bodice is in Bokhara Couching, and the sleeves outlined in coral stitch. I’m surprised at how well this works – it should look thorny, and heavy, but somehow manages to evoke an airy gauze sleeve. How does that work?
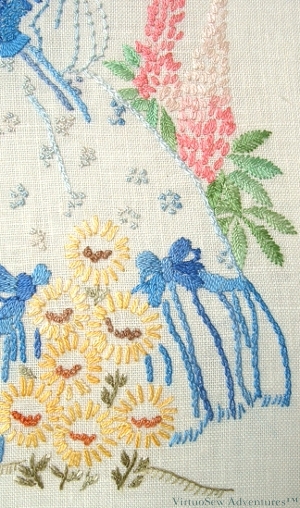
Skirt - Close Up
The bows above the flounce of the skirts are in satin stitch, and the impression of the flounce is given by lines of chain stitch. Almost all the visual weight of the dress is at the bottom, and the airy sprigging on the skirt allows the flowers to take some of the limelight.
Again the stitching is simple – fishbone stitch for the leaves, detached chain stitch and French knots for the flowers, and as almost all the threads were variegated, I got a lot of subtle – and not so subtle! – colour variation “for free” as it were.
I had already worked the Jacobean Fire Screen when I started work on the Peacock and the Lady, and was beginning to feel that I should do some more designing for myself. I will probably still use other designers’ work, because sometimes I want to concentrate on a particular thread or technique (as in the Tudor and Stuart Goldwork Masterclass) rather than the design. Besides, who knows what else I will find in the archives to write about!
The title of this post – for those who are scrabbling around in their memory – is the first line of “Silent Worship“, written by George Frederick Handel as an aria in his opera Tolomeo, but far more popular than anything else in it. Beware if you Google it – the last time I did so the first two links were for ringtones!