
Tag: Faience Hippopotamus
Preparing the “Spots”
Once I had some sense that I knew which blocks went where, and what shape I wanted them to be, I could begin to mount them. Some of them will be distinctly tricky, such as the Lotus Tile Fragments, the Nile Tilapia, and (especially), the Faience Hippopotamus.
Since I also picked up a shoulder injury, all this was slowed down by the necessity to do little bits at a time, rather than a whole orgy of concentration.
I worked on the Lotus Tile Fragment while I was stewarding an exhibition that some of my paintings were in. It’s a good idea to have something to do that’s small and easy to put down for that sort of occasion. It’s not a great look to loom at people who’ve come to stroll around, but equally, sitting, hands folded, demure and silent, might also put them off. Looking up with a friendly grin and then returning to something that’s plainly small and interruptible is a useful position between those extremes. ( I sold a painting, too!)
I had a very useful, and suitably faience coloured little box to hand in which all the pieces, so far, have fit rather neatly, keeping them dust-free and untangled.
It’s remarkably satisfying to see them all stacking up, and I have had an idea about details of display in the eventual, hoped-for, exhibition: I could do “record cards” for each piece in the style of something recorded from an excavation, thus providing information, but maintaining the theme.
So now, the question is – what information should I include?
Dreams of Amarna – More Research
This weekend I went to the exhibition “Tutankhamun – His Tomb and His Treasures” at the Museum of Museums near Manchester’s Trafford Centre. Partly just for fun, and partly because Mary Chubb mentions the huge excitement over Howard Carter’s discovery of Tutankhamun’s tomb as some of the “social background”, if you will, in her book “Nefertiti Lived Here”. I was hoping to catch some of the flavour of that excitement as well…
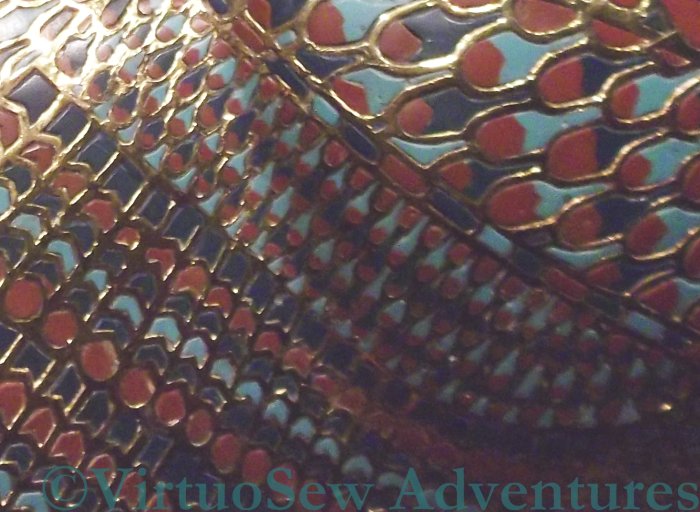
Cloisonne Feather Pattern on the Sarcophagus
It was an excellent exhibition. The usual introductory hall, with panels describing ancient Egypt and the development of Egyptology, but this one also included a reproduction of the Rosetta Stone. I knew that one of the languages was hieroglyphic and the other was Greek, but I hadn’t quite registered that the third was demotic, which was the “workday” script of ancient Egypt, as it were. Then there were films about Tutankhamun, and about Howard Carter, and then we turned a corner and found ourselves face to face with a reproduction of the antechamber of the tomb, just as Carter would have seen it. There is a British Museum page showing one of the original photos here. Except that doesn’t begin to give you any sense of the impact, because nearly every item is covered in gold. It speaks volumes for the self-discipline of Carter and his colleagues that the whole affair did not degenerate into a snatch and grab. I was too startled and overwhelmed to take a photo at this point, although non-flash photography was permitted.
Although I knew, of course, that the tomb contained a mixture of Amarna-period pieces and later pieces, I wasn’t aware that the cloisonné on the middle sarcophagus (close-up above) was an explicitly Amarna period design. So maybe I need to do a small patch using that pattern.
I took quite a lot of photos, which came out, on balance, much better than I expected them to, and may even turn out to be interesting and useful.
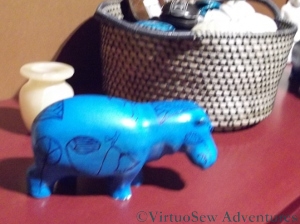
The Hippo In The Shop
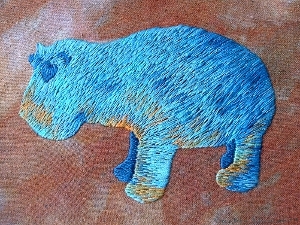
The Faience Hippo Finished
There was a short exhibition at the end which included some of Howard Carter’s watercolours – he was clearly a very fine archaeological artist and illustrator, and then we were sent out though the inevitable shop. Where I couldn’t fail to take one final photo…!
The Faience Hippo Finished
The Faience Hippo Finished
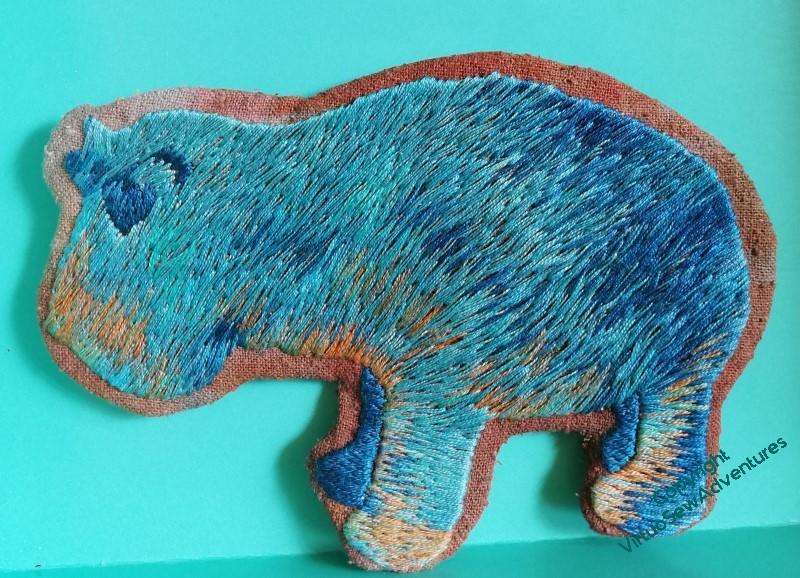
So here is the Faience Hippopotamus finished. That is, unless I decide to go over him with another layer of long and short stitch to break up some of the patterning even further…
I’m reasonably pleased with him, as a matter of fact. The loose weave of the base fabric was sometimes challenging to work on, and it isn’t at all a hardwearing piece – some of the stitches are half an inch long, which would be bound to catch on something – but as it will be part of a carefully protected wall panel if it makes the final piece, this is not going to be a problem.
I enjoyed doing it, as well. It was fascinating to see the colours change more subtly when I started using the thread turned end-for-end, and this vibrant turquoise/teal colour is one of my favourites.
And, yes, I did manage to work an entire piece in long and short stitch. It is fair to say, I think, that it will never be my favourite stitch, but it does have its place, and I am certainly happier to use it now I have had Tricia’s instructions on the Floral Glove Needlecase Course.
Dreams of Amarna – The Faience Hippopotamus, Second Stage
The reason I am calling this poor fellow an experiment is that I’m working him in long and short stitch. I have said that working on the Floral Glove Needlecase project has been illuminating and that I am warming to long and short stitch – well, we’ll see what I think when I’ve worked an entire piece in long and short stitch!
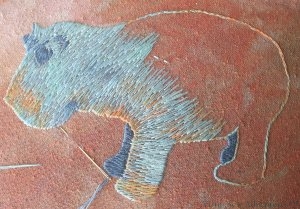
Half Done Hippo
In the meantime, here he is, half done. The darkest and lightest shades are ordinary stranded cottons, but the middle three use overdyed threads. One of them shades from turquoise blue to russett, and the others are both fairly subtle variations on a dark and a light turquoise.
I am using two strands, with one of them turned end-to-end in comparison with the other. I’ve never done this before, but it means that the shading of the overdyed colours is slightly more spread out and more subtle than it would be if I left them both as they came off the skein. It also means that the twist in one strand runs counterwise to the twist in the other so one strand shortens during stitching. I’ve chosen not to mind about that, but if you did happen to mind I think the way to achieve the same effect would be to buy two skeins and start them at different points in the cycle of colours.
I’m also working in slightly untidy sections of the body, with two or three needles ready to go, depending upon the colour I need. I’m using long stitches, and aiming to cover the fabric beneath without packing the stitches too closely.
I’m really pleased with this so far. The colours are working well, and the variations will give a bit of modelling without attempting to create a needle painting.
Dreams of Amarna – The Faience Hippopotamus, First Stage
I have two Amarna projects already on the go (one of the backgrounds, and the Dig House) but they are both monochromatic, and you will have gathered that I like colour. So I thought I would experiment. Again!
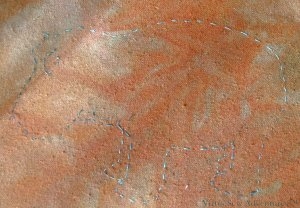
Small Hippo Outlined
My rule for the panels and motifs is that I may only depict items that Mary Chubb mentions, or that she would have known about, or which were excavated in Amarna about the time she was there. That means that anything seen in Howard Carter’s excavation of the tomb of Tutankhamun or excavated by Flinders Petrie is also allowed. So a faience hippo is just about permissible, as they seem to have cropped up in a lot of excavations, not just those of the Egypt Exploration Society. I’ve also just purchased (courtesy of Alibris, since it is out of print) “Tell el-Amarna”, by JDS Pendlebury, who was Director of the Excavation when Mary was Secretary. It should give me more ideas about what was known or thought at the time, which in turn will help me to plan more illustrations.
The background fabric is an overdyed silk noil from Stef Francis, and I will be using some of her stranded cottons as well. I began by copying the outline onto tissue paper and then went over the outline in running stitch. I rather like this technique for marking designs, at least where the design is relatively simple (see Ruth O’Leary’s Spirograph hangings for a less than simple design using the same transfer method – eek!).
I then stitched around the edges using split stitch to make the edge of the design clear, and took a deep breath…