
Search Results for: Tudor Rose
Tudor Rose Turned Into a Panel

Tudor Rose (Finally) Finished
At long last I got a chance to finish up and turn the Tudor Rose into a little mounted panel. I got a local framing shop to cut me two pieces of acid free mount board, and mounted it over one of them, with a little padding to bring it to life. Then I covered the other (also with wadding) with some upholstery fabric that happened to be to hand, and overstitched the two boards together.
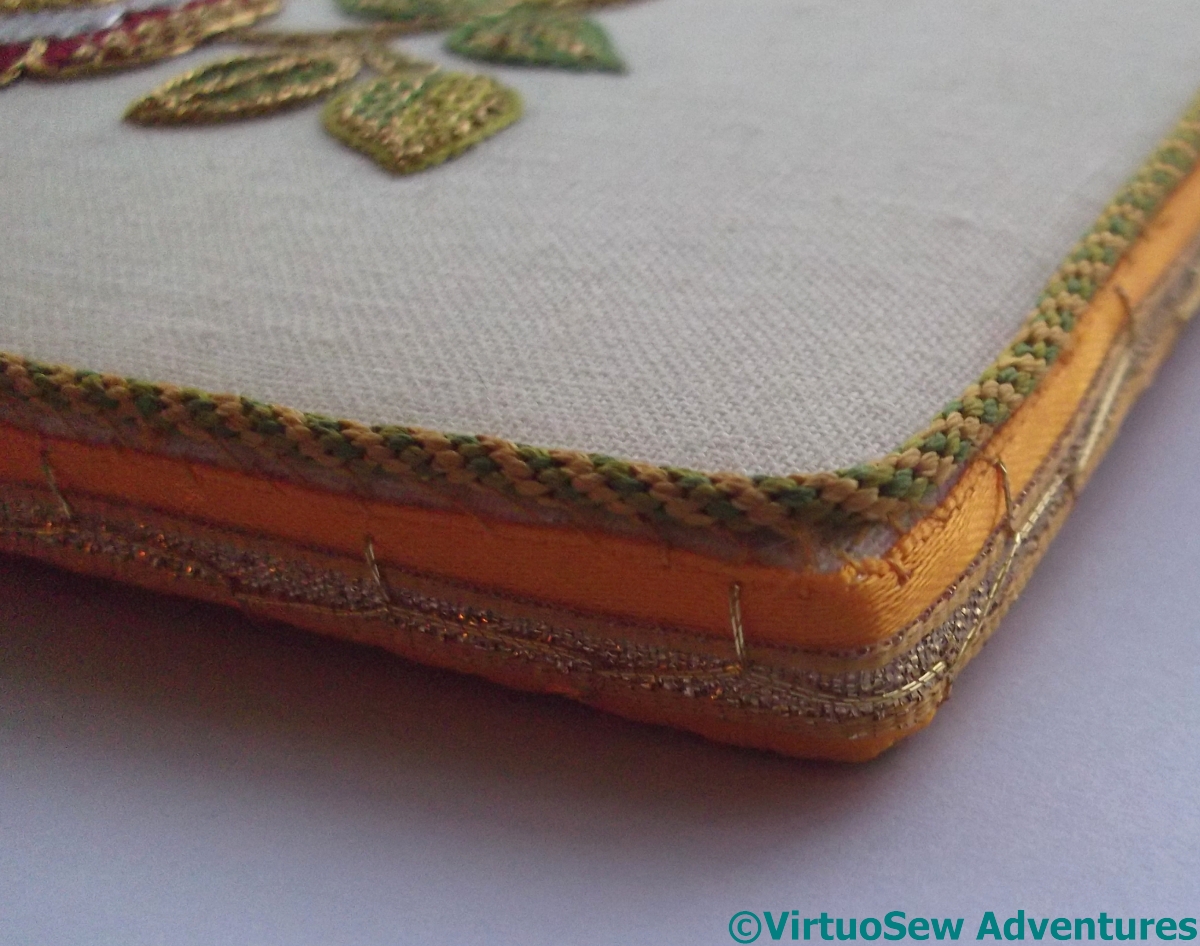
View Of Edges
I covered the overstitching with a ribbon trim left over from when I finally mounted Christus Natus Est (whoo-hoo, some stash busting achieved!) and then, at some length and not without difficulty, attached a fine kumihimo cord around the front edge of the panel to frame it nicely.
It will go in that famed (and so far, still mythological) Winter Decoration Corner that I keep on talking about – when I finally create it.
Continuing On The Tudor Rose

Tudor Rose Leaves
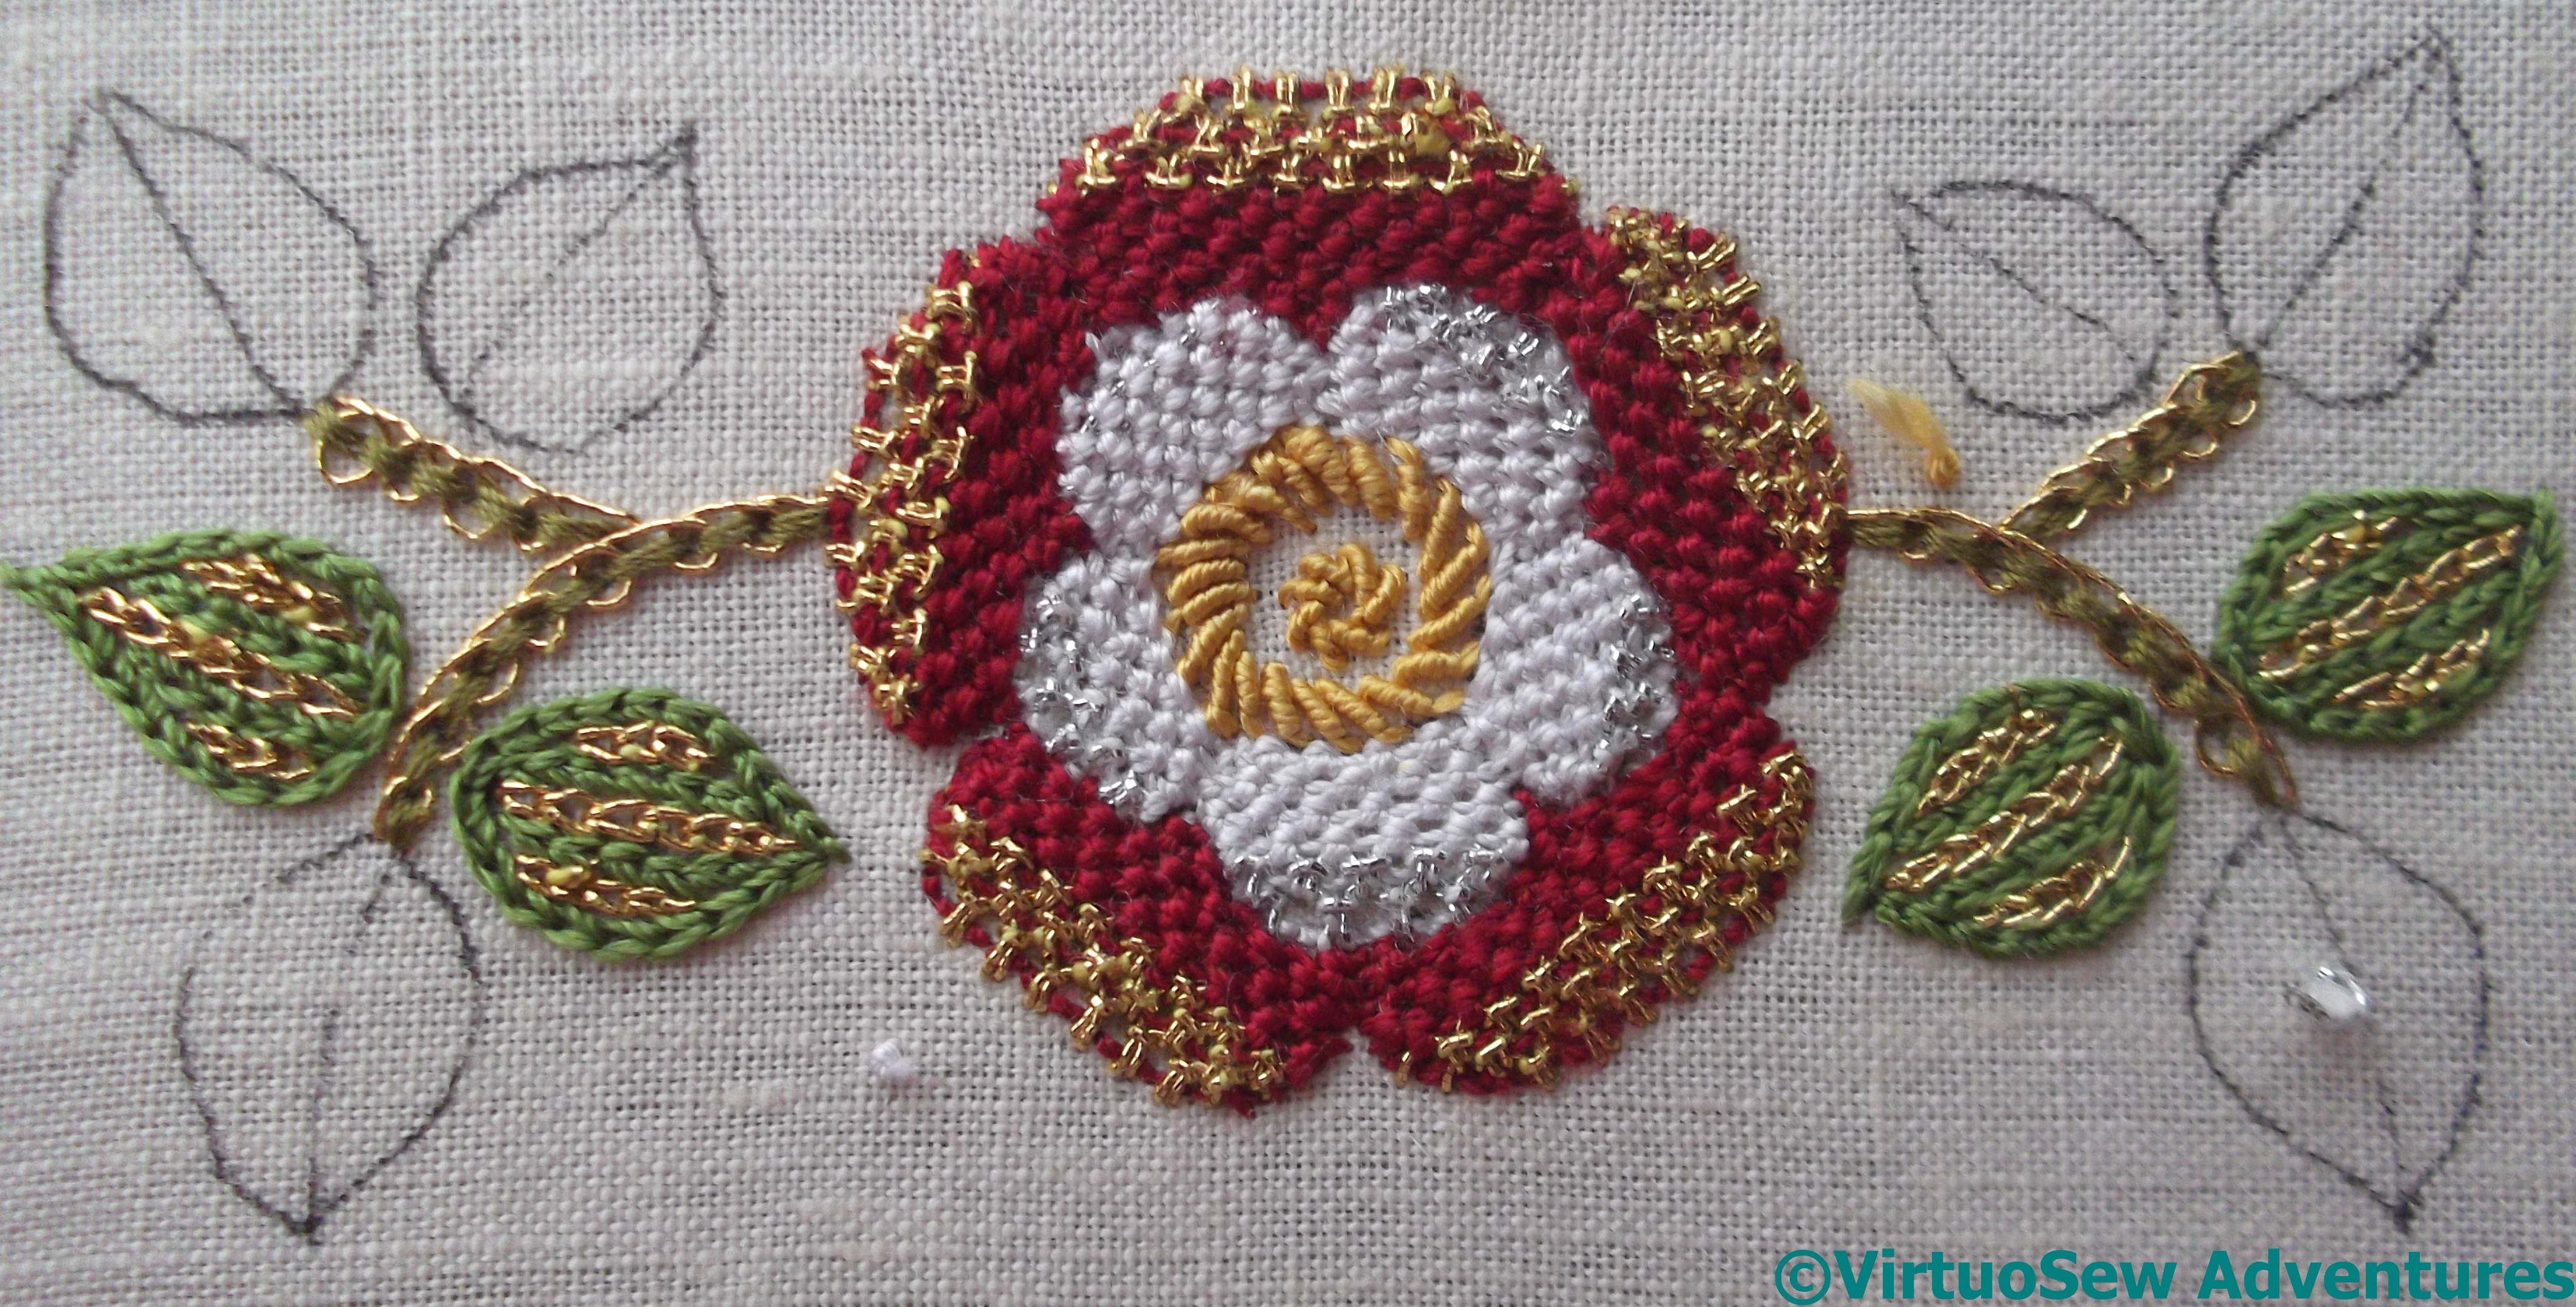
The work on the Tudor Rose continues.. The stitches used for the leaves are what I really wanted from this course, as I am hoping that they will help me to create elements in the Dreams of Amarna – the ancient Egyptians were as keen on bling as the Tudors!
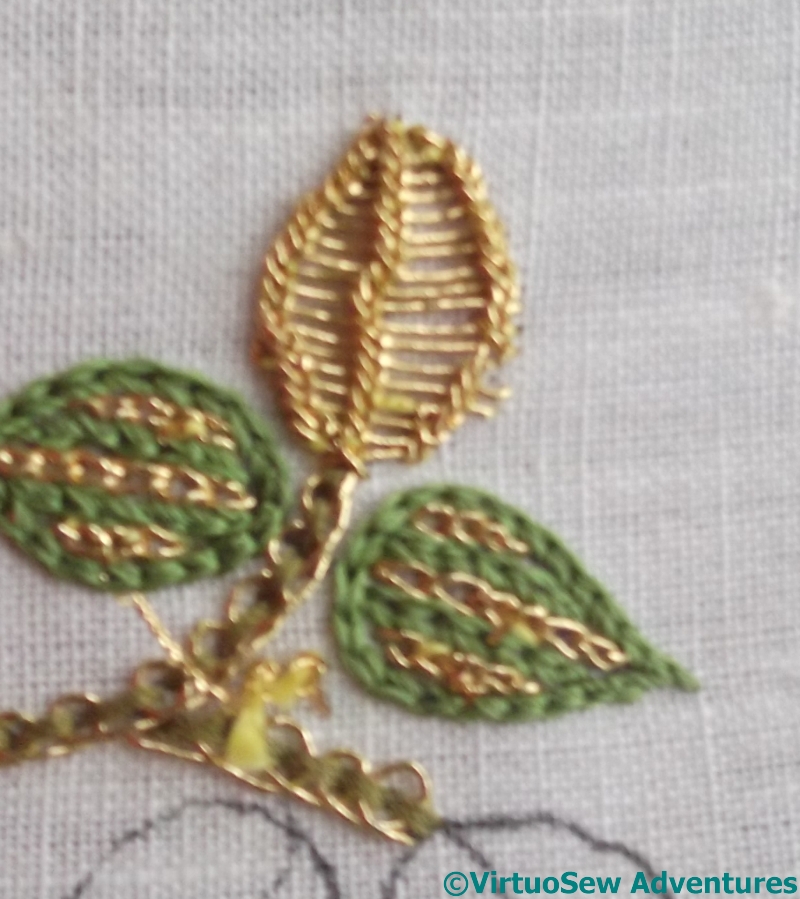
Zoom in on the picture to the right and you will see that there are four different combinations of metal and silk threads.
- The stem – whipped back stitch
- Alternating silk and metal chain stitches
- Ceylon stitch with silk thread woven through it
- Up and down buttonhole stitch with silk threads overcast through it
It was very hard to weave through the Ceylon Stitch – I didn’t pack the threads as tightly as Tricia’s instructions show, even after four leaves (two on each side). I think it would be easier in some of the applications I intend, though, because I am expecting at least some of them to have straight edges!
The overcasting through the Up and Down Buttonhole stitch was tricky to start, but once I’d got it started it was fairly straightforward – and a lot of fun.
Tudor Rose Finished
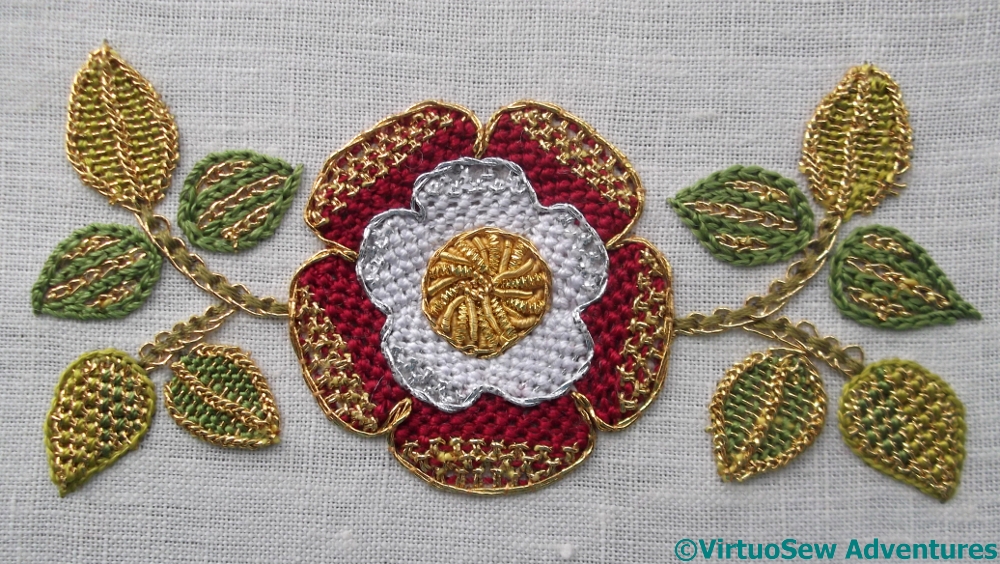
The final element of the piece was the pearl purl and check purl in the centre. That was quite fiddly, and I am not sure that I worked the initial layer of bullion knots in silk in such a way as to make the layer using metal threads easy to do. I have much more practice to do to get my metal thread work to the level I saw at the Eye of the Needle Exhibition in the Ashmolean Museum a few weeks ago.
Getting Back To The Tudor Rose
What with one thing and another – largely to do with the Hittite Amulet and the consequent overdose on metal threads – the Tudor Rose has been snoozing quietly in a boxfile for months, not drawing attention to itself.
Spot The Mistake!
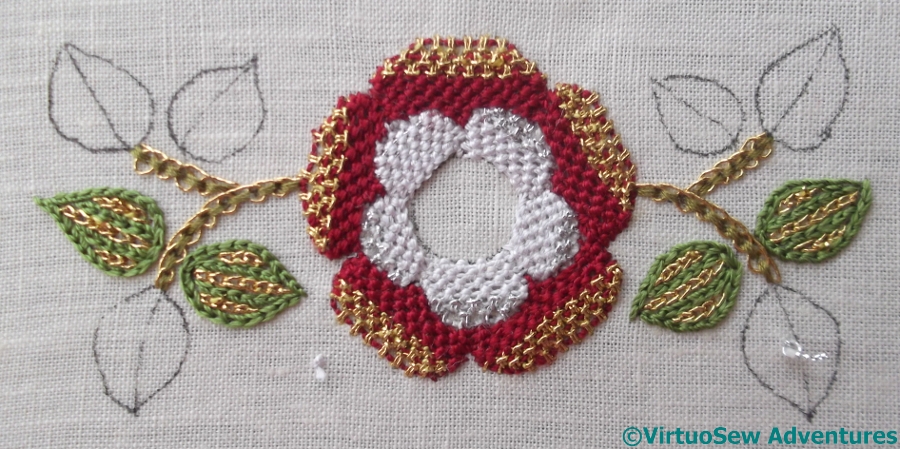
I’ve decided, however, that it’s time it got finished, so that I can move on to other things, and the first step was to complete the white and silver petals of the rose. I was puzzled and confused when I did my first petal after the break, because it didn’t present the same appearance as the other ones. Can you see why?
I’m going to leave it like this, to remind me to pay attention next time…
Bullion Knots Done
The next stage was to work the bullion knots in the centre. I’ve decided (again, not quite following the order of stitching in the instructions) that I’m going to leave the cut pieces of purl until everything else is done, so having done the bullions – with varying degrees of success, I admit! – I moved back to the leaves.
So, onward and forward, as my Grandad used to say…
First Stage Leaf
Some of the leaves are worked in Ceylon Stitch which is then woven through using the silk thread. Those of you who were reading my blog when I was working on the Tudor and Stuart Goldwork Masterclass may recall that I found Ceylon Stitch something of a trial. Working it in leaf shapes really doesn’t make it any easier!
There are three more of these, two each to be woven into with different colours of green Soie Perlée. Tricia says to pack the weavings in as tightly as possible.
We’ll just have to see how that turns out, won’t we…
Tudor Rose Progress
Rose Outlined
At this point, the challenges abruptly increased… The petals are to be filled with Up and Down Buttonhole Stitch With Return (which is one of the stitches from the Tudor and Stuart Goldwork Masterclass), but in a combination of metal and silk threads. The outer petals will be red and gold and the inner petals white and silver, and we are explicitly instructed to finish the back stitching (both white and red) before tackling the filling.

Detail Of Red Petal
The red silk is used for the return – the straight bar stitch – and the gold for the up and down buttonhole stitch. This means, of course, that there are long stitches on the back of the fabric, but it also creates a rather lovely chequerboard effect of gold and red. Up and down buttonhole stitch is one of my favourites, but as a detached stitch it offers a few challenges, especially in the gold thread. I was very glad to be working this in a frame resting on a stand, as there were times when both hands, and one of my bone stilettos, were needed to bring the gold thread under control.
I’ve noticed that in the metal thread, the stitch is squarer than in the silk, which compressed itself into a much denser fabric. I suppose this adds to the contrast in textures, but it will be interesting to see whether it becomes more even as I become more experienced with it!

Red Petals Complete
I’m rather pleased with it so far. In a couple of the petals, the rows somehow are not as straight as they should be – I’m not quite sure how that happened – but, if you click on the image you will see the larger version, and I think it shows evidence of improvement in technique. Which, after all, is the whole point of my following these courses…!
Starting on the Tudor Rose
Tudor Rose – First Stage
Having finished the embroidery on the Glittering Nightcap – even if I haven’t assembled it yet – I decided that I would allow myself to begin on the Tudor Rose. The goal of this course is to introduce stitches and effects that combine silk and metal thread – in the same stitch, not in the same thread – and I am hoping that it will give me ideas for tackling representations of ancient Egyptian jewellery for the Dreams of Amarna.
Interlaced Back Stitch
The first element is a fairly simple one, in effect a version of Pekinese Stitch, but with three rows of back stitch for the base, and a metal thread used for the interlacing. The challenge here is in making sure that the silk thread is sufficiently loosely stitched to make the interlacing possible, without being so loosely stitched that nothing stays in its’ place. Since the metal thread structure is of a core wrapped around with a fine film, when the thread is bent, the film sometimes stands away from the core, catching on the silk. Another key for Tricia in this course – as in fact in all her courses – is learning to be aware of the use to which a particular thread was intended to be put. We need not restrict ourselves to that use, but we do need to be aware of it!

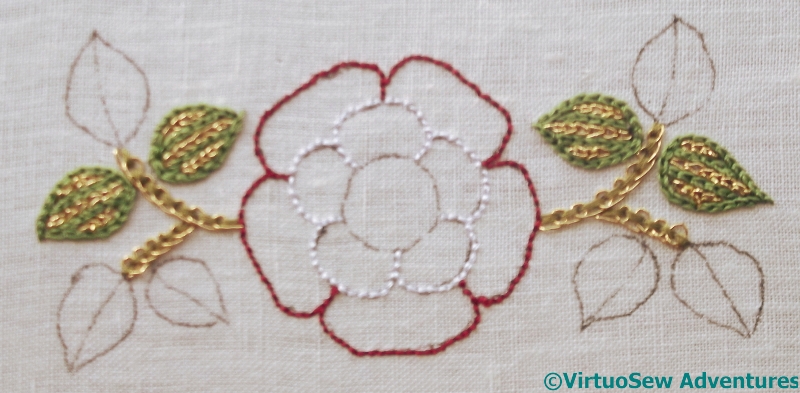
First Two Leaves
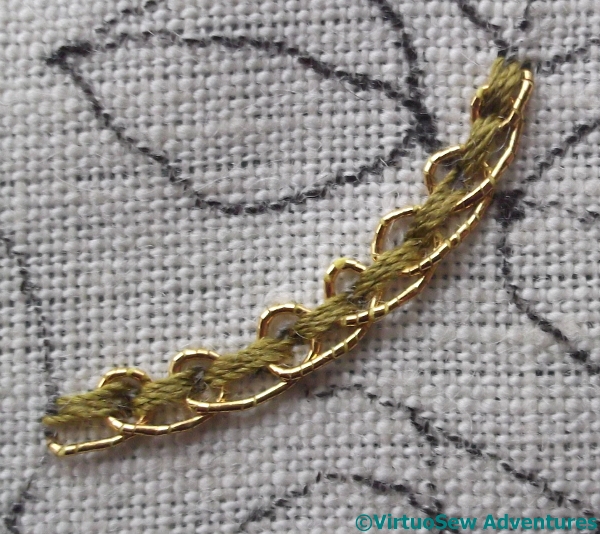
I rather suspect Tricia of letting us in gently, here, because the next element she describes is also fairly simple. The leaves are outlined in reverse chain stitch, in silk, and then filled using alternating rows of reverse chain in gold and in silk.
I hasten to add I have no objection to being let in gently – I’ve looked at the instructions for some of the later elements and rather expect a deal of unpicking to happen, so I’ve been able to enjoy handling the silk threads, which are quite heavy, but soft and “lofty” so they don’t punish the fabric unduly. If you look closely at this photo you will see that the olive green used for the stem is slightly thinner than the more emerald green thread used for the leaves. The weight matches nicely with the gold thread, so the more complicated elements that are coming up should look well balanced.
Tudor and Stuart Masterclass – Month Seventeen
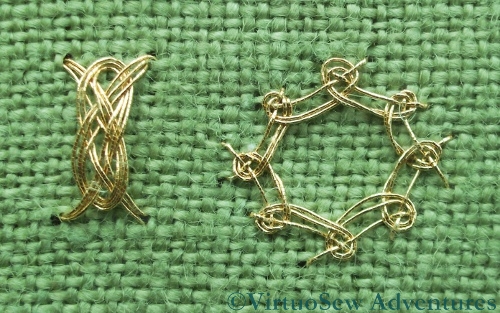
Eight Sided Interlacing And Josephina Knot
Month Seventeen’s stitches were Eight Sided Interlacing Stitch, and the Josephina Knot. I rather enjoyed them, too – they’re both very ornamental indeed!
The Eight Sided Stitch is less scary than you might expect on first sight, although I was slightly surprised to realise that the foundation layer interlaced in the direction contrary to the one I expected.
It will be more exciting at the smaller size on the real sampler, but I feel that I understand the structure, at least, and that is the important point, at this stage.
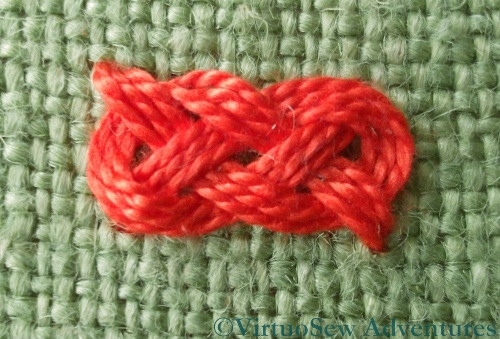
Josephina Knot in Pearl Cotton
However, if you look at the gold Josephina Knot in the top picture, you will see that I didn’t quite get the hang of that one…
This pearl cotton version shows what I was aiming for. It’s a really lovely ornamental spot stitch, with a slightly Celtic feel to it. However, if the interlacing goes wrong at any point during the working, it is very hard to recover – and not always easy to see before you’ve finished, either.
I made extensive use, for these stitches, of a belated birthday present from Elmsley Rose – a set of bone needlework awls/stilettos. I have a steel laying tool, but it’s so sharp that it’s not a good tool for coaxing threads into place. My birthday presents were just perfect – Thank You, Megan!
Tudor and Stuart Goldwork Masterclass – Month Thirteen
I’ve not really been making as much progress with the silkwork on the Masterclass Sampler and Tudor Pincushion as I would like. The weather has been cold and overcast, making my best stitching spot for natural light a chilly and uninviting place. Artificial light produces a confusing glimmer on metal threads, so unless it is a particularly easy stitch, I tend not to use metal threads in the evening.
I’ve been more or less keeping up with my practice stitching, however, and this month’s stitches are Cable Chain Stitch, and Knot Stitch (also known as Braid Stitch). I enjoyed these very much, as I already know them both, and it was good to be able to add them to the practice cloth and remind myself of my repertoire.
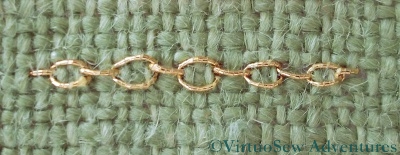
Cable Chain Stitch
Cable chain is my absolute favourite of the chain stitches, and pops up in all sorts of projects. I used it in the Jacobean Firescreen that I’ve used as my header picture, and the Jacobean Work panel that I’ve yet to find a use for, and on the dorsal fin of the Experimental Seahorse. I’ve even used it on the Map of Amarna, in the Compass Rose. I think that it looks its best using a fairly heavy round thread, so on my practice cloth the gold is somewhat out of scale with the fabric
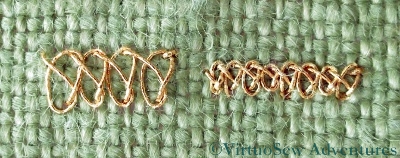
Braid Or Knot Stitch
Braid or Knot Stitch (not the terrifying Plaited Braid Stitch that I haven’t got to grips with yet!) is another favourite. I used it to create the Prince’s bow in the first of the Persian Fantasy Panels. I also used it for the ice cream cone part of the logo on the Frolicking Teddies Cot Blanket. I worked the stitch at two different scales, so you can see it looks a little loopy and untidy over four threads, but neatly ornate over two.
A tree for the trinkets..
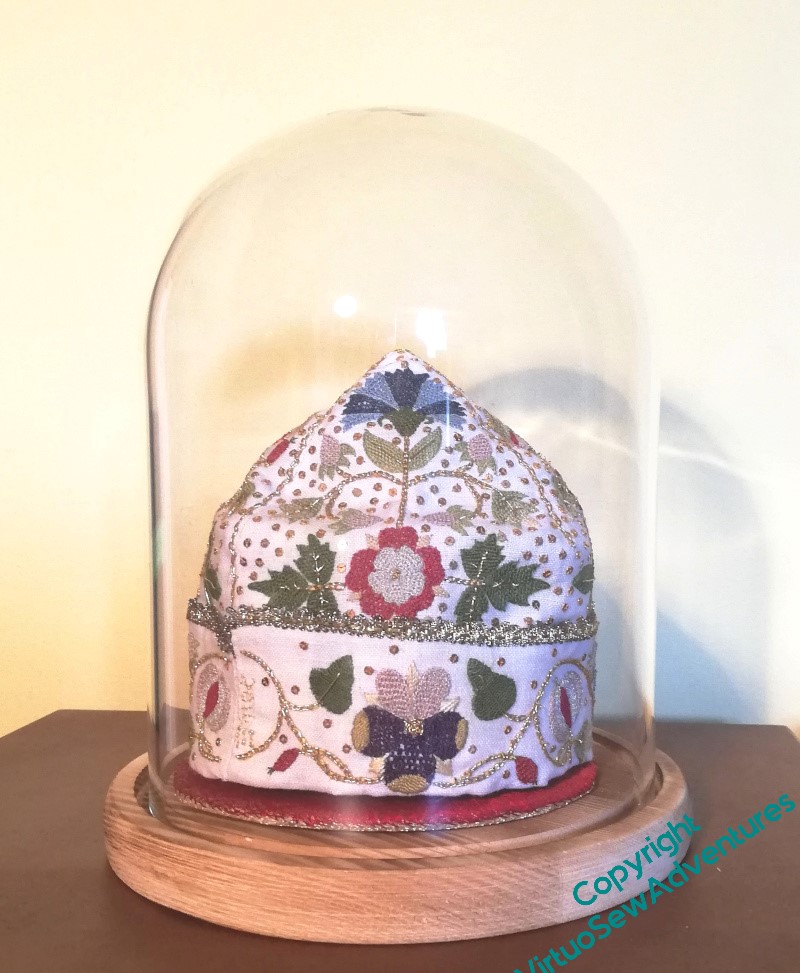
When I had the idea about using a parlour dome for the Violets and for the necklace, I realised that I would need to play with how I displayed them, trialled the Tudor Nightcap in the dome and realised that I could now put it on display.
So what about all the other Thistle Threads pieces?
Well, it turns out you can get parlour domes that aren’t round, so I got the largest I could bring myself to buy and then stopped to think…
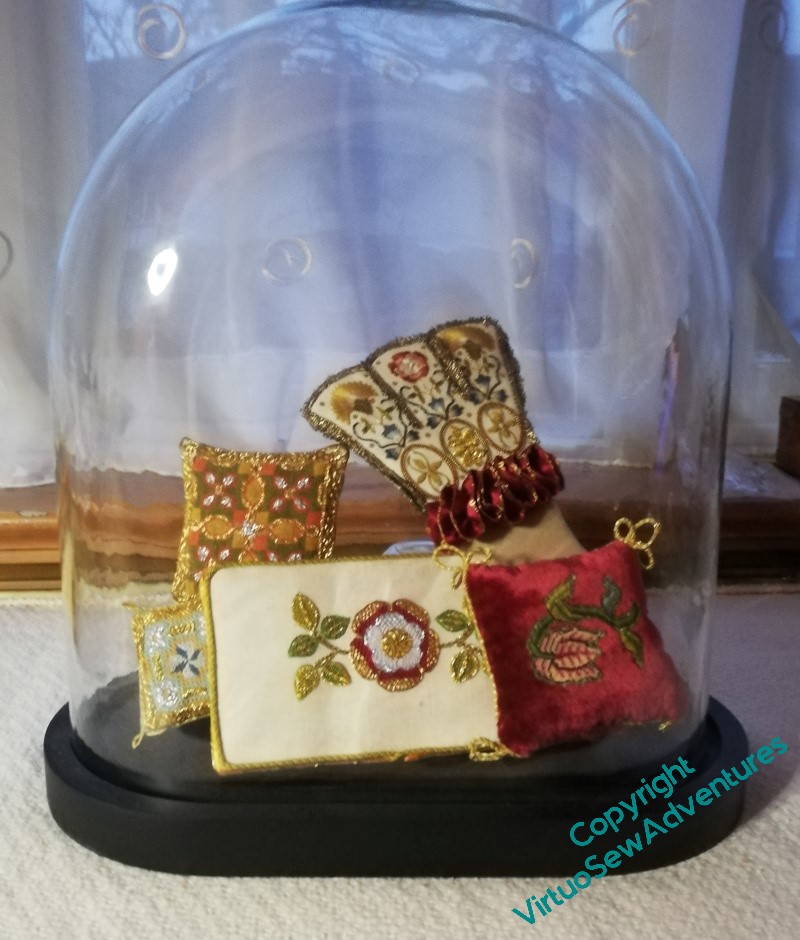
I started by playing around with propping the various pieces I’ve been planning for that Winter Decoration Corner against one another within the dome. It’s a flattened oval, and quite high, but anything I could improvise seemed not to have the height I wanted without taking up all the display space.
I think this shows the idea will work, but it doesn’t really have the presence that the pieces deserve.
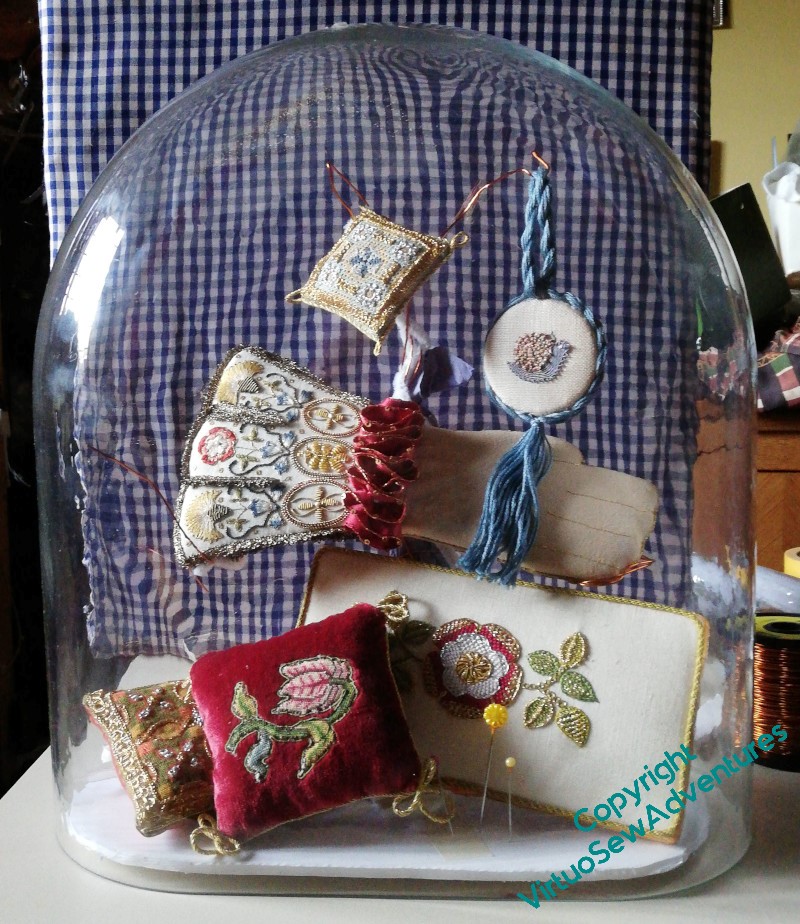
This is better. I’ve used offcuts of the foamcore that I bought to help me with Nefertiti and Akhenaten to create the base that will sit inside the glass, sandwiching the beginnings of the wires forming the tree between two layers. I’ve built up a support for the green and orange cushion at the back using smaller bits of foamcore, and wrapped pipe cleaners around the wires.
It’s not perfect, but I’ve set it up in the hall where I will pass it every day, to work out whether I like it. Then the idea is that I will have a lovely messy hour or so covering the wire with papier mache, allow it to dry, and paint the whole thing gold.
The Tudors were as fond of bling as the ancient Egyptians, after all!
Akhenaten – the next stage
BackStitch Details
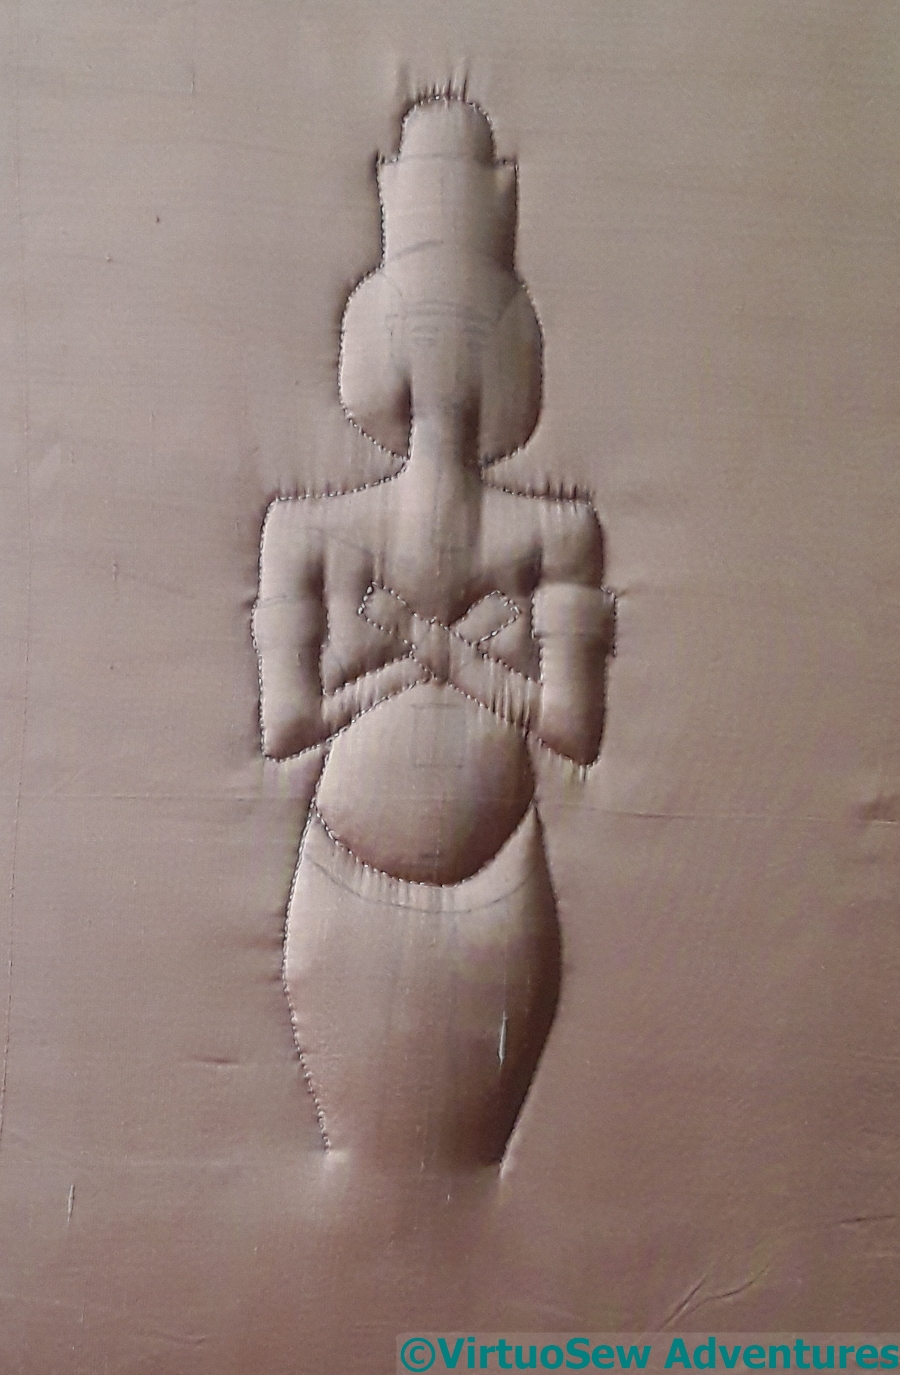
Once I had stuffed the figure from the back, I began to add to the backstitch outline with, for want of a better term, internal outlines.
I realise that the detail of the crossed arms has given him a hollow chest, but as the embroidered details are added I will be able to adjust the padding, if necessary removing some of it. Adding the stitching is going to be interesting. Some of it will need to balance over the curve of the padding, and some of it I will need to tighten a little through the padding – for example, his carefully-carved belly button.
At this point, I had to pause for thought. When the idea first came to me, it was the pleated loincloth that I could visualise, but the rest of the piece had yet to come into focus. I went rummaging on the web for polychrome representations of Akhenaten, and rummaging in my stash of threads for inspiration. And then suddenly, that inspiration duly arrived….
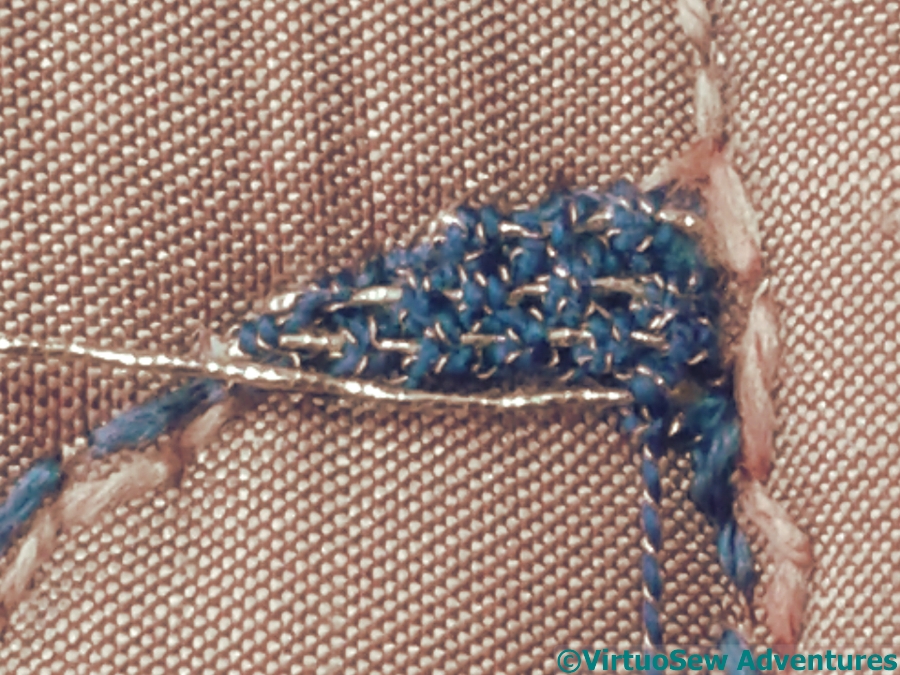
Detached Up And Down Buttonhole Stitch With Return
I remembered the ornamental stitches of the Tudor Rose Project, and fished out the Gold Special Tambour and Gilt Sylke Twist. Akhenaten’s wig is sometimes represented as black, and sometimes as blue. Black can be a somewhat problematic colour, often too dominating or simply “killing” other colours, so I decided I would go for blue, and the Indico Blewe Gilt Sylke Twist looked like it would produce just the right effect. Using the Gold Special Tambour as the thread for the return of the Detached Up And Down Buttonhole Stitch With Return helps to give a little more emphasis to the glint of the gold in the Gilt Sylke Twist.
But it’s not a quick stitch. This is going to take a while….
The Head of Nefertiti, Embellished with Silk and Gold
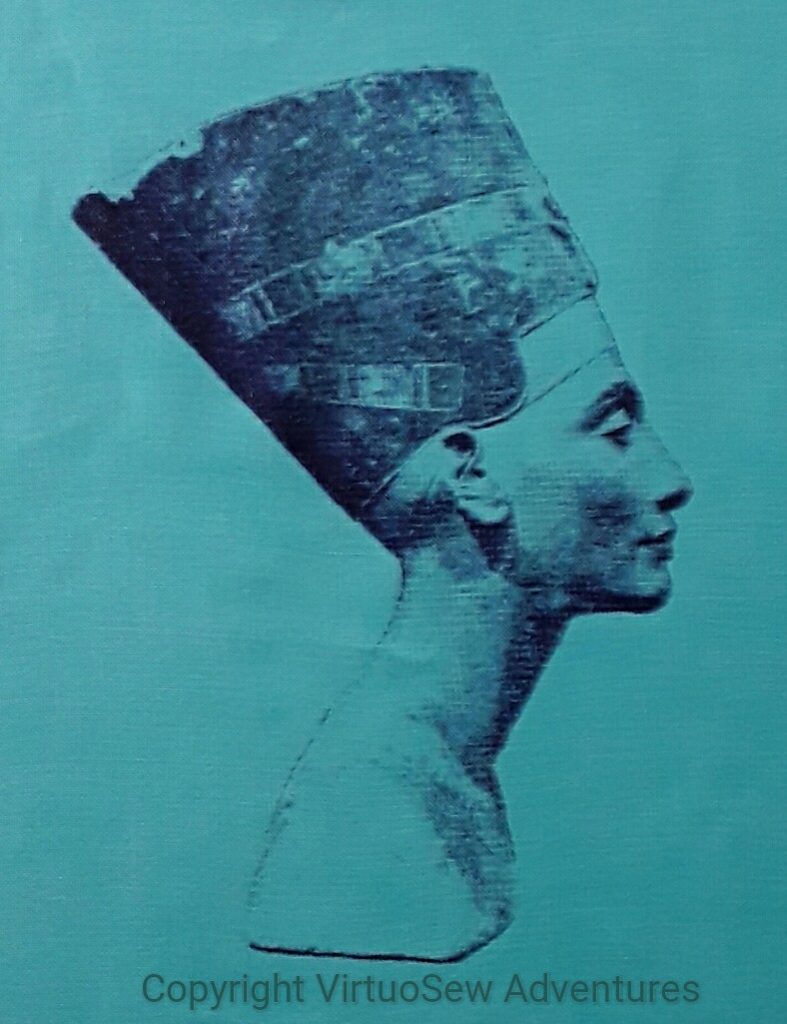
Screenprint of the Head of Nefertiti
This is much the best print I’ve managed of Nefertiti, pressure, speed and amount of ink all working nicely, and very few really dark sections. What I want to do now is to highlight the coloured elements of the crown she wears – unique to her, apparently, no-one else in ancient Egypt has ever been depicted wearing it. I’ve got some gorgeous silk threads from Mulberry Silks which should do the job perfectly, but first they need a skeleton of gold. I had a lovely rummage in among the assorted wonders I’ve received from Thistle Threads (they have their own special box, of course), and after staring critically at the linen fabric, picked out the Special Tambour, and made a start.
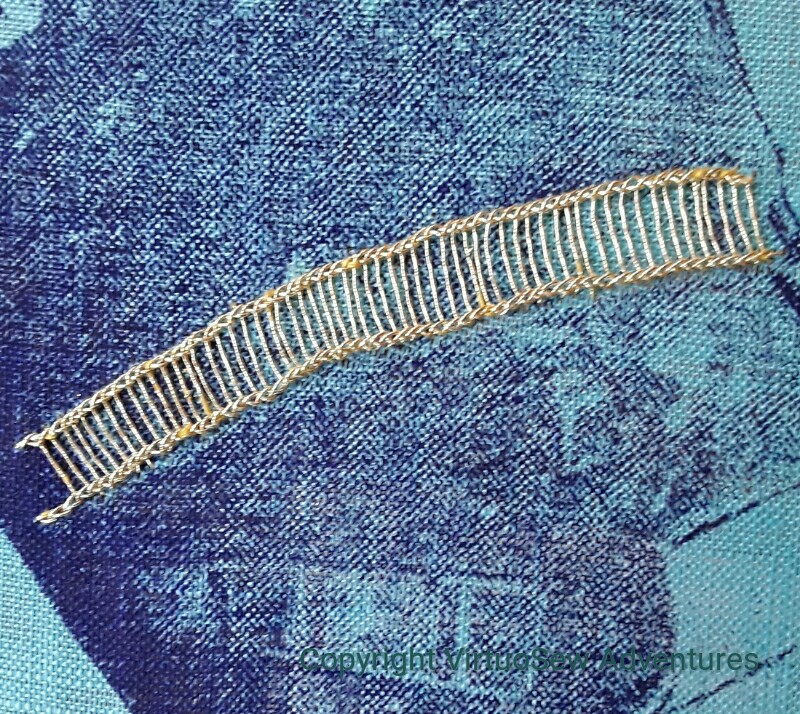 My idea is to create a framework of Ladder Stitch, and then add colour – as in the Tudor Rose project – using silk threads. Long term readers may recall that during the Tudor and Stuart Goldwork Masterclass, I had some trouble with Ladder stitch, so although I was fairly sure the idea would work, I sat down with some trepidation.
To be very pleasantly surprised. Something has happened in the intervening few years, and my ladder stitch wasn’t as trying as I expected, and moved fairly swiftly, too. I may yet decide to redo the stitches, because I re-tightened the fabric in the frame about halfway across, but that will depend upon how much better the second section looks when I have done it.
That’s a good start to a new project, isn’t it!