
Tag: Tudor and Stuart Goldwork Masterclass
Tudor and Stuart Goldwork Masterclass – More Gold!
More Goldwork On The Sampler
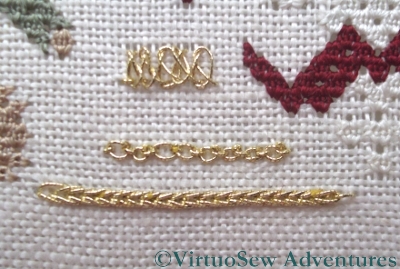
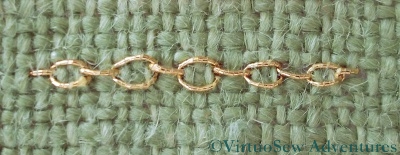
I’ve been doing more work on the metal thread embroidery on the Spot Sampler. The photograph shows (top to bottom) Braid Stitch, Cable Chain Stitch, and Heavy Chain Stitch.
I’ve used the real metal thread and the Japanese needle for all of them, which may have been a mistake. At the very least, the Japanese needle is a tool that I’ve not got to grips with, and which has had unanticipated side-effects on my technique!
As you can see, Heavy Chain Stitch worked beautifully. There are only a couple of places where the thread has broken and shows the core, and it has created a beautifully smooth and glimmering line.
With the Cable Chain Stitch, I think I need more practice in keeping the tension correct when using a “stab-stitch” technique, which is necessary because Japanese needles are short. This stitch is one of my favourites, but it was actually quite a struggle here, precisely because I couldn’t take up a piece of fabric on the needle as I usually do.
This was even more the case with the Braid Stitch. In fact it is worse than that. It wasn’t clear when I was stitching it, but now I see this section enlarged in the photo, it’s pretty clear that I’ve actually got myself into a dreadful tangle with a couple of my braid stitches. I need to pick up my practice cloth, fish out all my books, and try again. And yet I know I can work this stitch beautifully – I worked it on the logo for the Teddy Bear Cot Blanket, and for the Prince’s Bow on the Persian Fantasy!
Tudor and Stuart Goldwork Masterclass – Beginning the Gold on the Spot Sampler
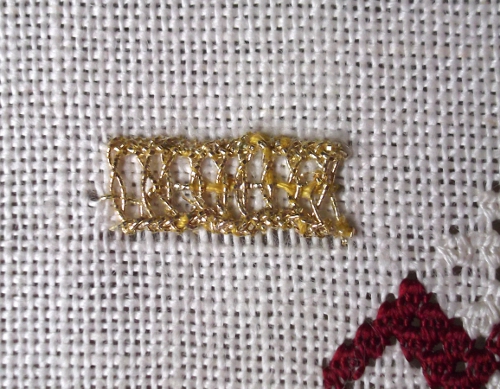
Interlaced Ladder Stitch In gold Thread on the Spot Sampler
I finished the silkwork on the Spot Sampler some time ago, but then ran into a problem, largely one of priorities. There have been so many other things I fancied trying, and so I’ve been working on the Amarna Map, the Christus Natus Est Panel, and a whole host of others. I’ve also been feeling just a bit jumpy about the real metal threads, and wanted to wait until I was feeling settled enough to read the instructions and make sense of them.
I have at last made a start, though. I even managed to thread my Japanese needle with thread from the Real Metal Thread Pack that arrived in the post a few weeks ago. Perhaps the practice thread I was using was quite simply fractionally too thick for the eye of the needle.
I started with Interlaced Ladder Stitch – which wasn’t necessarily the best or easiest starting point, but it is area number one on the chart! I’m a little disheartened that the gold thread has broken up quite as much as it has, here, but I’m leaving it there for now to act as a basis for comparison as I do other stitches. I’m going to try using even shorter lengths, and maybe even use a stiletto or similar tool to keep loops open while I pull the thread through.
Tudor and Stuart Goldwork Masterclass – Update on the Tudor Pincushion
First Stage Of Border
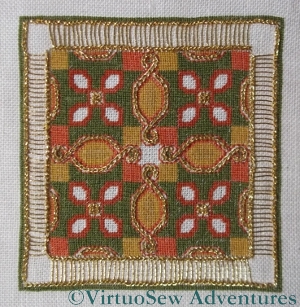
I’m making reasonably good progress with the Tudor Pincushion which is part of the Tudor and Stuart Goldwork Masterclass. The silkwork was finished a while ago, and now there are several different isolated stitches, and a continuous border.
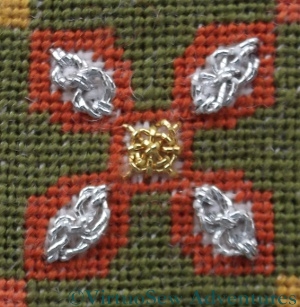
Silver Guilloche Close Up
I’m not using the real metal thread for this. I rather like the rich, vibrant colour of this thread, wrapped around a cotton core, and as I am planning to create a sort of winter “corner decoration” using all of my historical embroidery pieces, there is something positive to be said for the idea of using as many different shades of gold and silver as I can to create a really rich, varied impression.
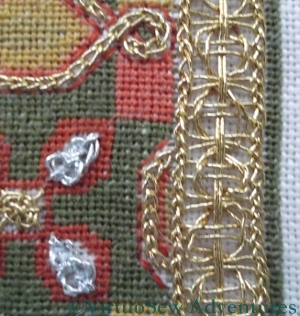
Border Close Up
The small sections of silver Guilloche Stitch have worked well, although I still have reservations about my gold Spider’s Web stitches, especially when I look at close-up photos of them!
The border is a Guilloche Stitch variation worked on a Ladder Stitch base. As it turned out, I didn’t get quite the right number of rungs on the ladders, so rather than being a neat continuation of the Guilloche Stitch, the corner elements are rather improvisatory.
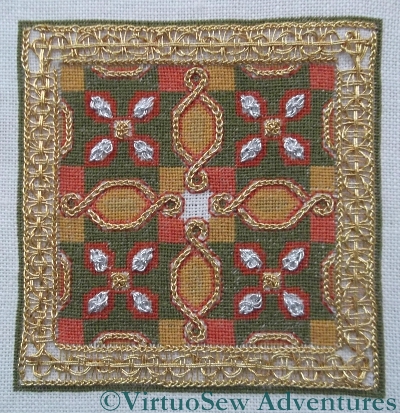
Tudor Pincushion - Almost Finished
This doesn’t worry me. At the moment, I am still waiting for the instructions for the central ornamental stitch, and if, by the time I have that stitch, I’ve decided that I really must redo it, I will do so then. By that time I will be still more practised at working with metal threads, and it should go more swiftly and easily.
In the meantime, I can go on to play with more new stitches, and even, perhaps, start work on the real metal threads to add them to the Spot Sampler!
Tudor And Stuart Goldwork Masterclass – Month Fourteen
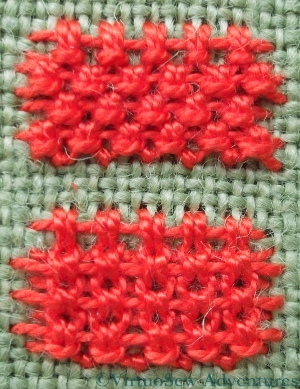
Plaited Braid Stitch In Pearl Cotton
The Plaited Braid Stitch was one of the reasons I wanted to do this course. There are instructions in at least half of my books on embroidery, and I’ve watched Tracy Franklin demonstrate the stitch. I even spent a whole day practising it at one of her courses. Sometimes it worked, sometimes it didn’t, and frustratingly, I never felt I knew what I was getting wrong.
Consequently, when I sat down to tackle this month’s Stitch, I was expecting frustration and fury to reign. I started with Pearl Cotton, thinking that I would be less fretful about errors if I was not conscious of using an expensive thread. I watched the animation first, and although you can see that the first inch of my practising got very tangled up, I’m sure that it helped.
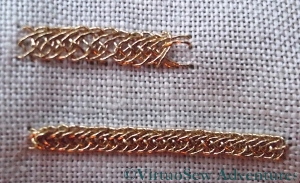
Plaited Braid Stitch In Gold
As I’ve repeatedly mentioned in my posts about this course, I’ve become acutely aware that the question of scale is critical to the success of some of these stitches. My first effort in pearl cotton was at too large a scale, and the thread floats were too floppy. In the case of the second trial, I reduced the size of the stitch, and suddenly found it coming together, which gave me some confidence that I was beginning to understand the structure of the stitch. The tension was still a little slack, but all in all, it was beginning to make sense.
So then I found a piece of scrap linen, and started playing with gold thread. Again the two rows are at slightly different scales, but now I really feel that I am going to master this stitch.
I also think I’ve cracked the problem of why the vast number of books I have on the subject don’t help. With the honourable exception of The Right Handed Embroiderer’s Companion, by Yvette Stanton of White Threads, they all use the same inadequate set of diagrams, presumably copied from an earlier publication. Furthermore, judging by the (slightly differing) diagrams in Tricia’s notes and Yvette’s book, they diagram the left-handed technique. Since all their other diagrams are for right-handers, these books provoke considerable confusion! Still, I now know where to go when I need to be reminded how to do the stitch, and I feel confident that with a bit of practise I will be able to pick it up any time I need to.
And I will need to. I have a few ideas buzzing around in my head, and Plaited Braid Stitch will take its’ place in them!
Sampler Silkwork Finished!

Sampler Silkwork Finished!
At last I have finished the silkwork on the sampler for the Tudor and Stuart Goldwork Masterclass. I don’t have much patience with counted work – I just keep doing it occasionally, as a salutary discipline! – so I am really very pleased with myself. After all, I began stitching it – according to my post on the subject – in June last year!
I’m pleased that I persevered. It’s fascinating to see the Queen Stitches create an entirely different fabric, with a totally different surface and reflectance to the surface of the fabric itself, and the other stitches (Rice Stitch, Roman Stitch and the Bargello section) all reveal different aspects of the silk thread and provided different challenges in working them.
In fact, in the end I have enjoyed the silkwork on the sampler rather more than I expected to. It has taken me much longer than some of the other members of the course, but I’ve been working on the Piano Shawl and the Dreams of Amarna at the same time, so I think I have a good excuse!
Now I need to work out how I am going to keep track of which goldwork stitches to do where. I’ve been printing out the instructions as I go along (thank heavens!) but I now have a large folder full of the historical essays Tricia has written for each month, and another one full of the stitches. It isn’t difficult to have a single chart by my workstand as I stitch, but I think I may need to create an annotated chart for the goldwork. So far, many of the stitches have been familiar enough for me to do some of them with only the name and placement to guide me, but in other cases I know I will need to have the folder open at the instructions as well. One of these days we will have to find a house with a studio for me to work in!
Tudor and Stuart Goldwork Masterclass – Month Thirteen
I’ve not really been making as much progress with the silkwork on the Masterclass Sampler and Tudor Pincushion as I would like. The weather has been cold and overcast, making my best stitching spot for natural light a chilly and uninviting place. Artificial light produces a confusing glimmer on metal threads, so unless it is a particularly easy stitch, I tend not to use metal threads in the evening.
I’ve been more or less keeping up with my practice stitching, however, and this month’s stitches are Cable Chain Stitch, and Knot Stitch (also known as Braid Stitch). I enjoyed these very much, as I already know them both, and it was good to be able to add them to the practice cloth and remind myself of my repertoire.
Cable Chain Stitch
Cable chain is my absolute favourite of the chain stitches, and pops up in all sorts of projects. I used it in the Jacobean Firescreen that I’ve used as my header picture, and the Jacobean Work panel that I’ve yet to find a use for, and on the dorsal fin of the Experimental Seahorse. I’ve even used it on the Map of Amarna, in the Compass Rose. I think that it looks its best using a fairly heavy round thread, so on my practice cloth the gold is somewhat out of scale with the fabric
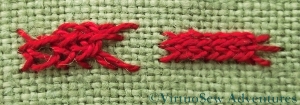
Braid Or Knot Stitch
Braid or Knot Stitch (not the terrifying Plaited Braid Stitch that I haven’t got to grips with yet!) is another favourite. I used it to create the Prince’s bow in the first of the Persian Fantasy Panels. I also used it for the ice cream cone part of the logo on the Frolicking Teddies Cot Blanket. I worked the stitch at two different scales, so you can see it looks a little loopy and untidy over four threads, but neatly ornate over two.
Tudor and Stuart Goldwork Masterclass – Month Twelve Goldwork Stitches
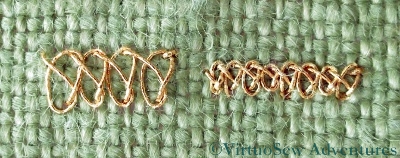
The two stitches this month are stitches I think I have seen used as needle-lace stitches, but whereas I’m most used to seeing variants of Blanket Stitch used in needle-lace, these are worked using Up-and-Down Blanket Stitch.
Up And Down Blanket Stitch - Alternating
As it happens, the Up-and-Down variant is one of my favourite stitches, so I sat down rather gleefully to have a go. This is the first of the variations, Alternating Up-and-Down Blanket Stitch, which produce a rather open, netlike appearance on my practice cloth, not much resembling the example in the instructions.
Up And Down Blanket Stitch With Return
The second stitch was Up And Down Blanket Stitch With Return. In this case the seconfd row of stitches goes into the tie of the Up And Down Blanket Stitch, creating a ribbed effect something like the welts on a sweater. It also rather conceals that same distinctive tie stitch, rather camouflaging the stitch that forms its basis. I’m very impressed that Tricia managed to “reverse-engineer” these stitches, as some of them are rather less than clear to work out!
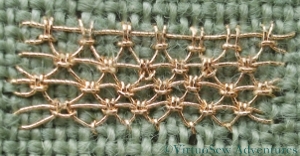
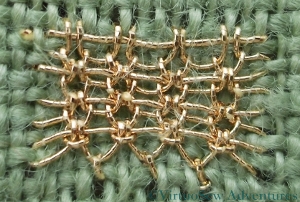
Both Stitches In Pearl Cotton
Naturally, my practise cloth version in the gold thread suffers from the problems of scale I’ve already discussed, but as well as that I find when I look at the photographs that in a couple of cases I have done a pair of buttonhole stitches instead of an Up-and-Down Blanket Stitch. I defy anyone to work that out at the normal scale of these stitches, but I’m actually quite surprised that I didn’t notice at the time, since the short loop at the base of up-and-down buttonhole stitch does tend to twist when worked as a needle-lace stitch instead of a fabric stitch!
These versions worked in pearl cotton show much more clearly the heavily textured fabric that these stitches form when worked at the correct scale.
Tudor Pincushion Progress
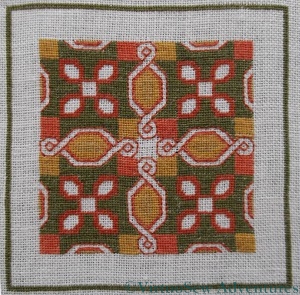
Tudor Pincushion Silkwork Finished!
Finally, I have finished the silkwork on the Tudor Pincushion, which is part of the Tudor and Stuart Goldwork Masterclass course I am following.
I think I need to find something that is less fine stitching than this, to give me a rest from all these tiny stitches!
Still, you can see that the final pattern is simple enough in concept, and there is just enough subtle variation in the colours to make the design interesting. The final effect is almost one of a woven fabric, as though the goldwork were embellishing a genuine tapestry. Remember that a real tapestry is woven (the Gobelins ateliers in France are the best known, historically, although a lot of tapestries I’ve seen have been from the Netherlands). A real tapestry is not worked in tent stitch on canvas, whatever the kit manufacturer says, and the Bayeux Tapestry is in fact an embroidery!
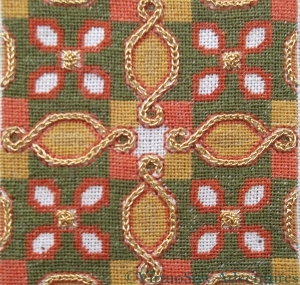
First Stage of Goldwork
I’ve also begun to work on the goldwork stitches. The small gold spots are worked in Eight Legged Spider’s Web Stitch which I first encountered in Month Four, and which is a great trial at the size it needs to be on the pincushion. I’ve not quite persuaded myself that I need to restitch them, as they didn’t markedly improve over the four I’ve done, but I am certainly considering the possibility.
The channels between the back stitches are filled with Reverse Chain Stitch, which I first encountered at the very beginning of the goldwork section of the course. This is an easy stitch to do, and very satisfying to see it build.
The course materials have included two Japanese hand made needles, which I was hoping to experiment with at this point, but I can’t even thread them! The eyes are much too fine for the thread, which is awkward, since I may be wasting quite a bit of gold thread unnecessarily because my ordinary needles strip the gold from its core.
There has to be a better way…
Tudor and Stuart Master Class – Month Eleven
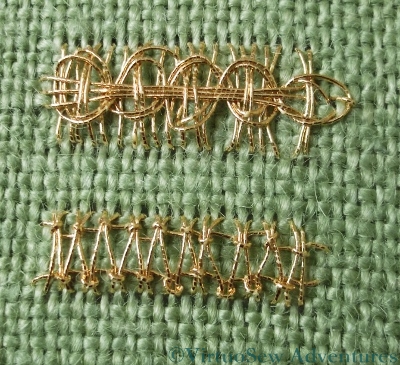
Month 11 Goldwork Stitches
So while I continue with the silkwork for the Spot Sampler and the Tudor Pincushion, here are the two new stitches for Month 11 of the course.
The two stitches are Guilloche on Ladder Stitch, and Hemstitch on Ladder Stitch. In both cases I have cheated and just worked a panel of straight stitch bars as the foundation. This is because I wanted to get a firm grip on the structure of the stitch, rather than spending my time on working the foundation.
As the stitches become more multi-phase and more complex, the green doodle cloth is becoming a less suitable foundation. While it makes things easier by making the stitches larger when using the counted diagrams for them, it also makes things more difficult by making the stitches larger! I find that I am having difficulty in getting tension and stitch length neat and correct – in fact, you can probably see that from the rather floppy loops on the Guilloche Stitch Of course when I come to work on the real fabric using the real gold and silver threads, this problem should be much reduced, but I think I will find myself using a stiletto or a laying tool to try to keep the thread under rather closer control, even so.
Tudor And Stuart Masterclass – Pincushion Progress
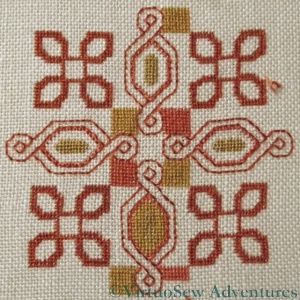
Tudor Pincushion Progress
So here is the progress on the Tudor Pincushion.
There are two close shades of red and two close shades of tan in the design, – this will increase the appearance of rich, subtle colour variation in the final piece, which will provide a gorgeous background for the gold and silver threads. It also means that I have to be super-organised with my thread. As soon as I cut a length, it is wound onto a card with the thread number written on it, because even my daylight lamp sometimes isn’t enough to help distinguish the colours.
I’ve miscounted and had to restitch the corner motifs in a couple of places, but that is probably because, first, it is a very fine count of fabric, and second, tent stitch is an oriented stitch.

Tent Stitch - demonstrating edges with the orientation and against it
That is, because it creates a diagonal stitch, diagonal elements of the design look different when stitched, depending upon whether they slant with the stitch or in the opposite direction. This doesn’t cause a problem once the piece is finished – especially given how small the stitches are! – but it does mean that it isn’t so easy to know at a glance whether details are right. When the details are wrong, it becomes clear that they are wrong just as soon as you stop stitching, and then it becomes a matter of how much or how little needs to be unpicked.
Of course, I suppose I could interpret (probably correctly!) that as a sign that I’ve been stitching for too long and my eyes are tired…