
Tag: ornamental stitches
The View of the Excavation Finished…
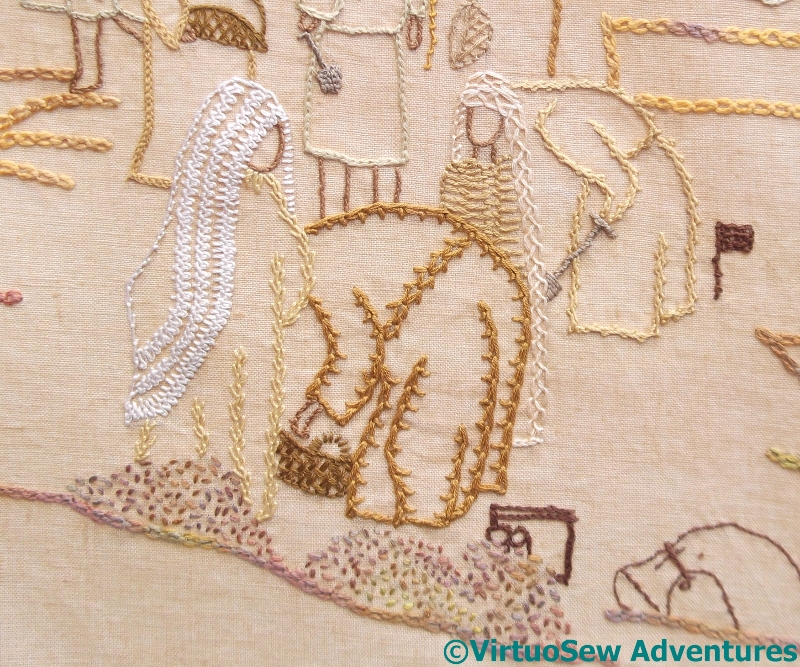
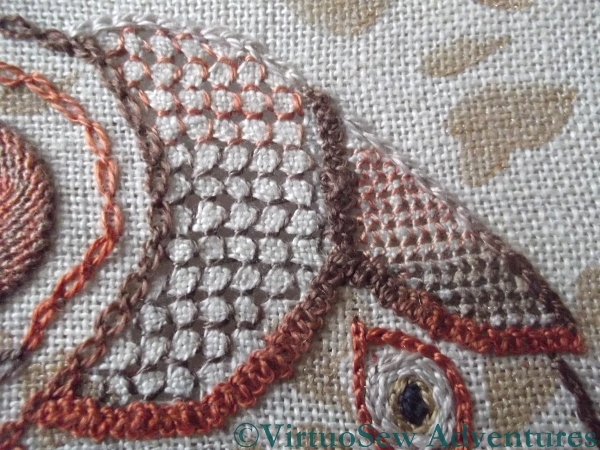
Foreground Group
The last group took a lot of stitching, restitching, unpicking and restitching. I couldn’t seem to get any of it right, and there are one or two bits I’m still not 100% sure about, even now…
The pale figure, bending over beside the little flag is in Spanish Knotted Feather Stitch, and the nearer bending figure is in Mountmellick Stitch. I was surprised that it was quite so hard to find suitably broad line stitches for the purpose; when you’re looking for characterful narrow stitches, you can only find broad ones, and when you’re looking for broad ones, by some strange alchemy only narrow ones catch your eye…
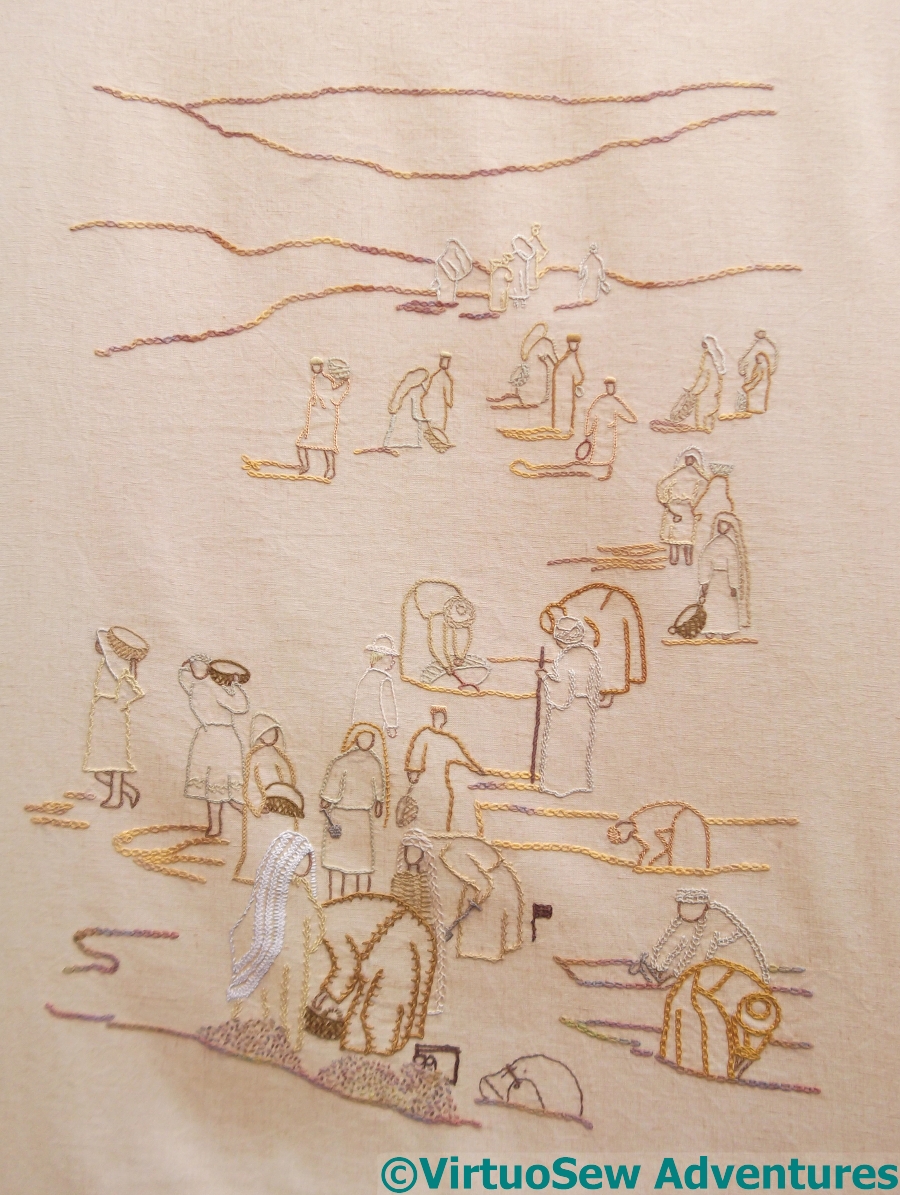
View Of The Excavation
The creamy white headscarf ran through Crested Chain Stitch (no!) and several stitches I hated so much I didn’t even record them, before I finally settled on three rows of Braid Stitch.
So at last, after much fiddling around, the View Of The Excavation is finished.
I’m fairly happy with it, actually. The trail of people into the distance creates a pleasing pattern, and I think that the alternation of the colours works well. Furthermore, as I wished, the Egyptian labourers and supervisors are the stars. There is a European, but he’s mostly concealed by the others.
There may be a few tweaks – not least I have yet to make sure that it works as a counterpoint to the Map of Amarna – but I think that at last it is finished for the time being!
Still More on the View of the Excavation

Supervising A Trench
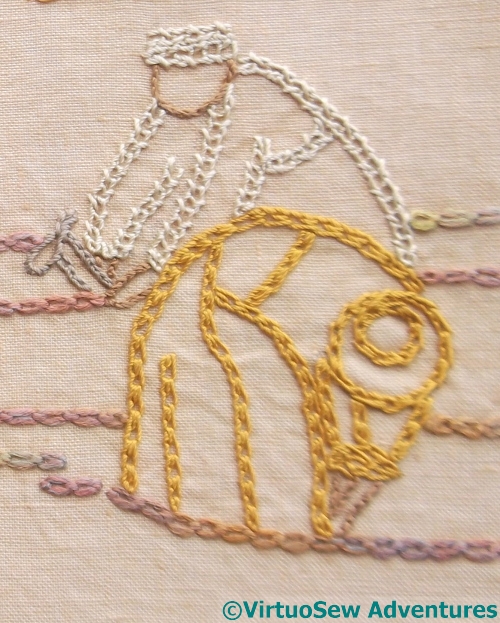
As I got nearer the foreground figures, I tried to pick broader stitches, or at least stitches that were a bit more emphatic. This group was great fun to do, starting with the Gufti with his staff of office (Portuguese Knotted Stem!). The Gufti’s robe is Feather stitch, as are some of the twists of his headgear. I concentrated very hard on keeping the stitches even and close so that the “density” of the stitch would be maintained. The one in dark gold is in double interlaced back stitch, except for the top of the headgear, and the waistline – those are whipped backstitch. The other one is in one of the Elizabethan stitches from Jacquie Carey’s book.
I had fun with the supervising excavator – the brim of his solar topee is the Hungarian Braid chain, and I reversed the direction of the chain stitch for the peak of the crown. He’s also the only one with fair hair and pinkish skin, and I dressed him in a pale, tailored jacket.
The two at the front are another mixture of stranded silk, stranded cotton, and round silk thread. The golden veil is coral stitch, and the tunic below it is stranded silk chain stitch, and the dark golden tunic is stranded cotton and twisted chain stitch. I’m trying to make choices of stranded or round yarn that will suit the stitch.
Two Diggers
I worked these two diggers on World Embroidery Day – which I hadn’t even known existed until the day before, so I was very glad I was able to sit and stitch!
I went back to my Edith John books for these two. The front one is in Shell Chain stitch, which I first used on the Circle Skirt. I won’t say it’s a favourite, but I have rather taken to it, and it creates an interesting effect.
The one behind is a very peculiar stitch, a combination of twisted chain stitch and open chain stitch. It creates a very square appearance, with the twisted chain alternating from side to side of the open chain, and it is called, rather predictably, Open Twisted Chain Stitch.
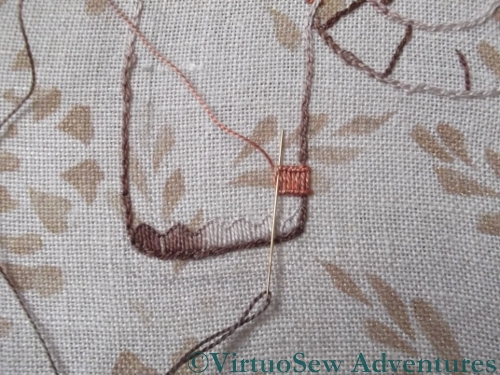
More Experiments!
Back Of Sample
You could be forgiven for thinking that I had finally lost all common sense. We’re all interested in fibre, fabric, and stitch, but even so, expecting you to take an interest in a photograph of a plain piece of felt seems a little extreme.
Especially a very ordinary, single-colour, and entirely unadorned piece of felt.
So what am I up to?
Mischief, of course!
Does it help if I tell you that it’s really quite a thick piece of felt?

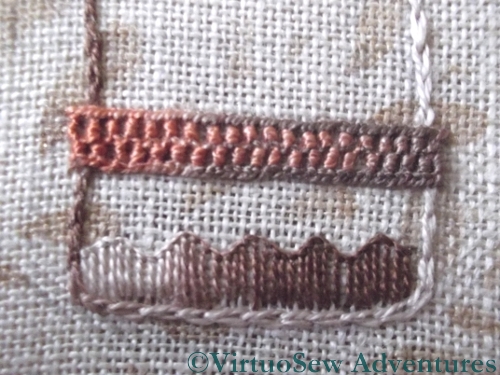
Front Of Sample
Or does it help if I tell you that this is the front?
I bought an “inspiration pack” of threads, and this thick square of felt at “Sewing For Pleasure” a while back, with absolutely no idea of what I expected or intended to do with it.
While I was wondering about it, I remembered reading about a medieval satchel that had been made by sewing the pieces together within the thickness of the leather. I didn’t feel quite willing to attempt something structural, but it gave me the idea of trying to work a sampler of stitches without the back showing.

Detail Of Sample
I even managed to work some of my favourite stitches.
I originally began with a wavy line of Shell Chain stitch, and then built up the design from there. Some of the threads were too heavy to use in this context, and there was a wonderful heavy slub that I couldn’t find a use for (never fear, I will!) but I had great fun alternating texture and shine, space-filling and line, and just playing.
I have absolutely no idea what I’m going to do with it, but I’m rather pleased with how it turned out!
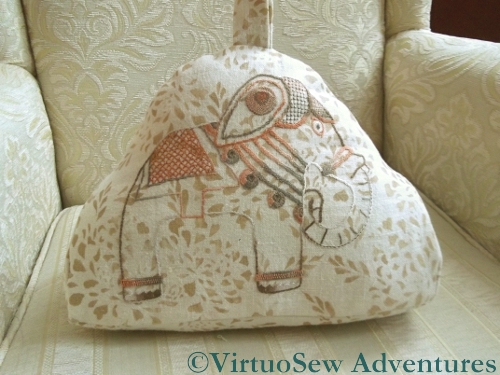
The Elephant Doorstop is Finished.
Finished Doorstop
At last – after some months of puzlement, delay and confusion – and with considerable help from my mother, who was, after all the client, and knew what she wanted! – the Elephant Doorstop is finished!
We decided to make the dorstop vaguely teacosy-shaped, with a flat base, so that it wouldn’t fall over, and a loop to pick it up by so that no one is tempted to pick it up by the embroidery and abrade all that painstaking stitchery.
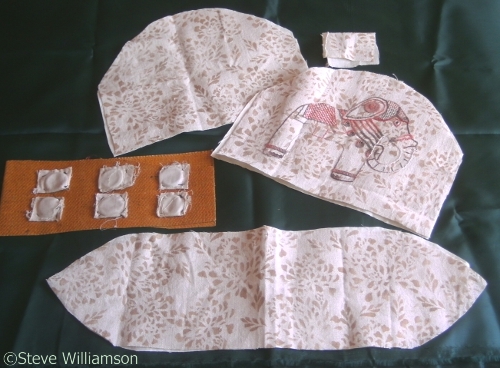
Pieces Laid Out
Once the pieces were cut out, my mother took a picture so you can see what we eventually decided upon. You will notice that there is a piece of buckram to flatten and stiffen the base, and it is being weighted with curtain-weights – small circles of lead held in their own fabric pocket. It’s easy to sew the fabric pocket into a curtain lining, or indeed, onto a piece of bukram, and it is less likely to catch and go astray than if the lead is sewn on like a button or a shisha mirror.
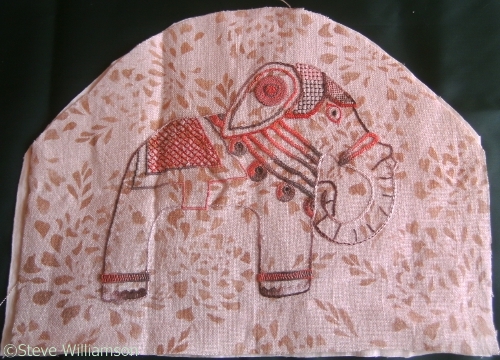
Elephant Finished
I’ve decided to call him “Kala Nag”, after the elephant in Rudyard Kiplings’s story “Toomai of the Elephants”, in “The Jungle Book”. He’s in ceremonial harness, rather than the working harness of the story, but I think he’s a very grand fellow, and I’m really very pleased with how the embroidery turned out. The variegated threads allow him to disappear slightly against the background in places, which makes for a more visually interesting piece than if he’d been stitched in the same tones throughout.
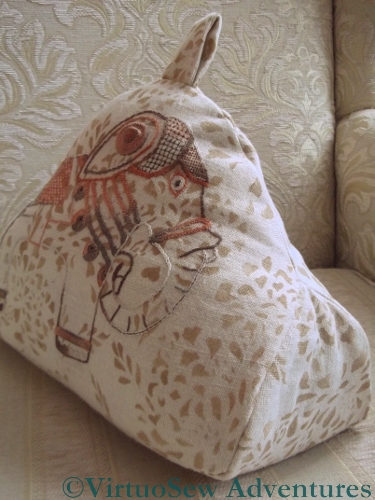
Side View
I propped the finished doorstop up on one of the living room chairs to take some more photos. This one gives you a better idea of the finished three-dimensional article, firmly stuffed with cotton linterfelt and ready to keep doors from swinging. He does a good job, too – those six small pieces of lead are just enough weight to keep him where he belongs.
And when he’s off duty, he sits on a bookshelf, conversing amicably with his older brother, The Elephant of Considerable Charm.
Jane Rainbow Kit – second installment
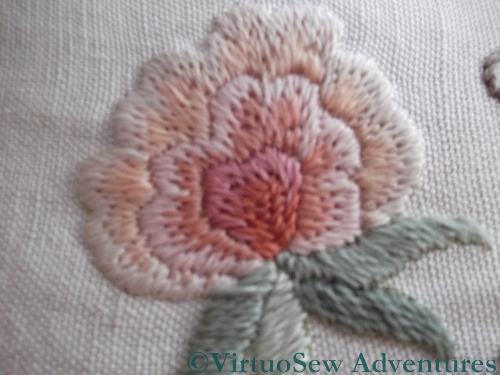
Flower 1 on the Jane Rainbow Kit
The raised edges of the petals of this flower are produced by working one row of blanket stitch along the edge and then working detached buttonhole stitch into that. It creates a fairly subtle effect in real life, and it’s always satisfying to see small details like this appearing in kits.
You can also see in this close up that although I was beginning to get to grips with satin stitch, my Long and Short Stitch wasn’t very good.
Flower 2 on the Jane Rainbow Kit
Really not very good, in fact! The stitching on the second flower looks more like brick stitch. I think this is the only bit of the design I didn’t enjoy doing, and that’s entirely because I simply could not get to grips with Long and Short Stitch. No-one had told me to think “Long and Longer”, which is what has cracked it for me since then. Besides, working a colour change into such narrow rows is not the easiest way to tackle Long and Short stitch!
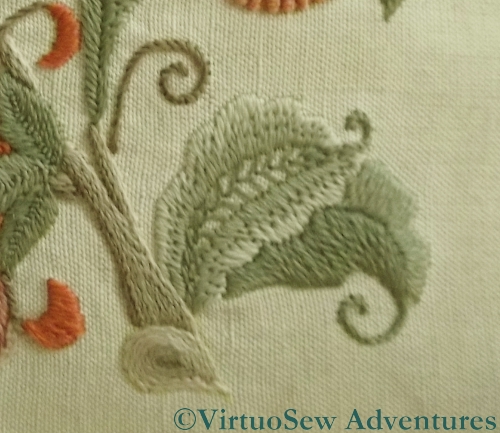
Leaves and stems on the Jane Rainbow Kit
I did like the rows of stem stitch shading from dark to light that were used for the stems – in fact I used the same technique in the stems on the Piano Shawl. The detail of the end of the stem – concentric rows of stem stitch – was particularly charming.
The leaves in the bottom corner worked well, too. The openwork at the centre of the upper leaf makes a nice contrast with the rest of the design which is very densely stitched.
I did enjoy working this – even if it was finished at the speed of lightening!
Another Long-Ago Project – Jane Rainbow Kit
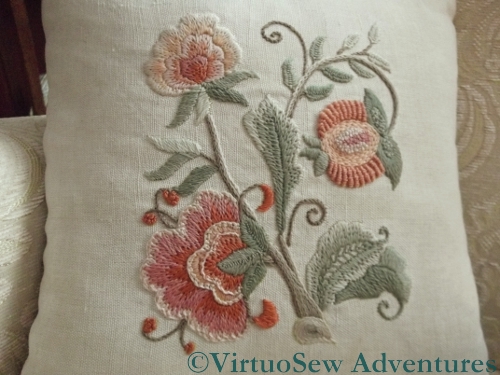
Jane Rainbow Kit
This crewelwork cushion came from a Jane Rainbow kit, which my parents gave me for Christmas about fifteen years ago. It’s the last kit that anyone’s ever bought for me, because I finished it in short order – it was done by Twelfth Night – and the family felt that it hadn’t kept me out of mischief for long enough! I’ve looked on a couple of needlework shop websites, and it seems that this design is no longer available, which I think is a pity. It was fun to do, and I learnt a couple of variations I’d not come across before.
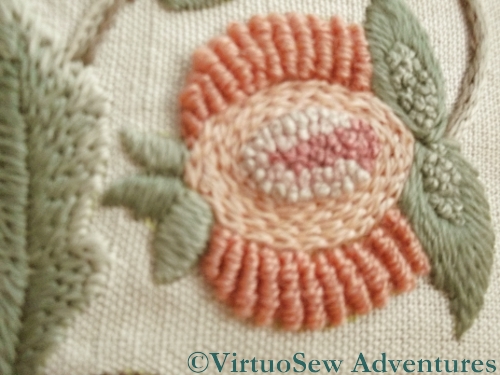
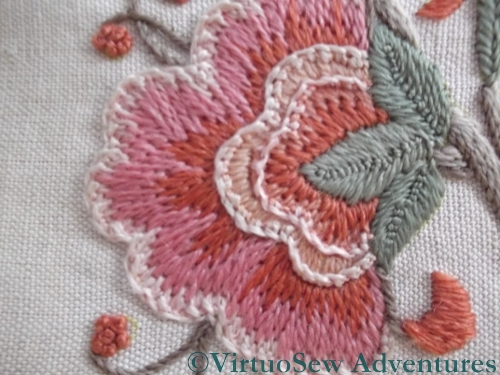
Pomegranate
The pomegranate shows a great variation in height and texture of stitches. I like the way the French knots used in the centre are also used for textured patches on the leaves, although I think I would be inclined, were I to work this today, to use a darker colour in the centre of the pomegranate. The ribbed pattern around isn’t made up of exceptionally long bullion knots, as you might expect, but instead is a sort of opened-out ribbed spiders web stitch. The instructions here said to pack in the stitches as much as possible to get a nicely raised effect. It worked really well – it almost looks padded!
Further Adventures In The Abstract Garden

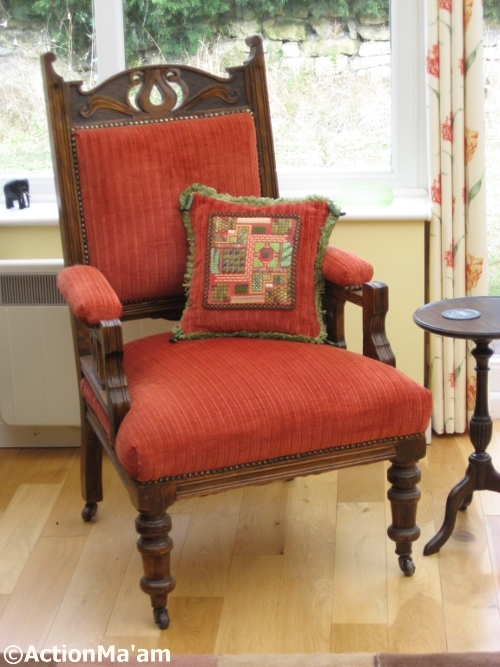
The Finished Cushion
You may recall that I worked an abstract piece of canvaswork inspired by a vegetable garden. When I’d finished it, I didn’t like it very much, and really didn’t know what to do with it. However, my cousin (who comments here occasionally as Action Ma’am) did not suffer from the same problem. Not only did she like it, she knew what to do with it. I’ve asked her to write up what she did, and here’s what she wrote:
Having commented how the abstract garden canvas reminded me of my veg garden, I was delighted when Rachel offered it to me. I knew exactly what to do – it had already told me it wanted to be on a cushion for the armchair in the conservatory. My guess that the red of the canvas was the same as the red of the upholstery was spot on.
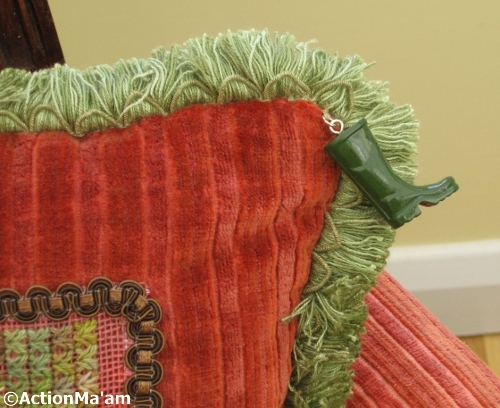
Close Up Of The Corner Trim
I don’t have a sewing machine, so Fiona my curtain-maker agreed to put the cover together for me. Not having done any needlework for many years, I was quite alarmed at the prospect of “getting it right”. Rachel and I had an email discussion about how to straighten the canvas and apply it to the velvet, handstitching it in place. To emphasize the garden theme, I had chosen some gimp braid to cover the edges of the canvas. The loops of the braid echo the hoops of the iron edging you sometimes find around borders in posh parks and gardens. I also chose some green fringe to define clearly where the cushion ended and the chair began.
The Cushion On Its Chair
Whilst I was still thinking about getting started, Fiona phoned to say she could deliver a bedspread she had been making for me the next day. This was too good an opportunity to miss. I took the afternoon off work, a deep breath, gritted my teeth and leapt in. The stripes on the velvet helped in getting the canvas straight, the braid hid the edge of the canvas, and two hours later, it was ready for Fiona.
Whilst the cover was away being made up, I found a necklace in an accessories shop, with a green wellington boot charm on it. I bought four as a finishing touch.
The abstract garden canvas is now a happy cushion, nestling into the crook of the chair arm, and kicking its welly-booted heels in the air. I don’t think the chair intends letting go of it any time soon!
Close-ups on the Elephant Doorstop
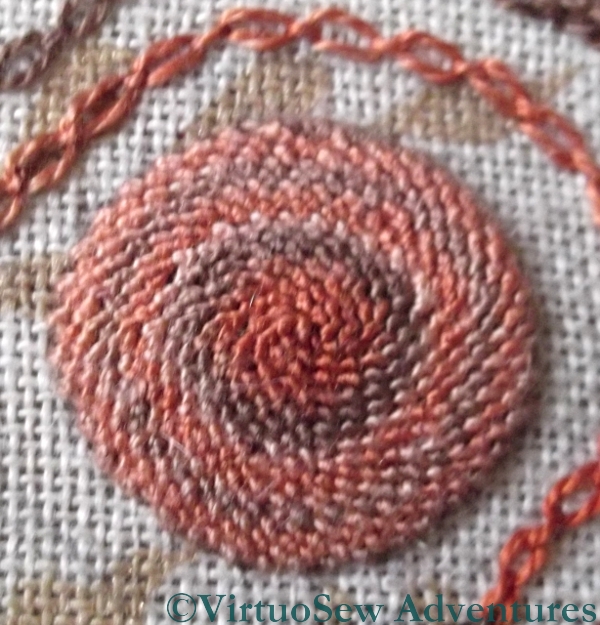
Close Up - Spiral Trellis Stitch
I’ve been asked to provide a few close ups from the Elephant Doorstop, so here goes.
This close-up shows the spiral trellis stitch medallion on the Elephant’s ear. I love this stitch – it creates a lovely nubbly texture! It’s about three quarters of an inch across.
The silk perlé I am using was in ready cut lengths, shading from orange to brown, and when I brought a new thread in, I started with the colour I’d just finished, so that the colour sections would be slightly longer and denser.
Close Up - Two Sizes of Four Sided Stitch
When I thought about working four-sided stitch on the Elephant’s headcloth, I was originally intending to work some other pattern over the top, so the background grid would modify the fabric and the pattern on the top would be the most visible thing. However, I couldn’t decide what size would be best and worked one section in each size, and now I’ve decided I like it just as it is. It recalls the Trellis Couching on the saddlecloth, but at a different orientation.
Elephant’s Anklets Identified!
Ladder Stitch Foundation
I’ve been struggling to decide what to do with the anklets for the Elephant of Infinite Charm. When I look at the Elephant without anklets it’s clear the design needs more visual weight lower down in the design, but when I asked the Elephant what sort of anklets he wanted, he just humphed at me. For days!
Now, however, I think I’ve cracked it. And one of the really pleasing things about the idea is that it helps me to practice my Ladder Stitch, which I’ve been struggling with for the Tudor and Stuart Goldwork Masterclasss. It’s easier in silk, partly because I’m not quite as conscious of the expense of the thread (I can’t believe I just wrote that!), and partly because the thread slides over itself more easily.
Zig Zag On LadderStitch Anklet
So here is my choice – ZigZag on Ladder Stitch. It adds a bit of patterning and structure , but it’s not out of scale with the Elephant or with his feet. The only slight difficulty is that because it it a complex stitch on top of a fairly complex foundation, it’s not exactly lightening-fast. Still, I’ve got one done, and the Elephant isn’t humphing anymore. When I’ve done both, I will need to decide whether to put a second anklet further up the leg. The original ceramic version does, but then in the ceramic version the anklet is smooth…
The Canvaswork Abstract Garden
The Canvaswork Abstract Garden
Following on from the Knot Garden, I decided to play a little more with the idea of using the canvas as a background, rather than covering it entirely. Since I already knew the canvas would not be covered, I chose a piece of dyed canvas (from “Kate’s Kloths”, which I haven’t been able to find online).
The first element was the simple path in expanded brick stitch, worked in wool. The rest of the panel was then built up as a pattern of varying stitches and threads. There was no predetermined idea, simply the aim of keeping a sense of balance and rhythm in the pattern densities. You will notice that block sizes and shapes are repeated, reflected across the path which snakes across the centre.
I’m not particularly comfortable with abstract work or even with designing it, so this repetition and reflection of the blocks was a way to give myself a structure for the piece. Otherwise I find abstract work often feels rather chaotic and it doesn’t offer me the chance to puzzle out “a good stitch to represent such-and-such”, which is where a lot of the fun of the Persian Fantasy came from.
This was an interesting exercise, but like the Knot Garden, it has remained as a piece of canvas, not mounted, framed or incorporated into anything, because I really haven’t a clue what to do with it!