
Tag: Elephant Doorstop
The Elephant Doorstop is Finished.
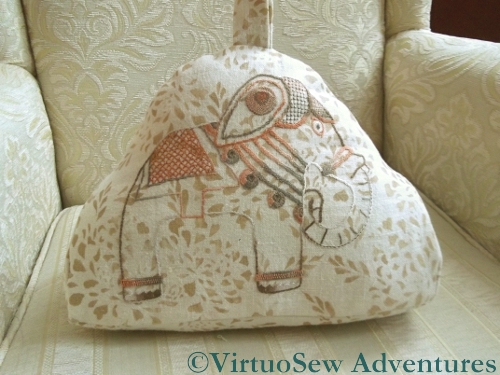
Finished Doorstop
At last – after some months of puzlement, delay and confusion – and with considerable help from my mother, who was, after all the client, and knew what she wanted! – the Elephant Doorstop is finished!
We decided to make the dorstop vaguely teacosy-shaped, with a flat base, so that it wouldn’t fall over, and a loop to pick it up by so that no one is tempted to pick it up by the embroidery and abrade all that painstaking stitchery.
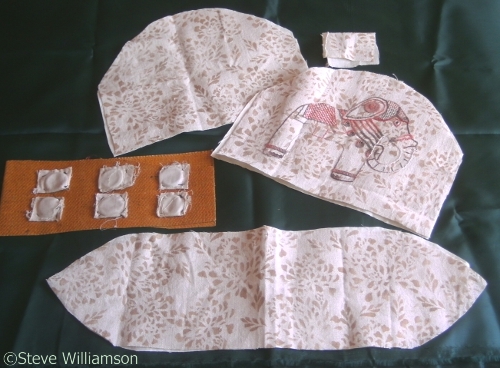
Pieces Laid Out
Once the pieces were cut out, my mother took a picture so you can see what we eventually decided upon. You will notice that there is a piece of buckram to flatten and stiffen the base, and it is being weighted with curtain-weights – small circles of lead held in their own fabric pocket. It’s easy to sew the fabric pocket into a curtain lining, or indeed, onto a piece of bukram, and it is less likely to catch and go astray than if the lead is sewn on like a button or a shisha mirror.
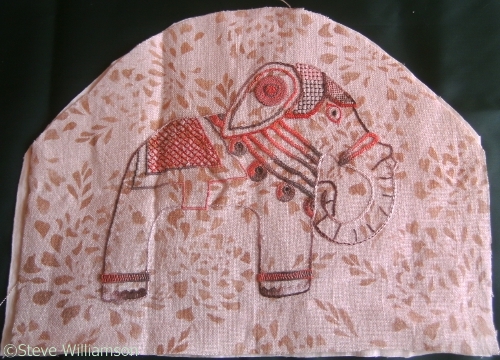
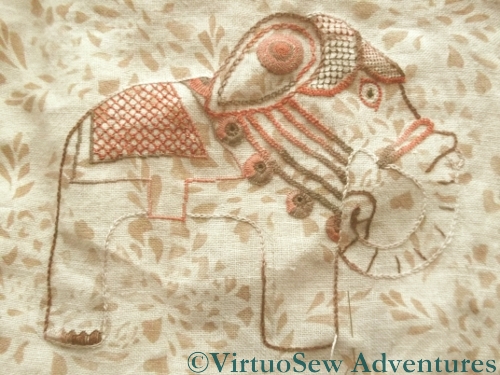
Elephant Finished
I’ve decided to call him “Kala Nag”, after the elephant in Rudyard Kiplings’s story “Toomai of the Elephants”, in “The Jungle Book”. He’s in ceremonial harness, rather than the working harness of the story, but I think he’s a very grand fellow, and I’m really very pleased with how the embroidery turned out. The variegated threads allow him to disappear slightly against the background in places, which makes for a more visually interesting piece than if he’d been stitched in the same tones throughout.
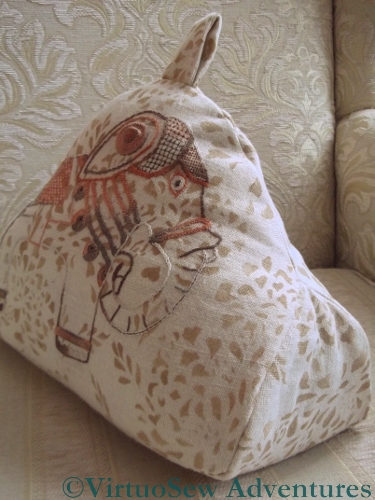
Side View
I propped the finished doorstop up on one of the living room chairs to take some more photos. This one gives you a better idea of the finished three-dimensional article, firmly stuffed with cotton linterfelt and ready to keep doors from swinging. He does a good job, too – those six small pieces of lead are just enough weight to keep him where he belongs.
And when he’s off duty, he sits on a bookshelf, conversing amicably with his older brother, The Elephant of Considerable Charm.
Close-ups on the Elephant Doorstop
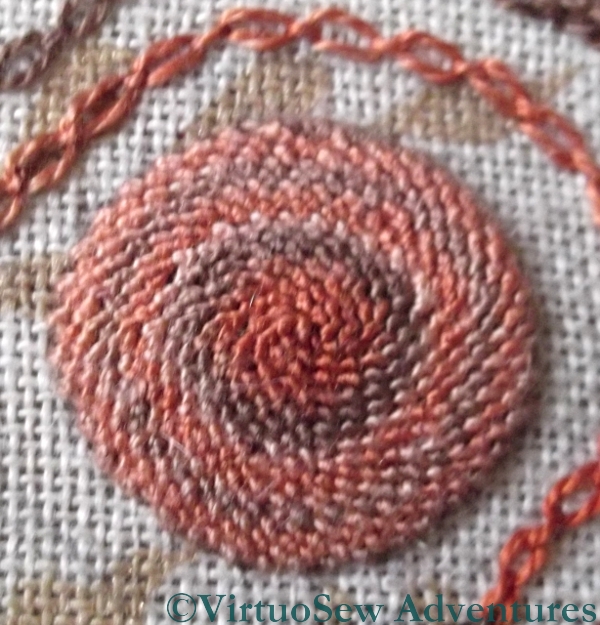
Close Up - Spiral Trellis Stitch
I’ve been asked to provide a few close ups from the Elephant Doorstop, so here goes.
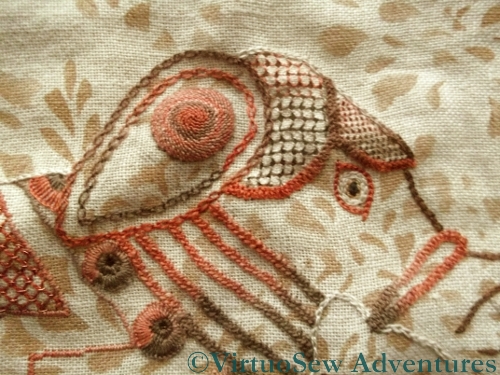
This close-up shows the spiral trellis stitch medallion on the Elephant’s ear. I love this stitch – it creates a lovely nubbly texture! It’s about three quarters of an inch across.
The silk perlé I am using was in ready cut lengths, shading from orange to brown, and when I brought a new thread in, I started with the colour I’d just finished, so that the colour sections would be slightly longer and denser.
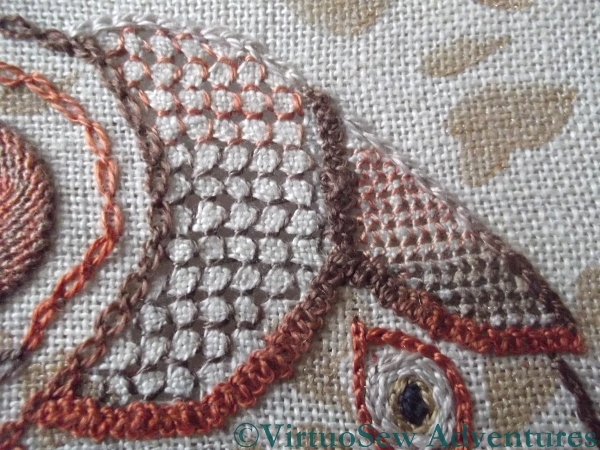
Close Up - Two Sizes of Four Sided Stitch
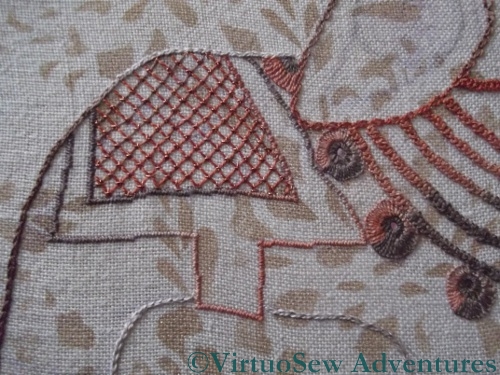
When I thought about working four-sided stitch on the Elephant’s headcloth, I was originally intending to work some other pattern over the top, so the background grid would modify the fabric and the pattern on the top would be the most visible thing. However, I couldn’t decide what size would be best and worked one section in each size, and now I’ve decided I like it just as it is. It recalls the Trellis Couching on the saddlecloth, but at a different orientation.
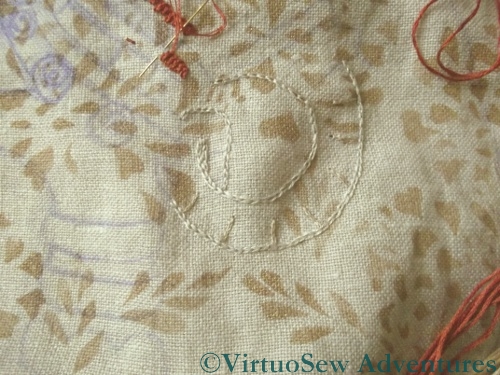
Elephant’s Anklets Identified!
Ladder Stitch Foundation
I’ve been struggling to decide what to do with the anklets for the Elephant of Infinite Charm. When I look at the Elephant without anklets it’s clear the design needs more visual weight lower down in the design, but when I asked the Elephant what sort of anklets he wanted, he just humphed at me. For days!
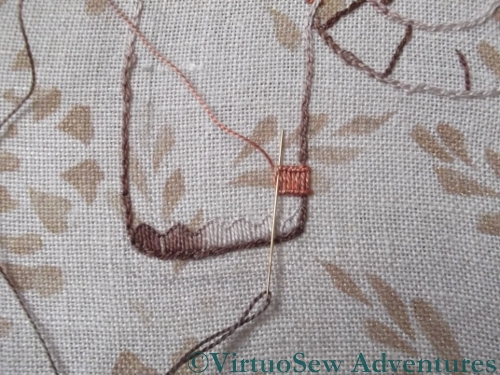
Now, however, I think I’ve cracked it. And one of the really pleasing things about the idea is that it helps me to practice my Ladder Stitch, which I’ve been struggling with for the Tudor and Stuart Goldwork Masterclasss. It’s easier in silk, partly because I’m not quite as conscious of the expense of the thread (I can’t believe I just wrote that!), and partly because the thread slides over itself more easily.
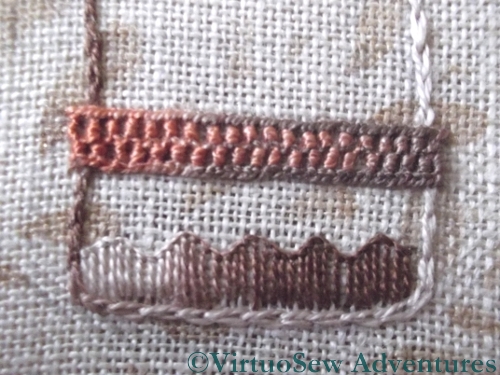
Zig Zag On LadderStitch Anklet
So here is my choice – ZigZag on Ladder Stitch. It adds a bit of patterning and structure , but it’s not out of scale with the Elephant or with his feet. The only slight difficulty is that because it it a complex stitch on top of a fairly complex foundation, it’s not exactly lightening-fast. Still, I’ve got one done, and the Elephant isn’t humphing anymore. When I’ve done both, I will need to decide whether to put a second anklet further up the leg. The original ceramic version does, but then in the ceramic version the anklet is smooth…
More Progress on the Elephant of Infinite Charm
I don’t work on the Christus Natus Est panel in the evenings, so I have been making progress on the Elephant of No Distinction But Infinite Charm. Slowly, because he has been proving obstreperous!
Progress on the Elephant of Infinite Charm
I’ve added a second row of cable chain stitch around his ear, and worked a single large roundel of spiral trellis stitch to embellish it. The spiral trellis is a very thread-hungry stitch – I think it used four or maybe five lengths, but it was well worth it. I was careful to bring the new end of the thread in using the end that the previous thread had just finished on, so that the blocks of colour in the variegated thread flowed smoothly rather than jumping about.
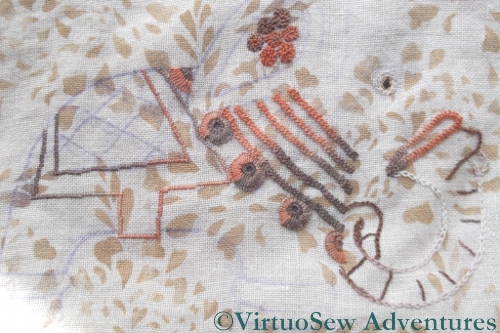
The Headcloth of the Elephant of Infinite Charm
You can see in the close up that I’ve used a pulled-work stitch for the Elephant’s Headcloth. I’m not sure which scale I prefer so I may just leave it as it stands. I wanted those sections to be covered, rather than open, but not completely solid. I think it’s pretty successful, but I intend to stare at him for a little while now, while I try to work out how I am going to work the anklets on his legs.
More on the Elephant of Infinite Charm
Trial of Interlacing
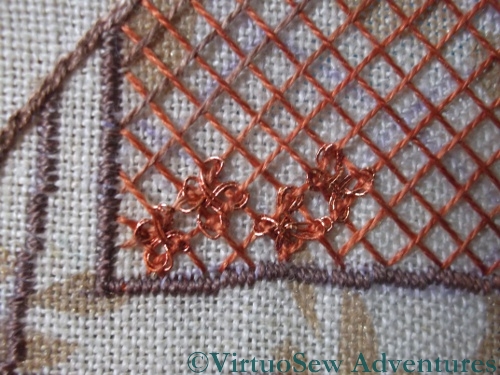
You may recall that last week I said I was thinking of working one of the new interlacing patterns on the Elephant’s saddlecloth. I ferreted around in my box of metallic threads and found several golds and coppers to choose from. Finally I chose a warm copper, and looked up the instructions for the interlacing.
I really didn’t like the look of it at all. Somehow it looked tangled and rather moth-eaten, instead of exotic. Not A Good Look, so out it came.
Final Decision
So in the end I decided to use ordinary trellis couching. The couching stitches are upright cross stitches in the copper thread, over a silk foundation. It looks a little dull in the photo, but in real life the little sparkle of copper “lifts” it nicely, and I think it will work well.
You might also notice that I’ve finished outlining him, using the thread that shades from brown to cream. It means that his edges aren’t always emphasised to the same degree, which I think is a good thing.
Artists talk of “light and shade”, and we usually interpret that as meaning simply that the patterns of tone are what build up a recognisable image. To an extent that is correct, in that if the tones are wrong, a picture won’t work well. When we are talking of a design of lines rather than shapes, however, it’s less obvious what we mean. I am trying to create a pattern of varying densities of stitching as well as colour, and in the end what I hope to have achieved is a pleasing rhythm for the eye to follow, not “sticking” anywhere, but not frantically jolting from one part of the design to the next.
Tricky!
One Collared Elephant
You can tell that the Elephant’s inspiration was the right one – suddenly he’s taken off!
The Elephant Collared
I’m using one set of variegated silk thread (shading from orange to brown) for the harness and headcloth and saddlecloth, and another (shading from cream to brown) for any small bits of the Elephant that show through all his finery. I shall have to redraw his head and headcloth – the transfer has rubbed off – but I’m pretty pleased with progress.
The collar is worked in six rows of braid stitch, which is a stitch that always looks better in a round yarn like this silk perlé. The roundels hanging from the collar are two rows of buttonhole stitch, and the roundels on the ear-covering are spiral trellis stitch – at the moment. I’m not quite sure that they are right. I first used Spiral Trellis on the Jacobean Work Panel, and really enjoyed stitching it, but I think these look too fussy. One big one might be better, and it would allow the colour change in the thread to show a little more.
I’m glad that I have worked out something to do next, as his anklets are giving me trouble.They are smooth and domed in the original model, but I think satin stitch might look a little ordinary.
I’ve used small satin stitches to outline the border of the saddlecloth, but only because I wanted something quiet to contain the excitement I intend to put inside it – I’m planning to use one of the complicated interlacings from the Tudor and Stuart Goldwork Masterclass for the saddlecloth, but extended to form an all-over pattern.
Watch this space…!
Rethinking The Elephant Doorstop
Needs More Thought
I originally decided to use plain stranded cotton for the Elephant Doorstop, in colours chosen to match the curtains in the living room as closely as possible.
However, once I started stitching I rapidly came to the conclusion that that just wasn’t going to work. We don’t want the Elephant to cover all my careful stencilling, but at the same time, he needs to show up. And he looks pretty hidden, here, as you can see. What’s more, I wasn’t enjoying it, and picking stitches was proving troublesome. I knew I wanted to stitch him – revisiting the original inspiration has been in the back of my mind for a while – but somehow, not like this.
There are two things I need to think about – the colours, and the weight of the thread. The creamy colours we chose are too light to show up well against the rather busy stencilled background, and although two threads of stranded cotton would be fine on this fabric, if it were a plain fabric, it is rather fine. Furthermore, one of the stitches I want to use is braid stitch, which is always a bit tricky in stranded cotton.
I’d already unpicked this section twice before I came to this conclusion, and I was beginning to feel rather anxious in case inspiration flagged completely. Then out of the blue, I was deafened by some triumphant trumpetings.
“I know what to do, I do!”, said he.
“What, then?” said I.
“Use some of those variegated silk perlés you’re always looking at. You can do any stitch that takes your fancy, the colours shading in and out will give you the lightness of effect you want, and – Ta-DA!”.
So now I’ve been told….!
The Elephant Doorstop
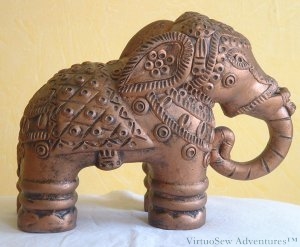
An Elephant Of No Distinction But Infinite Charm
Do you remember the Elephant of No Distinction But Infinite Charm, who inspired the canvaswork footstool I made for my mother? She’s now commissioned me to work a doorstop with the same inspiration. Naturally she didn’t want me to work it in the same technique. For one thing, the furniture in the living room has been reupholstered since I did it, and the jungle-inspired green background (although the footstool still looks quite happy) would no longer be as suitable as it was.

First Stage - stencil prepared and paint chosen
So we’ve picked a fairly loosely-woven linen, in a sort of pinkish beige (actually, “natural” unbleached linen run through the washing machine on Hot!), and rather than leaving the background completely plain, decided to stencil it with an all-over pattern taken from the lamps. The design is inspired by crystanthemums, as is the design on the curtains (a Designers Guild design which is older than me, and is proof that good design doesn’t date – it hasn’t looked dated or old-fashioned in more than forty years!).
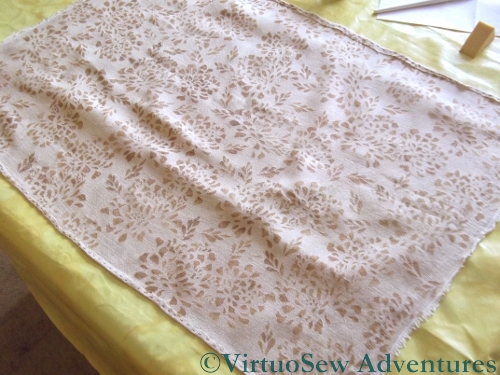
Stencilled fabric
After consulting my clients (!) I’ve decided to use a gold fabric paint for the background pattern. When I tested the stencil on paper the paint ran under it a little, so I chose to use a sponge instead. That seems to help in ensuring that the fabric paint isn’t laid on so thickly as to be unembroiderable, as well.
I didn’t create a proper, regimented repeating pattern, because I felt that it would make the stencil design too obvious. Instead I have twisted and turned the stencil and added extra leaves to fill in any really obvious gaps.