
Tag: ornamental stitches
Watermill Stitchery – Finishing Stones of Verrucola
You may recall that I was planning to use this design as a way to explore stonework in various forms, and to demonstrate stitches that might be chosen in each case.
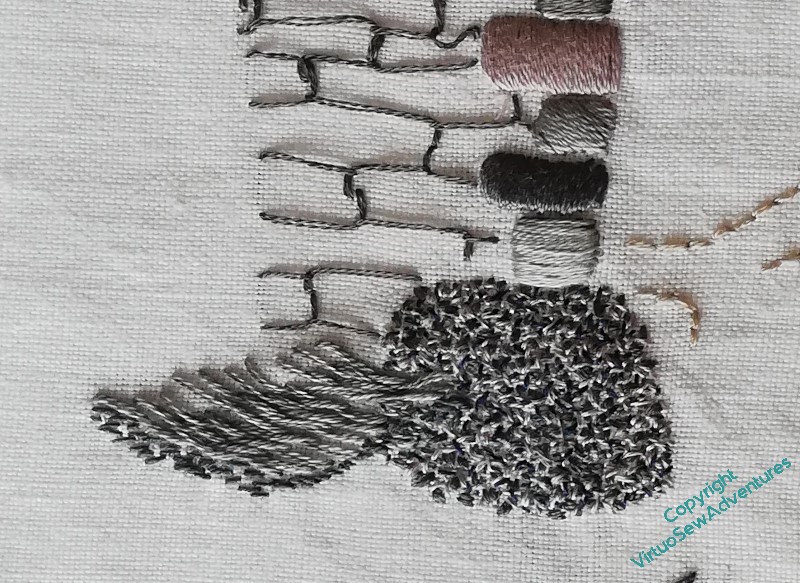
So here we have padded satin stitch for the cut and dressed stone of the arch, and seed stitch for the boulder beside it. The seat and the blocks of the wall around the arch are both in Cretan Stitch, the one spaced out and turned into a filling stitch of sorts, and the other compressed and set at a slight angle to represent the slightly dished stone seat.
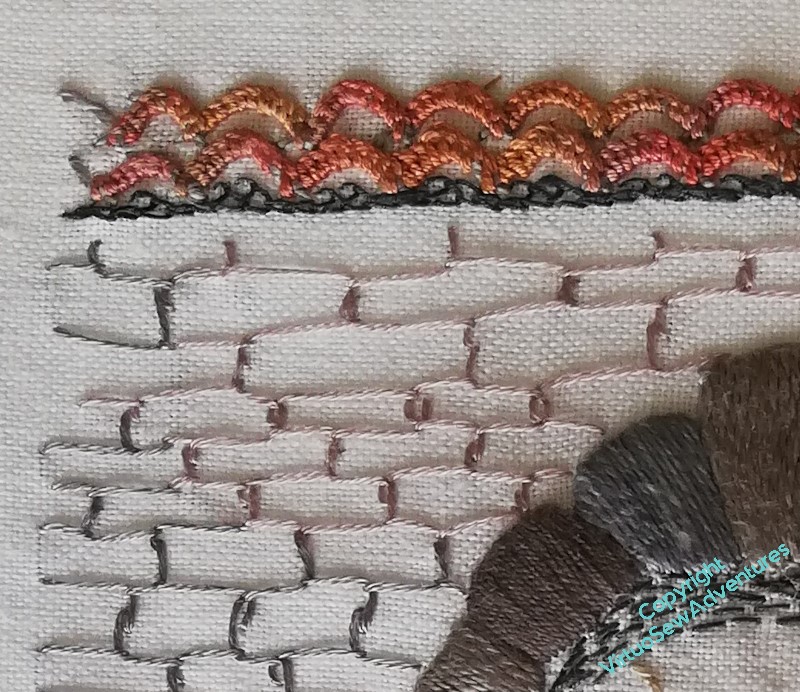
This view shows the height of the padding on the keystone and the line of dark stitching under the tiles, which is a line of chain stitch feathered on one side only to get one crisp edge and one which suggests the darkness of the arch. You can also see from the shadows just how strongly raised the blanket stitched herringbone stitch appears.
The Cretan Stitch rows are carefully varied in length and depth to show how the rows of cut stone are not all the same height or length. This was a stitch much more easily worked in a hoop, where you can see the layout, than in the hand – even though I prefer working in the hand where I can.
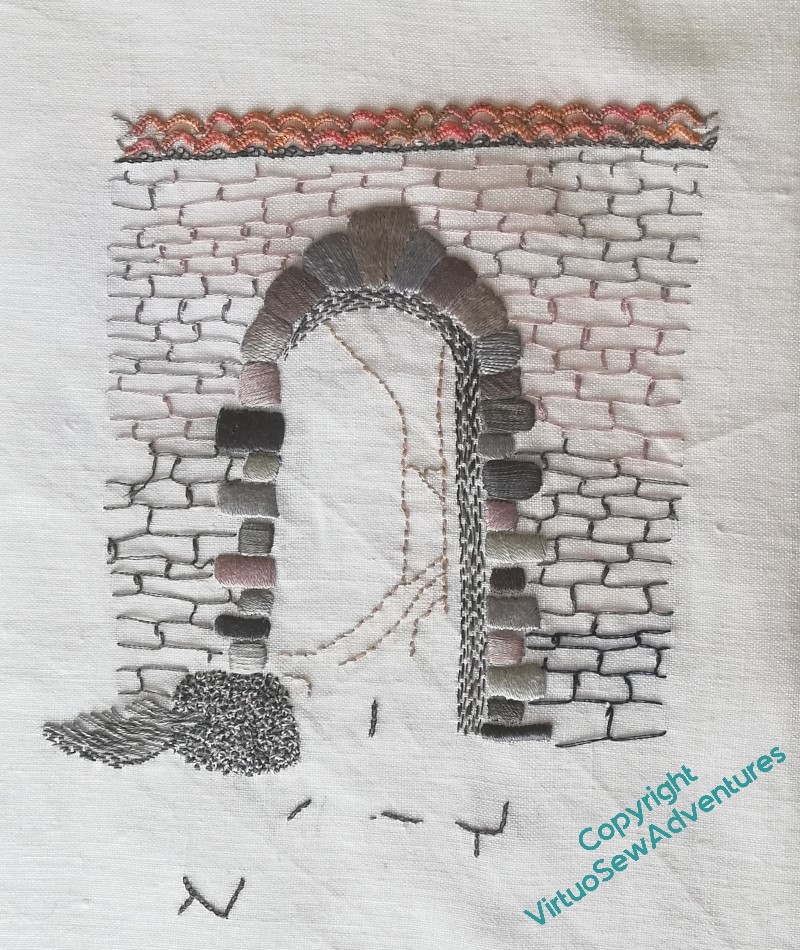
And here is the finished “Stones of Verrucola”.
There are some elements which work much better than others. The outlines through the arch and the chain stitch edges of the flagstones may not be necessary, and the shadow under the seat is a little too small.
The seed stitches could have been bigger, maybe even grouped, and maybe emphasizing one of the lighter colours more, but I am very happy that all of the different textures are truly differentiated.
Besides, all that I am seeking to do is to demonstrate ideas that the students can take on or not as they choose. If at the end of the week I have a classful of mini-mes, I will have failed. What I want is a group who’ve tried, experimented, and each of them produced, maybe even only a fragment, but still something that makes me think, “Goodness, I wish I’d thought of that!”
More progress on the Little Jacket
I decided that I was going to work all the major stems in one of the Braid Stitches, so I spent quite a bit of time revisiting Plaited Braid Stitch, the ordinary Braid Stitch, and others. For a while that was a little painful.
First of all, I was reminded that these stitches don’t stay in your hands the way (say) Feather Stitch does, and then secondly I was reminded that they are very thread-hungry. It’s (almost) all on the front, where you get the benefit of it, but metres get swallowed up in short order. And I knew there would be metres of whatever-stitch-I-chose. My stash doesn’t run to that sort of length, but having performed a few experiments, I realised that sock yarn would be perfectly useable, given the fabric I’m working on.
I finally chose to work Holly Braid Stitch, which I experimented with in 2014 when I was working on the Glittering Nightcap. I’d found it in Jacqui Carey’s book “Elizabethan Stitches”, and after some struggles it had worked pretty well. This time I tied myself in so many knots with it that I asked for help in the Historic Hand Embroidery group on fb, only to find that very few people had attempted it. However, those who did were very helpful, and several very intrigued people asked me could I video it if I got it to work…
So I have. What you see here is probably not enough to learn the stitch from without also following Jacqui’s diagrams and instructions, but I think it helps with the “workflow” of the stitch, which is not well represented in those diagrams, I suspect purely because, as a braidmaker, she thinks differently about the way a stitch works.
Once I had the stitch down pat, I bought a rather gorgeous sock yarn (Woodland Fire from The Yarn Gallery), and whenever I wasn’t sure about the details I wanted to add to a flower or leaf, I just kept on with the stems..
And on. And on!
And now, Episode 72 of Slow TV Stitchery is now live, in which we encounter difficulties in working a pattern backwards, experiment with French Knots, and recall “Leaving the Tyne”.
Watermill Stitchery – Stones of Verrucola
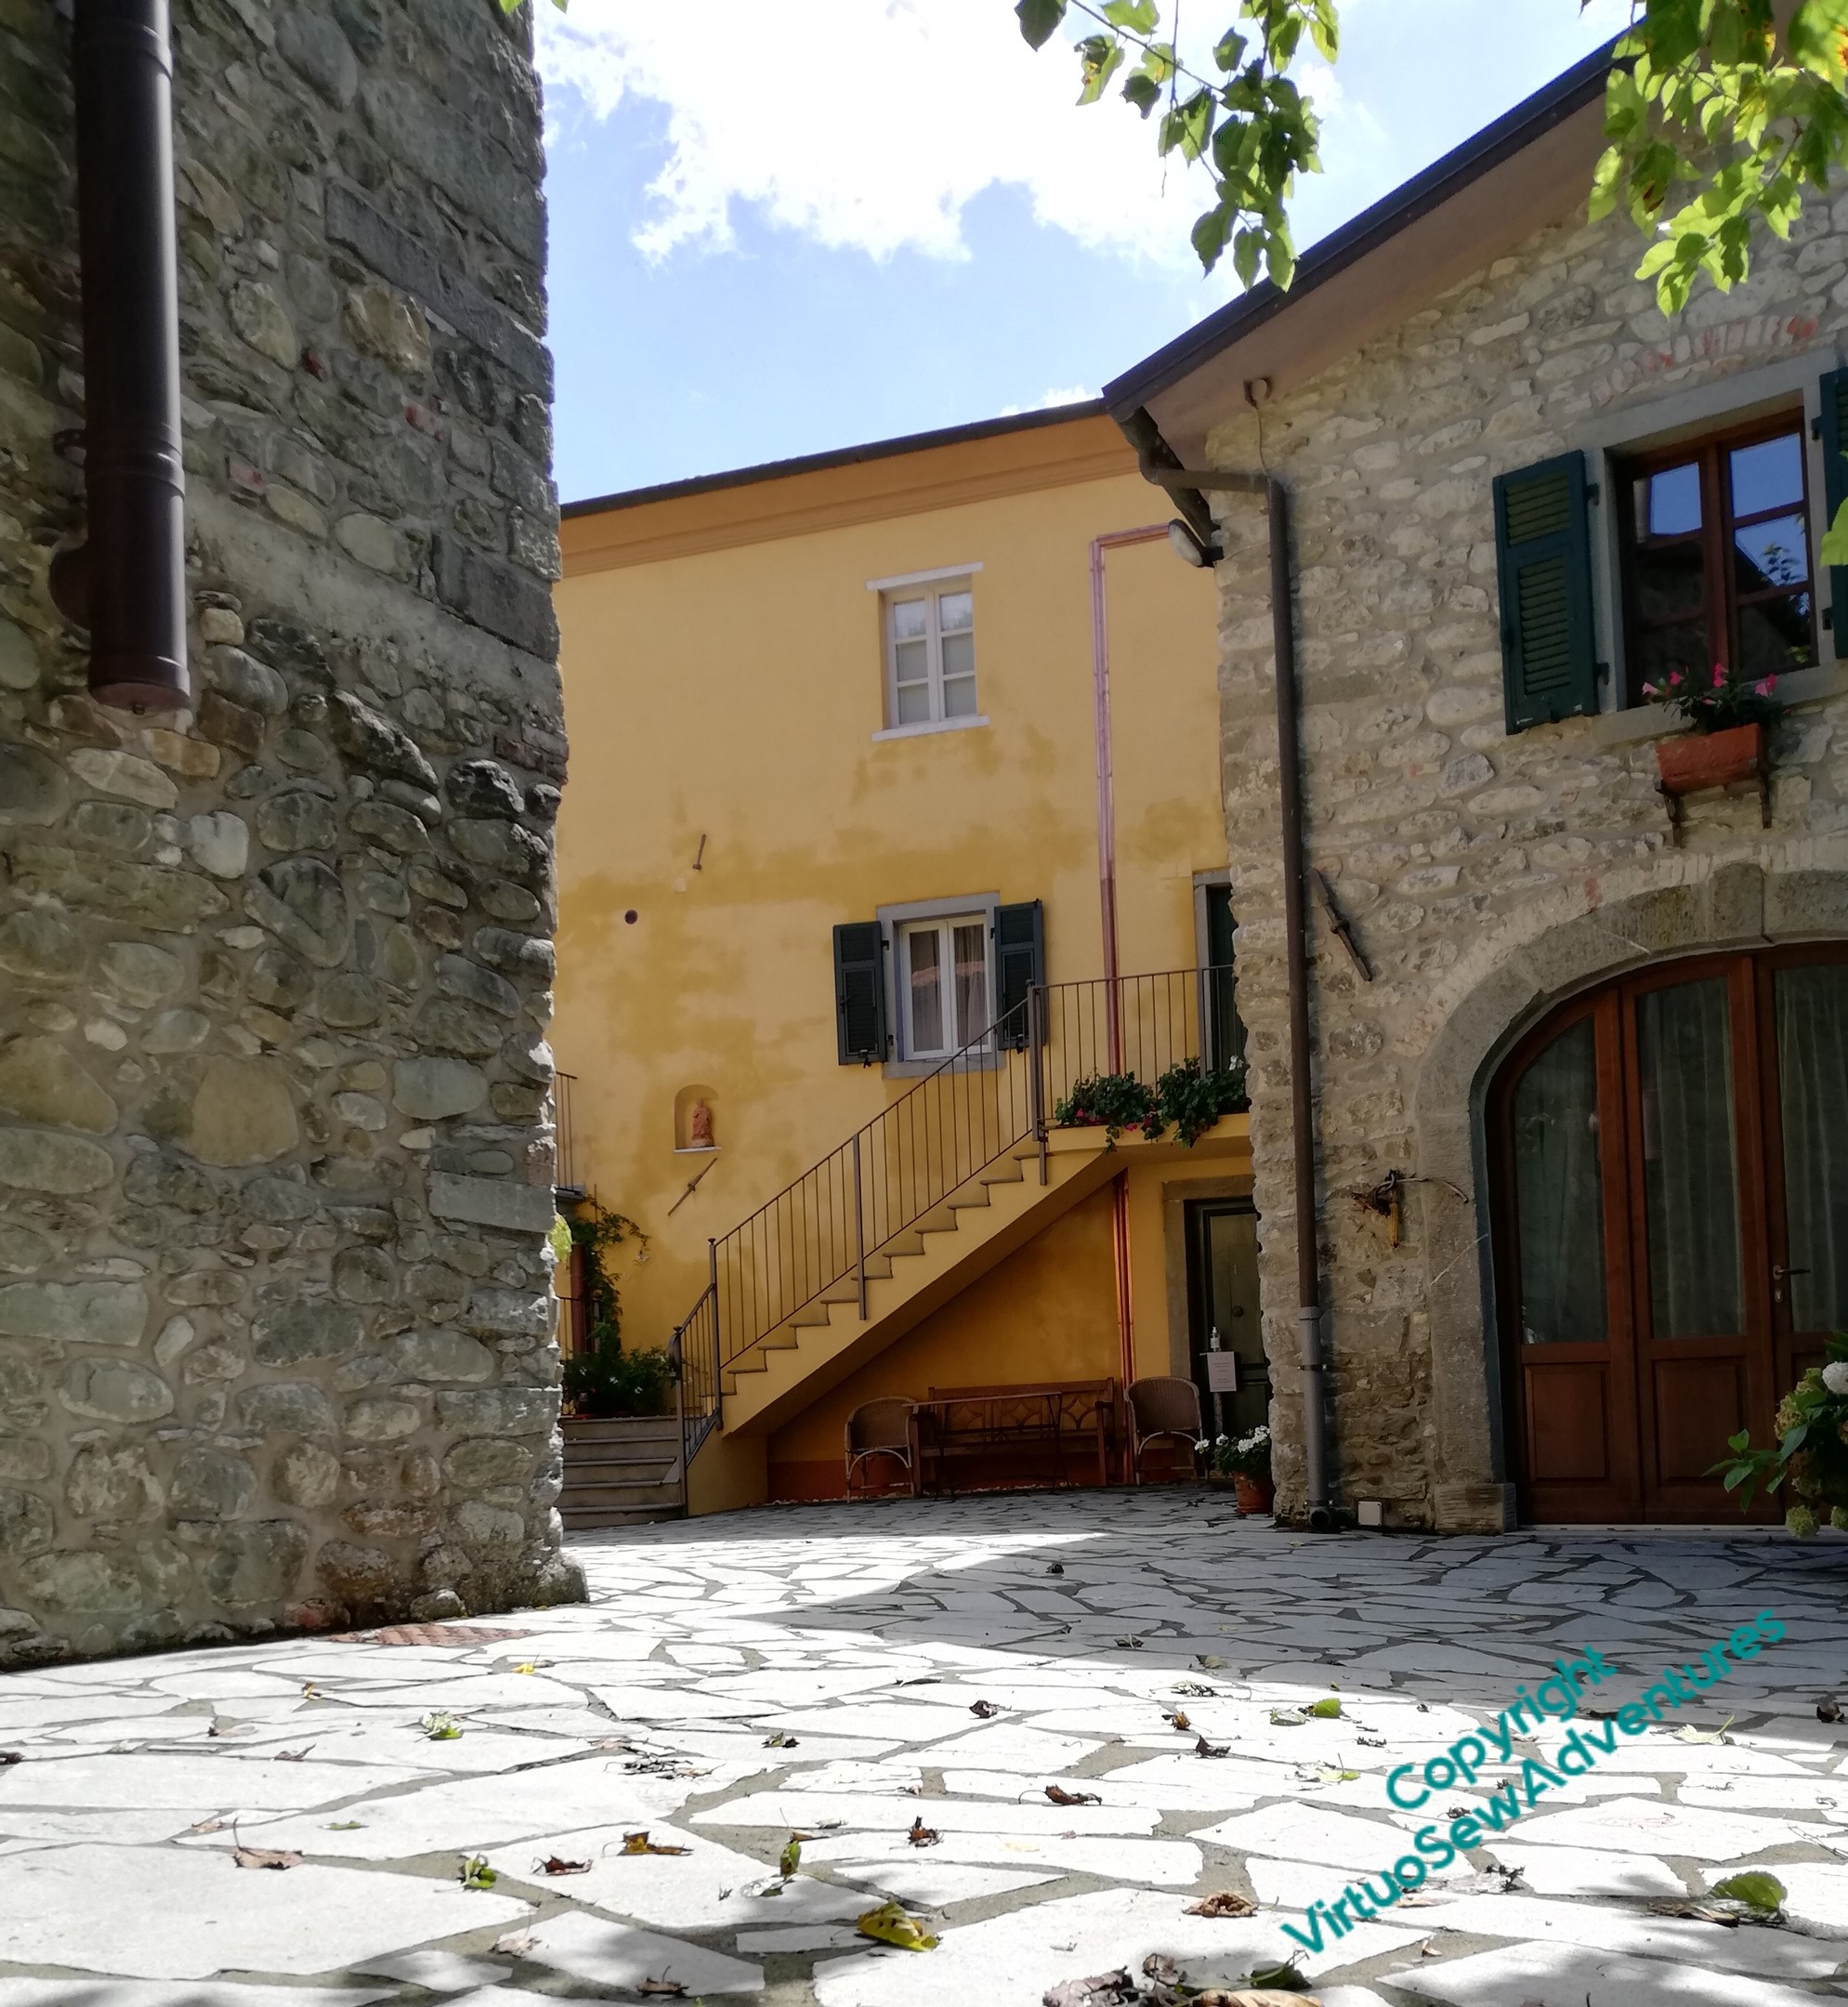
I’m continuing to explore ideas for the course at The Watermill in Posara, and this one is inspired by the first outing of the painting course I went on. Verrucola is a medieval village and fortress not far from Fivizzano, with a deep stream valley, some very impressive buildings – and a delightful trattoria just inside the walls.
I want to explore the different ways an embroiderer might choose to explore the textures of stone that a site like this afford – the living rock of the hillside, cut stone used for building, and the shaped and smoothed stone used for architectural features.
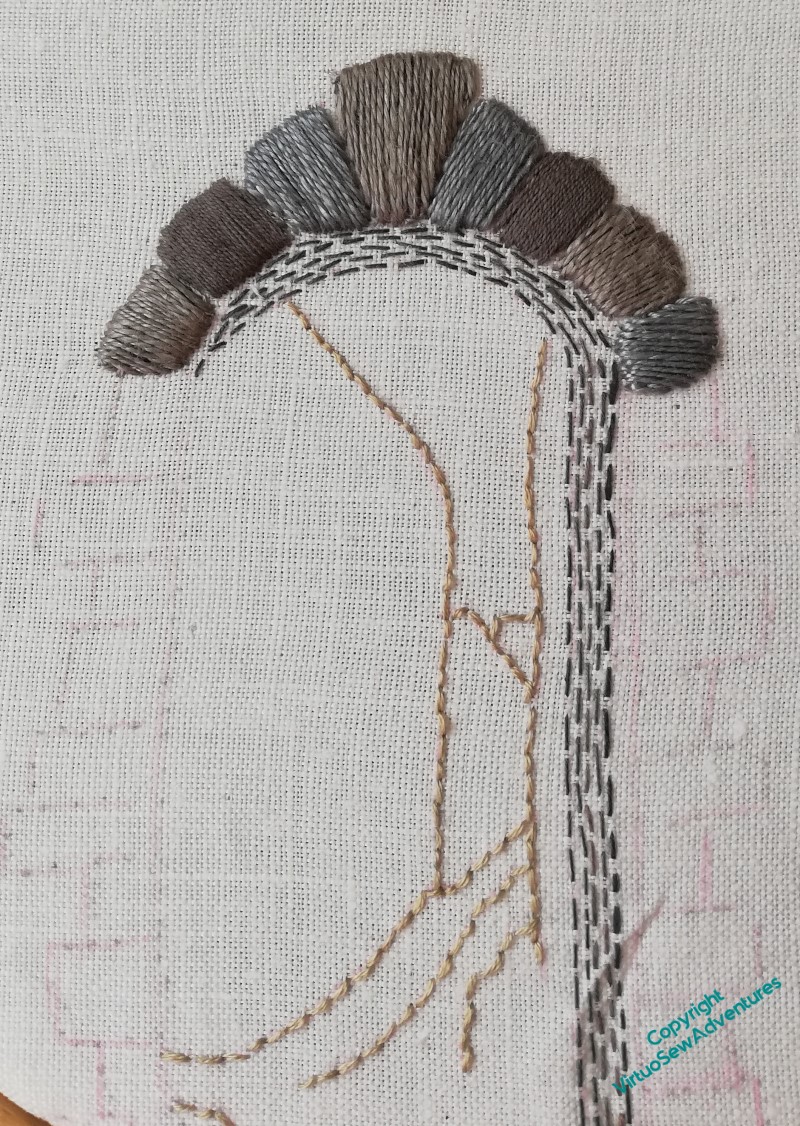
You can see in the first picture that I have just “drawn in” the street beyond the gate with back stitch and used darning stitch to suggest the shadow beneath the arch.
I’m using padded satin stitch for the cut and smoothed stone of the arch, but since I find that an exasperating stitch, I’ve alternated working on the arch with the tiles which cap the wall which is pierced by the arch.
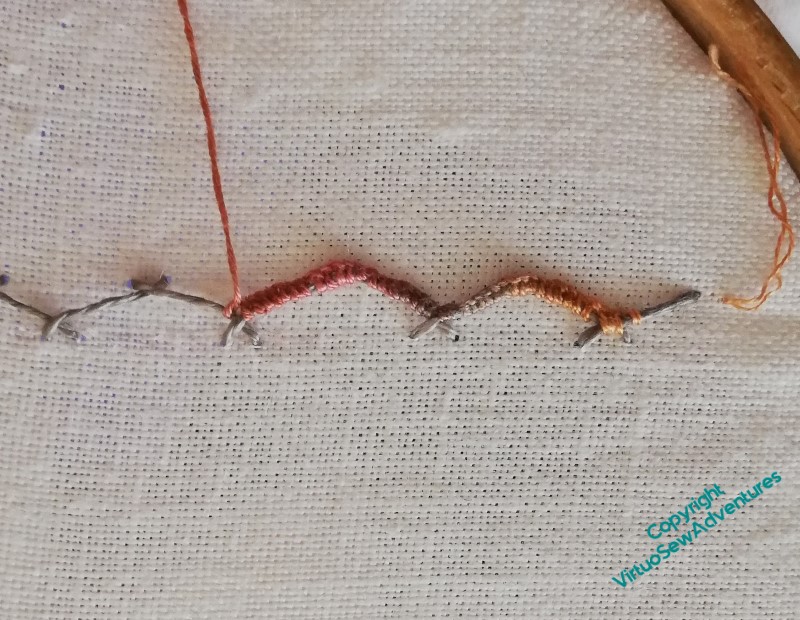
I found buttonholed herringbone stitch in one of Sharon Boggan’s books, but as you can see, my first attempt didn’t really produce the effect of the curved roof tiles that are so much part of the scenery in Tuscany. The linen herringbone stitch is too stretched out, and the two strands of stranded cotton just look straggly.
I am going to have to emphasise experimentation in the course, aren’t I!
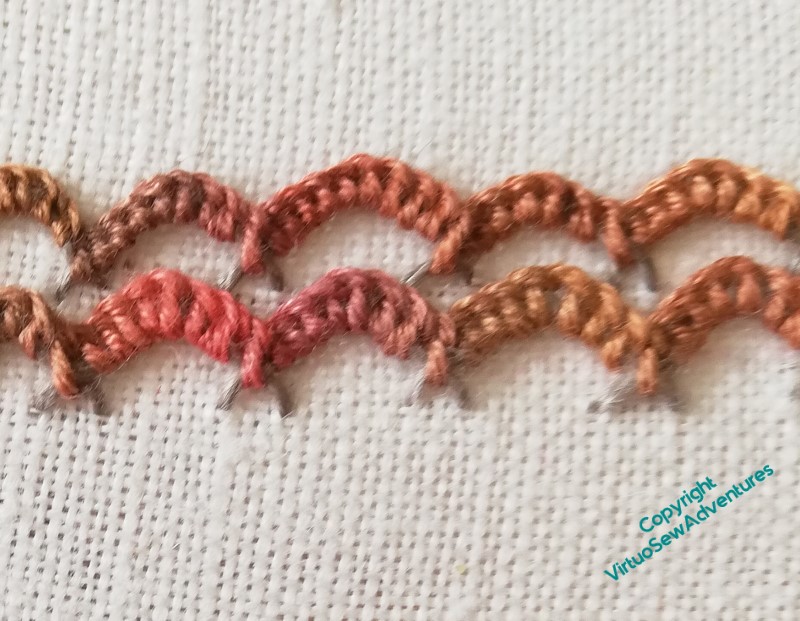
This version is much better – the shorter, higher herringbone stitch, just peering through at the base of the arches, three or even four strands of stranded cotton for the buttonhole stitch, and the stacked stitches create a good recollection of the tiled roofs I saw. I’m pleased with the way the variegation suggests the weathering on the tiles.
You will see that I have added a Page to the site which will make it easier to find and download details of the course if you are interested.
And also, Episode 71 of SlowTV Stitchery is now live, in which I experiment with the shore, and talk of plans for overland travel for Times To Come..
An adventure on the (distant) horizon
I have been asked to plan a week of embroidery next July for The Watermill, Posara, a rather wonderful place in Tuscany that hosts painting and knitting holidays among other things. Bill and Lois Breckon, who run The Watermill, have been gradually restoring and improving it over the past thirty years or so, and they have a gift for unobtrusive excellence of organisation I’ve never seen bettered.
At the moment, we are thinking of running an embroidery week along the lines of the knitting courses, with studio time alternating with the excursions and fabulous lunches, and I have been thinking quite hard about what might make for an interesting week.
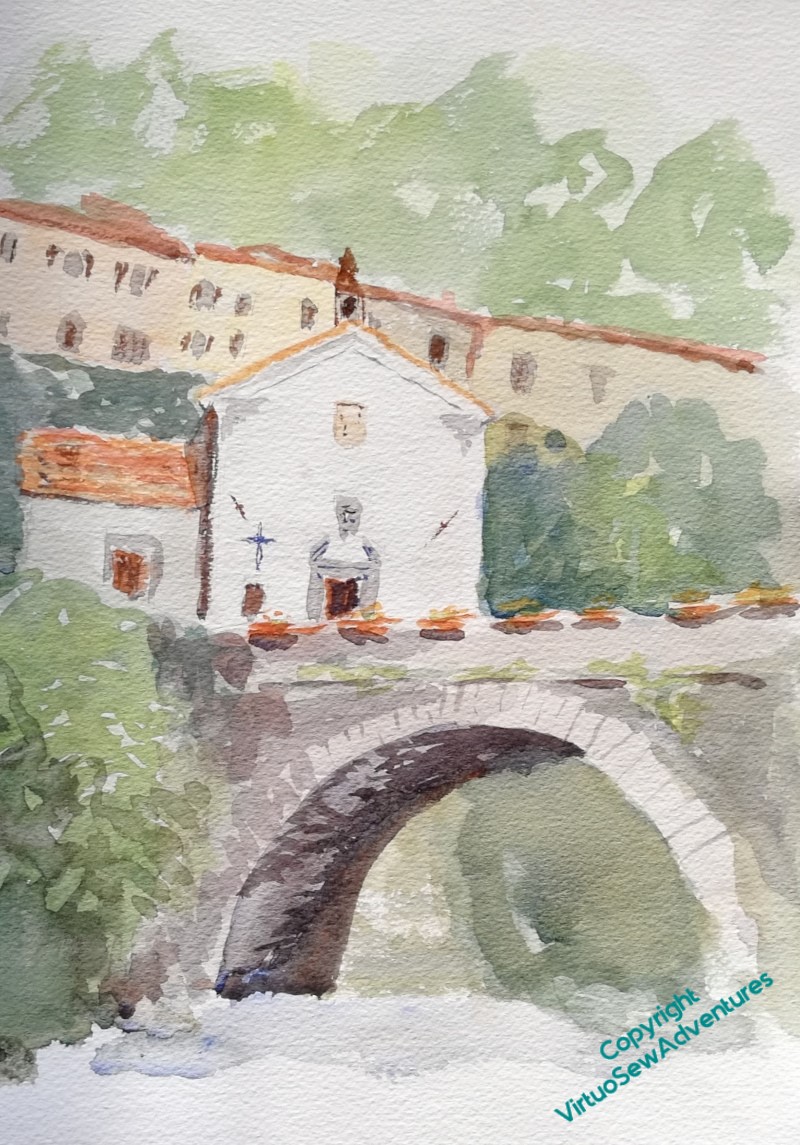
The painting classes are “plein air”, so involve setting up somewhere and painting all morning, followed by a delicious lunch (when I painted this watercolour I had my back to the trattoria where we had lunch) and painting some more in the afternoon. Apparently the knitters sometimes set themselves up somewhere and Knit In Public as well – the locals in all the destinations being so accustomed to artists and tourists that they barely even notice.
My idea for the embroidery week is to go adventuring Beyond Long And Short Stitch, to play with the ideas that are my first love in embroidery, the use of the ornamental stitches and varied threads to recall texture and pattern, to bring pictures to life without too much detail: “Impressionism in stitches”, if you will.

So I’ve started to plan Impressionistic stitcheries inspired by The Watermill and the excursions, which can be put together into a Watermill Sampler. The first (this is a detail) is inspired by the stands of bamboo which are merrily naturalising themselves up and down the valley, and by a recent post on Queenie’s Needlework blog about a stitch she calls “Danish Knotted Cross Stitch” (since the book she found it in didn’t give it a name at all!). When the stitch appeared I was already thinking about the Bambouserie, as they call it, and it occurred to me that it might make an effective stitch for the joint in the bamboo stalks – and sure enough, it does!
The long, rustling leaves of the bamboo are worked as clusters of long Detached Twisted Chain stitches, which I think are somehow much more evocative of the rustle than straight stitches would be. “Bambouserie” has set quite a high bar for my next “Watermill Stitchery”!
Episode 65 of SlowTV Stitchery is now live, in which we make an early start to avoid Noises Off, and thoughts of the sky as a sampler of graduating colour lead to a reconsideration of the idea for canvaswork cushions inspired by the Ironbridge and “Coalbrookdale by Night”.
Grape Hyacinths, 2
Having completed all the greenery and removed the satin stitch flowers, I had to put new flowers in. Naturally, that didn’t happen first time, either!
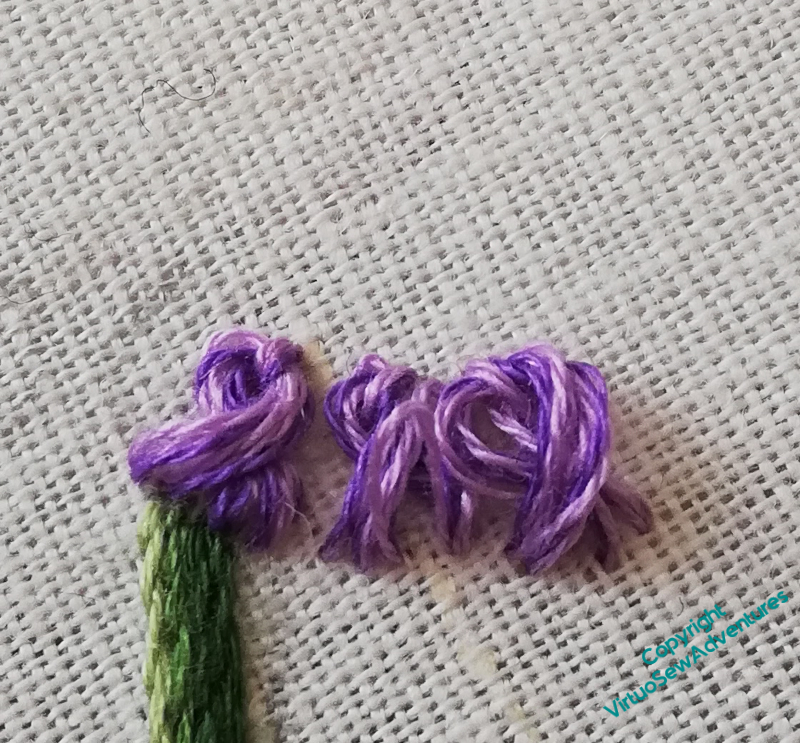
This was my first attempt at the individual flowers on the grape hyacinth flower heads – twisted chain stitches using several different coloured strands of stranded cotton.
I wanted to try something raised, to contrast with the flatness of the stems and leaves, but this, slightly full, version of twisted chain hasn’t really worked. It looks far too heavy for a spring flower!
Out it came, and I tried again.
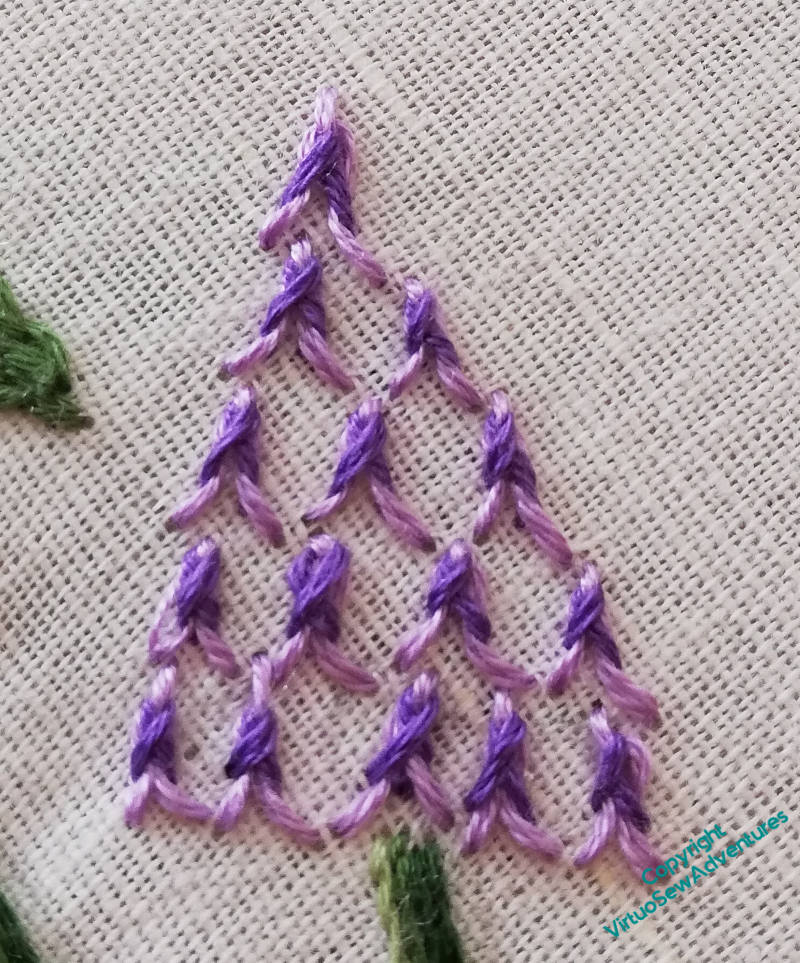
And for my second try, I may have invented another stitch. Again!
This is Fly Stitch topped with Twisted Chain Stitch. What I wanted to achieve was the slight sense of a ruffled skirt at the bottom of the individual bells, and this certainly works well enough for me to keep going, using this stitch, at least until I have a better idea!
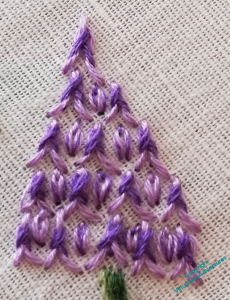
All that admitted, I felt I’d ended up with too great a space between the stitches, and of course, I don’t want to try to fit more in, in case I lose the ruffles (as it were!). So I have filled in the gaps with single detached chain stitches.
Of course, I may yet come back and do somethign entirely different. but I decided at this point to leave this in place and continue my experiments!
The next SlowTV Stitchery is now live. Episode 36 tackles the difficulties of the canvas, Reynard the Fox provides a distraction, and there is some tackling of quandaries by changing tack..
Canvaswork again – The Lady By The Lake
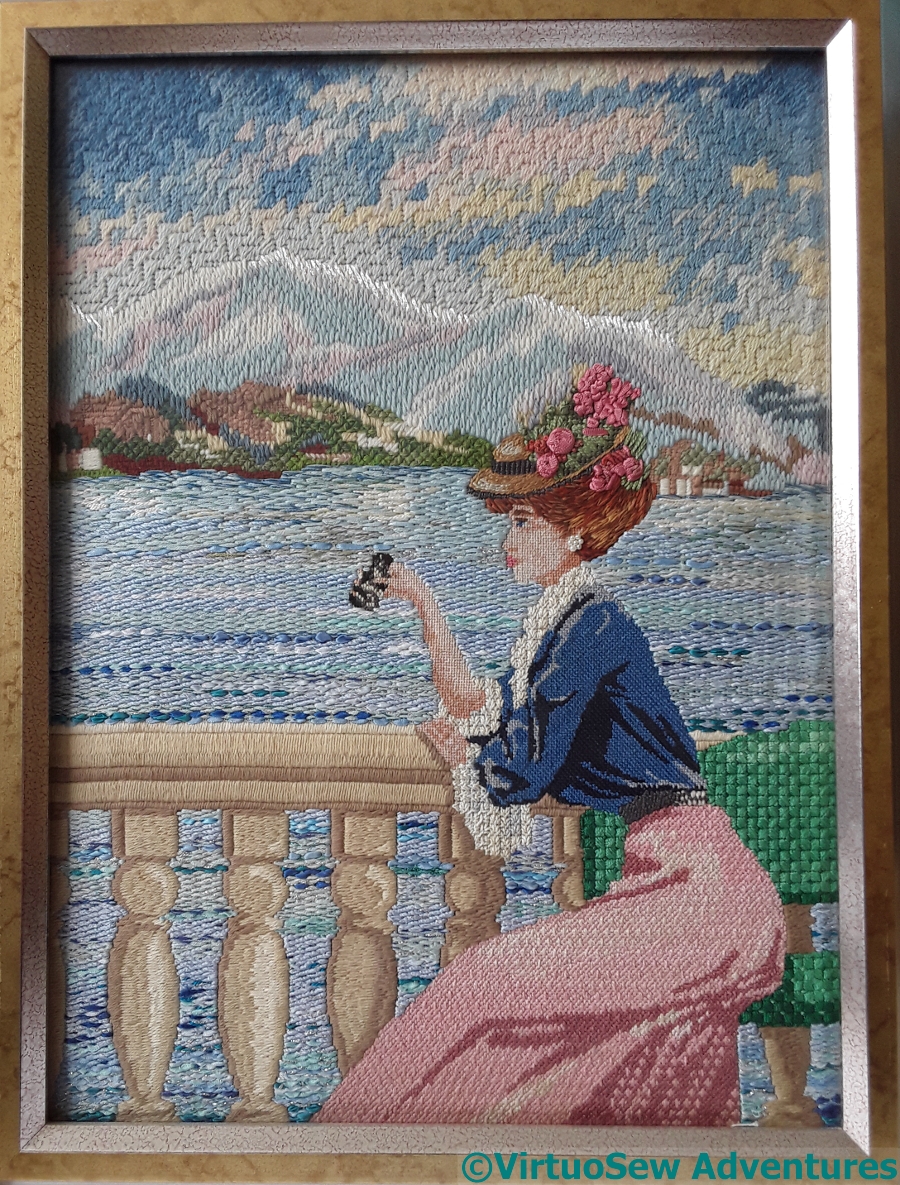
The Lady By The Lake
This is my second post of canvaswork for Catherine of Hillview Embroidery.
The Lady By The Lake has a much wider range of stitches and threads in it, including blends of stranded cottons, ribbons, and a variety of wools. The canvas is a double thread canvas which makes it possible to separate the threads and work some of the design in petit point.
I wrote a post about the Lady when I first started blogging, but I have a very much better camera now, and an incentive to take the picture down from the wall. Considering the canvas is still under glass I am very pleased with how the photographs turned out. There are enough different materials and textures in the scene to provide a good workout for thread and stitch selection muscles…
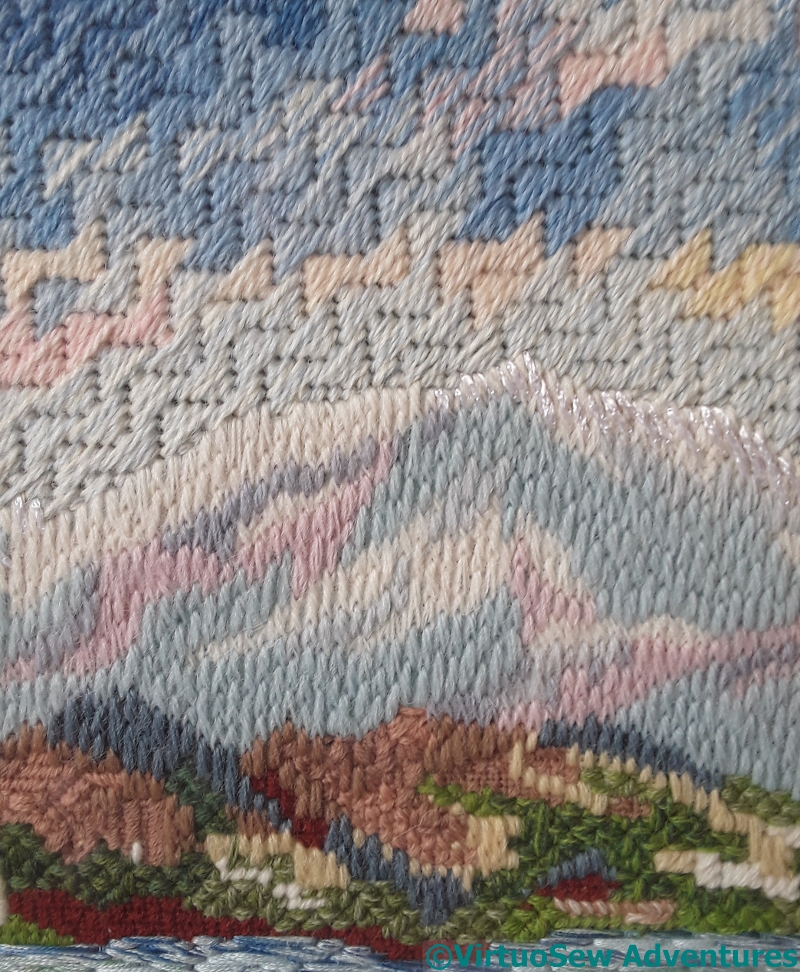
Sky And Mountains
The sky and clouds are all Milanese Stitch, worked in blended Persian yarns with three strands in the needle.
The mountains are in Gobelins Stitch in tapestry wool, and the lakeside hills with their forest and villages are a whole tangle of interesting variations of stitch and thread.
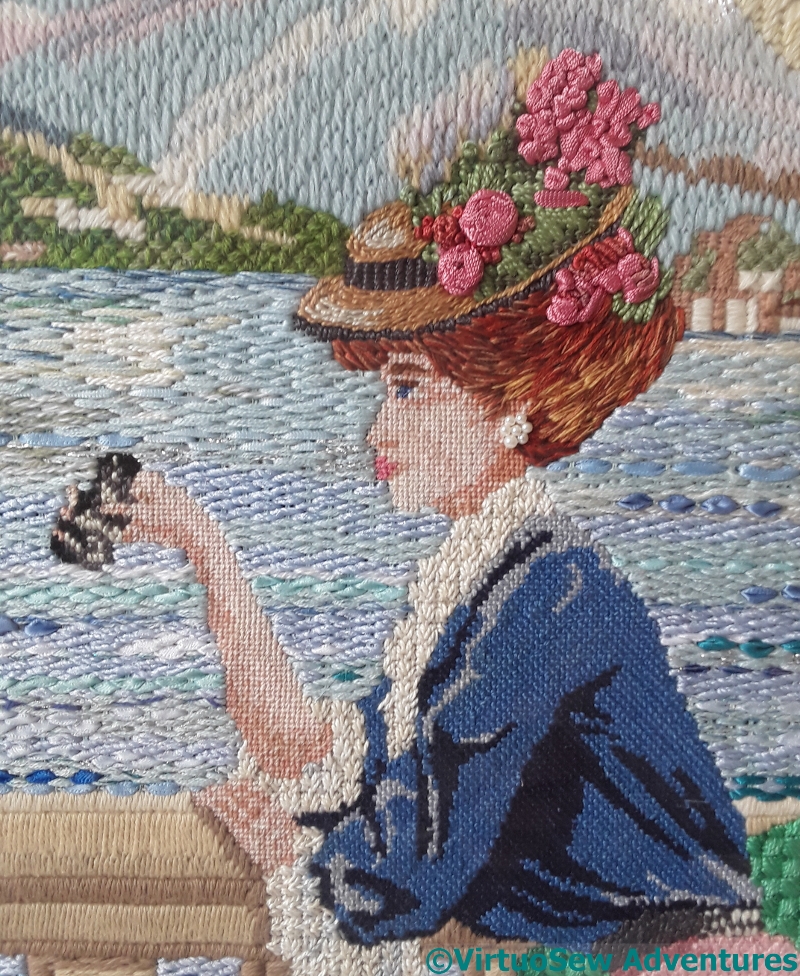
Hat, Face And Blouse
The face and arms were worked in petit point, separating the double threads to create single thread canvas, and worked in stranded cottons (blended). The hair (she didn’t have quite such glorious chestnut hair on the painted canvas itself) is also blended stranded cottons, worked in a sort of long and short stitch. The hat has spider’s web stitch roses on it, and she’s wearing large pearl bead earrings.
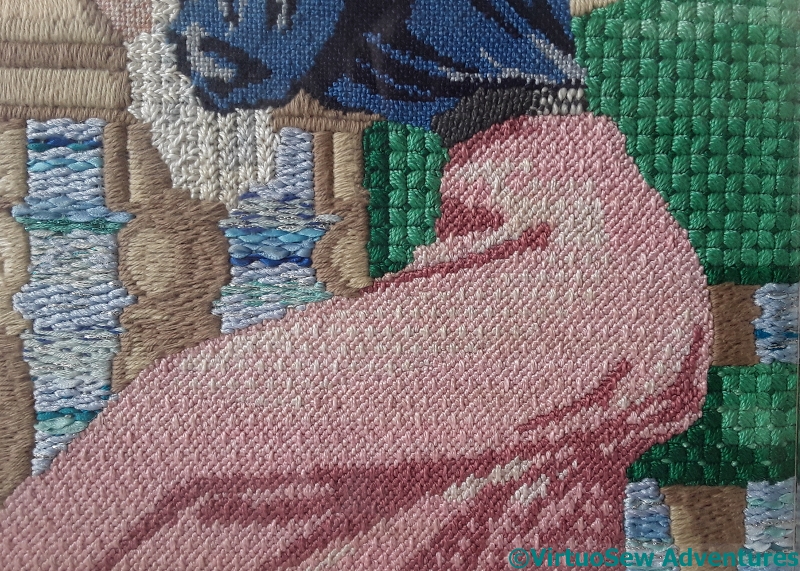
Skirt And Bench
It was the idea of experimenting with the skirt that attracted me. I used a bordered Hungarian Stitch, worked in three shades of pearl cotton and combining them to create the impression of five shades in the skirt. It worked!
The blouse is also pearl cotton, this time Linen Stitch, which is effectively the back of Basketweave Tent stitch put on the front.
I changed the wooden, slatted backed bench of the canvas into a padded one so that I could do the upholstery in Reversed Mosaic Stitch.
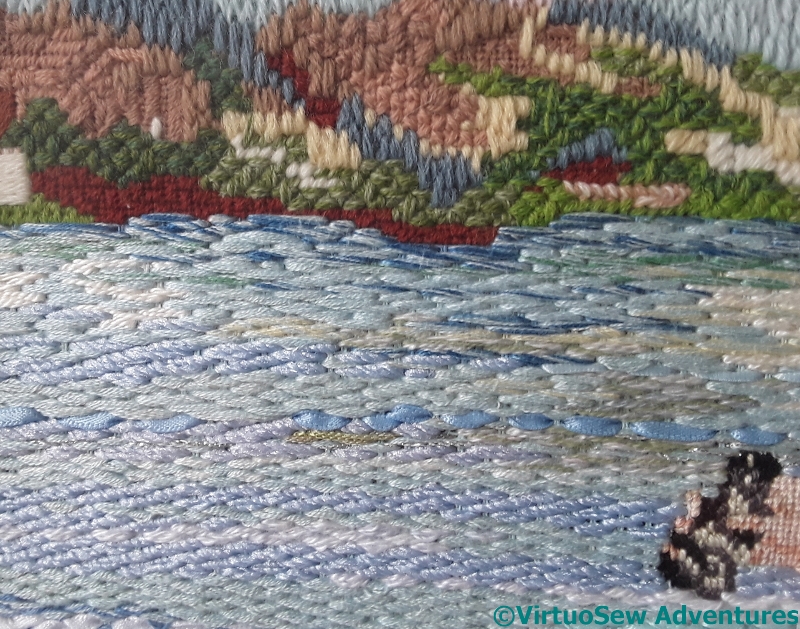
Lake And Town
The lake itself took ages to do – row after row of darning stitch using all sorts of ribbons and threads, including some truly ghastly double knitting acrylic yarn which would have made a dreadfully uncomfortable jumper, but made a very good lake surface, with that slight sparkle you get when there’s just enough breeze to move the water.
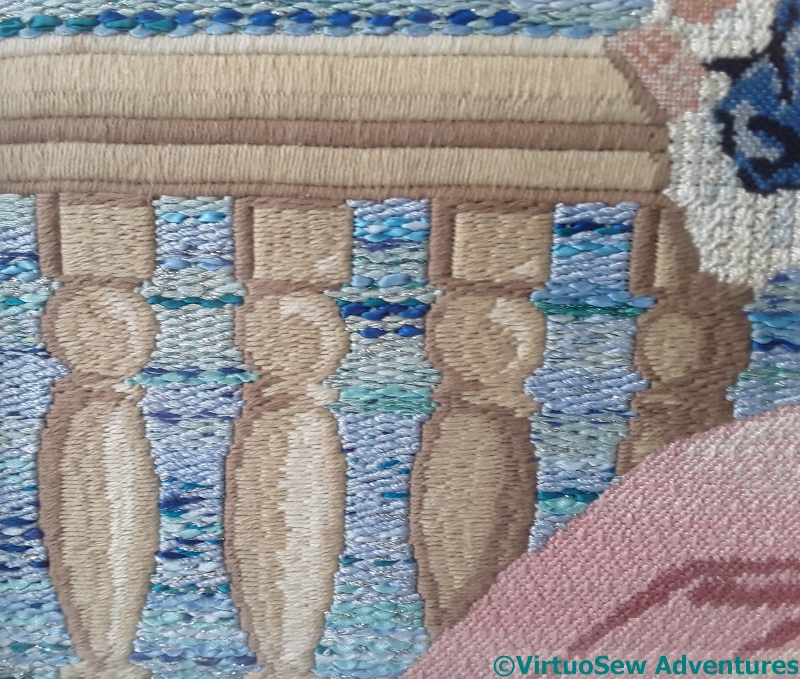
Balustrade And Lake
The balustrade was worked in Soft Embroidery Cotton. I assumed it was something like limestone, and not marble with a polished surface, so the thread needed to be dull to let other elements shine.
Again, click on the pictures to see more and have fun thinking about what I should have done differently!
Canvaswork – Sunset Study
Sunset Canvaswork
Catherine, of Hillview Embroidery, is doing an RSN canvaswork course at the moment, and commented in a recent post that the folder of photographs of the work of past students at the back of the studio has been really useful, partly for ideas, and partly just to practice analysing designs and stitches.
I have two canvaswork pieces that use ornamental stitches to represent the textures and colours they depict, both worked when I was a teenager. It’s much easier to analyse someone else’s work than your own, so Catherine, this post (and another, as yet unwritten) is for you!
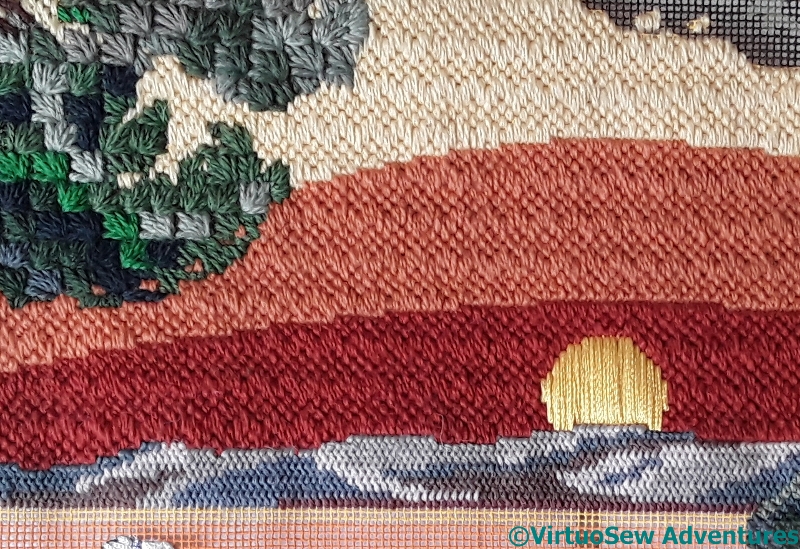
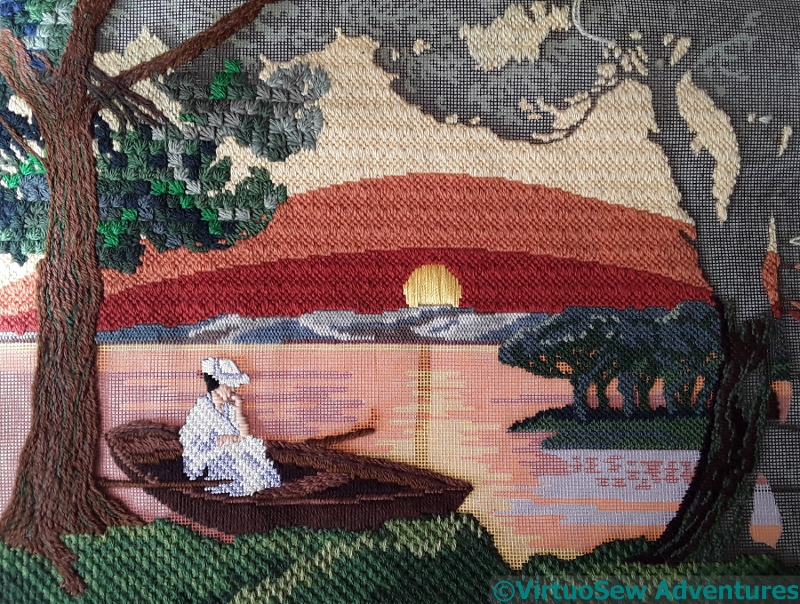
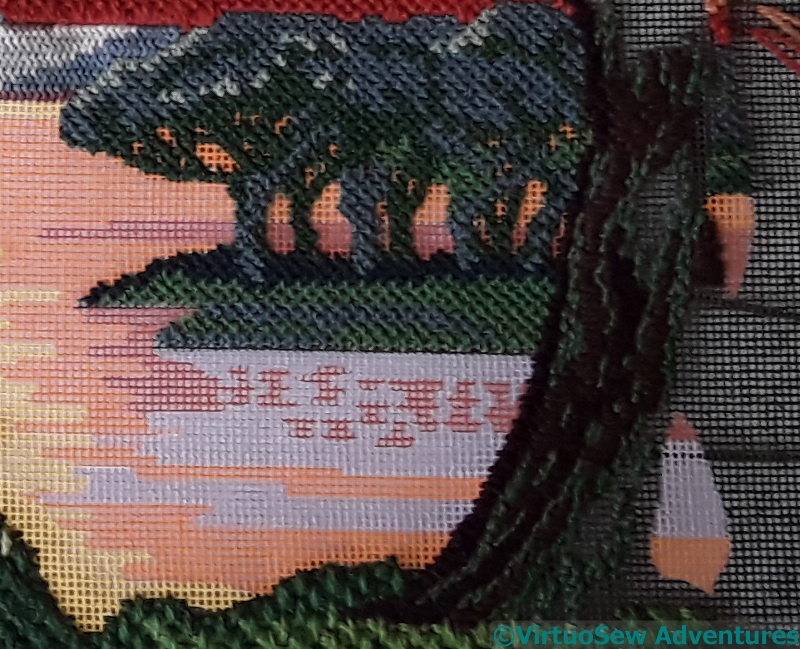
Sunset Sky
It was actually the sky that made me buy this particular painted canvas (this was long before I’d tried designing my own!). I think the stitch is Hungarian Point, and since the canvas had such a graphic feel, rather than being painterly, I was quite happy to leave the sky with those sharp colour changes. The pattern in fact runs clean through from bottom to top, but that those same colour changes mask the fact. The heather clad hills are in Plaited Stitch, worked small to help them recede. And the foliage of the tree is Ray Stitch. I do wonder whether I should have done the ray stitch facing downwards, but some of the pines have a slight upward curve, so they are staying as they are.
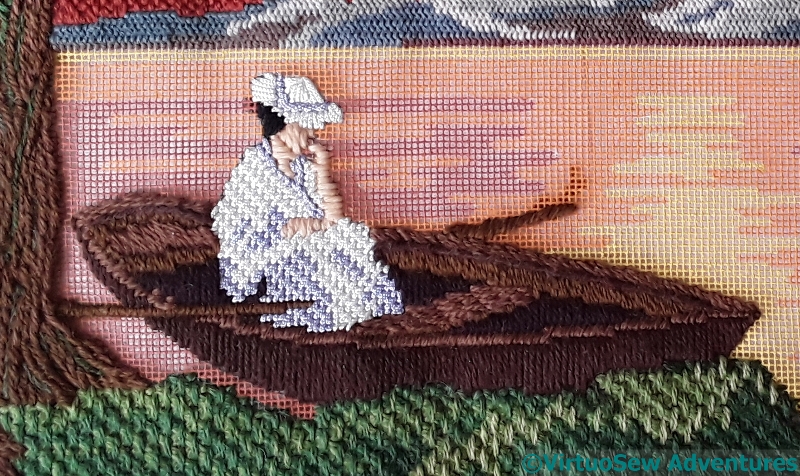
Lady In Punt
Almost all the threads in this piece were wool. It’s a fairly large gauge canvas, and again, there’s so much flat colour that blends wouldn’t really be suitable.
The lady in the the punt is Soft Embroidery Cotton for her skin and hair, and tubular synthetic for her gown and hat, and the punt is straight stitches in assorted browns. The tree trunk is effectively in stem stitch, and the bushes at the front are interlocking elongated cross stitches. They look surprisingly bushy, don’t they!
Trees And Bark
The trees in the distance are in Upright Cross Stitch, which makes a good intermediate texture between the bushes at the front and the distant hillside.
And that near tree? That’s one of the reasons I didn’t finish. I found that not only was I not enjoying the combination of stitches, I was running out of the threads and colours I was using. I threw it in the loft in frustration and disgust and only fished it out again after I’d read Catherine’s post.
The sea is another reason. I still haven’t worked out how to do it, and at the moment, I am still not at all sure I want to.
You can click on all the pictures to see them more closely, so Catherine, your homework is to look at them all, think about what you like and what you’d have done differently.
And if any of you have any suggestions for the sea – let me know!
Fine Feathers
Fine Feathers
Some time ago, I worked on a few designs vaguely inspired by crewelwork, which I submitted to a few companies, none of whom took them. I hadn’t stitched any of them, because I would have used the preferred thread of the company that intended to produce them, but I’ve wanted to…
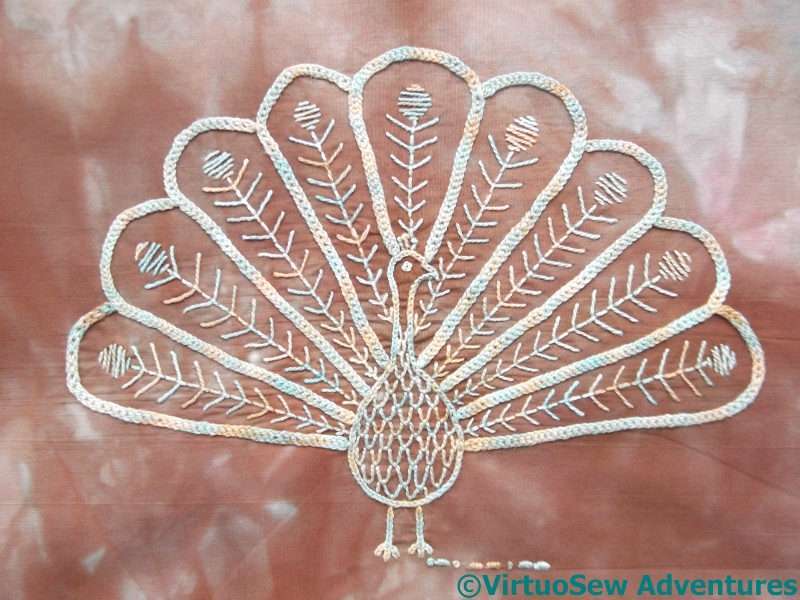
So when I had another hiatus of inspiration with the Dreams of Amarna, I rummaged for a thread that would work nicely with this over dyed fabric, and had a go. When I originally planned this design, I used peacock colours – blue and green, but I felt that it would be more interesting to work with a single, overdyed thread on the overdyed fabric.
Fine Feathers – Detail
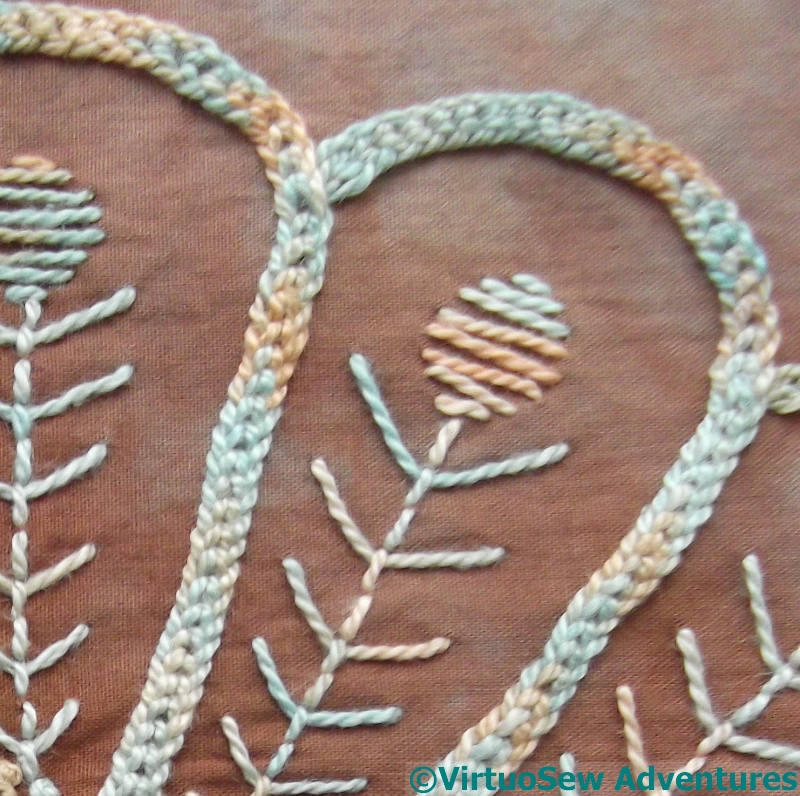
I chose to use Hungarian Plaited Braid stitch for most of the outline. The more I use this stitch, the more I like it. It’s richly textured but at the same time creates a fairly smooth effect, and while – as in this case – it works beautifully in a perlé type thread, it can be very successful, if a little trickier to work, in stranded cotton.
Fly stitch alternating with back stitch gives a bit of lightness to the tail feathers, and I borrowed the idea of the dragon’s scales from Kai Lung of the Golden Hours to create the effect of the down on the peacock’s breast.
I’ve signed him – the Morse code by his feet – but now I’m not at all sure what to do with him!
The View of the Excavation Finished…
Foreground Group
The last group took a lot of stitching, restitching, unpicking and restitching. I couldn’t seem to get any of it right, and there are one or two bits I’m still not 100% sure about, even now…
The pale figure, bending over beside the little flag is in Spanish Knotted Feather Stitch, and the nearer bending figure is in Mountmellick Stitch. I was surprised that it was quite so hard to find suitably broad line stitches for the purpose; when you’re looking for characterful narrow stitches, you can only find broad ones, and when you’re looking for broad ones, by some strange alchemy only narrow ones catch your eye…
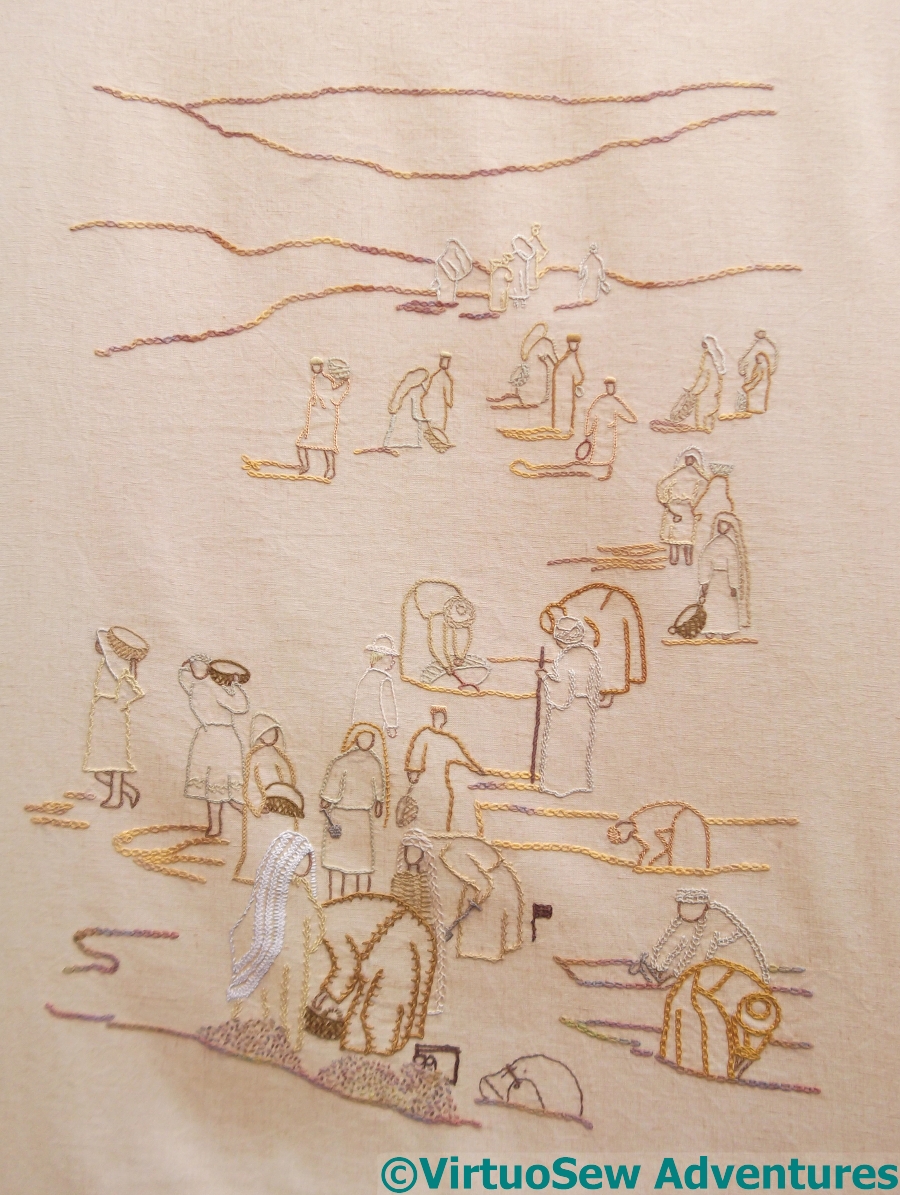
View Of The Excavation
The creamy white headscarf ran through Crested Chain Stitch (no!) and several stitches I hated so much I didn’t even record them, before I finally settled on three rows of Braid Stitch.
So at last, after much fiddling around, the View Of The Excavation is finished.
I’m fairly happy with it, actually. The trail of people into the distance creates a pleasing pattern, and I think that the alternation of the colours works well. Furthermore, as I wished, the Egyptian labourers and supervisors are the stars. There is a European, but he’s mostly concealed by the others.
There may be a few tweaks – not least I have yet to make sure that it works as a counterpoint to the Map of Amarna – but I think that at last it is finished for the time being!
Still More on the View of the Excavation

Supervising A Trench
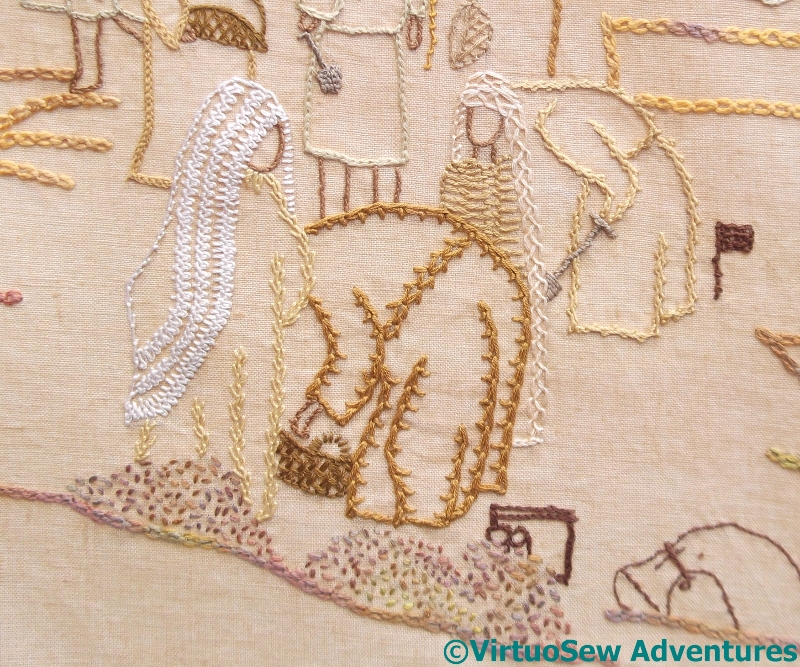
As I got nearer the foreground figures, I tried to pick broader stitches, or at least stitches that were a bit more emphatic. This group was great fun to do, starting with the Gufti with his staff of office (Portuguese Knotted Stem!). The Gufti’s robe is Feather stitch, as are some of the twists of his headgear. I concentrated very hard on keeping the stitches even and close so that the “density” of the stitch would be maintained. The one in dark gold is in double interlaced back stitch, except for the top of the headgear, and the waistline – those are whipped backstitch. The other one is in one of the Elizabethan stitches from Jacquie Carey’s book.
I had fun with the supervising excavator – the brim of his solar topee is the Hungarian Braid chain, and I reversed the direction of the chain stitch for the peak of the crown. He’s also the only one with fair hair and pinkish skin, and I dressed him in a pale, tailored jacket.
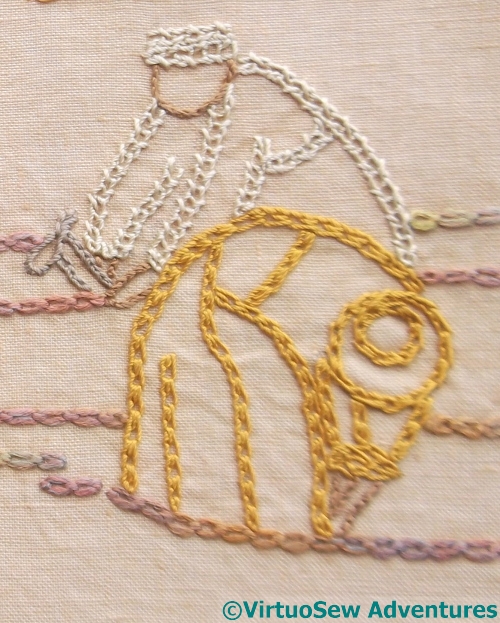
The two at the front are another mixture of stranded silk, stranded cotton, and round silk thread. The golden veil is coral stitch, and the tunic below it is stranded silk chain stitch, and the dark golden tunic is stranded cotton and twisted chain stitch. I’m trying to make choices of stranded or round yarn that will suit the stitch.
Two Diggers
I worked these two diggers on World Embroidery Day – which I hadn’t even known existed until the day before, so I was very glad I was able to sit and stitch!
I went back to my Edith John books for these two. The front one is in Shell Chain stitch, which I first used on the Circle Skirt. I won’t say it’s a favourite, but I have rather taken to it, and it creates an interesting effect.
The one behind is a very peculiar stitch, a combination of twisted chain stitch and open chain stitch. It creates a very square appearance, with the twisted chain alternating from side to side of the open chain, and it is called, rather predictably, Open Twisted Chain Stitch.