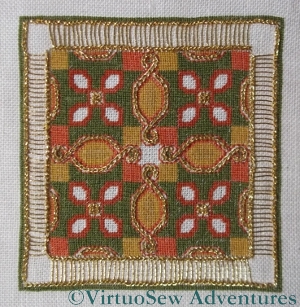
First Stage Of Border
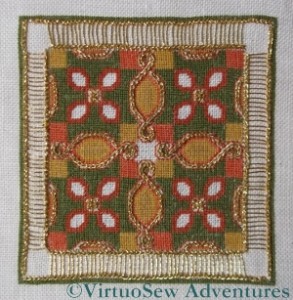
I’m making reasonably good progress with the Tudor Pincushion which is part of the Tudor and Stuart Goldwork Masterclass. The silkwork was finished a while ago, and now there are several different isolated stitches, and a continuous border.
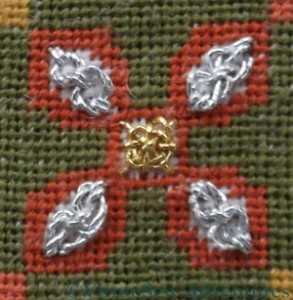
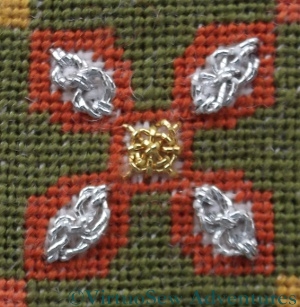
Silver Guilloche Close Up
I’m not using the real metal thread for this. I rather like the rich, vibrant colour of this thread, wrapped around a cotton core, and as I am planning to create a sort of winter “corner decoration” using all of my historical embroidery pieces, there is something positive to be said for the idea of using as many different shades of gold and silver as I can to create a really rich, varied impression.

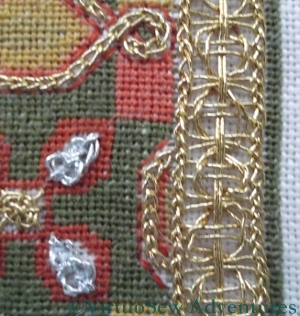
Border Close Up
The small sections of silver Guilloche Stitch have worked well, although I still have reservations about my gold Spider’s Web stitches, especially when I look at close-up photos of them!
The border is a Guilloche Stitch variation worked on a Ladder Stitch base. As it turned out, I didn’t get quite the right number of rungs on the ladders, so rather than being a neat continuation of the Guilloche Stitch, the corner elements are rather improvisatory.

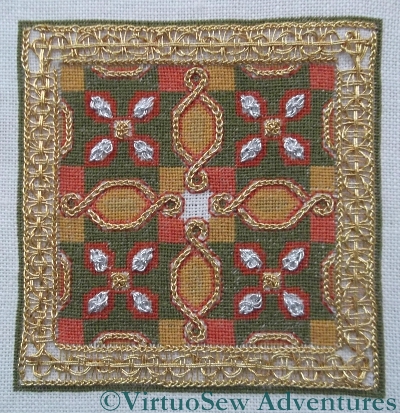
Tudor Pincushion - Almost Finished
This doesn’t worry me. At the moment, I am still waiting for the instructions for the central ornamental stitch, and if, by the time I have that stitch, I’ve decided that I really must redo it, I will do so then. By that time I will be still more practised at working with metal threads, and it should go more swiftly and easily.
In the meantime, I can go on to play with more new stitches, and even, perhaps, start work on the real metal threads to add them to the Spot Sampler!
Progress on Christus Natus Est
Recently I was sent a link to a page discussing Russian embroidered icons. It seems that for all we think of icons as purely painted pieces, embroidered icons aren’t new – it is simply that their relative fragility and the length of time it takes to create one have made them very much rarer.
As I can testify. There have been many hours already that have gone into this piece, and I’m not sure that the progress made is really all that clear. Still, the spiral is nearly touching the side (I’m going to cover all the black lines, because I’m not entirely sure how this will be mounted or framed), and in fact it won’t be long before I have to consider how the non-spiral lines will flow. If you go back and look at the design as I showed it in this earlier post, you will see there is an extra black line flowing from St. Joseph’s head towards the top left corner, and another in the bottom right. These lines are to change the direction of the lines of the gold in order to bring more life into the design, but now I have done some of the work I wonder whether the lines are in the right place.
There is also the section of the Virgin’s cape running up over her head where I have for now followed the line as drawn, but wonder whether I should perhaps in this one instance follow the line of the gold to maintain the clarity of the abstract shape. If I do that, it will provide some justification for using a line along the back of St Joseph’s head and cloak as one of the new lines for the gold.
In other words, more thinking needed!
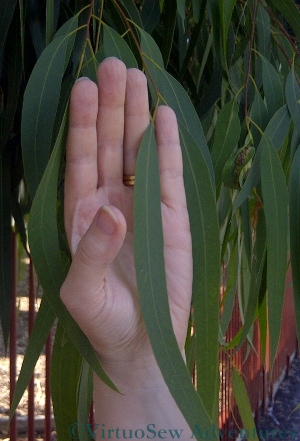
Eucalyptus Leaves
One of the hallmarks of Australian Embroidery, as shown in the magazines, is a willingness to mix techniques and “play”. So while I have no idea of how I am going to show the Rosella, I’ve been thinking in terms of creating a background of tessellated Eucalyptus leaves, one way or another. There are several ways this could be achieved, which would be to some degree in the spirit of what I have read, and I still haven’t worked out which to use. Although I hate working samples, I may have to do so this time, as I haven’t the faintest idea whether they will work!
- For example, the simplest, once I’ve developed and charted a tessellation, would be to work the background on canvas, using complete coverage. That might be a little dull..
- Another possibility would be to use a painted canvas or to overlay the canvas with gauze, and then just work the leaf shapes themselves and leave everything else un-stitched. I like that idea, but I think it will need playing with, to get the right gauge of thread to provide suitable coverage and at the same time not puncture the gauze too obviously. I won’t be able to unpick it either, so stitching it might be a nervy business!
- Then there is the possibility of using waste canvas over a felt or a linen background fabric, so I can chart the tessellation without being stuck with canvas as the whole background.
- Finally – although this is well outside my usual range of stitching – I could create cut-outs of the leaf shapes and sandwich them between layers of gauze, with minimal stitching to hold them in place.
Gosh. When I sat down to write this, the last couple of ideas hadn’t come to me at all! That’s one of the unanticipated benefits of blogging, because in sitting down to explain what I am doing, or planning, I concentrate so much more on the subject that I get even more ideas, and what’s more, I’ve got them written down, so when I actually get to that part of the project, I have my notes – often illustrated notes! – to help me reconstruct my ideas.
It would be nice to work this while I’m actually in Australia, using Australian sourced materials, so I think I need to spend more some time planning the project before our next visit.

Quayside First Stage
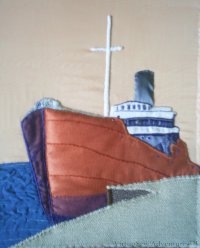
Quayside Second Stage
I ended up using both fabrics.
I decided to use a layer of the darker fabric to create the shadow of the face of the quayside edge, covered with a layer each of brown and navy net.
The two layers of net intensified the darkness of the shadow, but at the same time, suggested the roughness of the surface. The net was cut as fragments – not the same size – and the heavy material is cut to the same basic shape as the top layer, there were no lines of fabric edges showing through.
The slip for the upper layer was outlined in buttonhole stitch and then attached over the top. At this stage I felt that some additional stitching would be be needed to create an impression of the quayside in similar detail to the ship itself but now the only fabric to be applied was the border.
Which at this point I still hadn’t yet decided on….!

Progress On The Map of Amarna
You may recall that having worked most of the Map of Amarna, I then ran into a brick wall, and could not decide which thread to use for the last, rather extensive element – the depiction of the cultivation.
I decided, in the end, that I would use the more golden of the plain silk threads, but rather than spacing the stitches widely I would stitch quite densely, creating a sort of background pattern of tête de boeuf stitches. Then I began to worry that this would be visually too weighty and might even create the impression of a sort unlikely to be accurate given that in Mary Chubb’s time the villages were probably groups of smallholdings..
So instead, although some of the cultivation (on the eastern side of the river, running in a narrow band the length of the site) is worked in a single colour (or will be, when I finish it), the western side of the river will have some patches where the stitches are worked in one or other of the variegated silks.
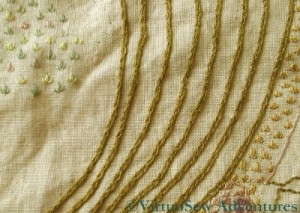
Patches On The Map of Amarna
The close up shot shows one of those patches already in place, with the single colour on the other side of the river and the modern village in a different variegated thread.
Or at least I think it will. It would not be the first time I’ve had a bright idea that really didn’t work when I tried it. I am prepared for the possibility that I will have to unpick all the variegated threads and restitch in a single colour!
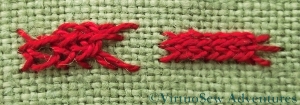
Plaited Braid Stitch In Pearl Cotton
The Plaited Braid Stitch was one of the reasons I wanted to do this course. There are instructions in at least half of my books on embroidery, and I’ve watched Tracy Franklin demonstrate the stitch. I even spent a whole day practising it at one of her courses. Sometimes it worked, sometimes it didn’t, and frustratingly, I never felt I knew what I was getting wrong.
Consequently, when I sat down to tackle this month’s Stitch, I was expecting frustration and fury to reign. I started with Pearl Cotton, thinking that I would be less fretful about errors if I was not conscious of using an expensive thread. I watched the animation first, and although you can see that the first inch of my practising got very tangled up, I’m sure that it helped.
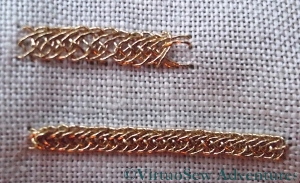
Plaited Braid Stitch In Gold
As I’ve repeatedly mentioned in my posts about this course, I’ve become acutely aware that the question of scale is critical to the success of some of these stitches. My first effort in pearl cotton was at too large a scale, and the thread floats were too floppy. In the case of the second trial, I reduced the size of the stitch, and suddenly found it coming together, which gave me some confidence that I was beginning to understand the structure of the stitch. The tension was still a little slack, but all in all, it was beginning to make sense.
So then I found a piece of scrap linen, and started playing with gold thread. Again the two rows are at slightly different scales, but now I really feel that I am going to master this stitch.
I also think I’ve cracked the problem of why the vast number of books I have on the subject don’t help. With the honourable exception of The Right Handed Embroiderer’s Companion, by Yvette Stanton of White Threads, they all use the same inadequate set of diagrams, presumably copied from an earlier publication. Furthermore, judging by the (slightly differing) diagrams in Tricia’s notes and Yvette’s book, they diagram the left-handed technique. Since all their other diagrams are for right-handers, these books provoke considerable confusion! Still, I now know where to go when I need to be reminded how to do the stitch, and I feel confident that with a bit of practise I will be able to pick it up any time I need to.
And I will need to. I have a few ideas buzzing around in my head, and Plaited Braid Stitch will take its’ place in them!

More Floral Glove Finishing Work
It’s been a long time since I posted about the Floral Glove Needlecase. For a variety of reasons I lost momentum once it came to the finishing of the piece, but I do intend to get it finished. I don’t know what I will do with it when it is finished – I can’t imagine being able to bring myself to use it! – but I will get it done (can you hear the determination in my voice?).
So, with my new-found spirit of determination, here I am, laying out various pieces while I re-read the instructions for the nth time (where n tends to infinity!) and try to work out where, precisely, I had got to…
The silk brocade gauntlet at the back has pockets for tools, and there is an ultrasuede-covered base that will keep the final piece from slipping around too much.
My next two tasks are to attach some gold lace to the brocade cuff shape, and to lay some gold couching lines on the last piece of ultrasuede to create the top surface of the glove. I’m taking it a bit at a time, because looking ahead was what stopped me in my tracks last time!

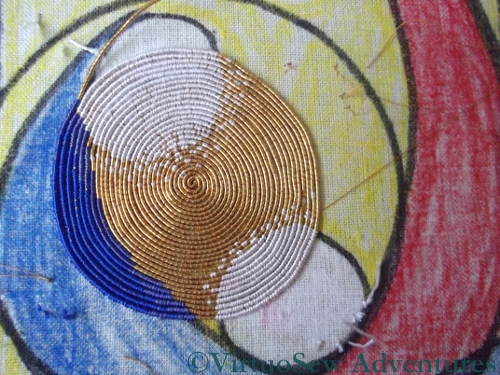
Continuing The Spiral
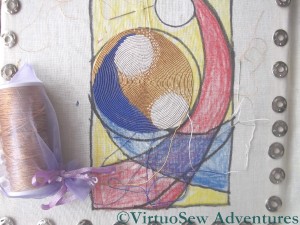
Since I’ve received so many comments – and additional e-mails! – asking me to post more about Christus Natus Est, I’ve decided to post about it more frequently than I originally intended.
Progress has slowed somewhat as the spiral gets larger, with ever-longer sections of the close silken stitching. Since I’m using two shades of blue at present, the blue of the Madonna’s robe involves three different threads, which means that every time I feel I’ve settled into a rhythm, I have to stop and change to another thread.
I’ve already had to reposition the fabric on the frame, since the constant close stitching had stretched it slightly. It’s much easier to work this style when the fabric is absolutely taut, so I expect that this will become a regular activity!
You’ve probably noticed that the Christ Child’s halo has a somewhat sawn-off look, and that I’ve not continued the Madonna’s halo over her robe. In both cases, this is because I have taken note of what one of the books I’ve been reading has told me – it is not difficult to add stitches to an or nué piece, but it is near-impossible to take them out. I’m not certain that I want the halos to spread over the robes, so until I’ve decided that, they won’t. I’m happy to go back over the piece tidying up when I’ve finished, so that is how it will be done.
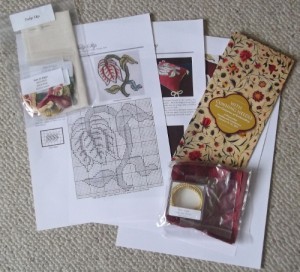
Tulip Kit And Finishing Kit
My kit and finishing kit for the Tulip Slip Needlework Nibble arrived very promptly. They have obviously got all this down to a fine art, now, at Thistle Threads, because I was expecting it to be another week at least!
My Tulip Kit contains the linen and silk for the embroidery, while the finishing kit contains silk velvet for the pincushion, gimp to edge the slip, and Grecian Twist to trim the pincushion when it’s finished. The parcel also contained information about the Exhibition being supported.
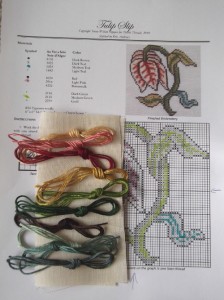
Tulip Kit - Silks and Chart
I’ve said before that I colour in charts when I’m about to start on counted work. I should have explained that I don’t colour in the whole thing, or at least, not necessarily. The second photo shows the linen and silks lying on my printout of the instructions. You can see that in this case I’ve picked one colour in each section to colour in. Usually it’s best to pick one of the middle tones, because if a design is properly charted, as this one is, the dark colours will have dark symbols, and the light colours, light symbols. The coloured shade is to help make it clear which of the medium-to-light tone of symbols is which.
It is really simply there to help me find my place on the chart just at a glance, without having to take to long to check I’m still doing the right thing!
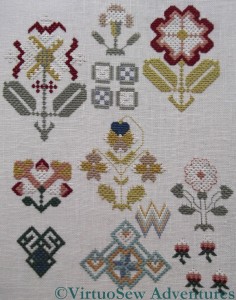
Sampler Silkwork Finished!
At last I have finished the silkwork on the sampler for the Tudor and Stuart Goldwork Masterclass. I don’t have much patience with counted work – I just keep doing it occasionally, as a salutary discipline! – so I am really very pleased with myself. After all, I began stitching it – according to my post on the subject – in June last year!
I’m pleased that I persevered. It’s fascinating to see the Queen Stitches create an entirely different fabric, with a totally different surface and reflectance to the surface of the fabric itself, and the other stitches (Rice Stitch, Roman Stitch and the Bargello section) all reveal different aspects of the silk thread and provided different challenges in working them.
In fact, in the end I have enjoyed the silkwork on the sampler rather more than I expected to. It has taken me much longer than some of the other members of the course, but I’ve been working on the Piano Shawl and the Dreams of Amarna at the same time, so I think I have a good excuse!
Now I need to work out how I am going to keep track of which goldwork stitches to do where. I’ve been printing out the instructions as I go along (thank heavens!) but I now have a large folder full of the historical essays Tricia has written for each month, and another one full of the stitches. It isn’t difficult to have a single chart by my workstand as I stitch, but I think I may need to create an annotated chart for the goldwork. So far, many of the stitches have been familiar enough for me to do some of them with only the name and placement to guide me, but in other cases I know I will need to have the folder open at the instructions as well. One of these days we will have to find a house with a studio for me to work in!