Materials Laid Out
At long last I have finished the embroidery on the Butterfly Pinpad. The embroidery was simple enough – chain stitch, French knots, and satin stitch, worked either with a fine metal thread or pale green silk thread but the fine stitches gave me aching arms during the tennis elbow episode, so everything took longer than I would expect. Then of course I had to get started on finishing it. The reason it took me so long to wind myself up to it was – as some of you may have guessed – that glue was involved!

Tying A Bow
In fact, on this occasion, I cheated – if you can call it cheating when an embroideress uses her needle and thread! I chose to lace the butterfly itself, and the silk backing, onto their card supports, rather than attaching them with glue.
I found the ruched edging almost impossible to keep straight and even – perhaps I simply didn’t make the gathering threads quite even enough. Even squiffy, though, it looks quite luxuriant!
The bows were quite hair-raising to do, as well – tiny, made of very fine silk ribbon, and a little inclined to flop. I tied my fingers in knots, several times, as I made and attached the four of them!

Butterfly PinPad Finished

Another View Of The Pinpad
Now that it’s finished, I’m pretty pleased with it, all the same, although I can’t imagine I’ll ever be able to bring myself to stick pins in it…

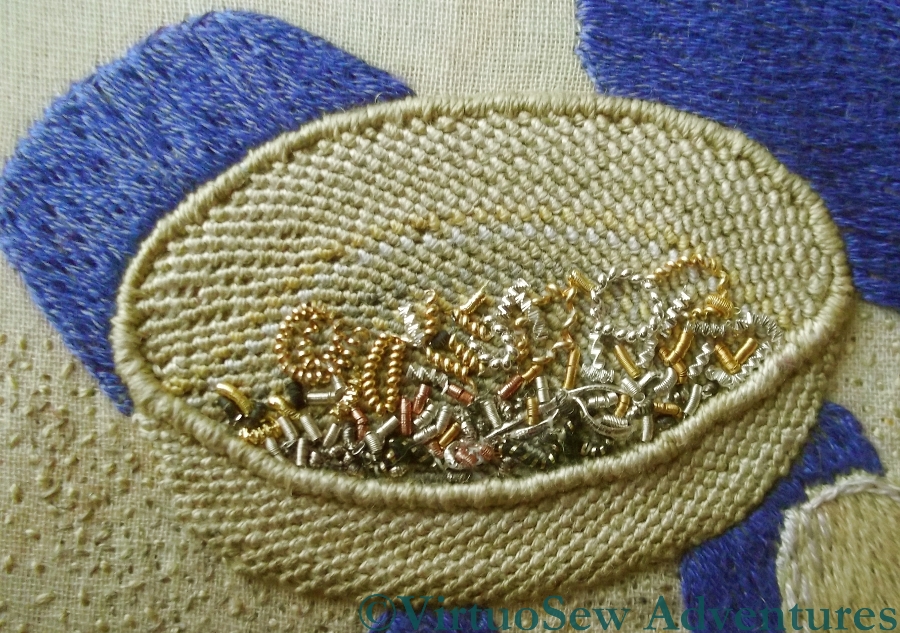
Chipwork Detail
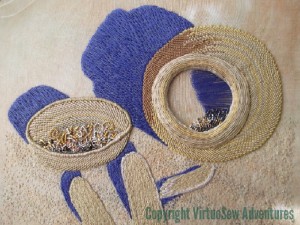
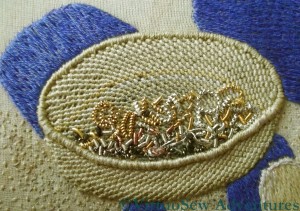
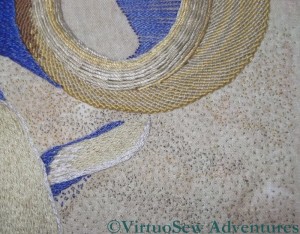
Here is a close up of the finished chipwork on the Crock of Gold Hoard. I’m very pleased with how it has turned out. Especially with a strong side light, there is the right mixture of glint and dullness to suggest old, tarnished metal. I’ve used a mixture of rough purl (both tarnished and untarnished), and check purl, in several shades of silver and gold.
I decided not to use any of the pearl purl, which I used to create the effect of bangles and broken jewellery in the lid. I’ve taken care not to over crowd the chips, because if they started to pile up, it would reduce the illusion of recession that I’m trying to create.
You may recall that last time I posted I had only just spotted the Amulet, set in front of the Crock for the photograph, and I was wondering whether or not to include it in this particular piece. I’m intending to work an or nué version of the Amulet, so even if I fail to include it here, it will still figure in the completed panels.

Crock of Gold Finished

With Kid Amulet
I could simply tell you what I decided, without explanation, but I think that would be unfair.
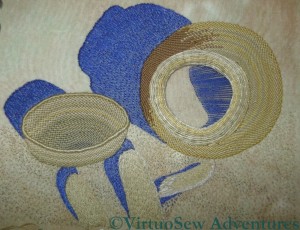
This first photo shows the piece as I originally intended to finish it. There are the sticks in the foreground, the deep blue shadows of the Egyptian sun, the Crock, its Lid, and the chipwork and curls of the fragments of metal.
I think it looks pretty good, and in fact I’ve decided to leave it like this, without adding the Amulet.
The second photo shows my experiment with adding the Amulet. Since creating the Amulet in stitchery would risk causing damage to the fabric, damage which would be impossible to repair if I dislike the effect, I thought that using silver kid leather would be ideal.
I cut out the Amulet shape – approximately – and laid it on the piece, shifting it around and looking at it in different lights. In some lights, the silver kid drew the eye to such an extent that the rest of the piece might just as well not have been there. In others, it looked like a greyish smudge, killing all the other colours, losing the sunshine and shadow. What it didn’t do, in any light, was create the sense of dialogue between the Amulet and the Crock it had been guarding so faithfully for so many centuries that I was looking for.
I’ve kept the piece of leather I cut out, and may, later, add the padding and stitching to give it form, and keep it to sneak onto the finished work as a challenge for the viewer – Find The Hittite Amulet!
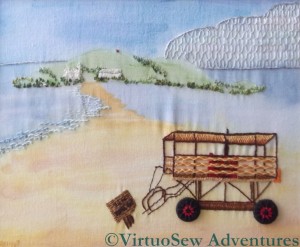
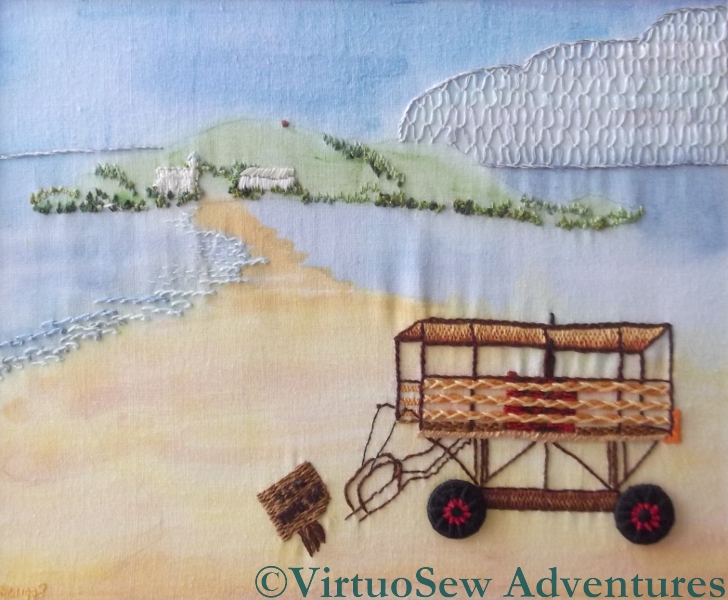
The Sea Tractor At Burgh Island
This piece was intended as an entry in a competition run by “Needlecraft” Magazine about 25 years ago. The brief was to recreate “A Holiday Memory”, and as it happened, that year we had had a great adventure – a ride on the Sea Tractor at Burgh Island in Devon.
“Needlecraft” had also run an article shortly before, describing and teaching Dorset Buttons, and they seemed perfect for the Sea Tractor’s wheels. Since time was short and the complexity of the Sea Tractor likely to be time-consuming, I also experimented with a painted background on my cotton fabric.
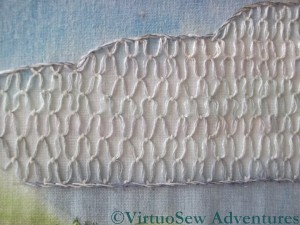
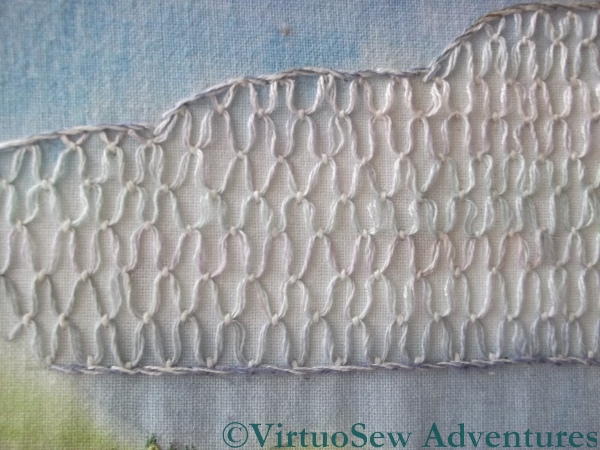
The Cloud Stitch Cloud
In retrospect, the painted background isn’t hugely successful, and it doesn’t have enough stitchery to qualify for high marks in an embroidery competition, but I enjoyed adding those details I did create, and so often in these early pieces, you can see “Rachel-Now” and her ideas prefigured in the stitch choices of “Rachel-Then”.
Looking at it now, I might have done better to work the cloud filling smaller, in white rather than pastels, over a painted base, and without outlining it. Still when you consider that the whole thing was an experiment….!
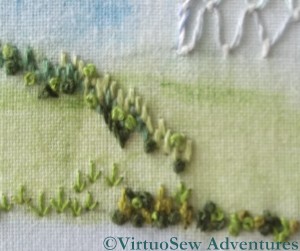
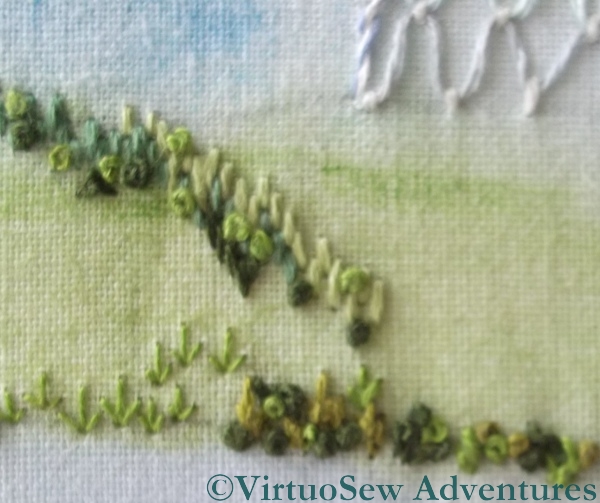
Hillside Stitch Details
The hillside details involved a lot of different stitches in lots of different greens. There are straight stitches, French Knots, chain stitches, and arrowhead stitches (upside down to look like shrubs). Again, if I were to work this now, there would be a great deal more stitchery in it, but I suspect that the combination of lack of time, and a disinclination to work areas of repetitive stitching led me to stop before I should have done.
What I can’t, now, recall, is whether I was pleased with it at the time. I’ve had it propped up in my living room since I rediscovered it, and I’m very tempted to crop it to show just the Sea Tractor itself – which would at least afford me the opportunity to re-block the piece and get rid of the ripples!
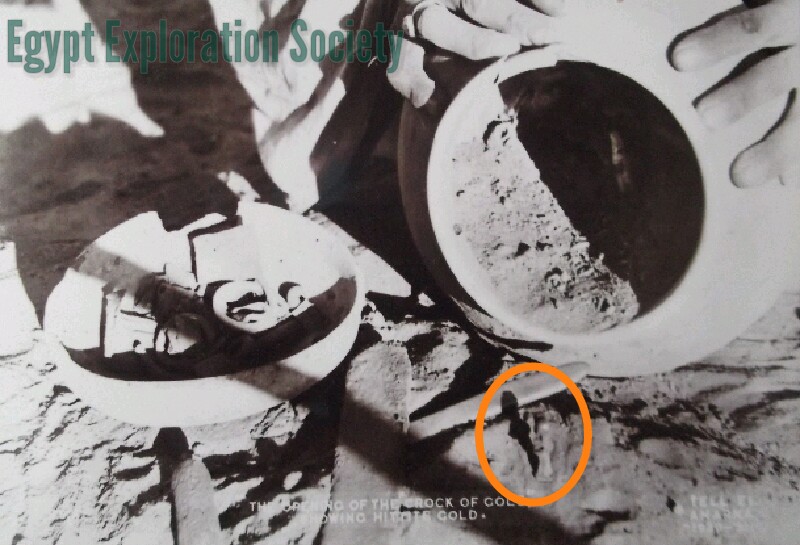
I’ve been working on the Crock of Gold Hoard for months, now, with the photo or even an enlargement of it, close at hand at all times. My mother and I even spent several hours staring fixedly at the photo while we tried to sort out the shadows.
Just Spotted
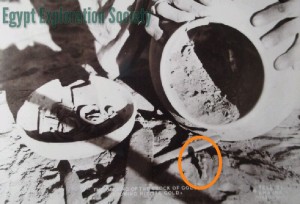
During all that time, something has been nagging me. Mary Chubb mentions that in one of the photos they took at the time of the discovery, the Hittite Amulet was placed in front of the Crock, rather as it had been on top of the Hoard for all those centuries before. And in all that time, with all that staring, I never found it.
And now I have – circled in orange here. In fact, now I’ve found it, I can’t not see it, but since it took me so long to spot it, I thought a bit of help might be in order for my readers!
Intermediate Progress
And here’s the update on progress. I’m working slowly, a bit at a time, on the chipwork inside the Crock. The tarnished silver purl is creating just exactly the effect I thought it would, because the tarnishing hasn’t been even, allowing just the occasional glint to show through.
What I’m still not sure of is just how far I need to go to get the effect of the Hoard still within the Crock, which is a matter of some concern to me, because I don’t have an unlimited supply of tarnished purl.
Oh, and there is the other question – do I even attempt to represent the Hittite Amulet at this scale? I’m going to work it in or nue, as a separate piece, and as the embroidery is only about the size of a postcard, the Amulet would only be about a centimetre high, and if it goes wrong and needs unpicking it will probably leave a blemish.
Tricky.
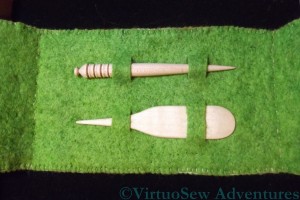
Stiletto And Mellor
The last time you saw the case I planned for the wooden mellor and stiletto, I’d cut the slits and described how I finished assembling it, using chain stitch down each spine, and blanket stitch around the edge.
When I put the tools in place, though, the whole thing seemed rather flimsy, somehow. I wracked my brains for a bit, and then thought that maybe if I were to needlefelt the layers together, it would give it a little more body.
I have a needlefelting tool with five needles in a single holder, so I fished it out, and stared at it pensively for a while. Fortunately it has a plastic guard around the needles, so I left the tools in place, and needlefelted around them. From both sides.
Finished Piece
Then I took out the tools, and felted between the loops so that the fabric behind the tools would stay in place and only the loops themselves would be free of the backing.
Finally, I needlefelted around the edge of the sampler panel and across all of the back, so that the whole case would have the same sense of solidity.
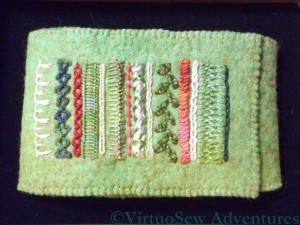
Here is the finished piece. You can zoom in on the picture to get a better view of the stitches, and the needlefelting that gives the piece its body.
I’m very pleased with how it turned out, and I hope my cousin will have many opportunities to use it, and will find the sampler panel inspiring and intriguing.
Close Up 3
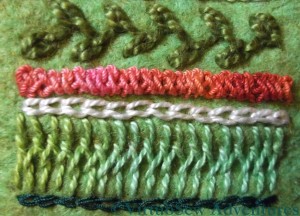
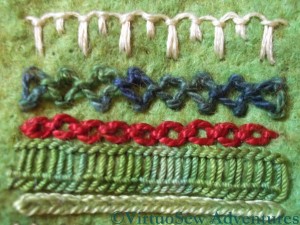
The final set of stitches for the sampler panel starts with Chained Feather Stitch, using very heavy plain pearl cotton
Braid Stitch (number eleven) is another stitch I’m fond of – I used it on the Frolicking Teddies Cot Blanket. It’s a stitch with a huge personality, so it needs to be used with care, but it’s a good one to have in the repertoire. The thread is another overdyed mercerised round yarn, and because braid stitch uses so much thread, it cycles beautifully through the colours and shows them off very well.
Stitch number twelve is Reverse Chain Stitch. This is a stitch I’d never used before the Goldwork Masterclass, but it is a very useful one, because for some threads it is much easier to work than conventional Chain Stitch.
Stitch number thirteen is Cretan Stitch. This is a great border stitch, but because the thread I chose – an overdyed soft cotton – was in a green that was rather close to the colour of the felt, I decided to add a row of Chain stitch in a very dark green silk to define the edge. It balances the cream Up and Down Buttonhole Stitch at the other end beautifully.
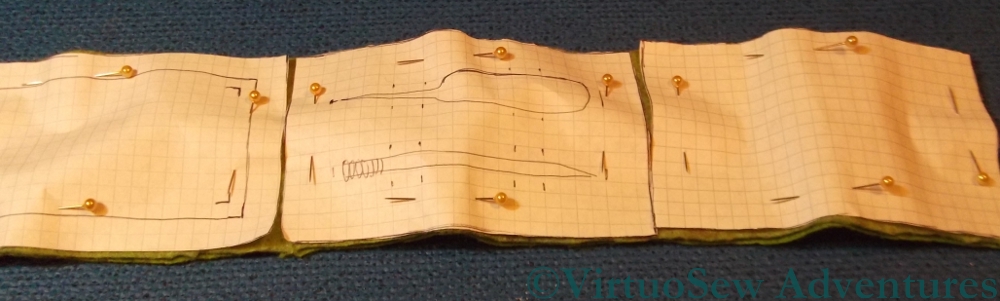
Layout For Tools
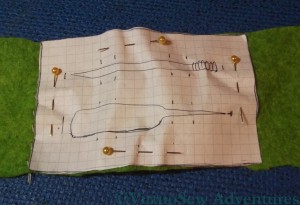
I double checked that I was happy with the layout for the tools by pinning an outline of the two wooden tools onto the felt.Since I used squared paper for the templates it was also very easy to plan where I would place the slits that would allow to tools to be held in place, and to line them up properly.
Then all I had to do was to make use of my mother’s buttonhole cutter to cut the slits – straight through the paper template – and reassemble the two layers. That was harder than I expected. I’d forgotten that felt is a very flexible material, and it bent and stretched itself, and needed to be coaxed back into shape, and then pinned firmly back into stability. Then I chain stitched down each spine, and blanket stitched around the edge….
Markup Shapes
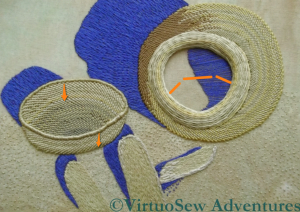
I began by staring at the black and white photograph for a while, and then “Skitch’d” an approximation of the shape of the chipwork inside the Crock. The arrows on the lid are there to remind me that it is quite shallow, and that the back wall and the front wall of the lid should be about the same. The photograph doesn’t show the lid as absolutely full, so I won’t be hiding the base completely, but I do need to remember details like this and bear them in mind.

Starting Chipwork
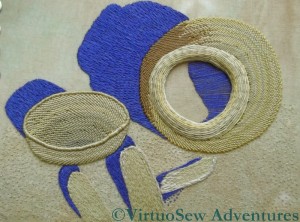
Since the Hoard has been described as forming in effect a jeweller’s cache of materials to recycle, I’ve assumed that it would be a mixture of metals. The Egyptians certainly knew enough about metal to create alloys, and different alloys would be different colours, which enables me to use a selection of materials. The Hoard was composed of ingots and bits and pieces, so none of it has to be perfectly shaped or even especially neatly assembled.
Detail Of Lid
I found some tarnished silver purl – it wasn’t tarnished when I bought it, but I was hoping it would be by the time I used it, so I was very pleased. It helps to create a bit of a shadow around the inside of the front rim of the lid. Untarnished silver check purl and rough purl, and various shades of gold and copper in pearl purl and rough purl help to create the impression of a collection of bits and pieces, broken bangles, roughly formed ingots and general jeweller’s scrap.
Now I just need to work on the chipwork inside the Crock itself. I don’t think that I have the shape of the scraps, even in the lid, quite right, but I am pleased with this as a start, and it will be several days before I can do some more, so I have propped it up where I can gaze at it thoughtfully at odd intervals.
Finished Shadows
It’s been a month since I posted about the Crock of Gold Hoard, and that is due partly to the intervening holidays, partly to the continuing Saga of the Tennis Elbow, and partly because I am really not good at all when it comes to large expanses of long and short stitch – or indeed any other stitch!
The shadow in the interior of the pot is done very simply in long straight stitches, because I know I will be adding chipwork there, so I want to avoid giving myself too much to stitch through. If I can find a “tarnished silver” or bronze purl to use, that will help to make the whole thing “read” properly, with the odd untarnished chip to sparkle and catch the light.
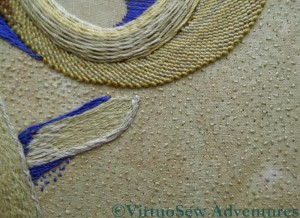
Texture Of Background
This picture shows the effect of the seed stitches. Although they’ve created a nice grainy background, the scattered seed stitches have slightly “flattened” the colour variation in the background fabric. That’s rather a pity, because the gentle changes in shade were rather attractive.
Detail Of Finished Texture
There is always a silver lining, however, and this gave me the opportunity to add a little more detail. The basic seed stitches were done in the same colour as the sticks, using two strands of stranded cotton. For the additional textures, I added “drifts” of tiny seed stitches in a darker shade, using a single strand of stranded cotton, and and then another scatter of them in a slightly more golden shade.
Completed Seed Stitches
I’ve been wondering whether the looming chipwork might have been making me slightly nervous, because I have been saying that I can’t do the chipwork until the rest of the embroidery is done, and somehow, I’ve found myself adding other layers of embroidery that must be done.
If that’s the case, I think I have now run out of excuses. I need to make sure that no guide lines are showing, re-stretch the fabric, which is sagging slightly, and then screw my courage to the sticking-point.
The idea of the sampler section was to give my cousin some inspiration for her own embroidery, and the chance to see what stitches look like in real life, since however good the book or the photo, it doesn’t come close to having the stitch there in front of you in real life! So I decided that it would consist of a sequence of stitches using a variety of threads. Naturally, I included some of my own favourite stitches!
Close Up 1
Here, the top one is Up and Down Buttonhole Stitch, using a stranded linen thread from DMC. I first used this stitch in the Persian Fantasy, and I’ve loved it ever since. In this case I’ve added to the ornamental effect by alternating long and short upright stitches.
The next is Diamond Stitch, using an over dyed pearl cotton from Stef Francis. This is a stitch I’ve never used before but often wanted to. I’ll use it again, I’m sure – it was rather fun!
The third – in standard Anchor pearl cotton – is Cable Chain Stitch, which is my favourite chain stitch variation. It isn’t always suitable, because it is a stitch with a very strong character, and sometimes something more subtle is needed, but I always enjoy stitching it.
The fourth is Ladder Stitch, which I struggled with so much on the Tudor and Stuart Goldwork Masterclass course. Here I have used an overdyed soft cotton (Stef Francis again) and found it so much easier to do!
The fifth is Heavy Chain Stitch, which I have found very useful a number of times. It produces a smooth, clean line, definition without texture, which can be hard to achieve in embroidery, which after all is a very textural form of expression!
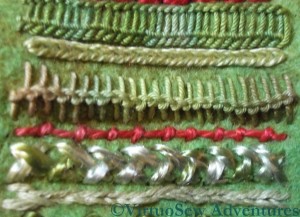
Close Up 2
The first new stitch in this photo (sixth in the sampler panel) is Loop Stitch, this one in a round mercerised cotton. It’s another stitch I’ve not often used, but it provides a great contrast in texture with the Heavy Chain Stitch above it.
Stitch number seven is Coral Stitch (remember I used it for the little girl’s hair in the Holiday Traycloth?). I used another overdyed pearl cotton – one of my favourite threads, because it brings stitches to life.
Closed Herringbone Stitch is next, using an almost untwisted rayon thread. This produces a dense plaited effect – very glossy and dramatic.
The final row in this second photograph, number nine in the sequence, is a combination of Stem Stitch set beside Outline Stitch. I know it looks a lot like chain stitch, but the two stitches are mirror images of one another!
Since Christmas is over and the present duly received, I can at last show you the present I made for my cousin. She’s become interested in embroidery, and when I saw some hand made, beautifully-finished wooden tools (a mellor and a stiletto) at the Knitting and Stitching Show in Harrogate, I decided that I would give them to her for Christmas.
That was all well and good, but I couldn’t think of a suitable way to present them, so I decided to make a case for them. I spent some time sat in the picnic area at the show, sketching different possibilities and trying to work out what other supplies I needed to buy, and when, between mid-November and Christmas Day, I would be able to make it since I was still suffering from tennis elbow (I still am, but not nearly as much!). I was beginning to threaten to put together a kit and giving her that when one of the other ladies at the table pointed out that I would still need to make one as a proof of concept (a phrase I never expected to hear at the Knitting and Stitching Show!). She was right, because it evolved considerably in the process!
Final Layout Plan
In the end I decided to make a case with three panels, using two layers of felt. I drew out paper patterns for each panel, and pinned them on to the piece of felt I had decided to use. I had considered putting a panel of canvaswork stitches on the front – I even bought a piece of congress cloth to use – but then decided that since she is interested in embroidery, it should be a panel of embroidery stitches.

Layout For Sampler Panel
As you can see, I also had second thoughts about the size of the sampler panel, and made it slightly smaller. That meant that there would be a wider border around the panel – always an improvement!
I ran tacking stitches around all the design elements to make sure I knew what was where, and then started thinking about the stitches to use for the sampler panel.