First Surface Embroidery
Rummaging in the archives is a very salutary experience. This indescribable piece of appliqué is the first embroidery I did without guiding holes in the fabric (like the little mat I described in an earlier post). I remember starting it when I was visiting a friend – it was a rainy day, and I think her mother was at her wits’ end with us. She sat us down with fabric, needle and thread, and (I suspect) prayed for peace and quiet..
Even though the stitches are dog-legged and the colour choices leave a lot to be desired, the piece still reveals things about Rachel-the-Stitcher that I recognise today. One side of the piece for the house is sewn down with blanket stitch, two with running stitch, and one with zigzag back stitch. You can take that two ways – either as evidence of my butterfly mind, never sticking to a single method, or as evidence that even then I was thinking about the implications of a stitch. Blanket stitch is a good “grounding” stitch, because of the combination of uprights and horizontals, and the zigzags are rather reminiscent of the wavy edges of some roof tiles.
The tweeds chosen for the windows and the pattern-woven braid for the door also show early signs of thinking about what I’m doing – the square patterns of the tweed recalling leaded windows and the pattern-woven braid creating a different texture for the entrance.
The braid edging glued to the frame is also symptomatic of a tendency to over-complicate, which I’ve not eradicated to this day. I think I keep it under control, but that is all I’ve managed to do…
Incidentally, like all those little girls of long ago, working on samplers with their governesses, unaware that students of social history and students of needlework would be poring over their work in the future, I noted on the back when I finished the piece – 30th September 1975. Unlike most of those little girls, I also noted – in so many words – that “It was fun.”
The Saviour Is Born!
Progress On The Sticks
I have been making progress on the sticks and the ground around the Crock and Lid. The speckling seed stitches are getting done in stages, rather as I tackled the (much bigger) job of the tête de boeuf stitch on the Map of Amarna.
The sticks are now all done, but in spite of the pattern of the shadows, they look a bit too flat. Somehow the pattern of dark and light is too undifferentiated.
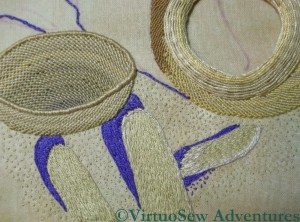
With Highlights Added
So I have added some highlights here to two of the sticks. I’ve used the same stitch – split stitch – and simply stitched over the top of the first layer. It’s tricky, because in addition to the two layers of fabric, there are two or three layers of thread to get through. Nor am I entirely sure that it is giving exactly the effect I wanted.
Still, there is still much speckling still to do, not to mention the shadows of the pot and the lid. That will give me time to think a bit longer, and plan a bit more.
For those in the UK who missed the previous broadcasts of “The Man Who Discovered Egypt”, it will be re-broadcast over Christmas – BBC4, on Thursday December 27, at 7pm.
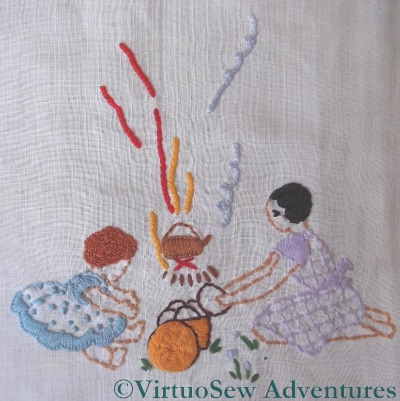
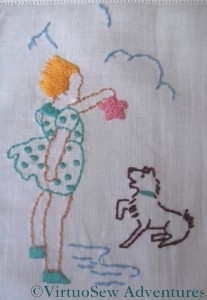
Making Tea
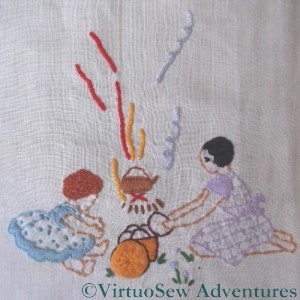
Now this is very “Swallows and Amazons“, isn’t it!
There’s a woven spiders web wheel for the top of the picnic basket, the little girl’s red hair is worked in coral stitch and her older sister’s is satin stitch. It’s barely visible in the photo, but the satin stitch is angled this way and that to create something that looks a little like a Marcel wave – a very grown up style on a relatively young girl!
As in the first installment, the cuffs and flounces are in blanket stitch. The spots are French knots, and the lilac dress is worked as a pattern of back stitches.

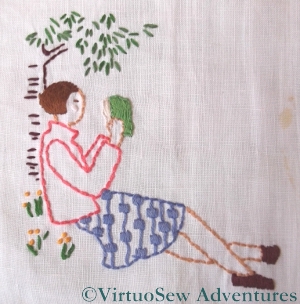
Reading
This motif, “Reading” shows particularly clearly how skilled the designer was in making the best possible use of simple shapes and simple line. Much of the design uses straight stitches – for the leaves, the bark, and the stems of the leaves.
The pattern on the skirt alternates back stitches with tiny satin stitch blocks, and the hair is stem stitch. The book and the shoes are satin stitch, the flowers are French Knots, and anything else is in back stitch.
It couldn’t be simpler to do, but doesn’t it look good!
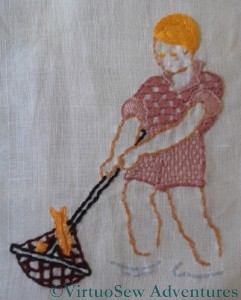
Fishing
This is the point where – after nobly containing my experimental impulses for quite some time! – I indulged in a few wanderings from the path laid down. The shorts are actually woven! It must have been tricky to get right, but it’s worked really well – they look slightly tweedy, but in any case the sort of heavy fabric that any sensible mother would clothe her child in for scrambling around rocks and beaches.
The little gold fish is worked in Vandyke stitch, which is tricky to keep even but creates a strong line down the side of the fish to contrast with the net in the background.
There’s been a frustrating hiatus in my stitching life of late – I’ve had tennis elbow, and have had to write up old embroidery projects for you instead of making progress on any of my current ones. I’ve been going stark, staring mad with frustration, because even holding a book has been painful.

Beginning The Shadows – Take Two
However, I’m beginning to get back to it at last. Cautiously, so there will still be older projects interspersed with the current ones!
I’ve been doing a few stitches here and there while I’ve been trying to rest the elbow, as much as anything else to gauge my recovery (or lack of it, as it sometimes seemed!). So now you can see that I’ve nearly outlined all the shadows. There’s just the shadow inside the pot to deal with and it occurs to me that I might need to find some tarnished purl to create the effect of the shadow on the metal inside!
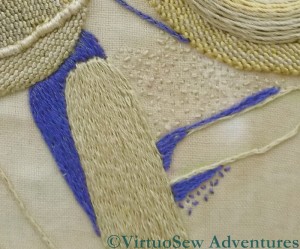
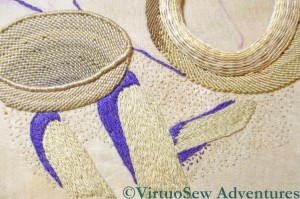
Close Up Of Sticks
I’ve also made a start on the sandy effect seed stitches, in a small section between the pot and the sticks. That’s going to challenge my boredom threshold, even though I don’t intend to have the seed stitches all over the background!
This close up shows that I’ve also managed to fill in the first of the sticks, using split stitch filling. I need to add some highlights later, because as it stands it’s a little flat.
Still, it’s great to be back!
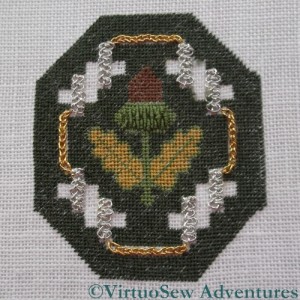
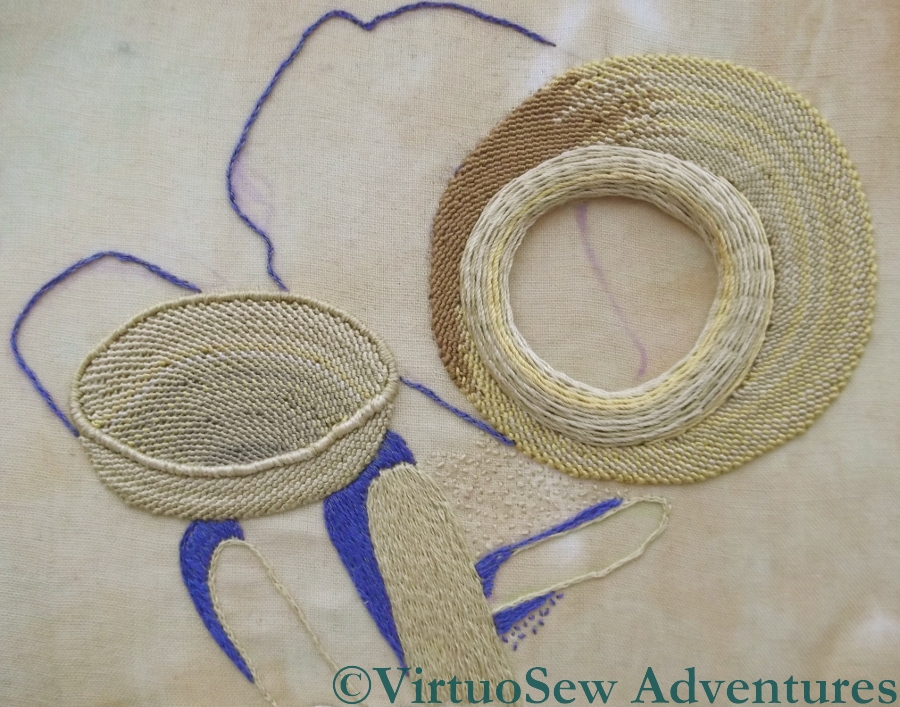
Silver Braid Stitch
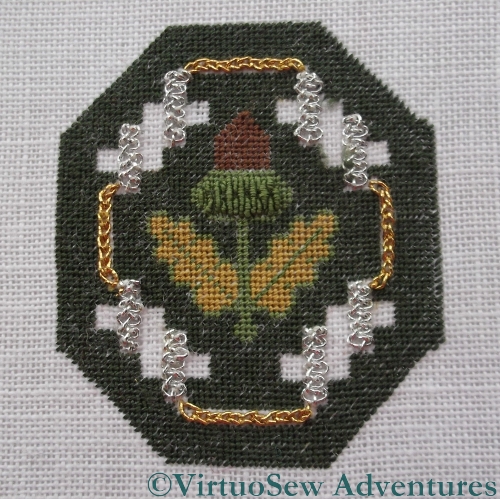
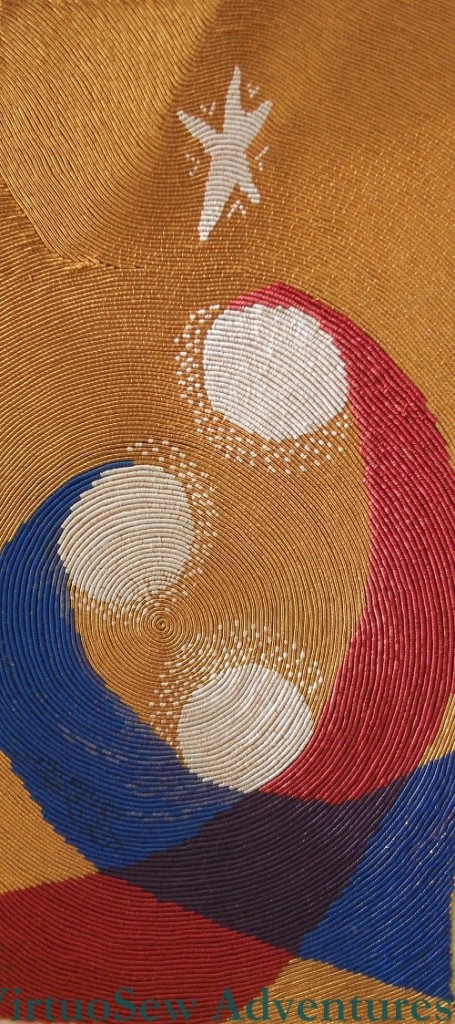
You last saw the Golden Acorn in July, when I was thoroughly fed up with it.
Since I’d got so engrossed in stitching that I’d neglected to pay attention to the details and had to unpick the lot, when I came to re-stitch I decided to put in the braid stitch in silver first.
I found the silver to be a more temperamental thread than the gold, although structurally it was exactly the same. However, these threads are all made more or less by hand, and must be hugely susceptible to temperature and humidity.
I know from my textile technology studies that natural fibres – such as cotton, wool, and silk – are susceptible to environmental conditions, because the basis for the success of the Lancashire cotton industry was due in no small part to the fact that ideal conditions for growing cotton are far from ideal for turning the cotton into cloth. In fact, nowadays, textile factories are built with climate control, because the speed of modern production demands that all possible variables be thoroughly ironed out.
In the same way, if you visit a woollen mill, you will see piles of wool at various stages of production, just sitting there. If you are a time-and-motion person you’ll get very uptight about this, and talk about “Just In Time” manufacturing – only to be told, in no uncertain terms, that if you want to pay for all the failed batches that will result from not allowing the wool to relax (technical term – yes, honestly) between processes, you’re welcome, but the manager won’t let it out of the factory with their name on it.
The silver and gold threads we are using have natural fibre cores, so sensitivity to climate is only to be expected!
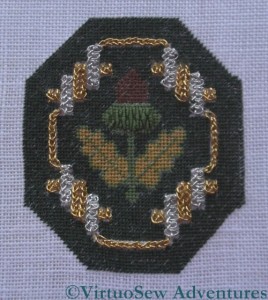
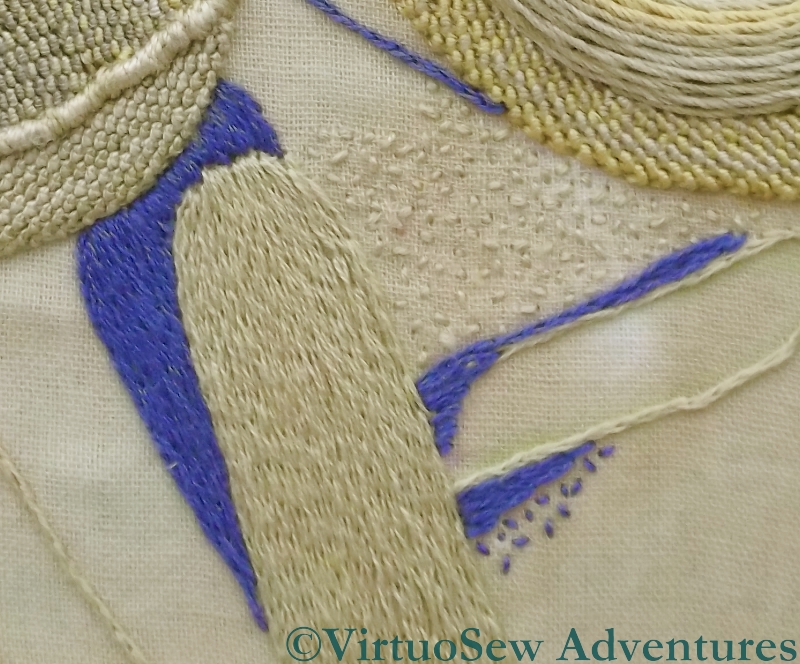
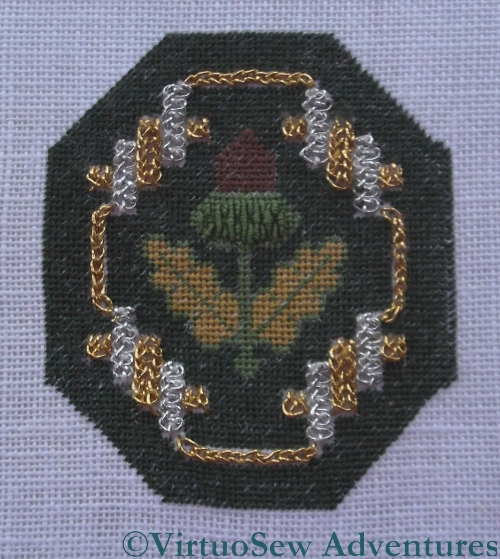
Second Time Lucky
I found both of the two main stitches in the strapwork, Ceylon stitch and Braid Stitch, rather troublesome in metal thread, although Braid Stitch in pearl cotton is one of my favourites. There’s no denying that they produce a rich and exotic effect once they are in place, though!
I became slightly fed up with tent stitch – there was such a lot of it! – while I was working this, so I’ve been giving myself some time away from it. I’ll get started on the next one of these when I feel ready for fine tent stitch again.
I’m also waiting until all three are stitched before I decide which to finish to create which stitching accessory. If I recall correctly, there’s a scissors keep, a needlecase, and a pincushion. I suspect they’ll end up in that famous Winter Decoration Corner I keep threatening to do!
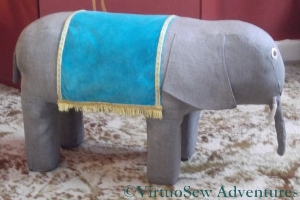
Cécile’s Saddlecloth
Once she was fully reassembled, with a neat patch across her tummy to hide the joins of the sides and ends, I was very keen to put back Cécile’s glorious turquoise velvet saddlecloth. I started sewing it on in the centre of each long edge – roughly where her spine would be – and worked outwards, to make sure that the saddlecloth didn’t end up squiffy. I’ve also not stitched too closely, because I want the fabrics to be able to move a little when I put my feet on the finished footstool and the padding “gives” a little.

Cécile’s Browband
I should note in passing that while Cécile is unquestionably a darling, she’s been the most preposterously obstreperous pachyderm I’ve ever encountered. Getting her legs re-covered was hair-raising, getting the body attached suitably was a challenge and tidying up the undercarriage so that Cécile stayed in one piece involved the sort of contortions that make me wish I’d been doing yoga all my life!
Grandmama gave Cécile a browband of upholstery fringe – probably left over from one of the many lampshades she made – and that was the only real casualty of her years in the loft. Even a run through the washing machine didn’t revive it, so it was abandoned and replaced with a similar piece left over from a lampshade recovered by either my mother or myself. The tradition of keeping and reusing scraps is very strong in our family!

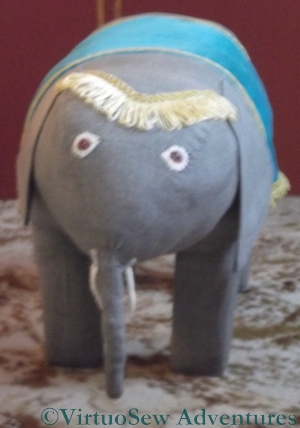
Cécile Finished!
So here she is, refurbished and back to her former glory. I was very fond of Cécile when I was a child, and I’ve enjoyed bringing her back to life.
Even it she was occasionally obstreperous!
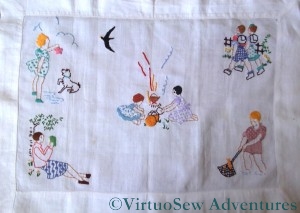
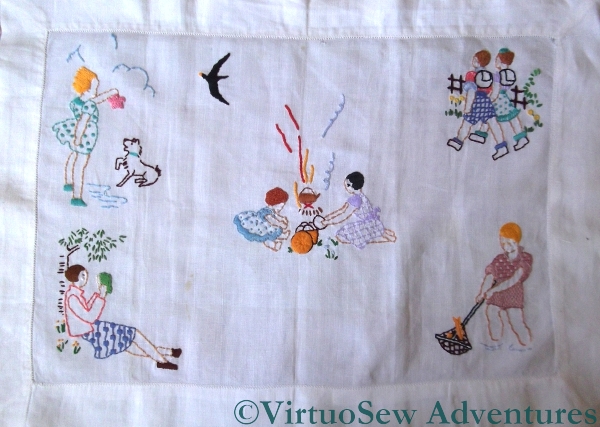
I worked this immediately after the First Voluntary Project, and my goodness, is there a difference between the two! I think I must have talked with Grandmama and looked at some of her embroidery, and it looks as though suddenly the whole idea “clicked”.
The motifs are from transfers from another of Grandmama’s Needlewoman Magazines (August 1934, if you are interested!), worked on an old piece of linen in stranded cottons. The design was suggested to be a cover for a photograph album, but since my family isn’t really photograph-conscious, I felt that such a thing would be superfluous, and finished it as a traycloth instead. We added the seagull to cover a hole in the linen, which was already quite old.
Rockpooling with Toto
The range of stitches is very limited on this piece – I must have been following the instructions in the magazine – and the whole thing is surprisingly neatly worked. I love the little girl’s spotty dress (satin stitch spots!) and windswept stem stitch hair, and the starfish is wonderfully knobbly, with closely packed French knots.
Most of the outlining across the whole piece is in back stitch, and although I didn’t count it precisely, I suspect the weave of the linen made that much easier to do than it might have been.
The designs themselves are very reminiscent of the children’s books of the period – it’s even exactly the right sort of dog, slightly scruffy, but always ready to play!
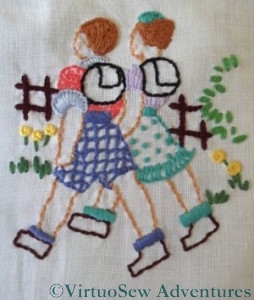
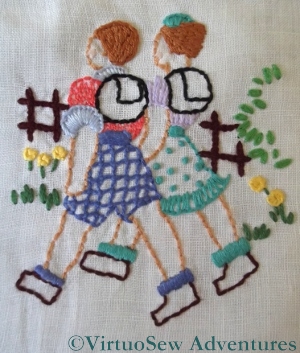
Walkers
These walkers have blanket stitch collars and cuffs, and stem stitch hair. His shorts are worked in Jacobean Couching and the spots on her skirt are French knots. The leaves on the bush in the background are detached chain, and the yellow flowers are blanket stitch wheels. Again, the hair is in stem stitch and the socks (like the little girl’s shoes) are in satin stitch.
You’ll notice that all of these stitches re-occur when I describe the other motifs, too. The designer has made absolutely first-class use of all the stitches.
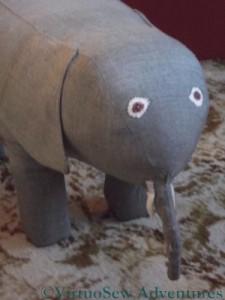
Face of Cécile
Allow me to introduce Cécile.
Grandmama made her for me when I was about two or three, we think, and I remember her as a constant and beloved part of my childhood. We rediscovered her recently in my parents’ loft, and I thought it would be nice to have her in my own living room, as a footstool and a seat for visiting children. Unfortunately, when I sat back and put my feet up, the stuffing collapsed, and Cécile began to look very sad indeed. So we skinned her (as it were!), washed the skin, and started looking for a suitable replacement for the padding.

Padding For Cécile
In the end, we used a spare cushion pad, and rearranged the stuffing slightly to leave the cover free to be stapled through. I think my grandfather must have made the basic internals – four sections of square wood for legs, screwed firmly into some equally solid half-centimetre thick hardboard.
I have all of Grandmama’s books about needlework and crafts, and there’s nothing like Cécile in any of them, so I think Grandmama must have made her up as she went along. I can’t imagine how she managed to assemble the whole thing unaided, because it took the combined efforts of my mother and myself to put the stockings on, and covering the assembly with the body was even more of an adventure.

Cécile Reassembled
But we got there in the end!
I added more stuffing while I was doing the assembly, to make sure that the finished piece would be nicely padded, and swapped the ears around – there was a hole in one side of one of them, which is now the underside.
I’ve also replaced the feet. Grandmama had glued small sections of carpet to the bottom and then stitched around the edge with wool. The carpet was looking distinctly sad and tatty, so I removed it – not without considerable effort! – and replaced it with two layers of grey felt.
Cécile is now reassembled, and just needs some of her finery re-instated. I’ll write about that when I have returned her to her former glory.

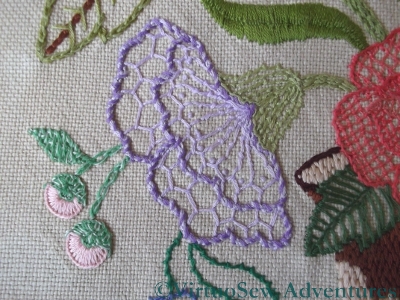
Cretan Chrysanthemum
This chrysanthemum is outlined, like the other, in Whipped Stem Stitch, but in this case the filling is Cretan Stitch, quite widely spaced. I rather like the slightly rippling effect this creates, but the stitches perhaps needed to be just a little more closely packed to make the ripple a bit stronger. The calyx is rows of coral stitch, and the stems of those strange little buds are the very first appearance in my work of one of my favourite stitches – Cable Chain Stitch.
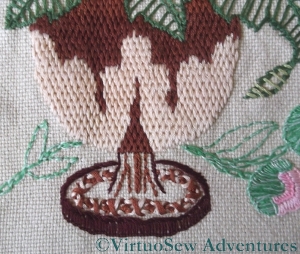
Brick Stitch Vase
The vase is worked in Brick Stitch, and since the fabric is a heavy square weave it was easy to do as a counted stitch – easier than when I worked the Prince’s Steed in the Persian Fantasy!
The foot of the vase is in closely-packed blanket stitch, and the ornamentation is Whipped Chain Stitch. I think if I were to be working it like this now, I would continue the brick stitch down the stem of the vase and leave out the whipped chain. But after all, it was my first solo project…
Naturally this won’t be going on display anywhere, but it’s been fascinating to revisit it, and try to remember what I chose and why. There wasn’t much of the why, but I’ve enjoyed looking at my experiments, anyway!