
Tag: Crock of Gold Hoard
Close ups on The Crock of Gold Hoard
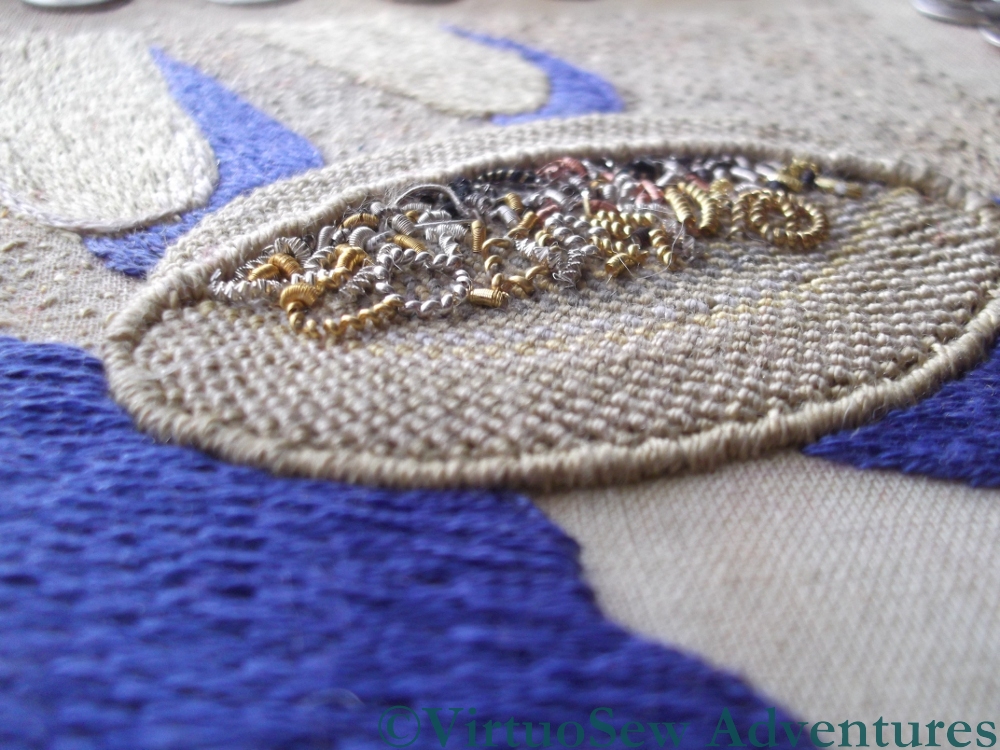
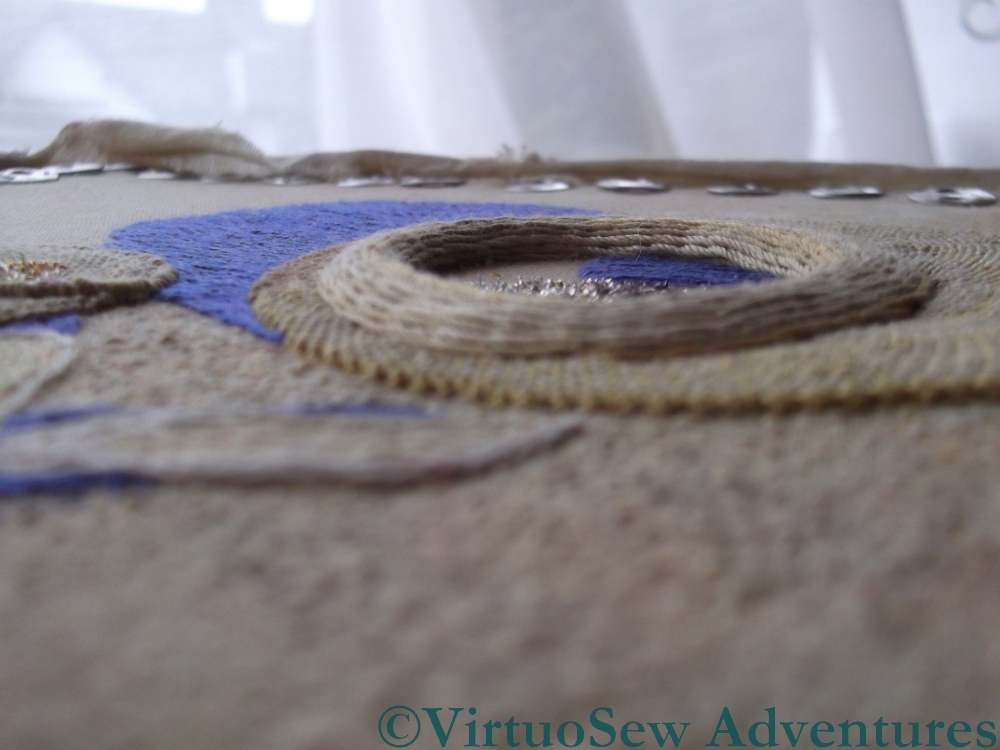
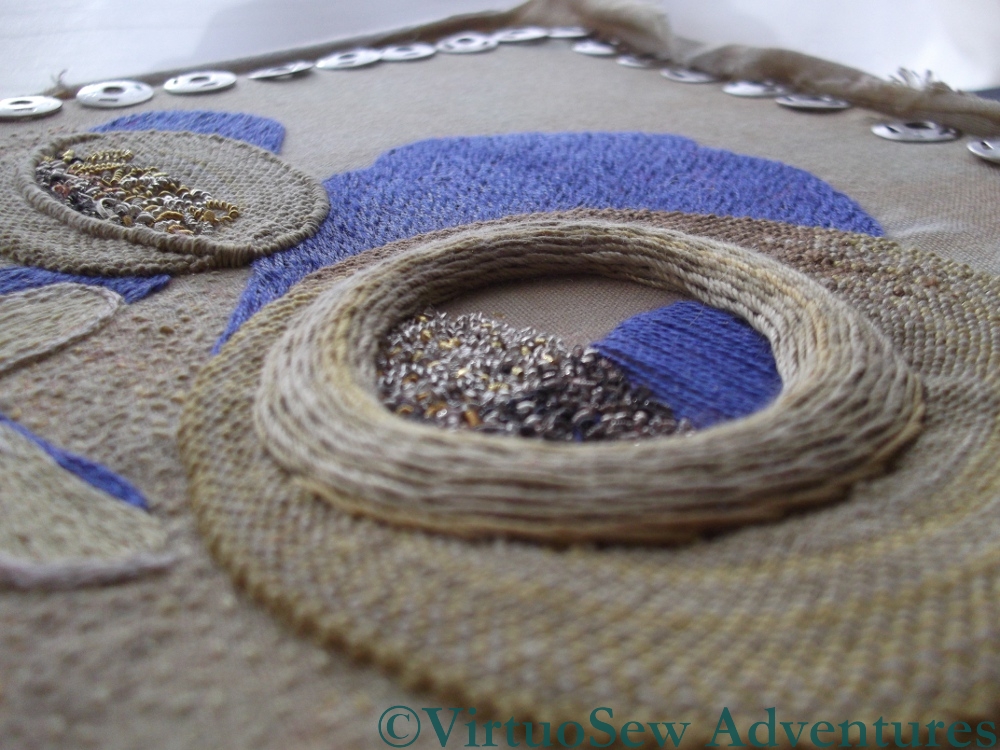
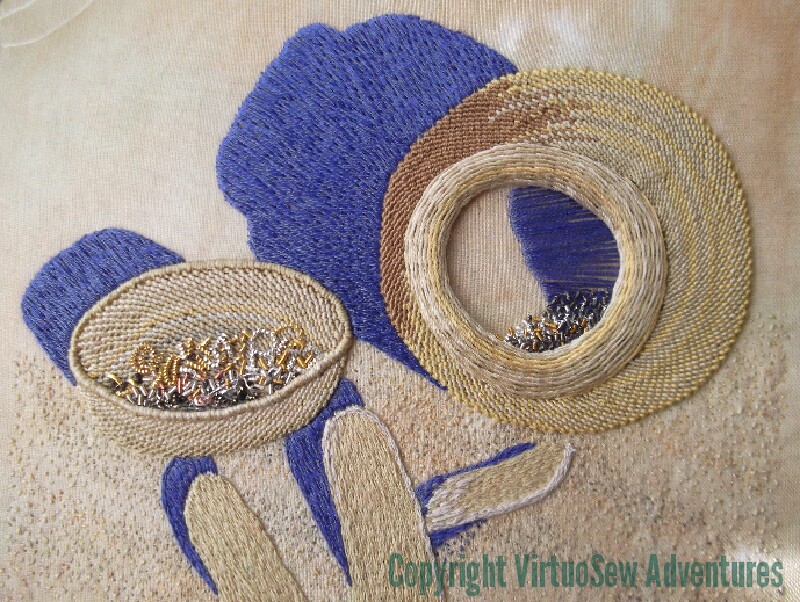
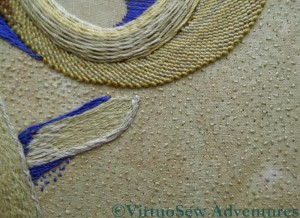
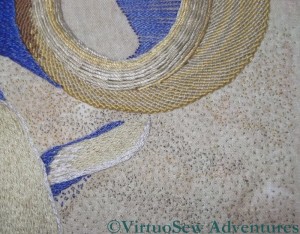
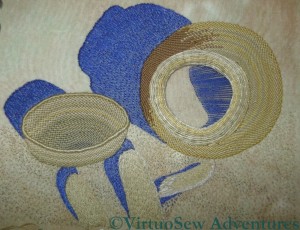
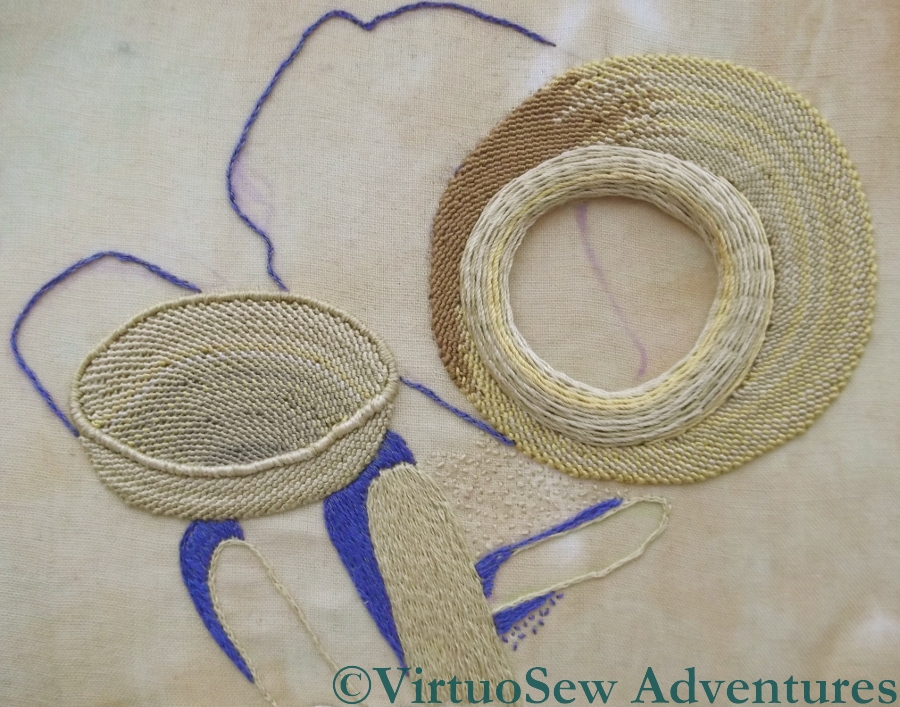
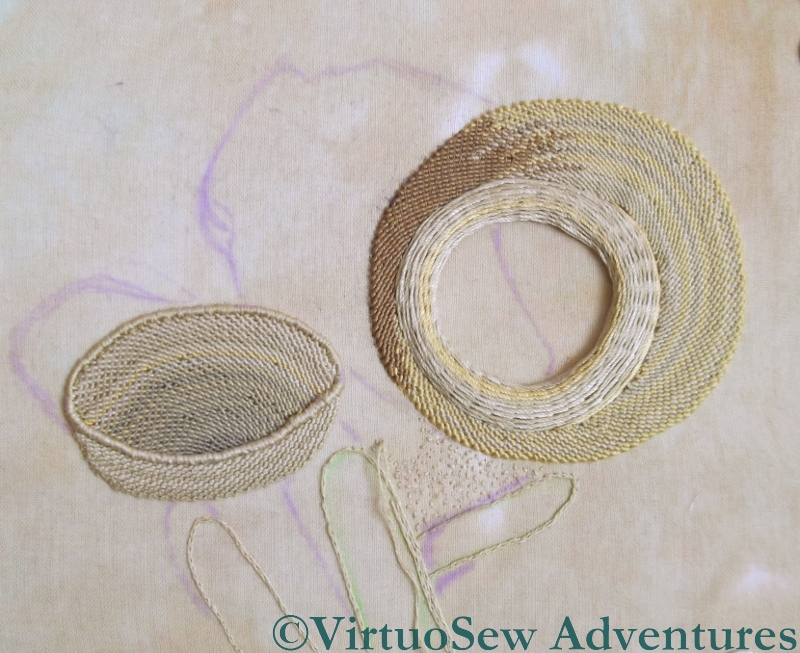
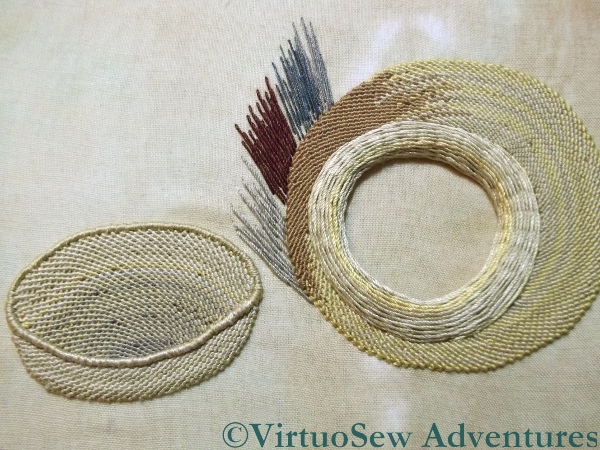
Very few words with this post – Megan asked for some pictures that showed the dimensionality of the various stitches, so here they are!
Looking into the lid
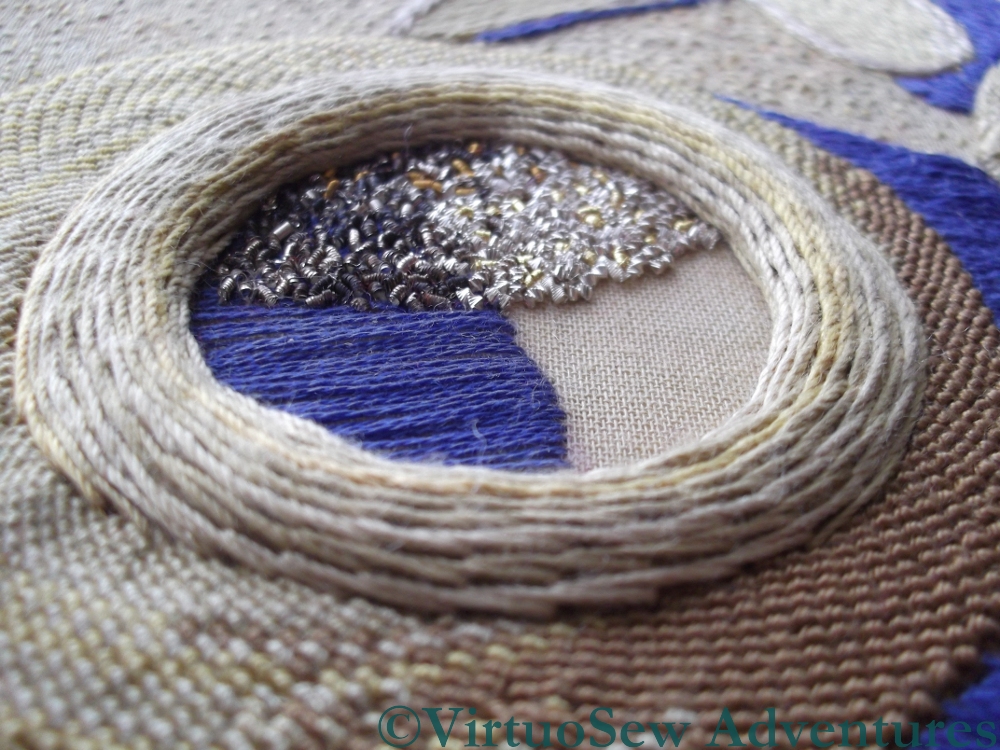
A View into the Crock
I’ve left the pictures larger than usual, so do click on them to have a closer look at the stitches and the purls!

Looking Into the Crock
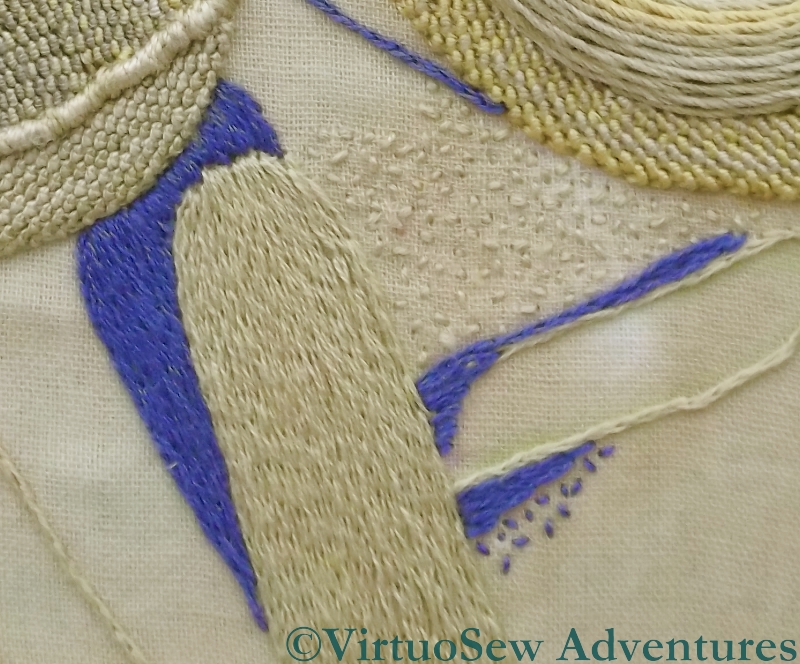
Side View across the ground
I’ve enjoyed revisiting the Crock and looking at it from new angles. I would have loved a strong side light to pick up the glints, but is has been overcast – a good light for working on the Glittering Nightcap, which I’ve finally got back to, in spite of my breath condensing on the magnifier!
A diagonal view

And again…
The Crock of Gold Hoard – Finished

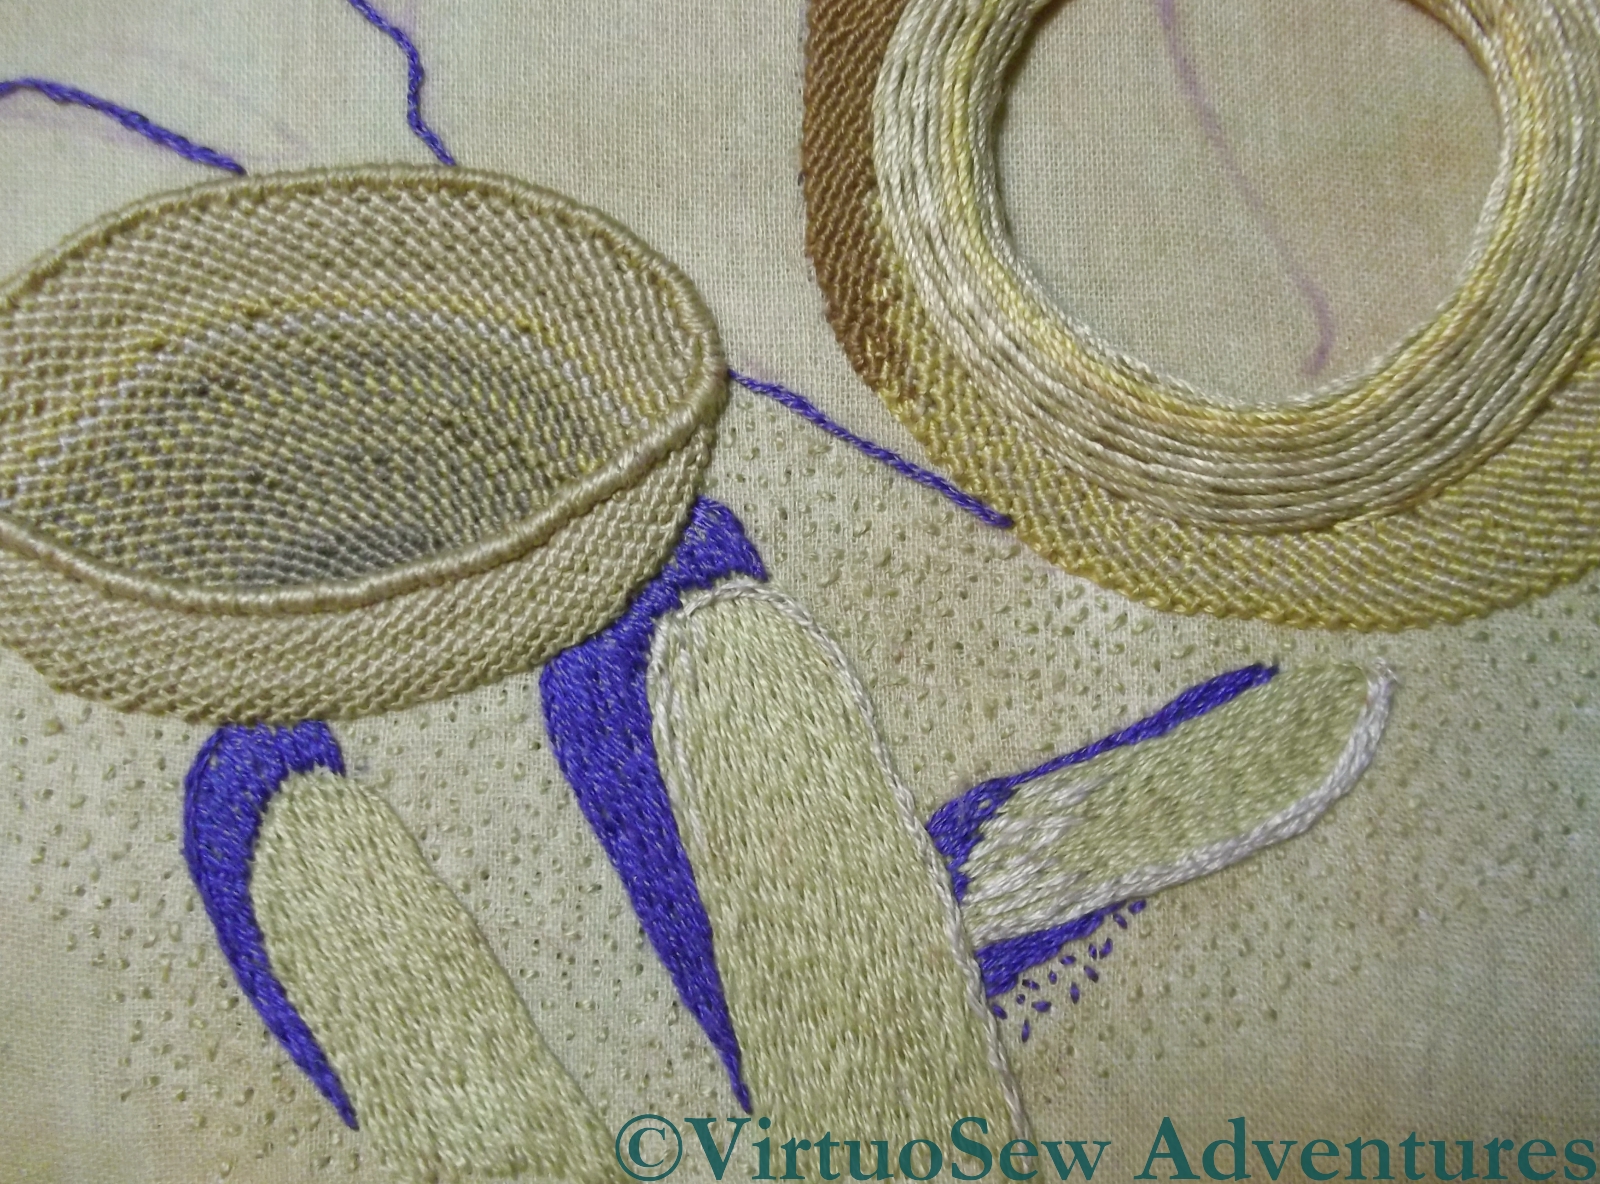
Chipwork Detail
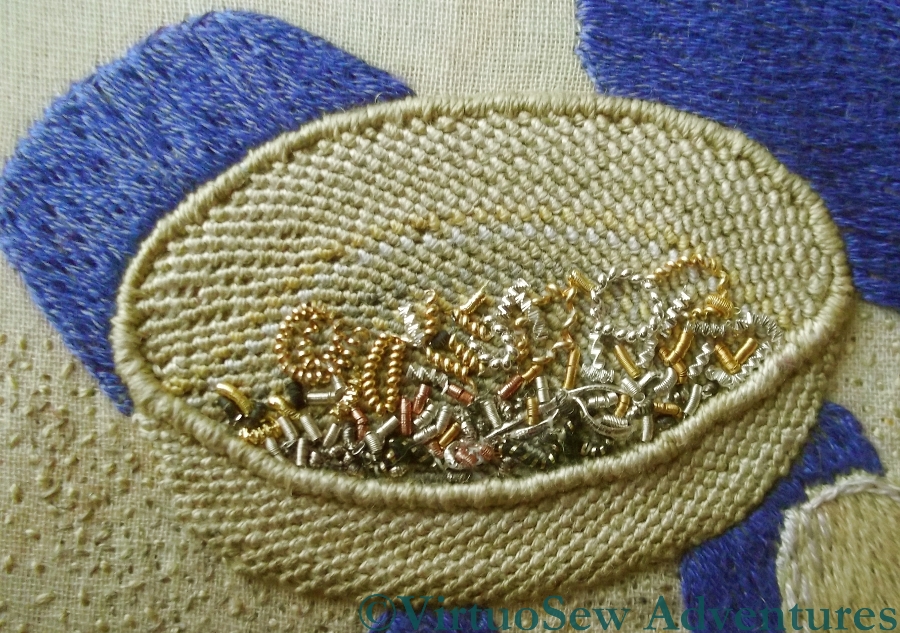
Here is a close up of the finished chipwork on the Crock of Gold Hoard. I’m very pleased with how it has turned out. Especially with a strong side light, there is the right mixture of glint and dullness to suggest old, tarnished metal. I’ve used a mixture of rough purl (both tarnished and untarnished), and check purl, in several shades of silver and gold.
I decided not to use any of the pearl purl, which I used to create the effect of bangles and broken jewellery in the lid. I’ve taken care not to over crowd the chips, because if they started to pile up, it would reduce the illusion of recession that I’m trying to create.
You may recall that last time I posted I had only just spotted the Amulet, set in front of the Crock for the photograph, and I was wondering whether or not to include it in this particular piece. I’m intending to work an or nué version of the Amulet, so even if I fail to include it here, it will still figure in the completed panels.

Crock of Gold Finished

With Kid Amulet
I could simply tell you what I decided, without explanation, but I think that would be unfair.
This first photo shows the piece as I originally intended to finish it. There are the sticks in the foreground, the deep blue shadows of the Egyptian sun, the Crock, its Lid, and the chipwork and curls of the fragments of metal.
I think it looks pretty good, and in fact I’ve decided to leave it like this, without adding the Amulet.
The second photo shows my experiment with adding the Amulet. Since creating the Amulet in stitchery would risk causing damage to the fabric, damage which would be impossible to repair if I dislike the effect, I thought that using silver kid leather would be ideal.
I cut out the Amulet shape – approximately – and laid it on the piece, shifting it around and looking at it in different lights. In some lights, the silver kid drew the eye to such an extent that the rest of the piece might just as well not have been there. In others, it looked like a greyish smudge, killing all the other colours, losing the sunshine and shadow. What it didn’t do, in any light, was create the sense of dialogue between the Amulet and the Crock it had been guarding so faithfully for so many centuries that I was looking for.
I’ve kept the piece of leather I cut out, and may, later, add the padding and stitching to give it form, and keep it to sneak onto the finished work as a challenge for the viewer – Find The Hittite Amulet!
Crock of Gold Hoard – A Surprise in the Photo
I’ve been working on the Crock of Gold Hoard for months, now, with the photo or even an enlargement of it, close at hand at all times. My mother and I even spent several hours staring fixedly at the photo while we tried to sort out the shadows.
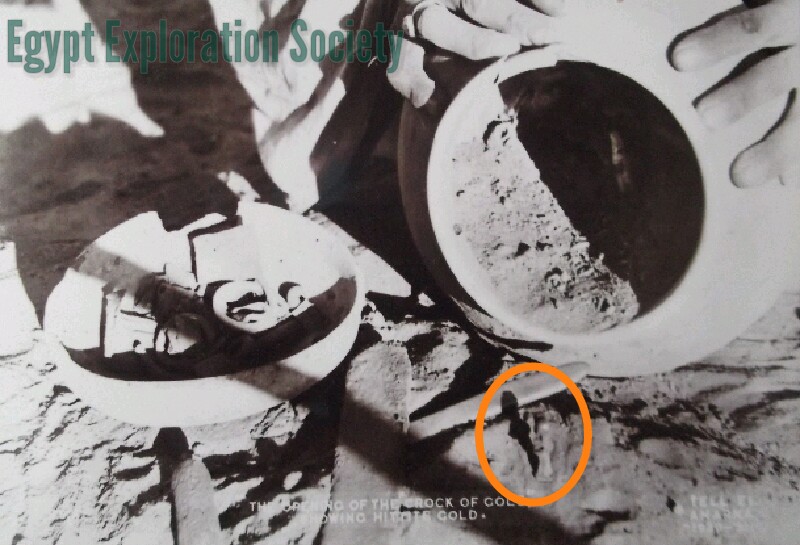
Just Spotted
During all that time, something has been nagging me. Mary Chubb mentions that in one of the photos they took at the time of the discovery, the Hittite Amulet was placed in front of the Crock, rather as it had been on top of the Hoard for all those centuries before. And in all that time, with all that staring, I never found it.
And now I have – circled in orange here. In fact, now I’ve found it, I can’t not see it, but since it took me so long to spot it, I thought a bit of help might be in order for my readers!
Intermediate Progress
And here’s the update on progress. I’m working slowly, a bit at a time, on the chipwork inside the Crock. The tarnished silver purl is creating just exactly the effect I thought it would, because the tarnishing hasn’t been even, allowing just the occasional glint to show through.
What I’m still not sure of is just how far I need to go to get the effect of the Hoard still within the Crock, which is a matter of some concern to me, because I don’t have an unlimited supply of tarnished purl.
Oh, and there is the other question – do I even attempt to represent the Hittite Amulet at this scale? I’m going to work it in or nue, as a separate piece, and as the embroidery is only about the size of a postcard, the Amulet would only be about a centimetre high, and if it goes wrong and needs unpicking it will probably leave a blemish.
Tricky.
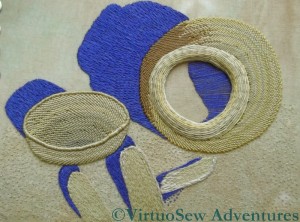
Crock Of Gold Hoard – Beginning the Chipwork

Markup Shapes
I began by staring at the black and white photograph for a while, and then “Skitch’d” an approximation of the shape of the chipwork inside the Crock. The arrows on the lid are there to remind me that it is quite shallow, and that the back wall and the front wall of the lid should be about the same. The photograph doesn’t show the lid as absolutely full, so I won’t be hiding the base completely, but I do need to remember details like this and bear them in mind.

Starting Chipwork
Since the Hoard has been described as forming in effect a jeweller’s cache of materials to recycle, I’ve assumed that it would be a mixture of metals. The Egyptians certainly knew enough about metal to create alloys, and different alloys would be different colours, which enables me to use a selection of materials. The Hoard was composed of ingots and bits and pieces, so none of it has to be perfectly shaped or even especially neatly assembled.
Detail Of Lid
I found some tarnished silver purl – it wasn’t tarnished when I bought it, but I was hoping it would be by the time I used it, so I was very pleased. It helps to create a bit of a shadow around the inside of the front rim of the lid. Untarnished silver check purl and rough purl, and various shades of gold and copper in pearl purl and rough purl help to create the impression of a collection of bits and pieces, broken bangles, roughly formed ingots and general jeweller’s scrap.
Now I just need to work on the chipwork inside the Crock itself. I don’t think that I have the shape of the scraps, even in the lid, quite right, but I am pleased with this as a start, and it will be several days before I can do some more, so I have propped it up where I can gaze at it thoughtfully at odd intervals.
Update on the Crock of Gold – a definite milestone reached
Finished Shadows
It’s been a month since I posted about the Crock of Gold Hoard, and that is due partly to the intervening holidays, partly to the continuing Saga of the Tennis Elbow, and partly because I am really not good at all when it comes to large expanses of long and short stitch – or indeed any other stitch!
The shadow in the interior of the pot is done very simply in long straight stitches, because I know I will be adding chipwork there, so I want to avoid giving myself too much to stitch through. If I can find a “tarnished silver” or bronze purl to use, that will help to make the whole thing “read” properly, with the odd untarnished chip to sparkle and catch the light.
Texture Of Background
This picture shows the effect of the seed stitches. Although they’ve created a nice grainy background, the scattered seed stitches have slightly “flattened” the colour variation in the background fabric. That’s rather a pity, because the gentle changes in shade were rather attractive.
Detail Of Finished Texture
There is always a silver lining, however, and this gave me the opportunity to add a little more detail. The basic seed stitches were done in the same colour as the sticks, using two strands of stranded cotton. For the additional textures, I added “drifts” of tiny seed stitches in a darker shade, using a single strand of stranded cotton, and and then another scatter of them in a slightly more golden shade.
Completed Seed Stitches
I’ve been wondering whether the looming chipwork might have been making me slightly nervous, because I have been saying that I can’t do the chipwork until the rest of the embroidery is done, and somehow, I’ve found myself adding other layers of embroidery that must be done.
If that’s the case, I think I have now run out of excuses. I need to make sure that no guide lines are showing, re-stretch the fabric, which is sagging slightly, and then screw my courage to the sticking-point.
More Slow Progress On The Crock Of Gold

Progress On The Sticks
I have been making progress on the sticks and the ground around the Crock and Lid. The speckling seed stitches are getting done in stages, rather as I tackled the (much bigger) job of the tête de boeuf stitch on the Map of Amarna.
The sticks are now all done, but in spite of the pattern of the shadows, they look a bit too flat. Somehow the pattern of dark and light is too undifferentiated.
With Highlights Added
So I have added some highlights here to two of the sticks. I’ve used the same stitch – split stitch – and simply stitched over the top of the first layer. It’s tricky, because in addition to the two layers of fabric, there are two or three layers of thread to get through. Nor am I entirely sure that it is giving exactly the effect I wanted.
Still, there is still much speckling still to do, not to mention the shadows of the pot and the lid. That will give me time to think a bit longer, and plan a bit more.
For those in the UK who missed the previous broadcasts of “The Man Who Discovered Egypt”, it will be re-broadcast over Christmas – BBC4, on Thursday December 27, at 7pm.
The Crock of Gold Hoard – The Ground And The Shadows
There’s been a frustrating hiatus in my stitching life of late – I’ve had tennis elbow, and have had to write up old embroidery projects for you instead of making progress on any of my current ones. I’ve been going stark, staring mad with frustration, because even holding a book has been painful.
Beginning The Shadows – Take Two
However, I’m beginning to get back to it at last. Cautiously, so there will still be older projects interspersed with the current ones!
I’ve been doing a few stitches here and there while I’ve been trying to rest the elbow, as much as anything else to gauge my recovery (or lack of it, as it sometimes seemed!). So now you can see that I’ve nearly outlined all the shadows. There’s just the shadow inside the pot to deal with and it occurs to me that I might need to find some tarnished purl to create the effect of the shadow on the metal inside!
Close Up Of Sticks
I’ve also made a start on the sandy effect seed stitches, in a small section between the pot and the sticks. That’s going to challenge my boredom threshold, even though I don’t intend to have the seed stitches all over the background!
This close up shows that I’ve also managed to fill in the first of the sticks, using split stitch filling. I need to add some highlights later, because as it stands it’s a little flat.
Still, it’s great to be back!
Crock of Gold Hoard – Those Wretched Shadows!

All Unpicked
When you last saw the Crock of Gold Hoard (here), it included some highly unsatisfactory shadows, and my mother and myself had pounding headaches and crossed eyes from deciphering the original photograph.
It took several hours of frustrating, painstaking unpicking, aided by tweezers, but I managed, and then started on the ground while I pondered the shadows. There are some sticks or something on the ground, and I want the ground to look sandy and speckled so I’m going to use seed stitches to create the sandy, gravelly look.
Simplified Shadows
There followed still more headscratching, sketching and puzzling (including experiments with photo-editing and watermarking on my tablet computer – that’s why there are two different copyright notices in this post!),
This example isn’t quite right – the shadow of the pot isn’t long enough, but it does demonstrate quite clearly that I’ve decided to simplify the shadows very considerably.
Shadows drawn in chalk
Since I’m removing the archaelogist and his hands, as well as the confusing shadow of the post which is out of the picture, I’ve decided I might as well simplify as many of the other shapes as I can. As I’ve said before, I’m not a needlepainter, and I’m not aiming for complete realism. Still, getting the shadows right will do much to make the design seem realistic enough.
I’m sure the detail of the shadows will change, but I’ve now drawn in an outline of those simplified shadows in chalk. I’ve even remembered that the pot has shoulders and a raised rim.
Crock of Gold Hoard – Problems with Shadows
Trialling Shadows
I mentioned in my last post that I was somewhat troubled by the question of the shadows that I need to have in this picture to “anchor” the Crock and its lid in space. Since the silk I used for the Crock has a sheen, my original idea was to try to find a matte thread to help keep the shadows in the background.
Another Trial
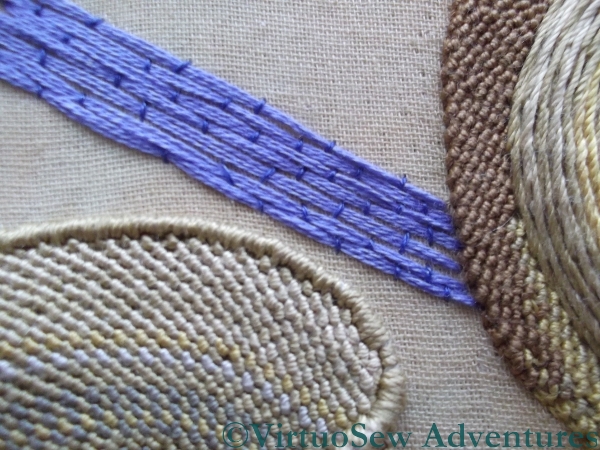
I had three dark, “shadowy” colours in a linen thread, and tried those first. I wasn’t happy either with the colours (too dull and drab for shadows cast by an Egyptian sun) or the texture (rough and scratchy), so I tried a soft lilac-y blue stranded cotton, couched down with a darker blue. That was better, but not really dark enough.
Wrong Shadows In Stitch
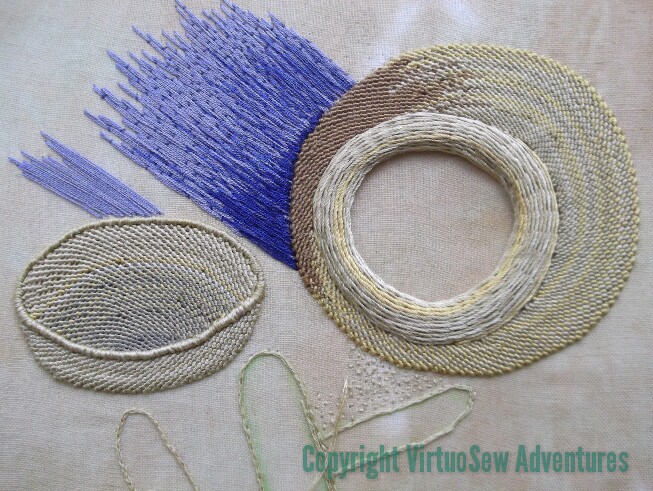
So this on the left was my next attempt. I like the shading effect and depth of colour that I’ve managed to achieve, but I can already tell that the shape of the shadow is absolutely wrong.
So I packed it up, and took my problems to my mother, who is an artist, and has a much more practised analytical eye than I have.
At which point, we realised that the shadows were rather more difficult even than I’d thought.
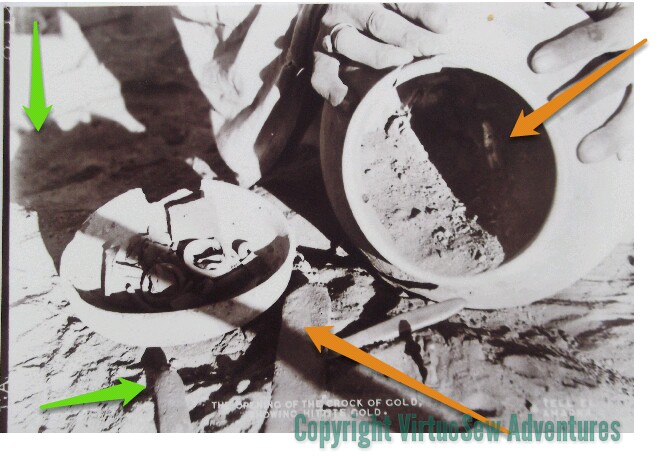
Difficult Shadows
A lot more difficult! The amber arrows indicate (approximately) what appear to be two conflicting light sources. Since the ground appears to be uneven, this must be a photo taken on site during the excavation. The vertical green arrow in the top left corner is pointing at a shadow which is clearly of something on top of a pole somewhere out of the picture. The other green arrow points to shadows show that the ground underneath the lid isn’t as even as a careless glance would at first suggest.
I’ve got a lot of unpicking to do!
Crock of Gold Hoard – Working the Rim of the Crock itself

Foundation Stitches on the Rim of the Crock
After much cogitation, I decided to work stem stitch band around the rim of the Crock of Gold. It seemed to me that that this might create the right combination of a rounded shape and a smooth line around the rim. Although satin stitch worked beautifully for the much narrower rim of the lid, I was sure that it would lead the eye wrongly in this case. In fact if you look at the foundation stitches for the stem stitch band, I think that confirms my suspicion.

Rim of the Crock in Close Up – Stem Stitch Band
The choice of stitch also meant that by changing colours as I worked the stem stitch over the foundation, I could keep the sense of movement that I feel recalls a hand-made pot. Had I worked the rim in satin stitches, changing colours would have created a rather blocky effect – fine when I come to re-create some of the geometric patterns the Egyptians used, not so good for a plain and undecorated earthenware pot!
I had a momentary wobble as I began to work the rows as the stitches seemed not to be packing together, and I kept catching my needle on the felt, but gradually as I added more rows of stitching I realised that it was working.
Both Rims Done
Now I have the rims done, I need to do the shadows, and I’ve not quite worked out how, as yet.
Still, thus far, the Crock of Gold is working pretty well. I think the raised effect of the rims will help to keep the chipwork visually contained, and that will be important, as there’s the potential for chipwork to draw the eye too much.