Silkwork On Brim
Finally!
It has been a very long haul, but at long last the silkwork on the brim of the Glittering Gentleman’s Nightcap was finished. That in turn meant that I could get going on the goldwork, of which there isn’t really very much – only the stems, and the centres of the pansies.

Goldwork On Brim
In fact, it took rather longer than I expected, because the gold thread was rather more tender than I remembered, ravelling and fraying if I so much as looked at it. It’s the same thread as I used on the crown, so I can only imagine that either I have forgotten how it behaved last time, or that the tail end of the spool has loosened slightly in the time I’ve not used it. I can quite believe that would happen, since it’s over a cotton core, and natural fibres can be rather sensitive to atmospheric conditions.

Spangles On Brim
Once the goldwork was done, I could put the spangles on. Continuing my slight alterations to the instructions, I’ve used rather fewer spangles than on the crown. I’m hoping that that, too, will help to provide contrasts of light reflectance and texture.
Of course, now I need to gather both courage and wits to put the thing together!
All these pictures are clickable so you can look at them in more detail, but I will take some more close-up pictures to compare the brim and the crown. In particular, I want to see whether there are obvious differences between the Detached Buttonhole Stitch with Return that I worked on the crown, and the Bordered Detached Buttonhole Stitch with Return that I worked on the brim, and if so what they are!
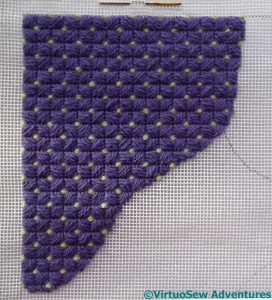
Reversed Mosaic Stitch
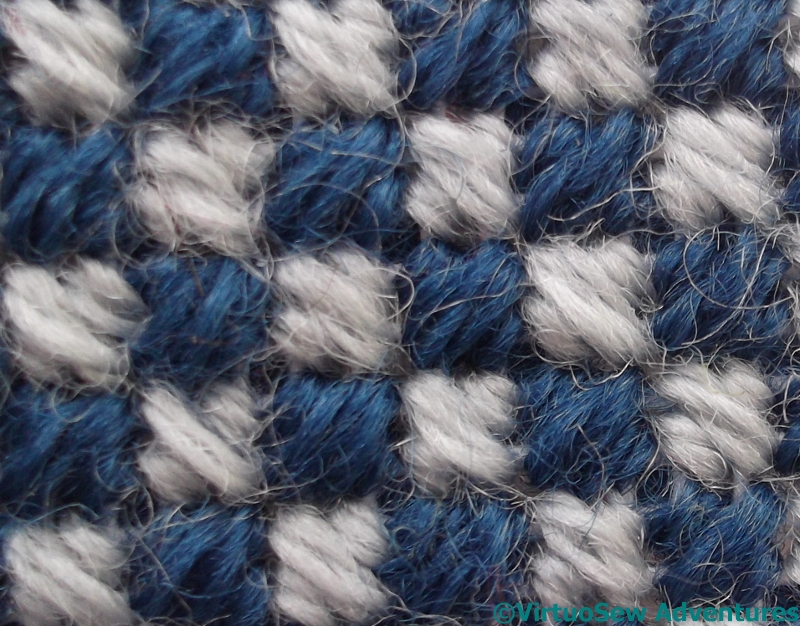
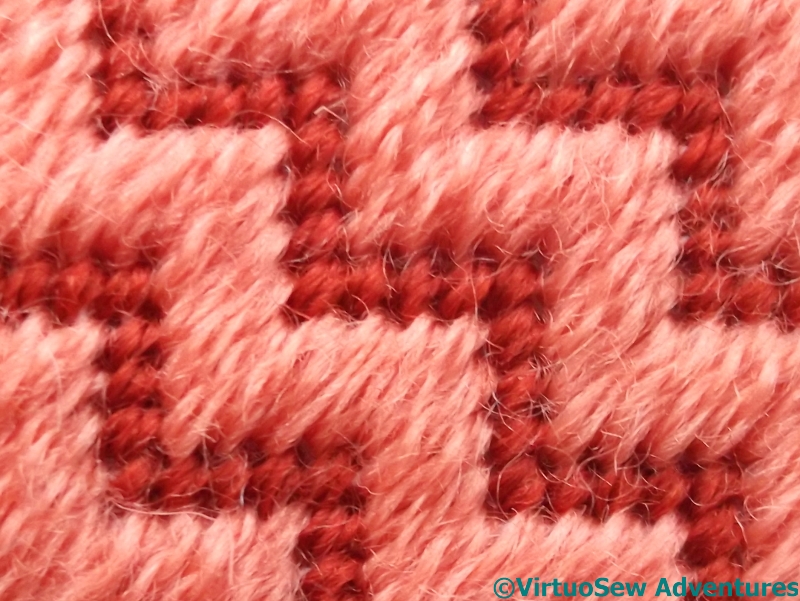
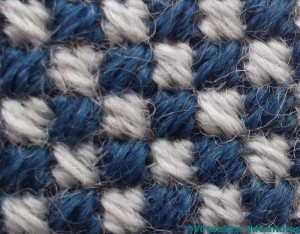
Section five needed to be worked in something that would help to calm down the acid green of section four.
I chose two shades of blue, and Reversed Mosaic Stitch, which at this scale is a small, neat pattern. The dark blue stitches are at ninety degrees to the light blue ones, hence the term “Reversed”. It also echoes to some degree the orientations of Brighton Stitch in the very first section. Just as in good script writing for a series, odd references may be made to incidents several episodes in the past, in designing large pieces of embroidery, references of colour, style and stitch help to give some cohesion to the overall item.
Section Five
I am a little concerned, in fact, that this pattern has calmed everything down too much, that it is looking rather grey and dull – which in turn means I need to take some time and effort to pick the next section, both stitch and colours.
I have even braced myself (reluctantly!) for the possibility that when the whole thing is finished and unrolled, I may look at this section askance and rip it out!
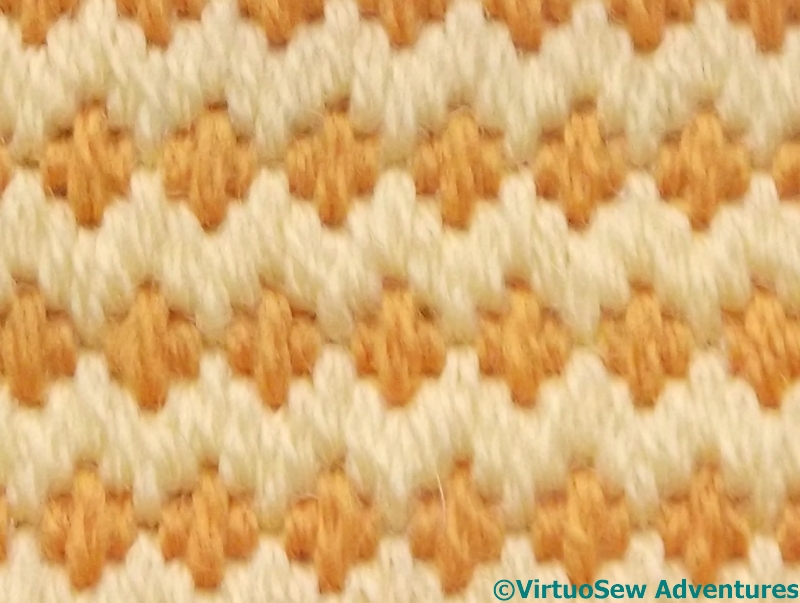
Hungarian Grounding
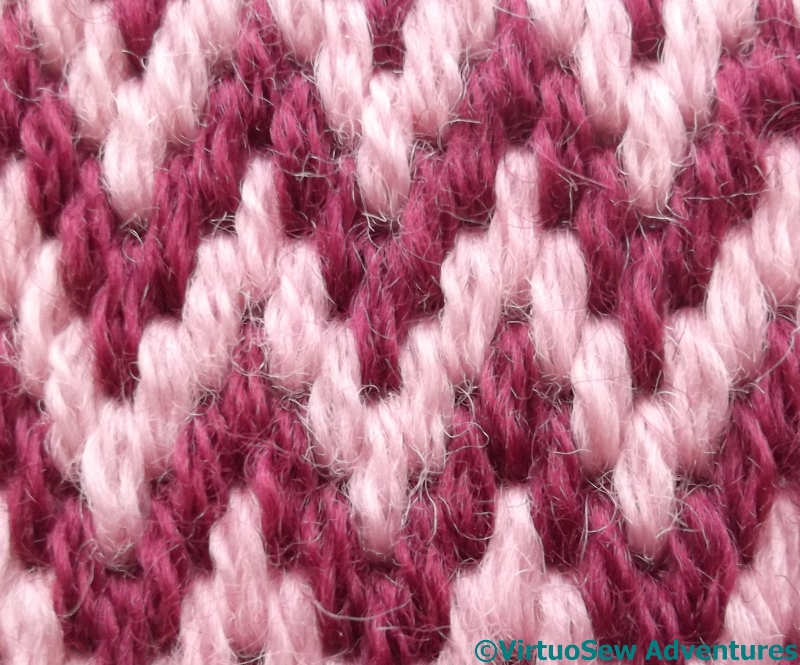
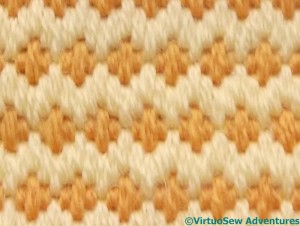
Moving on to Section Six, I wanted to choose a warm colour again, to counterbalance the warm colours of the Jacquard stitch, and eventually picked out two shades of warm yellow for the Hungarian Grounding Stitch. This is one I have wanted to do – I haven’t the faintest idea why! – ever since I found it, but have never had the right project to put it in. It’s a particularly useful one because it’s stripy, but at the same time spotty, so it reflects and recollects several different stitches.
Section Six
Seen from a distance the effect is stripy rather than spotty, but since the finished cushion is probably destined for my mother’s studio, it will be examined close up as well as from a distance!
The next pattern I choose will be much larger, and involving more colours. I am now far enough towards the centre to move on to the more multi-coloured sections, for maybe four sections before moving back to two colours. Some heathering will be involved, as well. Although my stash seems extensive it’s completely unstructured, being the leftovers of several of my own projects as well as inherited bits and pieces, and heathering will allow me to extend some of the colours to fill the elements I need them to.
I hope!

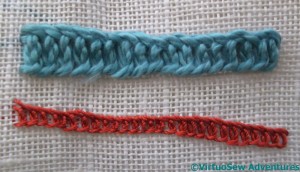
Shell Chain

Wavy Chain
Some of the suggested stitch variations in Edith John’s books have worked very well for the Circles Skirt, others rather less so. I think these two samples might help to show why.
Shell Chain Stitch worked beautifully. In the pearl cotton thread I used, there’s a nice, crisp sense of the stitch pattern, but the stitch is still flexible enough to curve around the circular shape I wanted it to, whereas Wavy Chain stitch, a variation upon it, is a very “stiff” stitch. It is wide, but each group of stitches stems from the same point, and even using a much finer thread and shortening the stitches really doesn’t make it any more flexible.

Shell Chain On Tweed
So here is Shell Chain on the skirt. It runs neatly around the edge of one of the checked circles, and although now I have worked the sample as well I might have preferred to shorten the stitches, it was fun to do, and easy to alter to match the curve.
I tried Wavy Chain several times in various places without managing to make it follow even the gentlest of curves, and eventually decided to give up until I’d thought it out some more, and maybe even done some practice.
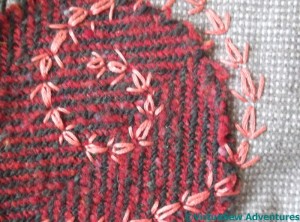
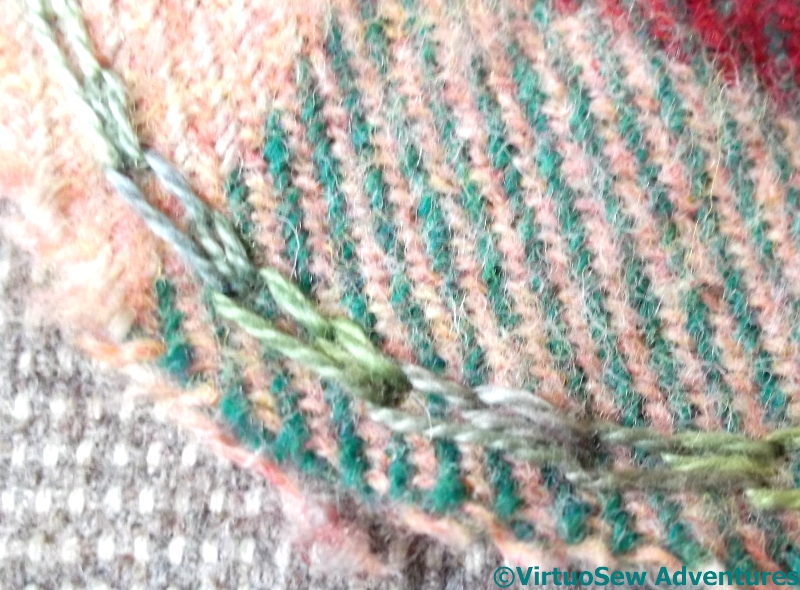
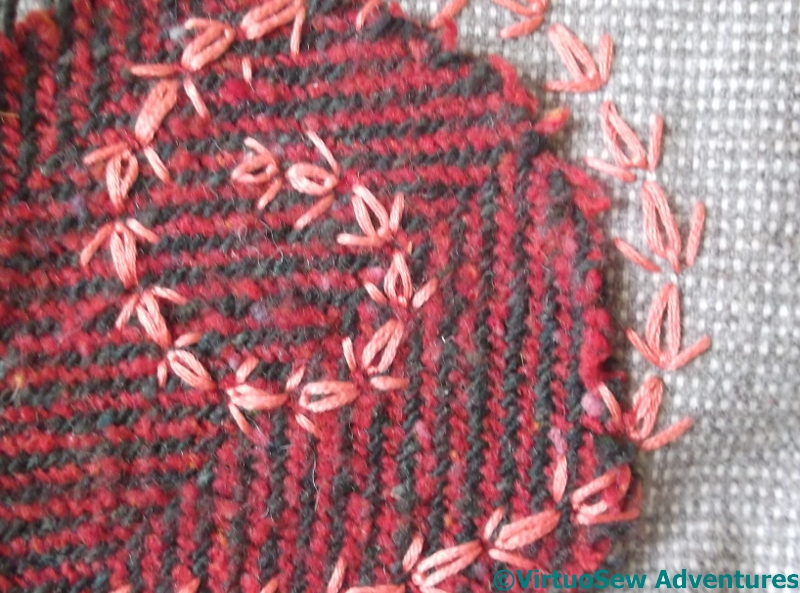
Wheatear Spiral
The Wheatear Spiral more than made up for my frustration.
It was a joy to do – the stitch itself is easy and effective, and the coral thread sings against the red and green tweed. Offsetting the spiral in comparison with the tweed also makes the whole thing more interesting, helping to connect the ground fabric and the embellishment. Maybe I should have swung the spiral further out over the base fabric, but this is what my needle wanted to do!
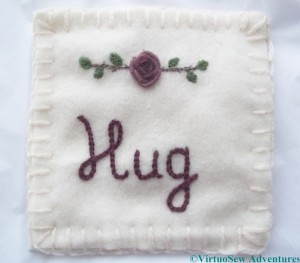
Rose Hug
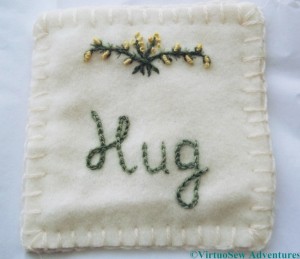
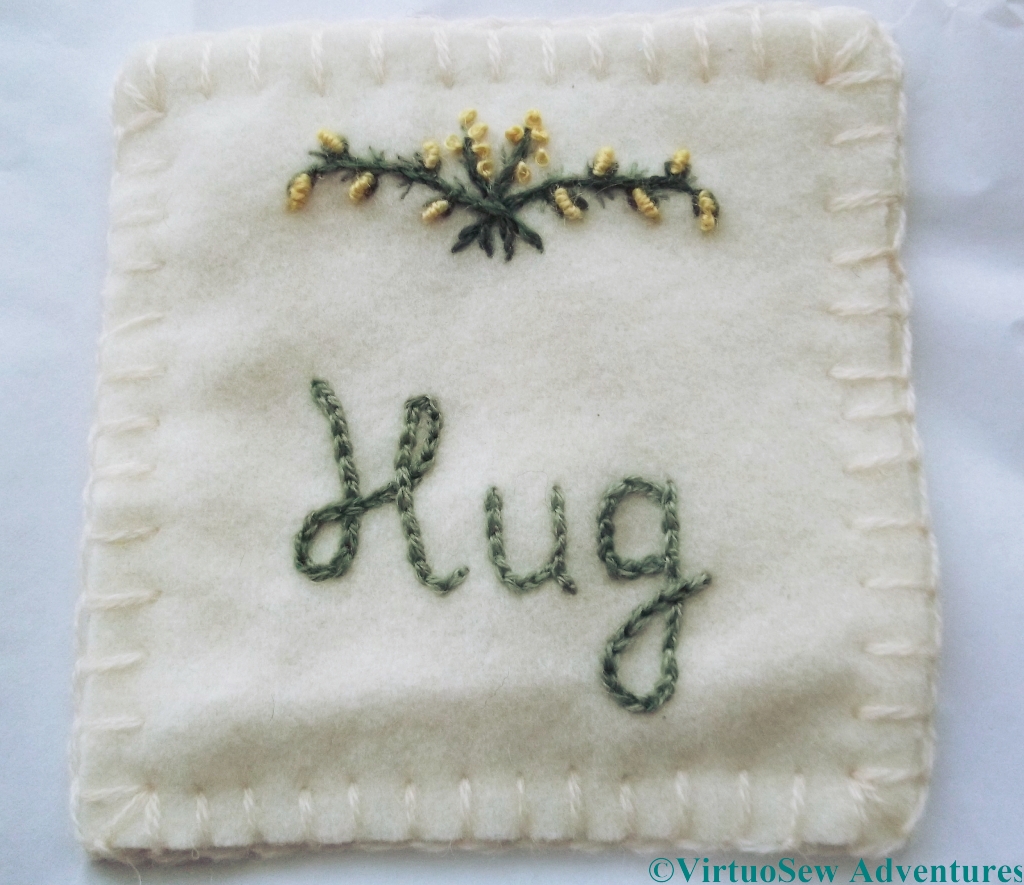
Gorse Hug
Sometimes there is nothing you can do for people but give them a hug; sometimes even that is rendered difficult, or even impossible, by distance. For those occasions, I’ve created a Hug For a Handbag. It’s a small square of snuggly cashmere blanketing, embroidered with the word “Hug” and with a small embroidered motif on the top. I have backed these with another layer of cashmere, to make them even snugglier.
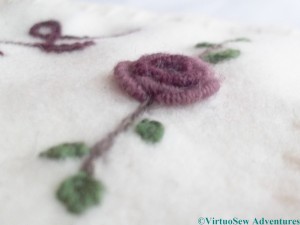
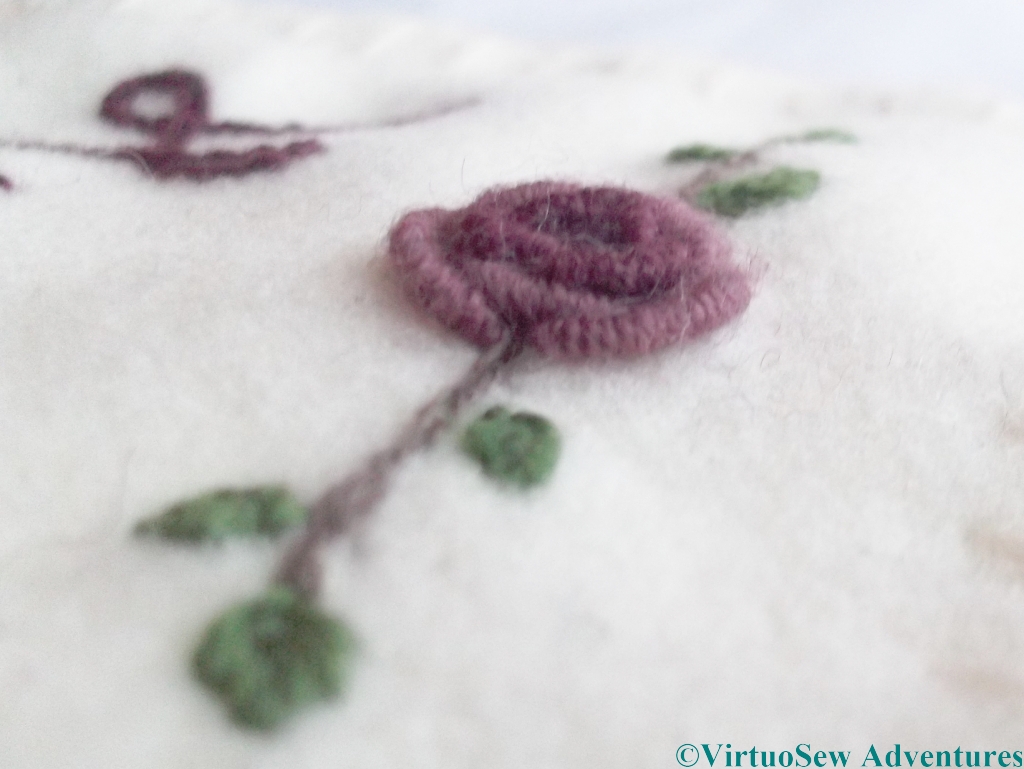
Rose In Profile
The rose on the Rose Hug is worked in bullion knots, which were not among my favourite stitches, but I’ve warmed to them because the rose seems to have worked so well. The inner knots are shorter, and worked using a single thread, while the outer ones are not only long enough to have involved a great deal of wrangling to get them to settle nicely, but worked using a double thread.
The leaves are worked in nested fly stitches, and the stems in stem stitch (of course!), with tiny thorns of straight stitch alternating with the leaves.

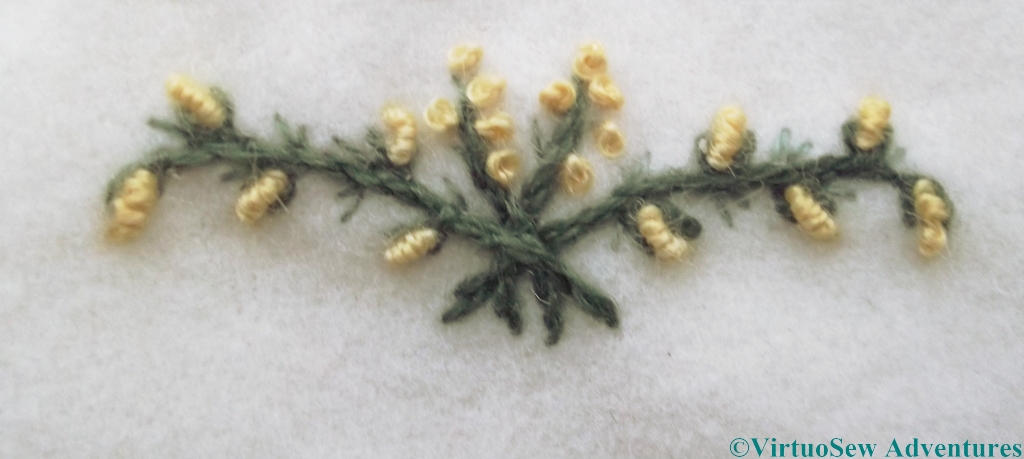
Gorse In Close Up
You can tell that I have warmed to bullion knots, because I used them for some of the flowers of the gorse on the Gorse Hug. The buds are French knots, and the thorns and sprigs are worked in fly stitches, using single threads instead of the double thread used for the stems.
This is a wonderful use for some gorgeous woollen threads I bought somewhere in Pembrokeshire ten years or so ago (unlabelled, but they are so soft and lovely I wonder whether they came from Renaissance Dyeing) and some more, bought in Australia, which come from Gumnut Yarns). They have been a sheer delight to use. There’s a lovely misty blue in among them, too, so I am thinking of another design, of Lavender, to make up to have ready next time I need a Hug to send out.
But on the other hand, I rather like stitching a Hug with the recipient in mind. Maybe they’ll feel the hugs I was thinking when they receive the gift.

Elizabethan Holly Braid
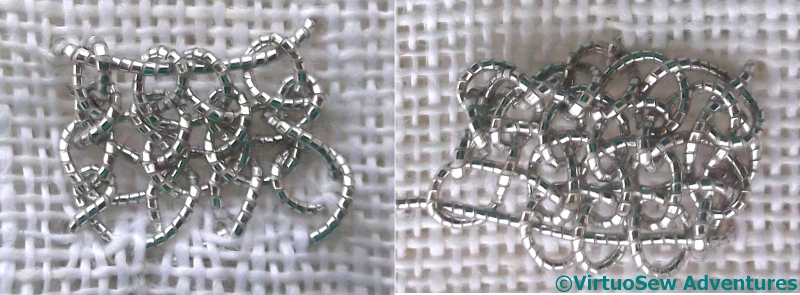
Continuing my idea of using different stitches on the brim, I spent a little more time experimenting with stitches mentioned in Jacquie Carey’s book “Elizabethan Stitches”.
As I have mentioned before, the difference in mental models between a braidmaker and an embroiderer are clearly considerable, since although the diagrams are very clear, I spent much longer than I would have expected in puzzling them out, especially the Holly Braid Stitch. Eventually I decided that it needed a much stiffer thread than pearl cotton, and indeed, the silver thread version came together much more easily than I expected.

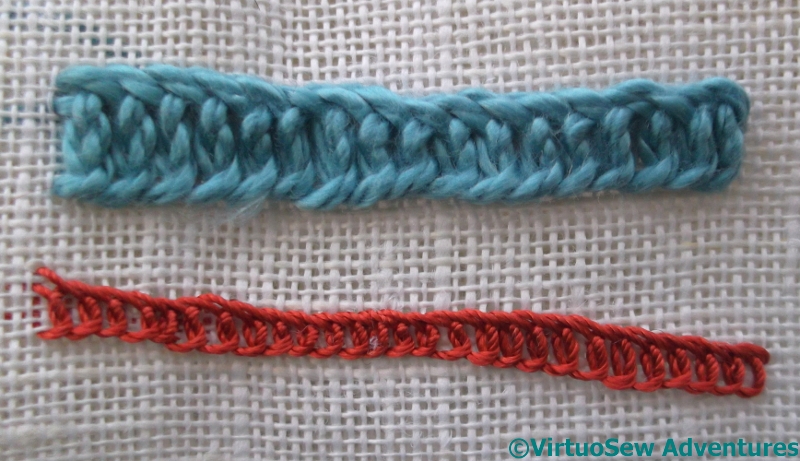
Elizabethan Double Twisted Chain
The Double Twisted Chain Stitch was much more straightforward to tackle, although wrangling the thread was quite a challenge at times – as you can see from the uneven stitch size and tension.
The Holly Braid Stitch is a little like a plaited braid stitch in that almost all the thread is on the surface in a neatly interlocked, textural pattern. It also uses up a lot of thread – maybe three or four times as much as the ordinary Reverse Chain Stitch that Tricia suggests for the stems. Unfortunately, I don’t think I have enough of the gold #381 in the kit to embark on stitch choices that are so profligate of thread, although if I find a spare tube in my stash, I may change my mind.

Two Forms Of Trellis Stitch
Nomenclature is a constant source of puzzlement. What Jacquie Carey refers to as Trellis Stitch – and offers an Elizabethan version for – I think of as Single Brussels Stitch. Jacquie’s is worked upward from the base cord, while Single Brussels I have always worked downward. I think I need to try again with these stitches, using something other than a metallic thread, because neither of these patches looks quite right!
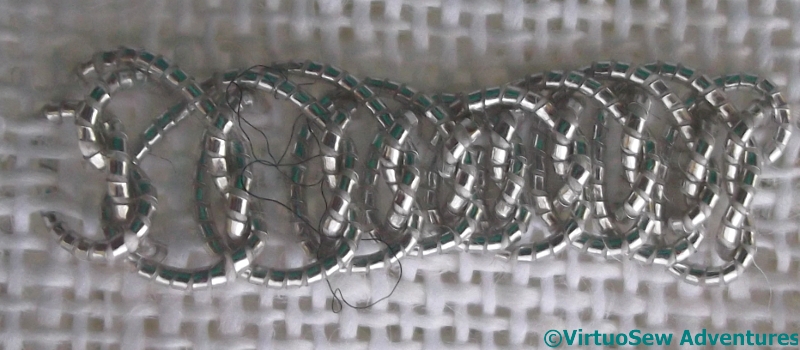
Elizabethan Twisted Braid Stitch in Pearl Cotton and Silk
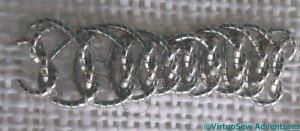
Elizabethan Twiseted Braid Stitch in Silver
Elizabethan Twisted Braid Stitch was rather more fun. Most of the thread is at the front of the fabric, making it a good choice for a metallic, or other expensive thread. The appearance – when the eye isn’t completely dazzled by sparkle! – is of an alternating twisted bar and straight bar. I clearly need to work the stitch for longer to learn to keep it consistent in width and to learn to alter the stitch length for differing effects, but I was pleased to find that the structure of this one made sense to me quite quickly.

Elizabethan Twisted Chain
Elizabeth Twisted Chain differs from the modern version in that both of the ends of the stitch are inside the loop, instead of one in and one out as in the modern version. It’s also worked in reverse – although that, I find, is no longer a challenge for me. The reverse versions on Chain Stitch are so much easier to work in metallic threads than the ordinary version that it is becoming second nature, and faced with a thread that is difficult for other reasons, it is also becoming second nature to consider whether working in reverse might help.
It is a constant source of delight to me to find that the things I learn, and the things I thought I would learn, are not always the same. The Online University courses, and my own experiments have given me more, and different, strings to my bow…
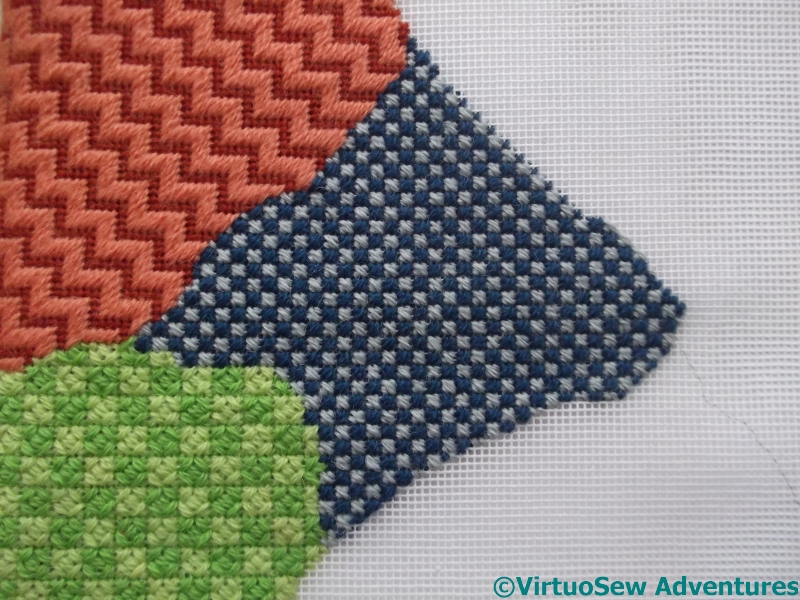
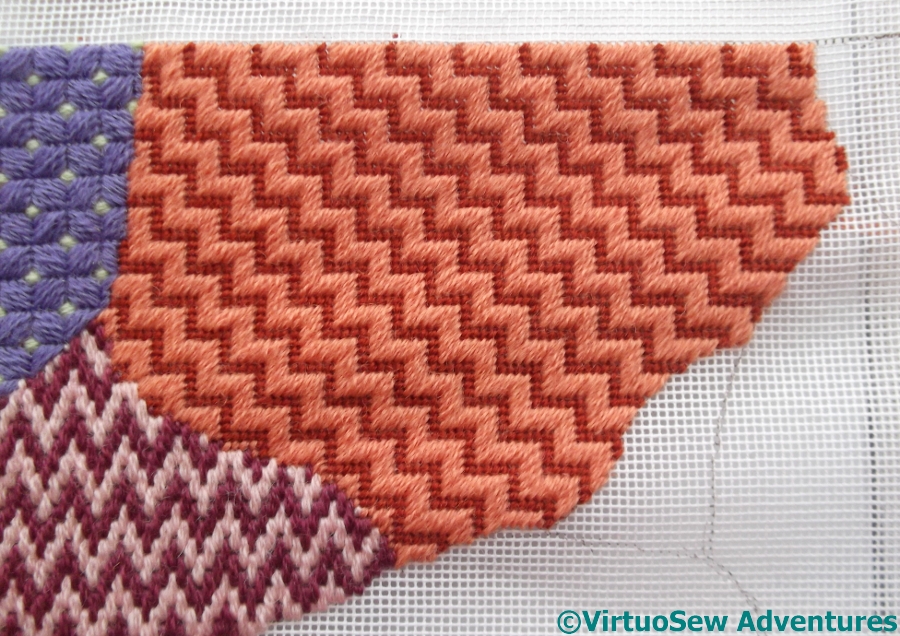
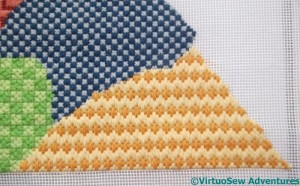
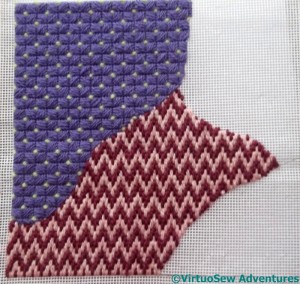
Jacquard Stitch
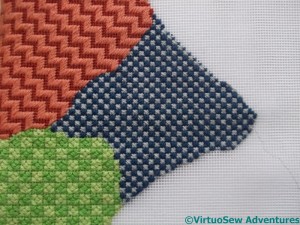
The third section is in Jacquard Stitch. I’ve always liked this stitch. It creates an effect rather reminiscent of a twill weave, which is one of my favourite fabric structures – you may recall that the Persian Fantasy screen was embroidered on a cotton twill, and that I used a cotton twill fabric for the superstructure and bridge of the Camberwell. It’s a little tricky to start, and doing the compensation along all the wiggly edges had me counting and recounting to try to make sure I didn’t create any steps that were longer than others. It is very much easier to do when the edges are straight!

Third Section
This view shows that whole shape of the third section.
As you can see, I am trying to change around between diagonal stitches and straight stitches, stripes and squares. Although Jacquard Stitch and Florentine stitch are both striped, one uses diagonal stitches and the other straight stitches. And strangely, again, the section used approximately the same amount of wool as the previous sections. By now I was beginning to be confident enough to pull out that number of strands from the hank and see what happened..
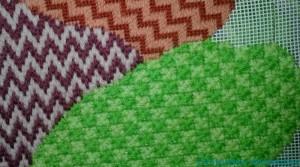
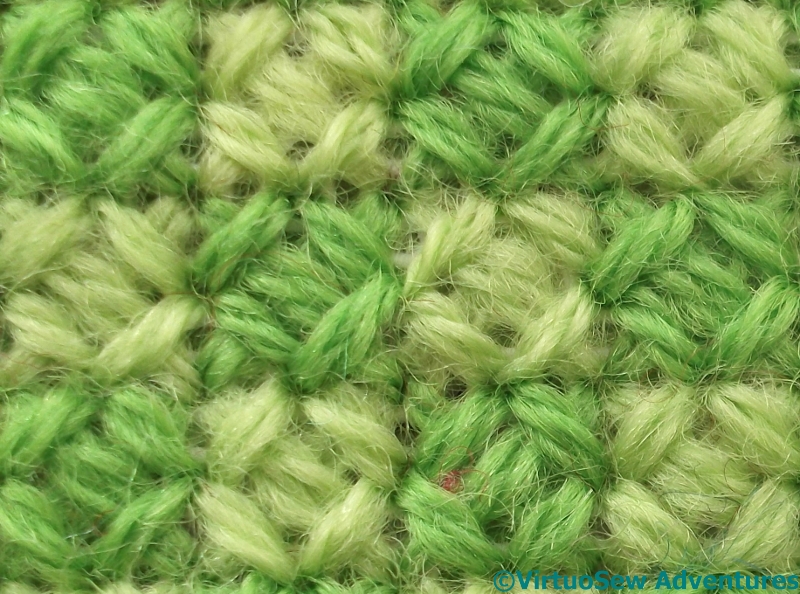
Section Four
For my next section, I looked for a square stitch which involved crossing threads. Since I chose to alternate the colours, the amount of each colour would be approximately the same. This is a rather acidic green, and swore violently at some of the other colours in my stash – although it does look better in real life than it does here!
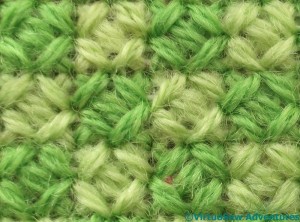
Rice Stitch
I chose Rice Stitch. This is probably the simplest way of using two colours for Rice Stitch, although later I may use the variant which has the corner crosses in a different colour to the underlying diagonal cross stitch.
Next time I may also choose to use three strands in the needle. Two are usually sufficient with a crossed stitch, but although this looks hardwearing , in real life it looks a little “thin”.

Spanish Knotted Feather Stitch
Naturally some of the threads I chose to use were from my extensive stash of variegated and over-dyed yarns. The Spanish knotted feather stitch running around the edge here is stitched using one of Stef Francis’s pearl cotton type yarns. This one has very little sheen, unlike the more standard pearl cottons, but the colour change brings up the texture of the stitch beautifully. I think this is the first time I’ve ever used that stitch, and I really enjoyed it.
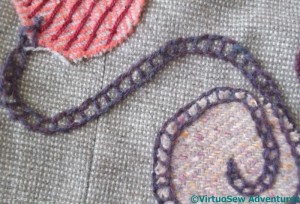
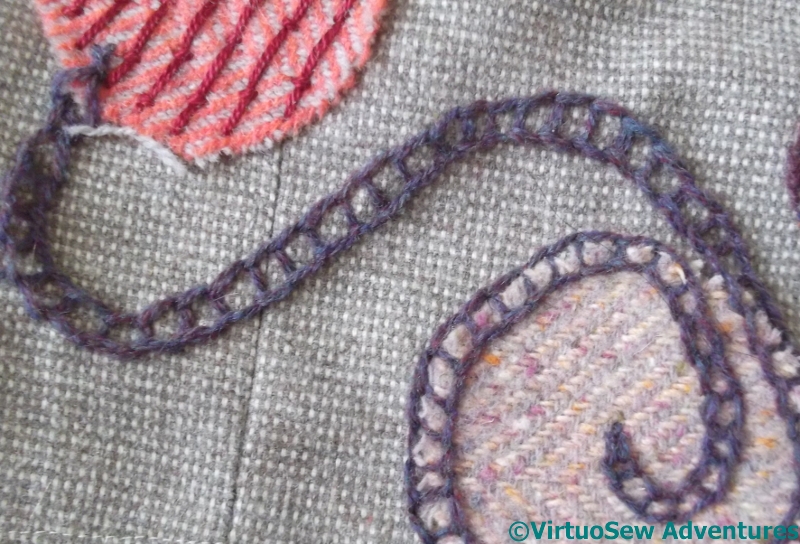
Spiral Of Ladder Chain
I realised that I had fallen somewhat into the trap of stitching around the edges of the circles, and wanted to create some sort of variation, so when it came to the pinky circle, I added a layer of widely-spaced burden stitch to alter the colour and effect a little. Then I used ladder chain stitch to join that circle to another.
I continued the Ladder Chain across the skirt fabric and around the rim of another circle, spiralling around it and then into the centre.
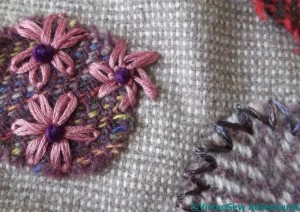
Glove Stitch And Daisies
More daisies, this time on one of the smallest circles. I may add to the grouping in due course, but for now, there are just the three pinkish ones with dark centres, one of them falling off the edge of the circle.
The shiny rayon in stormy colours around the edge of the other circle is glove stitch. It was surprisingly hard to bend the stitch around the circle. I expected it would be easier, since with a name like “Glove Stitch” you would expect the stitch to be intended to run around fingertips, which are much more tightly curved than this circle!
First Section
Once I had managed to get the canvas mounted on the frame, I could start stitching. Although the project is inspired by Crazy Patchwork, and is supposed to be random in feel, I always find it easier if I can give my randomness some structure, so I have worked out a few guidelines for myself:
- At least two colours in each patch
- Heathering will be permitted, but confined to the middle of the cushion
- Try to use crossed, slanted and straight stitch patterns in equal measure
- Don’t try to straighten lines – use partial stitches.

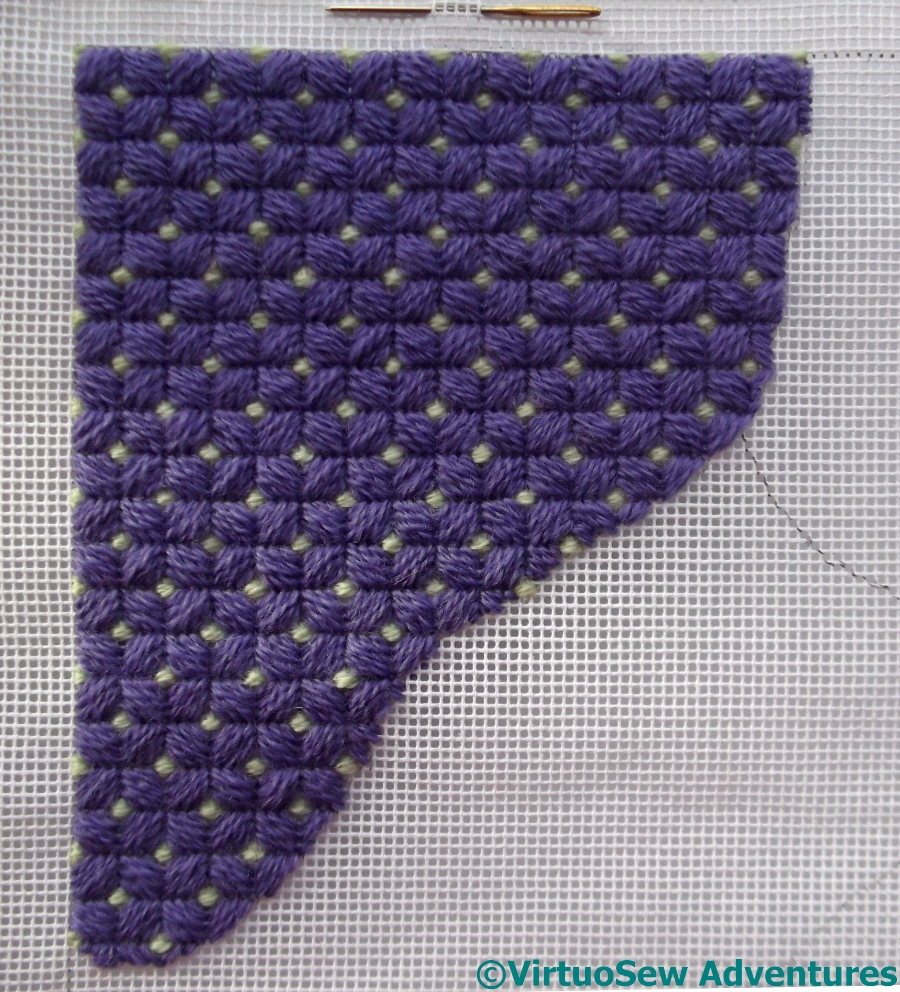
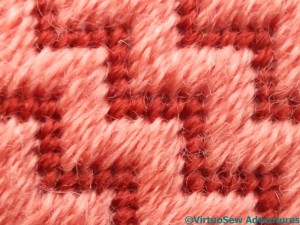
Brighton Stitch
They are only guidelines and I may ignore or break the rules later on!
The first section is worked in purple and pale minty green, using Brighton Stitch. I like this stitch. It creates a neat, geometric effect, covers the canvas well, and can be made as subtle or as dramatic as you like.
I’m also keeping track of the amount of thread I use. It will give me some sense, as I get nearer to completing the cushion, of whether or not I am likely to reach the end of the cushion or the stash first!

Florentine Stitch
For the second section, I decided to use the simplest and most basic of Florentine Stitch patterns. Only two colours, and a simple, regular zigzag.
I’ve found that three strands of the Paternayan are necessary for this stitch to cover the canvas, whereas for the Brighton Stitch I only needed two strands. The basic Florentine stitch is also terrifyingly quick to do. I realise this is an odd thing to say, but I want this project to last me a while, and if the sections turn out to be really quick, it won’t.
Second Section Added
It’s too early to draw any conclusions, but the first two sections also used about the same number of strands taken from the skein, even though in one case the lengths were used whole while in the other, two lengths from the skein produced three needlefuls!
I have yet to decide whether I will emphasize the joins, either by creating some sort of seam embellishment, or simply by back stitching in grey thread to make the edges seem crisper and sharper. That decision can wait until I’ve finished, not least because I suspect that I will need to see the whole thing at once before I decide!
Just as it does every winter, my work on my current Thistle Threads project has slowed to a crawl. The bay window where I have a decent light to work by is too cold to be inviting, and the grey, overcast, and rainy days result in very poor light even at the best of times. Given the effects of this past winter on other parts of the UK, the lack of light to embroider by is a very minor matter – but it does explain why canvaswork became so very appealing to me!

Gilt Sylke Twist Finished
However – trumpets, please! – I have now finished all of the Gilt Sylke Twist on the brim of the Glittering Nightcap! The photograph above does enlarge if you click on it, but I’ve noticed that it is slightly blurred at the edges. That isn’t surprising, as it is quite a long piece, and it was quite hard to get all of it in the frame at once.
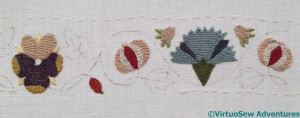
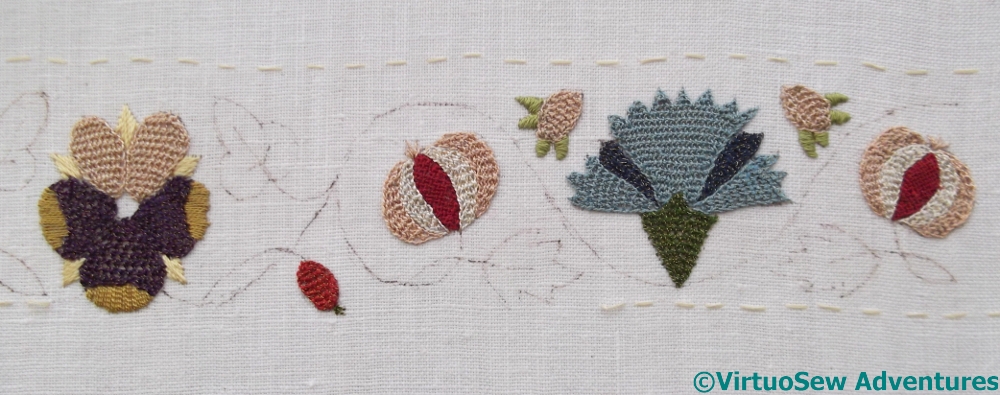
Half Of Design
So – to make it easier to look at – here is one half of the design as I have stitched it up. You will remember that I decided to work the brim slightly differently to the main section of the cap, so that when it was finished it would be even more of a sampler of techniques than it is already.
All the detached buttonhole with return was worked in the style I found in Jacquie Carey‘s book Elizabethan Stitches, in which the border of the stitch is integral to it. This in fact makes it rather easier to stitch – once you have a grip on how it works! – because you aren’t trying to stitch into a chain stitch border, so the thread isn’t quite so mauled about and the gilt wire doesn’t break quite as often.
I also substituted satin stitch for the sepals to create a change of reflectance. I’m now wondering whether the little scarlet buds should be taken out and worked in double padded satin stitch, too, maybe even in the silk thread used in the trellis stitch pomegranate centres, rather than the gilt sylke twist.

Tray – Poppies And Wheat
The design for this tray was embroidered by my Grandmama during the period when she and her sister and all their children were evacuated to Burton in Westmorland during the Second World War.
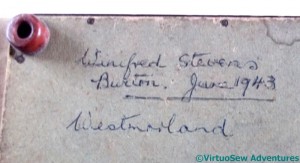
Signed On The Back
We know that because it has been signed on the back!
Besides, my mother remembers it being used on ceremonial occasions. It was always a trial – it’s very heavy (because of the glass), rather slippery (glass again) and doesn’t have much of a rim to keep what’s on it safe. Especially with four children and a dog in the house.
In fact Grandmama, and now my mother, both resorted to propping it up somewhere and using it as a cross between a picture and an ornament. It makes a rather large ornament, too. I’ve seen mirrors over fireplaces that weren’t much bigger!
And of course – again because of that wretched glass – most of the time you can’t really see the embroidery for the reflections. Which is a pity, because it is exquisitely worked, probably one of the pieces overseen by Grandmama’s embroidery teacher, Miss Hunter. Recently my mother decided to take it out of the tray, find some way of cleaning it of some of the discoloration, and mount it properly as an embroidery. Naturally we will find some way to remount the signature from the back as well.
Needless to state, this turned out not to be as easy as we might have hoped.