
Tag: Lotus Tile Fragment
Lotus Flower Coat – Difficulties!
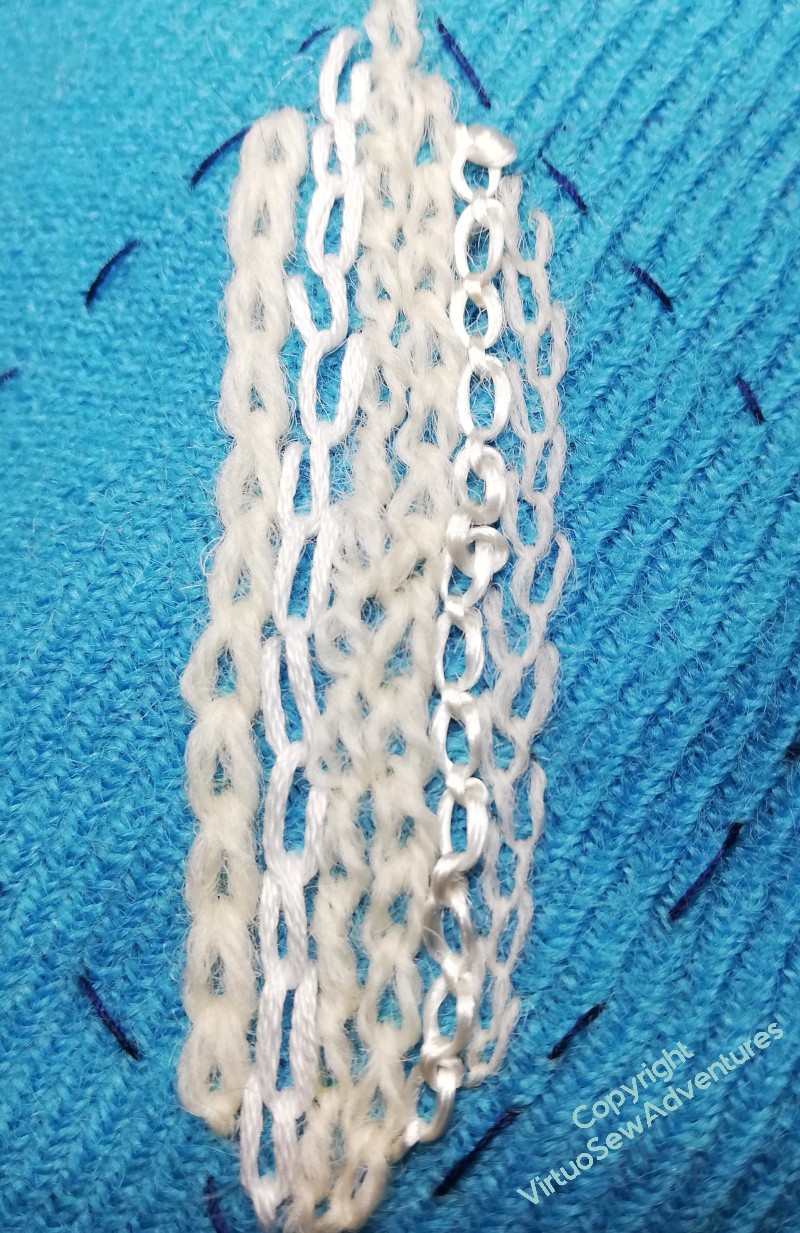
My idea for the stitching on the Lotus Flower Coat is that the petals will be filled with chain and feather stitch variations in a variety of threads and shades. White and cream for inside petals, white and cream with some lilac and pink on the outside petals and the half open flowers. I have plans for the leaves and stems, but we all know how my projects change under my feet!
This – one of the small petal tips that show the inside – shows how this developed in the early stages. I think the tapestry wool is too heavy, so that’s coming out.
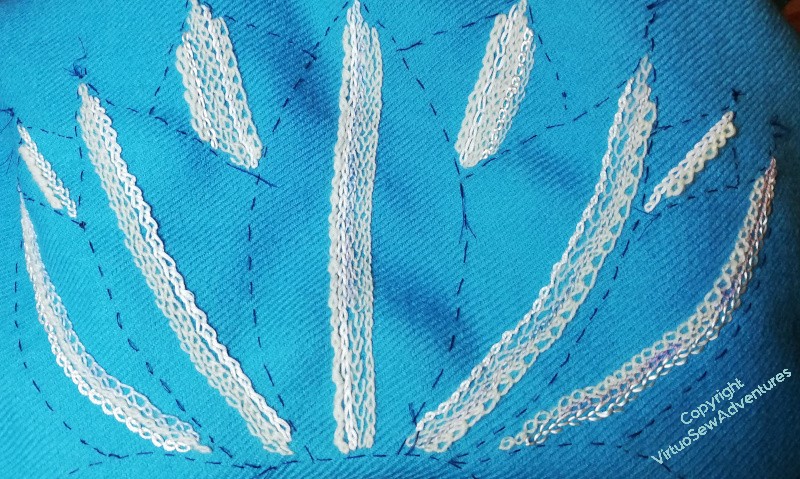
Mindful of the difficulties I sometimes have with repetition, I decided to work across the whole open flower at once, and at the point of writing, it had got to this, on the right. And at this point, I rather lost my nerve. I wasn’t sure what was wrong, or why, I was just rather unhappy with it.
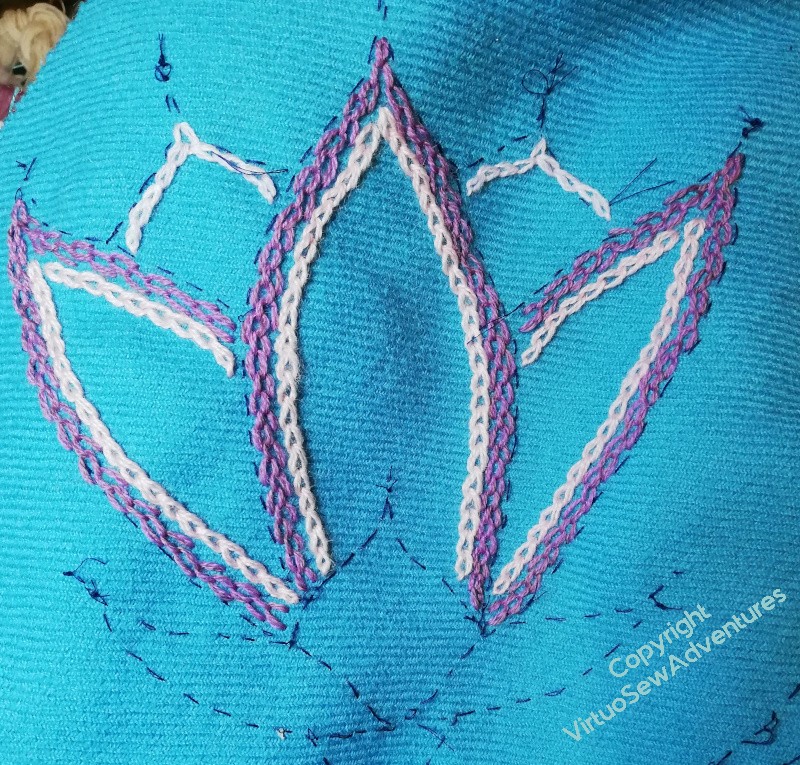
So I decided to try an entirely different approach on one of the half open flowers, to see whether that helped at all.
It has. I don’t like this at all, heavy, clumsy, not at all conveying the sense of enchantment I have from looking at my assorted source materials, or the sense of enchantment Mary Chubb describes in her first encounter with the Lotus Tile Fragment.
Look, I said that Dreams of Amarna had come to a satisfying and coherent conclusion – I never said that it would never guide my needle again!
Preparing the “Spots”
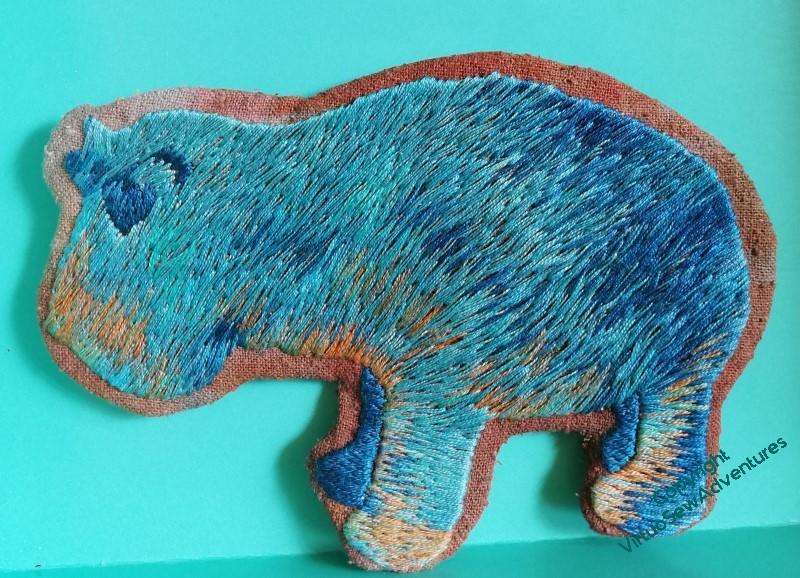
Once I had some sense that I knew which blocks went where, and what shape I wanted them to be, I could begin to mount them. Some of them will be distinctly tricky, such as the Lotus Tile Fragments, the Nile Tilapia, and (especially), the Faience Hippopotamus.
Since I also picked up a shoulder injury, all this was slowed down by the necessity to do little bits at a time, rather than a whole orgy of concentration.
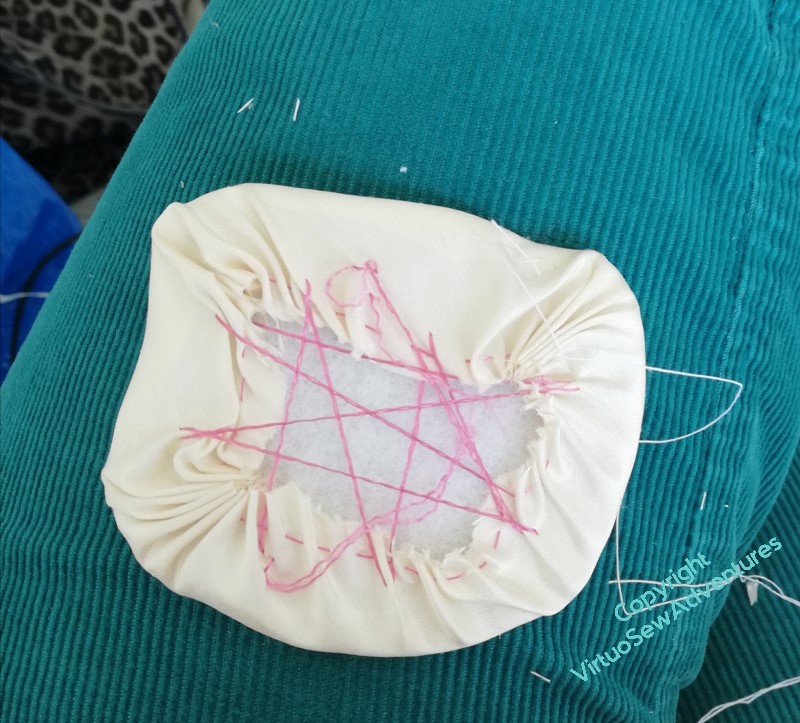
I worked on the Lotus Tile Fragment while I was stewarding an exhibition that some of my paintings were in. It’s a good idea to have something to do that’s small and easy to put down for that sort of occasion. It’s not a great look to loom at people who’ve come to stroll around, but equally, sitting, hands folded, demure and silent, might also put them off. Looking up with a friendly grin and then returning to something that’s plainly small and interruptible is a useful position between those extremes. ( I sold a painting, too!)
I had a very useful, and suitably faience coloured little box to hand in which all the pieces, so far, have fit rather neatly, keeping them dust-free and untangled.
It’s remarkably satisfying to see them all stacking up, and I have had an idea about details of display in the eventual, hoped-for, exhibition: I could do “record cards” for each piece in the style of something recorded from an excavation, thus providing information, but maintaining the theme.
So now, the question is – what information should I include?
The Lotus Flowers Finished
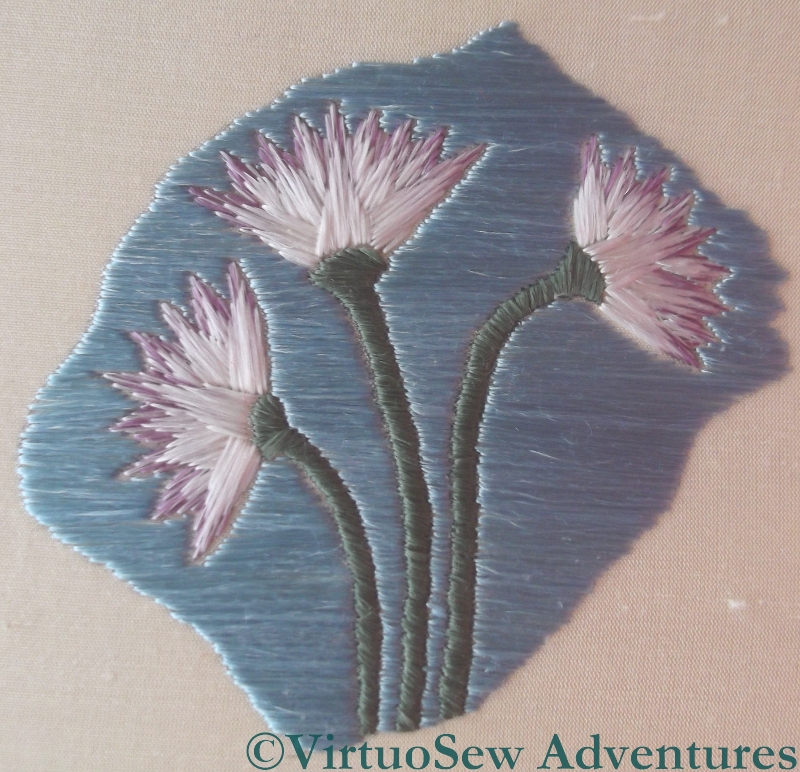
Silkwork Done
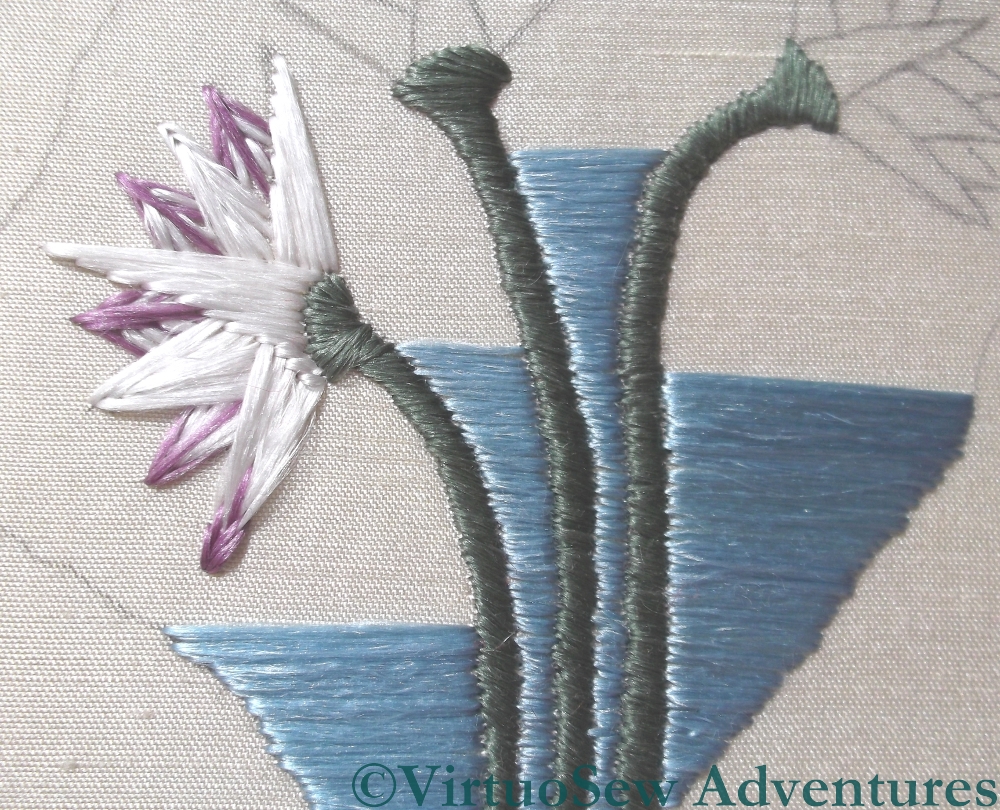
The laid silk satin stitches grew surprisingly quickly, in the end. I think of satin stitch as a very painstaking and tedious technique, but for some reason or other, I found the background of the Lotus Tile Fragment the reverse of tedious. I’m sure that the way flat silk spreads out helped with that, and likewise the increasing complication of working the satin stitches around the lotus flowers.
The horizontal stitches worked beautifully, creating the effect of a flowing stream behind the flowers. It can be hard to introduce enough movement into a design to prevent it seeming static, while at the same time avoiding any suggestion of hectic activity. In this case I think the balance between stillness and movement is reasonably well-achieved.
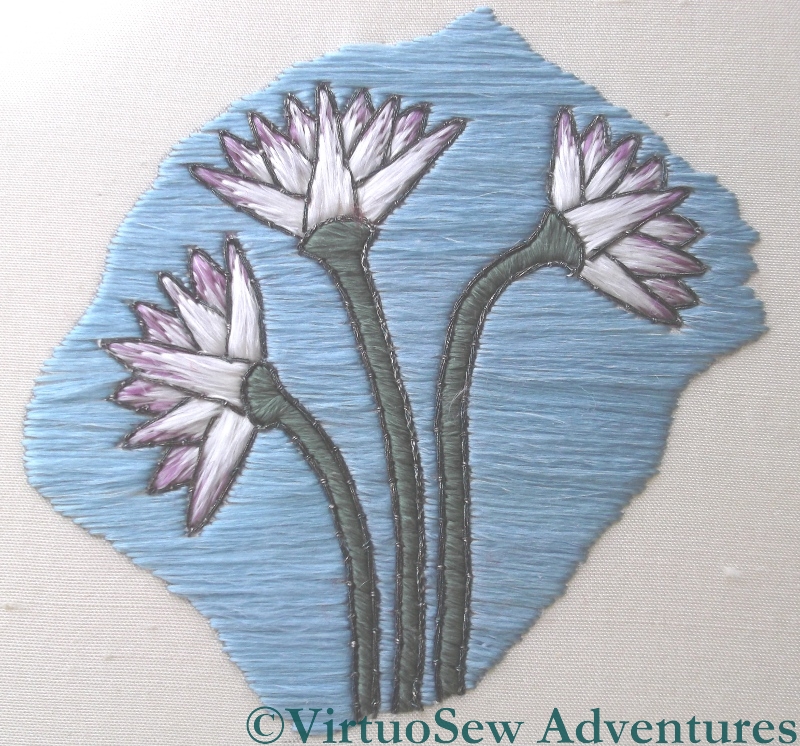
Outlining Done
Once it was done to my satisfaction, I spent a bit of time searching online for images of other Egyptian representations of Lotus Flowers dating from the Amarna period. I was a little disturbed to find that many of the photos in the search results were from this blog, which made my search a little self-referential, but in the end I decided that I should put an outline in, since most of the Egyptian images were outlined.
I was influenced in this decision by the fact that I really enjoyed stitching this little piece, and I felt that re-stitching it if the outline did not please me would be no hardship at all!
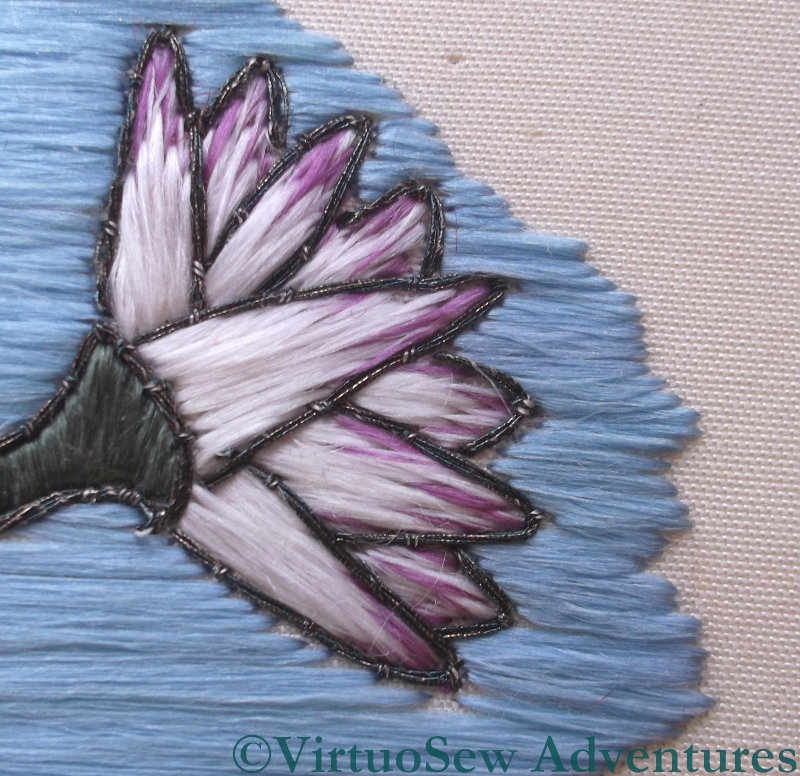
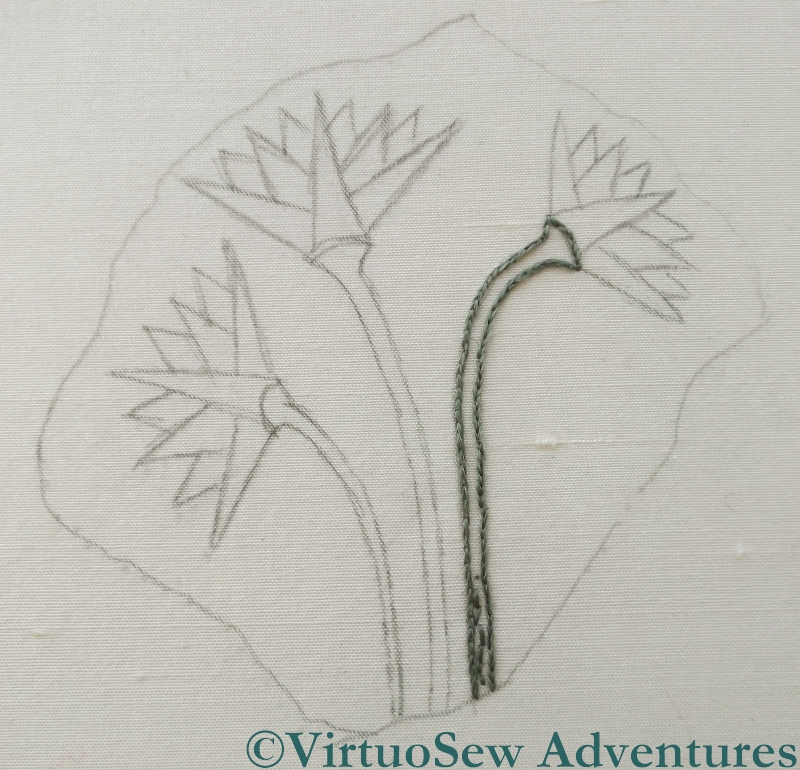
Detail of a Lotus Flower
I used a fine metallic thread, also purchased from Midori Matsushima, and couched it. For the stems I used three doubled threads and couched them – slightly twisting them – using a single doubled strand. For the flowers I used two doubled strands, couched with a single doubled strand. I’m not convinced that the different number of threads made a difference, but believe me, I won’t be unpicking it!
I’m pleased with it. The outlines do make it look a little more like some of the images I found in my search, and they will help the design to maintain its shape when it is overlaid with the gauze portrait.
Working On The Lotus Flowers

Blended Thread 1
Last week I posted about my progress on the Lotus Tile Fragment, and commented that I was rather concerned about producing a suitable effect. Remember, the original fragment was described by Mary Chubb as “faintly lilac-tipped”, and my first effort looked distinctly clunky. That wasn’t going to be suitable, because the Amarna-period art of ancient Egypt has a particularly graceful style.
Solid Tip
There were a lot of useful suggestions in the comments, and more than one encouraging email conversation as well (thank you all very much!), and I’ve enjoyed experimenting in the week since then.
I’ve now got two lotus flowers using blended thread, and one using solid colour tips, and I can’t quite decide between them.

Blended Thread 2
If it comes to that, I’m not sure whether even I, who stitched them, can tell the difference between the two blended tip flowers! In one case, I simply split my original silk thread in two, and laid the two halves side by side, whereas in the other, I split each half in half again, and reassembled them alternately.
I suppose that if I can’t really tell the difference, that suggests that splitting and reassembling once will be enough. I just need to decide whether to go for blended silk or separate colours.
Decisions, decisions!
Developing confidence in satin stitch
It may not seem as though much has been going on with the Lotus Fragment, apart from satin stitch, but I have in fact been learning a lot, and experimenting rather a lot too.
Choosing a background stitch
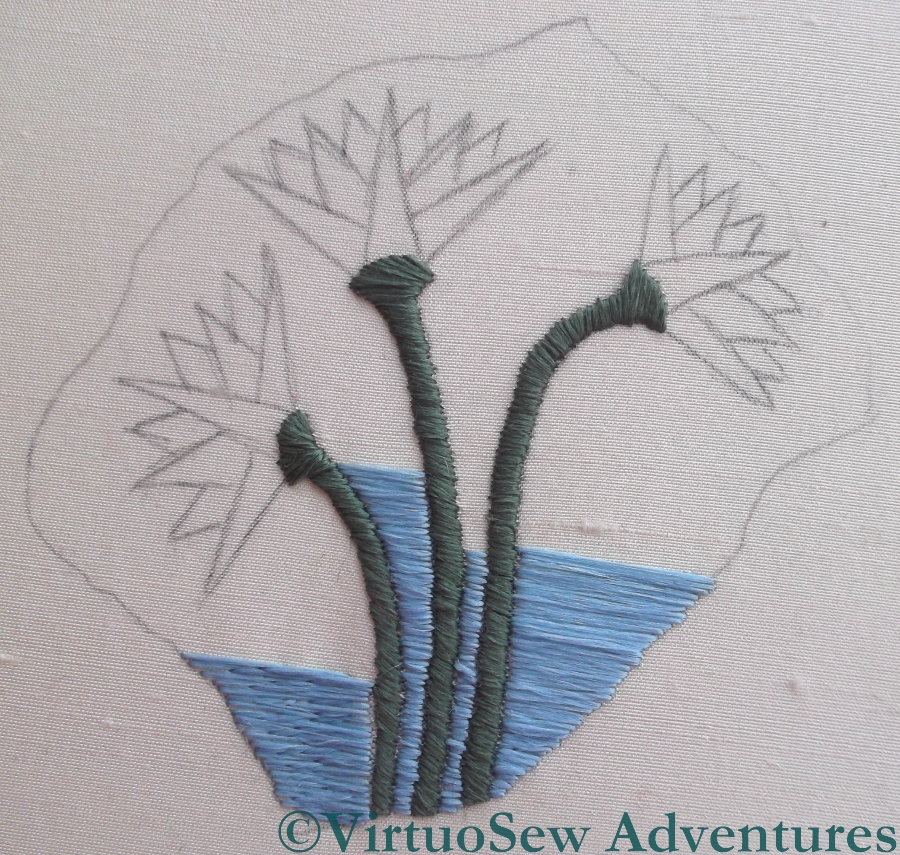
To begin with, I was intending to use a couching stitch for the blue background of the image. This is partly because I keep forgetting that the final Dreams of Amarna panels are not intended to be worn or leaned upon. The stitches would need to be quite long, which is contrary to my ingrained instinct to keep stitches short in order to make the finished article reasonably hard-wearing. But then, stitched on silk, using silk, it was never going to land in the washing machine!
After my short class with Midori Matsushima, I had a little more confidence in my satin stitch, and so I worked one side of the fragment in satin stitch and the other in Bokhara Couching, and then sat back and looked at them. Satin Stitch won, hands down. The flat silk spreads beautifully to help blend the stitches, and the reflectance of the silk filaments creates an almost radiant effect. So that small section of couching has been unpicked, and replaced in short order! In fact, the satin stitch fairly galloped away once I got settled and gained some facility with my mellor.
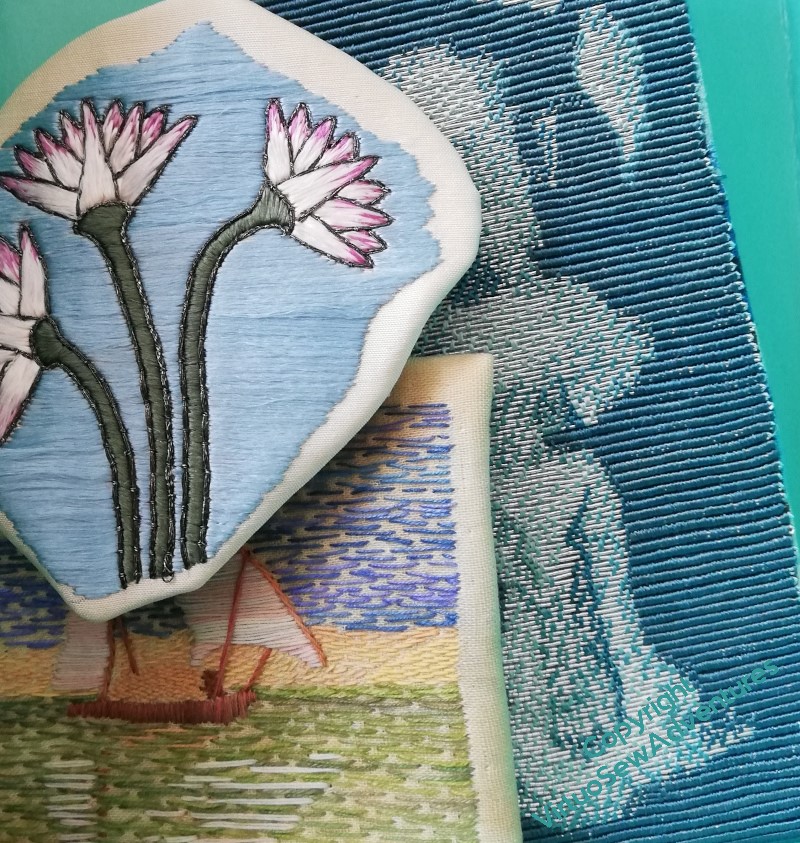
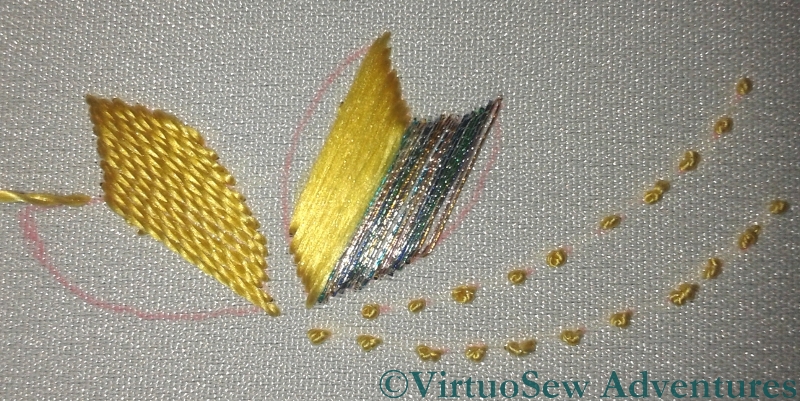
Lotus Flower Experiments
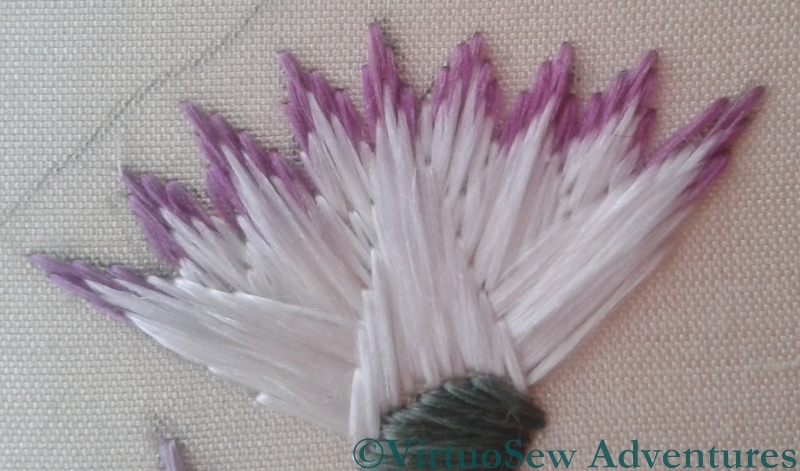
The lotus flowers themselves are giving me a little more trouble. As you can see in the second photograph, I have been trying various ways of stitching them. My challenge is that Mary Chubb describes the originals as “faintly lilac-tipped”, and so my experiments have two goals, not just one: I want to find the most effective way to use the silk to represent the lotus flowers, but at the same time it has to be a way that lets me tip the petals in the lilac without creating a clumsy effect.
The earlier petals use stitches that come to a point at the tips of the petals, crossing under a central stitch that seeks to smooth those tips. I am not happy with this – it looks clumsy and heavy, even though it makes adding in the lilac stitches fairly easy.
The later stitches use a more classical satin stitch, with the longest stitch on one long side of the petal, and shortening stitches creating the other side. This is better, and I think will be improved if I take all of the experiments out and then begin again, with the long stitch on the central axis of the petal and shorter ones to the side.
However, the challenge of creating the effect of the lilac tips remains. I want to blend the lilac and white stitches into one another, and for the life of me I can’t see how to achieve it, or even whether to stitch the lilac first or the white!
Progress on the Lotus Fragment

Lotus Tile Fragmen
I have chosen to work the Lotus Tile Fragment using Japanese Flat Silk, which I bought at last year’s Knitting and Stitching Show in Harrogate, from Midori Matsushima. This is rather an adventure, because I have never used flat silk before, except when I experimented with one of Stef Francis’s overdyed flat silks.
Suddenly, therefore, it rather matters to me whether I produce the effect I’m looking for, which was not the case with the Experimental Seahorse, entertaining and instructive though he was to do!
Last week , Susan of Plays with Needles quoted a Buddhist proverb in her blog – “When the student is ready, the teacher will appear“, and it turned out to be true for me too. Entirely by accident, I discovered that Midori would be teaching an introductory workshop in Japanese Embroidery techniques, not fifteen minutes’ drive away…
Japanese Embroidery Techniques
In two hours, there was only time for the merest scuttle through the techniques – making a twisted thread (we made a four-into-one), learning how to work a Japanese knot, how to stitch with the twisted thread and with the flat, untwisted silk, and finally how to use one of the fine metallic threads. As it happens, the techniques I have ended up using for the Lotus Tile Fragment are (understandably given my background) more Western than Japanese, but although I am intending to use flat silk throughout, it has already occurred to me that I might work an interesting alternate version using Japanese embroidery techniques. I just need Midori to come back and run another short workshop in s0me of the slightly less basic techniques…
Beginning work on the Lotus Fragment

Design Drawn
When I first wrote about the Lotus motif, in September (The Fragment of Tile That Started It All) it was because I wanted to buy materials for it at the Knitting and Stitching Show in Harrogate in November, which I duly did. And now that the Crock of Gold is finished, I can move on to the Lotus Tile Fragment! The colours I bought were soft and slightly greyish, rather than bright and clear, partly because that was all I could find, and partly because I was thinking more of the way Mary Chubb would have first seen the fragment, covered in dust.
However, just when I had got the design drawn out, I had a Dreadful Thought.
Split Stitch Edging
My intention for the final mounting of the two panels is to print a head of Akhenaten on a piece of gauze and stretch it in front of one of the completed panels, and a head of Nefertiti for the other. Just how fine and gauzy can it be and still create the effect I want of the Heretic Pharaoh and his Queen, brooding over the excavation of their city? How fine and gauzy a fabric can I find that will take a print? And how much brighter do the colours have to be to ensure that the jewel-like panels around the central panels shine like jewels, rather than being killed off by the gauze?
I shall finish this version, since I’ve started it, and I might, perhaps, need to begin learning about screenprinting, and experimenting with fabrics much sooner than I thought. If all the pieces I’ve worked so far need to be re-done in brighter colours, my current estimate will need to be revised outwards…
The Fragment of Tile That Started It All

Drafting the Lotus Flowers

Coloured Draft 1
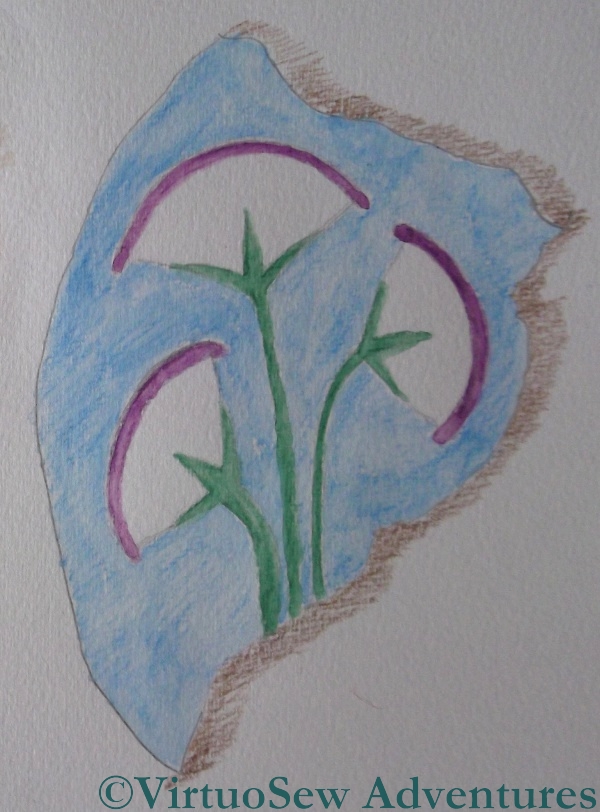
At the beginning of her book “Nefertiti Lived Here“, which is the inspiration for my “Dreams of Amarna” project, Mary Chubb describes a fragment of glazed tile she found at the bottom of a case full of excavation plans one wet and miserable February morning. That fragment, a genuine artifact from the excavations being undertaken far away in Egypt by her employer, the Egypt Exploration Society, ignited in her a hunger to go to Egypt and see for herself. Her description is so lyrical and vivid, I can’t possibly fail to include a representation in my panels:
The background was an incredible, adorable, hedgesparrow blue, the glazing just high enough to give it the same shell-like glowing quality. Against this grew three lotus flowers; the slender curling stems just firm enough to hold up the swaying heads of the flowers, faintly lilac-tipped within their dream-green, fanshaped sepals.
First Definite Draft
Coloured Draft 2
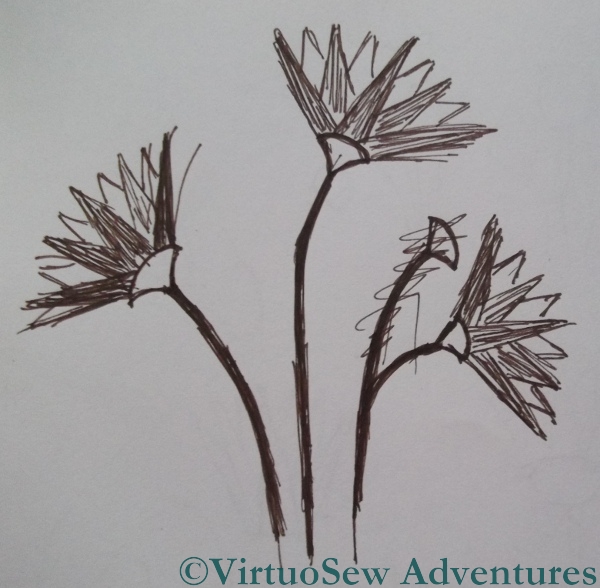
Unfortunately, she doesn’t include a photo, or a drawing, or even an accession number for the find so I can track it down for myself, so I’ve had to devise my own!
I’ve been looking through my reference books and photos to find out how the lotus flower was depicted in ancient Egypt, and I’ve found that there seem to be two versions, one with individual petals, and one a little simpler and more stylised. I suspect that the more complex version is more likely to be Amarna-period, so it’s a pity that my second coloured draft worked out better!
When I’ve settled on my design for the lotus flowers – and remember that these are only my first thoughts – I will need to work out how I can represent the broken edges of the tile, and even what shape to make the fragment. I may yet find myself finding a surplus tile and breaking it to see what happens.
Or would that be taking research too far?