
Category: General Embroidery
Getting Started on the Little Jacket
The basic technique I’m using for the Little Jacket is the same as I used for the Coat of Many Flowers, so the block colour comes from pieces of felt cut to shape. Most of them are the light and lofty felts I use with my embellisher, but this dark brown is slightly denser and more variable in colour. The variations aren’t as clear in photos as they are in real life, and I have a faint hope that if I wear it enough some of the lighter colours will fade a little more than the dark ones, and pull out the contrast a bit more.

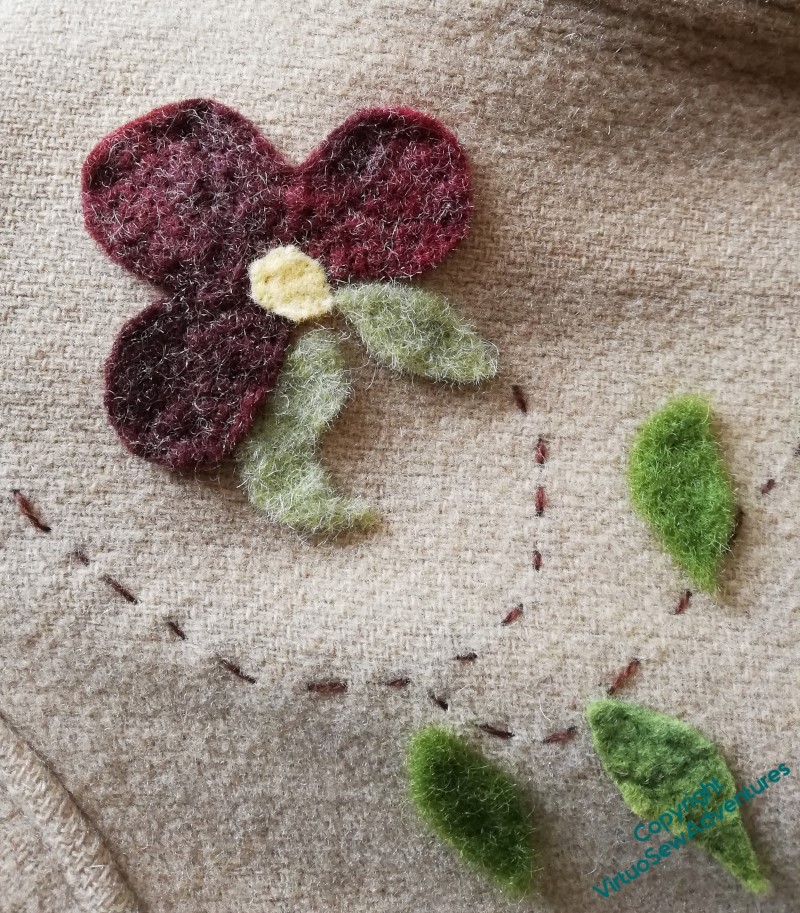
This is the first of the motifs I worked on. A long-legged variation on chain stitch on the central petal is set off by neat paired blanket stitch edgings on the outer petals. I’ve decided that the yellow is to be an accent colour, and I’ve ensured that I have small bits of it it scattered across the whole jacket. In this case I’ve not used contrast colours to stitch it down. I’m not sure about the whipped blanket stitch on the lower half, but I needed something to contrast with the single twisted chain stitches on the uper half, and I don’t think I will continue unhappy with it once the whole jacket is finished.
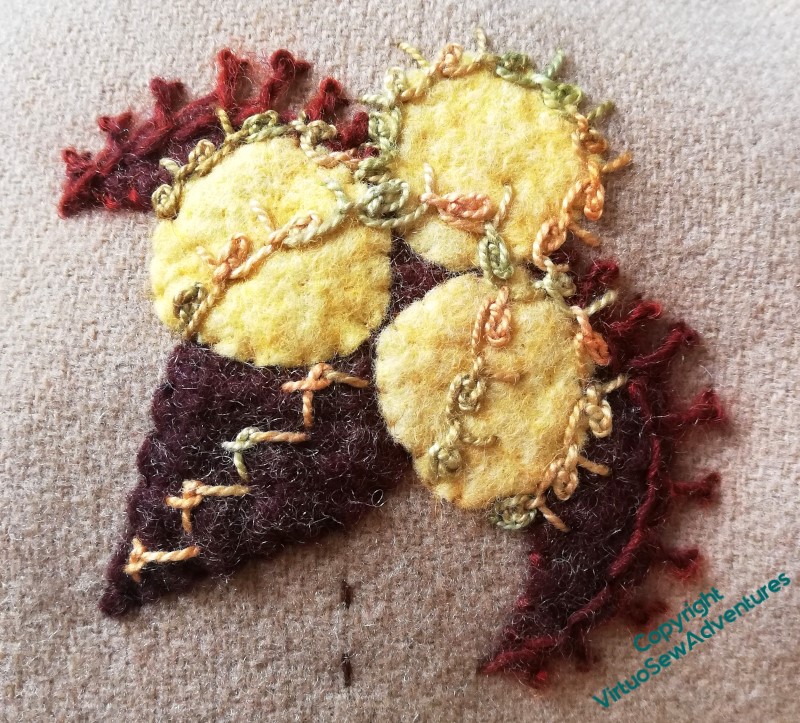
By contrast, I’m not at all happy with this one, and I don’t know what to do with it.
I like the crested chain edging on the brown petals, and I like the odd combination of rosette chain and blanket stitch in the yellow-green pearl cotton, but not how I’ve placed it or the effect it is creating. The stitch running in a spine down the lower brown petal is called “Wing Stitch” in the book I found it in, and again, I like it, but not what it is doing here.
I can see some unpicking in my future!
However, episode 66 of SlowTV Stitchery is now live, in which we consider the state of progress on Tynemouth Priory and plans for the sea, learn from Granny Weatherwax, and start planning more Watermill Stitcheries.
More Upcycling – a little jacket
This little edge-to-edge woollen jacket was inherited from a great aunt. She was much smaller than me (I’m not tall, but my great aunts were all tiny!) so, among other things, she’d turned up the sleeves to create cuffs, which has resulted in rather unattractive, and potential life-limiting (for the garment) wear patterns. Naturally, I’m not in favour of that. Nor do I especially cherish the look of me in unadorned beige, especially since the arrival of my “corona wings”, which otherwise I rather like. So the jacket is going to be jazzed up.
In fact, it probably won’t know what’s hit it, by the time I’ve finished!
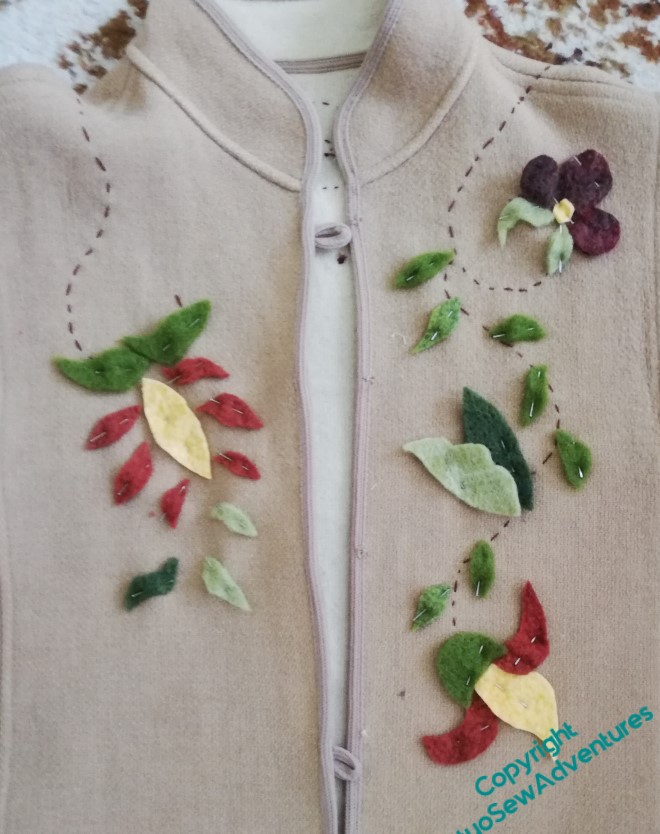
I am returning to the motifs from Grandmama’s tablecloth, which I also used on the Coat of Many Colours and the Jacobean Firescreen, so at least some of what you see over the next few posts will be familiar, but whereas the design for the Coat of Many Colours stretched across the skirt of the coat, the design here trails over the shoulders and down the arms.
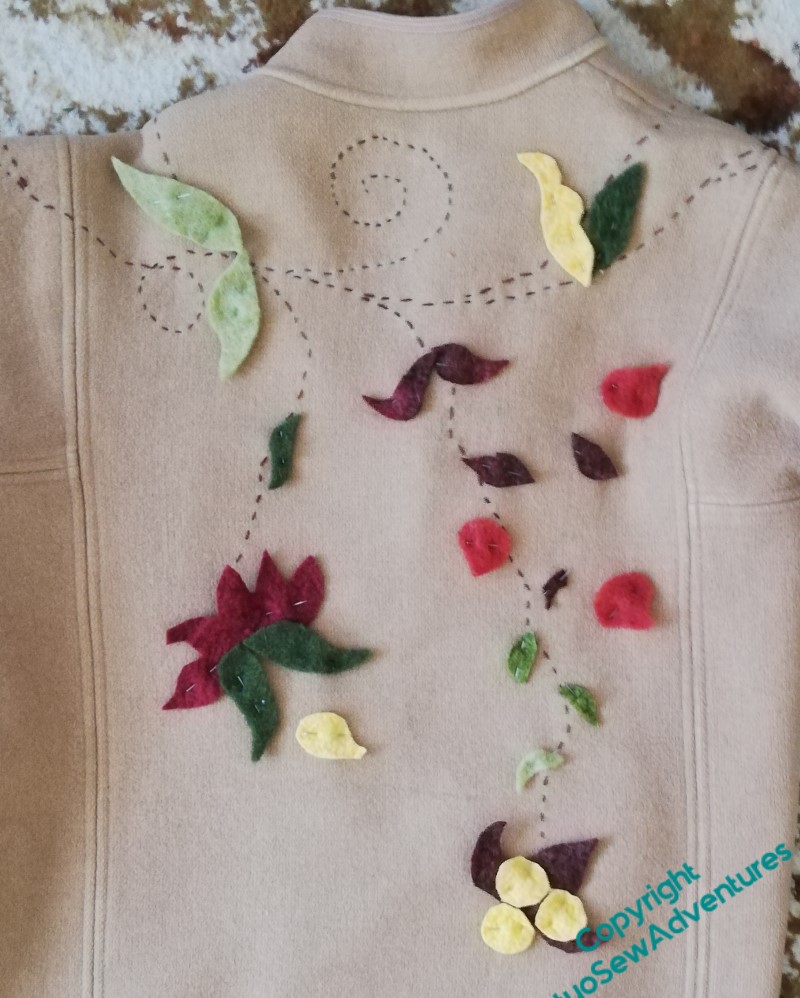
And whereas the design for the Coat of Many Flowers was planned in advance, with some care, the design for this one was put together in a series of adventures. First, my mother put the jacket on and I drew trailing stems around and over the jacket. Then I tacked them in with a single strand of Appletons Crewel Wool (then I won’t need to take them out!) and pinned cut out paper patterns of the motifs in their place.
Then the paper cutouts were replaced with felt cut outs. You can see from this picture of the back that I missed out some necessary stems here..
I wonder whether it’s luxuriant enough?
Meanwhile, in other news – Episode 64 of Slow TV Stitchery is now live, in which we discuss Impressionism in stitches and an Announcement is made..
More Needlelace Experiments
I wasn’t at all sure how to tackle the Oak Leaf Wreath Experiments, but as always, charging in head over heels is the most enlivening strategy!
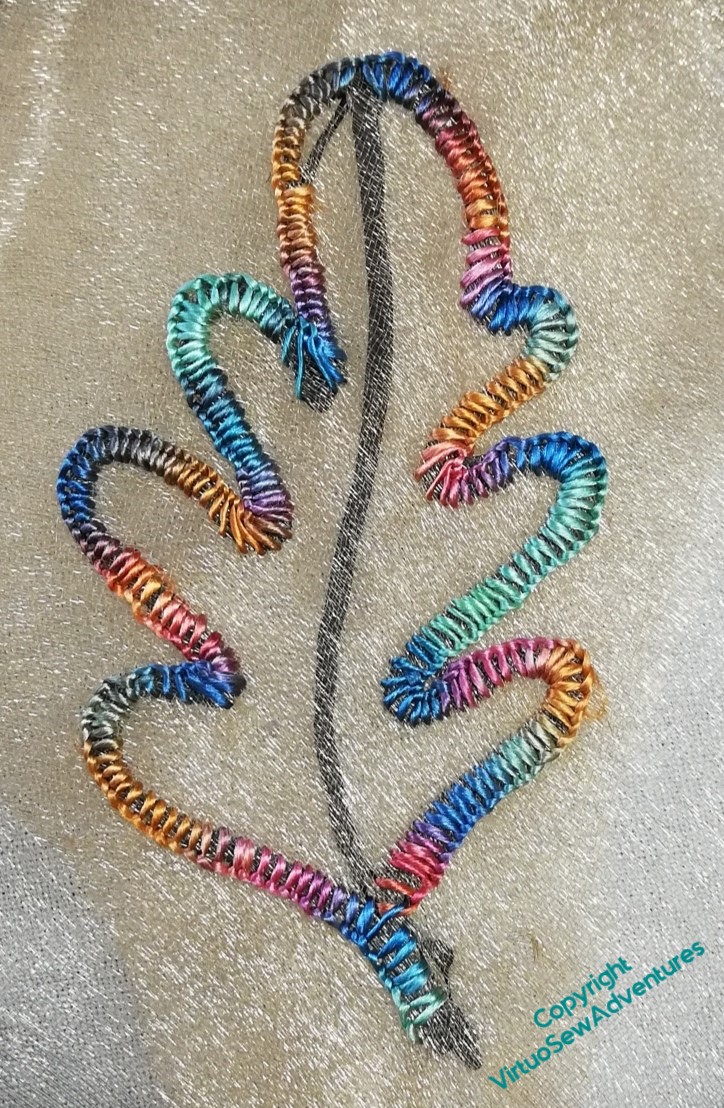
Having toyed with the idea of these drawn plastic oak leaves as the support for fabric leaves, I thought the next thing to play with would be needlelace, using different types of thread and different stitches. I want to get some sense of how to tackle a very difficult shape, and I think that even if I choose not to use the plastic pen, I will have learnt a great deal from the different combinations I’ve experimented with.
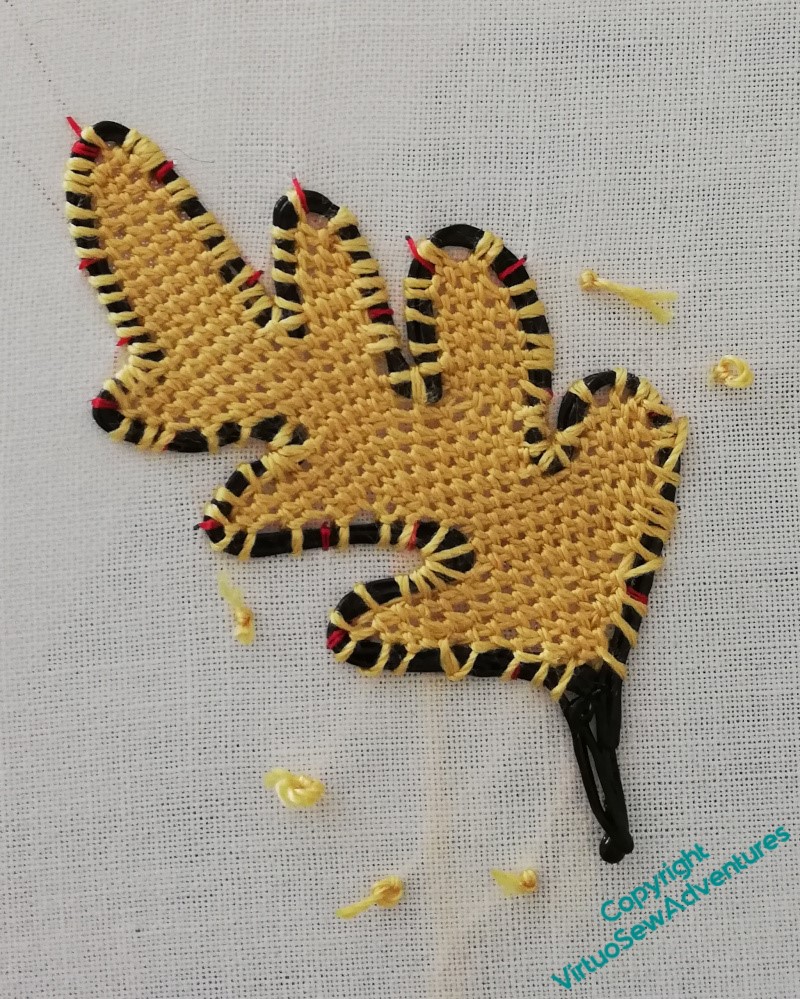
The first one uses a fairly heavy silk thread, not quite a perlé, but definitely not stranded. The stitch is the classic Corded Brussels Stitch.
I don’t think that this combination of thread and stitch leaves space to cover the plastic easily or neatly, and I can’t think of another way to tidy up all the ends I needed to use because of the uneven shape.
Also, my goodness, the plastic is slippery. Placement of rows might prove to be a bit of a challenge.
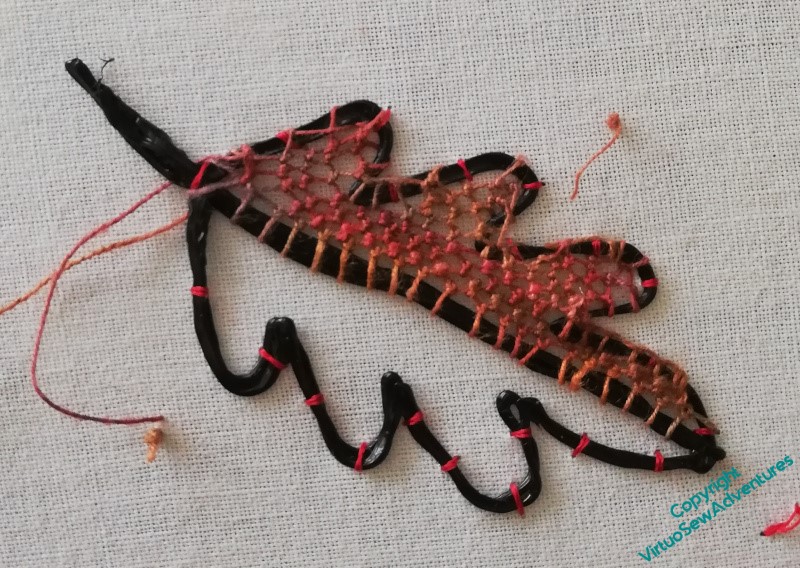
The next one is a rather finer linen thread, and I started from the extra line of plastic down the middle, which may have slightly simplified the stitching. There is probably enough space for a buttonhole stitch covering for the edge, but it was very hard to fit the needle around the more confined areas. Maybe I could devise some way to cover the edges once the leaf was off the backing?
The linen is a hard thread to work with, because the friction of the thread against itself it quite high, and since I chose a knotted stitch for this experiment, there was a lot of friction!
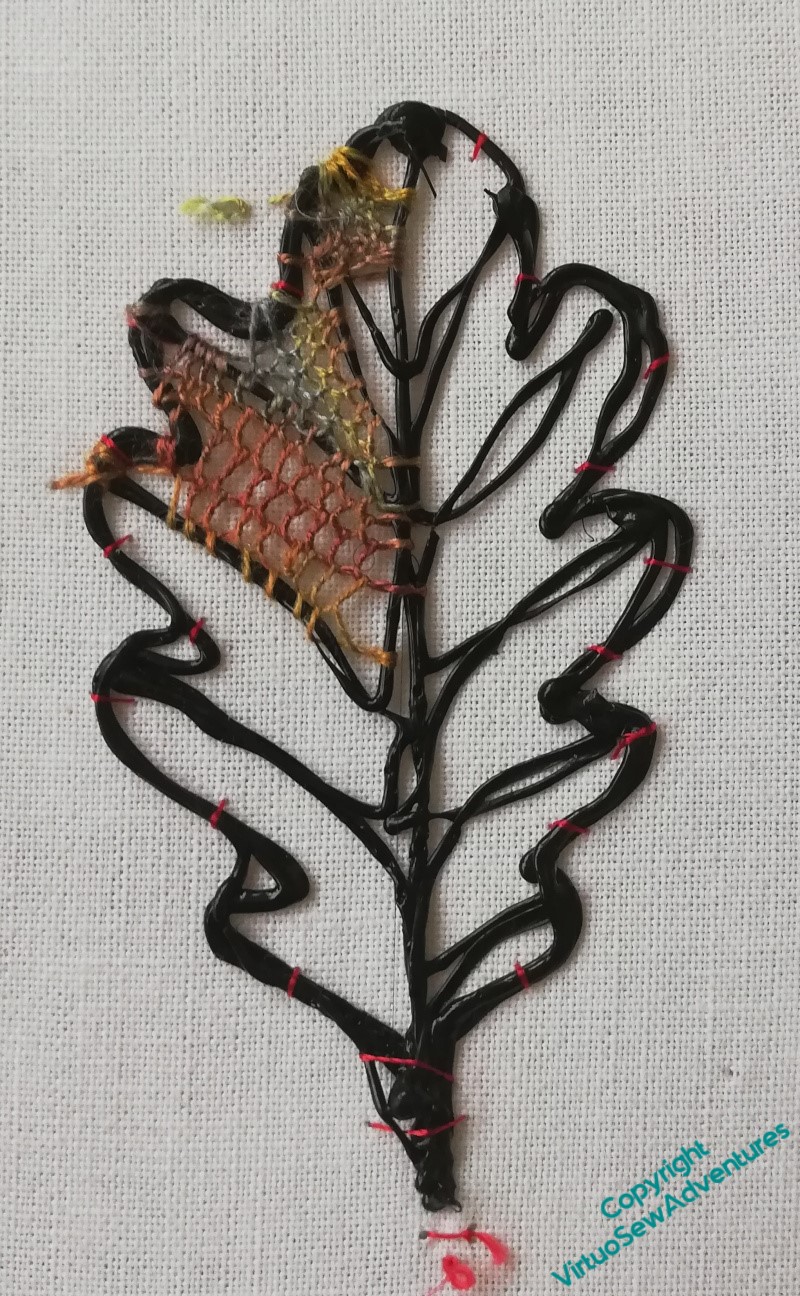
The final experiment for this week used a single strand of stranded silk. Caroline added veins to this one, and I tried to fit two different stitches around the veins and over the edges. Definitely not straightforward!
I found myself wondering about finding shorter needles for this project, maybe more like my Japanese needles, but blunt (the Japanese needles are super-sharp!). I’ve found the balance of the Japanese needles a bit challenging in the past, but fitting around the edges and corners of these shapes has also been a bit challenging.
What’s that saying about picking your battles?
And in the meantime, Episode 62 of SlowTV Stitchery is now live. In which we discuss Why The British Talk About The Weather, consider discoveries in the loft, and contemplate the placement of the needlelace slips.
Tynemouth Priory
Now then, this is an old friend, and everyone who’s been following my SlowTV Stitchery will be aware that since this is the Year of Finishes, I’ve decided to finish it. This is the first “Tynemouth Priory”, which I started, only to decide that the colours were all wrong against the Flag Sunrise, and I had to start again. I’m glad I did, because the second version fitted into the complete “Leaving The Tyne, 1915” very much better than this one would have done.
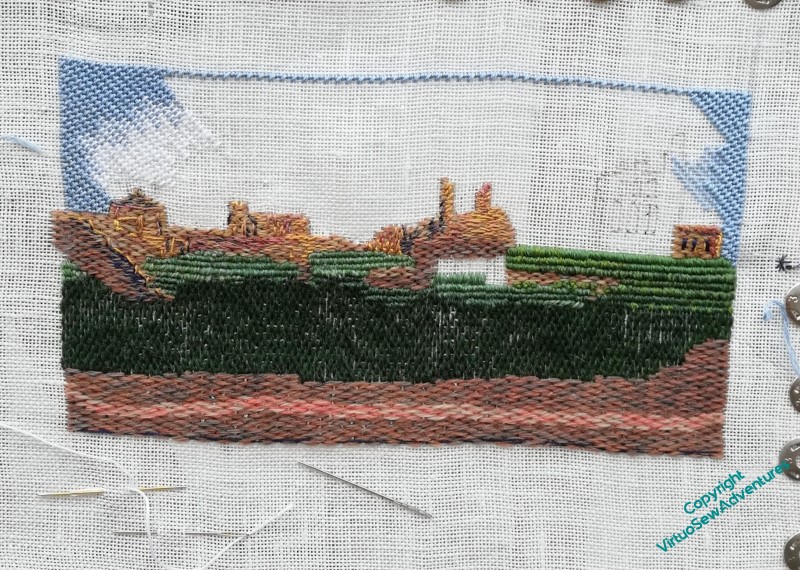
However, when I came back to it and started stitching again, I realised that the variegated thread I was using in the cloud may have looked right in the skein, but it wasn’t right when it was stitched.
Sigh.
Time to channel my inner Penelope, and unravel at night everything I had worked during the day.
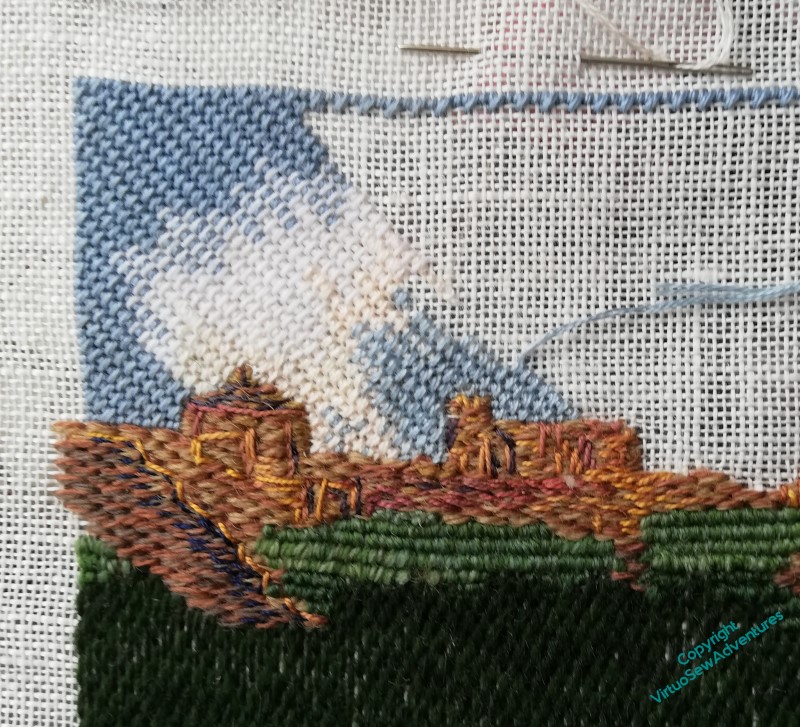
I picked out two slightly different pale cream stranded cottons to take the place of the variegated thread, and a stranded cotton in a slightly lighter blue than the coton a broder, to go near the horizon, and I’m now reinstating it, with interesting diversions to create cloud-like effects.
At this point I was still feeling very tentative, but I think the sky is improving as I progress across it!
Episode 60 of SlowTV Stitchery is now live. In which is considered making a virtue out of a necessity, arguments with the ghost of Miss Hunter, and a plea is made for an Introduction to the Picts, all supplemented with some meditations on literary sources for future projects.
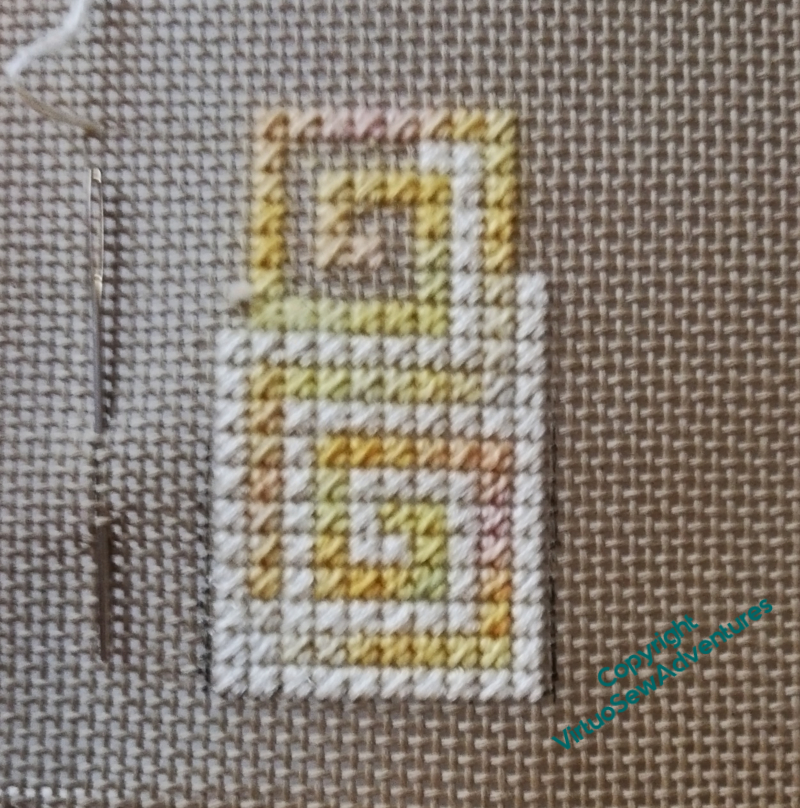
A nice, soft case for my lorgnettes
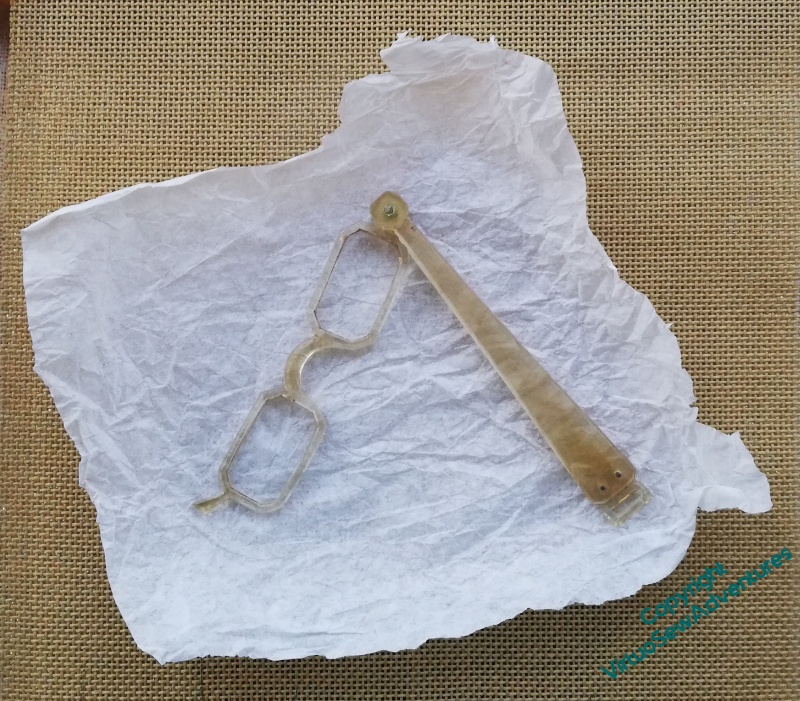
An old lady of my acquaintance once said to me, “Getting older is no fun, dear, but it’s better than the alternative”. Well, one of the effects of getting older – for me – is that I now need reading glasses. If I try to move while wearing my reading glasses, the results are sometimes disconcerting, sometimes positively disorientating.
I’d been wondering about what to do about this, until at the end of 2019, it occurred to me to channel my inner Lady Bracknell, and start wielding a pair of lorgnettes. I duly acquired some, with my usual impeccable timing (Ha!) at the beginning of March 2020.
Since then, of course, museums and menus have alike been out of reach, and I stowed the lorgnettes in my “Eve In The Garden of Eden” box in hopes of happier times to come. I’ve decided to get started on a case now, so as to be prepared for those happier times.
As I’m now dealing with the exhaustion consequent upon getting within sight of the finish on The Amarna Family Group (which has been going for nearly a year) and the Christmas Angel (begun around Christmas 2015!), I’ve been looking for small quick projects to reset myself, and this should be a good one.
This is a piece of 22 count cotton canvas I found lurking in my stash, and so far I think it will be very simple. I think six repetitions of the scroll will allow me to wrap the lorgnettes with a closing flap, and the light yellow (pearl cotton) and cream (stranded cotton) should make it eay to find in the depths of my handbag.
Episode 59 of SlowTV Stitchery is now live, in which we have almost recovered from the unpicking following last week’s stitching, and consider the particular delight of a fully-stitched fabric.
A Second Fishy Experiment

So, having learnt enough to be encouraged by the First Fishy Experiment, I embarked upon my Second Fishy Experiment.
Again, I drew out the borders, tacked the edges of the fish, and drafted the line of the bargello pattern using coloured sewing cotton. You can see how many times I thought and rethought what I was going to do in pencil beforehand!
I’m using the same bit of leftover canvas, so again my threads will be blended using nine strands of stranded cotton, although I’ve added a bit to the fish by using a variegated metallic machine embroidery thread as one of the strands.

This time the experiment is to see whether I can create something of the effect of looking through the surface of water at the fish. That means making the edges of the fish uneven, rather than crisp, so rather than an entirely different set of stitch choices for the fish, and compensation stitches everywhere, I will use the same stitch pattern throughout.
That in turn means that as I approach the edge of the fish on each row, I have a decision to make about whether to use the water colour or the fish colour for the stitch that straddles the edge. Fortunately, this isn’t the sort of decision I find unnerving or difficult to make, and even here, I think you can see that this idea is rather likely to work!
I realise that the post about starting the Second Fishy Experiment somehow managed to end up well behind the videos. Episode 57 of Slow TV Stitchery is now live, in which we muse on the effects of blending colours in the needle, the demise of Scottish pearling, and the final “It depends!” moment.
More Experiments!
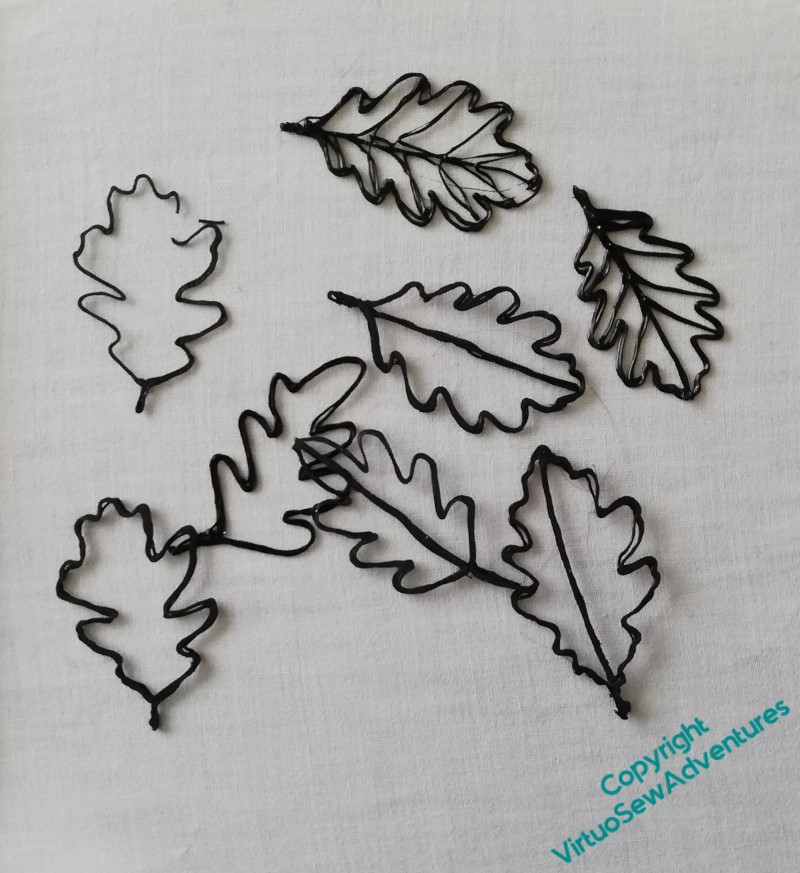
I have a rather nice circular wall mirror that my uncle passed on to me, which was his mother’s. That makes it close to a hundred years old, more than likely, and it occurred to me one day that it might enjoy having a stumpwork oak leaf frame.
Then one of the other embroiderers who joins in Hand Embroidery Hour on Twitter, the textile artist Caroline Hack, mentioned a new toy – a pen which allowed her to draw and create plastic outlines. Now, I know that there is perfectly ordinary cake-decorators wire to do the job, but I wondered whether this new material would add anything to the experiment. Like the star she is, Caroline drew a few oak leaf variations for me to play with, some with veins, some not, some using more passes of the pen, and some not, and posted them.
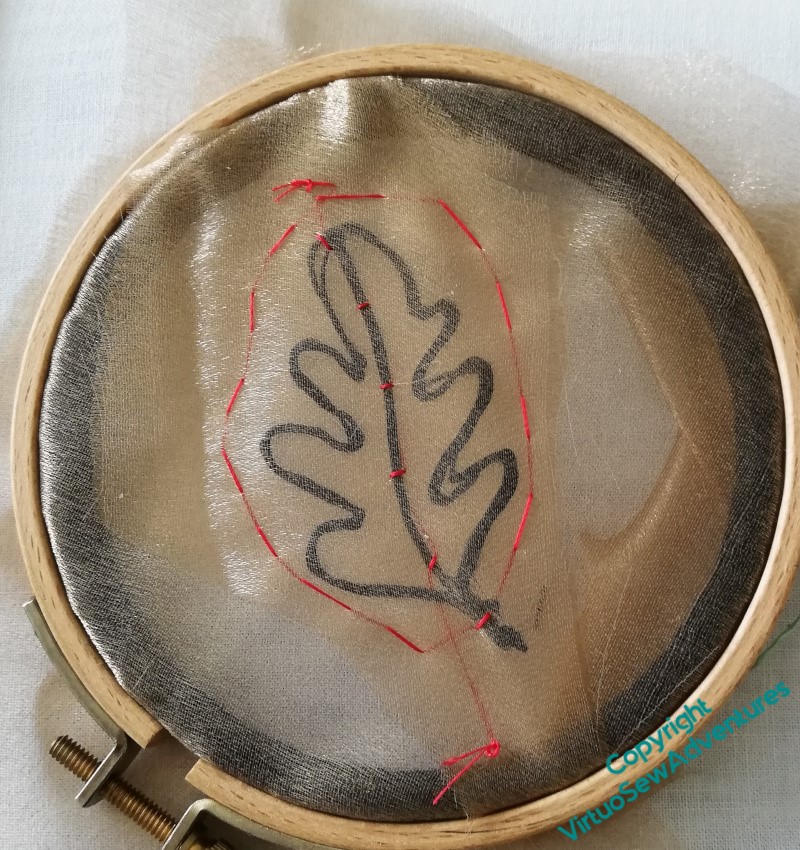
My first experiment plays with gauze. I’m thinking that the oak leaf frame might include some fabric leaves, as well as needlelace. After all, the mirror is a foot across – a wreath would involve a LOT of leaves!
So in this case, I have entrapped my leaf shape between two layers, tacking roughly around the edges to control the second piece of gauze, and very carefully down the central vein so that the leaf shape would stay where I wanted it to. Even by my standards, this is an odd proceeding…
I thought that while I was throwing experimental ideas together I would see whether the slight “spreading” qualities of floss silk help to cover the plastic outline, because gauze tends to ladder if you stitch it too closely. I don’t mind that if it’s part of the plan, but it’s better to know how to avoid it if you want to!
It was certainly an interesting experience. I didn’t quite get the floss silk to spread as much as I might have hoped, and there were some rather tense negotiations between the needle and the few points where there were two separate lines in the leaf shape.
I haven’t yet had the nerve to cut it out!
Episode 56 of SlowTV Stitchery is now live. In which I continue to make progress, almost silenced by the unnerving freedom offered by a Year of Experiments..
First Fishie Experiment Finished…
The background of freeform Bargello was rather entertaining to do. Working using nine strands of stranded cotton allowed for some subtlety in the colours, combining various blues and greens in different proportions and shading them into one another, sometimes gradually, sometimes stongly. I was surprised, sometimes, when progressively adding a particular colour, to find that it didn’t make as much difference as I expected – but this is why we experiment!
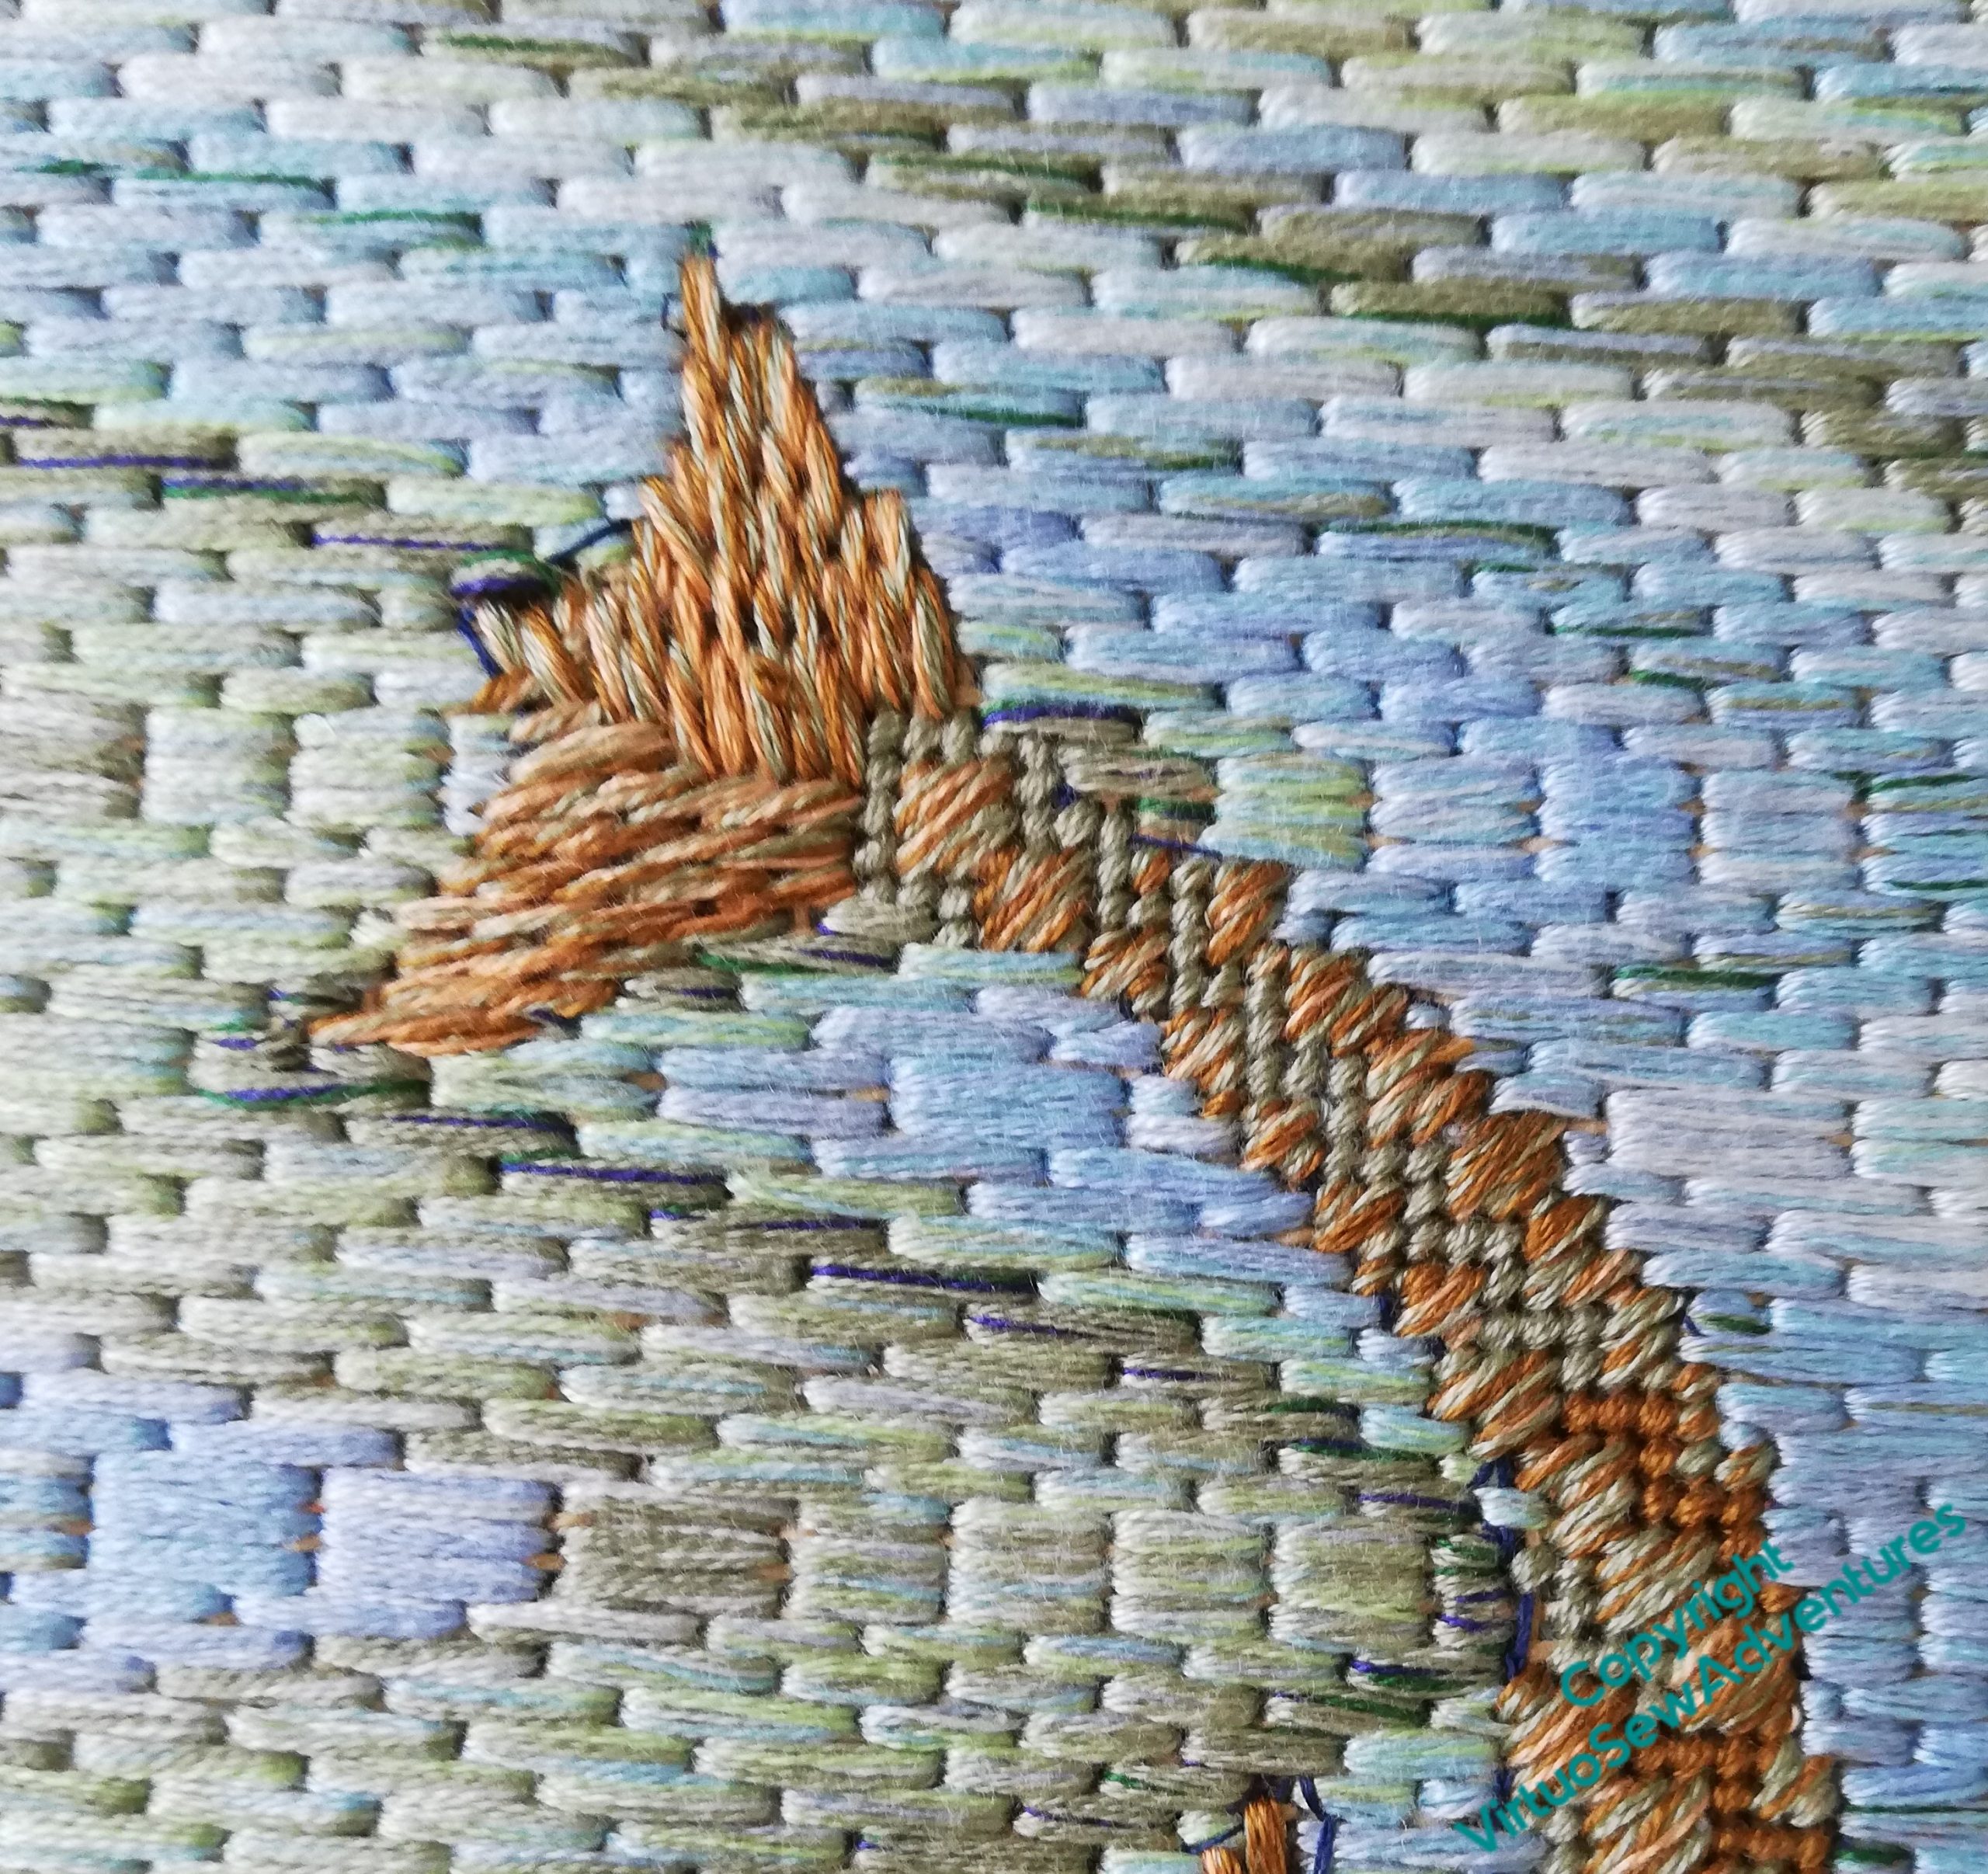
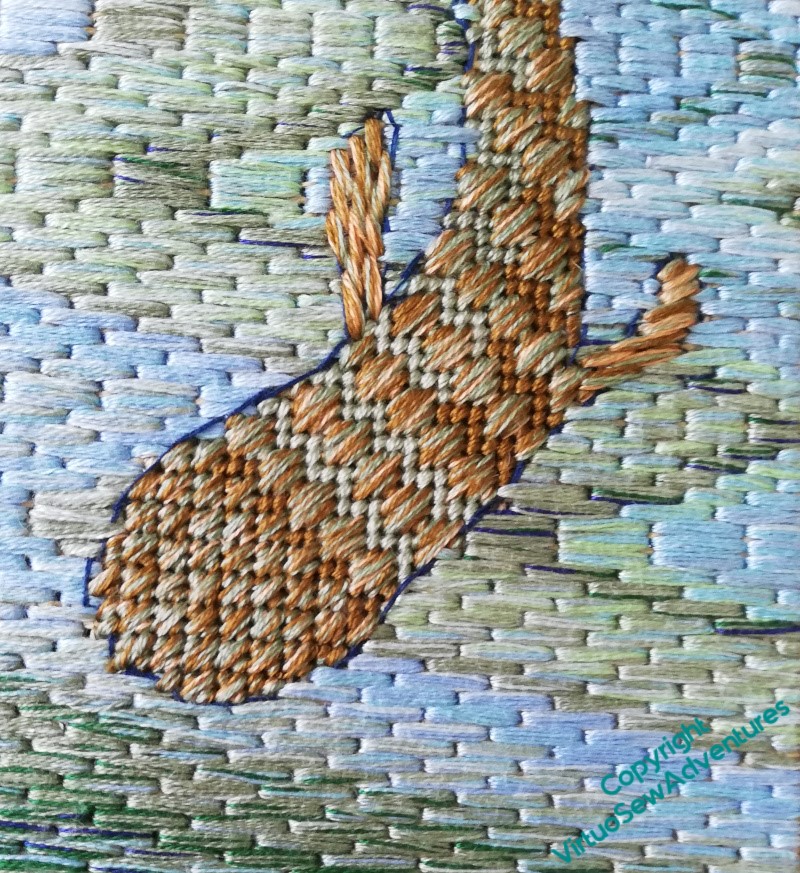
Once I came to the Fishie himself, there was a bit of puzzlement. I wanted to have a different pattern for the head, the fins and tail, and the body. I wanted a vaguely “scale-like” pattern, and I wanted to make sure that the stitches were at a different orientation to the water.
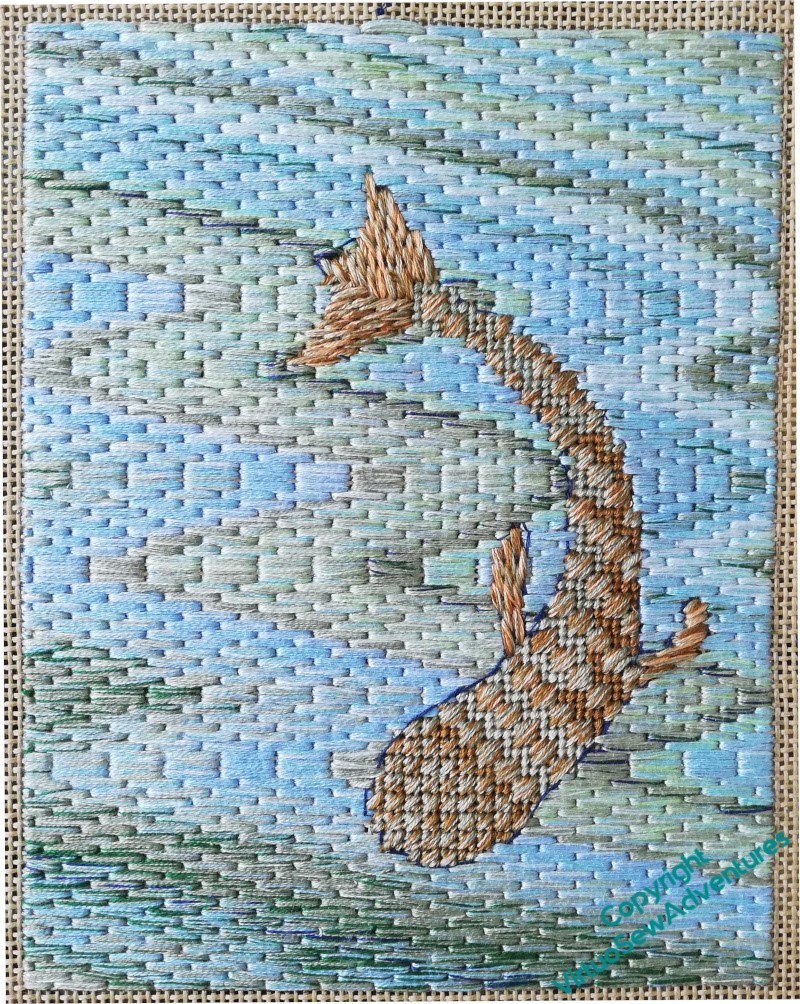
I settled on Moorish Stitch for the body, Mosaic Stitch for the head, and Encroaching Gobelins Stitch for the fins and tail. And I left in the tacked outlines. They only show in a few places, and I think they give the impression of sketched lines, which is quite suitable for an exploratory piece. I’ve also left out the eyes, since I’m looking from above.
Looking at it now, I’m pleased with the sense of flowing water that the bargello nearly creates, and the fish is interesting, but maybe not entirely successful. Some of the edges and joining points are a little clumsy – but that may be because this is an experiment, thrown together to see what I learn.
I’ve had at least one idea for another fishy experiment, so you will be seeing more of this sort of thing…
And indeed, Episode 54 of SlowTV Stitchery describes the beginning of the Second Fishy Experiment, in which I begin a second fishy experiment, this one attempting to give the impression of the fish seen through water, making some slight changes to the form of the freeform bargello, and anticipating tussles with my very leftoverish leftover thread.
Seeking fictional needleworkers
One of the joys of this past year has been the “Georgette Heyer ReadAlong” on Twitter, founded by @MissElvey. In fact, do read her account of why and how she started it. It spun off quizzes via Zoom on Christmas Eve and New Year’s Eve (I think I’m right), and so far two Zoom sessions of book recommendations, which have both added substantially to my list of Authors I Enjoy.
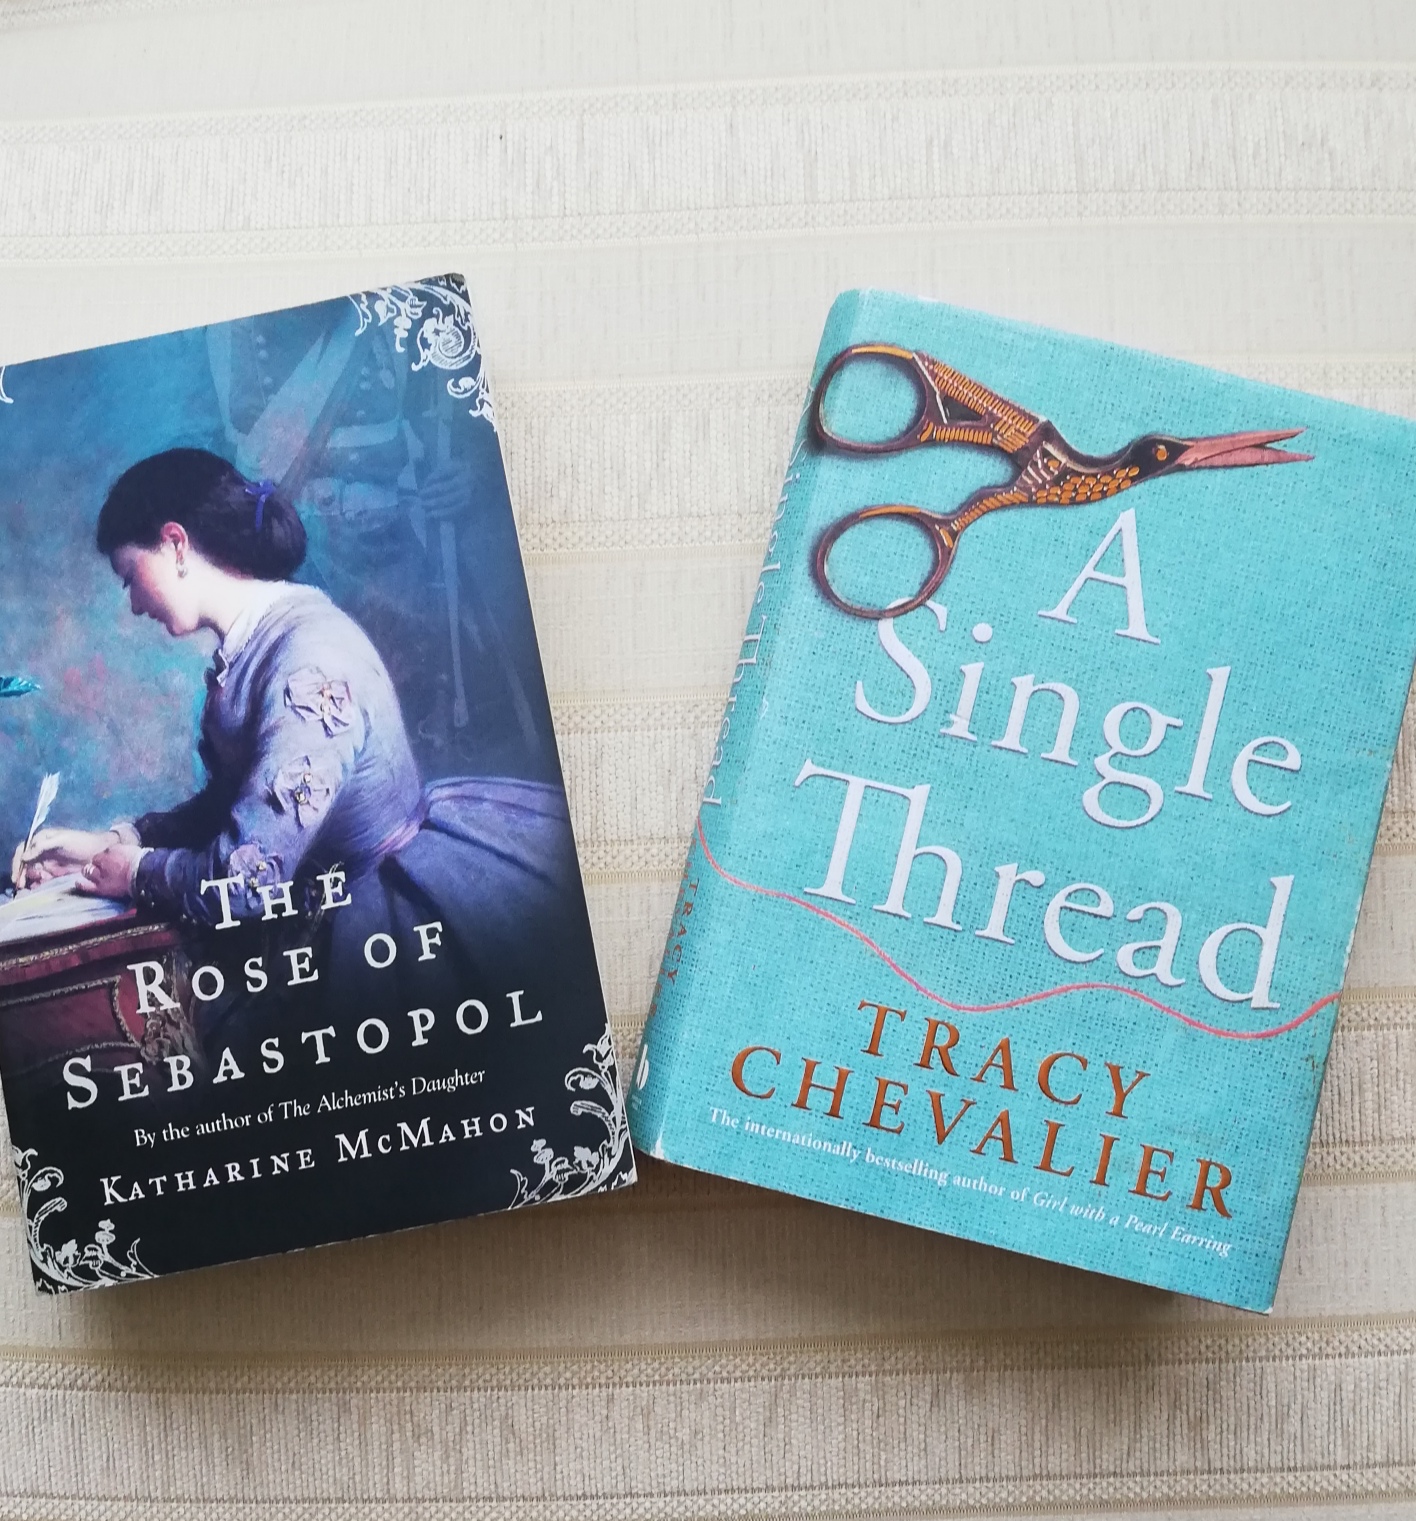
“The Rose of Sebastopol” was recommended during one of those, and quite apart from the fact that it’s the quiet, conventional cousin that goes off and adventures, the striking thing about the book is the very prominent part that needlework plays in it. The main protagonist is a highly skilled needlewoman, and needlework becomes both her refuge and her superpower as she uses it to transform herself and those around her to meet challenges she never expected to face.
Reading it, I realised that in over forty years of voracious reading, I’d encountered very few books in which needlework of any description played a prominent role. I thought a bit harder, and came up with Tracy Chevalier’s “A Single Thread”, in which the main character joins the Winchester Broderers, learning needlework almost from scratch.
So I have started asking for suggestions on various social media, and on SlowTV Stitchery and putting together a list. There have been more suggestions than I expected to find. In a few days, I will put the list on a separate page you’ll be able to find across the top of the page, and I’ll add to it any that are suggested to me, but bear in mind that I won’t have read them all yet, so I can’t offer personal recommendations!
The eagle eyed will have noted that my Ko-fi button has a specific aim now.
With the exception of one last piece to finish (and you will be seeing that, I promise) I believe “Dreams of Amarna” is now finished and just (just!, she says, whimpering quietly) needs to be assembled for display.
I’ve put so much effort into it that I would like other people to see the various pieces, but in order to hold an exhibition, as well as the excitement of preparing things for display, there will be supporting materials required. I don’t even know what those are yet, and I would be grateful for any support in arriving at the start of that adventure..
Advice also welcome!
In the meantime, please enjoy Episode 53 of SlowTV Stitchery, in which we continue to search for needlework in fiction, accompanied by the string quartets of Maddelena Lombardini Sirmen.
Finishing the Stash Busting Cushion
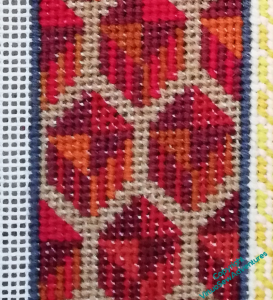
Remember this? Remember how suprised I was at just how much I was enjoying canvaswork?
I found the last pattern in “Victorian Needlepoint” by Freda Parker, another one inherited in a bundle. I keep meaning to have a good rummage in that bookshelf, and work out what I want to keep, but as it is, it makes a good resouce when I’m looking for “something, I don’t know what, but I will know it when I see it”.
Since I’m stash busting, I used several different skein remnants for each colour on the chart, so the pattern has more variety than drawn. There are three shades in the very darkest sections, and I was surprised by how little difference two of them showed once they were stitched. You learn things at the oddest times.
That panel is the last, by the way, because at this point I ran out of canvas!
It does, however, make a squarish, ornamental panel. If I can find some suitable fabric, I can give it a backing and turn it into a cushion.
Episode 52 of SlowTV Stitchery is now live, in which I challenge you all to name some works of fiction in which needlework has a prominent and positive role…