
Tag: perseverance
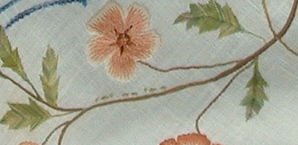
Tiger Lilies
Tiger Lilies – Long View
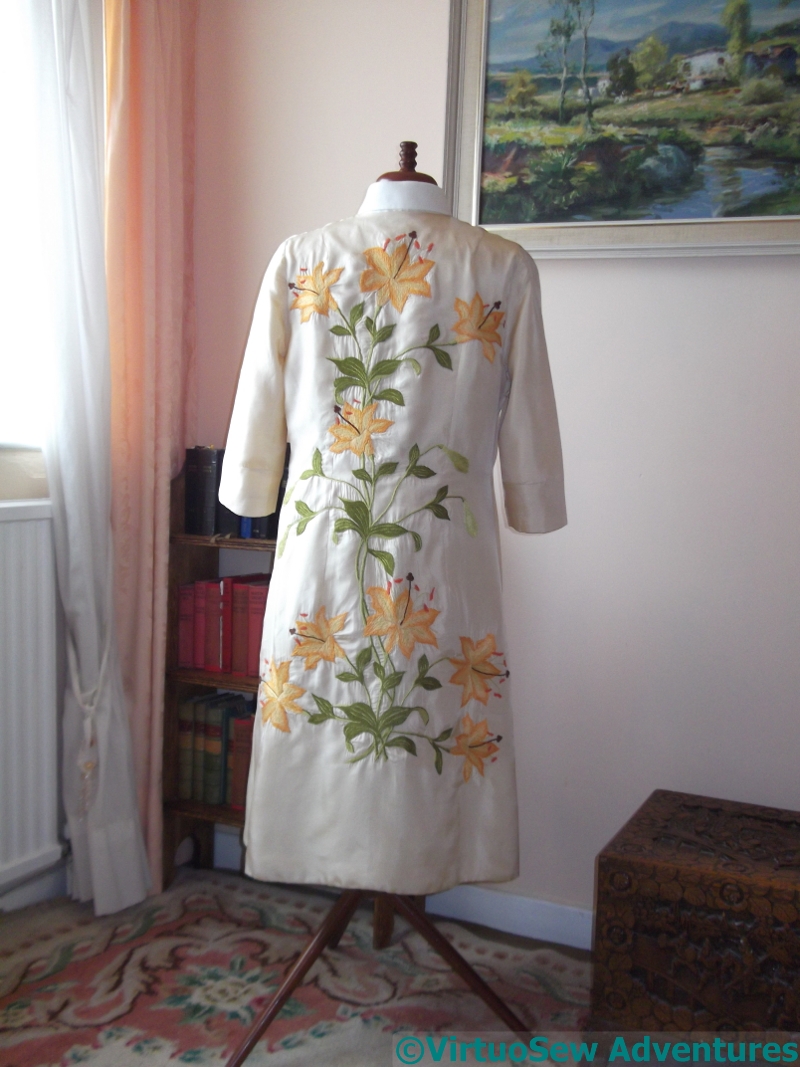
This rather fabulous coat was a collaboration. My mother made it for herself to wear at a friend’s wedding in the early nineteen-sixties, and when she began to run out of time, Grandmama stepped in and stitched like a whirlwind to get it finished!
The original outfit was a silk dress and coat combination, a very simple sheath dress, and this edge-to-edge, three-quarter sleeve coat. The front is completely unadorned, because, after all, at a Church wedding people will mostly see each other from the back!
The design of Tiger Lilies is from a transfer. Actually, we think it was three of the same transfer, cut and put together to create a design that fit the coat back. After the darts had been put in…

Tiger Lilies – A Flower
I’ve seen a few cream running stitches which suggest to me that, rather than using the transfers as transfers, the design was stitched through the paper. Given the sensitivities of silk, that was probably very sensible!
The embroidery is worked in stranded cotton. It’s all very simple stitchery, long and short stitch, stem stitch, French Knots, and a few buttonhole wheels.
It relies for its effect not on complexity of stitching, but on the colour and pattern combination.
If I’m going to be picky, the silk was a bit light for the stitching – although the puckers may be a result of years and cleaning, as I can’t imagine Grandmama, after Miss Hunter’s training, would have stitched with such tension, and no more would my mother, after Grandmama’s training!
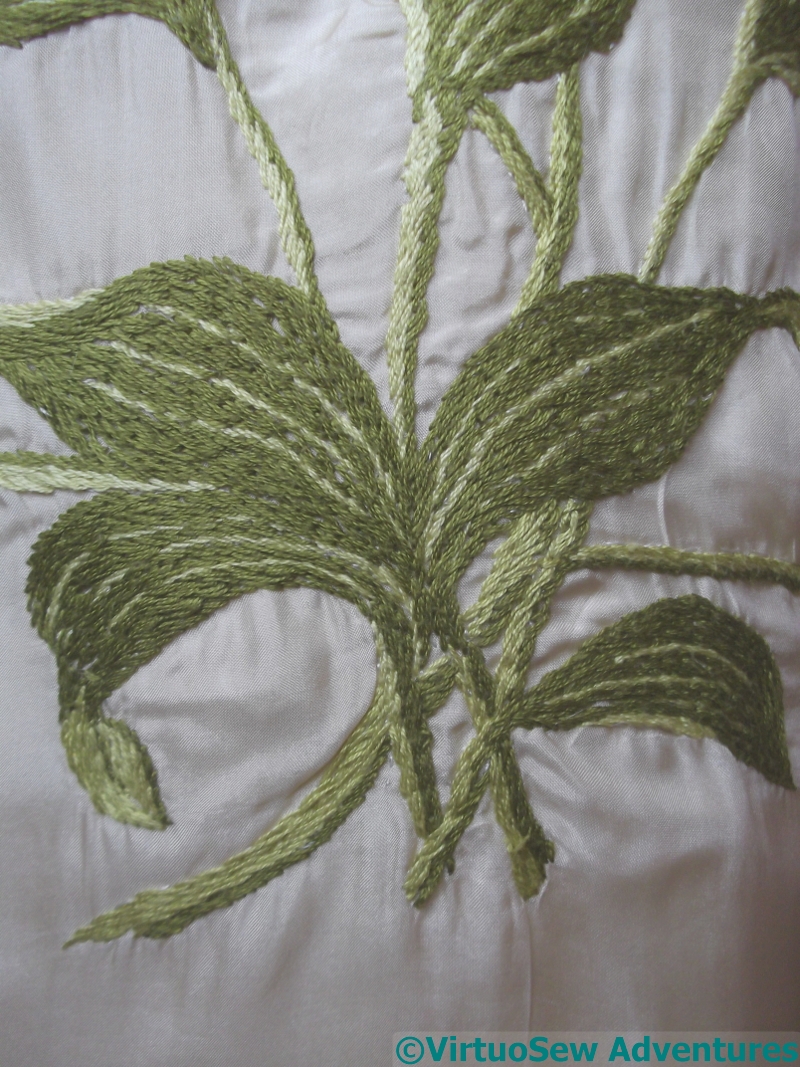
Tiger Lilies – Leaves
Grandmama also contributed assistance in making a pillbox hat, ornamented with swirls of gauze to match the colours, and then they painted a pair of shoes (Rayne, no less!) and a handbag (Marks and Spencer, alas) to match the green gloves which were bought new. A three-strand green stone bead necklace completed the outfit, and my mother remembers receiving a lot of compliments, at that occasion, and several others later.
Many years later still, when I was in the Upper Sixth, with a pale orange sheath dress underneath, I wore this for the Founders Day Service at school. We went into town afterwards, and my goodness, how people jumped to serve us!
Regrettably the coat fits neither my mother nor myself these days, and we’re wondering what to do with it…
Dreams of Amarna – Progress on the Map

Progress On The Map of Amarna
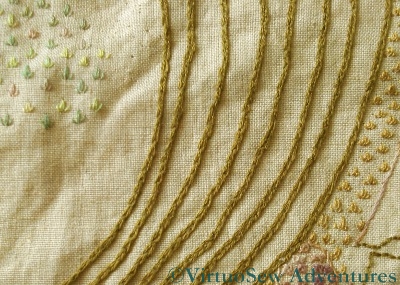
You may recall that having worked most of the Map of Amarna, I then ran into a brick wall, and could not decide which thread to use for the last, rather extensive element – the depiction of the cultivation.
I decided, in the end, that I would use the more golden of the plain silk threads, but rather than spacing the stitches widely I would stitch quite densely, creating a sort of background pattern of tête de boeuf stitches. Then I began to worry that this would be visually too weighty and might even create the impression of a sort unlikely to be accurate given that in Mary Chubb’s time the villages were probably groups of smallholdings..
So instead, although some of the cultivation (on the eastern side of the river, running in a narrow band the length of the site) is worked in a single colour (or will be, when I finish it), the western side of the river will have some patches where the stitches are worked in one or other of the variegated silks.
Patches On The Map of Amarna
The close up shot shows one of those patches already in place, with the single colour on the other side of the river and the modern village in a different variegated thread.
Or at least I think it will. It would not be the first time I’ve had a bright idea that really didn’t work when I tried it. I am prepared for the possibility that I will have to unpick all the variegated threads and restitch in a single colour!
Floral Glove Needlecase Course

More Floral Glove Finishing Work
It’s been a long time since I posted about the Floral Glove Needlecase. For a variety of reasons I lost momentum once it came to the finishing of the piece, but I do intend to get it finished. I don’t know what I will do with it when it is finished – I can’t imagine being able to bring myself to use it! – but I will get it done (can you hear the determination in my voice?).
So, with my new-found spirit of determination, here I am, laying out various pieces while I re-read the instructions for the nth time (where n tends to infinity!) and try to work out where, precisely, I had got to…
The silk brocade gauntlet at the back has pockets for tools, and there is an ultrasuede-covered base that will keep the final piece from slipping around too much.
My next two tasks are to attach some gold lace to the brocade cuff shape, and to lay some gold couching lines on the last piece of ultrasuede to create the top surface of the glove. I’m taking it a bit at a time, because looking ahead was what stopped me in my tracks last time!
Sampler Silkwork Finished!

Sampler Silkwork Finished!
At last I have finished the silkwork on the sampler for the Tudor and Stuart Goldwork Masterclass. I don’t have much patience with counted work – I just keep doing it occasionally, as a salutary discipline! – so I am really very pleased with myself. After all, I began stitching it – according to my post on the subject – in June last year!
I’m pleased that I persevered. It’s fascinating to see the Queen Stitches create an entirely different fabric, with a totally different surface and reflectance to the surface of the fabric itself, and the other stitches (Rice Stitch, Roman Stitch and the Bargello section) all reveal different aspects of the silk thread and provided different challenges in working them.
In fact, in the end I have enjoyed the silkwork on the sampler rather more than I expected to. It has taken me much longer than some of the other members of the course, but I’ve been working on the Piano Shawl and the Dreams of Amarna at the same time, so I think I have a good excuse!
Now I need to work out how I am going to keep track of which goldwork stitches to do where. I’ve been printing out the instructions as I go along (thank heavens!) but I now have a large folder full of the historical essays Tricia has written for each month, and another one full of the stitches. It isn’t difficult to have a single chart by my workstand as I stitch, but I think I may need to create an annotated chart for the goldwork. So far, many of the stitches have been familiar enough for me to do some of them with only the name and placement to guide me, but in other cases I know I will need to have the folder open at the instructions as well. One of these days we will have to find a house with a studio for me to work in!
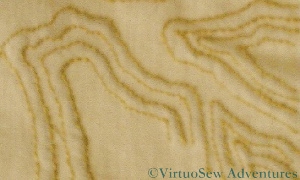
Still More Work on the Map of Amarna

Section of the Amarna Map
This photograph shows a completed section of the Amarna Map, which demonstrates most of the design choices I have made as I went along.
The long lines to the left in the picture are worked simply in Chain stitch and represent the Nile that runs beside the site. Small tête de boeuf stitches represent the cultivation, represented by hatched stars on the original map.
The text is worked in Back Stitch. It isn’t perfectly regular, but it isn’t really intended to be, either. I knew that all my favourite line stitches would be too heavy and detailed for the scale and the intention I have, so it is deliberately chosen to be as simple as I can make it.
Remember there will be areas competing for attention here and that what I want is a general impression that the viewer can then look at more closely if they want details.
There is at least as much again to do before the Map is finished – that’s why I have tagged this post “Perseverance”!
A final look at the Piano Shawl
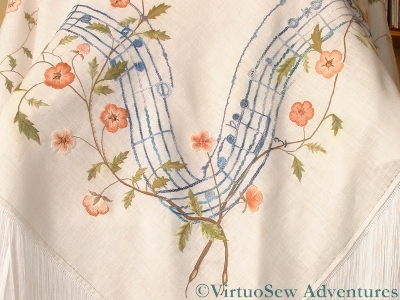
Corner Motif on the Piano Shawl
The Piano Shawl was only a metre and a half square (only!), so there wasn’t really space for a stave in each corner, even if Elaine had wanted four melodies included! At the same time, there was enough space in the corners that without something there, the whole thing looked half-hearted and unbalanced.
So I had to do something. I traced some of the stems and devised a very light floral motif, consisting of four stems and a few leaves. The main stems are worked in Broad Chain Stitch, using a plain stranded linen thread, which I used in the stems on the main design elements too, but the shorter, smaller stems are worked in Portuguese Knotted Stem Stitch, using a variegated silk thread. I used several different variegated silk threads for the leaves throughout the Piano Shawl. Again this is by no means a naturalistic treatment – the flowers are something like dog-roses, but the leaves (all worked in Fishbone Stitch) aren’t like any I’ve ever seen in a garden before!
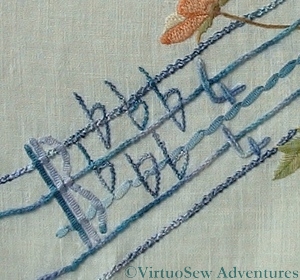
Initials in Morse Code on the Piano Shawl
My final picture is a shot to show my initials in Morse Code in one corner, pretending to be a caterpillar!
The picture also shows the centres of flowers, which were the same across the piece. The thread is a variegated, almost untwisted rayon thread, and it is used only in the centres of the flowers. It’s very like the thread I used for the headdress of the Prince’s Companion in the Persian Fantasy companion piece.
Now that I have seen the Piano Shawl in its destined place, I am happy with it. The overall effect is light-hearted without being entirely frivolous, and the time spent in Elaine’s music room pulling threads, and draping them over the furniture to make sure that they would all match nicely, wasn’t wasted.
However eccentric it might have seemed at the time!
Some Work On The Map of Amarna
Contour Lines on the Map of Amarna
Fortunately for me, I’d already had plenty of ideas for working the Map of Amarna for the first of the background panels, and in fact, as soon as I decided to include it there was one section about which I was absolutely certain – the contour lines. I’ve worked them in Reverse Herringbone Stitch. The fabric between the lines is thus slightly raised – padded by the threads behind it. I got this far on the map quite some time ago and was very pleased with myself when it turned out Just As I Hoped.
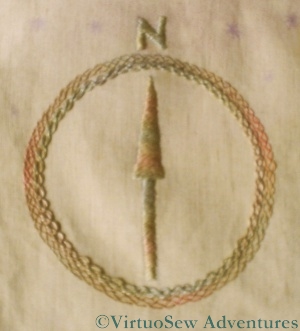
Compass Rose on the Amarna Map
Then I moved on to another section and found myself struggling. In the drawn map, the compass rose is indicated by three lines. When I tried that, it looked clunky and rather sad. So I returned to my stitch dictionaries, and looked for line stitches. Cable Chain Stitch was an obvious choice, as it has been a favourite of mine for years, and the outer ring is worked in Closed Feather Stitch. I used two Caron Collection threads in the same colourway here – a single strand of the heavy pearl cotton type which has three strands (Watercolours, I think it is called), and the much finer one, which I think is Wildflowers. It is interesting to watch the colour changes as they appear very different and have different emphases in the different threads.
I may yet decide to run a “shadow” to one side or the other of the arrow, using a simple stitch such as stem stitch, to throw the satin stitch into stronger relief, but for the moment I am happy that the flatter outer ring creates the illusion of a raised compass rose, while still being clearly something stitched.
More details about the Piano Shawl
Since I had some requests for more details about the Piano Shawl, I rummaged around in my photographs to try to come up with pictures that might explain a little more of what I did and how I approached it.
I knew that I would be using some variegated threads and some plain ones, so the first decision I made was that I would use each in particular places. In that way there would be a scheme of sorts that would guide me.
Five Flats on the Piano Shawl
First of all, the ribbon stave was definitely going to be variegated. It would help to create a ripple of life around the design, and incidentally, since it felt like miles of stitching, I would be able to feel the progress I had made in an afternoon in the colour changes. Then I felt that the colour alone did not provide sufficient structure, so I developed the scheme further – the chainette ribbon was couched down as the middle line on the stave, and also used for bar lines and clefs. The next two lines of the stave (one on each side of the central one) were worked using pearl cotton, in Portuguese Knotted Stem Stitch, which is a favourite of mine. I used it elsewhere for some of the stems, in a very fine silk thread which produced a very different effect. The two outer lines of the stave were stitched in ordinary chain stitch using a rayon bouclé which was serious trial to stitch with, but which looks really effective.
Melodic Corner on the Piano Shawl
The flowers themselves I worked in ordinary stranded cotton, using about six different shades of browny-pink, and creating an entirely un-naturalistic variety of light edges and dark edges, strong and weak colour variations. There was the risk of producing something too stately if I tried too hard, and since the Shawl was destined for a grand piano, the surroundings were going to be pretty stately already. A grand piano is a pretty dignified and imposing piece of furniture!
Commission Completed: Client Captivated!
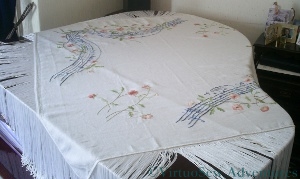
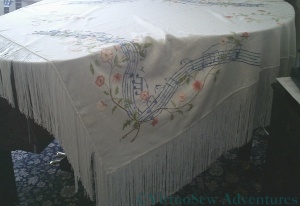
The Piano Shawl, Finished and Delivered
Although putting the fringing on brought the whole thing to life – which goes to show how important the finishing details are for big projects – I was very relieved when I delivered the Piano Shawl, and it settled into its destined home as though I’d sat there to stitch it. As I don’t have any rooms decorated in similar colours, I wasn’t confident when I finished the piece, until I saw it in place. Phew!
I created a booklet to go with the Piano Shawl, which included a short description from Elaine, describing why she wanted it, and the following, describing how I tackled the commission.
The Piano Shawl - Second View
From the Embroiderer’s Frame
This was an intriguing project, growing out of several conversations, visits to the Client’s house, and an assortment of research in libraries and online for suitable images and inspirations. The ultimate inspiration was a scene in a painting in which the black polished surface of a grand piano was broken by a patterned shawl.
I was asked for a piece that would suit the room and the grand piano, and would in some way incorporate references to Music. I prefer, with this sort of piece, to find some way of allowing the client to contribute, not just with a brief, but with some element of the design, so I devised three possible ideas,
- a piano keyboard stretched into a ring, which would allow for a variety of stitches and techniques
- a series of instruments rendered in a broad, slightly “graphic” style
- a more “romantic” design of flowers
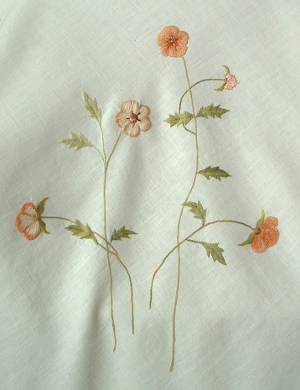
In adapting the inspiration to circumstances and ideas, we decided, rather than using a scattered all-over pattern, to develop an undulating stave design, entwined with flowering stems. The flower patterns were developed from the shapes used by my grandmother in one of her embroidered tablecloths. As she set me off on my embroidering way, I always try to include some idea or reference in big projects! We chose to pick up the floral pattern of the carpet, dusty pinks and apricots for the flowering stems, and take the blue background as the basis of colours for the stave. Then I asked Elaine to write out for me the musical elements that she wanted to have put on the staves.
In the event, this piece involved far less variety of stitch technique than the other design ideas I had thought of, but at the same time it gave scope for a much wider range of variegated threads. The blues used in the stave are brighter than those in the carpet, because darker colours would have dragged the design down, making it seem less light hearted. There is always a balance to be struck in embroidery between the naturalism that is available through needlepainting techniques and producing something that is clearly an embroidery. I almost always choose to do the latter, because the textures of fabric and thread as they are used in embroidery are what interest and inspire me.
My initials and the date are included in Morse code, on diagonally opposing corners.
Now Elaine not only has her Piano Shawl, but something for the archives as well.
Quietly Persevering
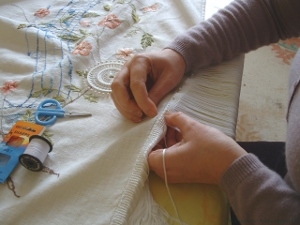
Adding The Fringe
I’m in the very last stages of a very long running commission here. It’s one of the reasons my reading of blogs has been sporadic of late – I’ve been working very hard on this!
Anyway, the last stage is to add fringing all around the edge – some six metres of fringing, which is why it isn’t happening all in one go – although we will need the dining room table again soon (I don’t have a studio – I only wish I did!). And I am using the pins I won in a giveaway on Karen’s blog recently – thank you, Karen, they are working very well for this!
I’ve learnt a lot from this project about managing, planning and specifying a commission. In particular, unless you can be guaranteed no disturbances, life has a tendancy to throw in the odd curve ball and suddenly progress slows to a crawl. It took over a year to find a suitable fabric that my client and I both liked, and over six months to find the fringing. Fortunately I haven’t had a hard deadline – my client wants it finished suitably and not rushed. That makes life much easier!
I also discovered that I have a tendancy not to work on what I want to work on, unless I can put forward an over-riding reason why I should. “I’m being paid” works, but so does “I want to write it up for my blog” (now I have a blog, that is!) or “I’m learning something here”. What hasn’t worked – until recently – is “I’m enjoying it”.
Still, it’s within eyeshot of being finished, now. Another day on the fringing, and then I shall take some photos from the right side before presenting it to my client. I’ll post those after she has seen it!