
Tag: Grandmama’s Embroidery
The Lady In The Garden – Progress
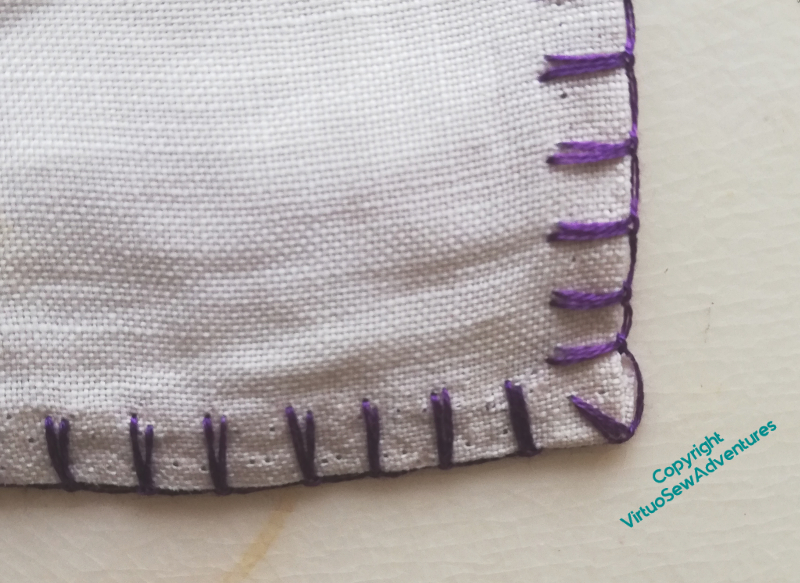
In a slight variation of what Grandmama did, I used Up and Down Blanket Stitch, which is one of my favourites, to work the purple section of the edging. It’s not as comfortable to work as an edging stitch as it is as a surface stitch, but I enjoyed it (as usual), and I’m pleased with how it looks.
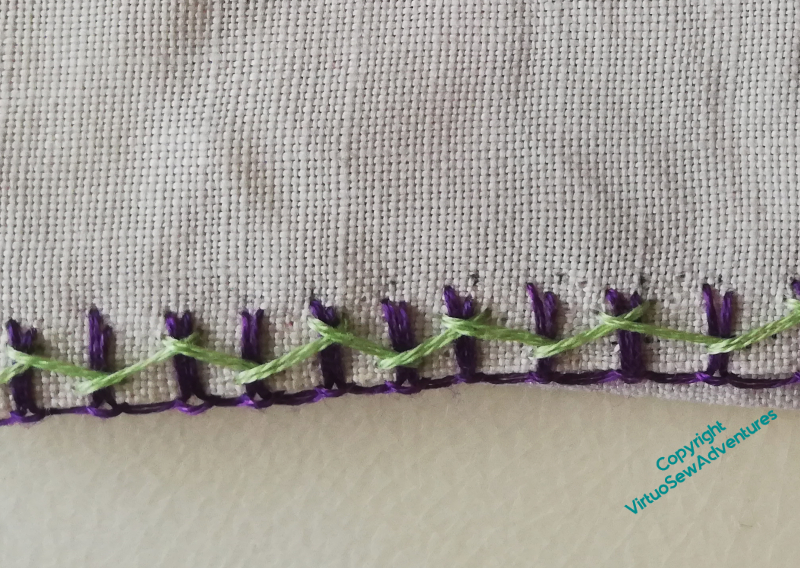
The second layer of the edging was in herringbone stitch, just as Grandmama worked it, but using a pale apple green instead of the pink. It will work much better in Mam’s room that way.
I’ve used two strands of cotton, which is what Grandmama did. I suspect that’s why the edging has collapsed in spite of not being used for decades!
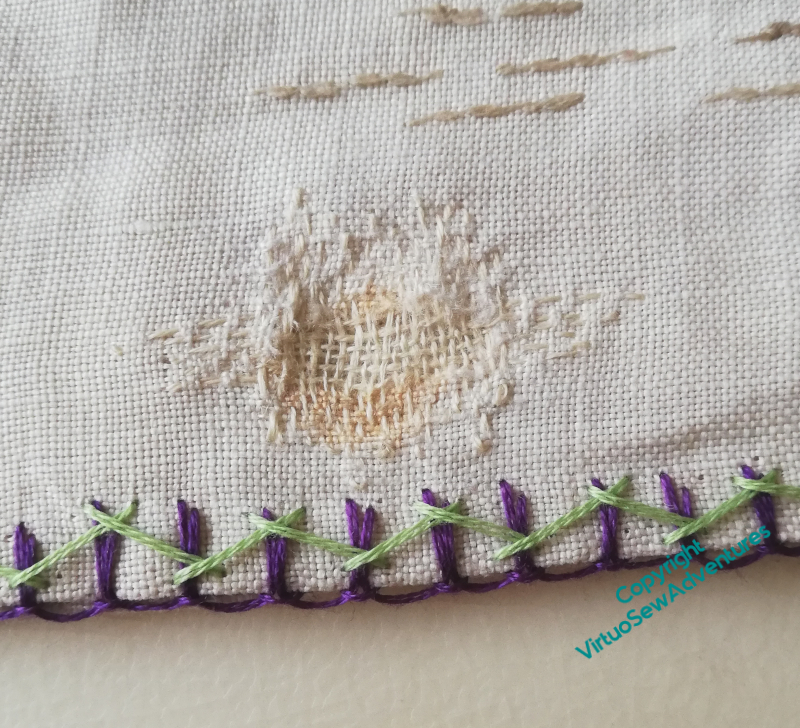
I’m not as satisfied with the darn, but I think it should stop the hole getting worse, and I’ve had a variety of suggestions for tracking down a suitable material to patch it with. At the best of times, that would be a tricky task, and in the current situation, it may well be years before I find something!
Progress continues in other areas, too – Episode Nineteen of SlowTV Stitchery is now up. It concerns, among other things, flyaway thread and the importance of writing things down…
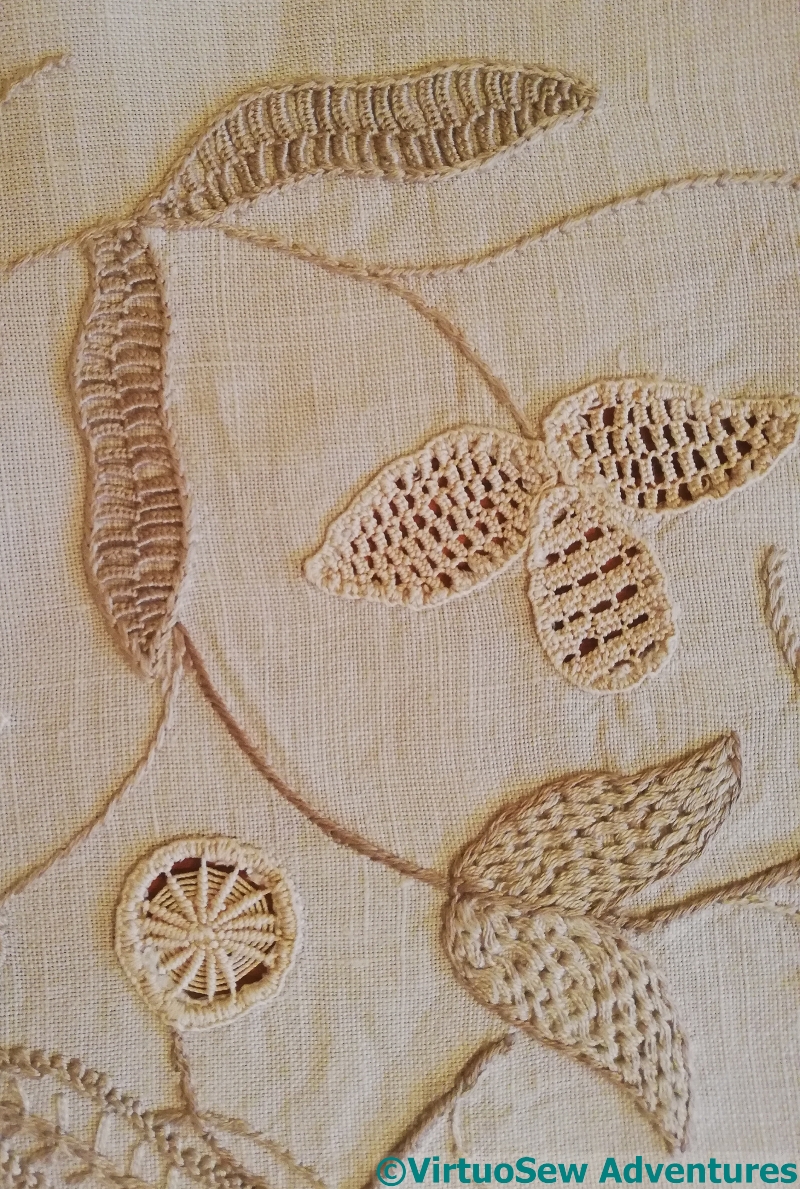
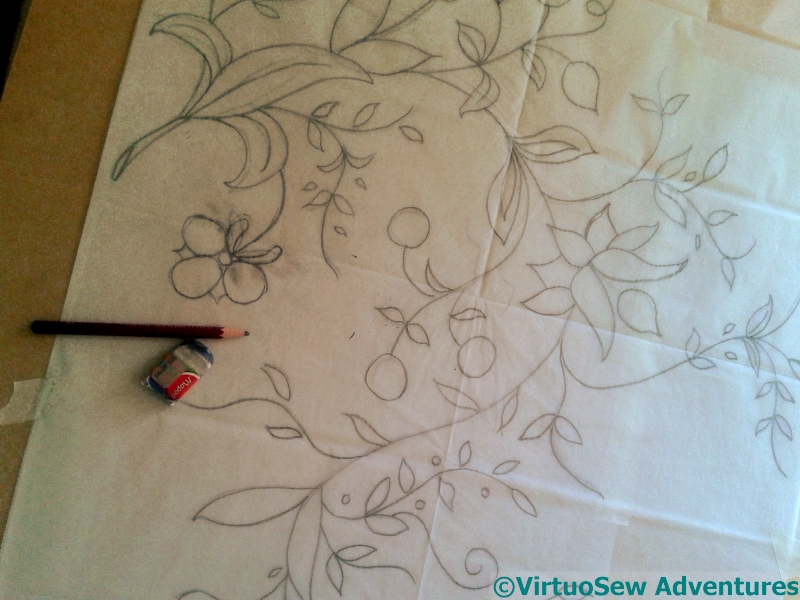
Mending the Lady in the Garden

Grandmama worked this pyjama case for my mother when she was a little girl. It’s beautifully worked, but slightly faded now, and the decorative stitching over the edges has all but disintegrated. Mam has asked me to reinstate that stitching.
It’s a good thing that my collection of stranded cotton includes some of Grandmama’s threads and that of various great aunts. That gives me a chance of finding something not a million miles removed!

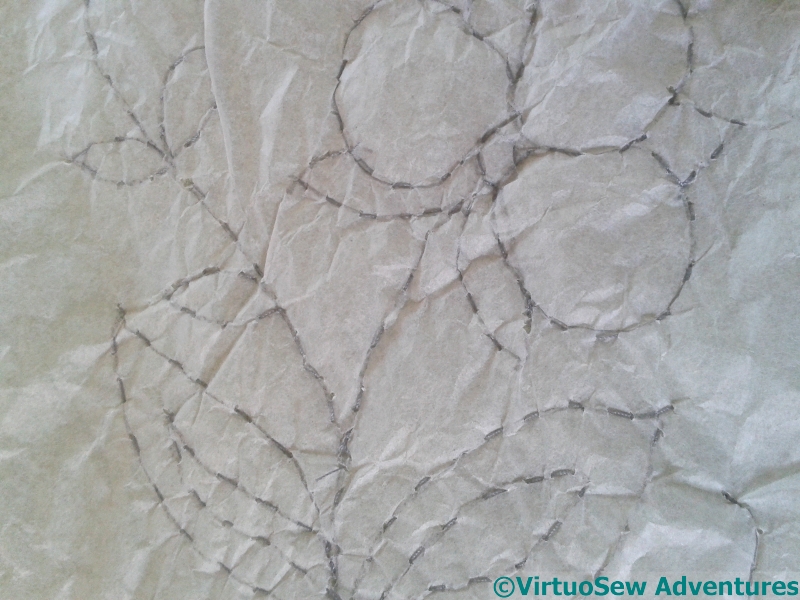
There’s some damage to repair as well. I’m not quite sure how I’m going to do so – there’s nowhere with spare threads to repair to attempt an invisible darn. So for now, I have outlined the area in split stitch, and I am going to concentrate – or try to concentrate – on putting in place a suitable border. The original was purple blanket stitch overlaid with pink herringbone, but we’ve decided that purple overlaid with green will work better in the room it will live in.

But we’ve already made a discovery. This slightly Art Deco looking border is the internal edging. It’s still undamaged, and I’m leaving well alone, but my Mam says she never remembers registering the detail here when she was a little girl!
We are pretty sure that the legendary Miss Hunter was involved in the stitching of this, so I’ve got a lot to live up to!
Meanwhile, in other news, Episode Fifteen of SlowTVStitchery is available, and concerns ideas for managing details, and the management of Very Long Projects.
A Source of Inspiration (2)
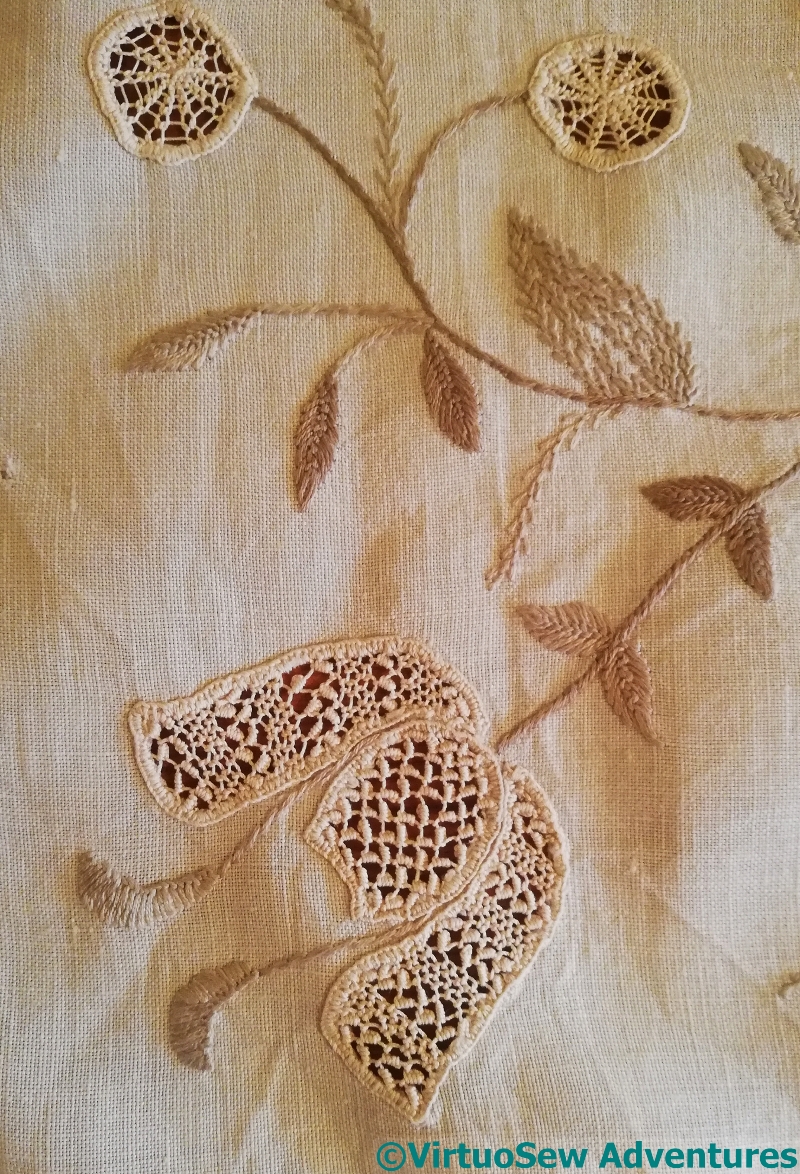
The Spiders Web Wheels in this case aren’t Spiders Web Wheels at all, but a needlelace variation. I think they are both worked in a spiral, and I’m not absolutely sure that they are the same: the slight difference in appearance may be purely a result of a different working tension or spacing.
I’ve only just realised that the small leaves aren’t worked stacked fly stitches, but in close, long-armed feather stitch. In fact feather stitches and their variations show up a lot in Grandmama’s embroidery – she must have enjoyed them!
I don’t think it has ever occurred to me to work needlelace stitches in bands, as she has here, but I can see myself trying it, one of these days! I do have a book, somewhere, full of needlelace stitches, ready for when I have a suitable project and the opportunity to Experiment…
When I was working on the lifebelts for the ship in “Leaving The Tyne”, I used the technique of a buttonhole wheel on thread, and discovered just how fiddly they are to make. Grandmama’s are even smaller and fiddlier, and sewn onto needlelace and not fabric!
The two embroidered leaves in the middle remind me just how effective simple stitch length variation can be. Much as I love my complex, textural stitches, sometimes all you need for a border is a blanket stitch variation!
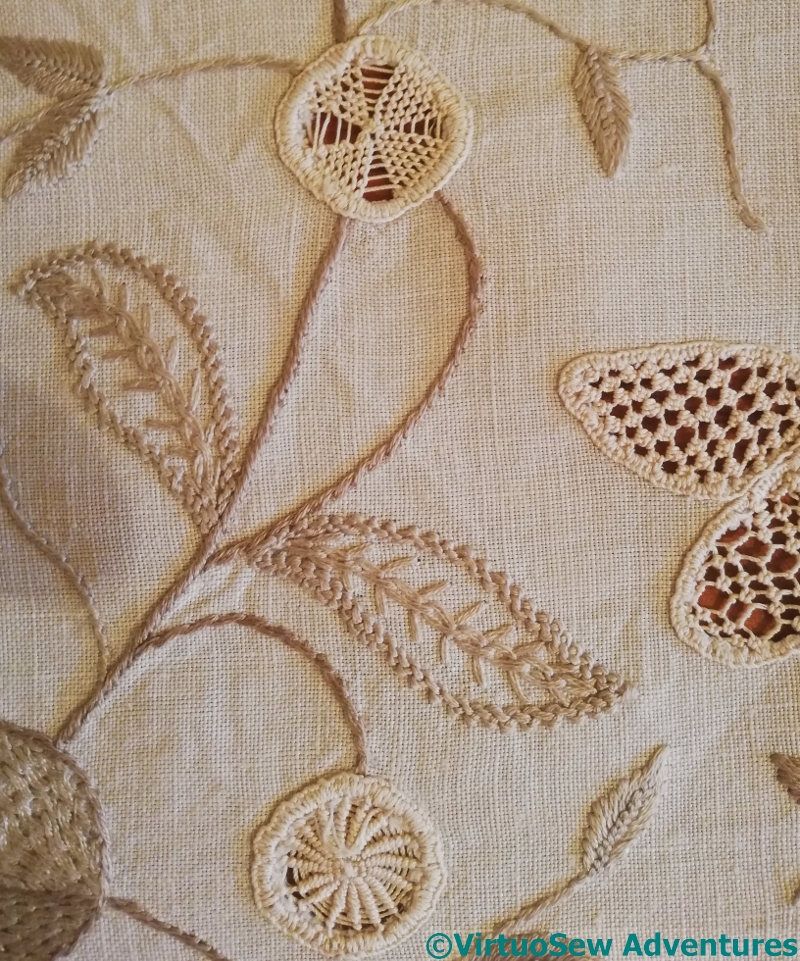
The variations possible to fill a circular shape seem to be endless, don’t they – a sort of beginning of a Maltese Cross at the top, a really dense Spiders Web at the bottom.
And this time, I think the two central leaves are in Wheatear Stitch, outlined with very close and small feather stitch outlines.
I really must try some of Grandmama’s stitches one of these days. Somewhere in the house I have the notes she took on a course, and I’m pretty sure they included sketches of stitches I haven’t seen in all my shelves full of needlework books….
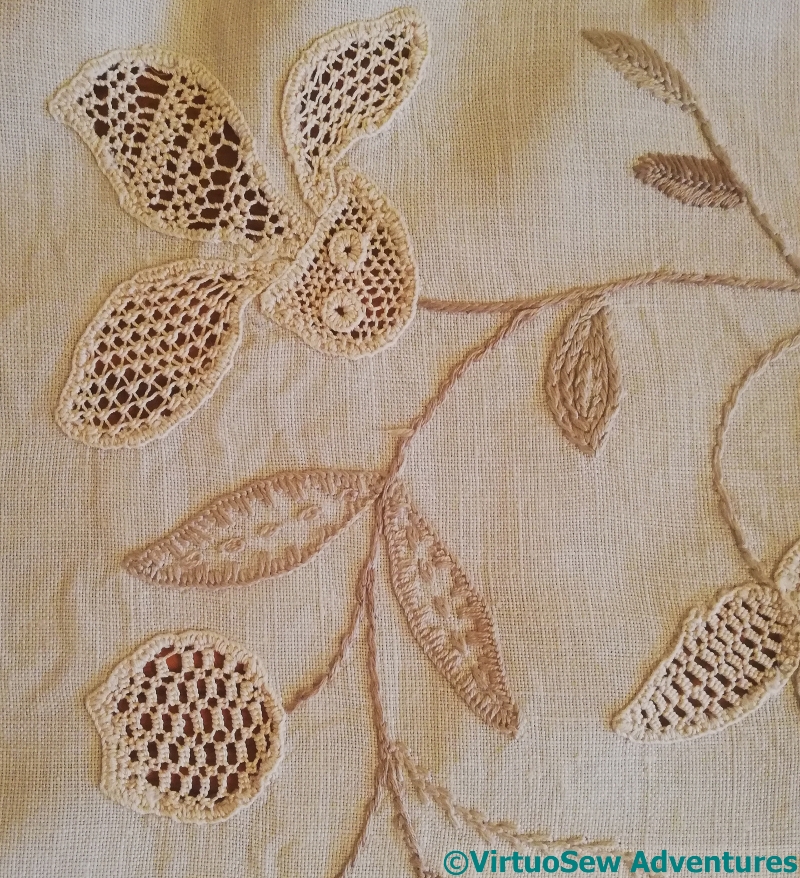
A Source of Inspiration (1)
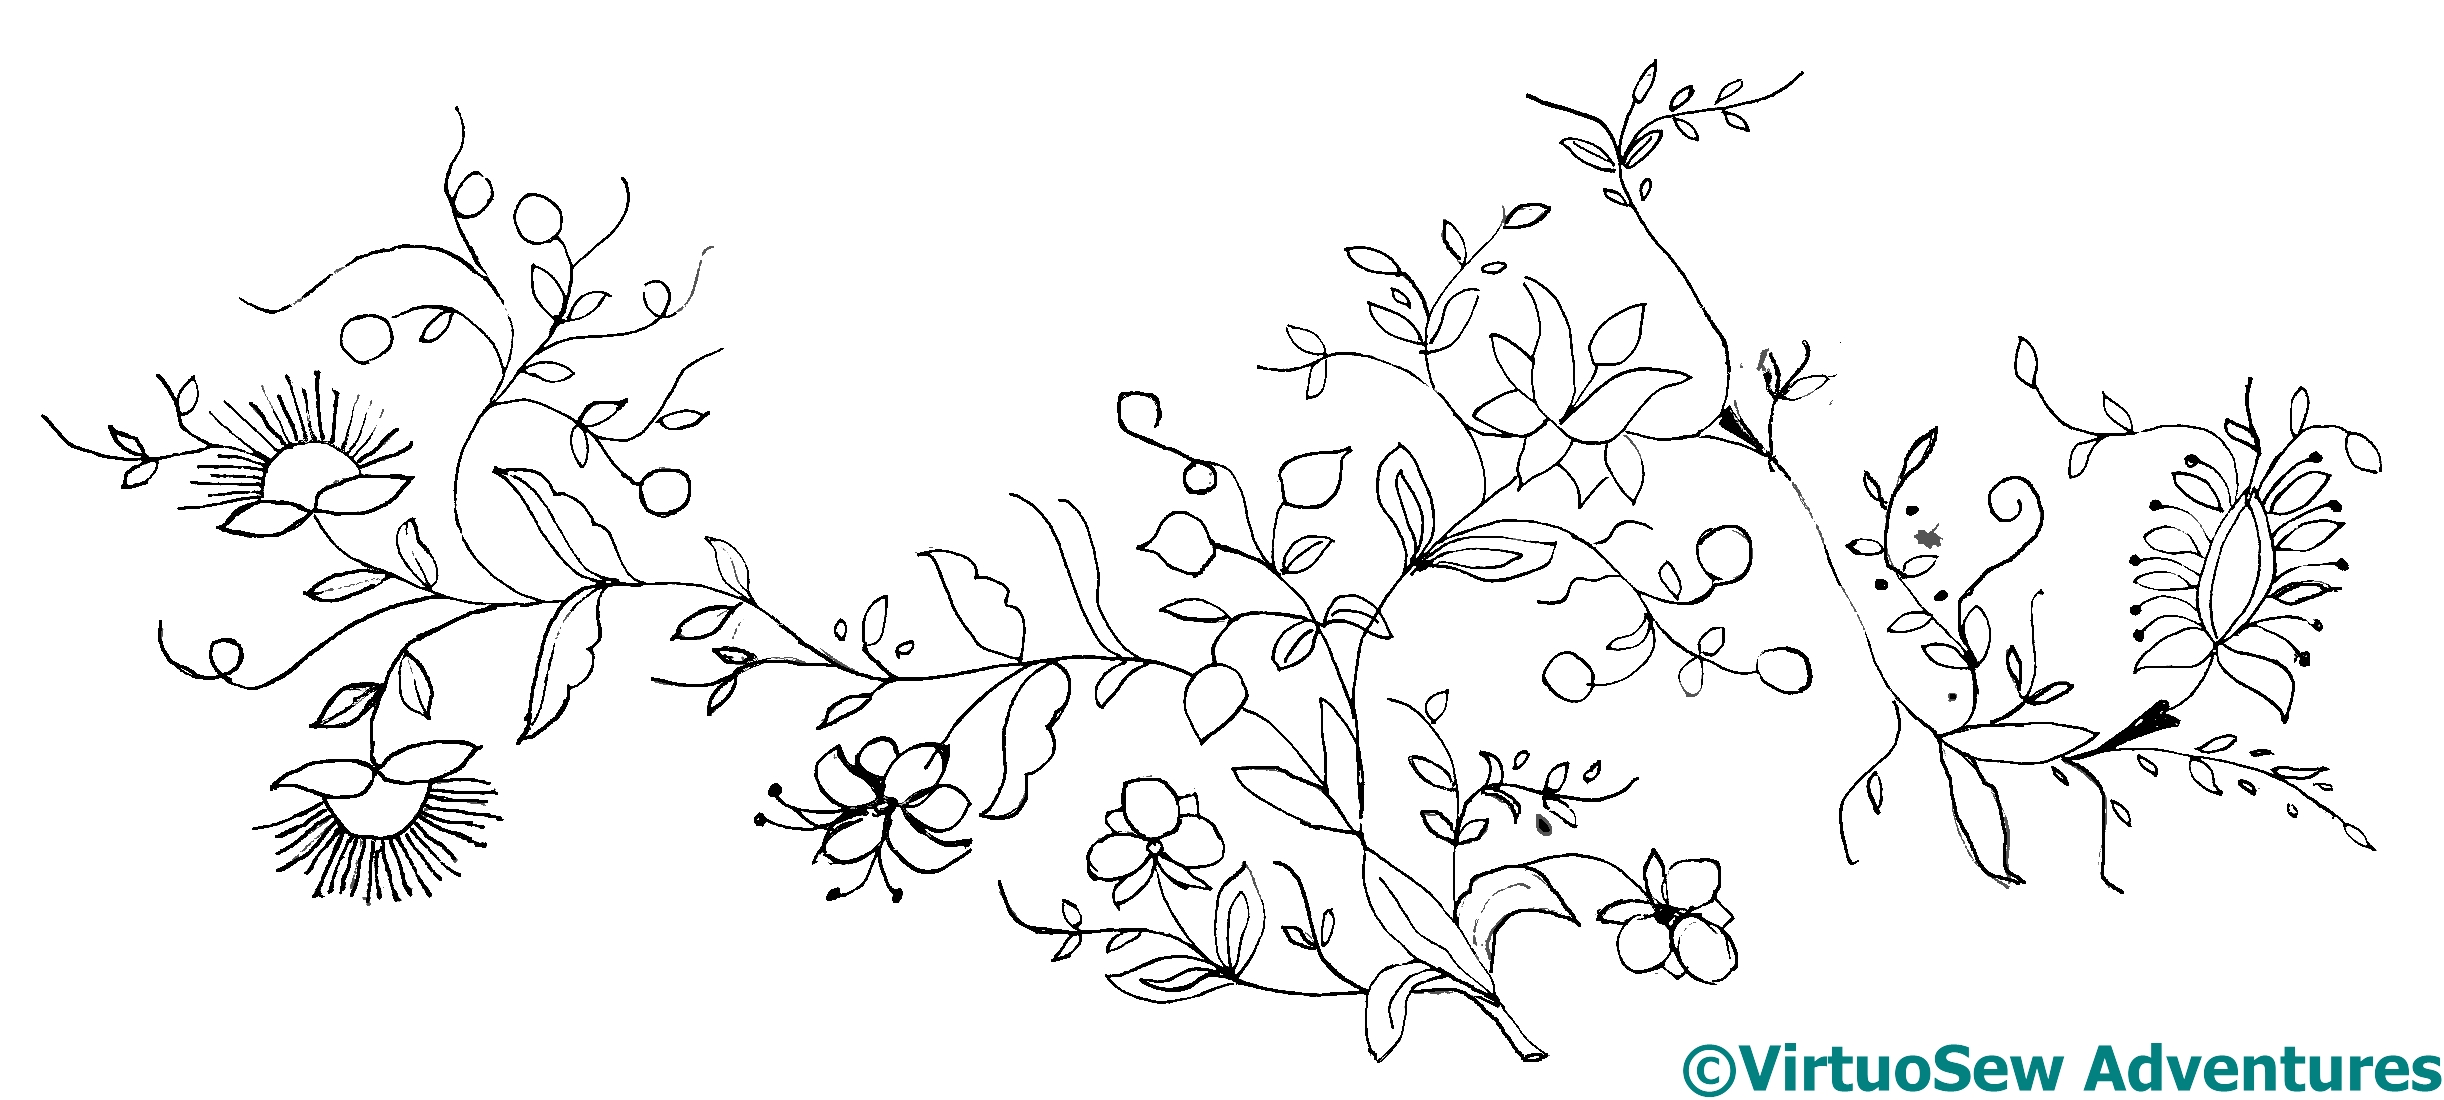
You might recognise some of the motifs on this teacloth..
Grandmama worked it, we think during the War, and it involves some motifs I used for the Coat of Many Colours.
In fact, even if I don’t use the exact motif, this teacloth, and a tablecloth (a sort of extended Director’s Cut!) are frequently the first places I look for inspiration when I am trying to put together a design for something stylised but floral. I suspect Grandmama would be laughing like a drain, as the family puts it, at the mere idea of being an inspiration all these years later!
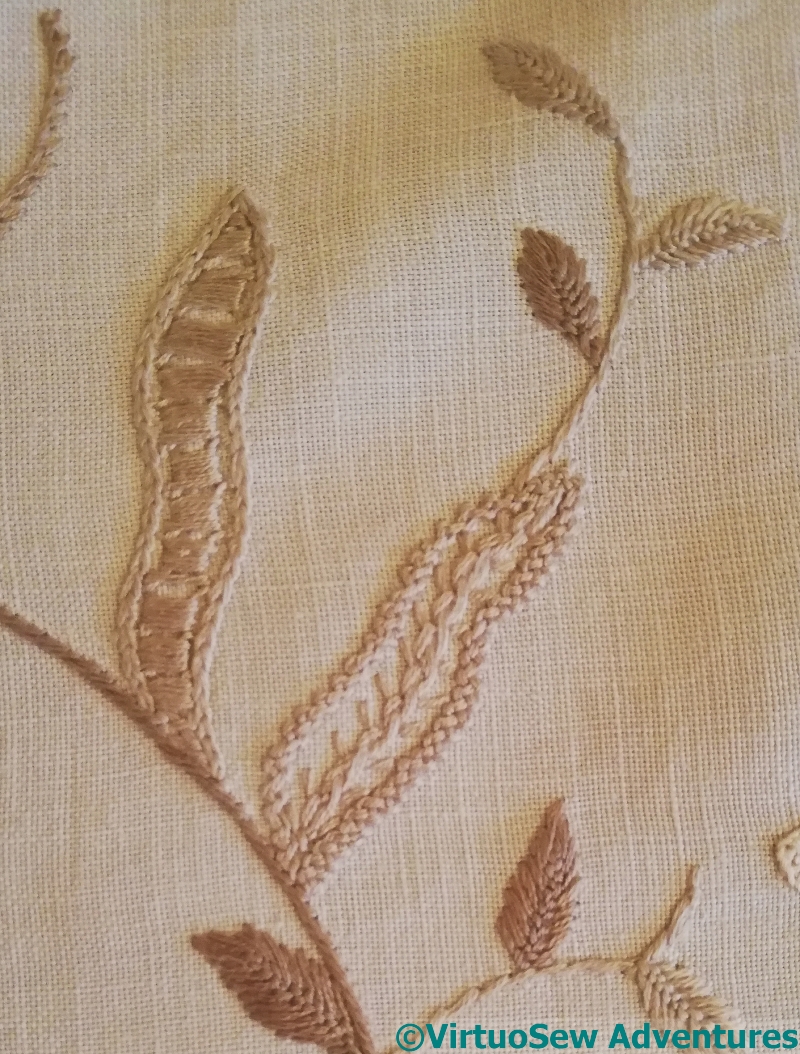
I’ve also learned an even greater respect for textile and embroidery historians, examining and cataloguing design and stitch use over the years. It’s all too easy to assume, complacently, that one’s first assessment of a stitch was correct, and I learnt when I looked at this photo that I was definitely wrong about the second of these two leaves. It might be Wheatear, but I suspect I will have to look at the back to be sure.
And I’m far from convinced that Grandmama didn’t simply make up the other one as she went along. It’s a whipped or wrapped Something, but it looks like a more complex composite stitch to me…
Whipped Spiders Web Wheel as a needlelace stitch, a sort of floral motif of needlelace, and a pair of leaves in the top left that I thought for a moment should have been cut away. However, looking more closely (aren’t smartphone cameras really useful on occasion!), I see that the edging isn’t buttonhole, but chain, so, no.
And that pair of leaves in the bottom left? They’ve been puzzling me for a while. The stitch looks a little as though it’s a whipped or wrapped stitch. Maybe stem stitch worked over foundation stitches?
More thoughts on the Jacobean Coat
Coat Design
The design wraps around the back of the coat, leaving the front mostly unadorned. There are sprigs placed on the sleeves, too, one of them above the elbow, and the one on the opposite side below it. Remember the comments I’ve made in the past, about taking inspiration from Grinling Gibbons, and aiming for balance rather than symmetry? That goes for the placement of design elements in apparel as well as anything decorative.
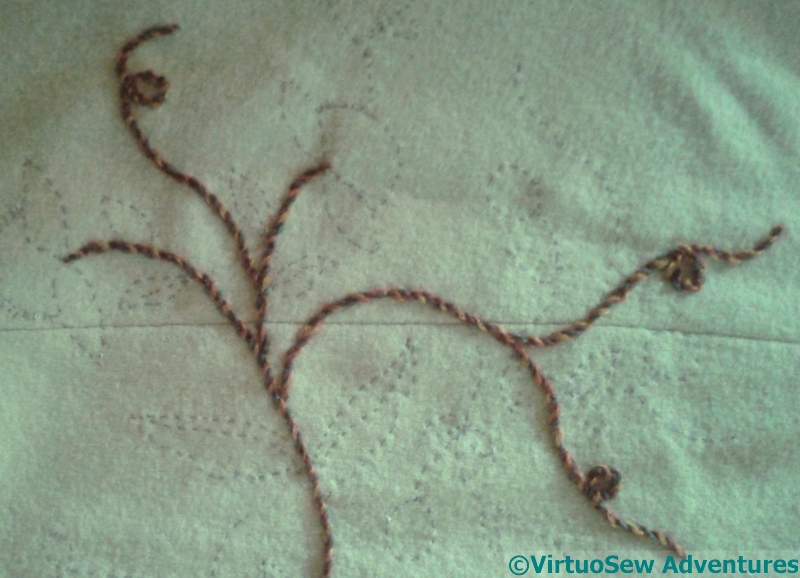
Starting Stems
My mother has commissioned the coat with various other garments and accessories in mind, and one of the ways we thought would help to tie the coat in with them would be to use a knitting wool which is involved in those accessories. Now, as it happens, I have experience with this sort of trailing design (remember the Piano Shawl?), and I remember that it can feel very disjointed and dispiriting as you work individual motifs, and however confident you are of the whole, it’s hard to be motivated when it keeps looking spotty and halfhearted.
However, the stems pull it together, so I thought this time I would start with the stems. It’s a big, chunky, variegated knitting yarn, so I will end up with the skeleton of the design, and all sorts of colours within it. I’m catching it in place with a fine woollen yarn, using small oblique stitches buried within the twist. They should be almost invisible.
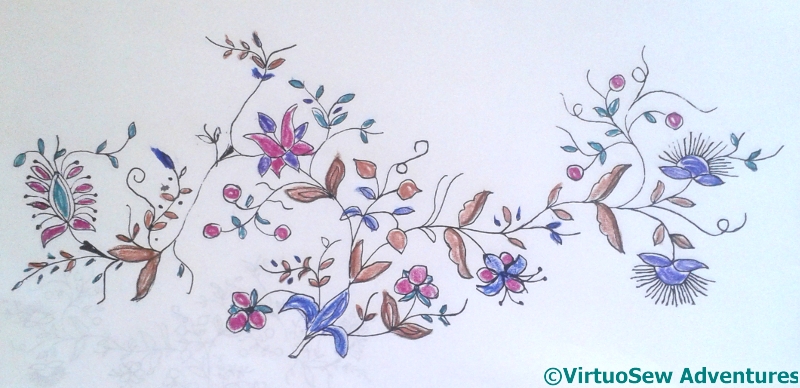
Trialling Colours
However, that too is going to take a while, so I can trial colour placement for the motifs themselves! As you can see, we aren’t aiming for a naturalistic colour scheme. This may not be the final arrangement, and there will be tweaks along the way, but I’m happy with this as a starting point.
The Jacobean Coat – getting started
Coat Designing
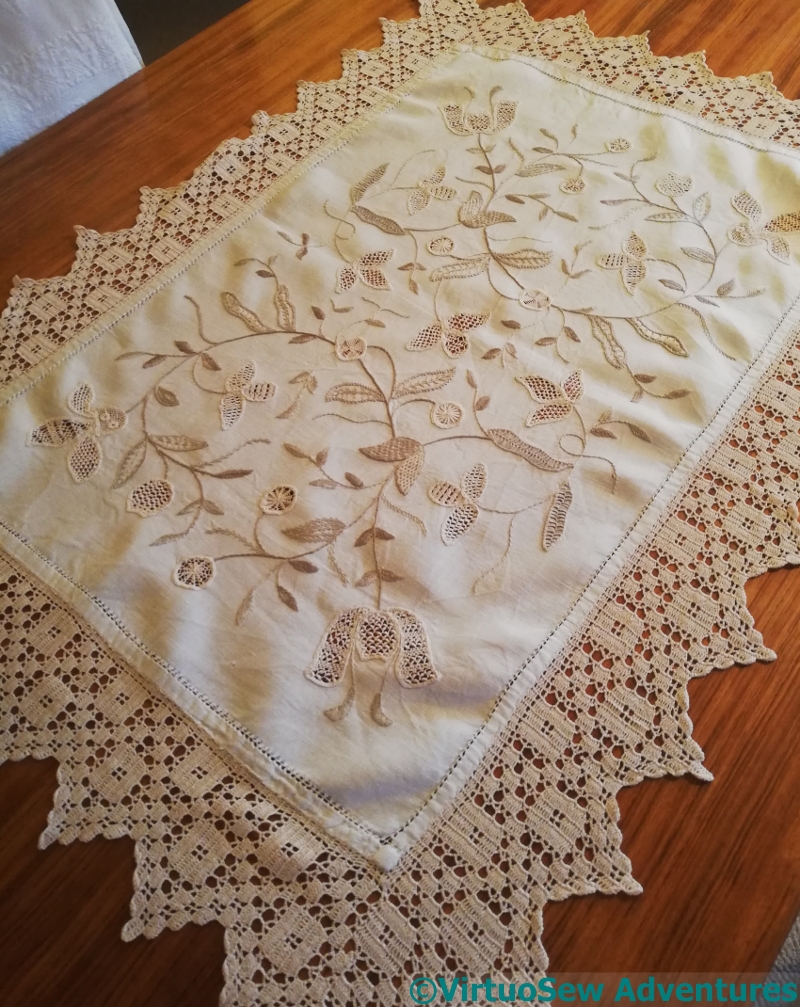
This is going to be a truly multi-generational project. The design elements are stolen from a tablecloth my Grandmama did during the war, and I’m going to embroider it on a coat for my Mam (her daughter). I will write a post about Grandmama’s tablecloth one of these days, because it’s an absolute cracker, full of wonderful needlelace patterns I’ve never seen anywhere else. However, as it is stitched in white on white fabric, I will have to become a better photographer first!
Stage One of Design Transfer
You may recall that during the Great Lady’s Magazine Stitch-Off, I wrote a post about the different methods for transferring designs, particularly concentrating on their advantages and disadvantages in different circumstances. The fabric of the coat (this will be the second incarnation of this fabric!) is a pale green boiled wool. It’s dense enough to have some structure and weight, light enough to be easy to stitch (I think). You might have thought it would accept gracefully any method I chose.
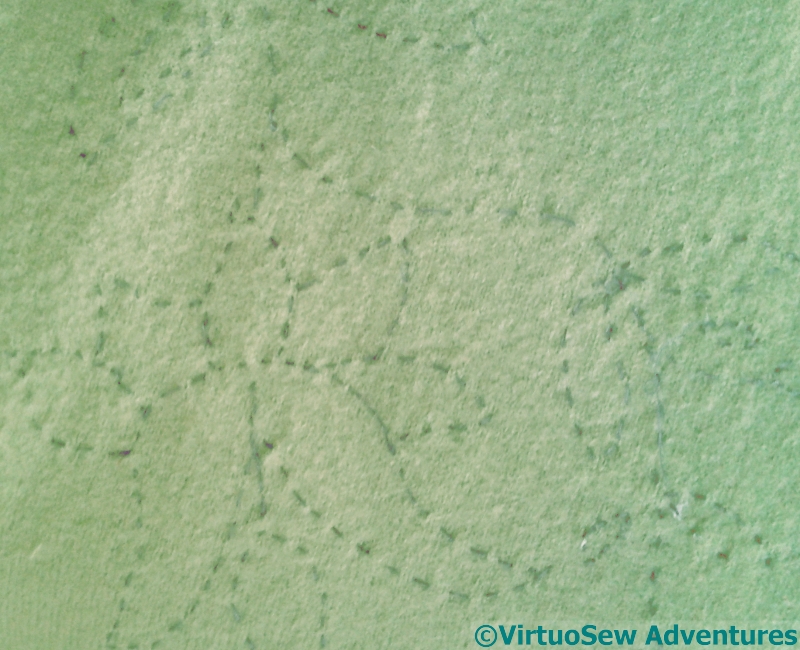
Stage Two of Design Transfer
However, when I thought about transferring the design, I found myself ending up with the most time consuming of the lot! Since the garment is unlikely to be washed, and rubbing may damage the surface, my options are somewhat limited. Transfer pencils spread, sometimes, if the ironing temperature is wrong, the chalks have a nasty habit of not always rubbing off when they’re wrong, and my quilter’s pencil doesn’t work on strongly textured fabrics.
So, running stitch through tissue it is, then. This will take a while…..
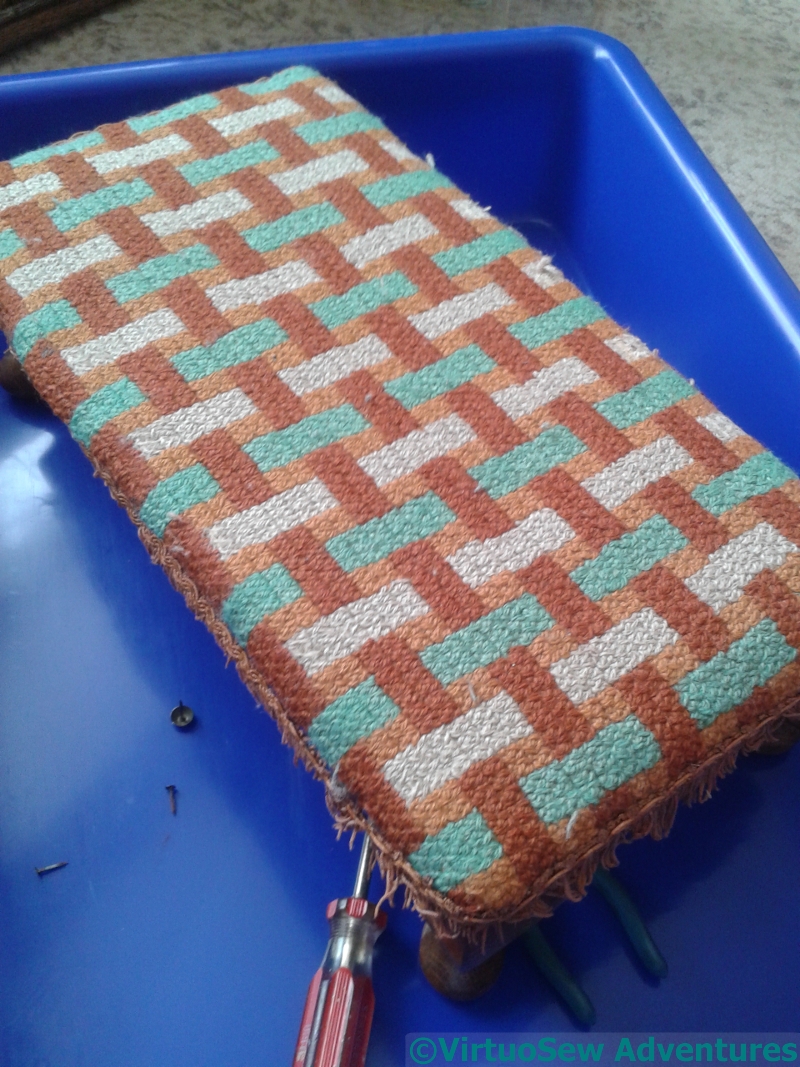
Renovating Grandmama’s Footstool
Beginning Refurbishment
Having been working on the Heart, I was still thinking about Grandmama, and noticing that one of the footstools she made was getting a bit shabby and buckled, I decided to renovate it…
It’s worked in tapestry wool on binca (that strange cotton matting fabric that stitching happened on at primary school – does anyone else remember it?). I think I still have, somewhere, Grandmama’s draft of the pattern on squared paper, but the best I can do for putting my hand on it is to say it is Somewhere In The House! Since I don’t have a workroom, I put the footstool in a plastic tray, which I seem to remember is sold for cleaning oven trays. I use it for wet felting and to contain messes when I’m doing things like this. The blued-steel flat-headed nails were very hard to get out, and indeed, some of them lost their heads (!) and didn’t come out. In due course they were hammered firmly back in, instead!
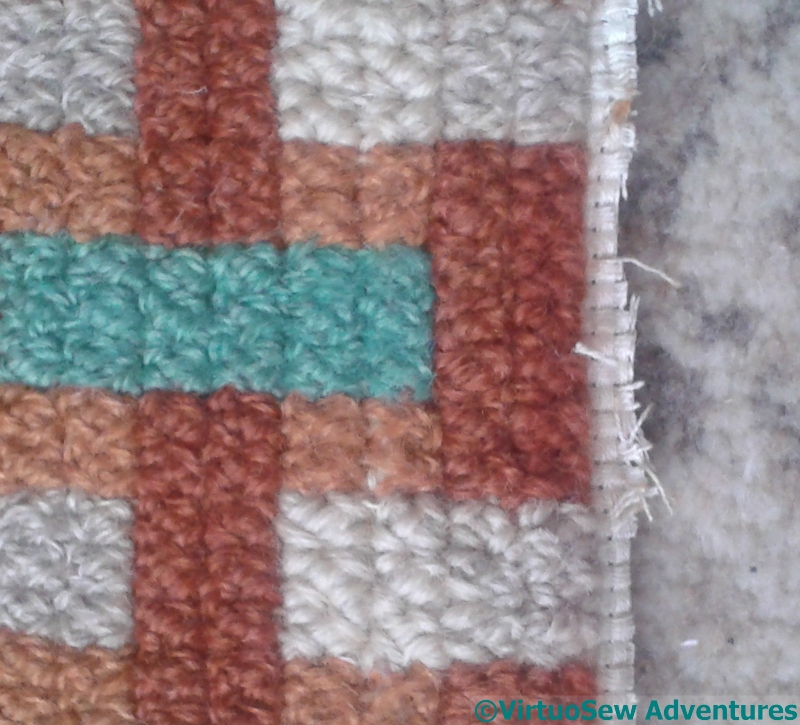
Repaired Stitching
The binca around the edge was badly mauled by the nails, so I knew I would have to do something about that, but in the meantime, there were sections of the canvaswork that needed to be reinstated. First I washed and dried the whole thing (by hand) and then spent some time looking very hard at the stitching. More than fifty years of use have worn a few small sections, and the stitch took some identifying, but in the end, I decided it was Rice Stitch, and found a pale oatmeal tapestry wool that didn’t shout its’ newness too loudly.
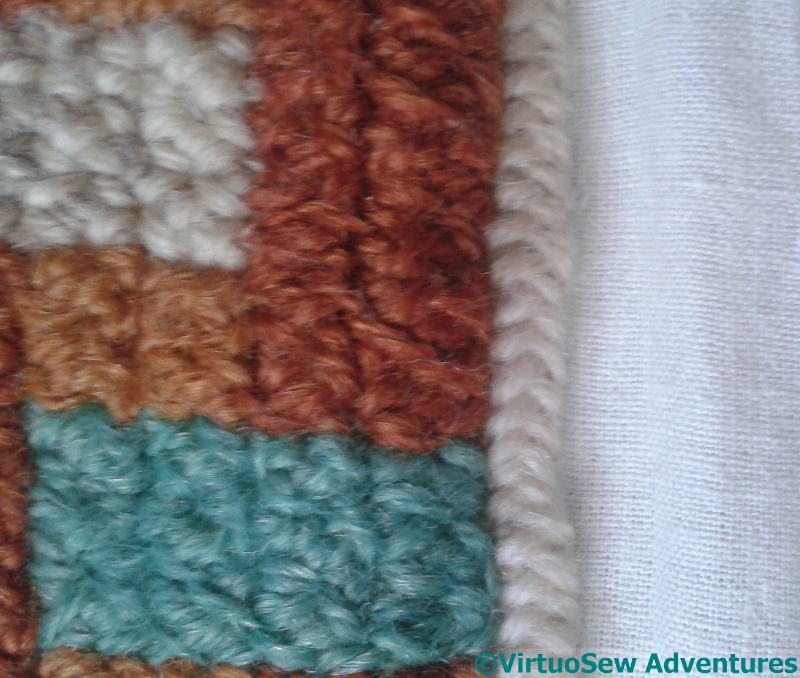
Attached To Calico
Then I attached the binca to some calico and covered the join with one of the long-armed cross stitches. I wasn’t absolutely sure I had enough of the plain oatmeal colour so I alternated a needleful of each all the way around.
In the end, I had plenty left over, but I’ve said many a time before that when ekeing out assorted supplies, the trick is to Make It Look Deliberate!
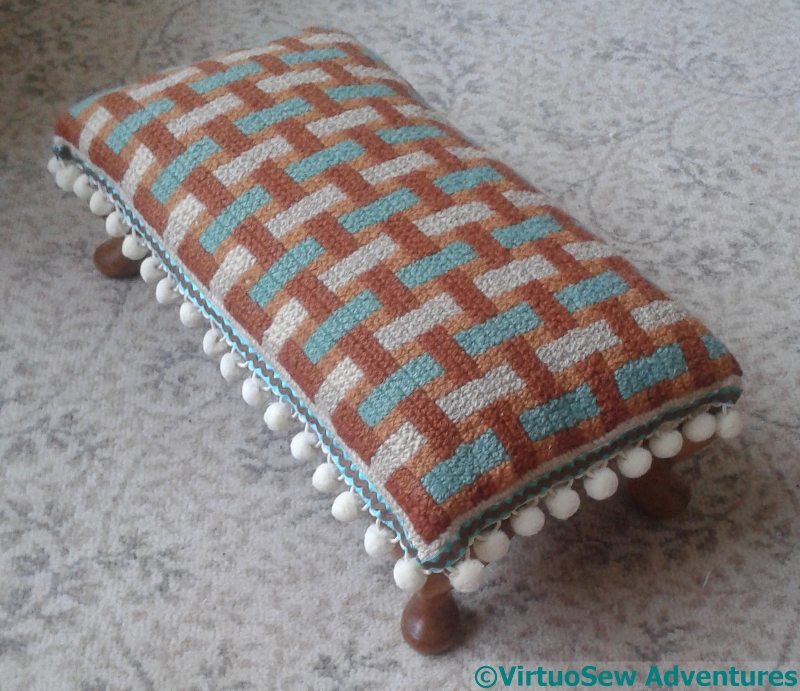
Finished Footstool
I had to do that with the trim as well. Nothing in our local needlework shop was even remotely suitable so in the end I took some bobble fringing, a length of ribbon and some ricrac, and made my own!
There are one or two infelicities in the details, but it’s certainly got a good few years left in it now.
Thank you, Grandmama.
Poppies And Wheat, Cleaned and Conserved
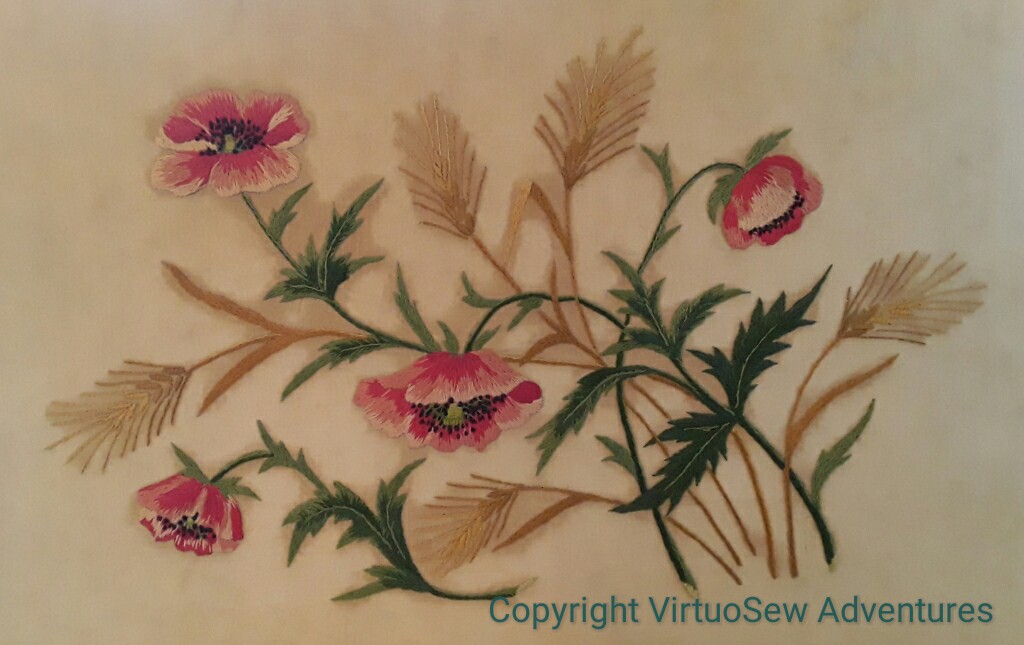
Some of you may recall that some time ago, my mother and I were planning to reframe one of my Grandmama’s embroideries, and discovered to our horror that it had been glued to a backing board made of strawboard.
In due course, we found a textile restorer, not too far away, and I took it to her. And now we have it back again. In the course of the work, it was discovered that two different sorts of glue had been used. One of them was unstuck fairly easily, but a particularly acidic glue had been used on the back of the embroidery itself – almost as if the framer did not believe the work had been finished off properly. Which it had – apparently it was very difficult to find some threads to take out to test for colourfastness!
-
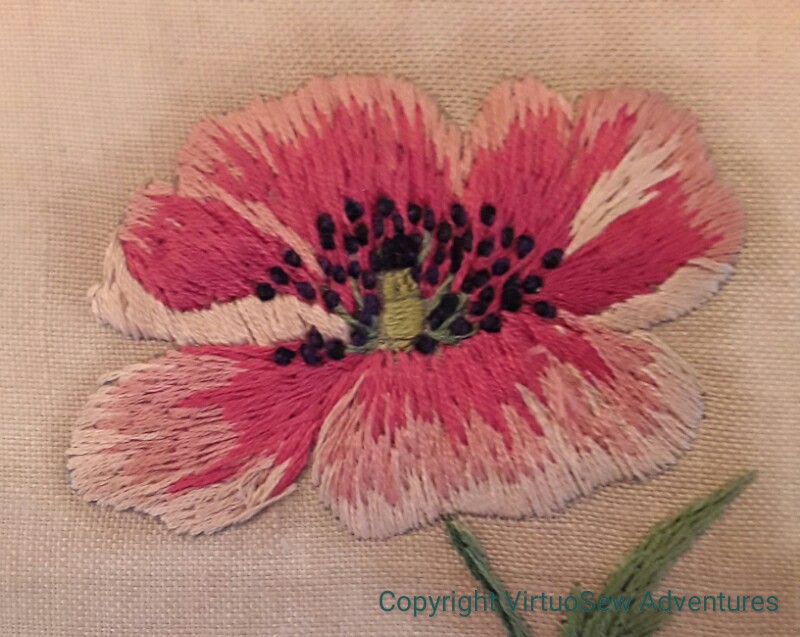
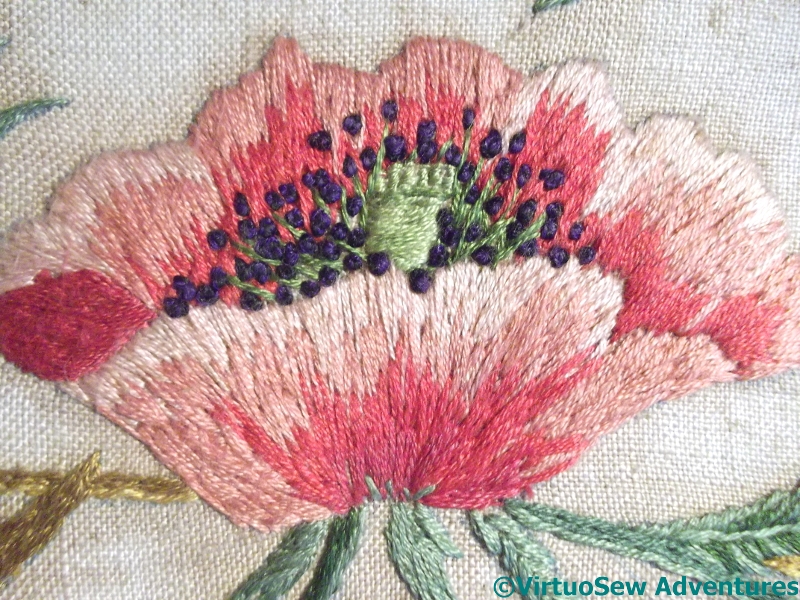
- Poppy – Brighter and Lighter
-
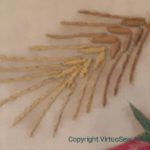
- Wheatear – Brighter and Lighter
-
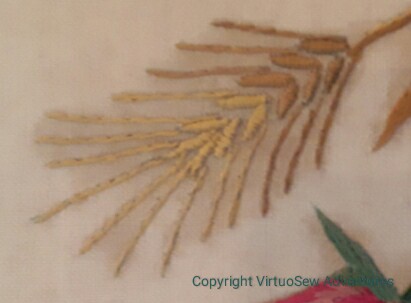
- Further Detail – Brighter and Lighter
The fabric and thread are both much brighter than they were, but the very acidic glue that was used is the reason for the bloom of staining around the embroidery. It’s much reduced, but unfortunately it wasn’t possible to remove it entirely.
So, Gentle Reader – be careful with glues and boards. Avoid if you can, use neutral-pH as far as you can, or someone in the future will be muttering imprecations in your direction!
Poppies and Wheat – a closer look at Grandmama’s embroidery
 When we took the tray to pieces to remove the embroidery, we had a Nasty Shock.
The fabric was glued to the backing board and cut off flush with it. So much for our blithe expectation that we would be able to remount the fabric – carefully, of course! – and then get it properly framed to advantage.
In retrospect, we should maybe have guessed from the staining around the stitching that maybe some glue had been involved, but since I always mount over padding, it would never have occurred to me that Grandmama’s framer would have done anything else, still less that the legendary Miss Hunter would have presided over all that beautiful embroidery and then permitted it to be mounted onto any old piece of board using any old glue that happened to be to hand!
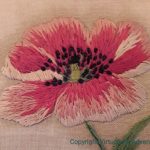
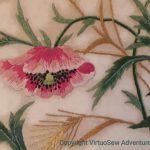
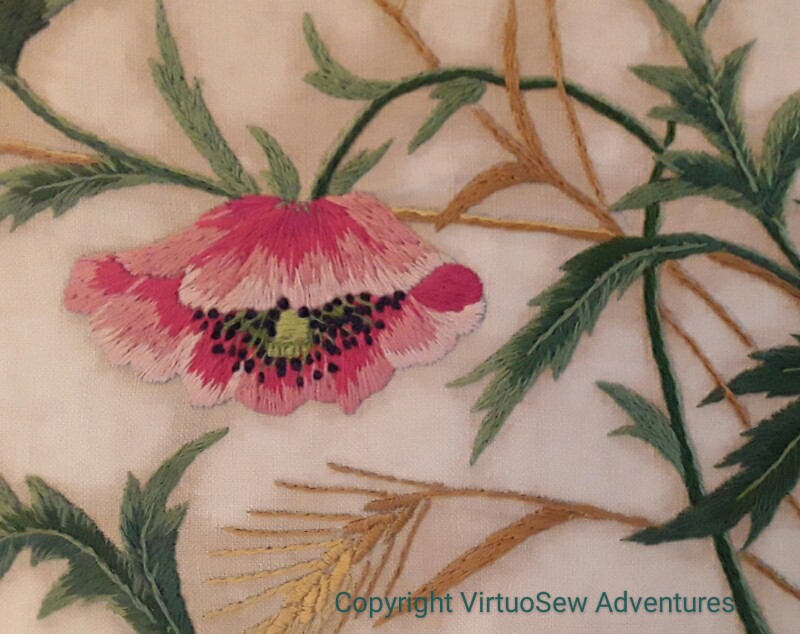
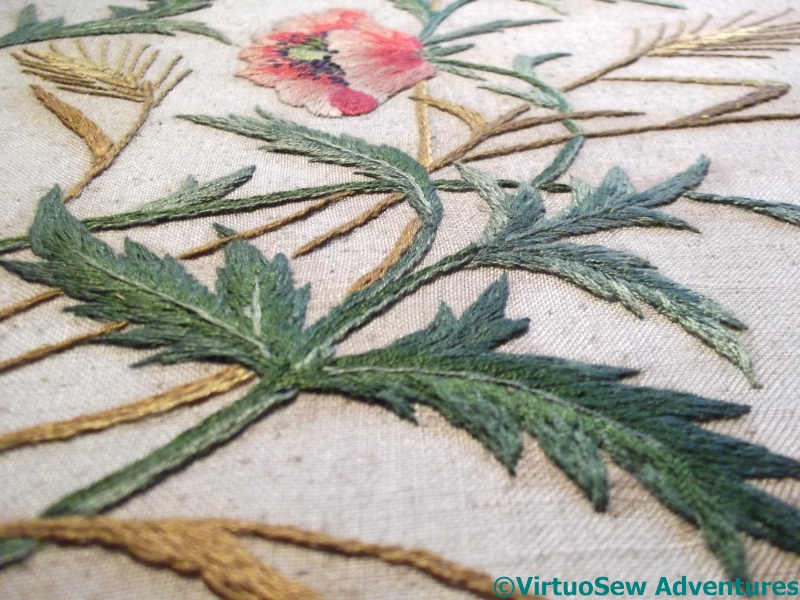
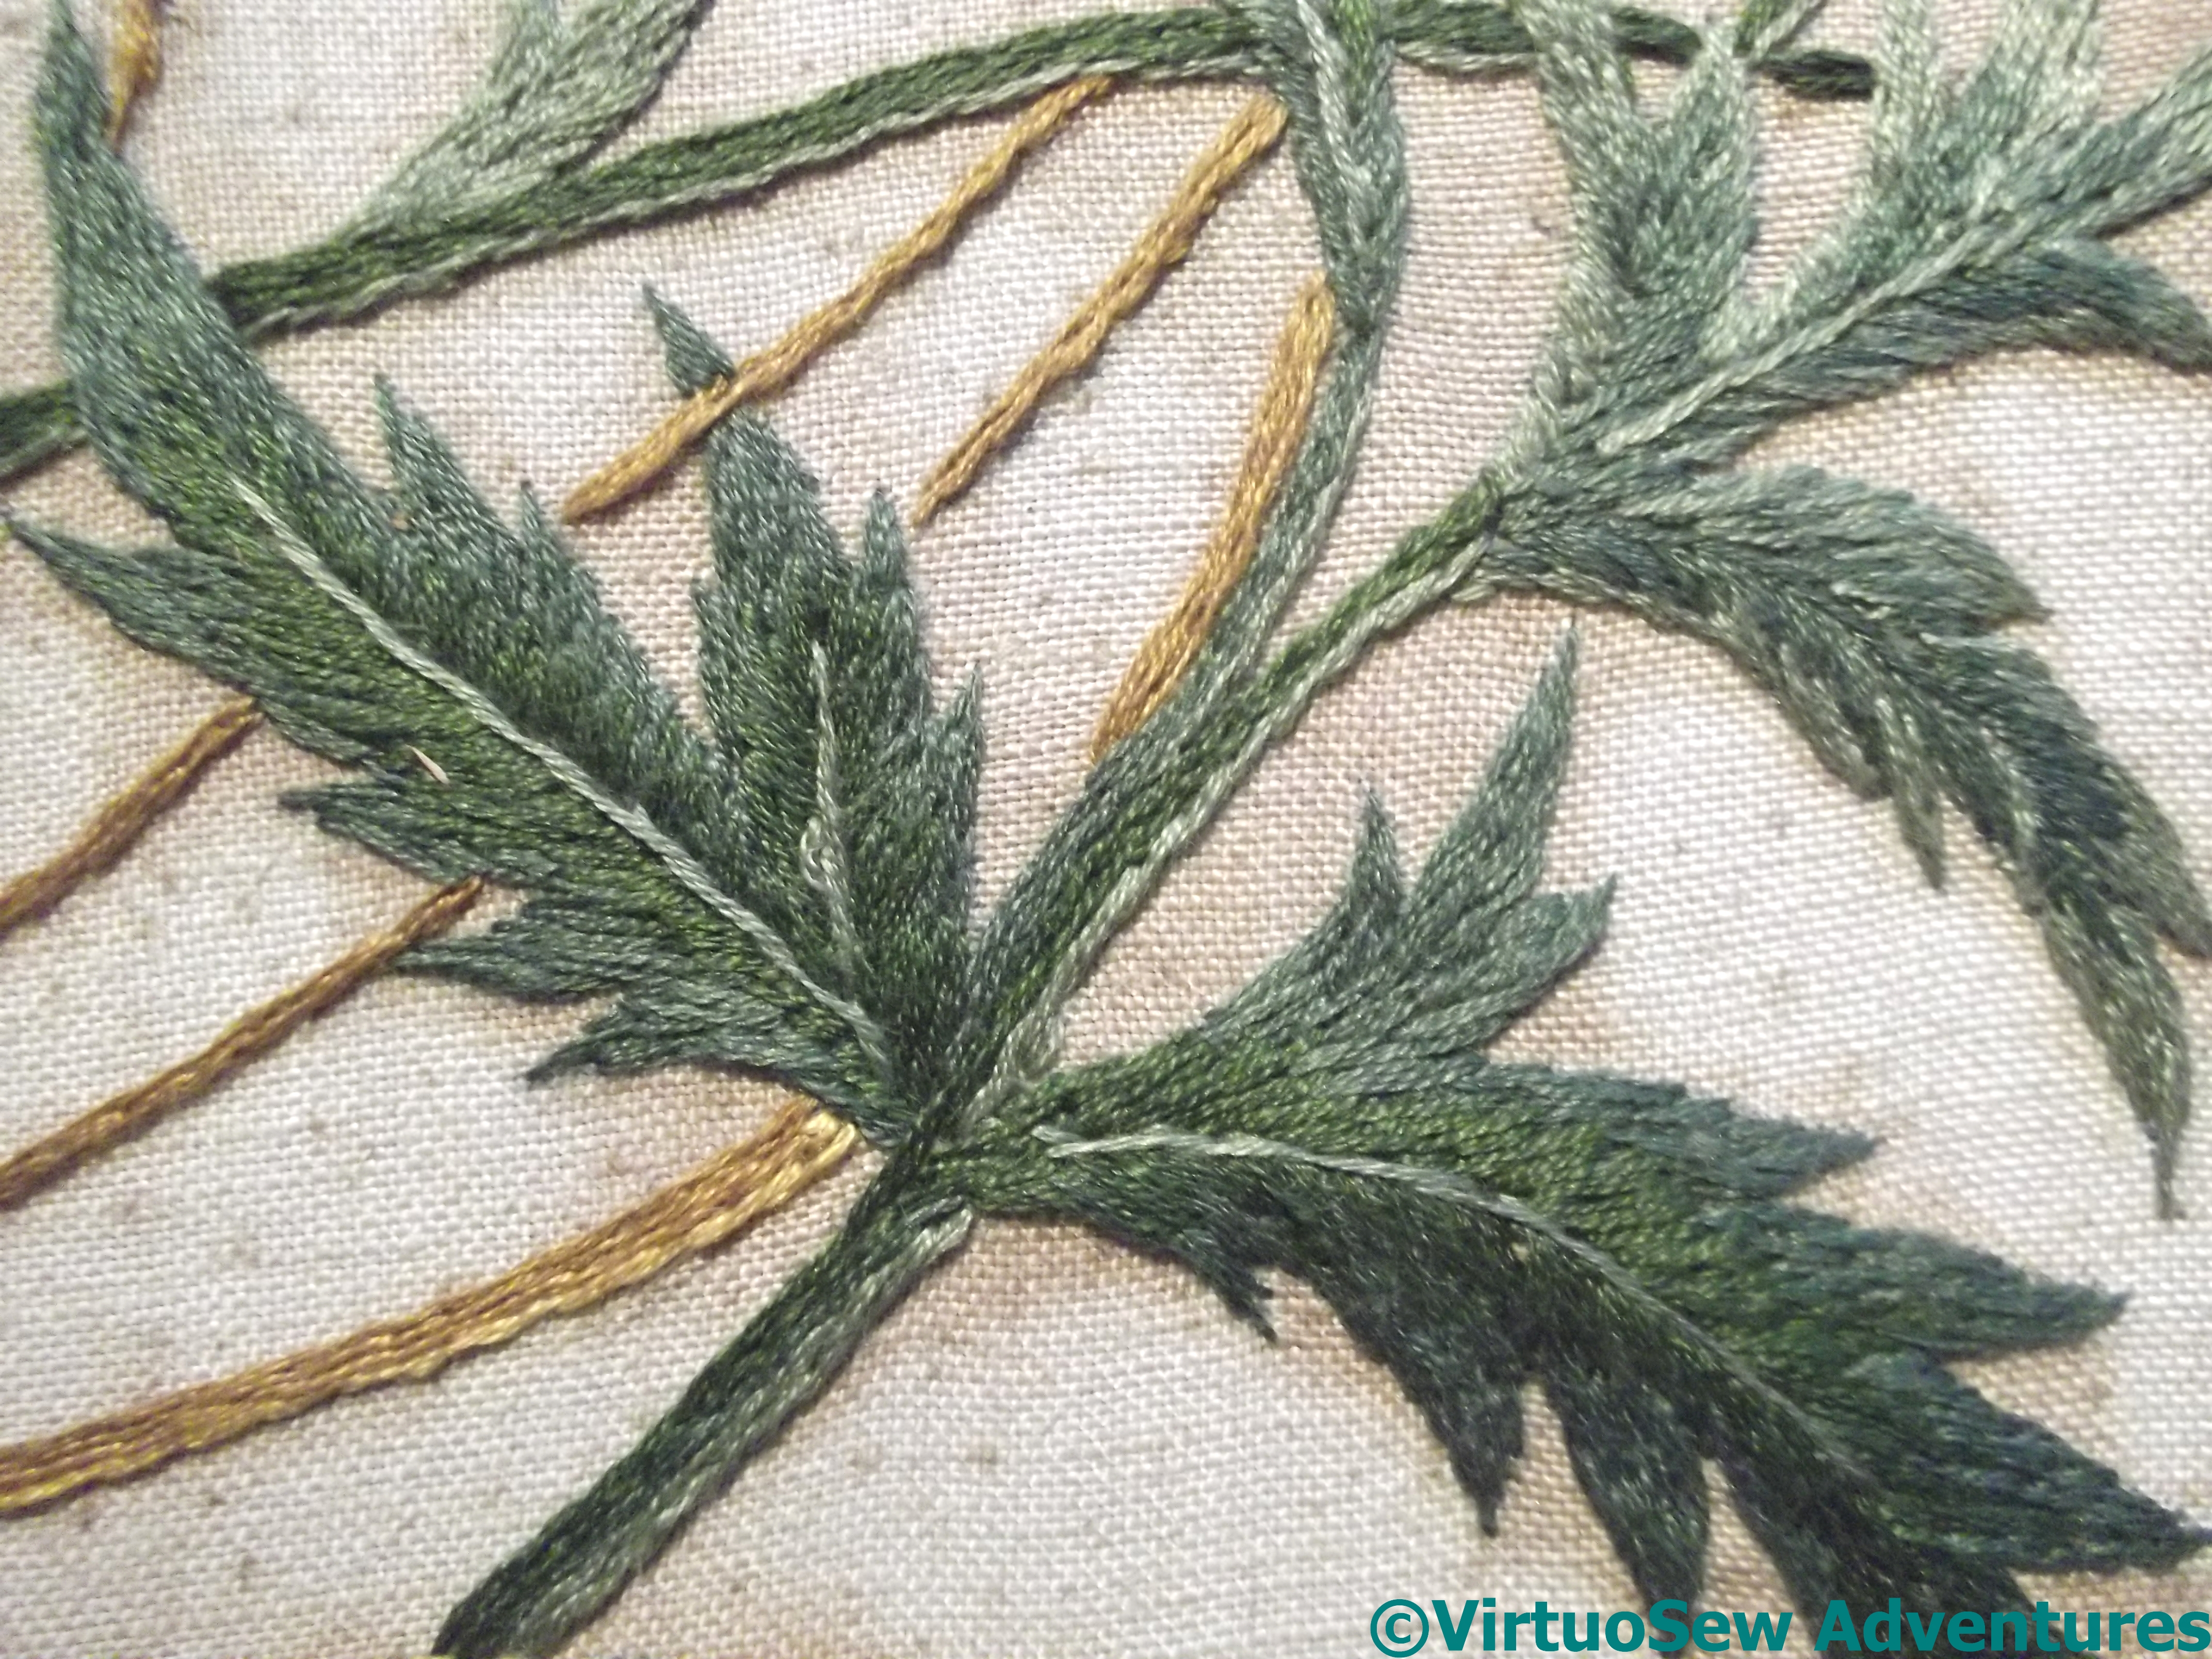
The embroidery is worked in long and short stitch, satin stitch, stem stitch, and French knots. I think Grandmama used two strands of stranded cotton throughout, and as it was wartime I’m impressed that she managed to gather ten different colours of thread for it.
It’s a salutary reminder to me that a riot of ornamental stitches and overdyed threads isn’ t always the very best way to achieve a striking result.
We are going to ask a textile conservator to have a look at the piece as it is, glued to its backing board, and give us some advice about the next step. Grandmama would be in pleats with laughter at the idea of any of her embroidery going to a conservator, but I hope she would be secretly pleased as well…!
Poppies and Wheat – Another of Grandmama’s Pieces (Introduction)

Tray – Poppies And Wheat
The design for this tray was embroidered by my Grandmama during the period when she and her sister and all their children were evacuated to Burton in Westmorland during the Second World War.

Signed On The Back
We know that because it has been signed on the back!
Besides, my mother remembers it being used on ceremonial occasions. It was always a trial – it’s very heavy (because of the glass), rather slippery (glass again) and doesn’t have much of a rim to keep what’s on it safe. Especially with four children and a dog in the house.
In fact Grandmama, and now my mother, both resorted to propping it up somewhere and using it as a cross between a picture and an ornament. It makes a rather large ornament, too. I’ve seen mirrors over fireplaces that weren’t much bigger!
And of course – again because of that wretched glass – most of the time you can’t really see the embroidery for the reflections. Which is a pity, because it is exquisitely worked, probably one of the pieces overseen by Grandmama’s embroidery teacher, Miss Hunter. Recently my mother decided to take it out of the tray, find some way of cleaning it of some of the discoloration, and mount it properly as an embroidery. Naturally we will find some way to remount the signature from the back as well.
Needless to state, this turned out not to be as easy as we might have hoped.