
Tag: stitches
The Crock of Gold Hoard – The Ground And The Shadows
There’s been a frustrating hiatus in my stitching life of late – I’ve had tennis elbow, and have had to write up old embroidery projects for you instead of making progress on any of my current ones. I’ve been going stark, staring mad with frustration, because even holding a book has been painful.
Beginning The Shadows – Take Two
However, I’m beginning to get back to it at last. Cautiously, so there will still be older projects interspersed with the current ones!
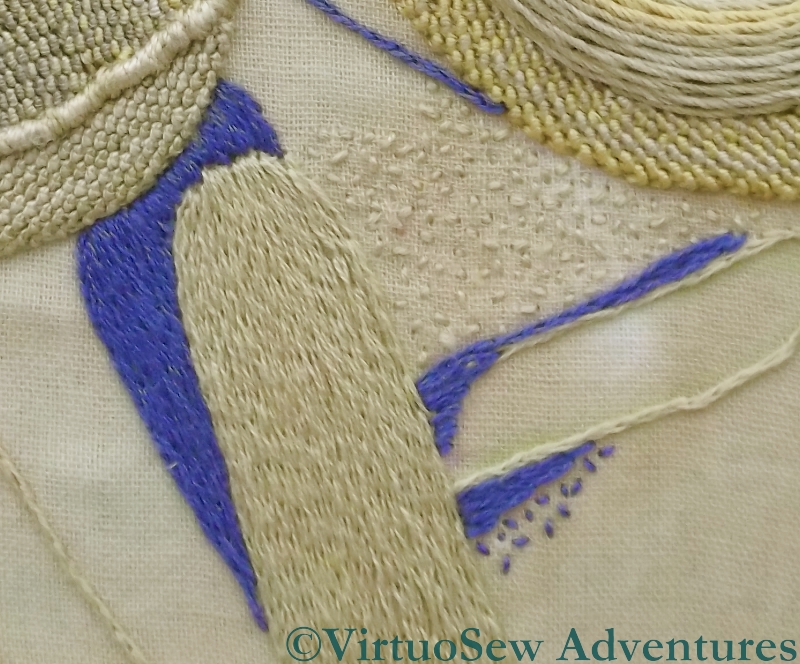
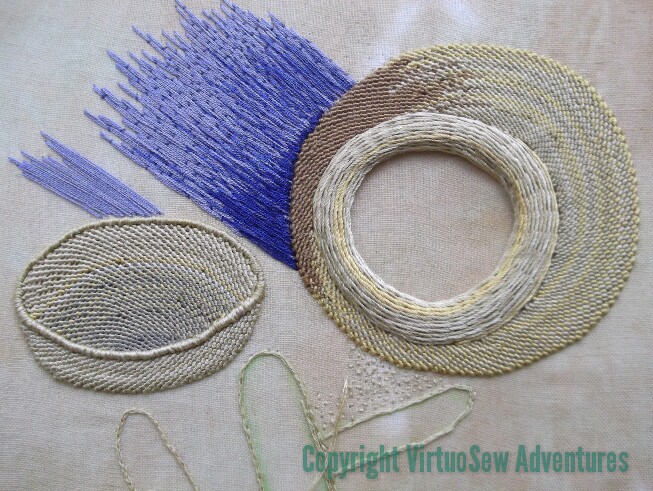
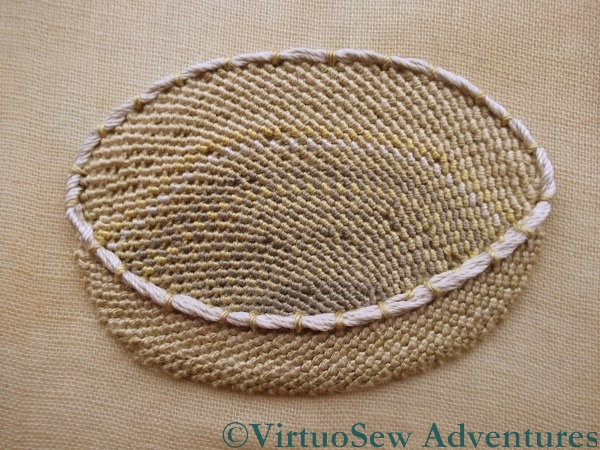
I’ve been doing a few stitches here and there while I’ve been trying to rest the elbow, as much as anything else to gauge my recovery (or lack of it, as it sometimes seemed!). So now you can see that I’ve nearly outlined all the shadows. There’s just the shadow inside the pot to deal with and it occurs to me that I might need to find some tarnished purl to create the effect of the shadow on the metal inside!
Close Up Of Sticks
I’ve also made a start on the sandy effect seed stitches, in a small section between the pot and the sticks. That’s going to challenge my boredom threshold, even though I don’t intend to have the seed stitches all over the background!
This close up shows that I’ve also managed to fill in the first of the sticks, using split stitch filling. I need to add some highlights later, because as it stands it’s a little flat.
Still, it’s great to be back!
Crock of Gold Hoard – Those Wretched Shadows!

All Unpicked
When you last saw the Crock of Gold Hoard (here), it included some highly unsatisfactory shadows, and my mother and myself had pounding headaches and crossed eyes from deciphering the original photograph.
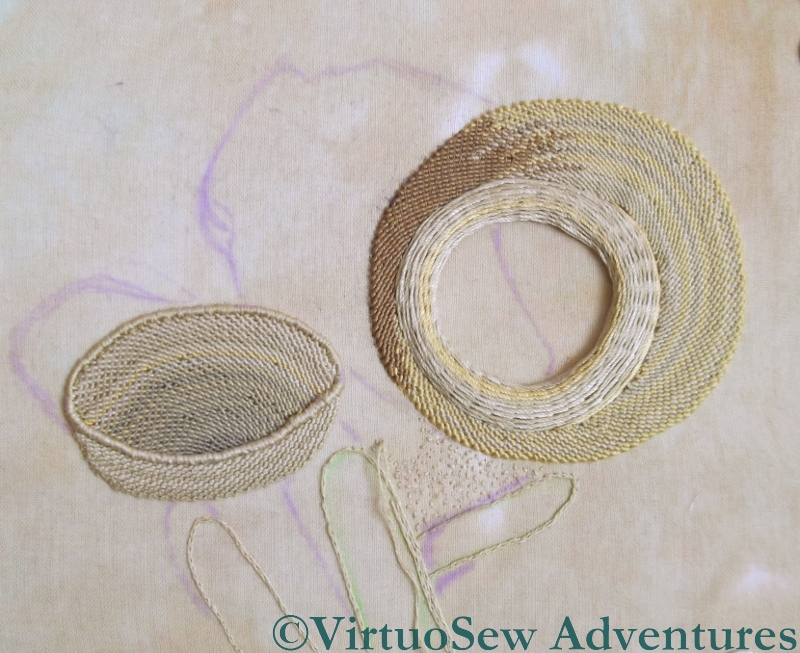
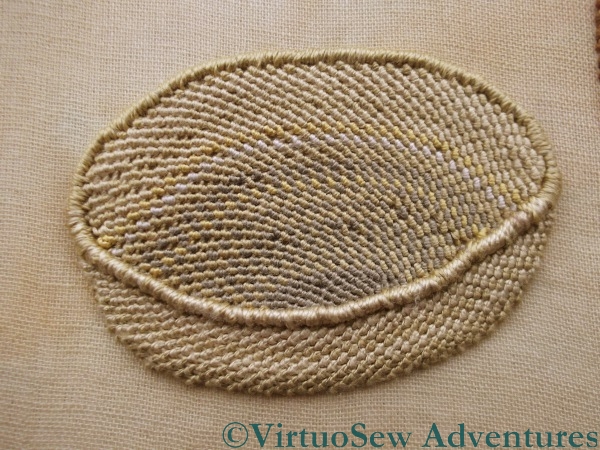
It took several hours of frustrating, painstaking unpicking, aided by tweezers, but I managed, and then started on the ground while I pondered the shadows. There are some sticks or something on the ground, and I want the ground to look sandy and speckled so I’m going to use seed stitches to create the sandy, gravelly look.
Simplified Shadows
There followed still more headscratching, sketching and puzzling (including experiments with photo-editing and watermarking on my tablet computer – that’s why there are two different copyright notices in this post!),
This example isn’t quite right – the shadow of the pot isn’t long enough, but it does demonstrate quite clearly that I’ve decided to simplify the shadows very considerably.
Shadows drawn in chalk
Since I’m removing the archaelogist and his hands, as well as the confusing shadow of the post which is out of the picture, I’ve decided I might as well simplify as many of the other shapes as I can. As I’ve said before, I’m not a needlepainter, and I’m not aiming for complete realism. Still, getting the shadows right will do much to make the design seem realistic enough.
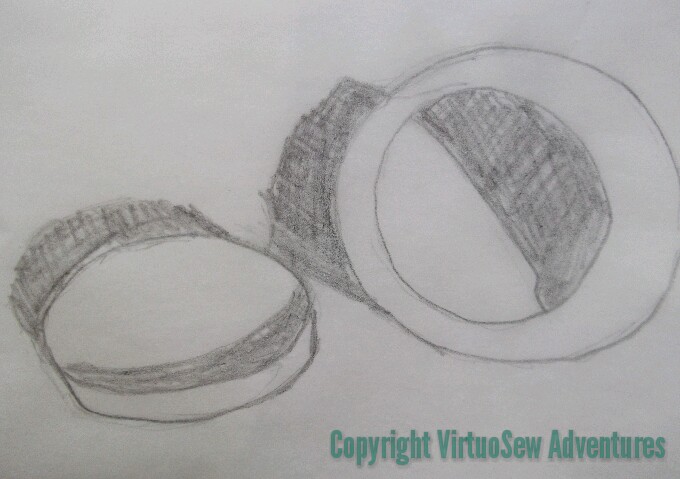
I’m sure the detail of the shadows will change, but I’ve now drawn in an outline of those simplified shadows in chalk. I’ve even remembered that the pot has shoulders and a raised rim.
Crock of Gold Hoard – Problems with Shadows
Trialling Shadows
I mentioned in my last post that I was somewhat troubled by the question of the shadows that I need to have in this picture to “anchor” the Crock and its lid in space. Since the silk I used for the Crock has a sheen, my original idea was to try to find a matte thread to help keep the shadows in the background.
Another Trial
I had three dark, “shadowy” colours in a linen thread, and tried those first. I wasn’t happy either with the colours (too dull and drab for shadows cast by an Egyptian sun) or the texture (rough and scratchy), so I tried a soft lilac-y blue stranded cotton, couched down with a darker blue. That was better, but not really dark enough.
Wrong Shadows In Stitch
So this on the left was my next attempt. I like the shading effect and depth of colour that I’ve managed to achieve, but I can already tell that the shape of the shadow is absolutely wrong.
So I packed it up, and took my problems to my mother, who is an artist, and has a much more practised analytical eye than I have.
At which point, we realised that the shadows were rather more difficult even than I’d thought.
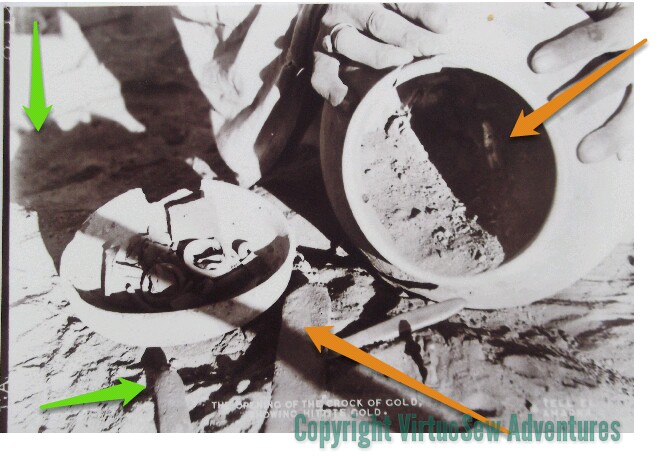
Difficult Shadows
A lot more difficult! The amber arrows indicate (approximately) what appear to be two conflicting light sources. Since the ground appears to be uneven, this must be a photo taken on site during the excavation. The vertical green arrow in the top left corner is pointing at a shadow which is clearly of something on top of a pole somewhere out of the picture. The other green arrow points to shadows show that the ground underneath the lid isn’t as even as a careless glance would at first suggest.
I’ve got a lot of unpicking to do!
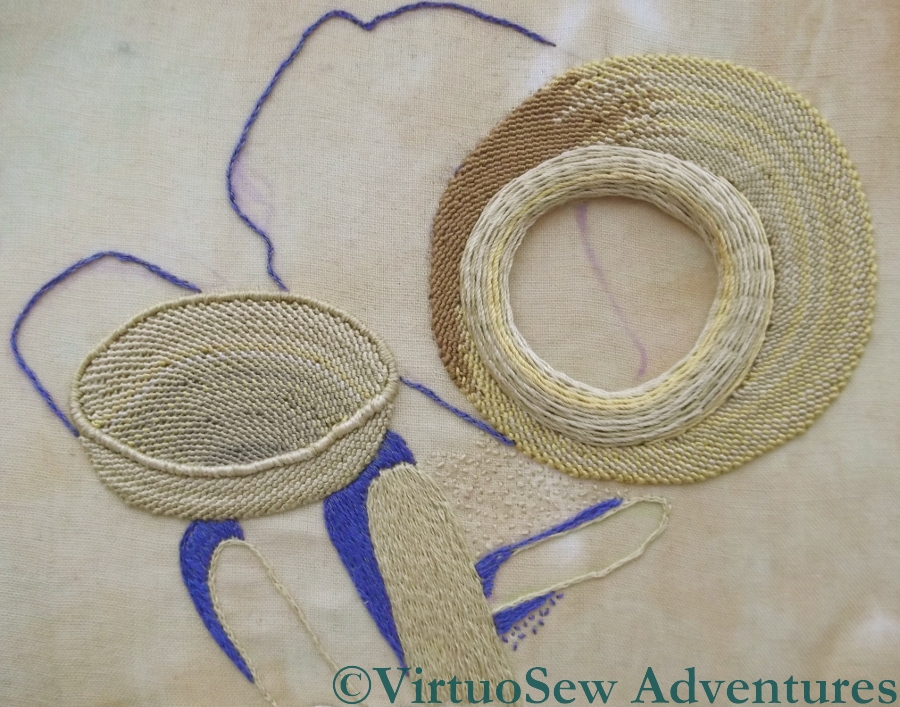
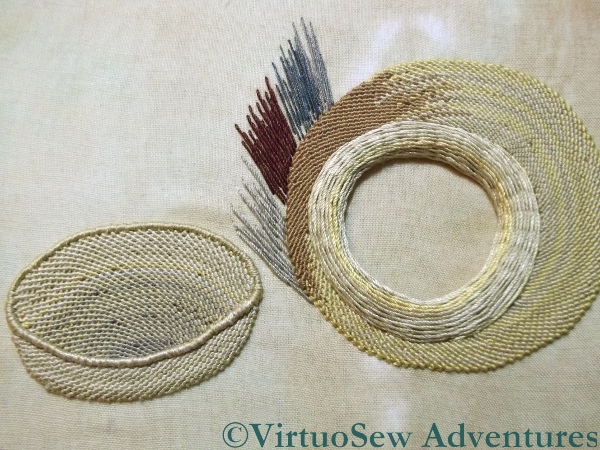
Crock of Gold Hoard – Working the Rim of the Crock itself

Foundation Stitches on the Rim of the Crock
After much cogitation, I decided to work stem stitch band around the rim of the Crock of Gold. It seemed to me that that this might create the right combination of a rounded shape and a smooth line around the rim. Although satin stitch worked beautifully for the much narrower rim of the lid, I was sure that it would lead the eye wrongly in this case. In fact if you look at the foundation stitches for the stem stitch band, I think that confirms my suspicion.

Rim of the Crock in Close Up – Stem Stitch Band
The choice of stitch also meant that by changing colours as I worked the stem stitch over the foundation, I could keep the sense of movement that I feel recalls a hand-made pot. Had I worked the rim in satin stitches, changing colours would have created a rather blocky effect – fine when I come to re-create some of the geometric patterns the Egyptians used, not so good for a plain and undecorated earthenware pot!
I had a momentary wobble as I began to work the rows as the stitches seemed not to be packing together, and I kept catching my needle on the felt, but gradually as I added more rows of stitching I realised that it was working.
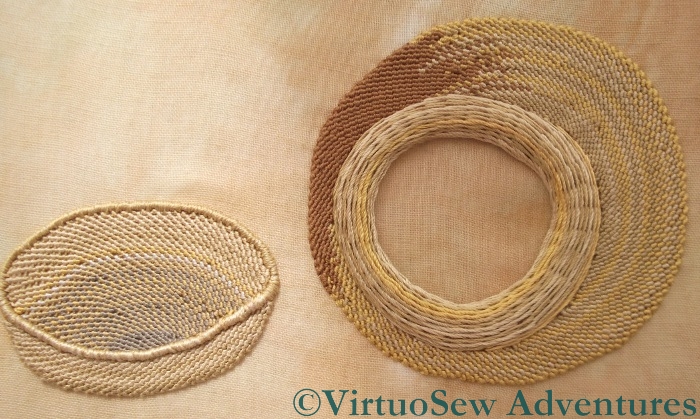
Both Rims Done
Now I have the rims done, I need to do the shadows, and I’ve not quite worked out how, as yet.
Still, thus far, the Crock of Gold is working pretty well. I think the raised effect of the rims will help to keep the chipwork visually contained, and that will be important, as there’s the potential for chipwork to draw the eye too much.
Crock of Gold Hoard – Working the Rim of the Lid
Trellis Stitch Finished
While continuing to work the eccentric spiral trellis stitch for the lid, I’ve been thinking about the rims.
Before I move on, though, this picture shows how I’ve tried to introduce darker colours inside the lid to create an impression that it is hollow.
I think it’s worked, too!
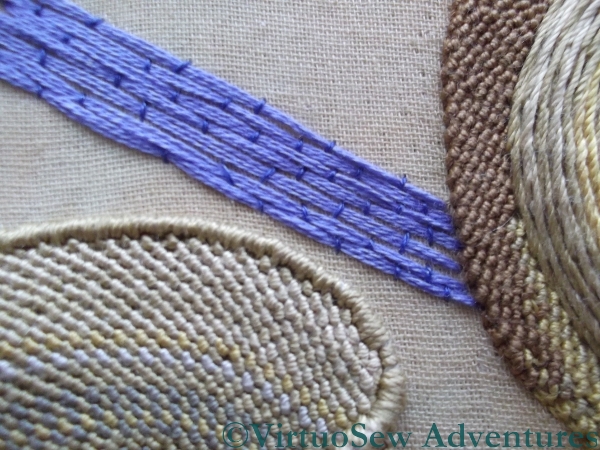
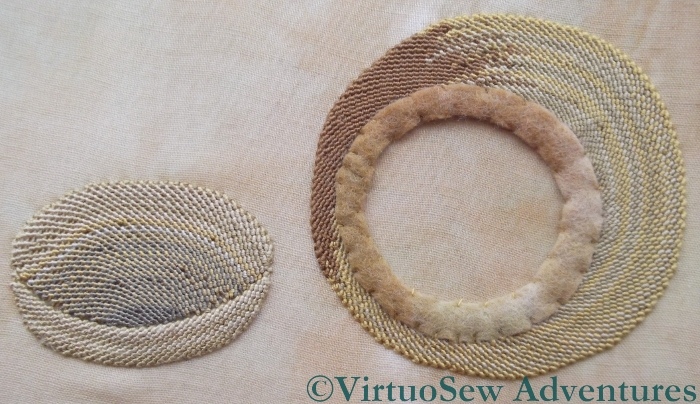
Padding Lid Rim
It’s clear that I’m not going to be able to use the same techniques for both rims, since one is so much wider than the other. I used felt for the rim of the crock itself, and four lengths of silk thread twisted together to put some padding on the lid rim. As much as anything else, this is to create a visual sense of depth when I put in the chipwork. Even without the padding covered, this works pretty well.
Lid Rim Done
However, with the padding covered with satin stitch, it looks altogether better. Working the satin stitch was something of a trial, because I have a layer of calico, a layer of turban cotton, and then the edge of the trellis stitch to deal with. I’ve varied the colours around the rim to create some sense of depth and highlight.
I’ve realised while I’ve been working on this that the next serious challenge on this piece is going to be working out how to put the shadows in. As it stands, it is interesting, but not visually satisfying, because the crock and the lid seem to be floating in mid-air. They need to be brought back to earth, preferably without a crash!
Finnish Embroidery
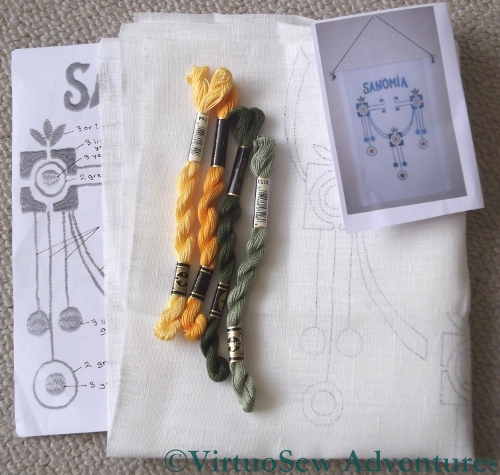
Finnish Embroidery Design
A few weeks ago, my husband the Australian was speaking at a conference in Turku, Finland, and the organisers were kind enough to allow me to go too. We had a marvellous time – the Finns are terrifyingly good linguists, so we had no language problems, and because the conference was about Science and Art, and how they feed off one another and contribute to one another, the conversations were very wide-ranging, full of sparkle and fun.
I didn’t have much time for side trips, but I did find an embroidery shop, and asked about local rural Finnish embroidery. I picked a design I liked the look of, and they agreed to prepare a tracing for me and send it on. It seems to be in a combination of stem stitch and Bokhara couching, but when I’ve had a closer look at the stitch diagrams, I will be able to tell you more.
This is what the lady in the shop told me about the design:
You also asked for some information about the pattern, we have a book that tells a brief history of where the pattern was found. Of course, the original designer of the pattern is impossible to trace.
The pattern was originally embroidered on a bag or pouch, that was hanged on the wall, where people put smaller newspapers and magazines into. That’s why the pattern is called ”Sanomia”, it means messages or news in finnish. The word was also embroidered in the bag. We copied the model ourselves to other products, such as runners.
The ”Sanomia”-newspaper bag was found in the Kankaristo house, in country village of Mynämäki.
The bag, that was found there, was sewn by the lady of the house, Helli Kankaristo, born in 1902. The story tells that she was taught to make embroideries by her very skillful teacher at school, and Helli passed her skills also to daughter Inkeri, born in 1928.
The Finnish Table Runner is Finished!
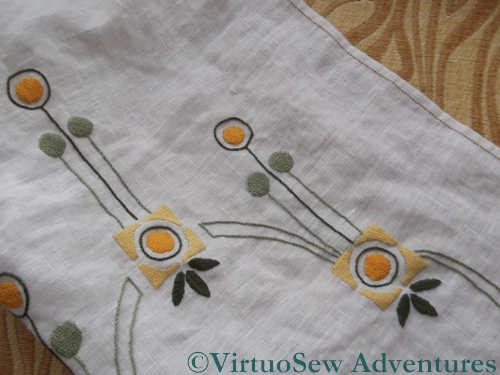
Table Runner Hemmed
At long last… I have finished the Finnish Table Runner!
The embroidery itself is very simple – Bokhara Couching and Stem Stitch, with the darkest leaves worked in nested Fly Stitches. I used two shades each of two colours – a greyish green, and a golden yellow.
The couching stitches of the Bokhara Couching are carefully arranged to create a basketweave effect, and I worked harder than usual to make the stem stitch regular with an even twist to it. Real simplicity is hard work, because the simpler the tools and effects you are using, the better-executed they have to be!
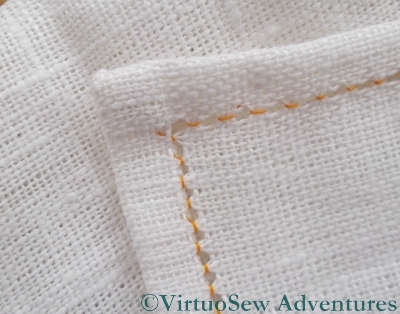
Antique Hemstitch - Corner Front
So I have taken particular care to stitch evenly. This was not entirely straightforward, in fact, as the fabric is a plain weave (one thread over and one thread under in each direction) but is not a square weave (warp and weft threads equally spaced). Since it is also a linen, and the threads are a little slubby, sometimes the effect is exaggerated. This became especially clear when I worked the hems.
Incidentally, I’ve no objections at all to the fabric not being a square weave or to the threads being slubby – these are just factors that sometimes influence how something is worked or the effects that are achievable.
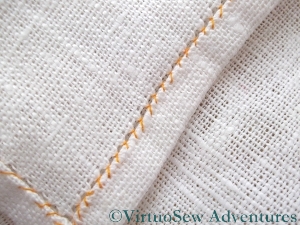
Antique Hemstitch - Corner Back
When I hemmed the piece, I chose to use Antique Hemstitch (at least, that is what it is called in Yvette Stanton’s Right Handed Embroiderer’s Companion). This leaves only a small stitch on the front of the piece. I withdrew a single thread for each hem (the instructions usually suggest at least two, but I wanted a narrow line down the edge and not the dogtooth effect of hemstith on only one side of the withdrawn threads), and then grouped four threads in each stitch. If you look hard at the photos, you will see that in one direction the stitches look longer than the other, although they group four threads in each case.
Since the table runner is about a metre and a half long, and nearly half a metre wide, that’s about four metres of hemming, which for some strange reason I enjoyed enormously, even though I’m really not good with repetition. I used ordinary sewing thread, but decided to use a golden yellow to add a bit of colour along the edges.
When my mother saw it first (half-done), she told be I was being a little show-off, but I think she meant it as a compliment!
Progress on the Finnish Embroidery
Finnish Embroidery - Progress
I managed to get started on my Finnish embroidery project at last. It’s going to be a table runner for our dining room, which is golden-yellow and decorated in a slightly Arts and Crafts fashion, so the design has been traced twice, back to back, to create a long design, and without the lettering shown in the photograph that accompanied the linen (see my first post about this project).
Following the model I saw in the shop, I’m using Bokhara Couching for all the solid shapes, laying the couching stitches in a sort of brickwork pattern to create texture. The deep golden circles will echo the sunburst in the eucalyptus frieze in the dining room, and the two greyish greens are close to the other colours in the frieze.
All the lines are going to be in stem stitch. I’m working this quite slowly and carefully to keep the stem stitch twisting neatly in the same direction and the stitch length more or less the same.
It’s some time off yet, but I’m planning to hand-hemstitch the edge of the runner. I take a slightly unexpected pleasure from hand-hemstitching, and even the six metres of hemstitching on the Piano Shawl haven’t put me off. There’ll be about three metres of hemstitching on this, and I’m rather looking forward to it!
More Progress on the Elephant of Infinite Charm
I don’t work on the Christus Natus Est panel in the evenings, so I have been making progress on the Elephant of No Distinction But Infinite Charm. Slowly, because he has been proving obstreperous!
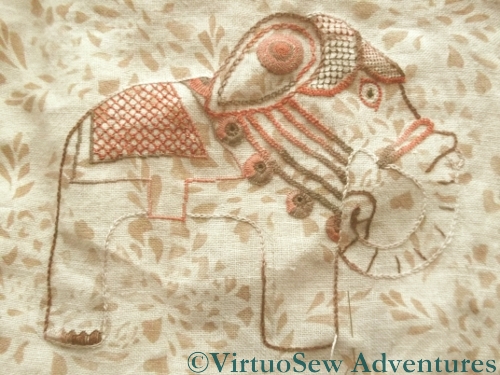
Progress on the Elephant of Infinite Charm
I’ve added a second row of cable chain stitch around his ear, and worked a single large roundel of spiral trellis stitch to embellish it. The spiral trellis is a very thread-hungry stitch – I think it used four or maybe five lengths, but it was well worth it. I was careful to bring the new end of the thread in using the end that the previous thread had just finished on, so that the blocks of colour in the variegated thread flowed smoothly rather than jumping about.
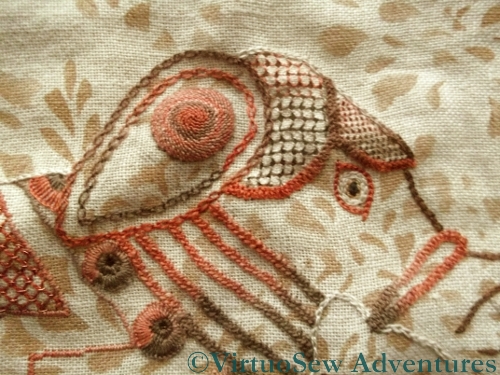
The Headcloth of the Elephant of Infinite Charm
You can see in the close up that I’ve used a pulled-work stitch for the Elephant’s Headcloth. I’m not sure which scale I prefer so I may just leave it as it stands. I wanted those sections to be covered, rather than open, but not completely solid. I think it’s pretty successful, but I intend to stare at him for a little while now, while I try to work out how I am going to work the anklets on his legs.
Published!
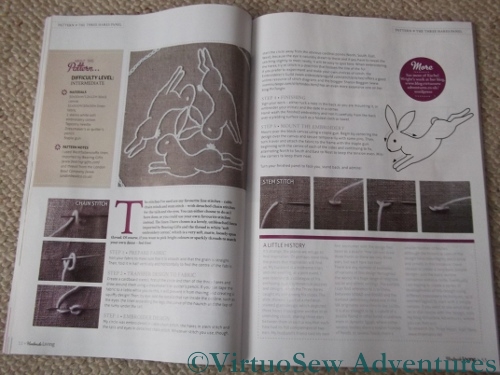
Article In Handmade Living
Some time ago I worked on a project I couldn’t tell you about, and this is it. There’s a new magazine in the UK – I think this one is issue 4 – which is called “Handmade Living”. It covers a huge variety of subjects, from knitting and embroidery to handmade soap and natural skincare. In order to bring all these subjects together, the editorial team have themes in mind for each issue, and when I suggested a few ideas to the editor, she thought that The Three Hares would fit nicely in the “Folk” theme. The Three Hares is a very old design, so she was absolutely right. It’s appeared all along the Silk Route…
I chose to use several of my favorite stitches, and worked the design as simply as possible. I’ve had a few ideas about using the design to experiment with some of the embroidery and needlework styles I’ve not played with yet – there are plenty of them, after all! – and it seemed sensible to start with a simple technique.
And by the way, if you’ve come to visit my blog after reading the magazine – Welcome! I hope you enjoy what you read…