
Tag: Silk thread
The View of the Excavation Finished…
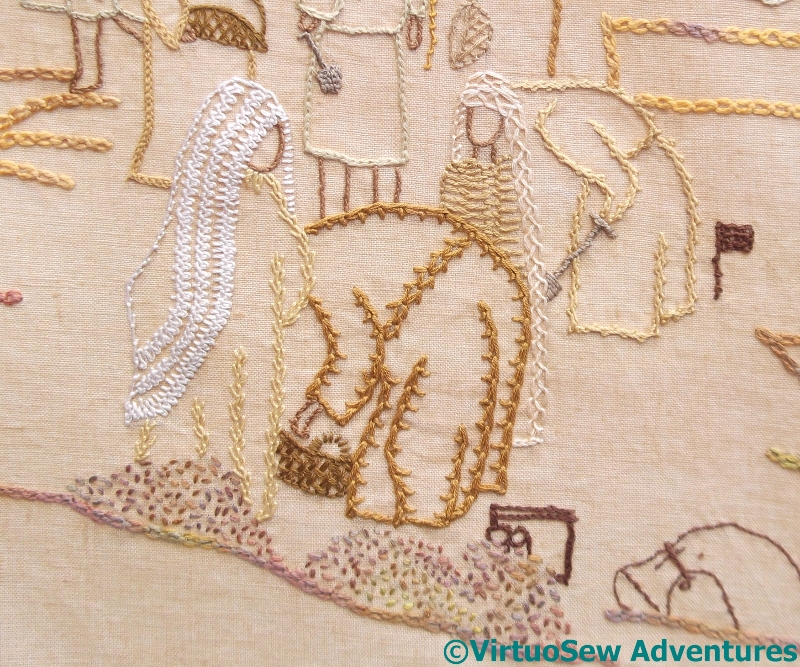
Foreground Group
The last group took a lot of stitching, restitching, unpicking and restitching. I couldn’t seem to get any of it right, and there are one or two bits I’m still not 100% sure about, even now…
The pale figure, bending over beside the little flag is in Spanish Knotted Feather Stitch, and the nearer bending figure is in Mountmellick Stitch. I was surprised that it was quite so hard to find suitably broad line stitches for the purpose; when you’re looking for characterful narrow stitches, you can only find broad ones, and when you’re looking for broad ones, by some strange alchemy only narrow ones catch your eye…
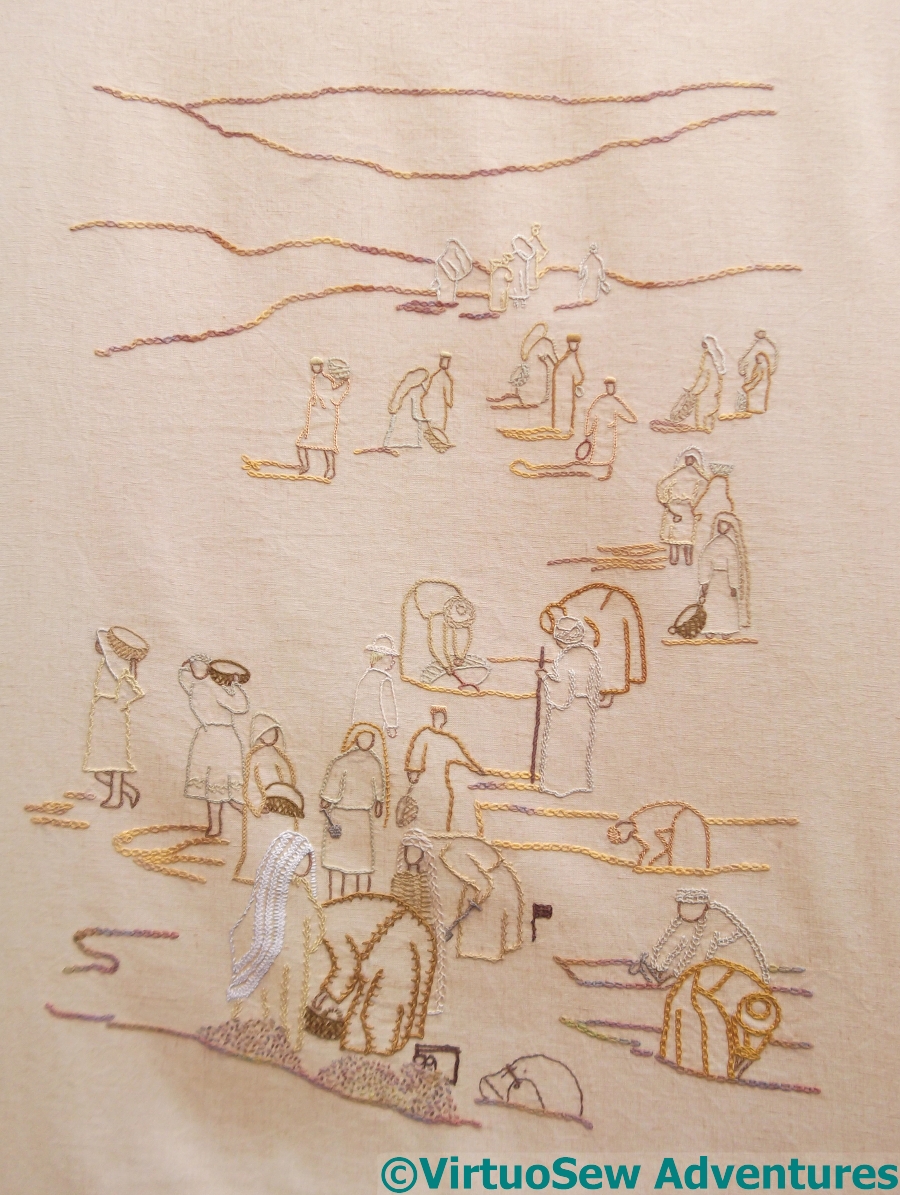
View Of The Excavation
The creamy white headscarf ran through Crested Chain Stitch (no!) and several stitches I hated so much I didn’t even record them, before I finally settled on three rows of Braid Stitch.
So at last, after much fiddling around, the View Of The Excavation is finished.
I’m fairly happy with it, actually. The trail of people into the distance creates a pleasing pattern, and I think that the alternation of the colours works well. Furthermore, as I wished, the Egyptian labourers and supervisors are the stars. There is a European, but he’s mostly concealed by the others.
There may be a few tweaks – not least I have yet to make sure that it works as a counterpoint to the Map of Amarna – but I think that at last it is finished for the time being!
Still More on the View of the Excavation

Supervising A Trench
As I got nearer the foreground figures, I tried to pick broader stitches, or at least stitches that were a bit more emphatic. This group was great fun to do, starting with the Gufti with his staff of office (Portuguese Knotted Stem!). The Gufti’s robe is Feather stitch, as are some of the twists of his headgear. I concentrated very hard on keeping the stitches even and close so that the “density” of the stitch would be maintained. The one in dark gold is in double interlaced back stitch, except for the top of the headgear, and the waistline – those are whipped backstitch. The other one is in one of the Elizabethan stitches from Jacquie Carey’s book.
I had fun with the supervising excavator – the brim of his solar topee is the Hungarian Braid chain, and I reversed the direction of the chain stitch for the peak of the crown. He’s also the only one with fair hair and pinkish skin, and I dressed him in a pale, tailored jacket.
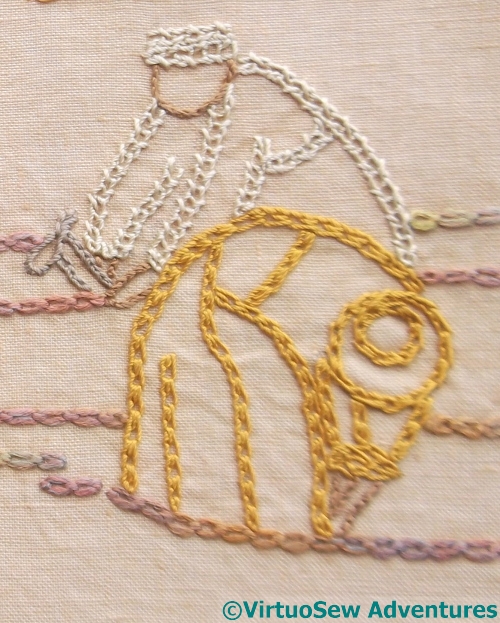
The two at the front are another mixture of stranded silk, stranded cotton, and round silk thread. The golden veil is coral stitch, and the tunic below it is stranded silk chain stitch, and the dark golden tunic is stranded cotton and twisted chain stitch. I’m trying to make choices of stranded or round yarn that will suit the stitch.
Two Diggers
I worked these two diggers on World Embroidery Day – which I hadn’t even known existed until the day before, so I was very glad I was able to sit and stitch!
I went back to my Edith John books for these two. The front one is in Shell Chain stitch, which I first used on the Circle Skirt. I won’t say it’s a favourite, but I have rather taken to it, and it creates an interesting effect.
The one behind is a very peculiar stitch, a combination of twisted chain stitch and open chain stitch. It creates a very square appearance, with the twisted chain alternating from side to side of the open chain, and it is called, rather predictably, Open Twisted Chain Stitch.
More Unfinished Objects
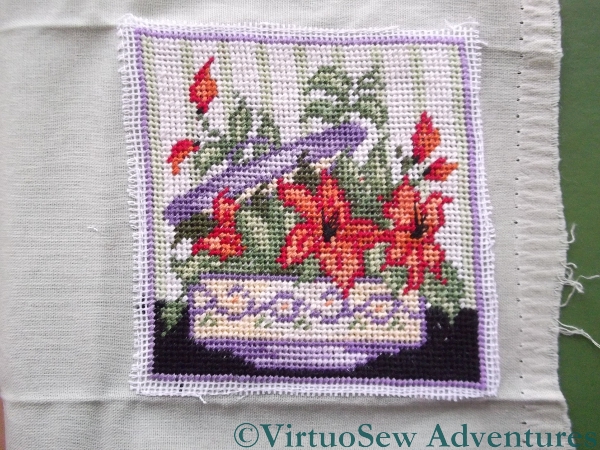
Tent Stitch Flowers
I keep on finding things that I’ve not quite finished, don’t I – and in some cases I had completely forgotten about them.
Like this one. I know it was a kit – stranded cotton worked in half-cross stitch on canvas, – but I don’t know why I bought it.
And I clearly had something in mind for it, because I have attached it to a cotton furnishing fabric. Equally clearly, it wasn’t going to be a cushion centre, or I would have centred it on the fabric. It is only about three inches square, so I suspect I had in mind making it into a needlecase.
But before I do anything else with it, I have to find some way of covering those raw edges of canvas with something that looks deliberate!
Any suggestions?
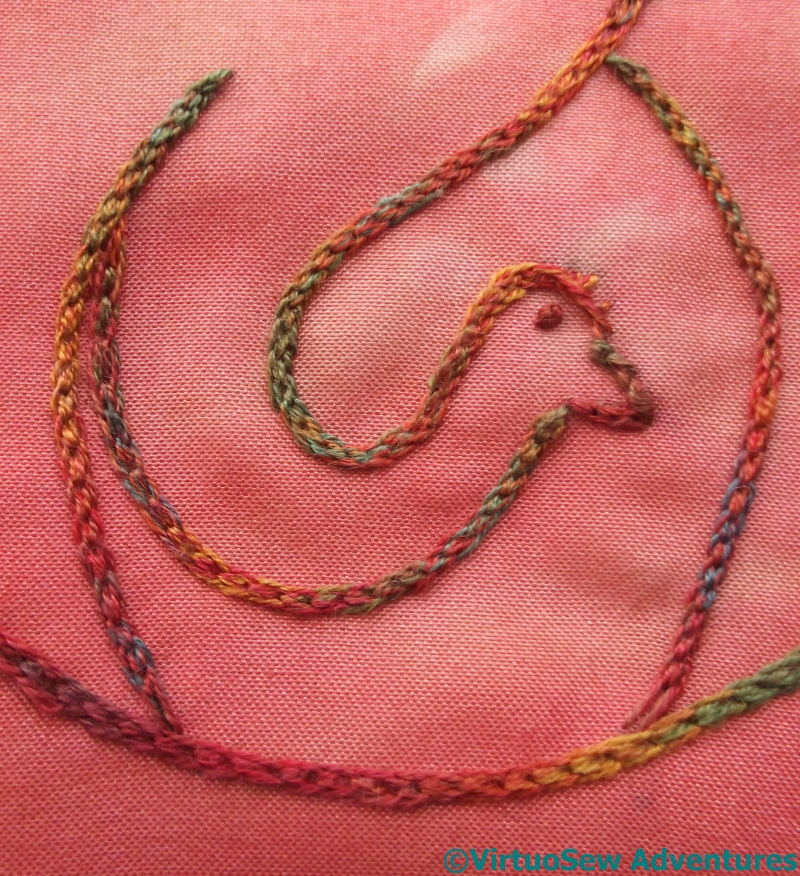
Coloured Crane
In other news, though – I’ve finished the second Crane!
Actually, you may recall that it was the first, but I decided it looked too overheated in the pot it was destined for, and set it aside for another version.
I found in when I was looking for something else, and finished it. At least, the embroidery…
I will probably mount it on a circle of card, and put in that famed Winter Decoration corner.
At least I know what I’m going to do with this one!
Finishing the Antelope Frieze
The Antelope Stitched
That didn’t take as long as I expected. Reverse chain stitch goes quite quickly once it gets started.
I am not at all sure what the elements to the right of the Antelope are intended to represent, but in the interests of completeness I’ve included them anyway.
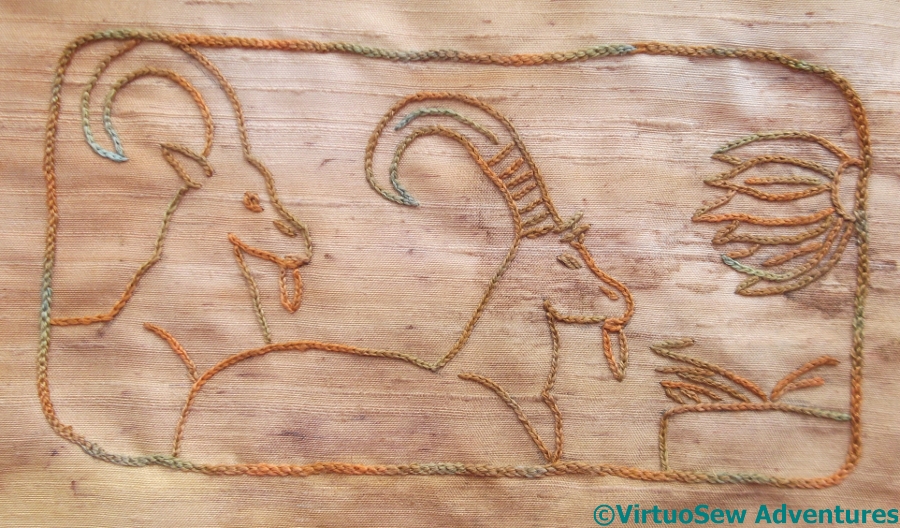
Finished and Framed Antelopes
I decided to stitch the frame after all, using the Hungarian Braided Chain Stitch I first used on The Crane Pot last year. It is structurally easy to get a grip on, especially immediately after an orgy of reverse chain stitch!
And furthermore, I’ve rather fallen in love with it – the intricate braided effect excites all my imaginative faculties!
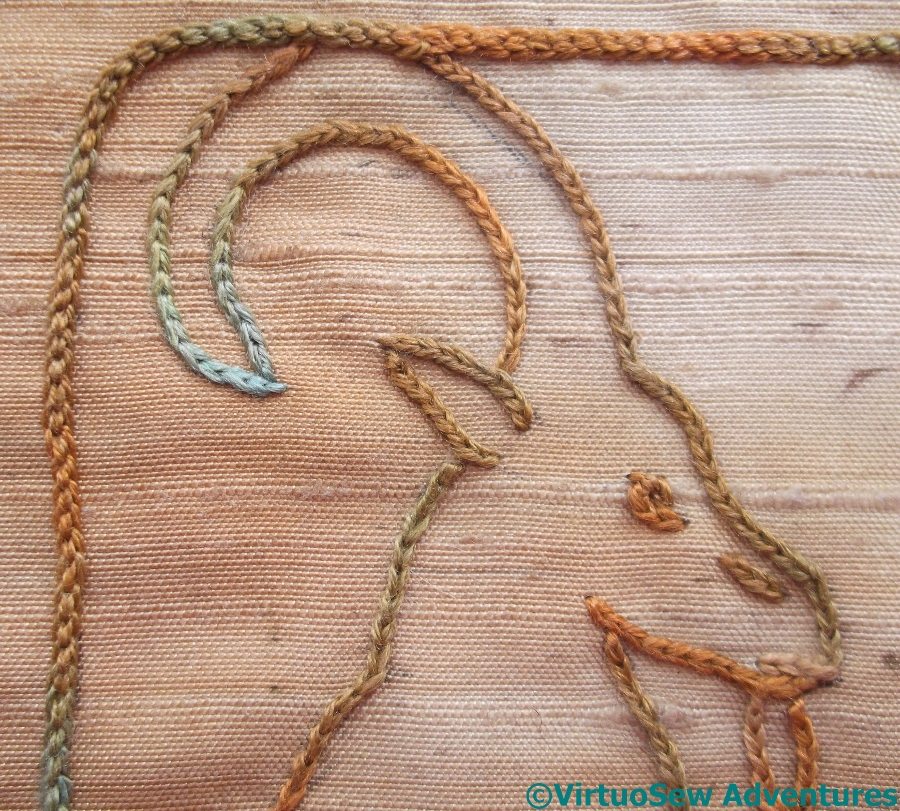
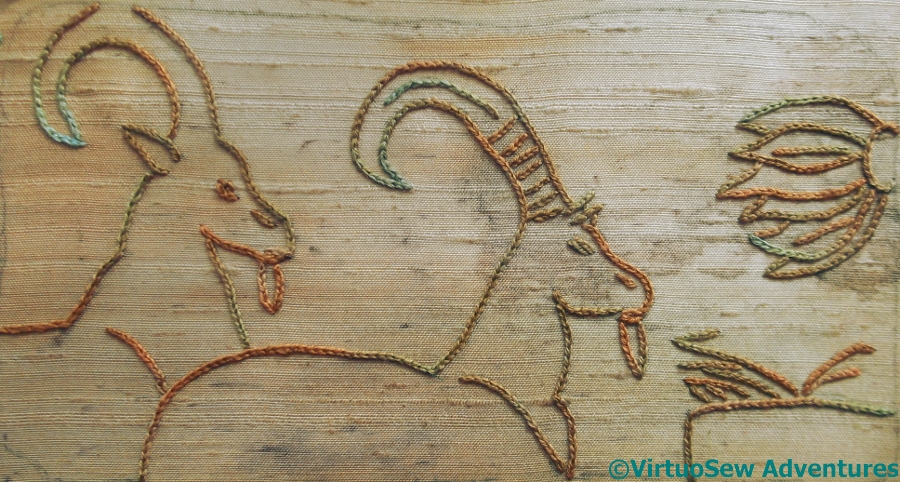
One Antelope Close Up
The slubby, handpainted silk is rather reminiscent of the sort of papyrus that tourists bring back, but rather than the garish coloured designs that are painted on those sheets, the subtle variations in the silk thread pull the impression back to resemble the stone in the original photograph. I also rather enjoyed the simplicity of a single stitch and a single type of thread.
I was really pleased, when I took this close up, to see how even the stitches were. This evenness hasn’t, in the past, come naturally to me – anyone who has ever received a handwritten letter from me will know that – but I think all the work on Thistle Threads Online University Courses is beginning to pay off!
Dreams of Amarna – The Antelope Panel
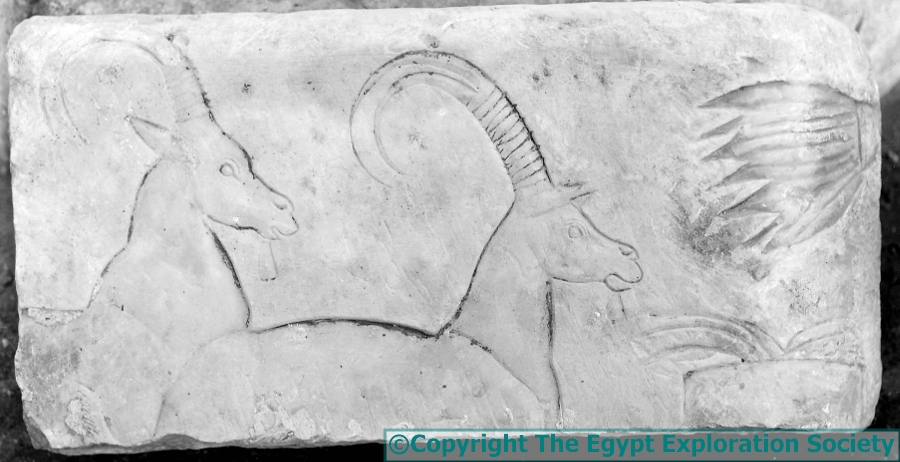
Antelope Carving – Photo copyright The Egypt Exploration Society
When I finished the Hittite Amulet, I didn’t have another piece ready to go, but feeling a little jaded with metal threads, I didn’t want to move straight back to the Tudor Rose… So I went rummaging in the wonderful selection of photographs that the Egypt Exploration Society allowed me to have copies of to use as reference, and found a photograph of a small piece of stone, carved with part of a frieze of antelope.
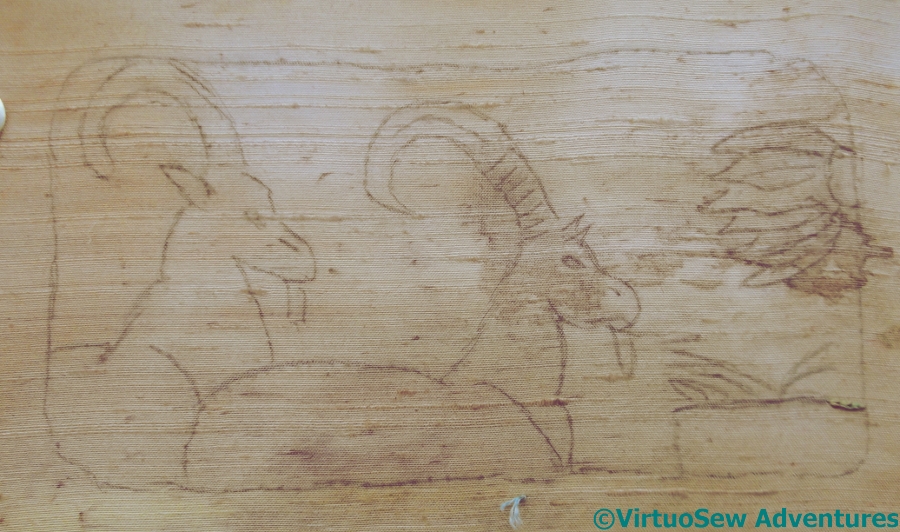
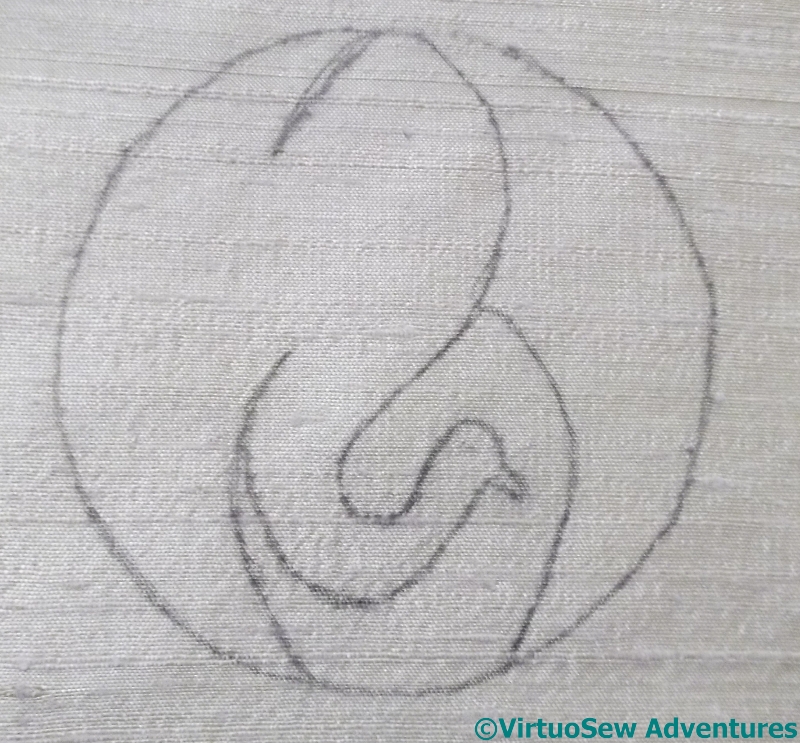
AntelopeFrieze
I transferred the design onto some handpainted silk using the prick-and-pounce method, and went over the lines with a pencil, then framed it up over a calico backing, picked out a skein of hand-dyed twelve strand silk and thought about stitches.
In the end I decided that what had attracted me to the photograph was the simplicity of the lines against the slightly uneven texture of the stone, and so I should make my version absolutely simple too.
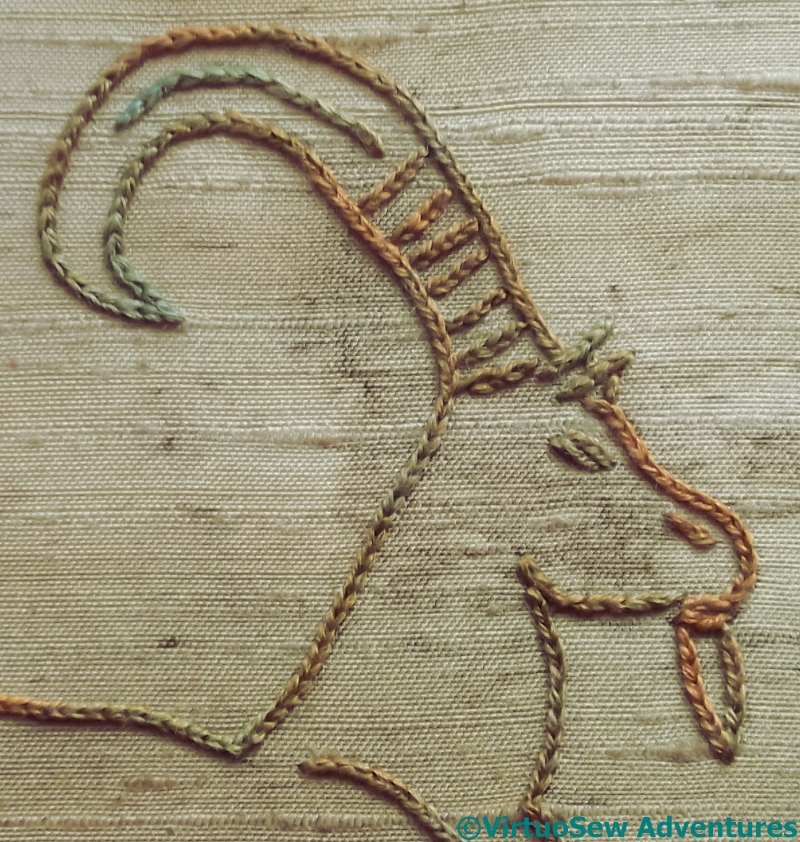
Antelope Close Up
With that in mind, all the lines will be in reverse chain stitch, worked as small and as evenly as I can manage without using a magnifier, for all the lines. Reverse chain stitch is so much easier than ordinary chain stitch when the fabric is in a frame!
I am thinking of using Hungarian Braided Chain, which I worked on the Crane Pot, for the edge, but I am also considering the possibility of not stitching a frame at all, but instead stretching the silk over a piece of skirtex cut to the shape of the stone.
This is a real contrast with the Glittering Nightcap – very simple and very “minimal”. Almost like a palate cleanser after a heavy meal!
Starting on the Tudor Rose
Tudor Rose – First Stage
Having finished the embroidery on the Glittering Nightcap – even if I haven’t assembled it yet – I decided that I would allow myself to begin on the Tudor Rose. The goal of this course is to introduce stitches and effects that combine silk and metal thread – in the same stitch, not in the same thread – and I am hoping that it will give me ideas for tackling representations of ancient Egyptian jewellery for the Dreams of Amarna.
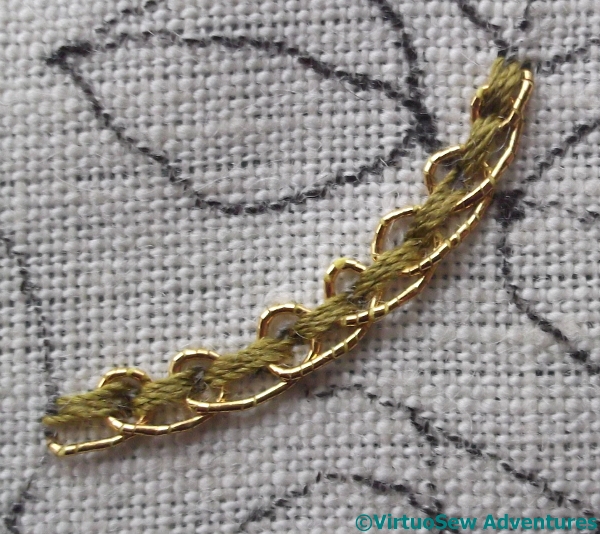
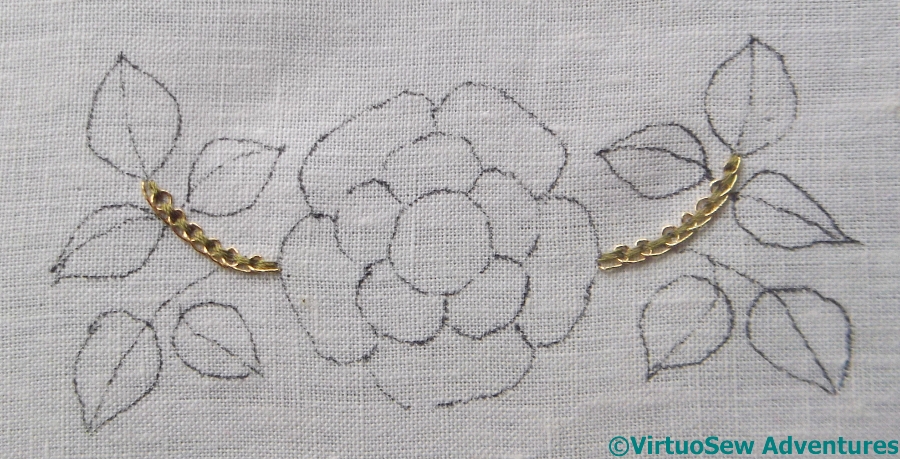
Interlaced Back Stitch
The first element is a fairly simple one, in effect a version of Pekinese Stitch, but with three rows of back stitch for the base, and a metal thread used for the interlacing. The challenge here is in making sure that the silk thread is sufficiently loosely stitched to make the interlacing possible, without being so loosely stitched that nothing stays in its’ place. Since the metal thread structure is of a core wrapped around with a fine film, when the thread is bent, the film sometimes stands away from the core, catching on the silk. Another key for Tricia in this course – as in fact in all her courses – is learning to be aware of the use to which a particular thread was intended to be put. We need not restrict ourselves to that use, but we do need to be aware of it!

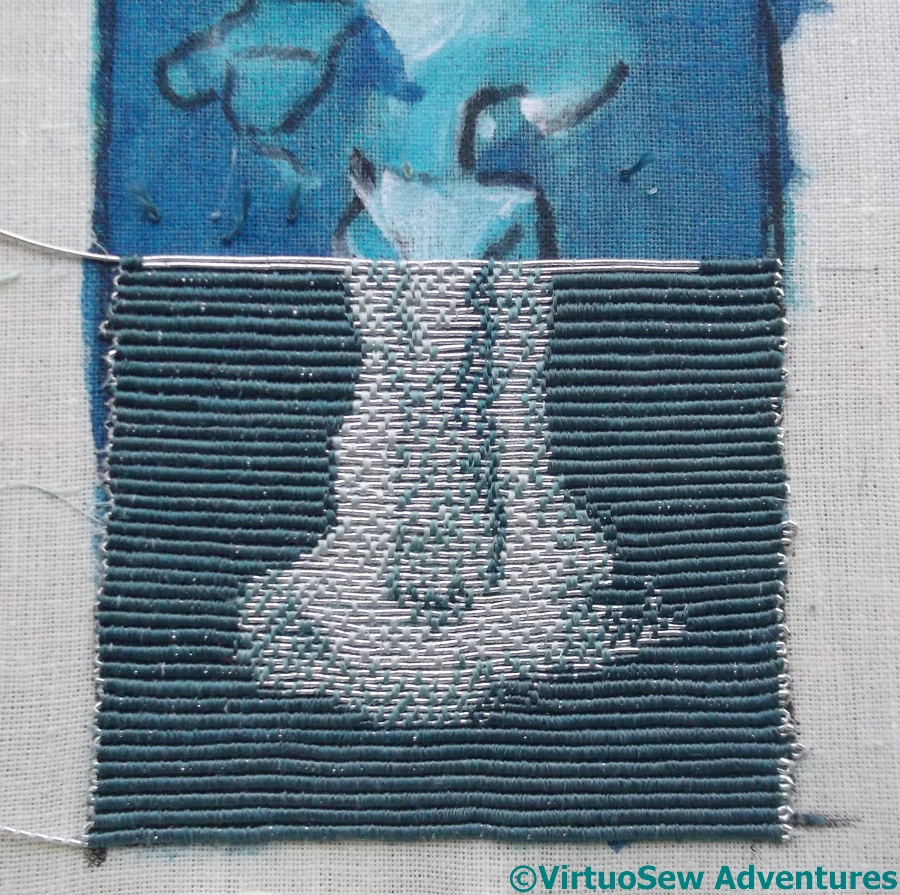
First Two Leaves
I rather suspect Tricia of letting us in gently, here, because the next element she describes is also fairly simple. The leaves are outlined in reverse chain stitch, in silk, and then filled using alternating rows of reverse chain in gold and in silk.
I hasten to add I have no objection to being let in gently – I’ve looked at the instructions for some of the later elements and rather expect a deal of unpicking to happen, so I’ve been able to enjoy handling the silk threads, which are quite heavy, but soft and “lofty” so they don’t punish the fabric unduly. If you look closely at this photo you will see that the olive green used for the stem is slightly thinner than the more emerald green thread used for the leaves. The weight matches nicely with the gold thread, so the more complicated elements that are coming up should look well balanced.
Restarting on the Hittite Amulet
Progress On The Hittite Amulet
It is months since you last saw the Hittite Amulet. I put him away in a boxfile before Christmas and refused to get him out again until the embroidery on the Glittering Nightcap was finished.
Of course, it takes a while to gather ones’ wits, and restore the “flow” of a piece like thisl. Since there are two alternating tasks – laying the silver thread and then covering it with silk as appropriate – it is hard to develop a sense of momentum. If I succeed, I may find he gallops away with me – which would be gratifying, because I have a lot more ideas for Dreams of Amarna pieces that I want out of my head and onto fabric!
Oblique View
I’ve tautened the fabric again, and I am trying hard to remember not to let the lines of couching sag in the middle. Sometimes I forget and stitch too tightly, but usually only for one row, so the situation does not get out of hand!
This close-up, oblique view, gives you a sense of the ribbed, “grosgrain” type effect of the background, and the speckling of stitches across the Amulet himself that give the light and shade.
I really think it’s working!
The Crane – playing with silken thread, Part Two
Japanese Crane Design
Here is the Crane design, finished and ready to be mounted for display.
I picked a wooden pot from Framecraft Ltd. People who have been stitching for a long time may remember them as “Framecraft Miniatures”, and they were always a good source of silk gauze and other supplies for people interested in furnishing dolls’ houses. They also supply a huge variety of other items with spaces for inserting embroidery – you might remember my Homage To The Opal, if you’ve been reading my blog for a while.

View Of Crane Pot
Framecraft supply a plastic cover to protect the embroidery, but as my cousin isn’t the type of person to maul a piece of embroidery with sticky fingers, I decided she would probably prefer to see the embroidery properly. They also supply padding, but it is a light foam, and I substituted two layers of a very fine cotton wadding instead. The cotton wadding has a bit more substance to it, and created a nice firm dome, which looks much better when the embroidery is displayed without a plastic cover.

Crane In Place
The colour changes and textural stitches keep the design from looking too stiff, but because the silk thread has a slightly matte appearance it looks soft and doesn’t dazzle the eye.
When my cousin took it home, she strolled around her house asking the Crane where he wanted to live. He chose the bedside table in the spare room, where his colours talk nicely with the wallpaper and the bedspread, and the wooden pot echoes the dark wooden bedhead and wardrobe.
The Crane – playing with silken thread, Part One
Japanese Bird
I decided to make a “Useful Pot For Putting Things In”, as Winnie-The-Pooh would have called it, for my cousin for Christmas. In fact, I cheated and merely embroidered a design for a lid!
I found the motif in the Japanese section of “Pattern Motifs: A Sourcebook” by Graham Leslie McCallum. I think it’s a crane. The design is very pared-down, and I thought it would make a good way to show off some of the superfine silk thread from Stef Francis, maybe even an excuse to use some more unusual stitches to see how the threads show them off.
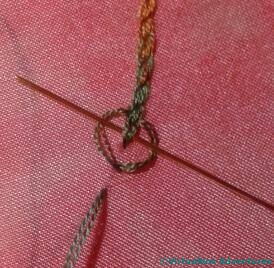
Hungarian Braided Chain Stitch
Those of you who follow me on Twitter may recall that I tweeted this picture of the stitch I eventually chose to use. It’s called Hungarian Braided Chain, and I found it in one of those books by Edith John that I mentioned when I began embellishing the Circles Skirt. If you think of it as Heavy Chain with the needle weaving over and under the threads as shown here, you will get the idea.
I’m very taken with the stitch, in fact. It creates a fascinating textured line, and colour changes in an over-dyed thread bring it to life even more. I can imagine using it in plain thread as an indication of braid on clothing, or ropes on a ship, or even simply in side-by-side rows to create a textured effect.
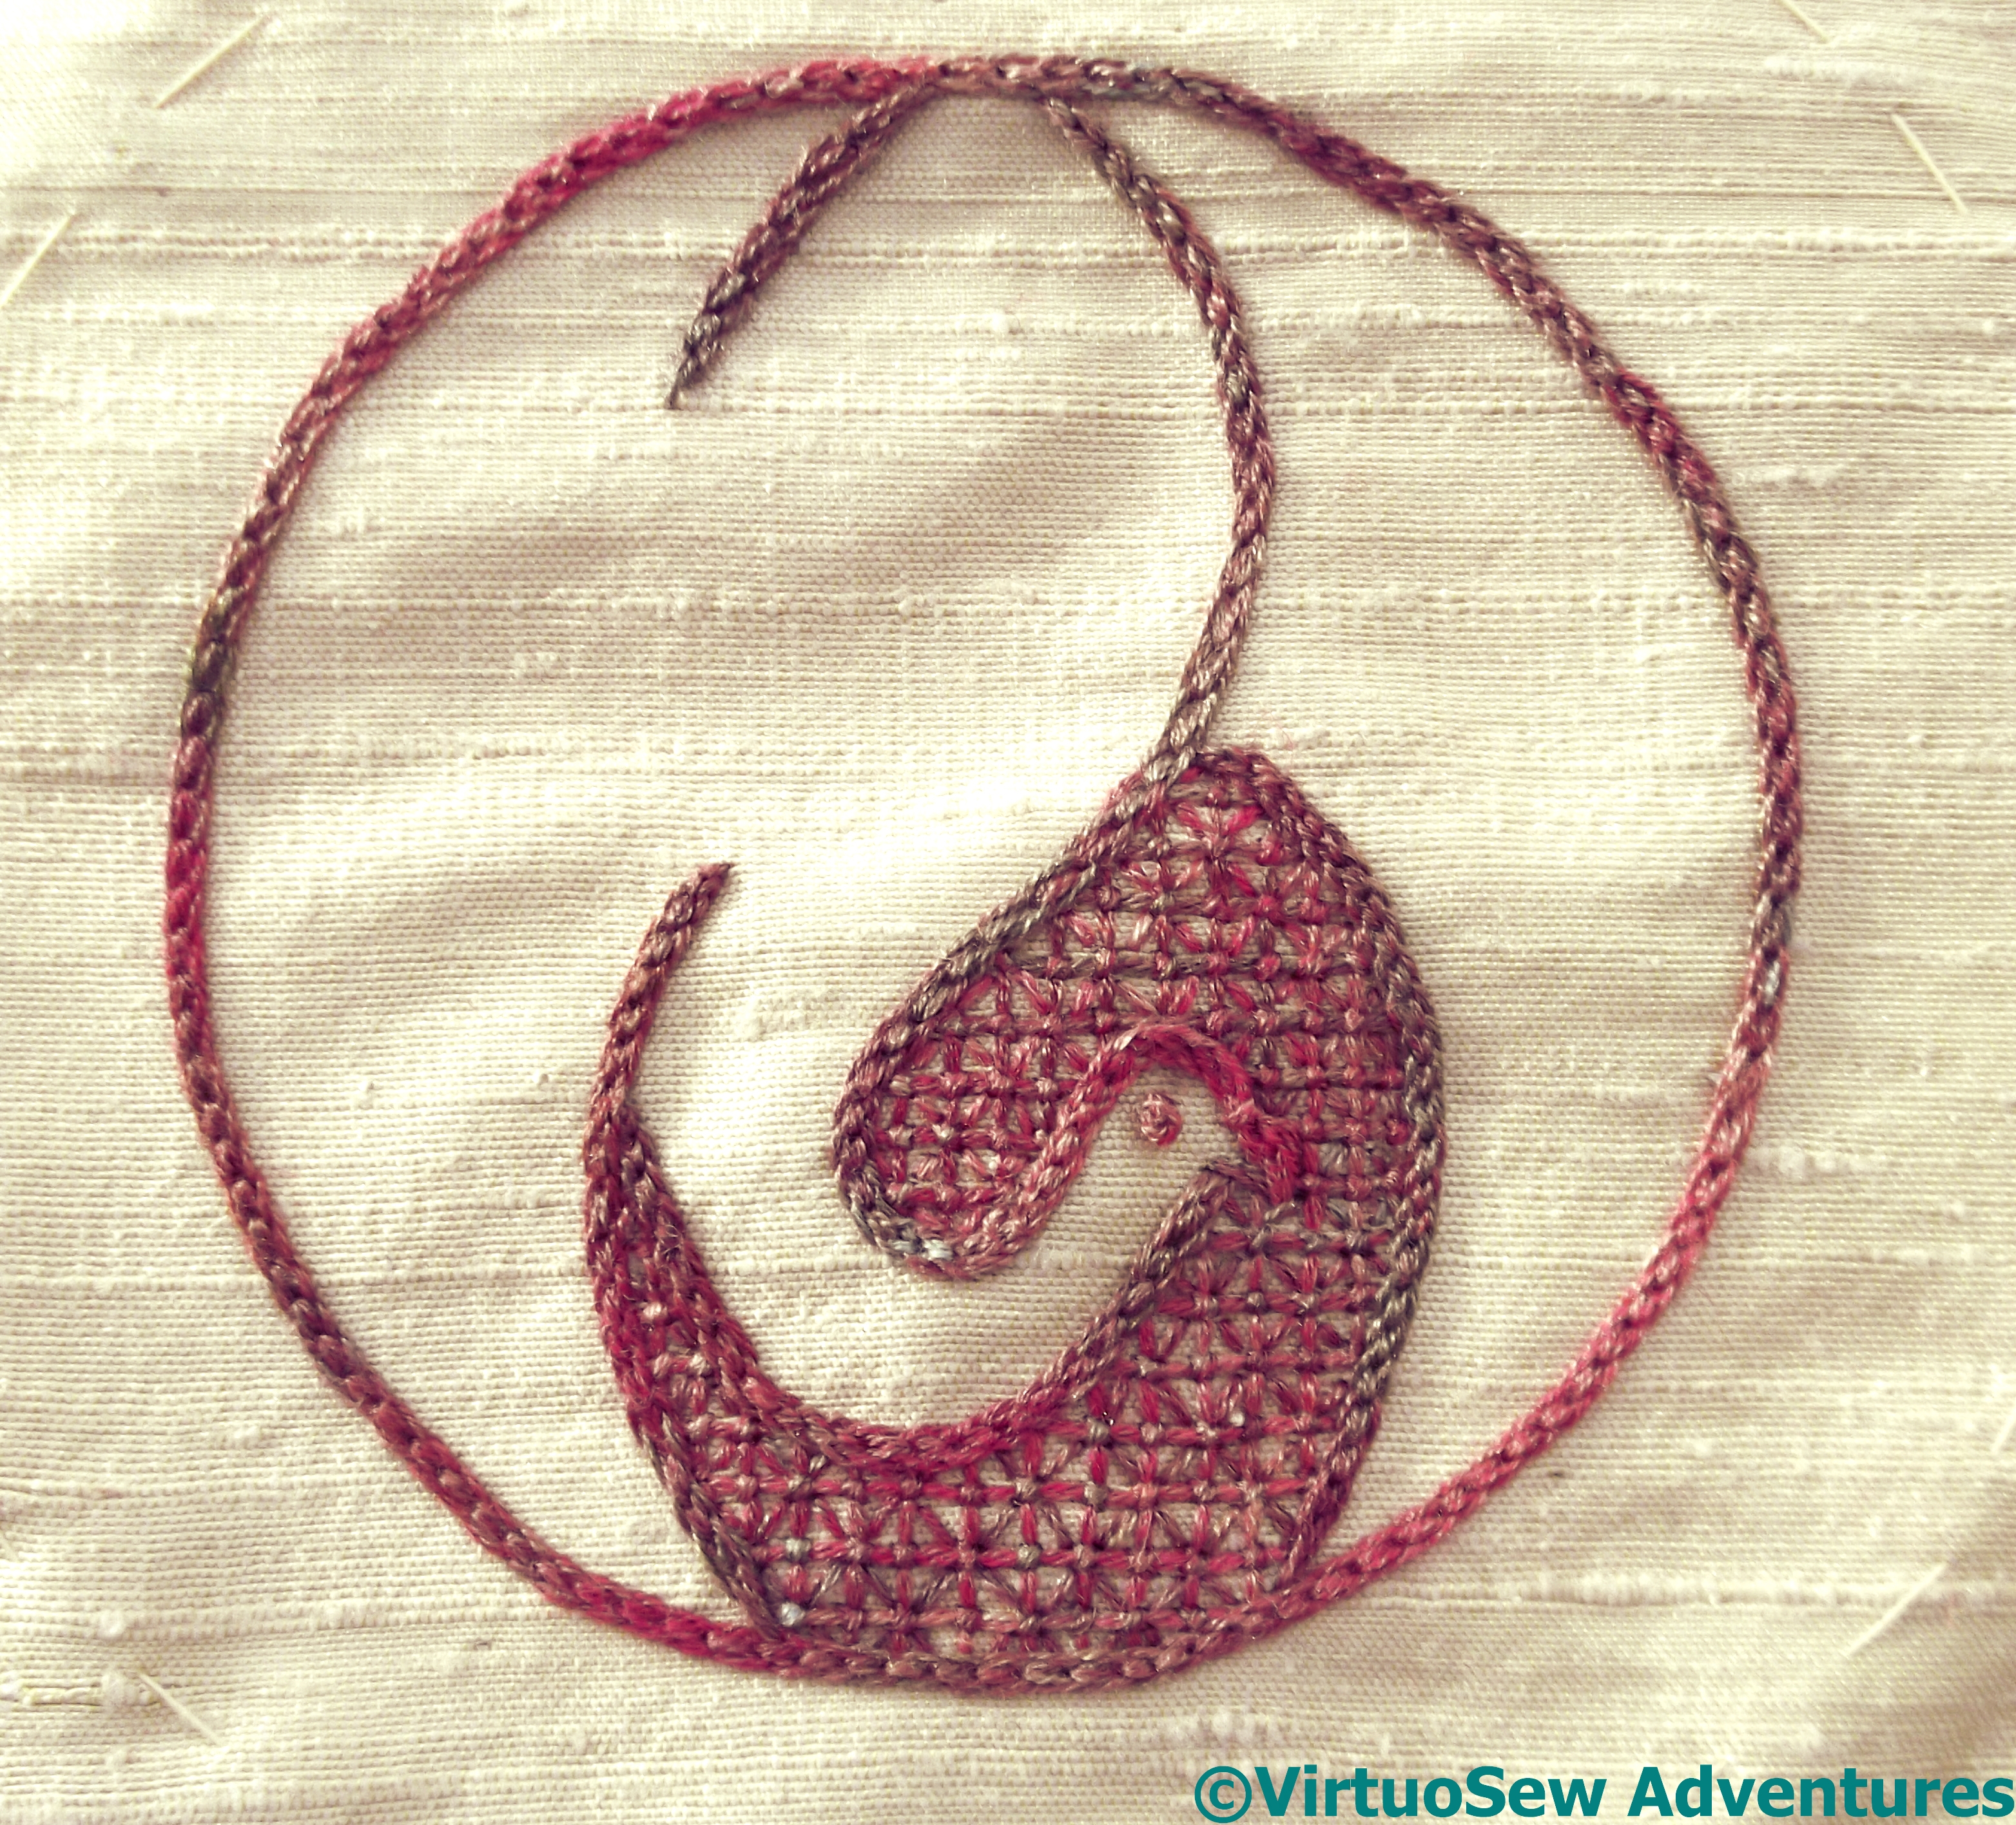
This is the first – so far unfinished version, in superfine silk on silk habotai. The relatively short colour changes in this thread create subtle changes from stitch to stitch, emphasizing the structural patterning and texture. When the destined pot arrived I decided the combination looked altogether too hot and bothered, and went rummaging in my stash again…

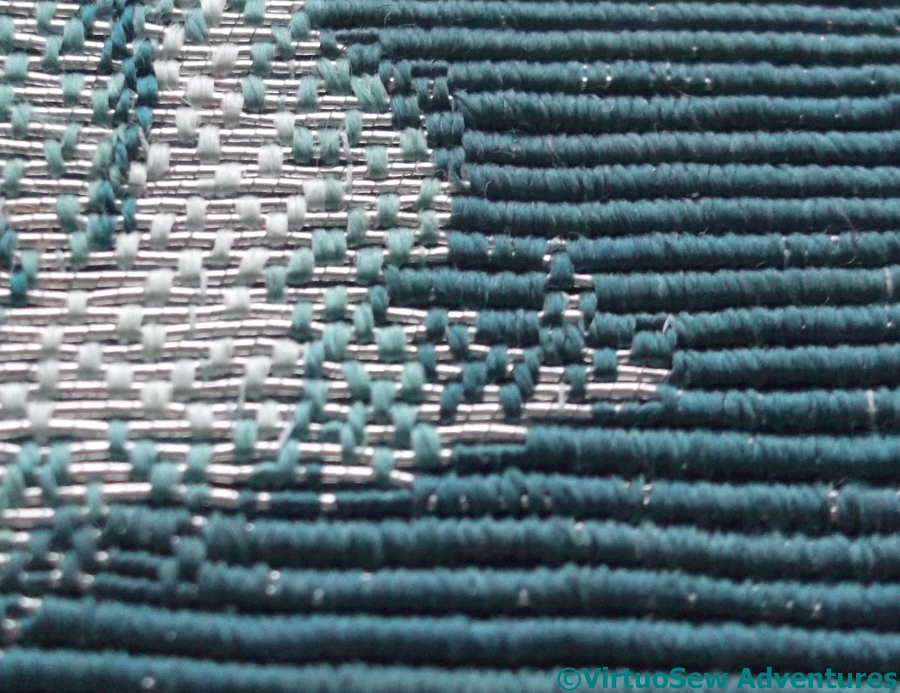
Close Up Of Stitching On The Crane
The fabric I finally chose is a rough dupion from The Silk Route, in a golden cream colour which is extraordinarily difficult to photograph, and I picked a slightly different silk thread, more restricted in colour range. Using four strands of thread produced a lovely cable-like appearance, which you will see if you open the photo at full size.
The dark section of the design, behind the bird’s head, I worked in a dense version of trellis stitch, with horizontal, vertical, and diagonal lies all tied down with tiny cross stitches. Even working in a hoop or frame, trellis stitch cane be a bit of a challenge to stitch, but I made it in the end!
Another Course From Thistle Threads!
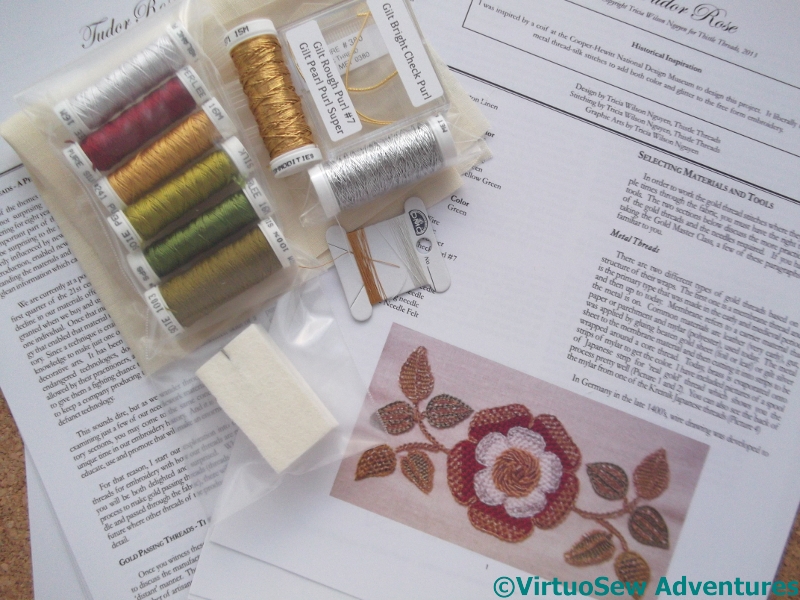
Tudor Rose Kit
There was another clatter of the letterbox and a gentle thunk on the carpet recently. It was soon followed by some excited squeaks and a dash upstairs to print out Month 1 of the History and Instructions.
This time, instead of a clear distinction between metal thread stitching and silkwork, as in the Floral Glove Needlecase, the Tudor and Stuart Goldwork Masterclass, or the Glittering Gentleman’s Nightcap, the aim of the course is to show how the metal and silk threads were combined within stitches and motifs.
I’m hoping that this will give me some new ideas and techniques to apply to my Dreams of Amarna panels. However, I intend to be a good girl. I won’t actually start this until I’ve done the Glittering Gentleman’s Nightcap, which is still “going slow” owing to a combination of end-of-year exhaustion and fugitive winter light. With a bit of luck, I may be able to get started in the spring.