
Category: General Embroidery
Tudor and Stuart Goldwork – Month Five Stitches
As I’ve mentioned, while I continue to persevere with the silkwork (there is a limit to how long I can stitch such fine work, even with the magnifier), I’m practising the goldwork stitches on a separate cloth. I don’t want the silk catching on metal threads while I’m working it, so the best way to avoid the problem is to do no metal thread work until the silk is finished. However, I couldn’t bring myself to ignore all the interesting stitches we are promised – hence the practice cloth.
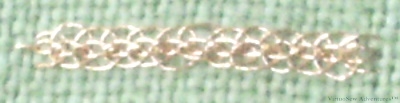
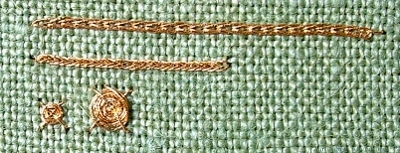
Reverse Chain With Buttonhole Edging
I can see potential to use the Reverse Chain with Buttonhole Edging in the Amarna panels, since it creates a very complex impression when seen at real size, while not being all that difficult to stitch. It looks a lot like a braid or a filagree, so might be used to represent the necklaces that the Pharaoh gave to favoured courtiers at the Window of Appearances.
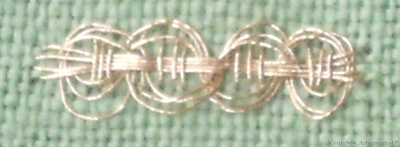
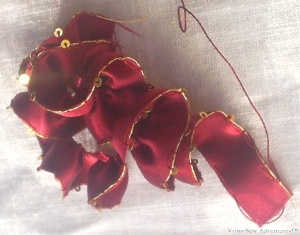
Guilloche Stitch
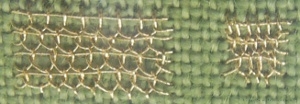
Guilloche stitch was an entirely different matter. It didn’t seem to matter what I tried, I couldn’t keep the crossing places of the final stage neatly under the long straight stitches, and the loops wouldn’t stay neat. In fact I even had a go in cotton threads, as you can see below.
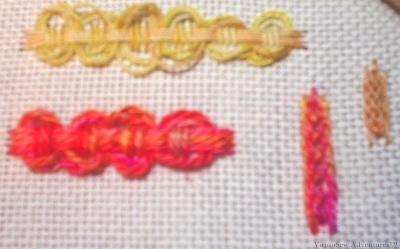
Stitches Tried In Mercerised Cotton and Pearl Cotton
The yellow is a mercerised cotton, while the orange is a fairly heavy pearl cotton. The Guilloche stitch seemed to work better in the heavy pearl cotton, which makes me wonder whether it is simply a matter of scale. The bulk of the pearl cotton makes the stitch so much more compact, whereas the gold thread on the practice cloth is much too fine for the spacing of the stitches. Note that the Reverse Chain with Buttonhole Edging looks much more braid-like with the finer, mercerised thread, where the pearl cotton almost looks like a different stitch. All of these stitches should also be easier when I’m working on the real piece which is resting on a floor frame. I’ll be able to use both hands to control the thread if necessary!
Floral Glove Needlecase – Second Stage of Finishing
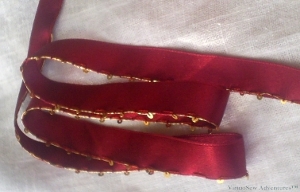
Silk Ribbon - First Stage
There is a sparkly ruffle between the cuff and the hand on the Floral Glove Needlecase, and of course we have to make it ourselves. You can’t go to your local needlework shop and say “Half a yard of Elizabethan glove trimming, please” with any prospect of success!
So the trim is composed of a length of double-sided silk ribbon, with Gold Twist and spangles whip-stitched down one edge.
The silk ribbon is wonderful stuff to play with, smooth and supple, and with just enough body not to flop. The idea is to ensure that the spangles all end up on the same side of the ribbon as each other and as the Gold Twist, and I think I managed it (not without the occasional tweak!).
Silk Ribbon Gathered into a Ruffle
Then, we run a gathering thread down the other side and pull it up to make a ruffle. It looks wonderfully exuberant, doesn’t it, and I haven’t even set it into the shape it needs to fill on the project. Tricia suggests leaving that stage until the various unseen bits of backing are all assembled and shaped, and since I need to buy some fabric glue before moving to that stage, that is exactly what I am going to do.
Completing this fairly simple task took me most of an afternoon. But then, no one ever said embroidery was quick!
Floral Glove Needlecase – beginning the Finishing Process
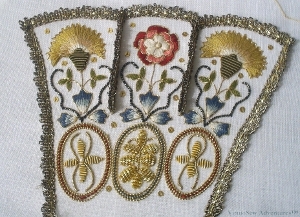
Floral Glove Needlecase - Gold Lace added
I’ve been prevaricating on the finishing process for the Floral Glove Needlecase, because it will involve glue, and I’m clumsy with that sort of thing.
I’ve worked very hard on the embroidery, I’m quite pleased with most of it, and I don’t want to fall at the last hurdle!
Finally, however (largely because I’ve been blogging about it and felt I should finish what I started!) I’ve screwed my courage to the sticking point, printed out the instructions and promised myself I would read everything twice before starting any stage of it.
That’s one of the effects I hoped blogging would achieve – providing encouragement to finish things properly. So I think we can count that as a success, can’t we!
What you see here is stage one of the fifth month’s instructions – adding the gold lace to the edge and around the tabs. This has actually been fairly simple, in that the lace has loops on the straight edge, and the whole thing is done with a single length. No joining ends to worry about, just making sure that the lace is neatly attached along the line, carefully controlled at the corners, and back-to-back on the lines separating the tabs.
I’m pleased with this. In real life it has a lovely sparkle and – yet again – the addition of further embellishment seems to have brought it to life even more.
A Glamorous Peacock
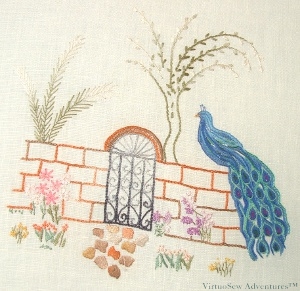
The Peacock
I’ve only recently begun to design my embroideries entirely for myself. To begin with I took painted canvases or transfers and worked them using a variety of stitches and thread combinations, depending on what I had to hand and what aspect of embroidery was catching my attention at the time.
I was attracted by this transfer of a peacock a long time ago, in fact I think I bought it when I was still a teenager. If I had paid attention to my whims I would have bought a good many canvases and transfers of peacocks over the years. In fact there is a painted canvas that I didn’t buy that I now would, if I were to see it somewhere!
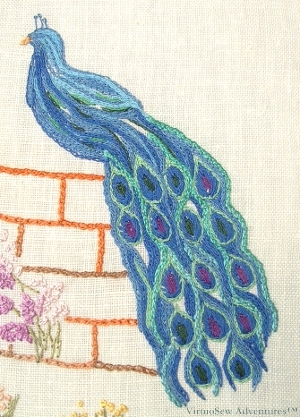
Peacock - Close Up
The fabric is a linen napkin, and the threads are a variety of silks bought when a needlework shop I worked in as a teenager closed. I got a very good discount, in gratitude for services rendered..
I didn’t actually get to begin stitching the Peacock until after I was married. He’s worked using chain stitch and heavy chain stitch, rows and rows and rows in blues and greens with a little purple in some of the eyes on his tail. I quite deliberately left some fragments unworked because it was beginning to feel rather congested, and although a peacock’s tail can look pretty bedraggled when it is closed, I wanted to bring to mind the glamour of the open tail and not the impediment of the closed one!
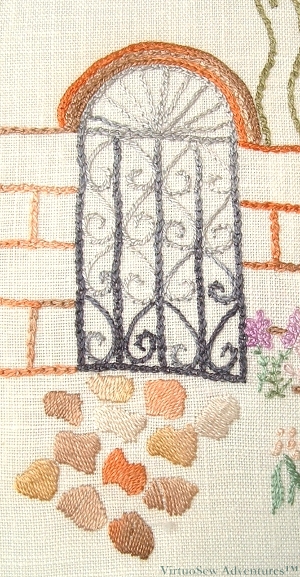
Gate - Close Up
Now I look at the design again, it is worked almost entirely in chain stitch and chain stitch variations. The olive green tree is worked in twisted chain, with detached chain stitch leaves.
The brick work is outlined in ordinary chain stitch, and the arch includes cable chain stitch, which is one of my favourite surface embroidery stitches. It looks much harder than it really is, produces a line which is slightly more marked than ordinary chain stitch, and can be tweaked and ornamented with French Knots or simple seed stitches inside the links.
I tried to make as much use as possible of the variation of colour in some of the threads, so the work in this piece is done by the colour variation rather than by trying to make excessive use of stitch texture changes. It is now stretched and mounted over padding and framed without glass, so that the textures and colours have the best chance of being seen, and hangs in our spare room. Whether our guests notice it is altogether a different matter!
Tudor and Stuart Goldwork Masterclass – Month Four Stitches
Detached Buttonhole With Return
While I continue to persevere with the silkwork, I am trying to keep up with the new stitches, practising on a separate cloth. In the case of the Detached Buttonhole stitch with Return, I think you can see that the fabric and the thread are not well matched, and so the structure is correct, but the appearance is not. The stitch should be much more closely worked, giving the impression of a fabric, not of a net. It’s tricky to be sure that the gold thread doesn’t kink back on itself in working this stitch, although this may be easier when I’m working on the real thing, using a slate frame on a stand, and therefore have both hands free to control the thread!
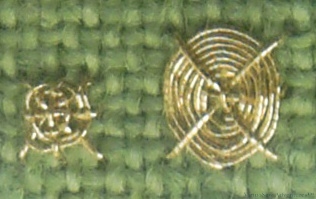
Eight Spoked Wheel
This second stitch is an Eight Spoked Flat Spider’s Web. It is very similar to the one in last month’s pair of stitches, but uses a foundation composed of a cross and an upright cross. I suspect it will be rather more stable than the four-legged version.
These “spot” stitches may come in very handy when I start thinking about some elements of the Amarna Panels.
I’m using a single type of thread for all these practise stitches. I don’t want to confuse myself with problems that may relate to an unfamiliar thread when I am already dealing with unfamiliar stitches! Still, already when I look down the row of stitches I’ve already tried, I see ideas for further experiments and even for applications of the stitches. This is what I hoped for when I joined the course, so I’m very happy with how it is going!
Tudor and Stuart Goldwork Master Class – Progress on the Silkwork
SilkWork On Sampler - Progress
I’m still working away at the silkwork on the sampler. It has been so grey and miserable recently that the light has been poor and it has been difficult to make any progress at all.
Some time ago I bought a daylight lamp to use in the evenings or when the natural light is poor. It works well for some projects, but not this one. I think part of the problem is that it glares on both the fabric and the magnifier, and believe me, I’m not going to work this piece without a magnifier!
So I can only work on this when there is good natural light, but not glaring sunshine, of which there has been all too little this summer. I’m also careful not to strain my eyes, so I work maybe two lengths each time I sit down, but no more.
I’m working one motif at a time, and letting it grow from the nearest point at which it approaches a previously finished one. That means I have relatively little counting to do, although sometimes I start a motif somewhere a little odd. The one I am working on at the moment started from the tip of the large leaf. When I do have to count, I count in fours – that is, the width of one Queen Stitch. I can almost do that by eye, and if I do miscount, it’s easy to double check.
The stitch produces a very pleasing texture on the fabric, and because it is a pulled stitch – at least on this fabric – there is a light and lacy look to it. If only I had better light I would be enjoying this even more!
Canvaswork Inspired by Clarice Cliff
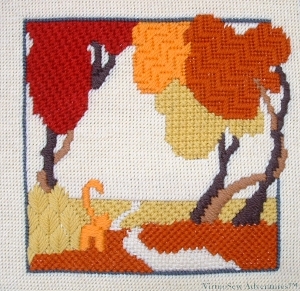
"The Cat Who Walked By Himself" in canvaswork
The design in counted cross stitch that I created, “The Cat Who Walked By Himself” (now being re-issued by Classic Embroidery – remember how excited I was a few months ago?) was such a success that I experimented with other ways in which the basic design might be used.
First of all, in ordinary tent stitch at a large size. Pleasant enough, but rather dull – for me, at any rate.
Then, at the same size as the original cross stitch, but using ornamental canvaswork stitches. Originally I had in mind to run classes based on these designs, in one of the local shops, but the shop closed, life changed direction, and I’ve not done anything with it yet.
As I post more of my early canvaswork, you will probably notice some stitches recur. For example, I like Upright Cross Stitch – it is sturdy and heavily textured – and Milanese stitch (I think just because I like the name). I usually sneak in Leaf Stitch as well (remember the Elephant of Considerable Charm?). I’ve also used Jacquard Stitch, and Satin Stitch. The background was worked in Encroaching Gobelin Stitch.
I’ve not put the heavy outlines on yet. Tapestry wool would be too heavy – some of the areas are quite small – but on the other hand, I don’t want to use something that will draw too much attention to itself by being shiny..
The Faience Hippo Finished
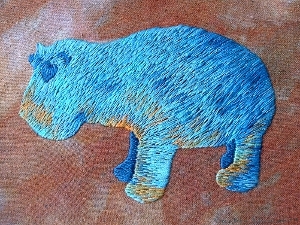
The Faience Hippo Finished
So here is the Faience Hippopotamus finished. That is, unless I decide to go over him with another layer of long and short stitch to break up some of the patterning even further…
I’m reasonably pleased with him, as a matter of fact. The loose weave of the base fabric was sometimes challenging to work on, and it isn’t at all a hardwearing piece – some of the stitches are half an inch long, which would be bound to catch on something – but as it will be part of a carefully protected wall panel if it makes the final piece, this is not going to be a problem.
I enjoyed doing it, as well. It was fascinating to see the colours change more subtly when I started using the thread turned end-for-end, and this vibrant turquoise/teal colour is one of my favourites.
And, yes, I did manage to work an entire piece in long and short stitch. It is fair to say, I think, that it will never be my favourite stitch, but it does have its place, and I am certainly happier to use it now I have had Tricia’s instructions on the Floral Glove Needlecase Course.
Tudor and Stuart Goldwork Course – Month Three Practice
Month Three Goldwork Practice
I am continuing to work practice lengths and fragments of the stitches in the Goldwork MasterClass, since I am still working the silk motifs that form the basis for the Spot Sampler.
Again I worked the Heavy Chain Stitch in two “scales”. I find it rather surprising that the stitch changes width with the length, even though the needle comes up from and returns into the same hole. Still, it is useful to know that I can change the appearance of scale so much without changing the thread I am using.
The second stitch is Four-Legged Flat Spider Web Stitch, and I’ve not found a diagram on the web anywhere. It is a large cross stitch, woven around in a weaving pattern. Simple to do, if you make sure to go over the top layer of the cross stitch and under the bottom layer. The challenge lies in keeping the thread spiralling smoothly around, rather than catching itself and crossing where it shouldn’t. I think I would be reluctant to use this stitch on a garment or something that would move a lot, as I would be uncertain of the stability of the coil. Using it on my sample cloth might reveal that, of course. I shall try to remember to examine it at the end of the course!
C is for Cat
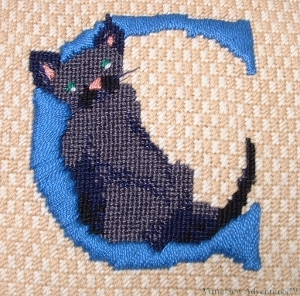
C is for Cat Cushion Panel
When I saw this as a painted canvas is a needlework shop, it immediately made me think of a friend who had a black cat, so I thought of doing it as a present.
The original canvas showed a seal-point Siamese with blue eyes, so I stretched a few points and used grey and navy to create a black cat that was light enough to show its shape and markings, and gave him green eyes as well. The cat is entirely worked in basketweave tent stitch. Much as I enjoy working the ornamental stitches, sometimes restraint is advisable!
Besides, the bright blue “C” is double padded with soft embroidery cotton and then satin stitched over with pearl cotton. I thought that would be quite dramatic enough without any additional flourishes!
The background is worked as a gentle oblong check in Straight Cashmere Stitch, using two shades of soft embroidery cotton that tone with the velveteen I used to make the cushion it is mounted on. I’d almost forgotten about this panel until I was rummaging for notes of some other embroidery I had done and found a reference to it, so it is gratifying to find that I am still very pleased with it. It was a fairly simple and straightforward design, and I think my choice of stitches and threads was simple enough to reflect that while having enough variation to be interesting.
I’m not sure what the real cat thought of his portrait. Cats are what they had in mind when they came up with the word “inscrutable”!