
Category: General Posts
I wonder what happened next . . .
I Wonder What Happened
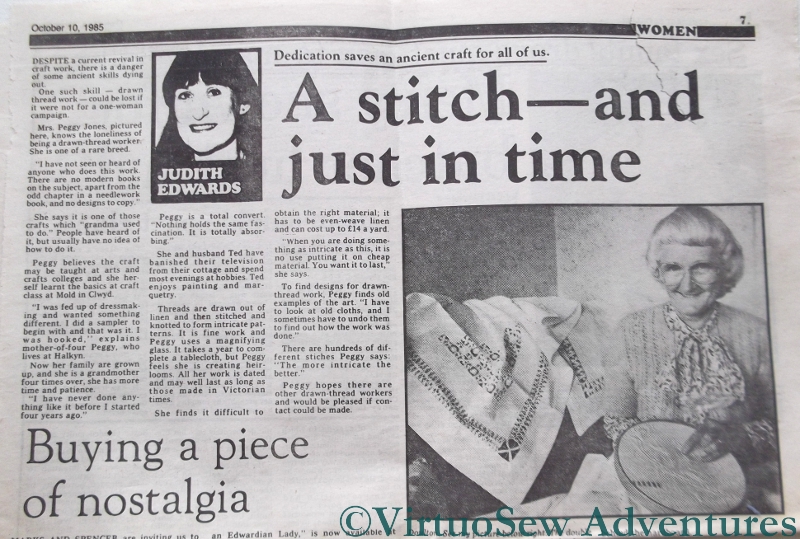
I’ve been rummaging in the archives of late, in particular in a pile of papers left by my Grandmama. I don’t know which newpaper this was cut out of, but it describes Mrs Peggy Jones’ passion for drawn thread work. I’ve done a little googling, and I’ve not found any reference to either the journalist or Mrs Jones in relation to drawn thread work. She mentions unpicking it to work out the stitches, and taking a year to work a tablecloth – all of which I think we can all relate to!
Grandmama didn’t do any drawn thread work that I’m aware of, so I don’t know why she cut it out, unless it was surprise and delight to find any form of needlework in a newspaper.
I’ve scanned the article so that you should be able to read it – maybe if we all keep asking, we can find out what happened to Mrs Jones and her stitchery?
Dressing Cécile
Cécile’s Saddlecloth
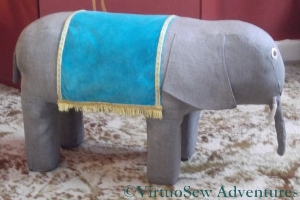
Once she was fully reassembled, with a neat patch across her tummy to hide the joins of the sides and ends, I was very keen to put back Cécile’s glorious turquoise velvet saddlecloth. I started sewing it on in the centre of each long edge – roughly where her spine would be – and worked outwards, to make sure that the saddlecloth didn’t end up squiffy. I’ve also not stitched too closely, because I want the fabrics to be able to move a little when I put my feet on the finished footstool and the padding “gives” a little.
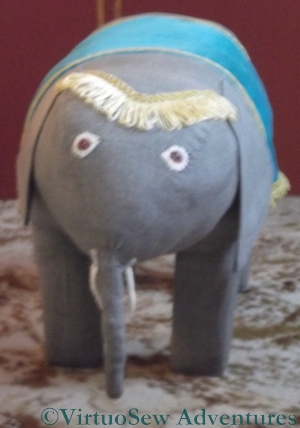
Cécile’s Browband
I should note in passing that while Cécile is unquestionably a darling, she’s been the most preposterously obstreperous pachyderm I’ve ever encountered. Getting her legs re-covered was hair-raising, getting the body attached suitably was a challenge and tidying up the undercarriage so that Cécile stayed in one piece involved the sort of contortions that make me wish I’d been doing yoga all my life!
Grandmama gave Cécile a browband of upholstery fringe – probably left over from one of the many lampshades she made – and that was the only real casualty of her years in the loft. Even a run through the washing machine didn’t revive it, so it was abandoned and replaced with a similar piece left over from a lampshade recovered by either my mother or myself. The tradition of keeping and reusing scraps is very strong in our family!

Cécile Finished!
So here she is, refurbished and back to her former glory. I was very fond of Cécile when I was a child, and I’ve enjoyed bringing her back to life.
Even it she was occasionally obstreperous!
Reconstructing Cécile
Face of Cécile
Allow me to introduce Cécile.
Grandmama made her for me when I was about two or three, we think, and I remember her as a constant and beloved part of my childhood. We rediscovered her recently in my parents’ loft, and I thought it would be nice to have her in my own living room, as a footstool and a seat for visiting children. Unfortunately, when I sat back and put my feet up, the stuffing collapsed, and Cécile began to look very sad indeed. So we skinned her (as it were!), washed the skin, and started looking for a suitable replacement for the padding.

Padding For Cécile
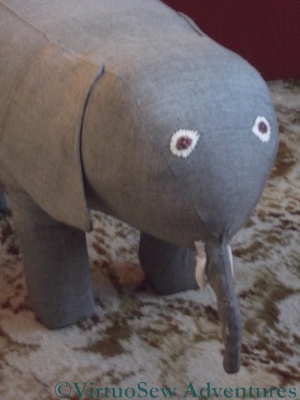
In the end, we used a spare cushion pad, and rearranged the stuffing slightly to leave the cover free to be stapled through. I think my grandfather must have made the basic internals – four sections of square wood for legs, screwed firmly into some equally solid half-centimetre thick hardboard.
I have all of Grandmama’s books about needlework and crafts, and there’s nothing like Cécile in any of them, so I think Grandmama must have made her up as she went along. I can’t imagine how she managed to assemble the whole thing unaided, because it took the combined efforts of my mother and myself to put the stockings on, and covering the assembly with the body was even more of an adventure.

Cécile Reassembled
But we got there in the end!
I added more stuffing while I was doing the assembly, to make sure that the finished piece would be nicely padded, and swapped the ears around – there was a hole in one side of one of them, which is now the underside.
I’ve also replaced the feet. Grandmama had glued small sections of carpet to the bottom and then stitched around the edge with wool. The carpet was looking distinctly sad and tatty, so I removed it – not without considerable effort! – and replaced it with two layers of grey felt.
Cécile is now reassembled, and just needs some of her finery re-instated. I’ll write about that when I have returned her to her former glory.
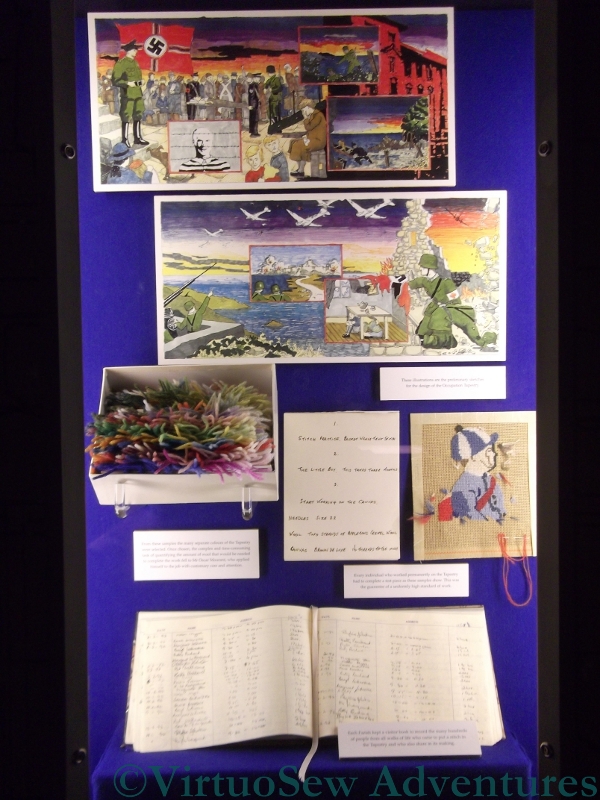
Worth A Visit – The Jersey Occupation Tapestry
Planning Panel
Regular readers will know that I like large projects for myself; it won’t have been so obvious that I am interested in community or group projects as well. Not just the stitching, but the inspiration, organisation, management and quality control necessary to bring such projects to a successful conclusion.
And make no mistake – quality control can be a serious issue. Often you will hear it suggested that volunteers can’t be expected to do good work, or that, because they are volunteers, anything they produce, however sloppy, should be accepted with enthusiasm and gratitude.
Well, I’m sorry, but I don’t agree. Volunteers should be expected to want to do well, and to practise to make sure that they do.
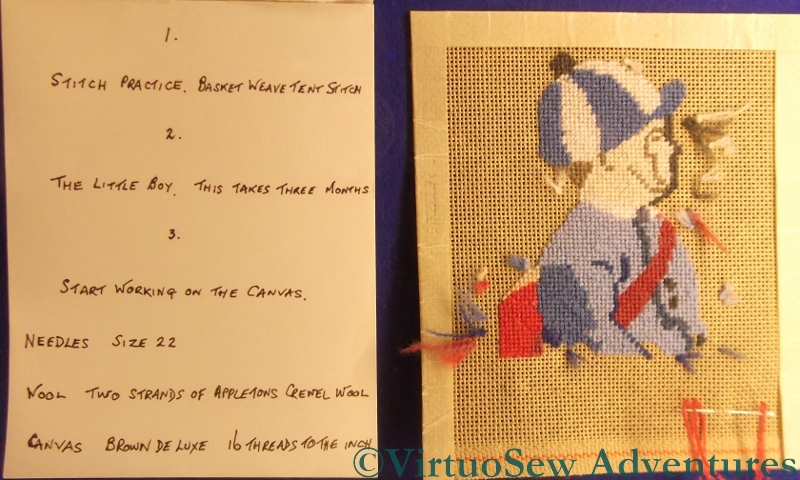
Stitch Practice
The volunteers who stitched the Jersey Occupation Tapestry were asked to stitch sample pieces before starting on the real thing. The twelve panels of the Tapestry are worked entirely in Basketweave Tent stitch, which is an easy stitch – but that very simplicity means that there are no textural variations available to hide variations in technique. So all the stitching had to be right. And it was.
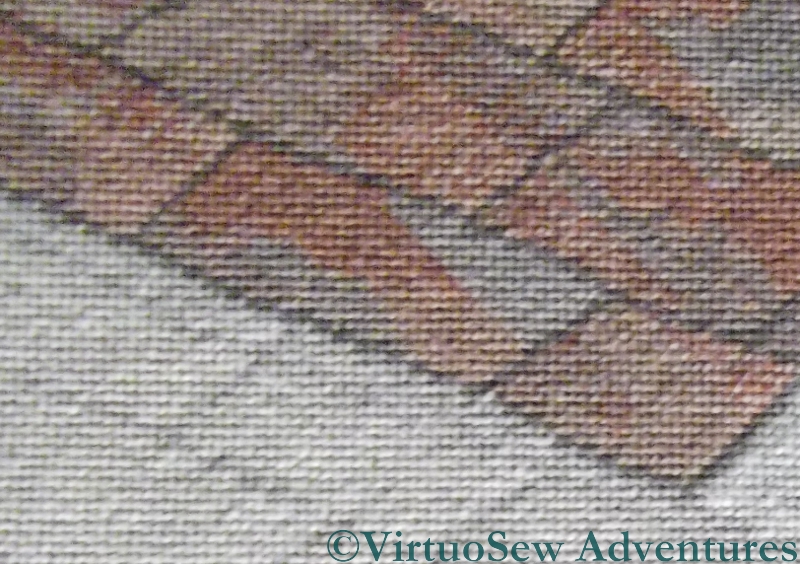
Detail Of Paving
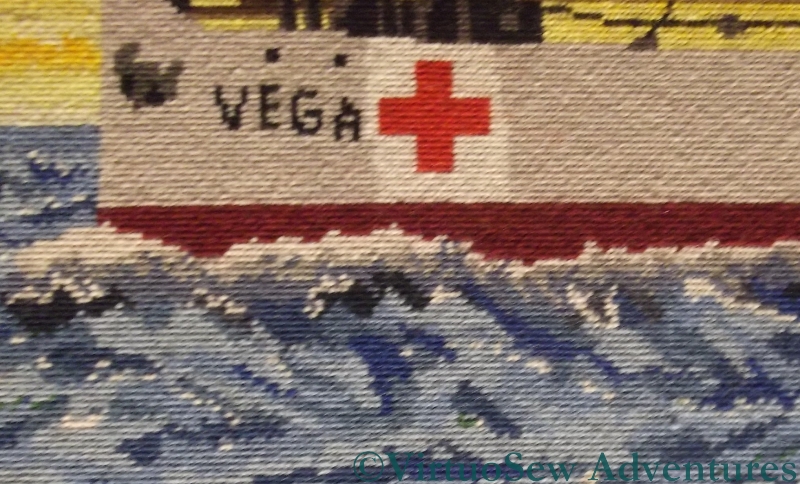
Red Cross Ship Vega And the Sea
The panels were designed by a curator at Jersey Heritage, who then drew out the designs on canvas and marked the thread colours for each element. In the case of seas, skies and such sections, he suggested a range of colours and allowed the stitchers to use their own artistic skills to bring those elements to life. If you look at the photos, I think you’ll agree that his faith in them has been triumphantly justified.
The Jersey Occupation Tapestry Gallery is part of the Maritime Museum in St Helier, and was worked to commemorate the Liberation of the Channel Islands in 1945. Unlike some textile galleries, they don’t mind photographs being taken, although as the panels are displayed behind glass, flashes would be counterproductive as well as unpopular! The display includes some details about Albert Bedane, and a video about the making of the tapestry. Some of the stitchers were children on the island during the Occupation, and some of their memories are included in the designs.
Altogether I had a fascinating time, and can recommend it highly!
Sunny days are on the way!

Sunshine Award
I was rather flattered to find that Anne wanted to give me an award. As usual, the idea is to link to the giver (which I have), say something about oneself, and then pass the award on to some other bloggers.
Hmm…now, what to say? Ah yes – I’m a true Englishwoman! How can you tell? Well, besides the customary Scottish, Irish and Welsh ancestry, not to mention the Norman French (that was a very long time ago, of course), I’m very proud of being one-eighth Swedish. Only the English – in my experience – are actually proud of being mongrels!
My sidebar blogroll doesn’t reflect the breadth of my reading these days, so here are a few suggestions you won’t find there…
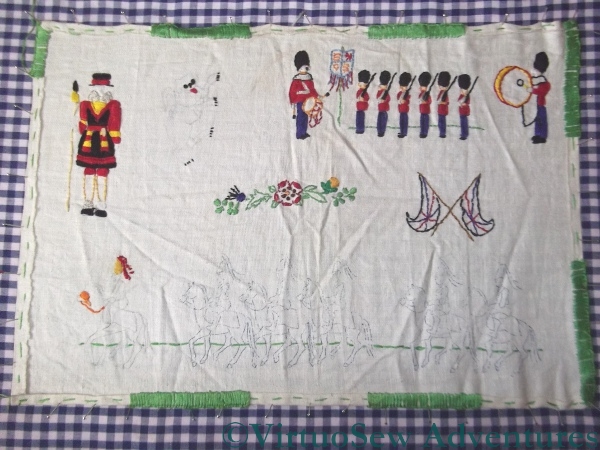
Found in the Archive – a traycloth
Something Else In The Archive
My mother and I have been trying to make sense of the various boxes and bags that travelled from my grandparents’ attic to my parents’, and we’ve found all sorts of things.
This traycloth must be something that Grandmama began to work quite late in life, when her eyesight was no longer what it had been, because it’s worked in four strands, and the back would not pass Miss Hunter‘s scrutiny. Judging by the subject matter – maybe she began it in 1977 for the Queen’s Silver Jubilee?
I suspect she intended to alternate the colours of the blanket stitch edging to create the same effect as the coloured blocks of fringing on a ceremonial trumpet’s banner.
I rather like the idea of tackling the parade of guardsmen at the bottom, so I’m planning to add this to my list of projects at some point. It would be the only project of which I would be able to say I had finished what Grandmama started!
I daren’t wash the piece or iron it, because the tracing has already begun to break up in some places. The unstitched motif in the top row is a heraldic lion, and most of his outline has rubbed off. It’s really just as well that I was keen on heraldry as a teenager and still have my books on the subject. I should be able to recreate him without too much trouble.
Blog Award!

Liebster Blog Award
I’ve had a blog award passed on to me – thank you, Karen of Stitching Life.
When given this award:
1. Thank the giver and link back to their blog.
2. Reveal your 5 top picks and leave a comment on their blog.
3. Copy and paste the award onto your blog.
4. Have faith that your followers will spread the love too.
My picks:
- Susan of Plays With Needles, for providing thoughtful and thought provoking posts, and truly exquisite embroidery.
- Kathy of The Unbroken Thread, whose careful step-by-step descriptions of technique, and clear joy in creation make her blog a delight to read.
- Megan of Elmsley Rose, who is currently undergoing traumas of blog reorganisation, but whose embroidery posts always make me stop and think, and whose comments here are uniformly supportive and encouraging and frequently insightful as well.
- Alex of Under A Topaz Sky, whose embroidery I find wonderful to behold, although it isn’t a bit like mine.
- Hannah of Embrouderie, whose skills grow with every post as her blog develops.
Thank you, ladies, for hours of delight!
Another ancient piece
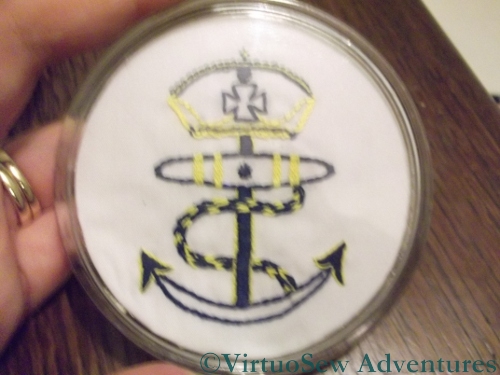
The Coaster I worked for my Grandfather
About fifteen years ago I was going through one of those periods of penury that we are all subject to, so Christmas presents and birthday presents became rather a challenge – usually solved by making something, with varying degrees of success.
This coaster was made for my grandfather, based on a version of the merchant navy’s Crown And Anchor symbol. It’s worked in ordinary stranded cotton (all I had at the time) and you’ll be surprised what stitches I managed to cram into it!
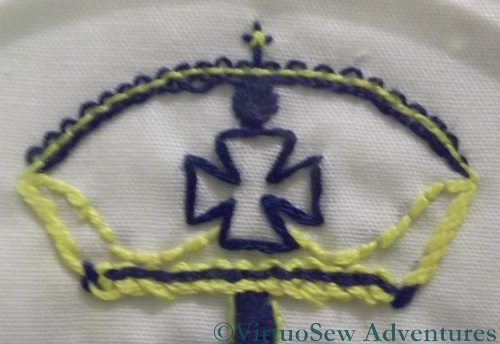
The Crown in close up
I don’t imagine that Grandad noticed (he only had one eye – the other was glass – and the working eye was short-sighted), but the top curve of the crown is worked in Pekinese Stitch, worked very small and tight, while the headband is worked with the colours the other way around and slightly larger and looser. The tiny cross on the top is a composite of an ordinary cross stitch worked over a slightly larger upright cross stitch.
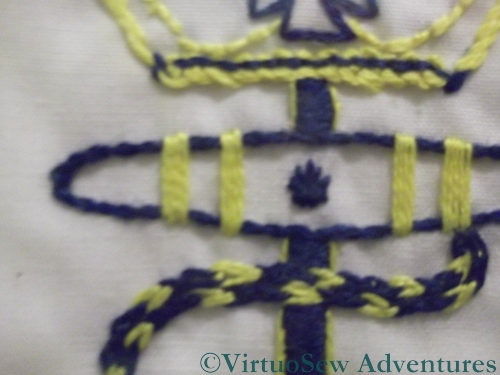
The Rope And Shank
The more conventional stitches of course included back stitch, stem stitch, and satin stitch. The cable that is wrapped around the anchor is worked in two rows of Magic Chain Stitch, purely because (if I remember correctly!) I thought it would be fun and had been twitching to try it ever since I had seen it diagrammed. It worked pretty well in the end, as it happens.
It’s not one of my most successful pieces, but it was fun to do, and it came back to me after my grandfather died and now lives beside the spare room bed, ready for glasses of water or cups of morning tea.
A Very Frivolous Project – Third Stage
Embellished Necklace - intermediate stage
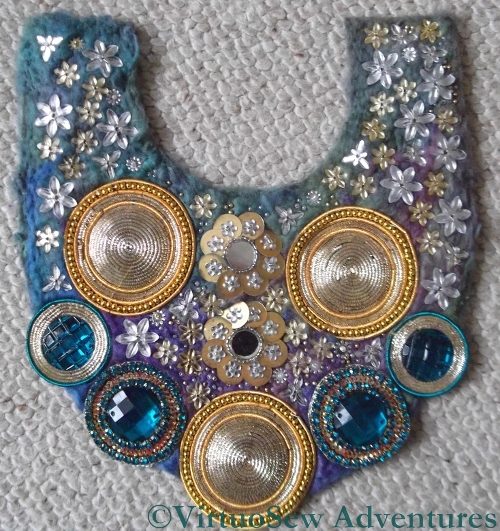
When I’d finished putting the large elements on to the backing felt, I laid it on the floor and scattered the small elements over it.
Although the basic shape is symmetrical and the basic layout of the design is too, I’ve not attempted to create absolute precision in the execution of the design. The backing has some “give” in it anyway, and besides I felt that if the piece were precisely symmetrical it would produce a rather stiff and lifeless effect, not at all the exuberant effect I was seeking.
So one side has more of the pale yellow flower gems, and indeed is more densely packed all together, while the other side is lighter and shows more of the background fabric. Remember that the point of the layer of throwster’s waste was to tie in the necklace to a dress, so I had to leave some of it showing!
At about this stage I realised that the next day was the day before Christmas Eve, so I attached some double-faced satin ribbons and decided to wear it as it was a couple of times before deciding whether it needed any more embellishment. It was a great success – it works well with the dress I intended it for, and really beautifully with a teal cashmere sweater I bought in the autumn.
I’ll let you know if I add any more beads!
A Very Frivolous Project – Second Stage
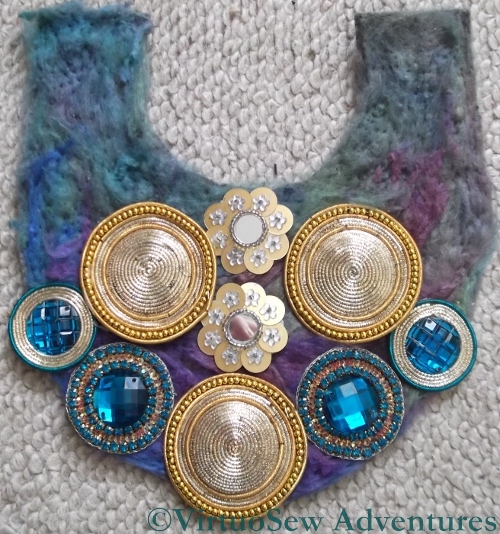
Laying Out The Large Elements
Once I had decided which of the score or so of arrangements I was going to create, I laid out the large elements on the needlefelted felt and tweaked the design a little more.
The gaps will be filled in with little flower gems and seed beads, so I ended up spacing out the large elements a little more. Then I had to work out how to sew them on. You see, unlike the original design in the magazine which had used oversized sew-on gems with no settings, I had ended up buying a selection of bead-and-purl assemblages from Aarti J’s and Bombay Fabrics. They weren’t quite as straightforward to sew on, and they certainly couldn’t be temporarily attached with safety pins, lest I break or crack some of the check purl.
Sewing on the large gems was several evenings’ work, as it turned out, using a fine but sturdy needle and being careful where I placed it. Still, each assemblage is backed with stiffened muslin, so in some cases it was relatively easy to stitch through the muslin and avoid the beads. In other cases the thread snagged on the front of one gem while I was working on another!