
About Rachel
View all posts by Rachel
Floral Glove Needlecase Course

More Floral Glove Finishing Work
It’s been a long time since I posted about the Floral Glove Needlecase. For a variety of reasons I lost momentum once it came to the finishing of the piece, but I do intend to get it finished. I don’t know what I will do with it when it is finished – I can’t imagine being able to bring myself to use it! – but I will get it done (can you hear the determination in my voice?).
So, with my new-found spirit of determination, here I am, laying out various pieces while I re-read the instructions for the nth time (where n tends to infinity!) and try to work out where, precisely, I had got to…
The silk brocade gauntlet at the back has pockets for tools, and there is an ultrasuede-covered base that will keep the final piece from slipping around too much.
My next two tasks are to attach some gold lace to the brocade cuff shape, and to lay some gold couching lines on the last piece of ultrasuede to create the top surface of the glove. I’m taking it a bit at a time, because looking ahead was what stopped me in my tracks last time!
Spiralling Onward
Continuing The Spiral
Since I’ve received so many comments – and additional e-mails! – asking me to post more about Christus Natus Est, I’ve decided to post about it more frequently than I originally intended.
Progress has slowed somewhat as the spiral gets larger, with ever-longer sections of the close silken stitching. Since I’m using two shades of blue at present, the blue of the Madonna’s robe involves three different threads, which means that every time I feel I’ve settled into a rhythm, I have to stop and change to another thread.
I’ve already had to reposition the fabric on the frame, since the constant close stitching had stretched it slightly. It’s much easier to work this style when the fabric is absolutely taut, so I expect that this will become a regular activity!
You’ve probably noticed that the Christ Child’s halo has a somewhat sawn-off look, and that I’ve not continued the Madonna’s halo over her robe. In both cases, this is because I have taken note of what one of the books I’ve been reading has told me – it is not difficult to add stitches to an or nué piece, but it is near-impossible to take them out. I’m not certain that I want the halos to spread over the robes, so until I’ve decided that, they won’t. I’m happy to go back over the piece tidying up when I’ve finished, so that is how it will be done.
Tulip Needlework Nibble – Getting Started

Tulip Kit And Finishing Kit
My kit and finishing kit for the Tulip Slip Needlework Nibble arrived very promptly. They have obviously got all this down to a fine art, now, at Thistle Threads, because I was expecting it to be another week at least!
My Tulip Kit contains the linen and silk for the embroidery, while the finishing kit contains silk velvet for the pincushion, gimp to edge the slip, and Grecian Twist to trim the pincushion when it’s finished. The parcel also contained information about the Exhibition being supported.

Tulip Kit - Silks and Chart
I’ve said before that I colour in charts when I’m about to start on counted work. I should have explained that I don’t colour in the whole thing, or at least, not necessarily. The second photo shows the linen and silks lying on my printout of the instructions. You can see that in this case I’ve picked one colour in each section to colour in. Usually it’s best to pick one of the middle tones, because if a design is properly charted, as this one is, the dark colours will have dark symbols, and the light colours, light symbols. The coloured shade is to help make it clear which of the medium-to-light tone of symbols is which.
It is really simply there to help me find my place on the chart just at a glance, without having to take to long to check I’m still doing the right thing!
Sampler Silkwork Finished!

Sampler Silkwork Finished!
At last I have finished the silkwork on the sampler for the Tudor and Stuart Goldwork Masterclass. I don’t have much patience with counted work – I just keep doing it occasionally, as a salutary discipline! – so I am really very pleased with myself. After all, I began stitching it – according to my post on the subject – in June last year!
I’m pleased that I persevered. It’s fascinating to see the Queen Stitches create an entirely different fabric, with a totally different surface and reflectance to the surface of the fabric itself, and the other stitches (Rice Stitch, Roman Stitch and the Bargello section) all reveal different aspects of the silk thread and provided different challenges in working them.
In fact, in the end I have enjoyed the silkwork on the sampler rather more than I expected to. It has taken me much longer than some of the other members of the course, but I’ve been working on the Piano Shawl and the Dreams of Amarna at the same time, so I think I have a good excuse!
Now I need to work out how I am going to keep track of which goldwork stitches to do where. I’ve been printing out the instructions as I go along (thank heavens!) but I now have a large folder full of the historical essays Tricia has written for each month, and another one full of the stitches. It isn’t difficult to have a single chart by my workstand as I stitch, but I think I may need to create an annotated chart for the goldwork. So far, many of the stitches have been familiar enough for me to do some of them with only the name and placement to guide me, but in other cases I know I will need to have the folder open at the instructions as well. One of these days we will have to find a house with a studio for me to work in!
The Camberwell Panel – Nine
Transferred to stretchers
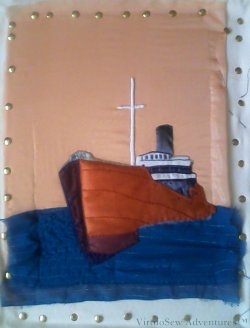
When I began to attach the slip, I needed to make sure that the background would be smooth and straight, so as the floor frame was failing to achieve that, I transferred the work to an old set of stretcher bars and used plenty of drawing pins to attach the fabric. I wasn’t concerned about holes in the fabric because the pins were well outside the area of the design that would be on show.
This photo shows the slip of the hull and superstructure, the funnel, and the masts finally attached. Each area was firmly sewn on using a suitable colour of stranded cotton (several different colours in the the case of the hull!), and the holes for the anchor chains were held down to let the background show through.
There are some small elements which yet need to be done on the ship – notably the rigging, but the next important element is the quayside. I had originally picked out two upholstery fabrics to choose between, one of them dark and heavily patterned, and the other lighter and smoother, but as it turned out both of them came in useful….
Starting the Christus Natus Est Or Nué Panel

Christus Natus Est - Materials
I know I should try to limit the number of projects I work on at once, but my fingers have been itching to start the Christus Natus Est Panel, and I finally decided to have a go.
I bought the silk thread (Pearsall’s Filoselle) and the gold passing thread, at the Knitting and Stitching Show in Harrogate last year. The Filoselle is a beautiful stranded thread, and I’m using a single strand to couch down the colours of the thread, and a different, very fine thread to couch down the bare gold sections.
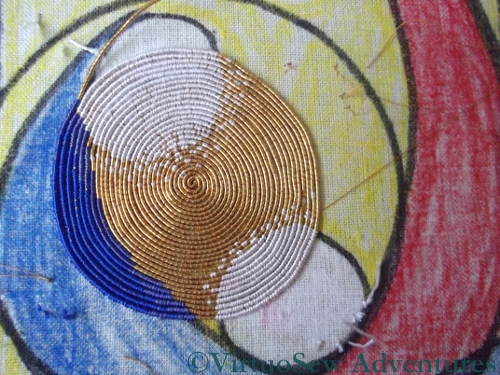
I was somewhat afraid that choosing to work my or nué panel in the circular and curving fashion would create considerable headaches, especially in starting the spiral at the centre of the circle, but actually it was fairly straightforward. I’ve put the gold thread into a little gauze bag, which keeps it from unwinding- mostly- and means I don’t have to worry about it snagging or catching as I work
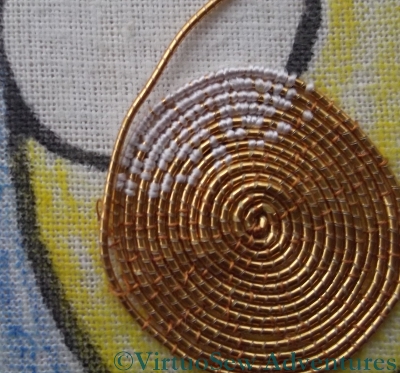
Close-up of Starting The Or Nué panel
As my spiral becomes larger, and the number of colours I am using in each circuit increases, the work will become slower, and more confusing, but so far, I am enjoying it very much. It would be much easier if I had a proper slate frame and trestles to stand it on, as I can see that the pins holding the calico to the frame will need to be moved occasionally as the fabric stretches. However, the silk thread covers the gold reasonably easily, and since I was aware from reading about the technique that the silk would distort the rows slightly, I’ve not been unduly disturbed by the way the spiral isn’t quite circular anymore. It won’t be that obvious when the piece is finished, after all!
In fact I’ve been enjoying myself so much that I just have to be a little careful not to get so wound up in it that I stitch for too long and end up with fuzzy eyes!
Thistle Threads Fundraising Needlework Nibble

Tulip Needlework Nibble - image from Thistle Threads website
Encouraged by the success of the Needlework Nibble that supported the Museum of Costume in Bath, Tricia at Thistle Threads has launched another fundraising Needlework Nibble, this time to support the exhibition With Cunning Needle: Four Centuries of Embroidery at Winterthur Museum.
I’ve enjoyed the Glittering Snail, and the two Thistle Threads courses I’ve been following, so I’ve ordered my kit, and the finishing kit to go with it. I’ve printed out the instructions, as well.
Tricia has already reported that the fundraising is going well – about halfway to the target, thanks to the generosity of one of her readers who has matched the first thousand dollars raised. That means there are still kits available, although they are clearly moving fast.
Why don’t you join us?
An Embroidered Jewel
Design And Inspiration
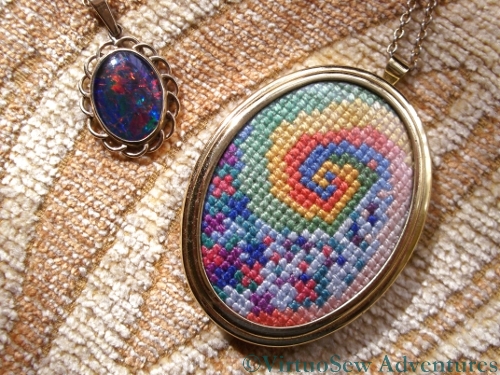
Some years ago (in fact long before we were married) my husband the Australian bought me an Australian Opal Triplet pendant. It’s really stunning, and when it catches the sunlight it takes people’s breath away.
At about the same time, I received a Framecraft pendant blank with a magazine I’d bought, and found myself thinking it might be fun to create a sort of Homage To The Opal.
I still have, somewhere, a whole sheet of coloured design ideas that never made it to a chart, but anyway, here is the final result. It combines a swirling spiral (inspired by the simple gold wire setting he designed for the stone) with some basic “flower” shapes intermingled to create the effect of the changing colours of the stone. The colours were picked to echo the colours in my opal triplet – naturally each opal is different.
The embroidered version is worked in counted cross stitch on 18hpi aida using variegated silk threads, and although I know I am not exactly an unbiased judge, I think it is lovely, and I very much enjoy wearing it!
Another Design Inspired By Clarice Cliff

Cotton Bag with Aida panel, beginning the Design
Here is something else I have found in a heap of things to finish…
This cotton tote bag with an aida panel across the front was a free gift with a magazine, several years ago. It must have been about the time I was designing the series “Inspired by Clarice Cliff“, and it probably seemed a good idea to cover all the aida, rather than having threads stretching across the back of the stitching.
It’s a real trial to stitch, though. I’m not at all surprised it ended up at the bottom of the workbasket. If the handles don’t get in the way, the rest of the bag does. Since it is made without a seam at the bottom, I can’t even release the seam to make life easier, although I admit that doing so might not help as much as you’d hope.
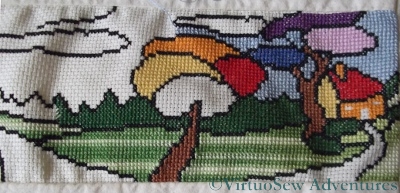
Another Clarice Cliff Inspired Design
Here is a close-up of the design as far as it is stitched. I’ve used Anchor Stranded Cotton, and the variegated thread is one of Anchor’s standard variegated threads. I’ve stitched the primary section in that thread in two phases of half-cross stitch, to spread out and change the colour effect a little.
This is going to be my “travelling project” until it is finished, as when I sort out the threads it should be quite compact, and it’s not such fine and delicate stitching as most of my other current projects. As I don’t travel regularly, it will be a while before you see it again.
A Very Open Weave
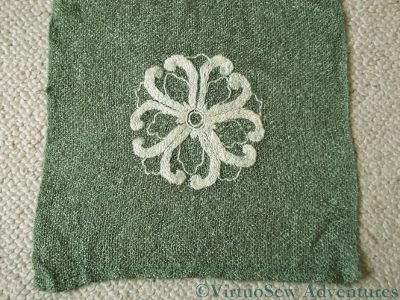
Scarf End
This is a long rectangular scarf in a very open weave, woven using a textured yarn. I bought it on the high street, but decided to embellish it somewhat. At the time I was fed up with embroidered pictures and wanted to embroider something useful. Life no longer being leisurely enough to require a huge stack of teacloths or placemats, clothes seemed an obvious choice.
I also wanted to play with a soluble fabric. Soluble fabrics are usually used for machine embroidery, but naturally I had other plans!
The embroidery thread was one of the Caron Collection three-stranded cottons – from the Watercolours range, I think, and the design is based upon a Chinese heraldic badge depicted on one of the designs in “Traditional Chinese Designs: Iron-on Transfer Patterns”, produced by Dover books. Of course I didn’t iron it on…!
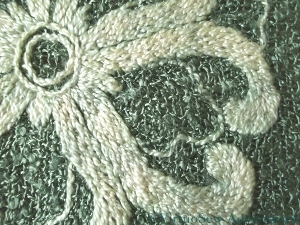
Scarf Motif - CloseUp
As you can see, most of the design is worked using closely packed long and short stitch, with the thin lines worked in double running stitch. This makes the design close enough to reversible to cope with the odd gust of wind when I’m wearing it!
You might be wondering what use the soluble fabric was. It was very useful in fact, because it allowed me to put stitches in the middle of holes in the weave of the scarf without them pulling to the edge of the hole before I’d locked them in place with the next row of stitching. The stitch length is pretty constant throughout the piece, and that’s because my stitch placement wasn’t undermined by the base material.
You could argue that a backing fabric would have done that job without messing around with soluble fabric, and you would be right. But such a backing fabric would have permanently altered the appearance and drape of the scarf, and I liked it the way it was.
I still do!