The Camberwell Panel – Nine
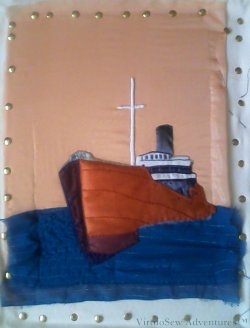
When I began to attach the slip, I needed to make sure that the background would be smooth and straight, so as the floor frame was failing to achieve that, I transferred the work to an old set of stretcher bars and used plenty of drawing pins to attach the fabric. I wasn’t concerned about holes in the fabric because the pins were well outside the area of the design that would be on show.
This photo shows the slip of the hull and superstructure, the funnel, and the masts finally attached. Each area was firmly sewn on using a suitable colour of stranded cotton (several different colours in the the case of the hull!), and the holes for the anchor chains were held down to let the background show through.
There are some small elements which yet need to be done on the ship – notably the rigging, but the next important element is the quayside. I had originally picked out two upholstery fabrics to choose between, one of them dark and heavily patterned, and the other lighter and smoother, but as it turned out both of them came in useful….


Wow wow wow! It looks wonderful!
Just wait till you see it finished and framed!
Things are coming together and the bow is begining to loom the way we had hoped.
I love this piece. The boat looks great!
It really looks 3D! That’s great!
Looking good! it has a great sense of perspective.
oh!! It’s amazing and will be fantastic when it’s finished.
Wonderful depth and realism to the hull of the ship. Looking forward to finding out how the fabrics worked out!
This just says ‘quality’ to me Rachel – the detail, the way it has been ‘constructed’. I’m sure this is an interesting series of posts for your cousin to see what went into each stage of the process too.
This is looking amazing!! It looks so real – I love it!
This is looking very nice Rachel. The ship pops, just great.
The perspective in this piece is fabulous Rachel. Very very cool.