
Category: Goldwork
Another Course From Thistle Threads!
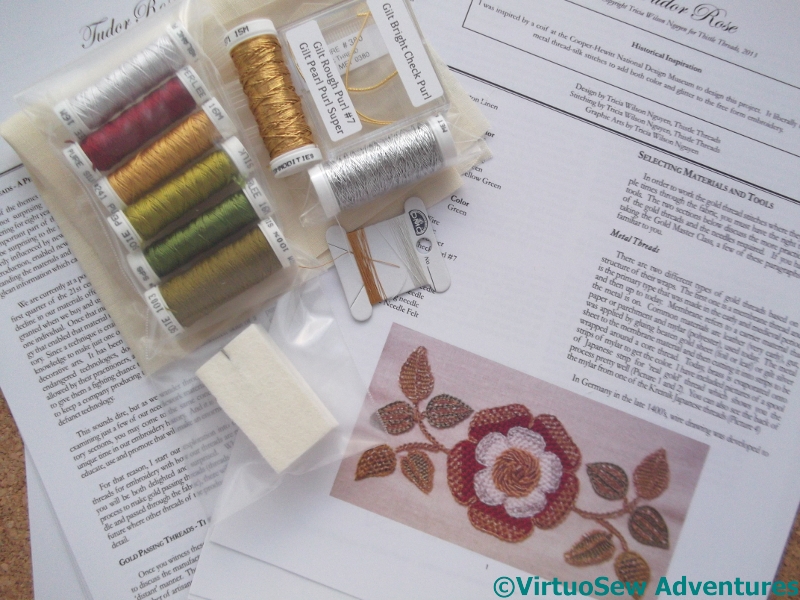
Tudor Rose Kit
There was another clatter of the letterbox and a gentle thunk on the carpet recently. It was soon followed by some excited squeaks and a dash upstairs to print out Month 1 of the History and Instructions.
This time, instead of a clear distinction between metal thread stitching and silkwork, as in the Floral Glove Needlecase, the Tudor and Stuart Goldwork Masterclass, or the Glittering Gentleman’s Nightcap, the aim of the course is to show how the metal and silk threads were combined within stitches and motifs.
I’m hoping that this will give me some new ideas and techniques to apply to my Dreams of Amarna panels. However, I intend to be a good girl. I won’t actually start this until I’ve done the Glittering Gentleman’s Nightcap, which is still “going slow” owing to a combination of end-of-year exhaustion and fugitive winter light. With a bit of luck, I may be able to get started in the spring.
The Latest on the Glittering Nightcap

Progress Report
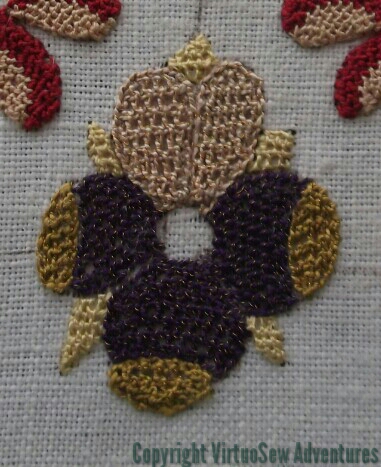
It’s been very difficult to get back to the Glittering Nightcap, but I must, because in December the Tudor Rose course is starting. There are, I think, four pomegranates, two carnations, and two pansies to do, as well as all the leaves.
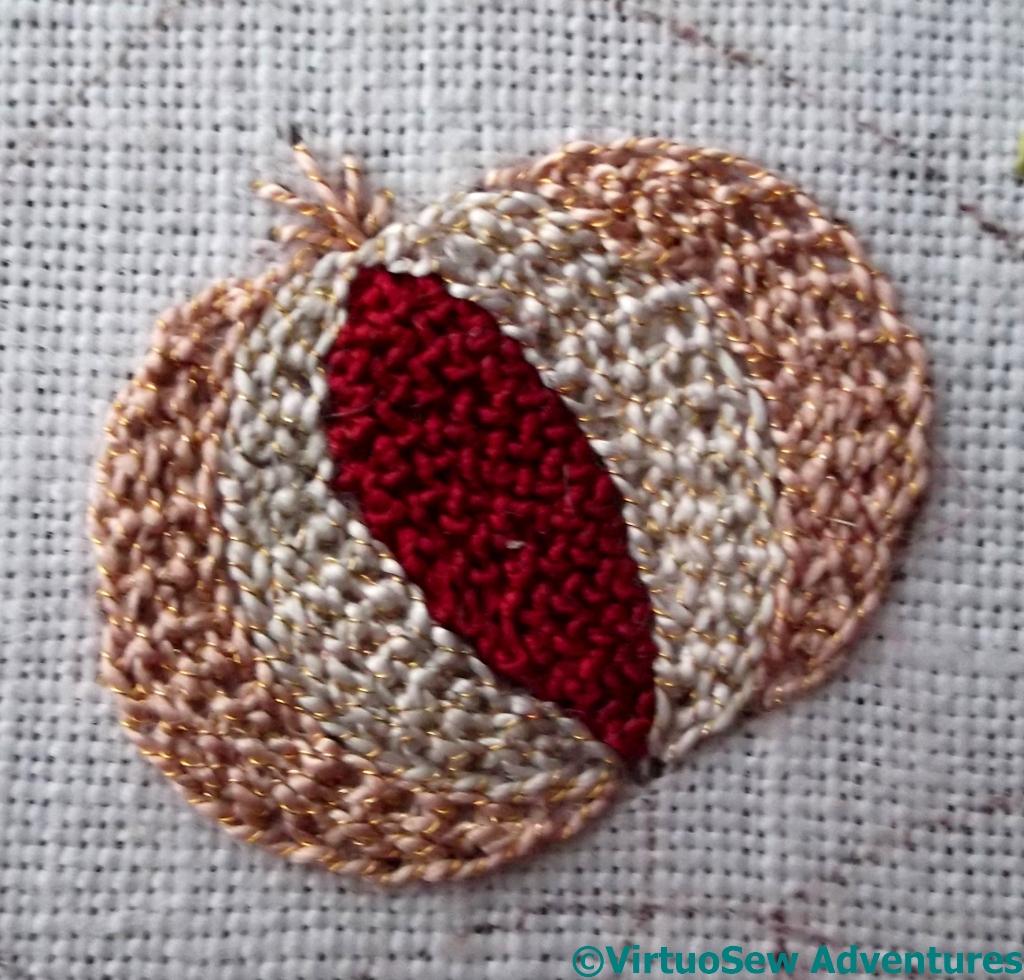
First Pomegranate On Brim
The pomegranates are going to be quite a trial. The central section is worked in Trellis Stitch, using the Soie Perlee. I seem to have begun with the one section that was easy to work, because the central section of the next pomegranate – still unfinished – took me several sessions to do, purely because of the angles at which I was attempting to work.
Of course, fugitive winter light isn’t helping, either. Sometimes I finish the other stuff I need to do, sit down at my frame, decide after about three stitches that there isn’t enough light to see what I’m doing, and get up again, muttering discontentedly!
I’ve continued to make changes in the working, as well. I’ve used the Bordered Corded Brussels stitch for both the white and pink sections of the pomegranate, and rather than working the white in a “vertical” alignment, I’ve worked it all “horizontally” – relative to the body of the motif, not to the weave of the fabric, of course.
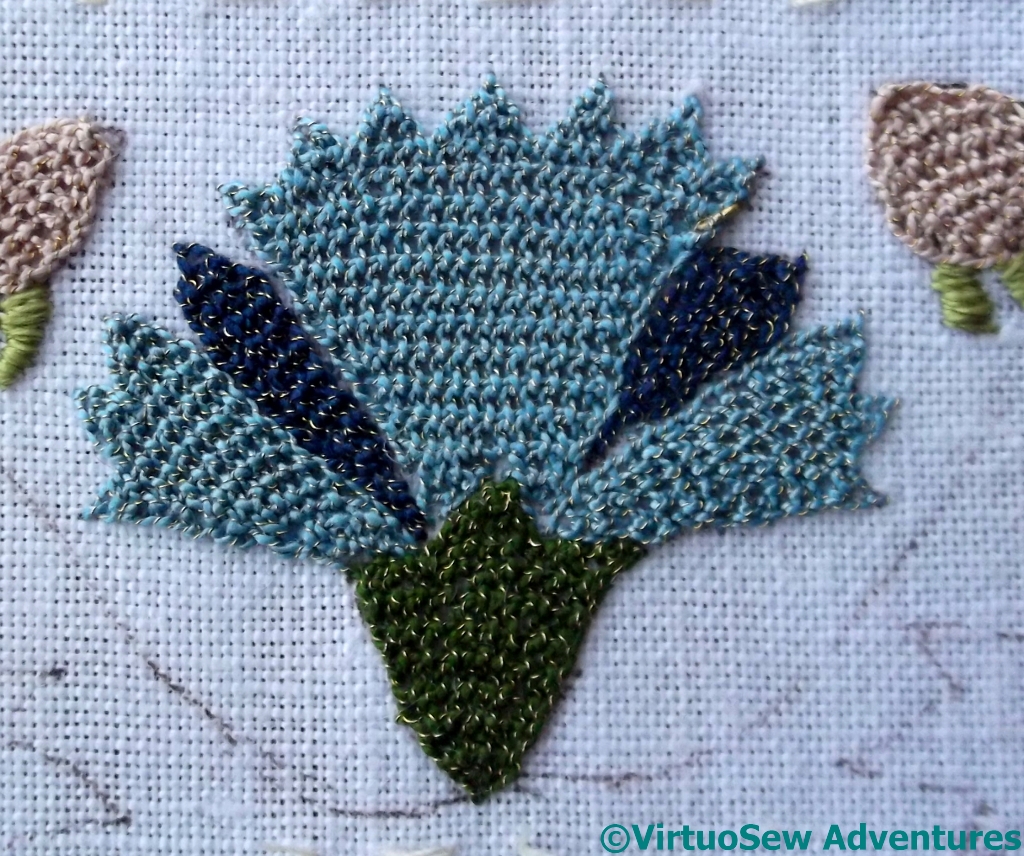
First Carnation On Brim
If you look at the top right hand corner of this carnation, you will see one of the hazards of working with Gilt Sylke Twist. The gold wire has scrunched itself up into a single length that looks almost like a bullion knot. What must have happened was that the wire snapped, and then for one reason or another caught on the right side of the fabric instead of continuing through with the needle to make the stitch.
I’ve decided that I definitely prefer Bordered Corded Brussels Stitch to working Corded Brussels stitch into a Chain Stitch border. It is much easier to work, because there’s no fighting through the stitching of the border, and it looks very clean and crisp – at least when I get it right.
I’ve done the buds, the pansies, and one carnation, so now I have three pomegranates and one carnation to do before I move on to the leaves.
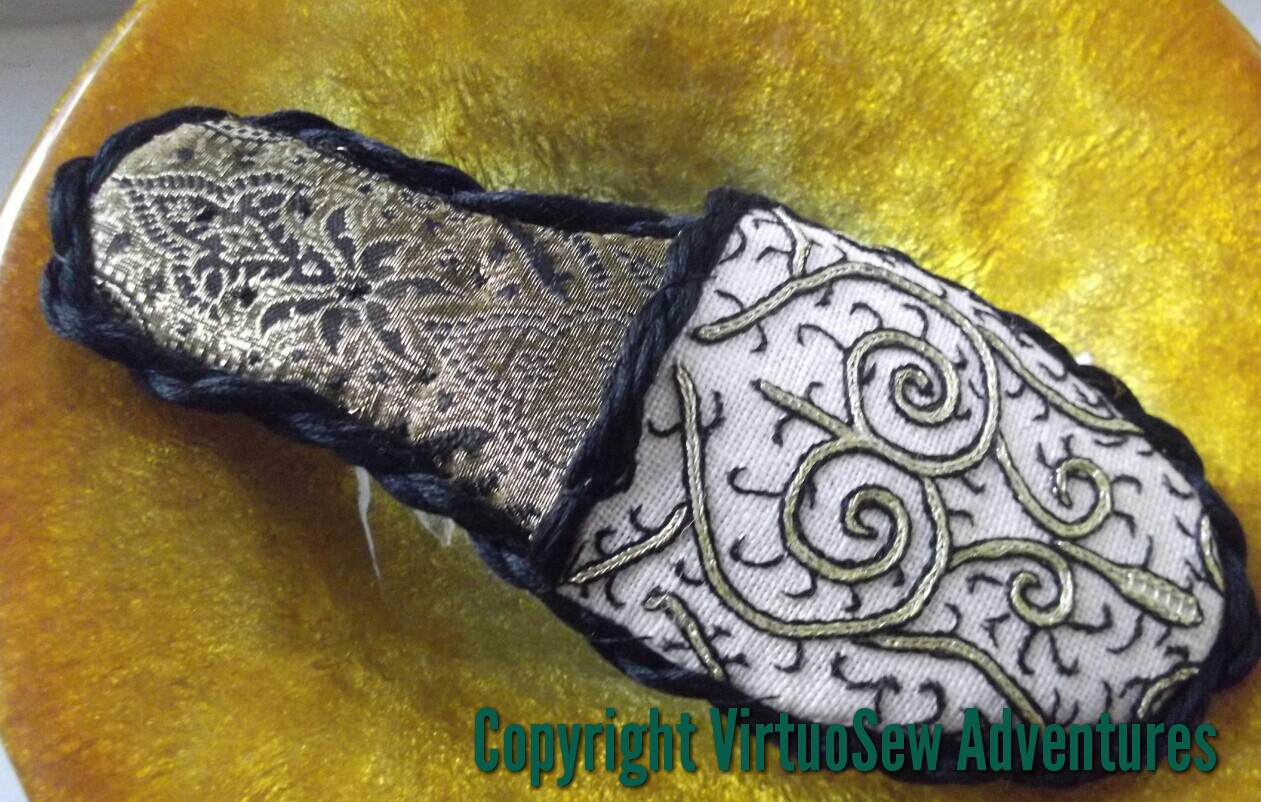
Lady Catherine’s Slipper
Starting the finishing on Lady Catherine’s Slipper
It has taken me a while to finish the embroidery for the Lady Catherine’s Slipper Needlework Nibble. In part this is due to our usual modern complaint of Life in general getting in the way, and in part it is due to my aversion to black. It will look lovely when it’s done, but anything that involves me working with black thread rather than any other colour is always going to be low on the list. However, now it is done, and I move on to the question of Finishing…
Which means being a brave girl and messing around with glue, close to my careful stitchery and some absolutely gorgeous silk brocade.
Lady Catherine’s Slipper
Since glue is involved, and has to dry between each stage of the assembly, it took several episodes, spread over a couple of days, but I got there in the end, and I’m very pleased with it.
I photographed it lying across a Limoges enamel bowl belonging to my parents, so that it would show up nicely against against the glossy enamel background.
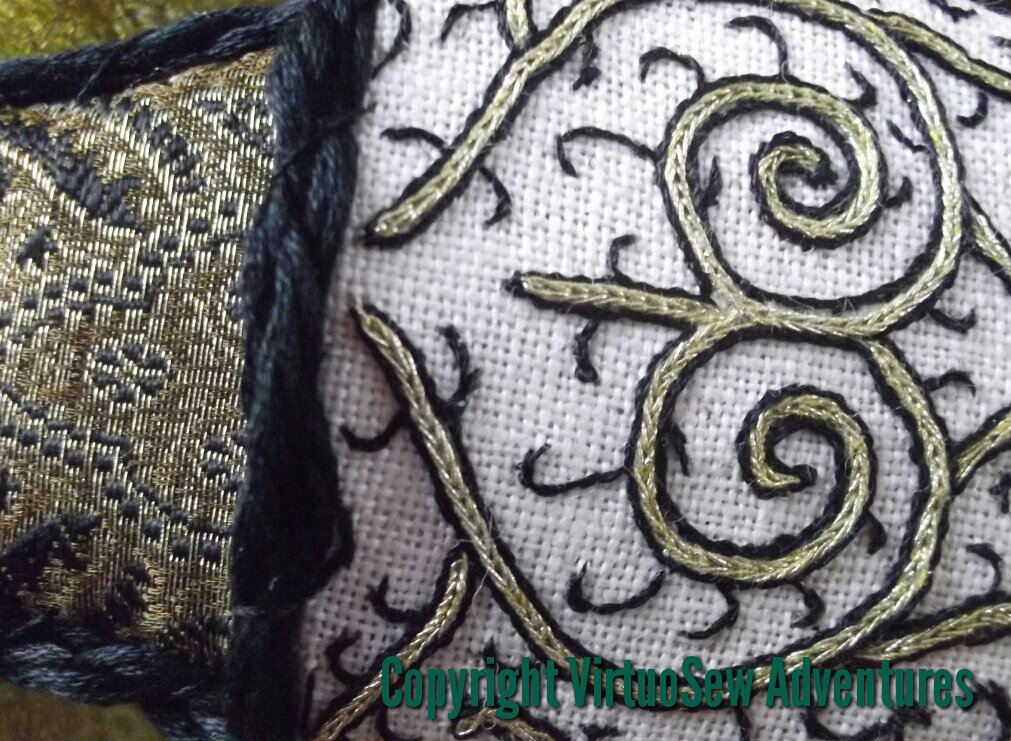
Close Up of the Slipper
The gold thread is a really fine one, and the spidery black tendrils embellishing the black border help it to stand out against the base fabric.
My cord-making skills could use some improvement, I think, as the cord sewn around the edge isn’t entirely even, nor is it as tightly twisted as I would have liked. It is, however, rather better than the one I made for the Glittering Snail, so at least there are signs that Practise is indeed Making Perfect!
Glittering Nightcap – Making Changes
Although I have already commented that I usually regard Online University pieces as tutorial pieces to be worked according to the instructions, I’ve decided to make a few changes on the brim. This will mean I will be able to compare directly some of the working methods I’ve learned about since I began on the Nightcap, so I should learn even more!
 The first change was to use Bordered Corded Brussels Stitch for much of the detached buttonhole stitch. I can’t say that I am finding the Gilt Sylke Twist markedly easier to use now than it was when I started. However, I do find that the Bordered Corded Brussels stitch is easier than working Detached Buttonhole with return into a border of chain stitch, and less prone to breakages of the gilt wire.
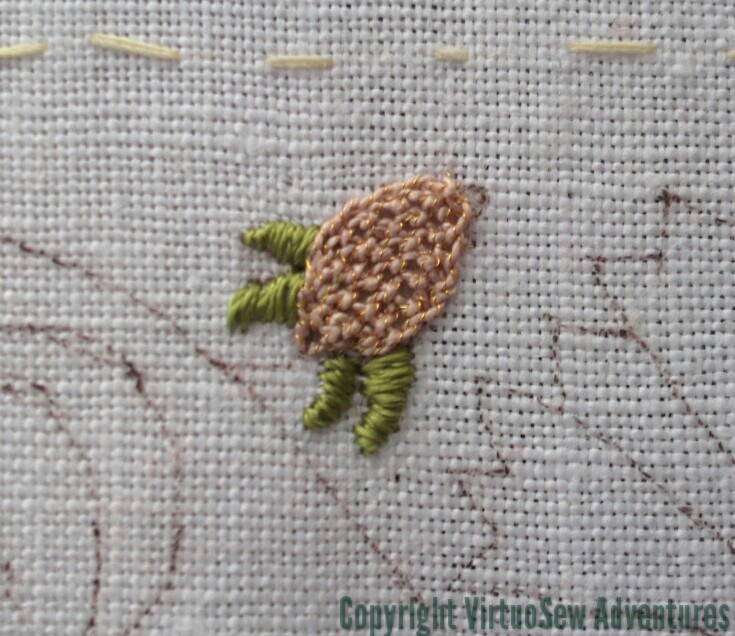
In the case of the strawberries I have also chosen to use satin stitch in place of trellis stitch for the sepals. I’ve padded the satin stitch, to give it a little more life.
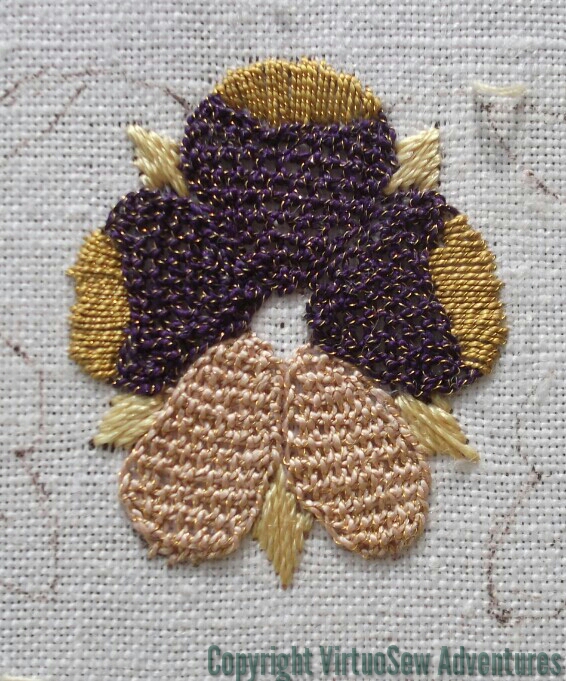
New Version Pansy
Old Version Pansy
There are changes to the Pansy too. Again, the petals are worked in Bordered Corded Brussels stitch, but the curled edges I worked in satin stitch. The outer edge is padded with a line of back stitch to lift it a little. Possibly not enough, so when I work the second pansy I might choose to pad the edge with chain stitch, or whipped back stitch to see whether it makes a difference.
The straw-coloured sepals are unpadded satin stitch this time, rather than the trellis stitch suggested in the instructions. It’s much less fiddly to do, but I wonder whether these changes rather undermine the style, looking a little too modern, too simple, too plain.
And if there is one thing I have learnt from the exhibition “In Fine Style“, and from its fabulous book, it is that the Tudors believed very much that more is more – more texture, more glitter, more colour, more everything.
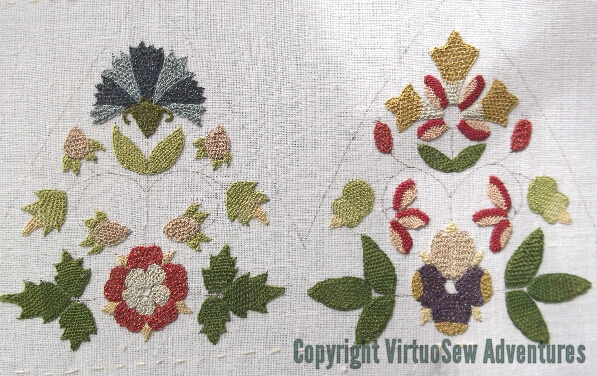
Glittering Nightcap – Close ups on the Crown
Pansy
Before I move on to work on the brim, here are close ups of two of the panels of the Nightcap. You will see, when you zoom in, the French Knots at the centre of the rose, contrasted with the Spiders Web stitch at the centre of the pansy.
You can also see that the spangles aren’t evenly spaced – there are some areas more densely spangled than others. I do think I have achieved a reasonably random placement, but humans are pattern-making animals, and it is really extraordinarily difficult to combine relatively even spacings with random placement! However, I am absolutely sure that attempting an even regular spacing would have had me stark mad if I had tried it!
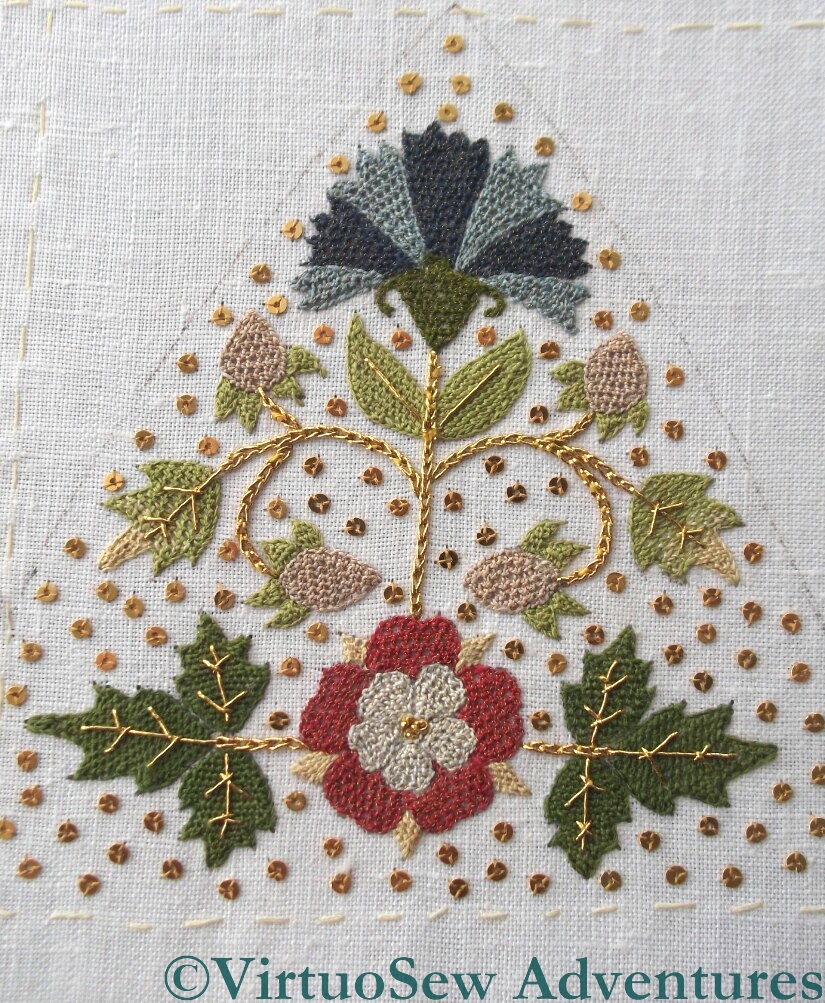
Rose
In ordinary light, the spangles don’t really shine as I am sure they would in the flickering light of a candle. When I have the piece finished and on display somewhere, I will probably have to spend a lot of time getting the lighting right – without using real candles…
Once I had taken the photographs, I tacked a calico cover over the completed crown of the nightcap, back and front, and turned the fabric over in the frame in order to start on the brim. Covering the finished work will stop me catching my threads on it, or knocking spangles off as I work.
I hope…
Glittering Nightcap Progress – Metal Threads and Spangles

Complete With Gold Thread
Gosh. Silkwork all done, and metal thread completed too. The experiments with the bordered detached buttonhole stitch with return must have got me a bit fired up, because as well as planning some variations on the brim, I incorporated some changes in the gold metal stitching on the crown. The two roses have a cluster of French Knots at their centres, instead of Eight-Spoked Spiders Web Stitches, and I quite deliberately have not used exactly the same run of lines for each variation.
I have to say that although I commented that my visit to “In Fine Style” showed me that I had not stitched my Detached Buttonhole Stitch with Return closely enough, I would hate to have to sink a metal thread through anything more closely stitched. I was on tenterhooks lest I damage the silk, or the metal thread, or create some sort of obvious flaw in the stitching.

Spangled
The next stage was to add the spangles, since I want everything on this side finished before I turn the fabric over to start on the brim. Tricia says in the instructions that in the light of the experience they had with the Plimoth Jacket, she feels that they should have used more spangles, rather than fewer, and with that in mind she was much more generous with the provision of spangles than she would otherwise have been. I divided my packet of spangles roughly into six (one for each quadrant of the crown and two for the brim), and Spangled away enthusiastically.
A milestone on the Gentleman’s Nightcap, and an experiment
Silkwork On Cap Done
I’ve now finished the silk work on the main sections of the Glittering Gentleman’s Nightcap. The next stage is to work the metal thread embroidery, because I want everything on this side of the fabric done before I take it off the frame, turn it over and work on the brim. In the end, I found that the last few bits went quite quickly, perhaps because I had a whole day when I did nothing else and found the stitching speeding up. It’s taken me a while to realise it, but I now think that Detached Buttonhole Stitch With Return is one of those stitches which requires “flow”, which in turn doesn’t happen if you sit down with only time to do one leaf before doing something else!
Up until now, I have tended to regard the Online University projects I have done as a sort of salutary discipline, and worked them exactly according to the instructions (something I rarely do, even when I have instructions!), but during my last visit to a stitching show, I spent some time on Jacqui Carey‘s stand, talking to her, and acquiring her books about Elizabethan Stitches and Sweet Bags. One of the stitches she found, and “reverse-engineered” is effectively the “Detached Buttonhole stitch with Return” which forms so much of the stitchery on this piece, but it incorporates a border within the method of stitching. So I thought maybe on the brim I could used this bordered stitch instead of the standard stitch.
Unsuccessful Trial
In another departure from my usual procedure I decided to practise the stitch first, and it’s really just as well.
Perhaps because Jaqui is primarily a braid maker and not an embroiderer, it took me some time to adapt my way of thinking to make sense of her diagrams. She also shows the stitch as worked upwards, whereas I have worked downwards with this sort of stitch all my life – or at least ever since my first attempt, when I worked the Needlelace Embellished Blouse.
Second Trial Much Better
The fact that version one was worked on felt didn’t help, either, since the needle kept snagging it, and the felt sagged under the weight of the stitching.
So version two was worked on linen, using a mercerised cotton instead of pearl cotton. This time I think I have got to grips with the stitching and the way to create the border. The linen survived much better, but the mercerised thread kept trying to tie itself in knots!
Furthermore, try as I might to work the stitch as diagrammed – upwards and away from me – I kept turning the frame and working it sideways or downwards instead.
I probably will choose to use the stitch for at least some of the areas on the brim, but it will be interesting to see how I cope when I simply can’t turn the frame around!
Needlework Nibble – Lady Catherine’s Slipper

Lady Catherine’s Slipper
As though I haven’t enough to do, I have decided to do another of the Needlework Nibbles from Thistle Threads.
This one has gold curlicues edged in black and the background and lining are of black and gold silk brocade. I hesitated before deciding to take it on – black is a colour I’m not fond of – but since the gold was there to lift it, and since the various challenges of finishing the Nibbles are very good for me, I went ahead.
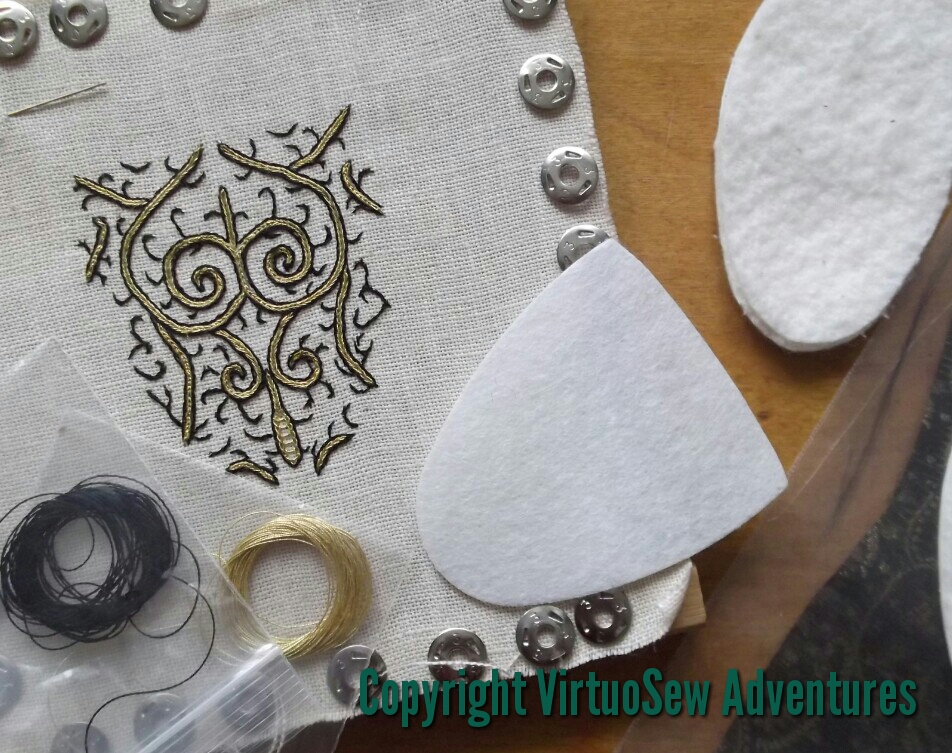
First Curlicue
In the instructions, Tricia suggests using brown Micron pen for the main curlicues and black for the ornamental curls. That’s a great idea, but as brown is all I have (from the Glittering Nightcap kit) and my local artists’ suppliers don’t know about Micron I shall simply have to stay alert, especially as the lines have turned out rather faint.
The embroidery in this case seems fairly simple – the golden curlicues are worked in Heavy Chain Stitch, one of my favourites, and the black silk will be worked in Stem Stitch and Split Stitch.
As usual, therefore, the challenge will be in the making up. It will probably take me a week or so, once I’ve finished the embroidery, to gather my courage to tackle the finishing!
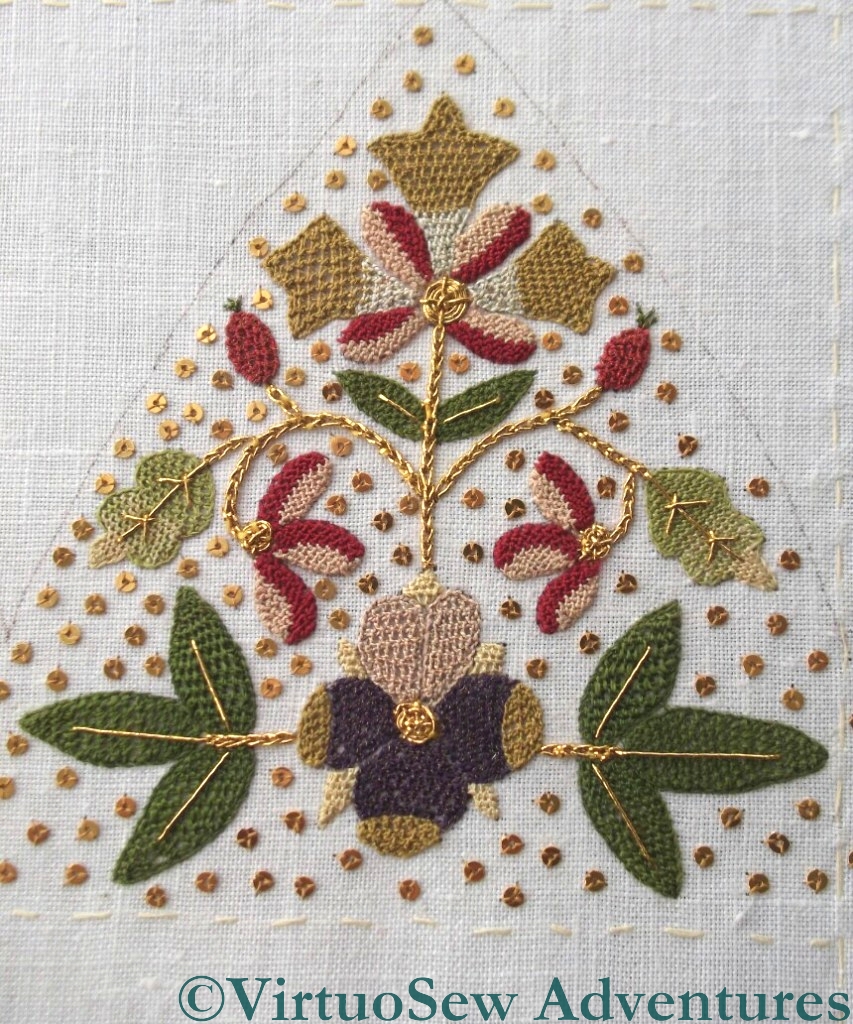
Update on Month Four of Glittering Gentleman’s Nightcap
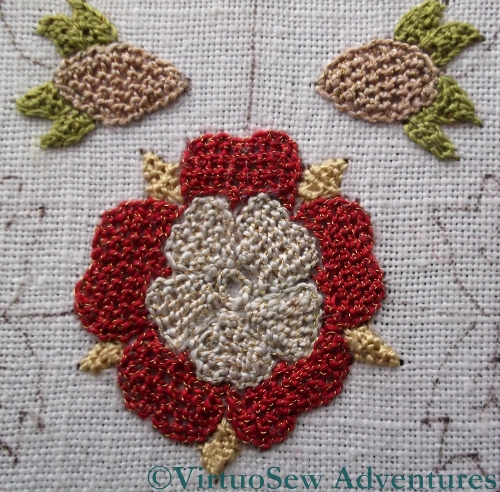
First Tudor Rose
My last post about the Glittering Gentleman’s Nightcap was in September, but I’m afraid it has not made much progress over the winter. This is because I only work on it when I have good natural light, and that means sitting in a bay window, which can be very cold indeed!

Second Tudor Rose
I managed to get one of the Tudor Roses done and then there was a long, chilly hiatus. Each petal is worked in Gilt Sylke Twist, outlined in reverse chain stitch and filled in with detached buttonhole with return. I think that is the same as “corded Brussels Stitch” in needle-lace, or if it is not, I have yet to work out the difference. The sepals are worked, again in detached buttonhole with return, using straw coloured silk.
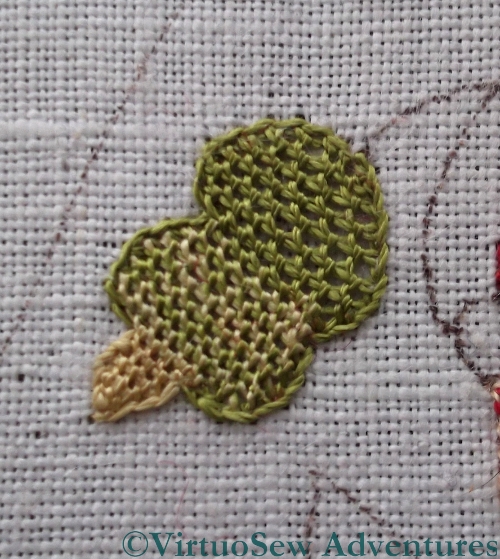
First Blended Leaf
As I mentioned in my previous post, Month Four consisted of the Tudor Roses and a plethora of leaves in a variety of combinations of colours. It was not uncommon for embroiderers of the period to blend colours in the needle, and Tricia suggested that we might choose to do the same. This is not quite as straightforward as one might hope, since of course the Soie Perlee is not intended to be plied and recombined, unlike the stranded cotton I used when I did something similar with Tracy Franklin in Durham.
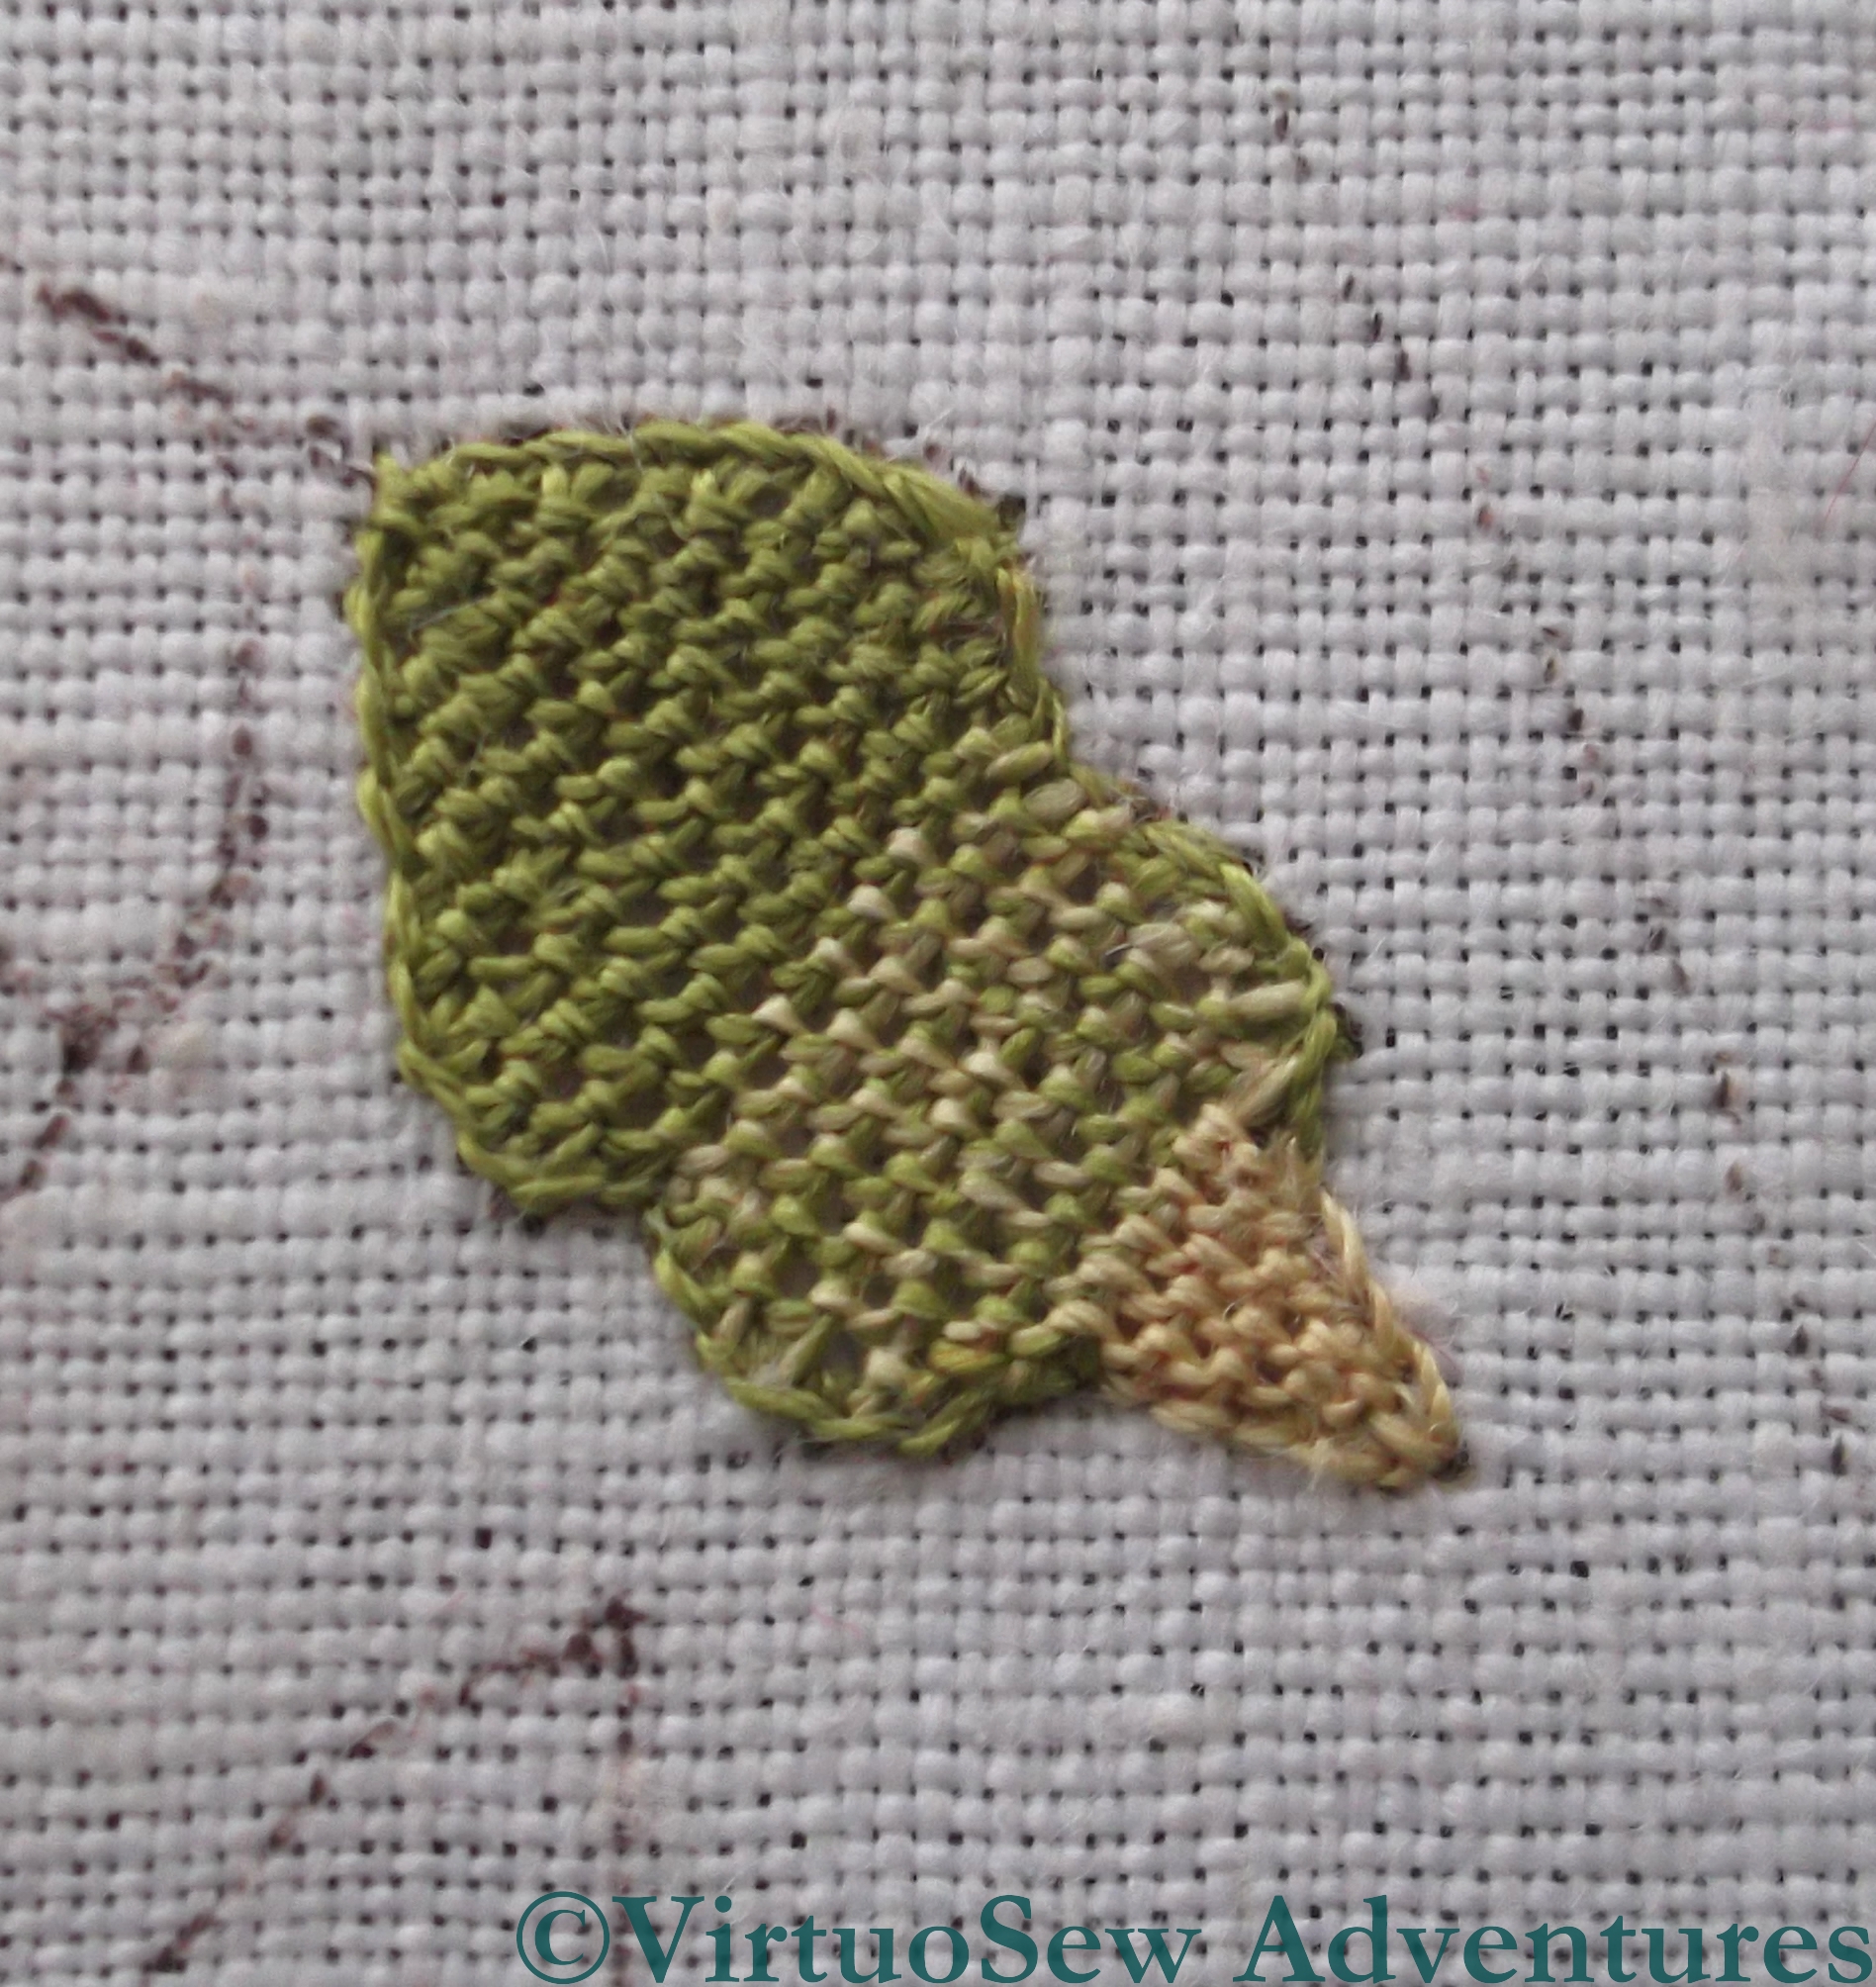
Second Blended Leaf
It produces an interesting effect, and it does allow for a smoother colour change than using the threads in their normal state. What interested me, however, was that without being aware of changing my technique in any way, the coverage of the second leaf was markedly denser than that of the first.
Each leaf took about three-quarters of an hour to work, which tells me that I’ve some considerable time to go before I can get on to the goldwork or turn over to work the brim – there are about 28 more leaves to work!
The Butterfly Pinpad Finished

Materials Laid Out
At long last I have finished the embroidery on the Butterfly Pinpad. The embroidery was simple enough – chain stitch, French knots, and satin stitch, worked either with a fine metal thread or pale green silk thread but the fine stitches gave me aching arms during the tennis elbow episode, so everything took longer than I would expect. Then of course I had to get started on finishing it. The reason it took me so long to wind myself up to it was – as some of you may have guessed – that glue was involved!

Tying A Bow
In fact, on this occasion, I cheated – if you can call it cheating when an embroideress uses her needle and thread! I chose to lace the butterfly itself, and the silk backing, onto their card supports, rather than attaching them with glue.
I found the ruched edging almost impossible to keep straight and even – perhaps I simply didn’t make the gathering threads quite even enough. Even squiffy, though, it looks quite luxuriant!
The bows were quite hair-raising to do, as well – tiny, made of very fine silk ribbon, and a little inclined to flop. I tied my fingers in knots, several times, as I made and attached the four of them!

Butterfly PinPad Finished

Another View Of The Pinpad
Now that it’s finished, I’m pretty pleased with it, all the same, although I can’t imagine I’ll ever be able to bring myself to stick pins in it…