
Category: Goldwork
Dealing with the Golden Acorn
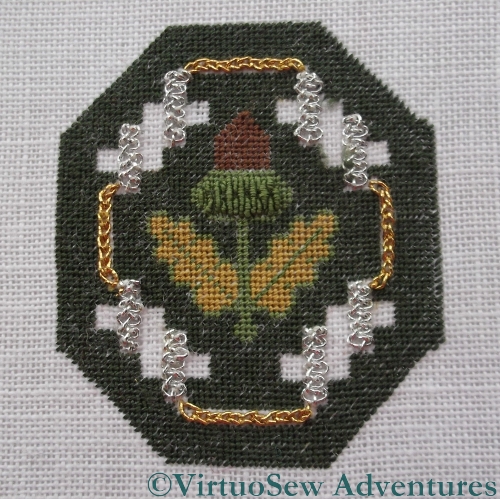
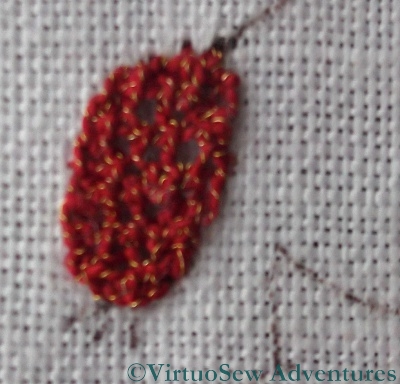
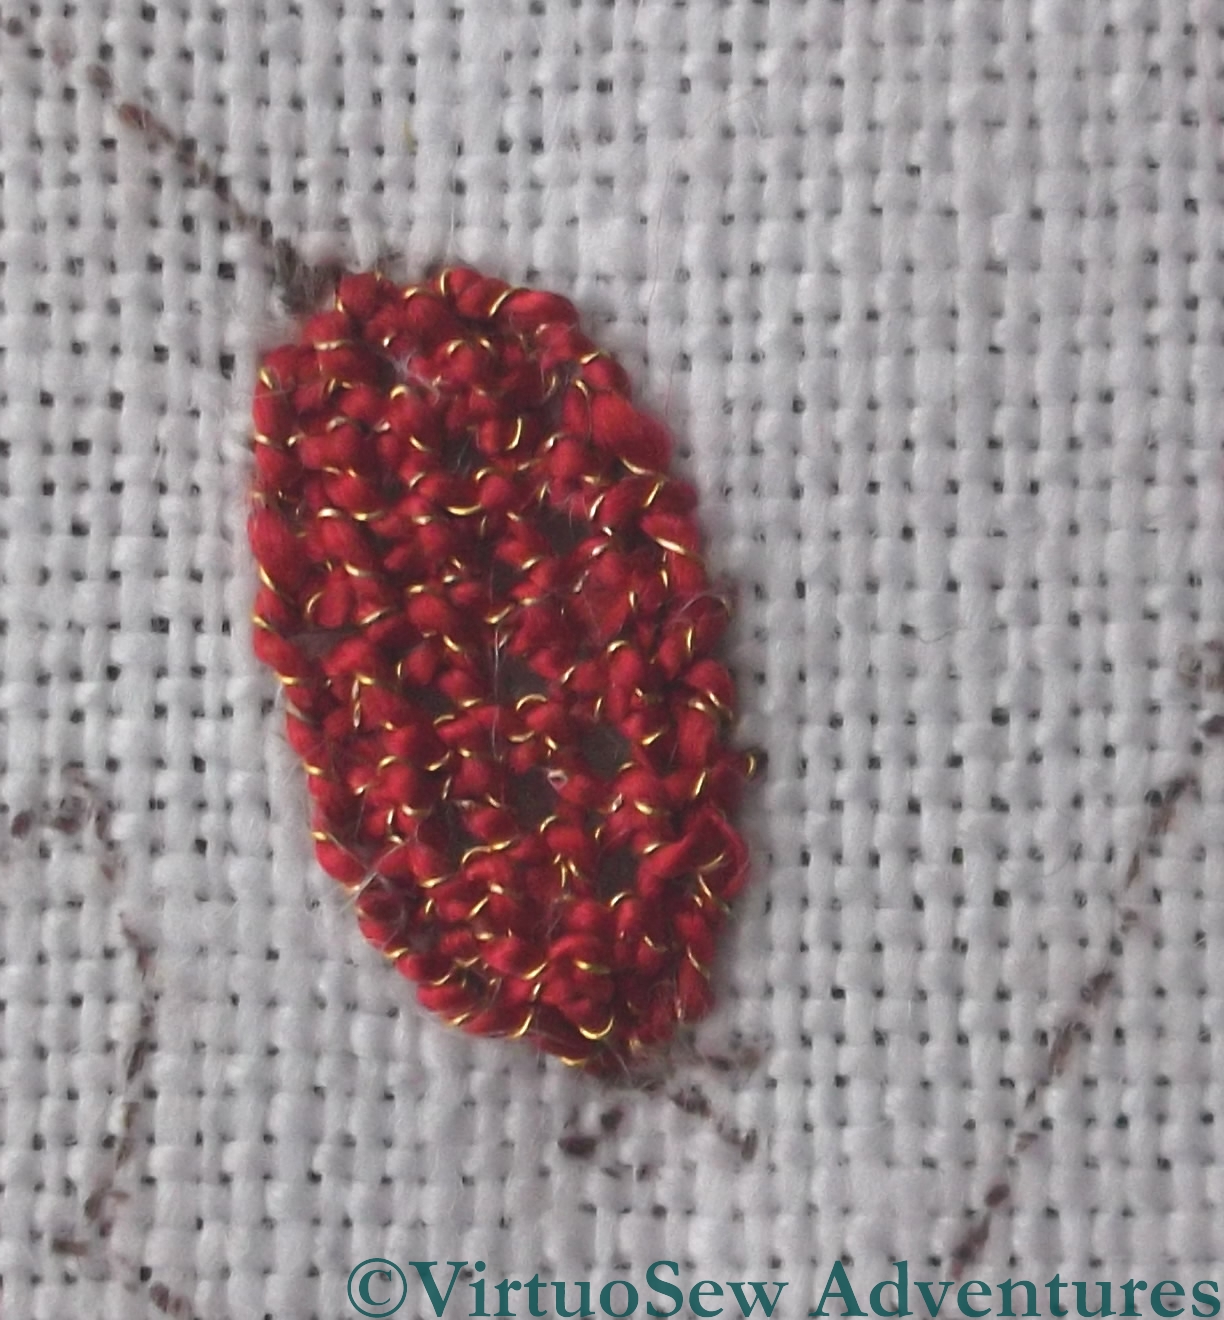
Silver Braid Stitch
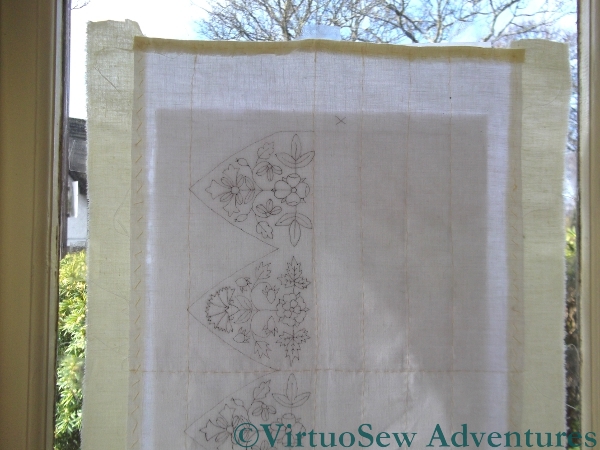
You last saw the Golden Acorn in July, when I was thoroughly fed up with it.
Since I’d got so engrossed in stitching that I’d neglected to pay attention to the details and had to unpick the lot, when I came to re-stitch I decided to put in the braid stitch in silver first.
I found the silver to be a more temperamental thread than the gold, although structurally it was exactly the same. However, these threads are all made more or less by hand, and must be hugely susceptible to temperature and humidity.
I know from my textile technology studies that natural fibres – such as cotton, wool, and silk – are susceptible to environmental conditions, because the basis for the success of the Lancashire cotton industry was due in no small part to the fact that ideal conditions for growing cotton are far from ideal for turning the cotton into cloth. In fact, nowadays, textile factories are built with climate control, because the speed of modern production demands that all possible variables be thoroughly ironed out.
In the same way, if you visit a woollen mill, you will see piles of wool at various stages of production, just sitting there. If you are a time-and-motion person you’ll get very uptight about this, and talk about “Just In Time” manufacturing – only to be told, in no uncertain terms, that if you want to pay for all the failed batches that will result from not allowing the wool to relax (technical term – yes, honestly) between processes, you’re welcome, but the manager won’t let it out of the factory with their name on it.
The silver and gold threads we are using have natural fibre cores, so sensitivity to climate is only to be expected!
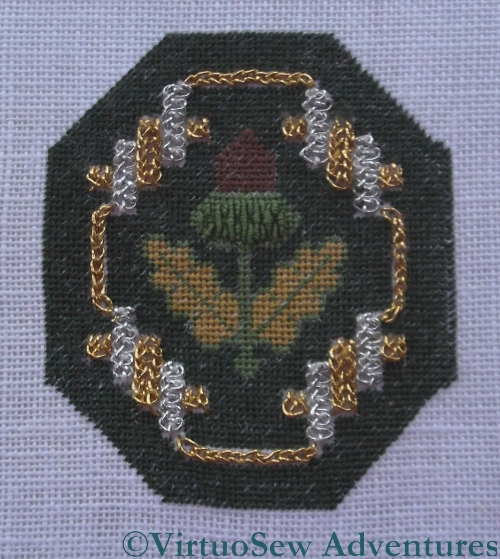
Second Time Lucky
I found both of the two main stitches in the strapwork, Ceylon stitch and Braid Stitch, rather troublesome in metal thread, although Braid Stitch in pearl cotton is one of my favourites. There’s no denying that they produce a rich and exotic effect once they are in place, though!
I became slightly fed up with tent stitch – there was such a lot of it! – while I was working this, so I’ve been giving myself some time away from it. I’ll get started on the next one of these when I feel ready for fine tent stitch again.
I’m also waiting until all three are stitched before I decide which to finish to create which stitching accessory. If I recall correctly, there’s a scissors keep, a needlecase, and a pincushion. I suspect they’ll end up in that famous Winter Decoration Corner I keep threatening to do!
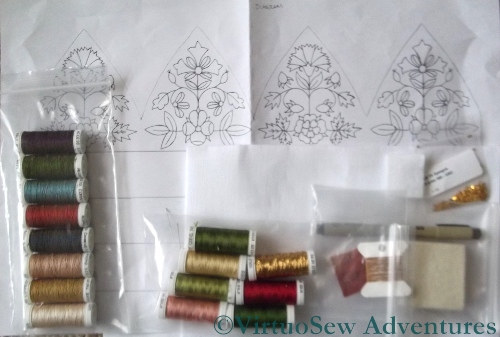
Another Needlework Nibble – the Butterfly Pinpad
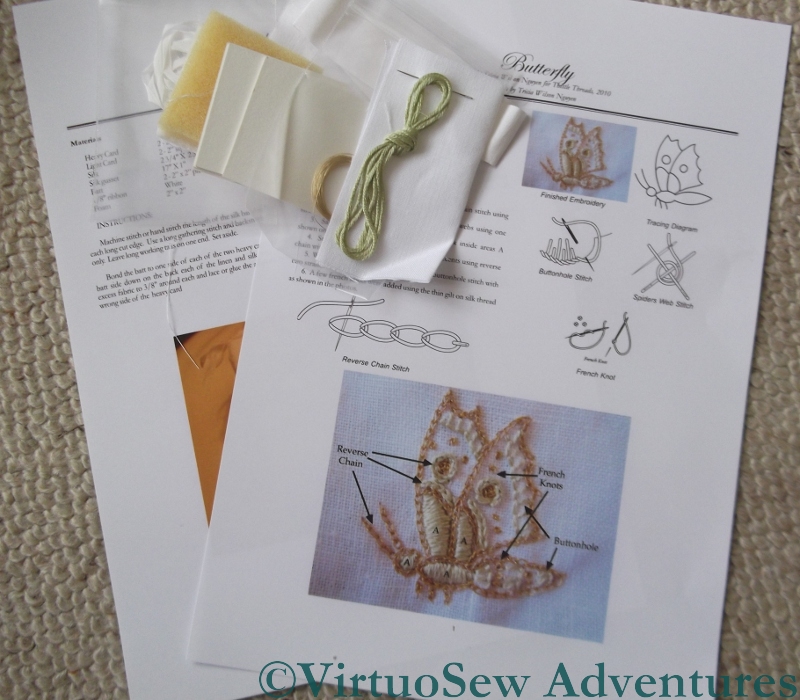
The Butterfly Nibble, instructions and materials
There is yet another Needlework Nibble available from Thistle Threads! This involves a particularly fine gold thread, and some stranded silk.
This one is a tiny butterfly, outlined in gold, highlighted in pale green silk, and then finished as a pinpad. I have discovered in the past two years that I really enjoy working these little pieces, and they are a great way to find out about different threads, stitches or techniques without being entirely overwhelmed by the scale of the project.
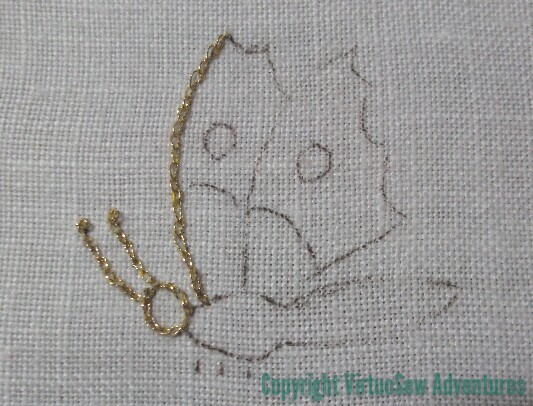
Beginning The Butterfly Pinpad
I’m suffering from tennis elbow at the moment (owing to the housework, not the embroidery!), so I am particularly interested in smaller projects that allow me to make visible progress in short spans of time. I thought that this might be one of them, but actually the stitches are so hair-raisingly small that I’m no longer sure that is the case.
The stitches are only a couple of millimetres long, and with my arm in its present state, what you see here is the result of two half-hour sessions!
Glittering Nightcap – Month Three Done
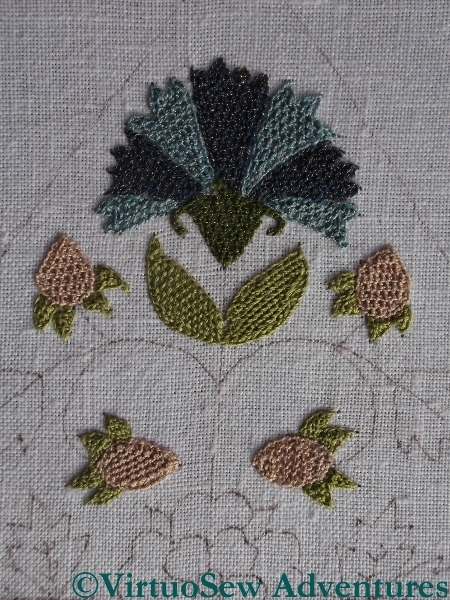
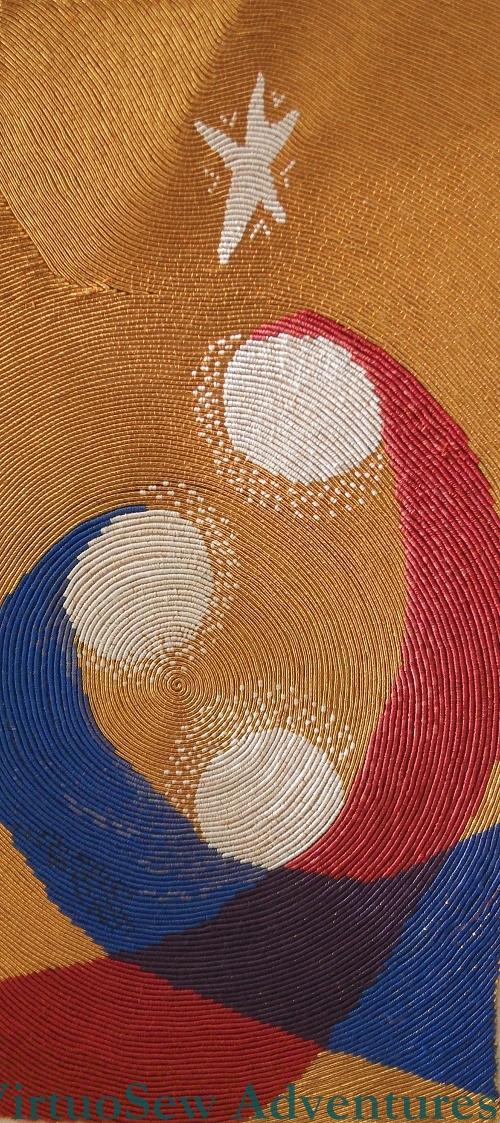
Pansy From Month Three
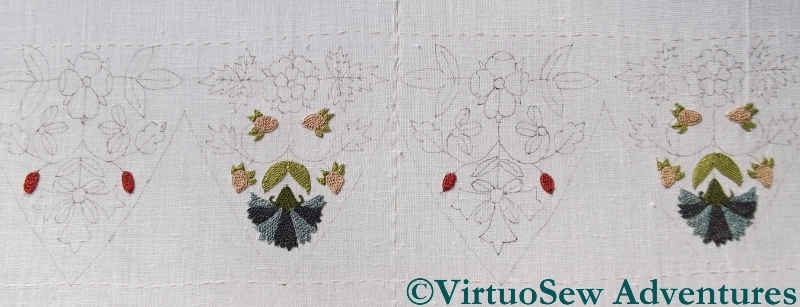
This month, because I’m working the main body of the cap first and then intend to turn over and work the rim, has been a little thin of activity. I’ve really no excuse for it taking so long except that I’ve become very taken up with the Dreams of Amarna. The work on the main part of the cap this month has been only two pansies, worked in detached buttonhole stitch using the Gilt Sylke Twist, with straw-coloured calyxes worked in Soie Perlee.
The other half of Month Three – two pomegranates on the rim – will have to wait until I turn the fabric over. Next month’s activity involves two Tudor Roses and a positive plethora of different leaves in various combinations of Soie Perlee.

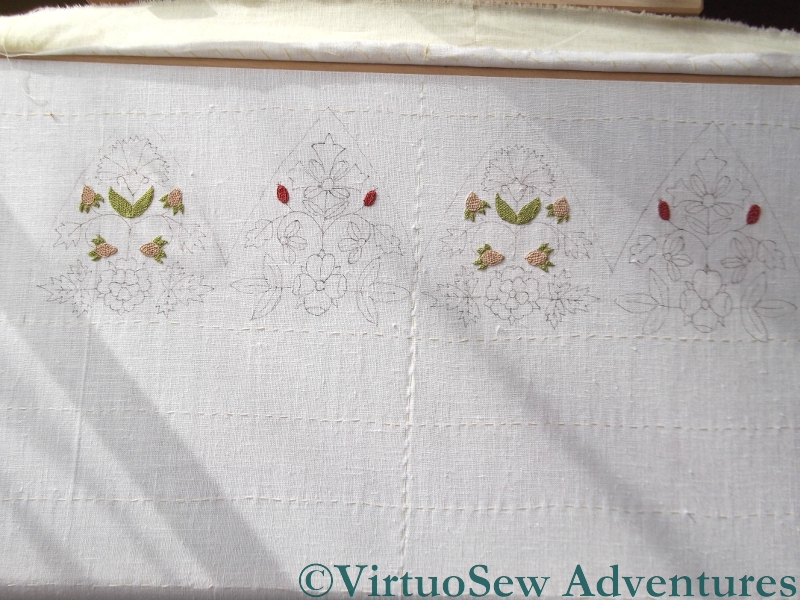
Month Three Done
This picture shows one of the two pairs of sections that will make up the finished Nightcap. As you can see, there are still large gaps in the pattern, but it is gradually filling in, and Month Four actually completes the embroidery. Months Five and Six concern the finishing of the embroidery to create the nightcap and the silk-brocaded stand for it.
The Glittering Nightcap – Month Two Complete
Month Two Done
So, here we are, more progress on the Glittering Nightcap. It still looks spotty, but rather less so, I’m happy to say!
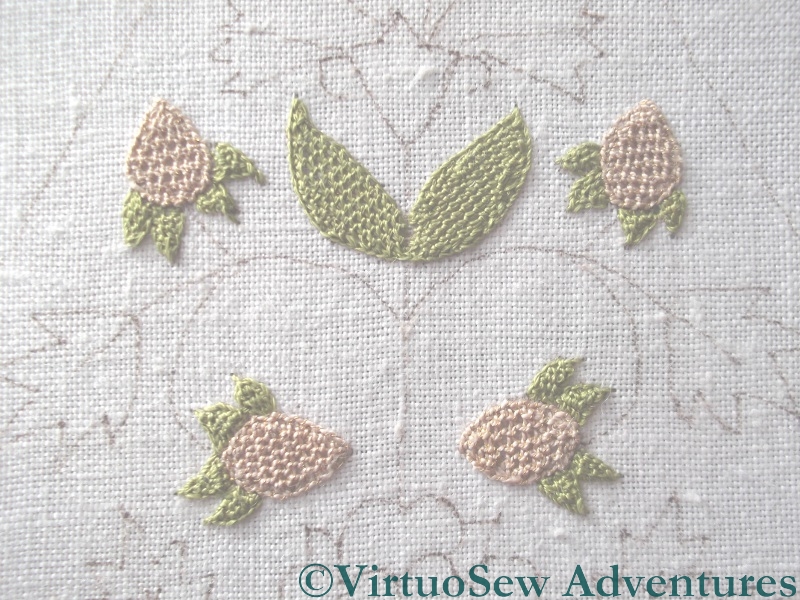
Month Two Detail
Here is a close up to show you what has been added in Month Two in more detail, and you can click on the picture to enlarge it further. The flower is apparently a honeysuckle (botanical realism wasn’t one of the artistic preoccupations of the period!), and is stitched in two shades of Gilt Sylke Twist, in detached buttonhole stitch. All of the pink and red buds are worked in detached trellis stitch in the soie perlee. In both these cases there is nothing complicated about changing colours – it is simply a matter of starting the new colour with a new row of stitches. It does mean that there seem to be ever more threads to finish off at the end of a stitching session, which is when I prefer to do it, because that means that when I sit down to start again everything is clear and tidy, and there is nothing to tangle my next set of stitches.
Stitch Direction
Working the trellis stitch involved some rather uncomfortable contortions in order to work the stitches in the directions described in the instructions. The annotated sketch on the right shows the stitch directions spiralling around the centre of the flower. The whole thing is mounted in a rectangular frame about twenty inches across – sometimes there is a lot of fabric and frame between me and the tiny petal I’m stitching.
That’s the other thing to remember – everything is very small. In a way this is not a problem, because even though the stitches are tiny the shapes do fill fairly quickly. If I have a good light, and a tranquil mind, I can make quite a bit of progress in a single afternoon.
Glittering Gentleman’s Nightcap – Month One Stitching
Glittering Gentleman's Nightcap - Month One
You may recall that I commented in my last post about the Nightcap that it looked very “bitty” because each flower, leaf and bud was going to be done before the stems. This view of the whole piece, with all of Month 1 finished, shows precisely what I mean. If you click on the photo to the left you will be able to see a larger version of it, with the blurred copyright notice unblurred (something strange happened there!).
Glittering Gentleman's Nightcap - Month One - Detail
There are two of these flowers worked in two shades of blue, using detached buttonhole stitch in Gilt Silke Twist. Some of it is tricky because I want to change the orientation of the fabric relative to me, which is impossible because it’s framed up as an entire rectangle. Since I really don’t want to crush work already done, I can’t put each element in a hoop, so I’m occasionally having to sit in a rather contorted fashion to to tackle some of the sections.
The leaves and strawberry calyxes are in Soie Perlee, which is a joy to use, supple, smooth and strong. That said, there’s something distinctly odd about the right hand leaf in this detail photograph. It seems almost as though the stitching has pleated or bunched up on itself. One of the possibilities is that I was working this leaf before I bought my Necessaire stand, and somehow I tied myself in knots because I was balancing the frame on the windowsill as well; it might be something to do with the angle of the stitch relative to the stitcher; or I might simply have lost concentration.
Oh, and when I say “All of Month One”, that’s a slight exaggeration. Because of the structure of the Nightcap, there is a band of stitching on the back, which will form a brim or browband. I’m going to do that last, so that I don’t spend too much time changing the orientation of the fabric in the frame. So what I really mean is “All of Month One on the front”…
Progress on the Glittering Gentleman’s Nightcap
Progress So Far
As you might have guessed, once I got started, I wanted to keep going!
However, detached buttonhole stitch is a very time consuming stitch, and I’ve been warned by comments in emails that the Gilt Sylke Twist, undeniably gorgeous though it is, can be a bit trying to stitch with. So I have been working quite hard to remind myself it is not a race, and that doing as much as I feel up to at any one time is perfectly acceptable!
I found myself struggling with the Millenium frame on my existing frame stand, which was too flimsy for the breadth and weight of the frame, so after some weeks I decide to invest in the Necessaire Floor Stand that goes with it. After only two stitching sessions, I love it. Sturdy and well made, it doesn’t sag under the weight of the frame, there is a place for my magnifier to attach, and there’s even a hook for a pair of scissors.
Detail of Month One stitching
I haven’t yet finished Month One of the instructions, so what you are seeing is an intermediate stage. At the moment, as you will see from the “Progress So Far” it’s looking very spotty, because there are such acres of linen between the stitched motifs. It can be a little disheartening to slave for hours and find that the odd couple of leaves has made very little difference to the overall impression. This is a problem I had with the Piano Shawl, but in that case I was able to solve the problem very simply by stitching in the stems. I don’t want to do that here, because the silk thread would catch on the gold thread of the stems and be spoiled. So I will simply have to be patient and find some other way of highlighting my progress.
You will notice that there is some peculiarity about the right-hand leaf in the detail picture. I’m not quite sure what happened there – I think it was in the period of struggle before I bought my Necessaire – but I’m not going to take it out until Month One is complete. I want to have a clear sense of progress before I start snipping things out!
Beginning the Glittering Gentleman’s Nightcap
Transferring The Design
I’ve been looking at the kit of materials for the Glittering Gentleman’s Nightcap Course for quite some time, but since I received the finishing kit I’ve finally decided to get going.
There was quite a bit of preparation to do. There are lines of basting to help with finishing the piece when the stitching is done, and I’ve added fabric at the top and bottom, and bound the sides, to make framing up a bit easier. I invested in a Millenium frame for this project, and I wanted to be sure that I would have enough fabric at the top and bottom to work with the attachment system.
I don’t have anything that resembles a light-table, so I had to improvise. The tracing and the fabric have both been taped to a pane of the only unleaded window in the house, and I spent a careful hour or so using the Pigma pen included in the kit to trace over the pattern onto the fabric. Bear in mind, if you find yourselves applying this method – it’s a most unnatural position to be drawing in, and you will find your arm aching and your hand cramping, if you aren’t careful.
First Bud
Second Bud
I also did some stitching. These are my first two attempts at Detached Buttonhole Stitch using the Gilt Sylke Twist.
Which is just as hair-raising as anything you might have read will have lead you to expect. It’s very lively and springy, and the gold spiral does sometimes break or scrunch up along the silk.
All that said, perhaps because I was prepared for it, I did not find it as troublesome as I feared, and the second bud is a marked improvement on the first, so I think I can be very pleased!
Glittering Gentleman’s Nightcap Finishing Kit
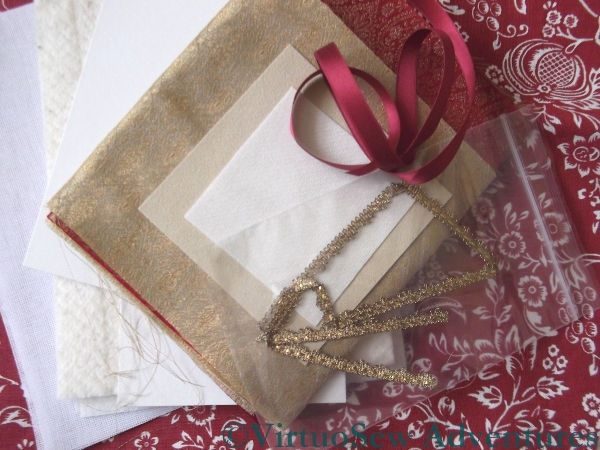
NightCap Finishing Kit
I’m really not keeping up at all, am I?
I’ve not even started on the Glittering Gentleman’s Nightcap course from Thistle Threads, and then the finishing kit drops through the letterbox, rather rubbing my nose in the fact.
However – now I’ve finished the Masterclass, I can get started – only about four months late!
The package contained more mouthwatering silk brocades (one creamy-beige, one burgundy), more of that lovely silk ribbon (like the ribbon on the Floral Glove Needlecase) and gold lace (ditto), together with assorted pieces of stiffening and padding, and – a sort of bonus – a canvas shopping bag printed with a suitably period pattern.
Time I got started on the embroidery, then…
A Final Look At Christus Natus Est
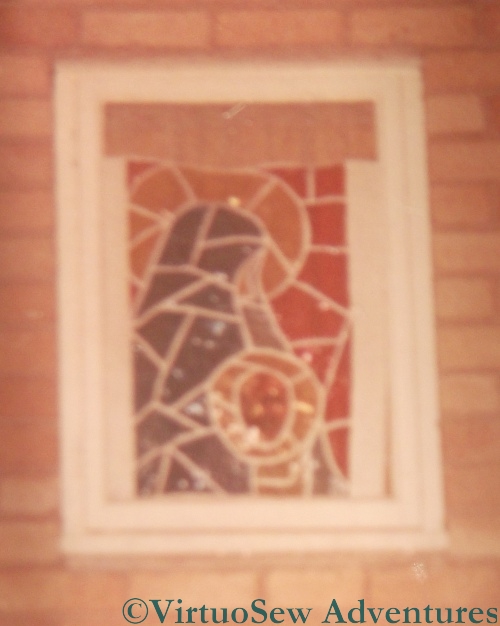
First Stained Glass Window

Second Version of the Stained Glass Window
I promised a look at the development of the “Christus Natus Est” design, so here is the very first version, much more traditionally representative in style, made by my mother when I was a little girl, for the window over the stairs in the first house I remember.
When we moved house, there was no window that the first version could fill, so she designed another, this time to fit in a living room window. It is much simpler and more stylised, but I think you can see that in both versions the primary impression is one of the protecting care of the Holy Family.

Christus Natus Est, by Steve Williamson
Then, about four years ago, she did a version in oils, for an exhibition at a local gallery that had the theme “Memorable Dates”. Somehow the design came into vivid life in the painting – she says it came together much more easily than many of her paintings do, but in this version, the Christ Child needs no protection, instead the Light of the World blazes fiercely, incandescent with power and authority.
The Saviour Is Born!
I expect it is a surprise to none of you, having seen that progression, that I decided I wanted to do my own interpretation. As I’ve said before, I think my version is quieter and more subdued. It has a sense of stillness and purpose, perhaps, the outstretched arms of the Christ Child already prefiguring the Crucifixion, with none of the exaltation of the heavenly choirs.
If, unlike me, you believe that an artist’s work reflects their state of mind, you might be worried about that. Don’t be. Beethoven wrote some of his most joyous music when he was already profoundly deaf and acutely depressed, and while I would not in any other way expect to be bracketed with the great man, my embroidery never has anything to do with my emotional state!
Glittering Nightcap – Materials Arrived
Glittering Nightcap Materials
Although I am very tempted by Tricia Nguyen-Wilson’s Cabinet of Curiosties Casket Course (who wouldn’t be?) I decided that I really shouldn’t take on a multi-year project such as that would certainly turn out to be, not least because I really want to do more on the Dreams of Amarna Panels.
I couldn’t quite do without an Online University course, though, so I have signed up to the Glittering Nightcap Course, and the materials arrived just before Christmas. Eight colours of Gilt Sylke Twist, as well as all the other silk thread, real spangles (tiny ones), a Japanese needle, and even a Pigma pen (for which I am devoutly grateful, because my local – usually very good – artists’ suppliers was completely non-plussed when I asked about them. I suppose it’s an American brand.
I shan’t be able to start before the middle of January or maybe even later, but I’m really looking forward to it. It will be interesting to get to grips with Gilt Sylke Twist, having heard so much about it!