
Tag: experiments
Playing with brooches again
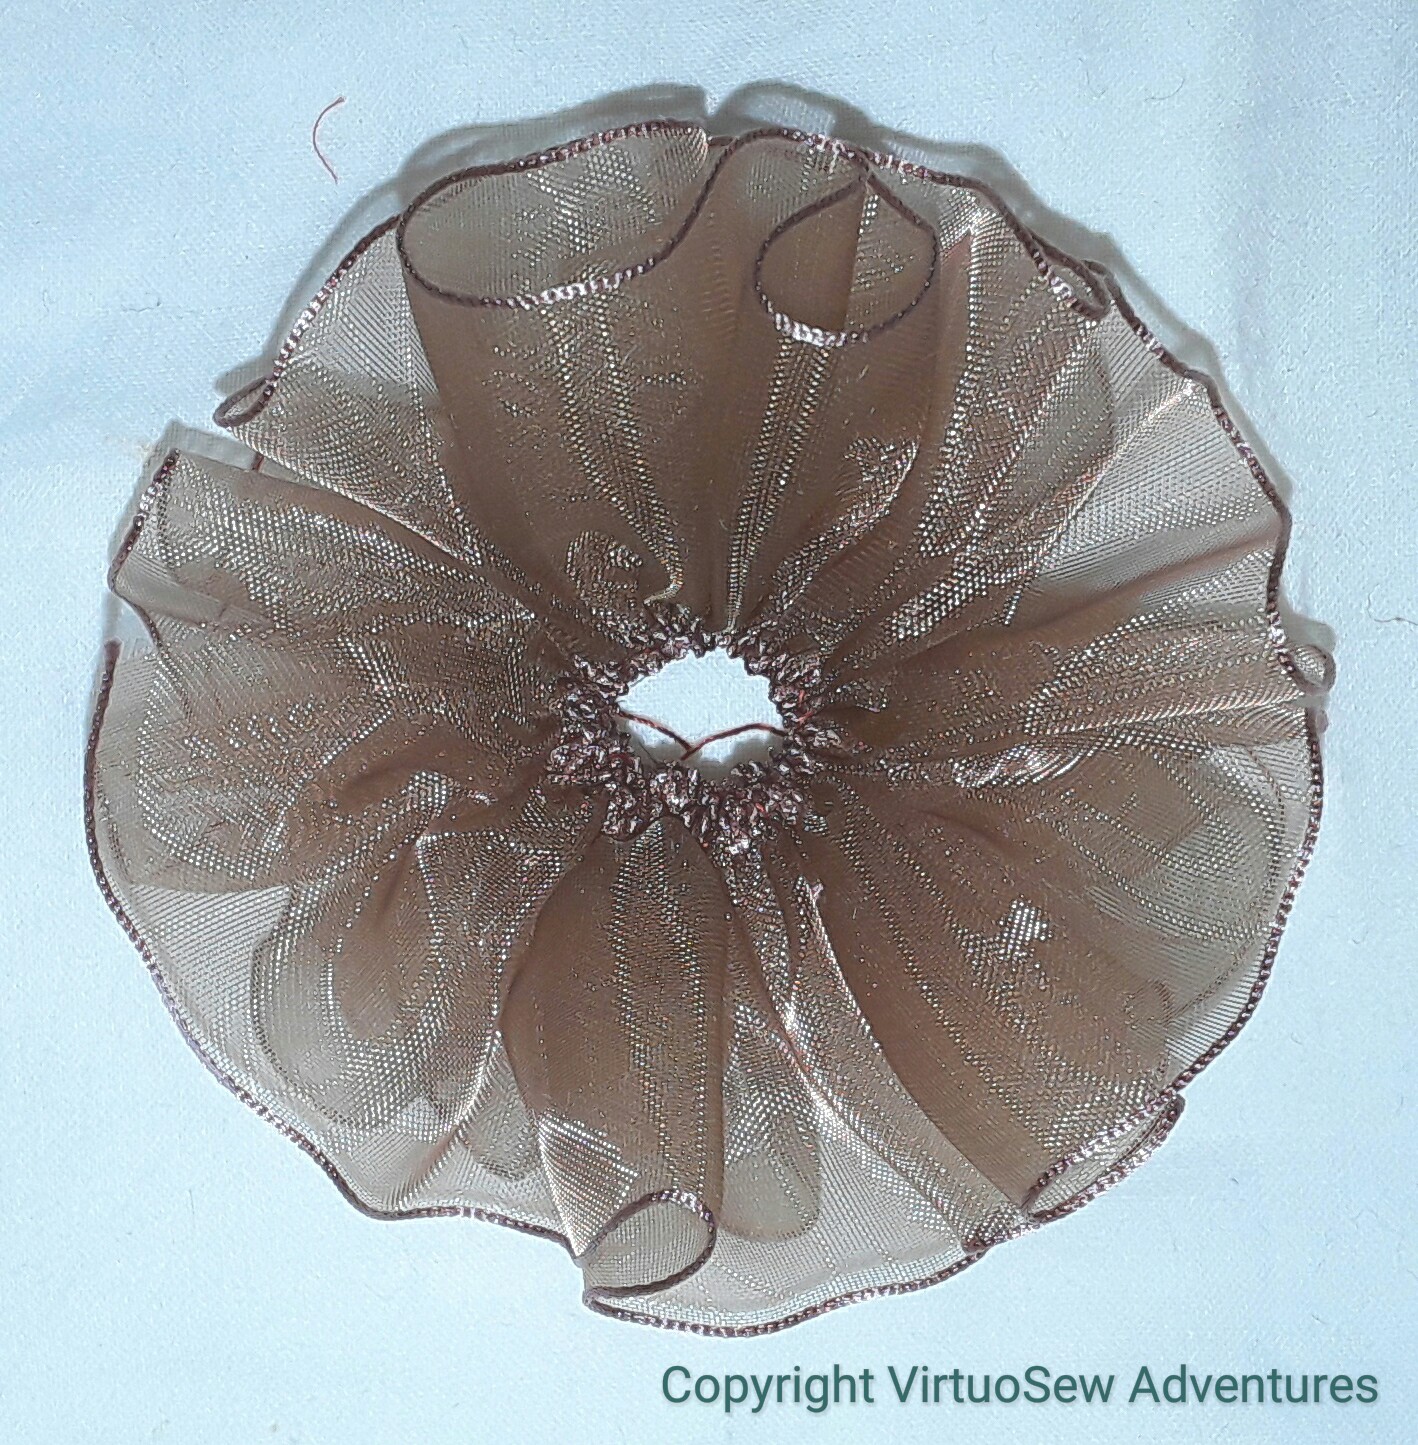
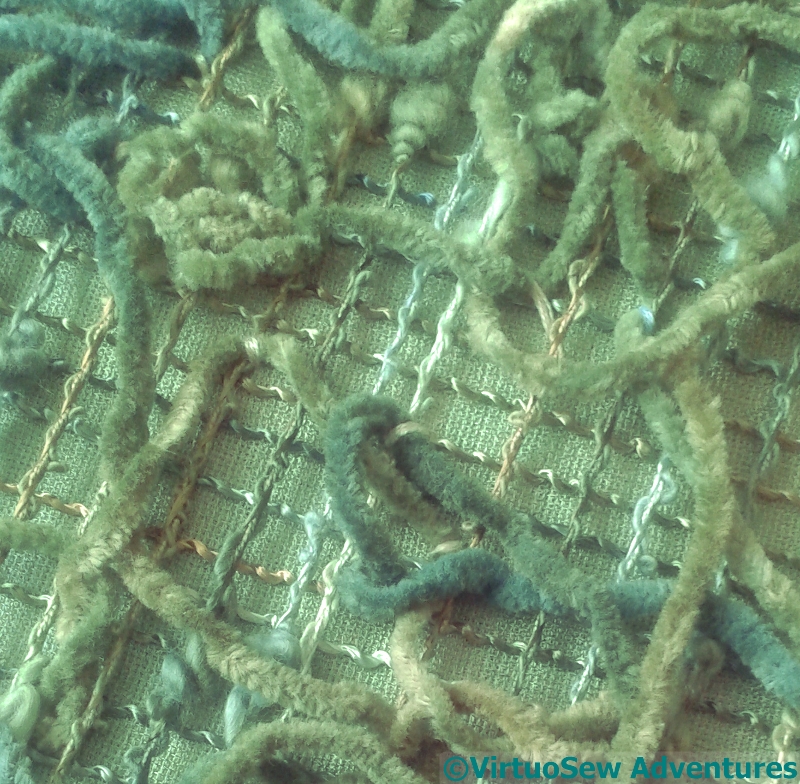
Gauze Spiral
I was very taken with a length of gauze ribbon i found when I was rummaging for bits of teal fabric, and spent an idle moment or two running a gathering thread along one edge. I wasn’t at all sure where I would go from there, but as I pulled the gathering thread up the ribbon settled naturally into a tight spiral reminiscent of an Elizabethan ruff. Hmmm. Promising!
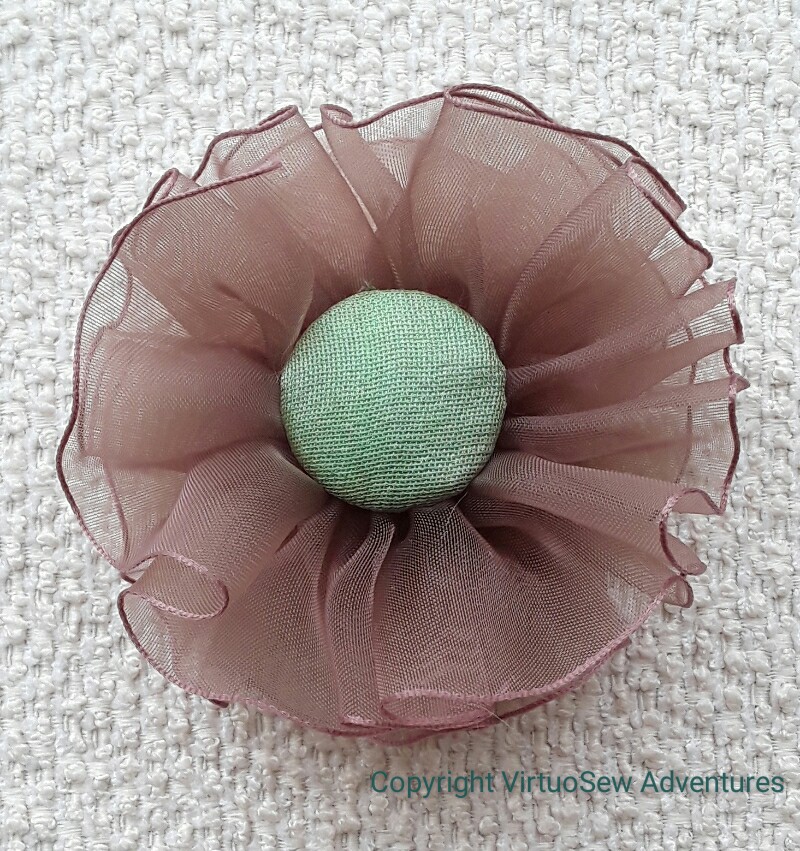
In the end, I covered another self-cover button with two layers of a rather gorgeous silk fabric which I originally bought for my mother to line a bookbox she made for a fine binding of “The Wind In The Willow”, and created a cross between a winner’s rosette and a new species of flower.
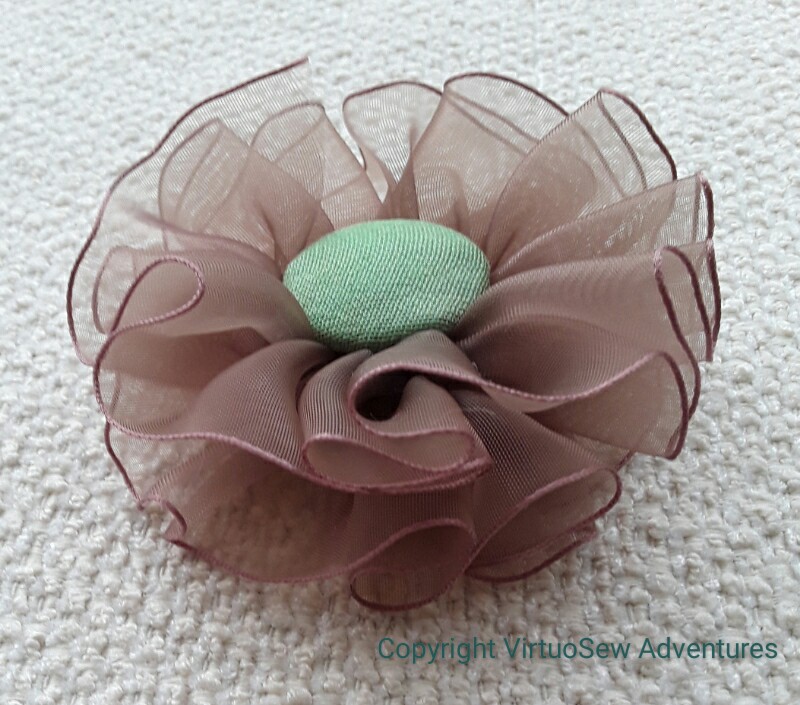
I think it will be fun to wear, but the real delight is the ruffle… It has “loft”, and a gentle glimmer, both from the gauze and from the silk button. More of a spring than an autumn piece, with that light spring green and and the gauzy ruffle, but I’ll look forward to the treat!
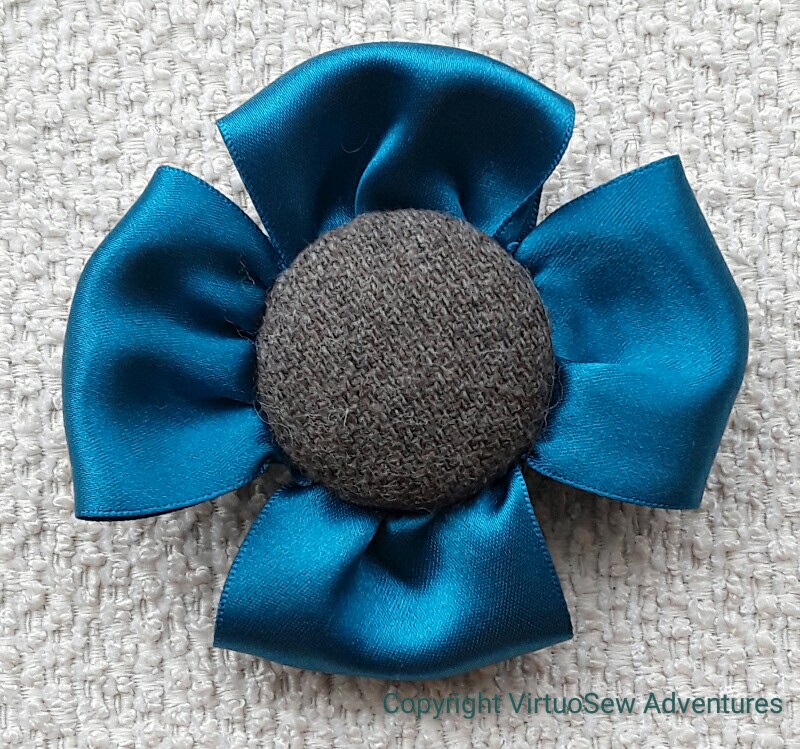
Satin and Tweed
Talking of unnatural flowers….
What I would really like to do is think of something else to do with the tweed fabric in the centre of this. It was cut off a pair of trousers which were too long for me, but it is a nice fabric and I want to create something fun with the scraps.
Thinking caps on, then…
Making Brooches
Haul from L’uccello
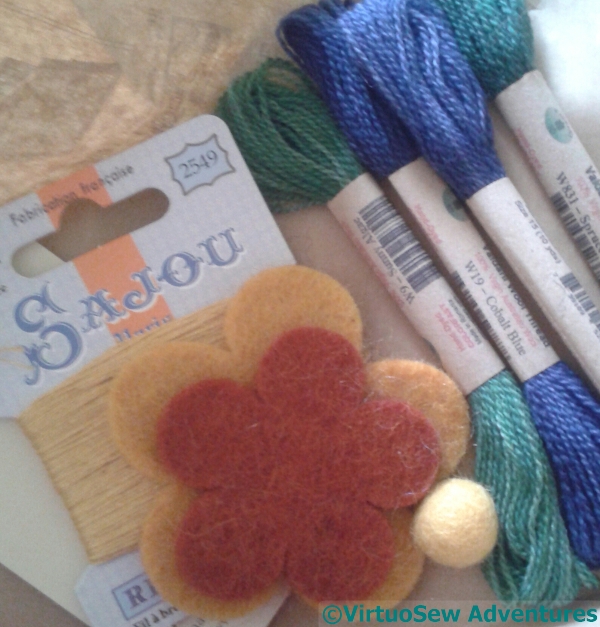
Those who follow me on Instagram may recall that I posted a picture of goodies acquired from L’uccello, on Swanston St in Melbourne, when I was there over the summer. Since I went in with no particular end in view, I was completely bewildered by the range of possibilities I found, so I didn’t buy very much, but now I know where to find them, I will do my homework in advance!
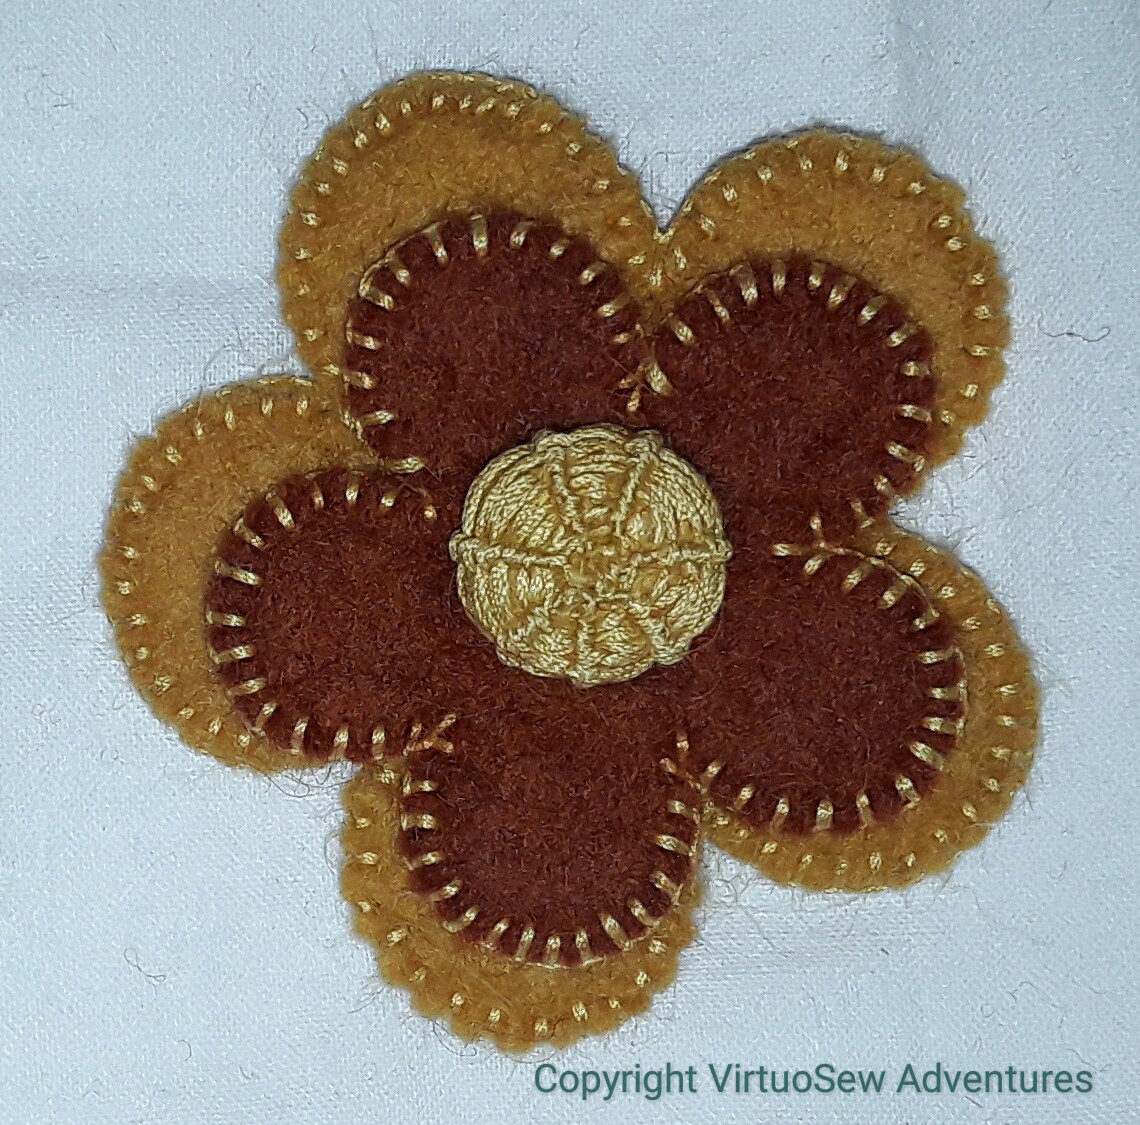
Felt Flower
When I came home, vague and somewhat jetlagged, I sat and played with the felt and thread (a cotton from Sajou, a brand I’ve heard of, but never used before) that I’d bought, blanket stitching the felt shapes I had bought, and then attaching the felt ball using a whipped spider’s web stitch, pulled tight to flatten the ball slightly into the stacked shapes, and made a brooch. It works well, and there’s a lovely shine from the cotton.
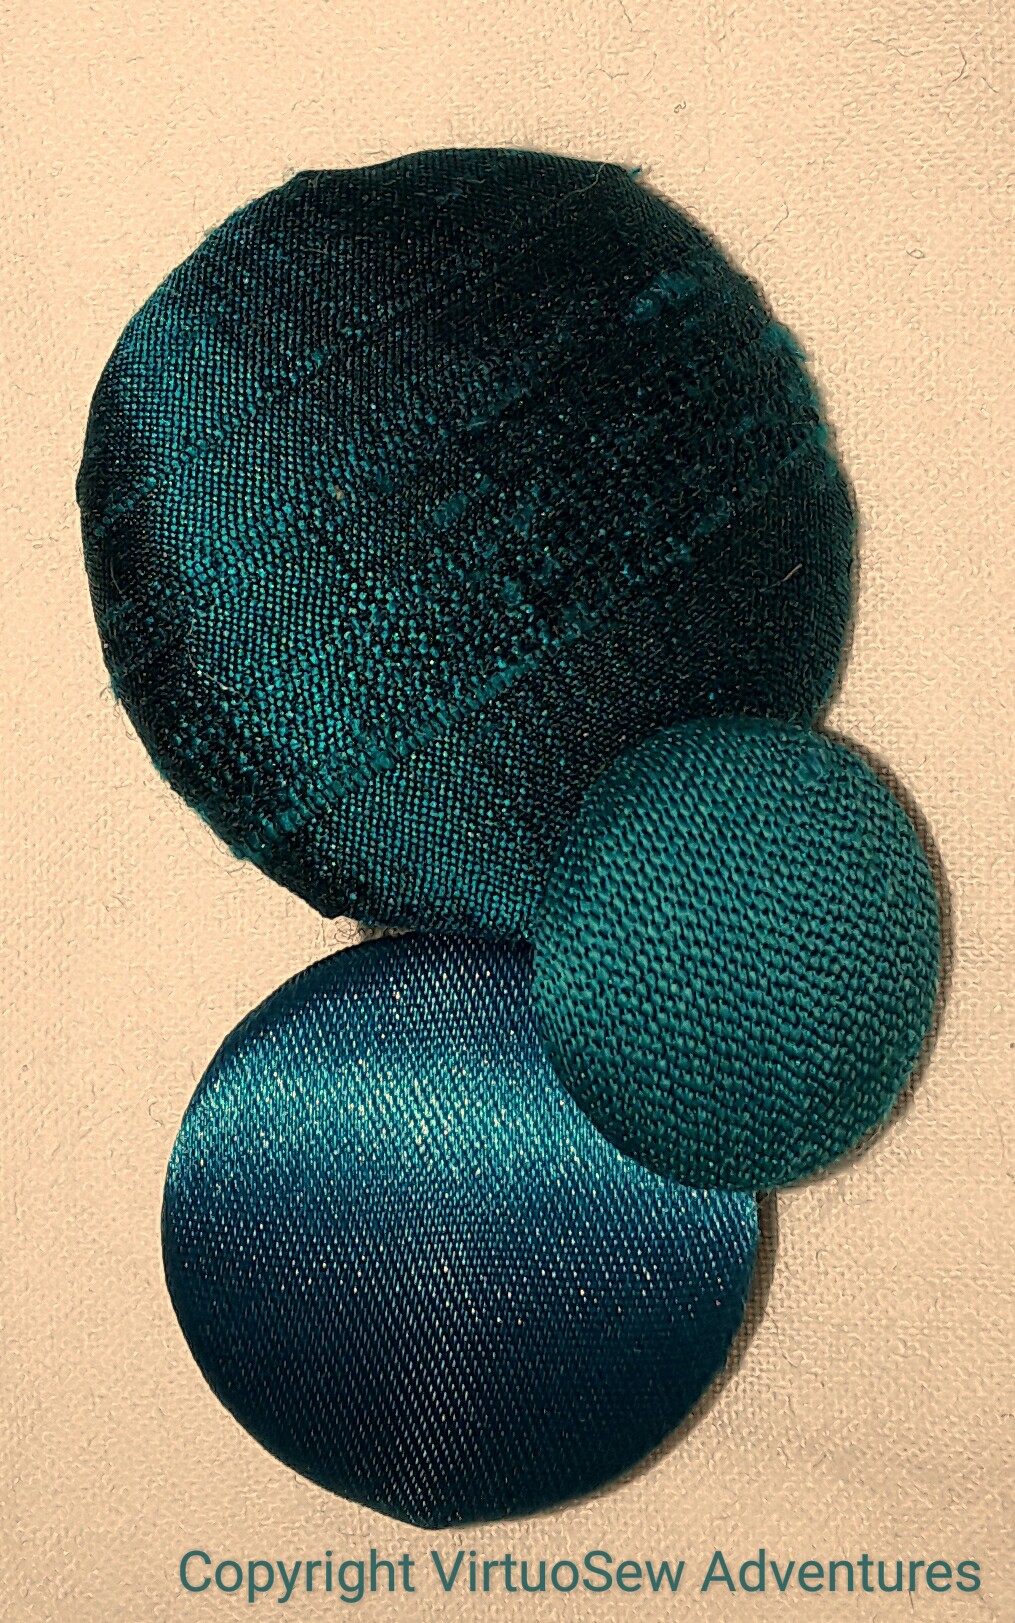
Teal Circles
I enjoyed myself so much (somewhat to my surprise, as small, fiddly projects don’t go well with jetlag!), I started thinking of other brooches I might make. You may have noticed that I love Teal, in almost all shades, so my next effort was to cover different sizes of self-cover buttons with different teal fabrics. In fact the most difficult thing here was to devise a backing that might help to stack the buttons as I wished them to be stacked. In the end, I created a roll of felt, and sewed the buttons to that. The finished brooch looks a lot better than in the photo, which has killed off the colour.
Adventures with a screen print
It occurred to me recently that when I finally finish the Dreams of Amarna panels I will probably want to exhibit them somewhere – displaying them at home would require a complete redesign, including moving walls! – and that, however large or intricate they may be, two panels do not an exhibition make.
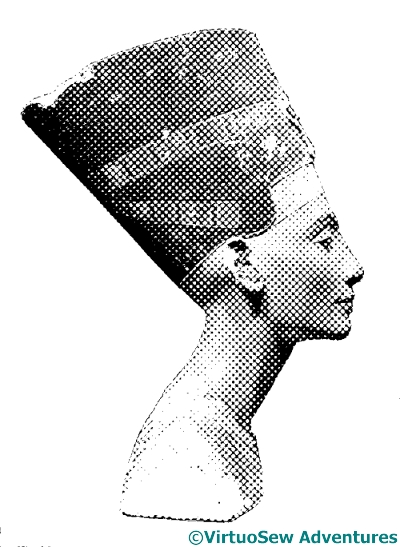
Nefertiti rendered in “newsprint”
At the same time, however, I’d had an idea for a design for which I could apply the combined silk and gold stitches of the Tudor Rose, and furthermore, that might allow me scope, later, to play with some of the mixed media techniques that are available…
So I went rummaging among the assorted copyright-free and Creative Commons images on the web (my goodness, there are thousands!) and found a photo of the famous painted head of Nefertiti which is in the Berlin Museum. Then with some cropping and processing, from a photo of the bust in its case it became a plain headshot with no background, rendered in the style of an old-fashioned newsprint picture. An email conversation and a payment later, that image had been turned into a custom-made Thermofax screen…
At which point, all the simplicity fell over. I’ve actually done four screen prints on the faience-coloured linen, and about three on sandy coloured linen, and none of them was good enough for my purposes. I’m not sure whether the screen is too detailed for the fabric or whether it is simply my technique that is faulty.
So I guess I just need to try harder!
Inspired By Spring Flowers – 3
Four Stitched Panels
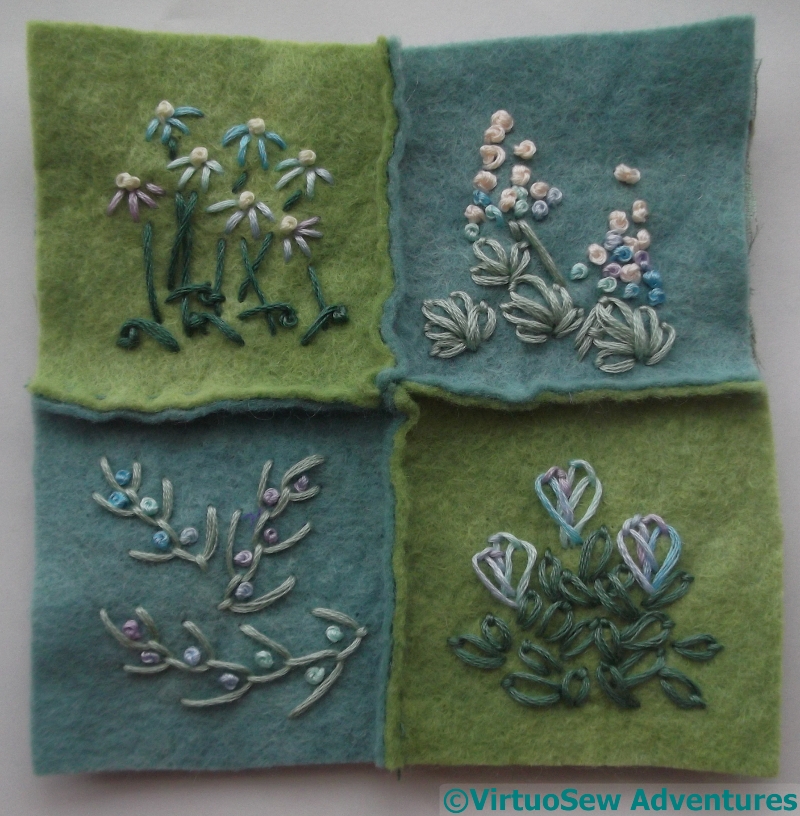
I decided to create a chequerboard effect for the pincushion. The four panels are stab-stitched together with the raw edges visible. I think that makes for an interesting effect, although it can be over-used.
The first panel has a few French Knots, lots of straight stitches, and some singleton scroll stitches around the base of the stems.
The second is lots of French knots, and palmate leaves made of lazy daisy stitches.
The third is primarily lazy daisy stitch, with the flowers made using blanket stitch.
The four panel is feather stitch with French Knots.
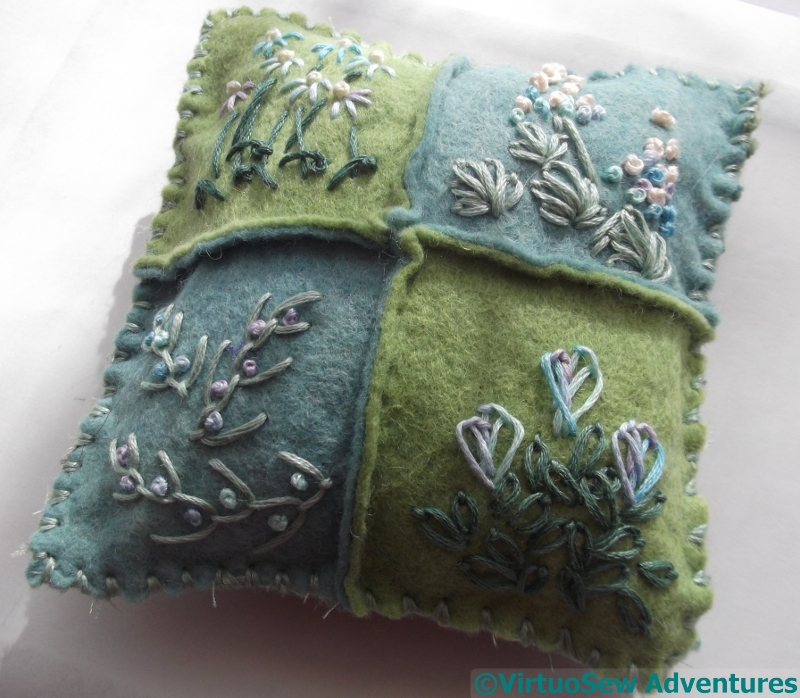
The pincushion
The pincushion is only lightly stuffed. I felt that somehow stuffing it to the point of solidity wouldn’t be quite right, although I don’t know why.
In this case I closed the edges with glove stitch. This is really a sort of variant on overcast stitch, so it isn’t difficult, but – even with shaggy bits of embellished fabric appearing around the edges! – it gives a slightly more “finished” effect.
One of those details that most people don’t consciously notice, but it still has an effect…
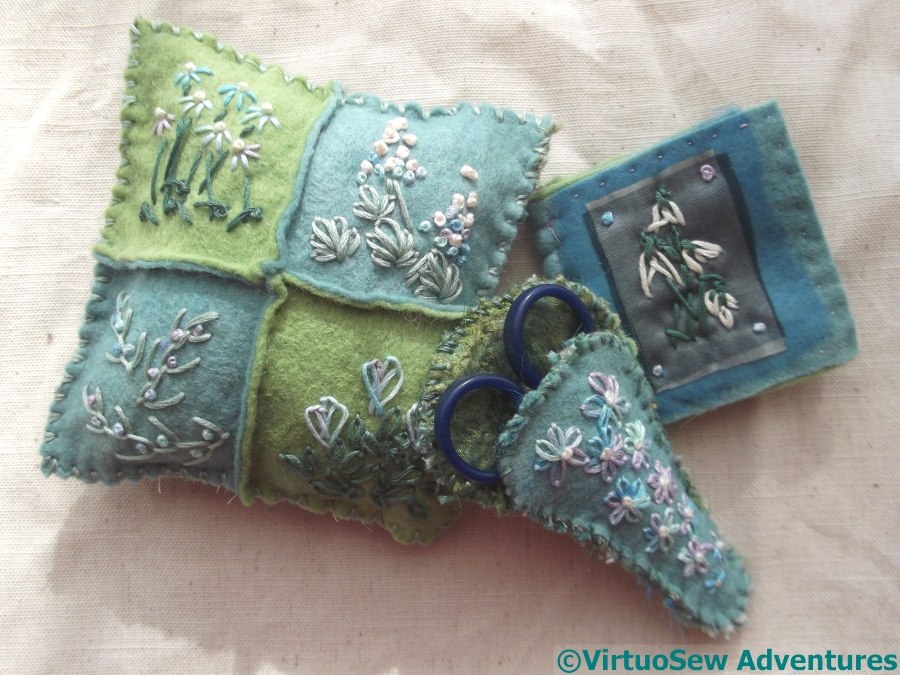
The Set
The finished set looks cheerful and springlike, in spite of the increasingly distant relationship between the stitchery and the spring flowers that inspired me.
I’m rather pleased; even if it took me months to find the inspiration, the final result makes me smile!
Amarna Geese – stage 2
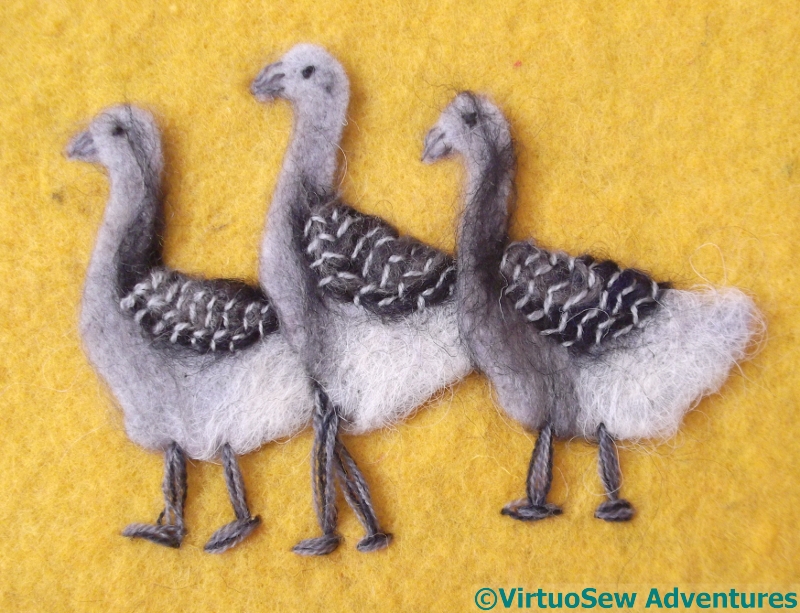
Detail Added To The Geese
I’ve started adding more detail with needle and thread. The chevron pattern, the eyes, and the detail on the beak are all made using straight stitches in single strands of Appletons wool. I can’t think where I got a whole series of greys, unless it’s from hand-me-downs. I’m glad I have them now, but it isn’t a colour I much like and I can’t imagine going out and buying them!
For the legs, I have used three different colours of wool in the needle. I can see that for all my staring at photographs and trying to sketch, I’ve not really got a clear or accurate idea of the details of goose anatomy! And somehow, for all my care in placing the cut out felt geese, they’ve ended up attached in not-quite-the-right place.
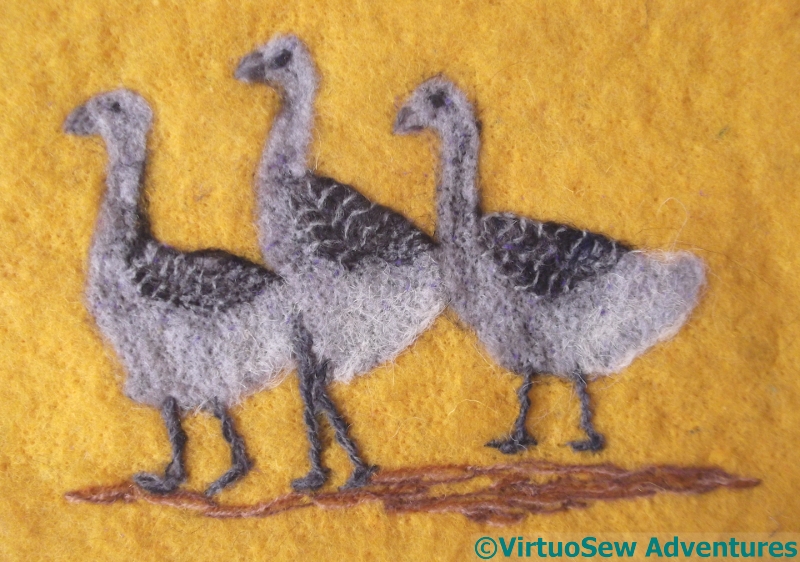
Geese Needlefelted
Still, let’s not despair.
I’ve also added some ground below the the geese. Three strands of different colours of wool, again. I did a sort of loopy knot stitch crossed with a split stitch, which I couldn’t reproduce if I tried. But it produces a very good broken-ground effect, so as long as I don’t decide I need more ground, we’ll be fine.
Then I sat down at the embellisher and tried to blend the fabrics together. This meant quite heavy embellishing, but fortunately the fabrics are none of them dense, so there was room for the fibres to mingle.
When I noticed that the legs weren’t getting caught in, I twisted some more threads around them. That’s better.
Then another pause. Do I add leaves, to match my vague memory, or shall I leave well alone?
Playing with Dyeing
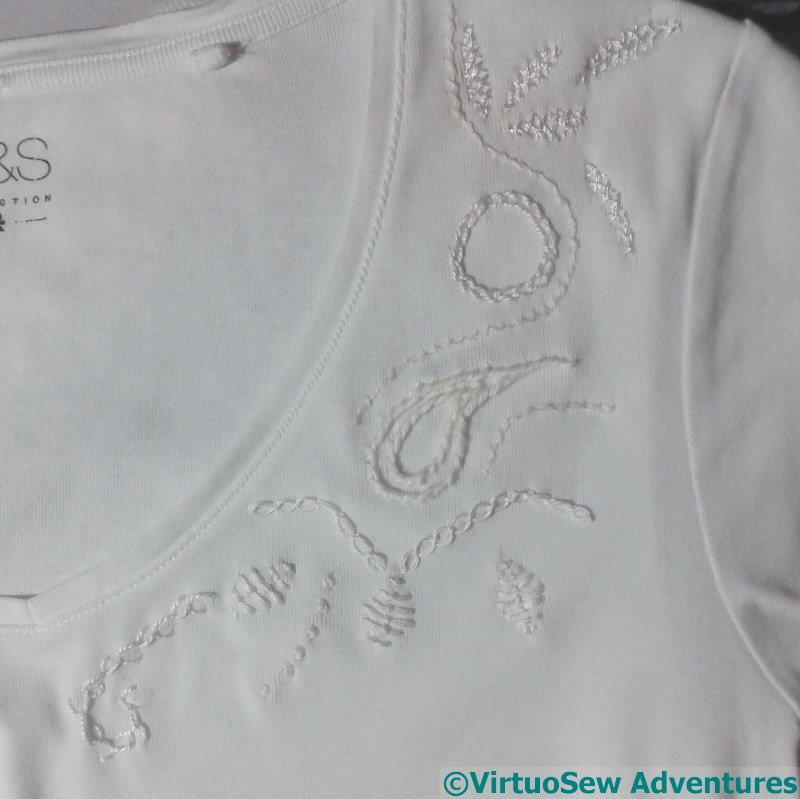
White Embroidery
I’m continuing to think about that quotation from Pliny, and considering how I might bring it to life. In the meantime, I’m trying to develop some familiarity with small-scale dyeing, rather than the huge machinery of my course, so when I heard that The Wild Dyery, not far away, was running an evening of indigo dyeing, I decided to go along.
I found a cotton T-shirt in a charity shot, and proceeded to embroider it using every different white thread I could find. I want to see how the different threads respond, because it occurred to me that I could add to my adventures by embroidering with mordanted threads.
Ever the over-complicatrix of my own life….!
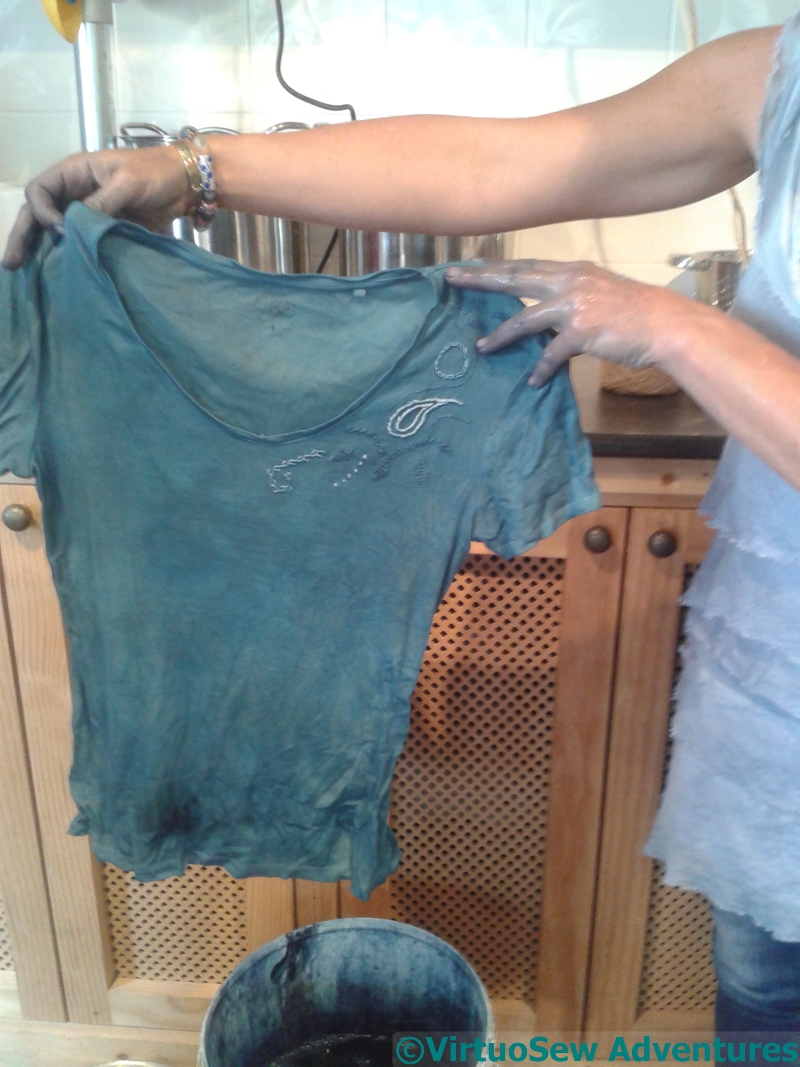
Out Of Dye Bath
Justine, owner, tutor, and guide in our adventure, kindly hauled everyone’s pieces out of the dyebath for them. As the dyeing process with indigo is an oxidation reaction, incautious splashings in the dyebath, even drips from a piece being removed, can compromise the dyebath by removing dye from it before it has a chance to bond with fabric.
Besides, as she commented – there’s no need for everyone to leave with blue hands!
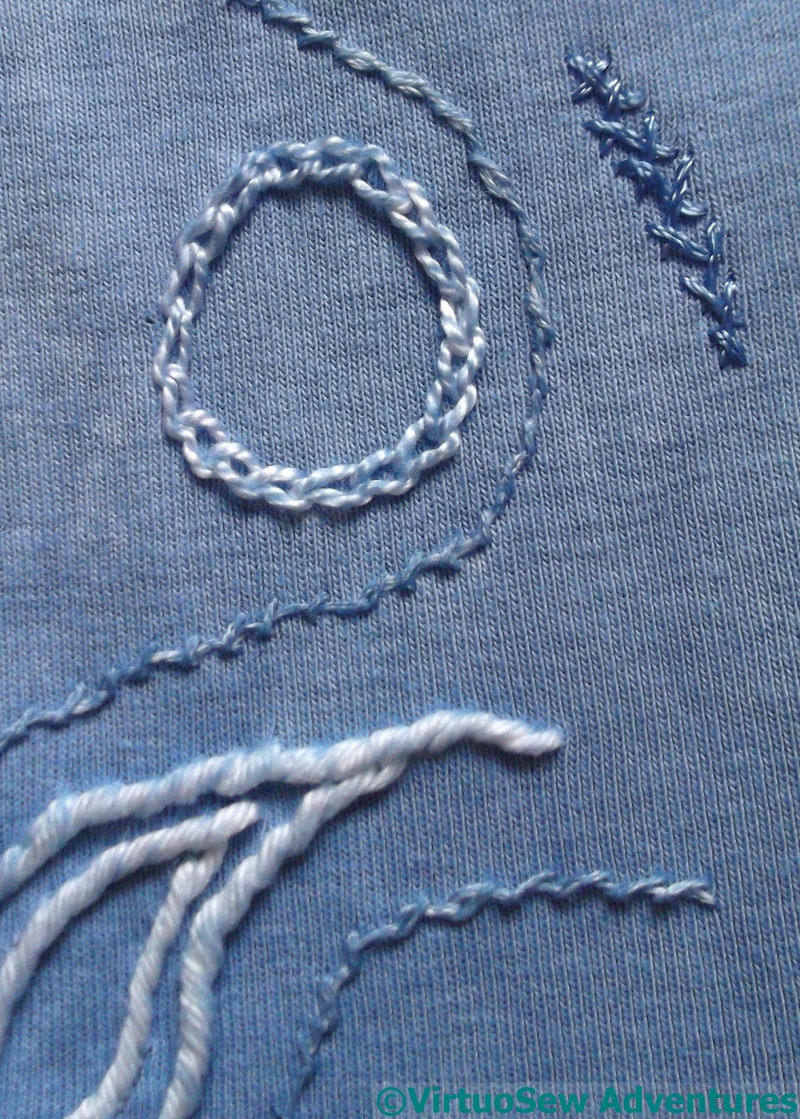
Brought home, rinsed, hand-washed and then left to dry, the T-shirt came out lighter, blue rather than turquoise, and with a few interesting discoveries made…
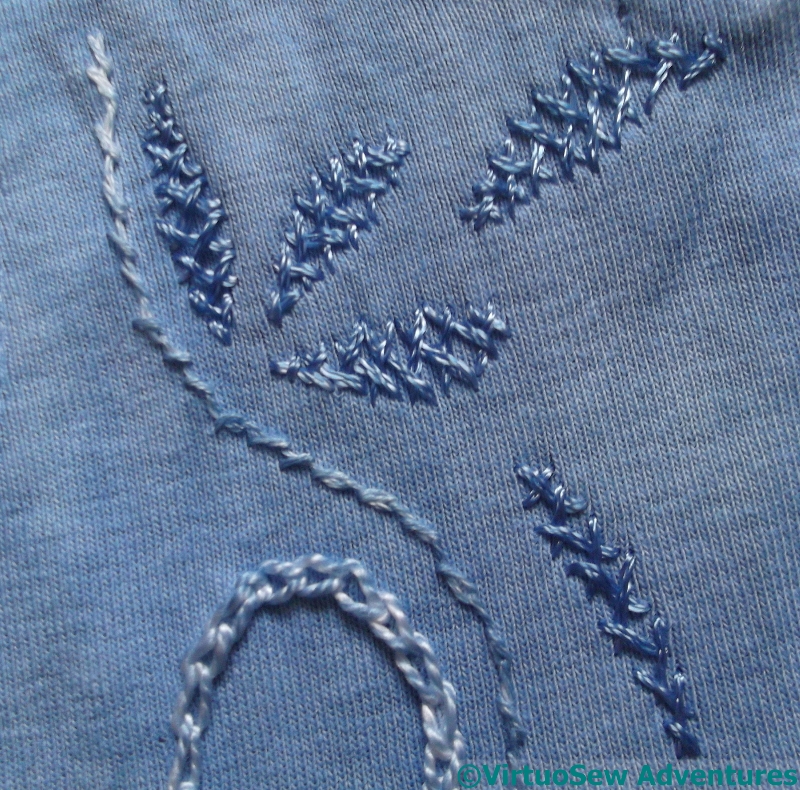
Top Section
Working from the top down…
The herringbone stitch leaf shapes are in Anchor Marlitt, and that seems to have taken the dye nicely. I’d expect that, I think, although the thread is so glossy I might have expect it to have some finishing treatment.
The line of twisted chain stitch is in that frustrating DMC linen. I didn’t enjoy stitching with it, as it it rough, stiff and lifeless. It’s taken the dye in a rather patchy fashion, and I suspect as I wear and wash the T-shirt, the dye will wear off even more.
The next, the circle of chain stitch, is pearl cotton, and this is such a popular thread with the companies that overdye threads that I was expecting it to take the colour much more strongly.
Middle Section
The next photo shows that circle in full, together with the twisted chain stitch in linen thread that curved around it.
The paisley shape in stem stitch is in soft embroidery cotton, and this absolutely astonished me. I was expecting at least some signs of attachment, but there are only the faintest suggestions that the dye was able to attach to the yarn.
Cotton usually takes dyes really well – just think of how easy it is to revive an old cotton shirt with a packet of dye – and if, anything I was expecting it to be one of the darker results. As it is, I think this will wear off in short order!

Lower Section
The line of cable chain stitch is more the colour I was expecting from the soft cotton. It’s a tightly twisted, stiff, mercerised crochet cotton, and it seemed to swallow the dye and hang on to it.
The diamonds of romanian couching stitch are stranded cotton. That has taken the dye well, too, although there are hints that whenever the threads have crossed each other there has been a resist effect, which may show more as the T-shirt is worn.
The feather stitch is pearl cotton and the trail of seed stitch is soft cotton, and they haven’t taken the dye any better than before.
Well, that’s given me something to think about, hasn’t it!
Needlefelted Amarna Geese
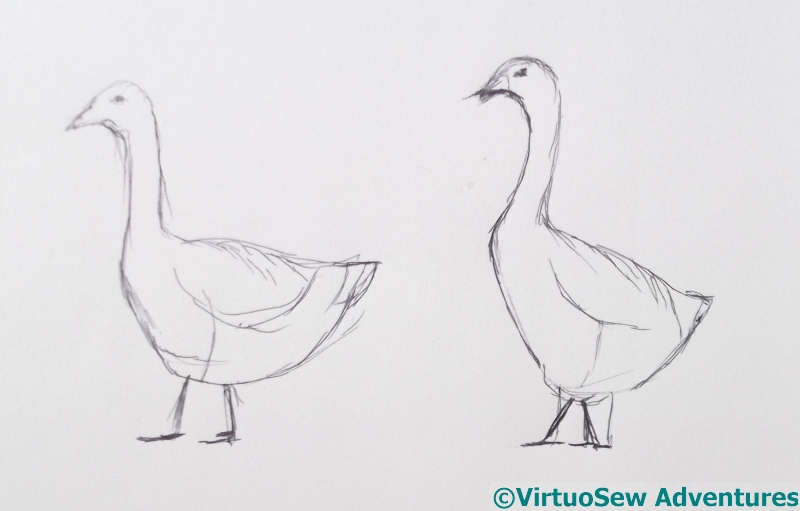
Sketched Geese
I have a picture in my mind of a gaggle of geese, fresco’d on an Amarna wall. Unfortunately, all my rummagings haven’t turned up a reference or any idea where I saw it. So I am going to make it up!
I spent some time online, looking for pictures of geese, and made some sketches. I’ve decided to use my embellisher – this is a sort of “bonus” project, as it won’t go on the main panels.
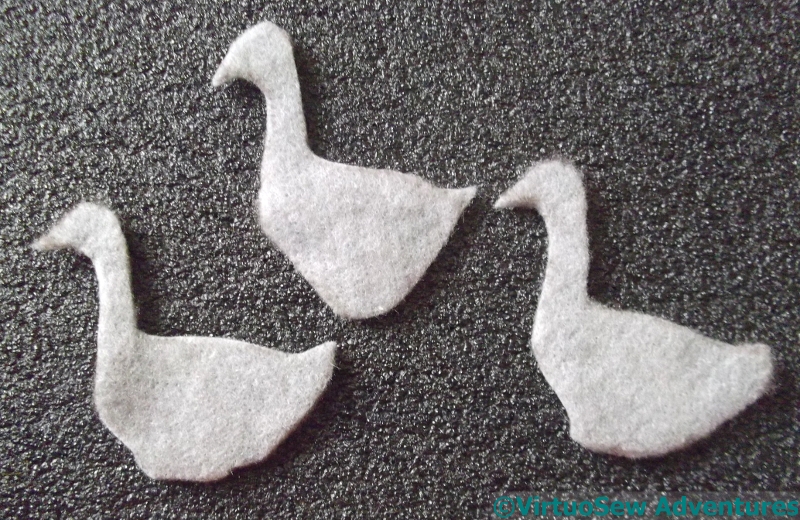
Geese Cut Out
So the next stage was to cut out some geese from some light grey pre-felt. One of them is to be slightly more upright than the other two, but since needlefelting – like wet felting – reduces the dimensions of the piece, it’s anyone’s guess how clear that will be when I’ve finished!
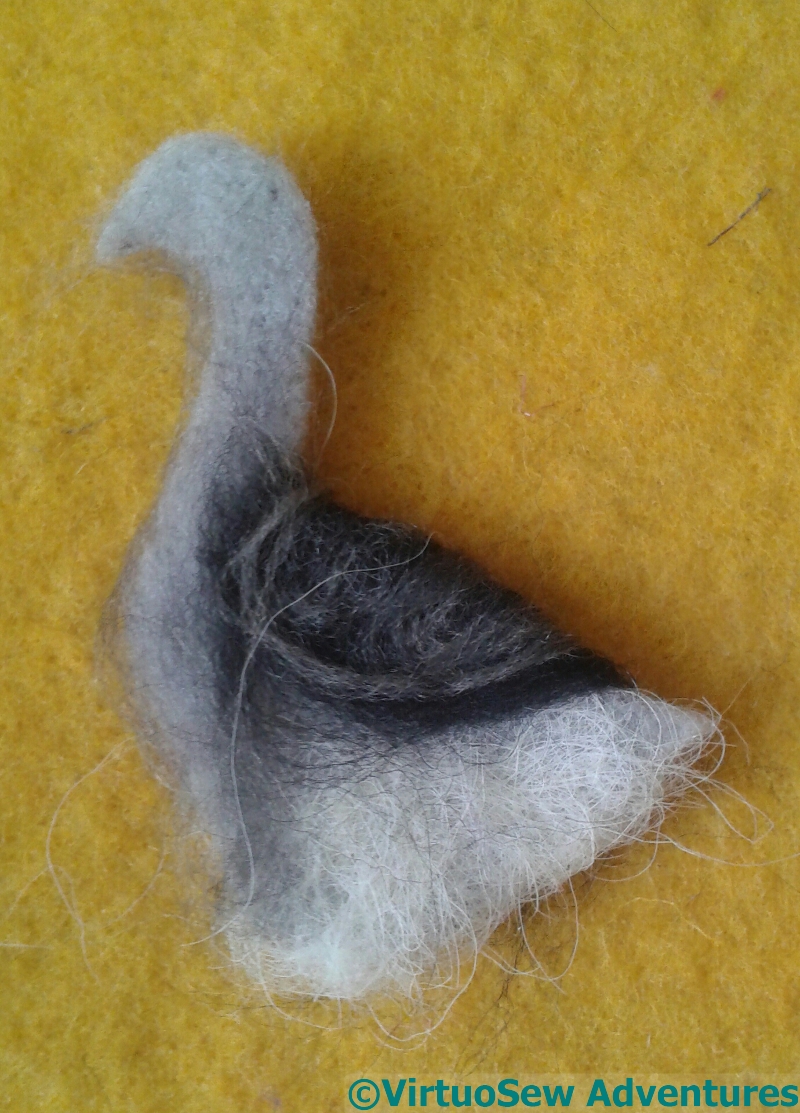
Goose with layers
I’ve tried to create the basic appearance of the goose using fragments of wool – several shades of grey merino, and some of the very wiry white wool from Heligan. It’s all needlefelted into place by hand. Not enough hands – I’m sure I could have done with another pair, or some other way to control the bits I hadn’t managed to deal with yet!
At this point there was a pause for thought… I have neither the inclination nor the patience to add the details with needlefelting, but equally, how much detail will I really need?
Inspired By Spring Flowers – 2
Texture
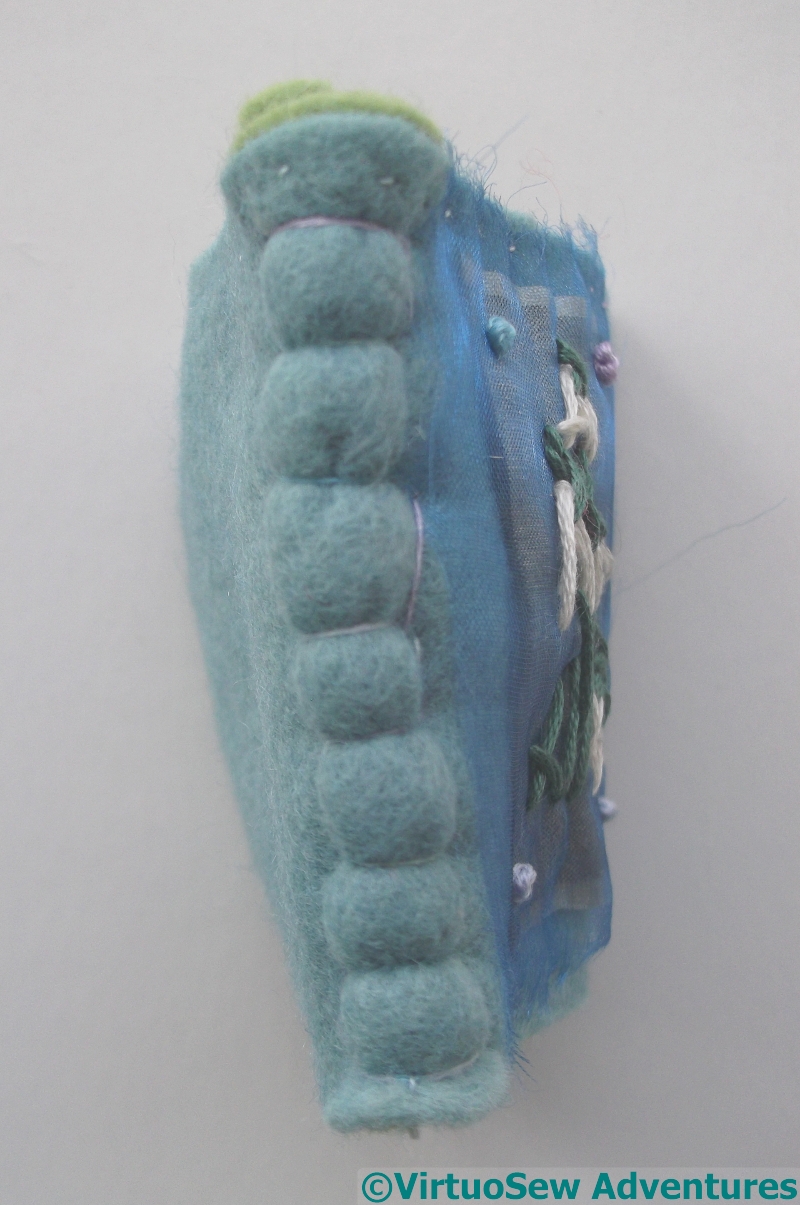
Once I’d finished the little needlebook, using the little pack from Rowandean, I thought I might have a bit more of a play, and make a scissors case and a pincushion.
So I fished out a piece of dyed silk left over from a book box my mother made for her fine binding of The Wind In The Willows, and a whole hank of fantastical, textured threads, and spent an afternoon tacking them in place and then playing with my embellisher, in order to create a mossy, textural piece of fabric to line the scissor case and back the pincushion.

Inside Scissors Case
Bear with me, I know the textures would snag the scissor blades! I used some of the pieces of gauze from the kit – also run gently through the embellisher – to smooth down the lining. The texture is still there, but it has been muted and slightly smoothed over. And now the scissors will be beautifully padded and protected!
The edges are simply whipstitched – a considerable effort, through two layers of felt and two layers of the embellished fabric, but I’m glad to say I didn’t break any needles doing it!
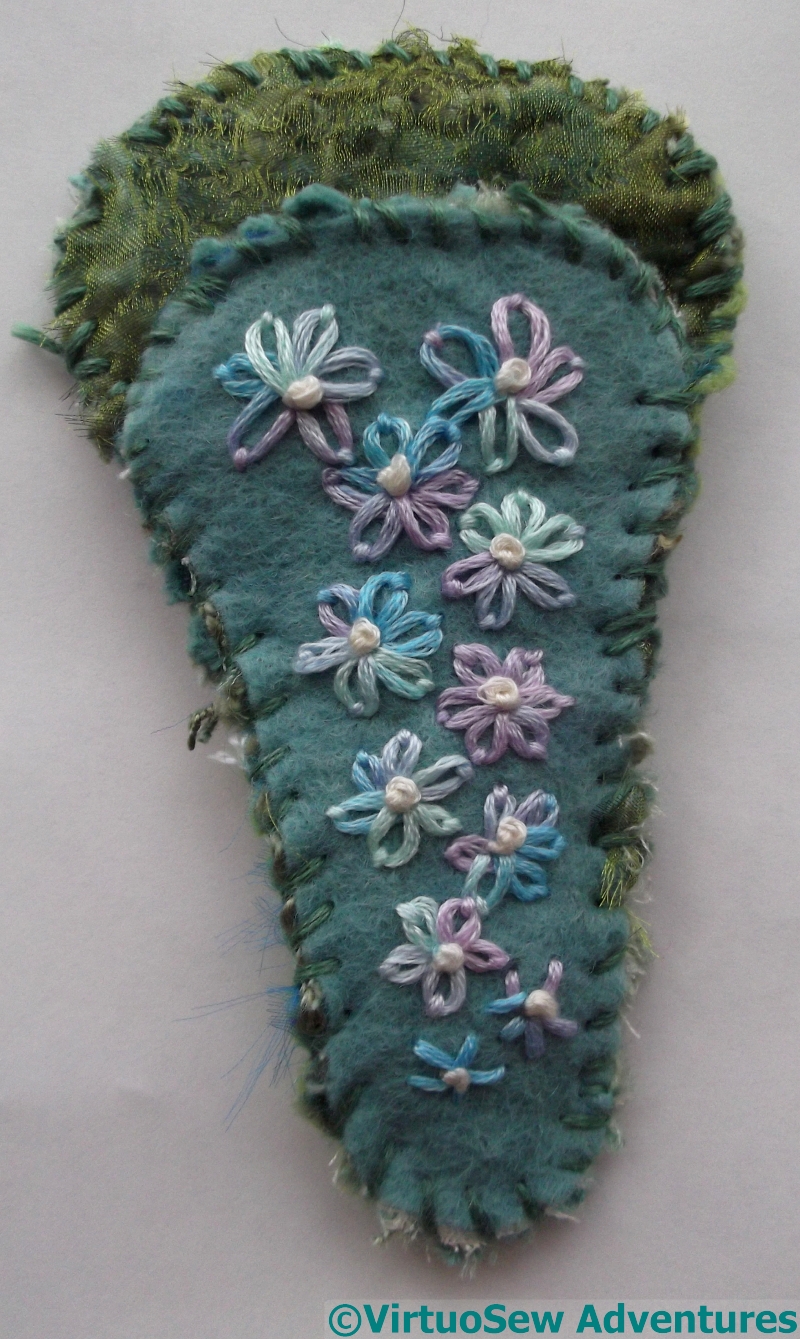
Scissor Case – Front

Scissor Case – Back
For the front and back, again I used simple stitchery, in undivided stranded cotton. A vaguely wisteria-like (not really Spring any more…!) fall of lazy daisy flowers with French Knot centres enliven the front.
And three wheatear stitch stems (seedheads left over from winter, perhaps…?) decorate the back.
The variegated thread makes all the colour changes happen by magic, and since my other main project at the moment is the 40-count tent stitch of Eve In the Garden Of Eden, six strands of stranded cotton is a blessed relief..!
Inspired by Spring flowers..
Cover Layers
You may recall that last year – or was it the year before? – I joined in a “Make & Take” at the Rowandean stand in Harrogate. Last time, I bought a little kit and one of Katrina’s pages of ideas and brought them home to play with.
Of course, as we all know, the Bringing Home is the easy part… !
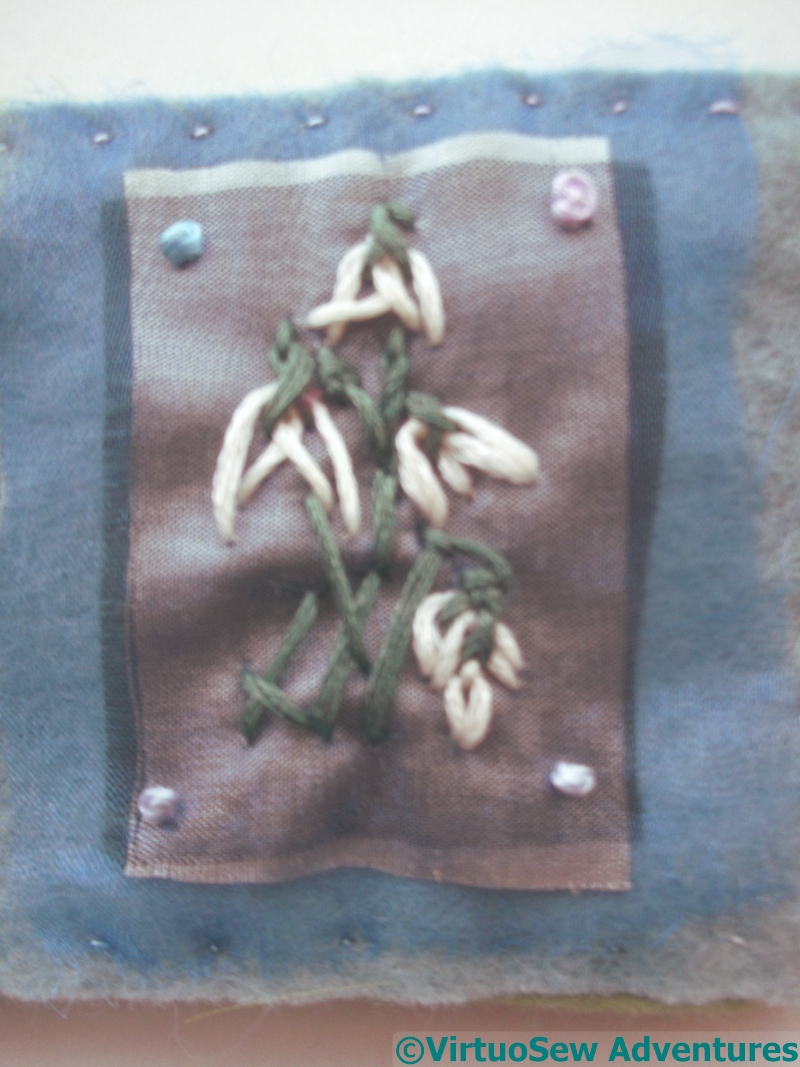
The colours are soft and fresh, springlike, so I thought I would start by playing with forms vaguely inspired by spring flowers. The ultimate inspiration here was from snowdrops, made by stitching a fly stitch and a twisted fly stitch on top of one another. It has almost worked, certainly close enough for my purposes. Maybe an embroidering botanist would like to play a bit more.
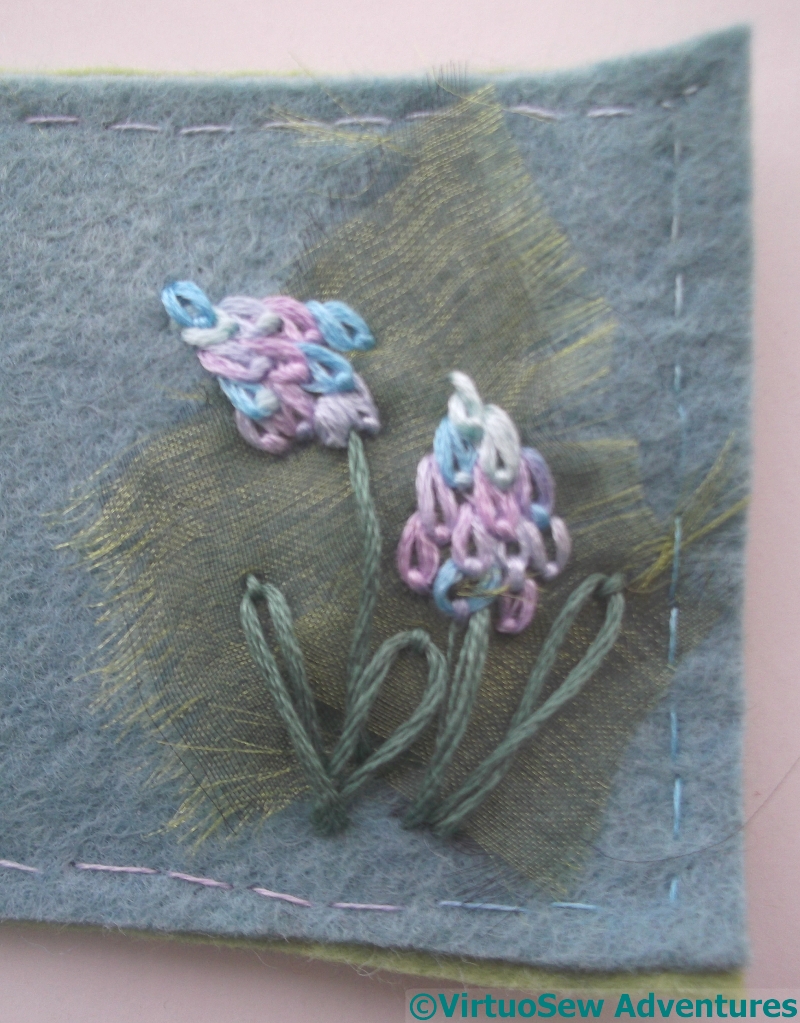
Grape Hyacinth
The flowers are stitched on a piece of gauze which is layered over a piece of silk, which in turn lies over apiece of felt. The french knots in the corners held everything together while I tackled the flowers.
The next fragment was vaguely inspired by grape hyacinths, which are among my favourite spring flowers. Overlapping detached chain stitches worked well, and layering gauze over the felt helped to bring the flowers out from the background.
I may choose to fray the gauze further, but I was struggling with light at this point and decided to see what I thought under different atmospheric conditions!
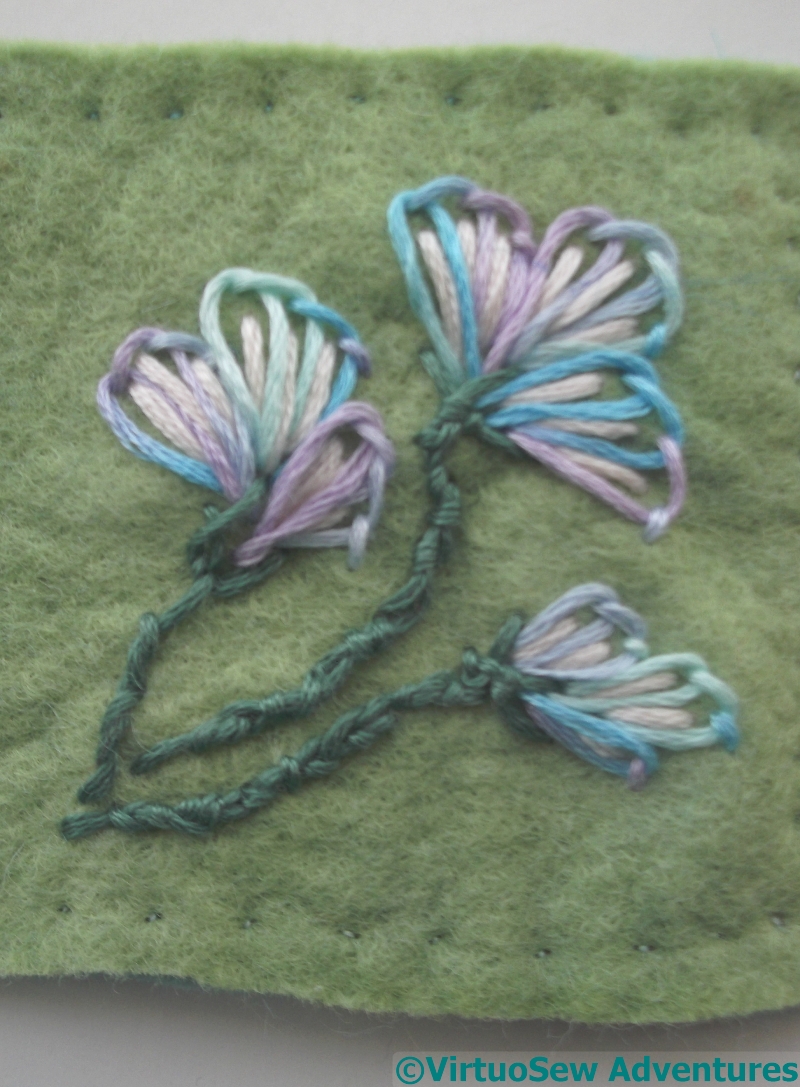
Crocus of a sort
I did mention that I’m no botanist! The ultimate inspiration here were the stripy crocus I see a lot near where I live. They are getting a little old and blowsy, not the trim, upright bolts of colour that first appeared, but nevertheless the ones I’ve stitched look more like some strange new flora, unknown to either science or art!
I rather enjoyed them, all the same…
Stitched Spine
I’ve turned the resulting pile of felt into a needlebook, rather more illustrated that is usual, and with a dramatic stitched spine. This was a distinct piece of experimentation – I could have done with a milliner’s needle, but not having one I improvised with a beading needle, which was very flimsy and flexible, but did the job in the end.
Now I’ve put it under a heap of books to flatten it gradually without the squashing effect of an iron. And I still have some felt, some thread, and some gauze left over for further experimentation!
Worked on a whim
Pincushion
Just before Christmas I was struggling with the “Dreams of Amarna” designs, but I still had itchy fingers from longing to stitch, and sore eyes from staring at “Eve In The Garden of Eden“, so I wanted something a bit less precise..
My Dad’s shaving cream comes in a rather nice wooden pot. There are refills, but sometimes the shop doesn’t have them, and consequently – since they’re much too nice to throw away – my parents have ended up with something of a stockpile. I’ve taken one of them off their hands, and turned it into a pincushion.
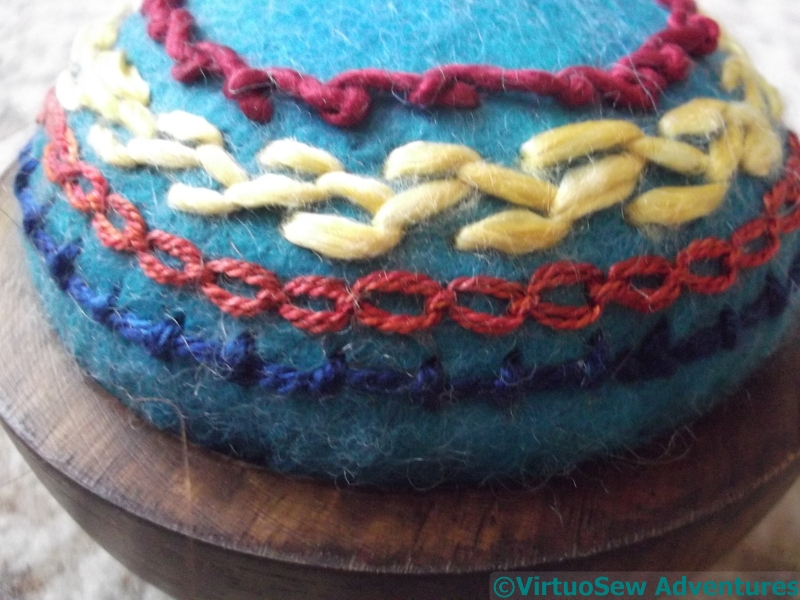
Coral Stitch
At the moment the lid is being used as a coaster, but I am open to suggestions for it!
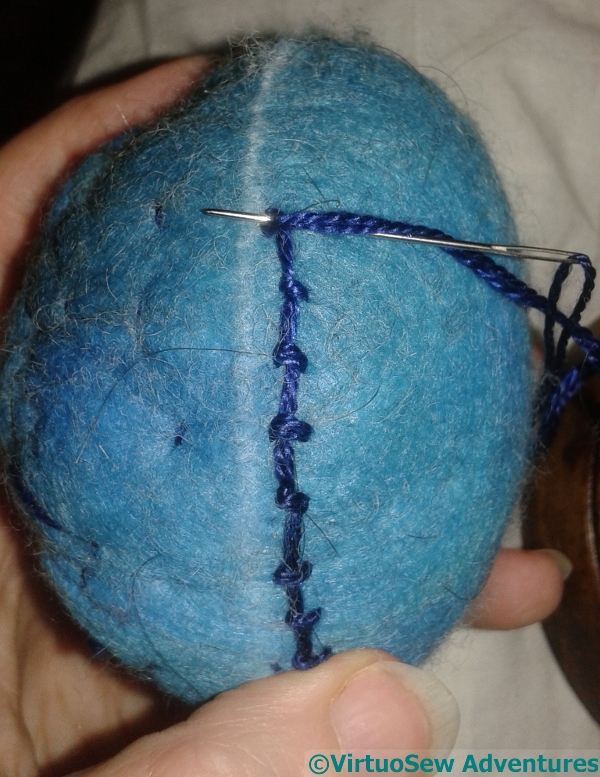
The threads are silks, bought at the Knitting and Stitching Show, worked on felt acquired at the same time. I created the shape of the pincushion itself with shaping stitches, stitching around and around the padding and the felt top layer, rather as doll and puppet makers do, and once I’d settled it into the bowl, I drew a chalk line around the waist, took the pincushion out, and started stitching.
Lucet
Coral Stitch, Cable Chain (do I ever do anything that Cable Chain doesn’t sneak into somehow?), Semi-Closed Feather Stitch, and Scroll Stitch, all stitched into the felt, catching as little of the stuffing as I could.
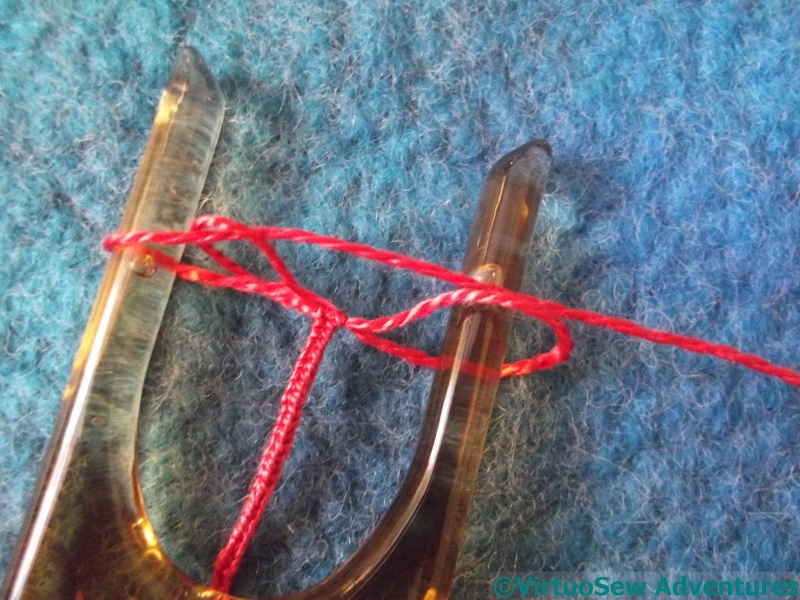
Then I decided to do make a scissors-keeper for my lovely Ernest Wright and Son Ltd scissors, so I started by using one of the threads, and my lucet, to make a cord for it. I’d forgotten some of the knack of lucetting, but it came back gradually, and it’s ever so satisfying!
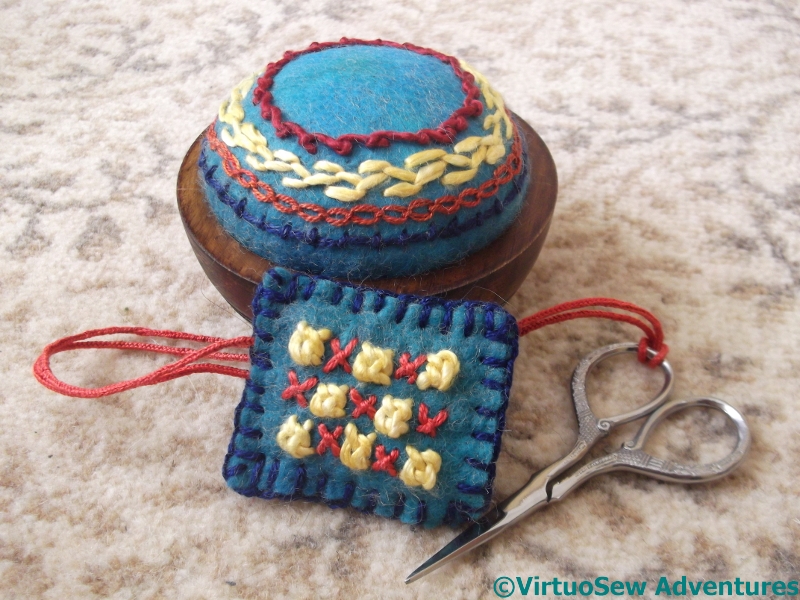
Finished Pair
The stitches on the scissors keeper are Sorbello Stitches (another favourite of mine) and Tied Cross Stitches, and the the pieces of felt are stitched together with ordinary blanket stitch. In silk!
Don’t they look good…!