
Tag: applique
Still that Packing Case
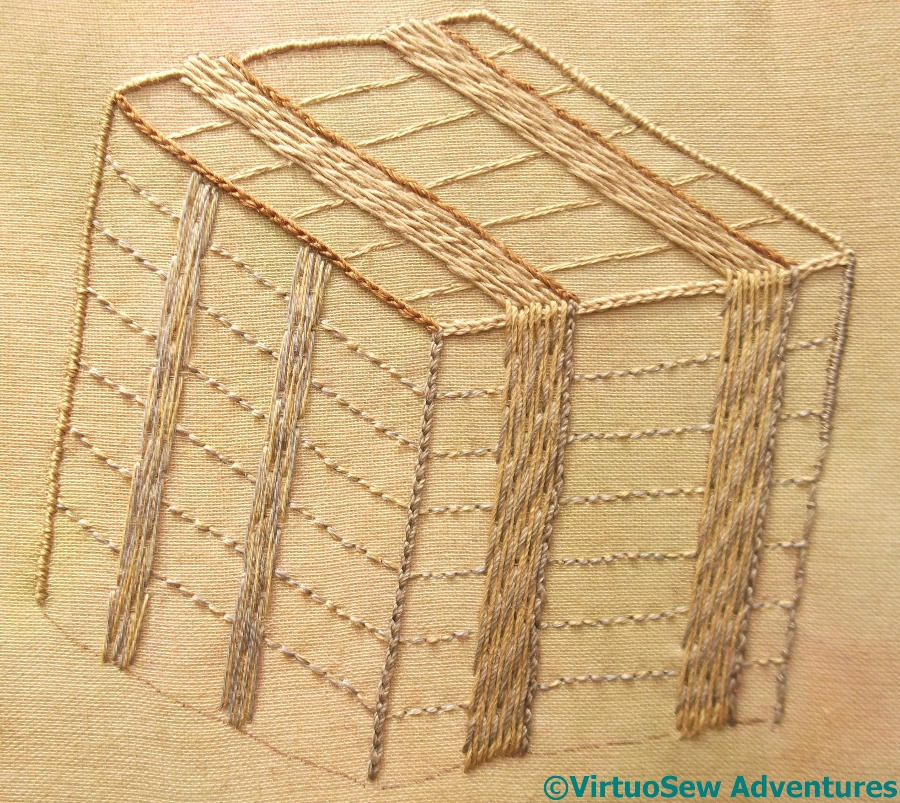
Stitching Done
I’m rather afraid you’ll be fed up with this packing case. It’s caused me no end of thinking and re-thinking, stitching and re-stitching, but now I think I’ve done as much as can be done while it remains a separate piece. I may add more stitched details to the final piece, but that will be after I have everything else in place.
So the next job is to turn it into that separate piece which can then be attached in place on the background, and then itself become the background for the main adventure, which will be dressing the figures.
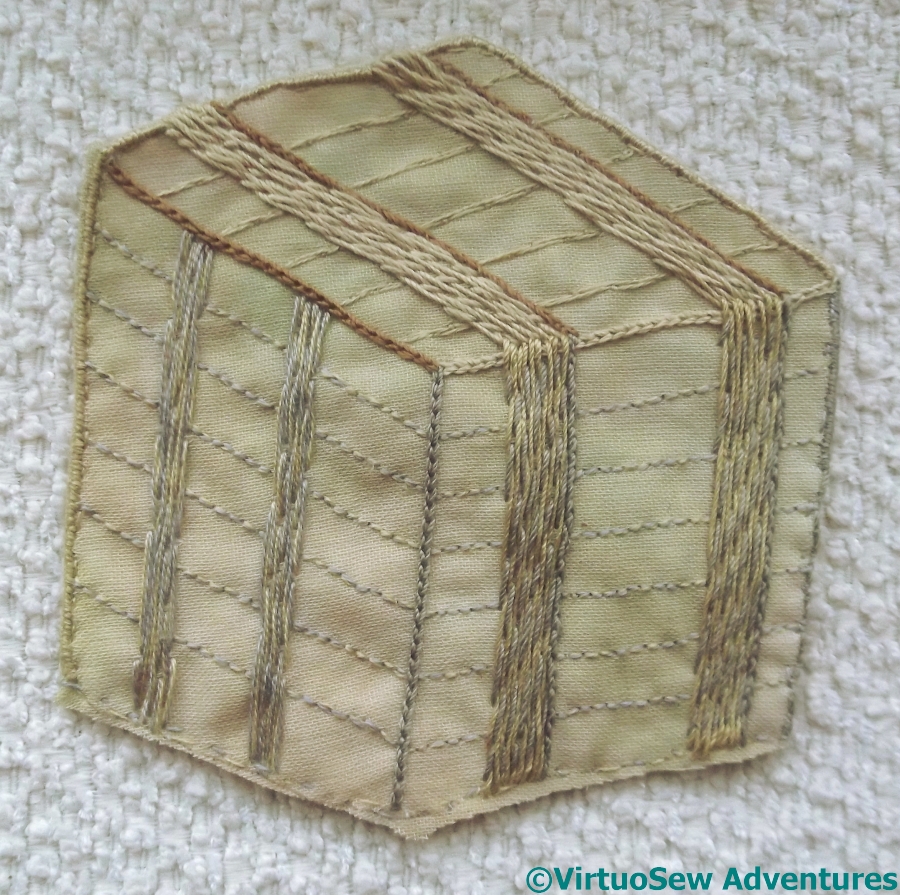
Trimmed Packing Case
And here it is. I have left the fabric around the edges attached and folded it back to provide a little padding.
I’ve used single strands of stranded cotton to hold the extra fabric in place, and trimmed the unbound edges close.
None of the planks run quite true, but since the whole thing is a wild experiment that may go dreadfully wrong, I’m not going lose any sleep over that. If it looks wrong when it’s finished, I’ll unpick those bits and put them right. If it looks right in spite of wonky planks, I shall pretend it was meant to be that way..
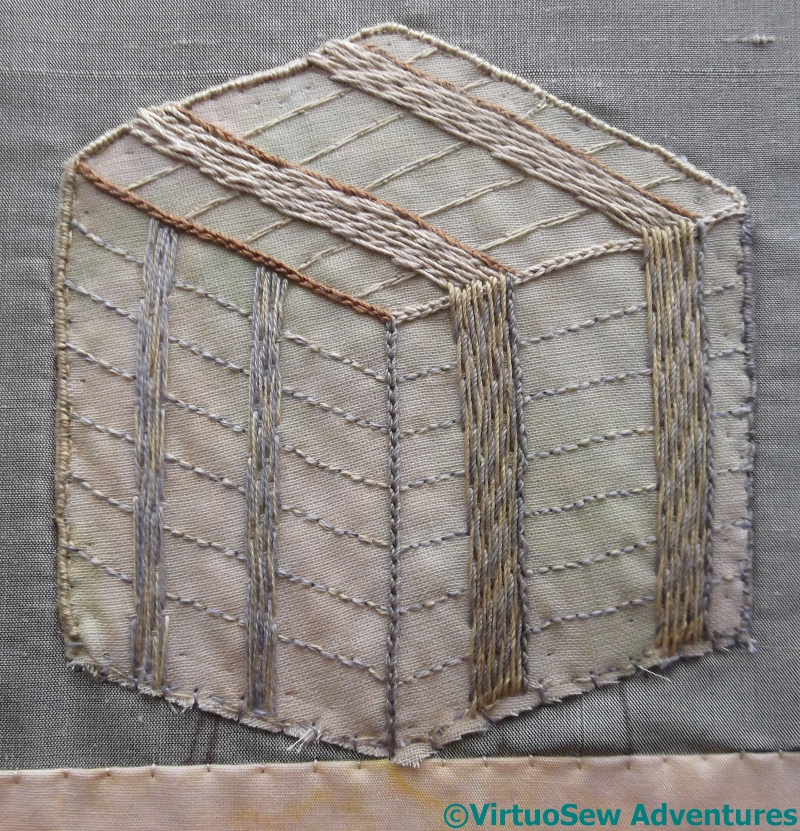
Packing Case Attached
Thank goodness I marked a couple of points to help me put the packing case in place. I double checked the placement with the tracing paper people, then went around the edges catching them down with small stitches and a sharp needle.
As far as possible, I stretched the packing case as I was attaching it. It puts the turban cotton under some slight strain, but with all the support underneath, I think it will be fine. I would be much more worried if this were to be applied to a garment…
Still More On The Packing Case
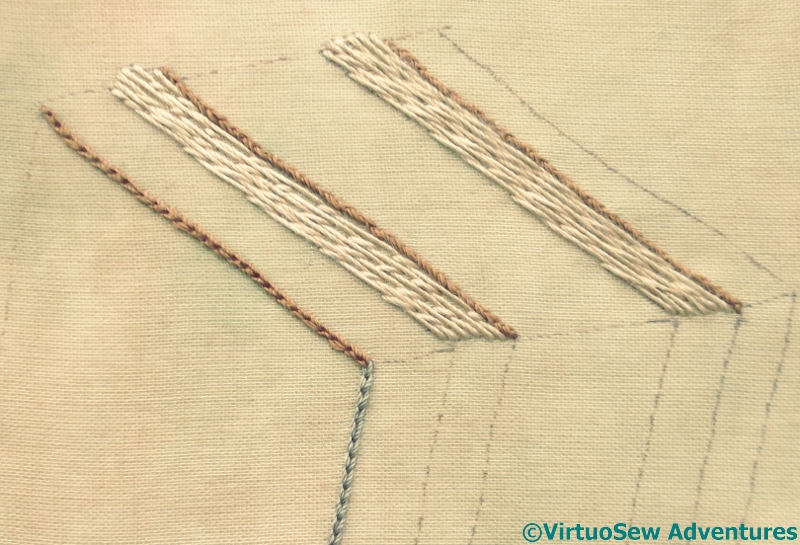
Bands In Place
When I came to work the bands on the “back” surface of the packing case, I felt that the slightly darker yellow silk thread was still too bright, so I worked the Bokhara Couching in two colours – the yellow as the long stitch, and the grey as the diagonal couching stitch. That shadows it nicely, I think.
I’ve only worked the trailing satin stitch edging at the back for about twice the distance I think will be visible. I believe there will be enough layers of fabric over the top, representing the clothes of the figures, that the trail won’t show through – but there is no point making life too difficult!
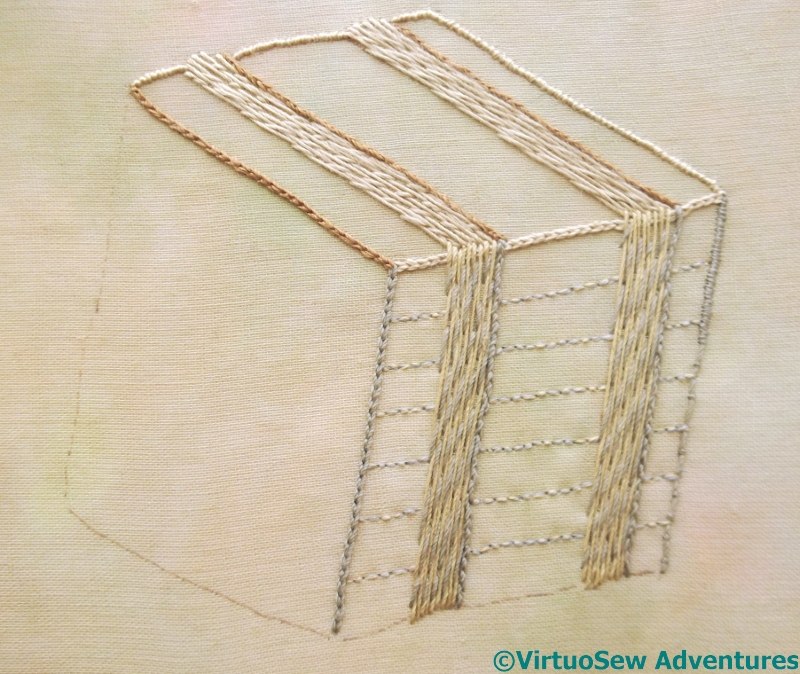
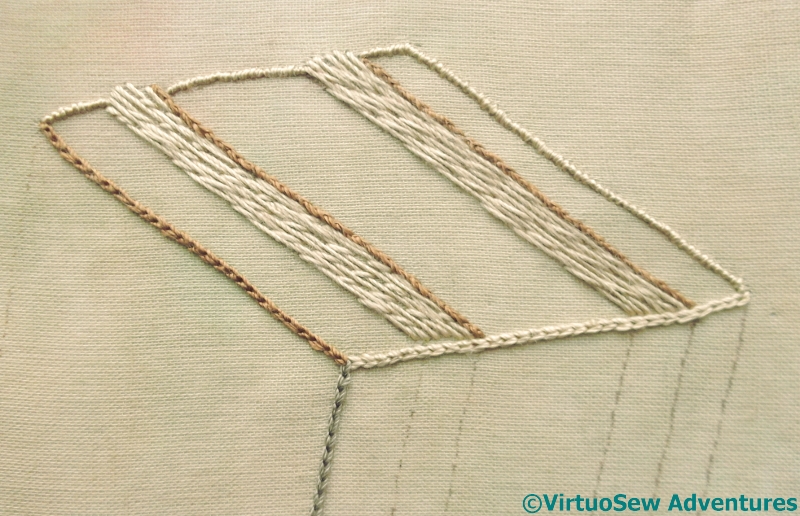
Planks On Side
I want to give some suggestion of the planks making up the packing case, but the silk thread is too heavy for that purpose. Fortunately I have some stranded threads that match the silk very closely, and using one of each colour breaks it up, as does using back stitches.
I used quilter’s disappearing pen to sketch approximate planks. It disappears so quickly that sometimes I’d lost my guideline by the time I was half way across!
Packing Case
I used a slightly different technique on the top. I’ve laid two strands across on each plank-line, and then couched down each strand individually in a brick pattern, It creates a less spotty effect, and I am now wondering whether I should take out the backstitch and use this other technique instead.
I’ve done the trailing satin stitch on the back edge, because I am fairly sure about that, but the planking still leaves me in a quandary. Have I used the right technique? Do I need to do more, to differentiate shadow from sunlit? Dare I leave it as it is, put it in place, and add any other details later?
So I am now, once again, at the “Stare at it and think” stage.
More on the Packing Case
A New Approach
Having unpicked my experiments, I decided on a new approach..
Actually, a digression here. A lot of people talk of test-stitching, by which they mean trying something out, but not on the real thing. I did that with all those goldwork stitches in the Tudor and Stuart Goldwork Masterclass, but as a general rule, my experiments do happen on the project itself. As much as anything else, this is because it is the interaction between the fabric, the design, and the thread that I am experimenting with, and if I take one of those out, I’m not testing what I need to test. I have a picture in my mind of the effect I want to achieve, but it is rarely detailed enough for me to know what to do at every point before I even begin. Instead, I rely on the project to tell me what it wants next, and while some projects are sullen (they know who they are!) others are talkative beyond belief. This one, so far, occupies the middle ground!
Top Surface
End of digression.
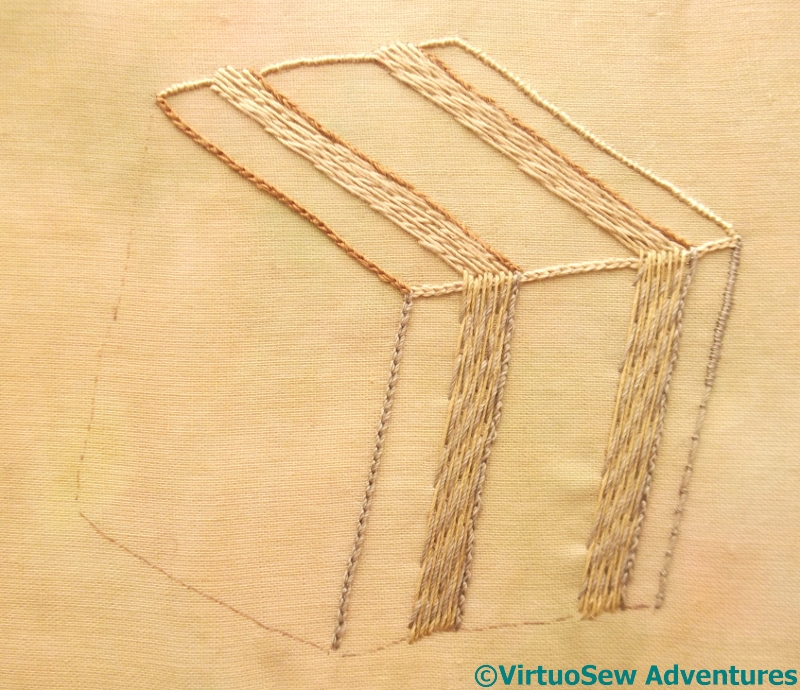
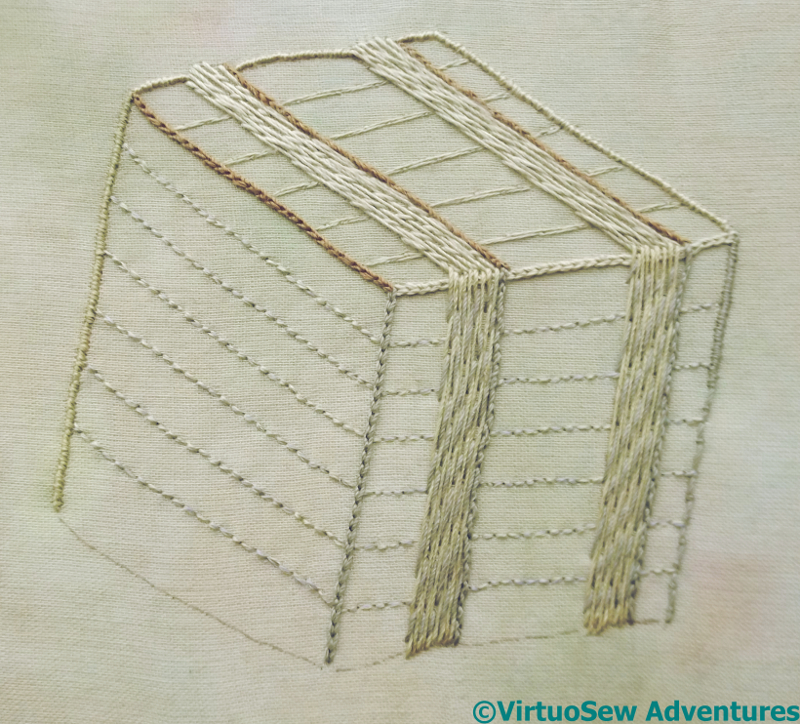
Since I had decided on how I was going to work the reinforcing boards, I decided that it might – possibly! – make sense to work some of the dark shadows to help me with their edges. I’m using the warm brown as the dark edge on the top surface, to keep the sense of bright sunshine, and the greyish colour for the front surface which is in a more even shadow. I will be combining the grey and the yellow in the reinforcing boards to help confirm that effect.
Top Edges
I also need to make sure that all the edges are clear and won’t fray. A packing case holding delicate antiquities should be a solid looking object, not one suggesting that even a gentle tug will take it apart! Just to give that sense of solidity, I have worked an overcast trail along each of the top edges that will be cut, whereas the edges that are within the piece of fabric are worked in reverse chain stitch. So far..
More progress on Loading The Felucca
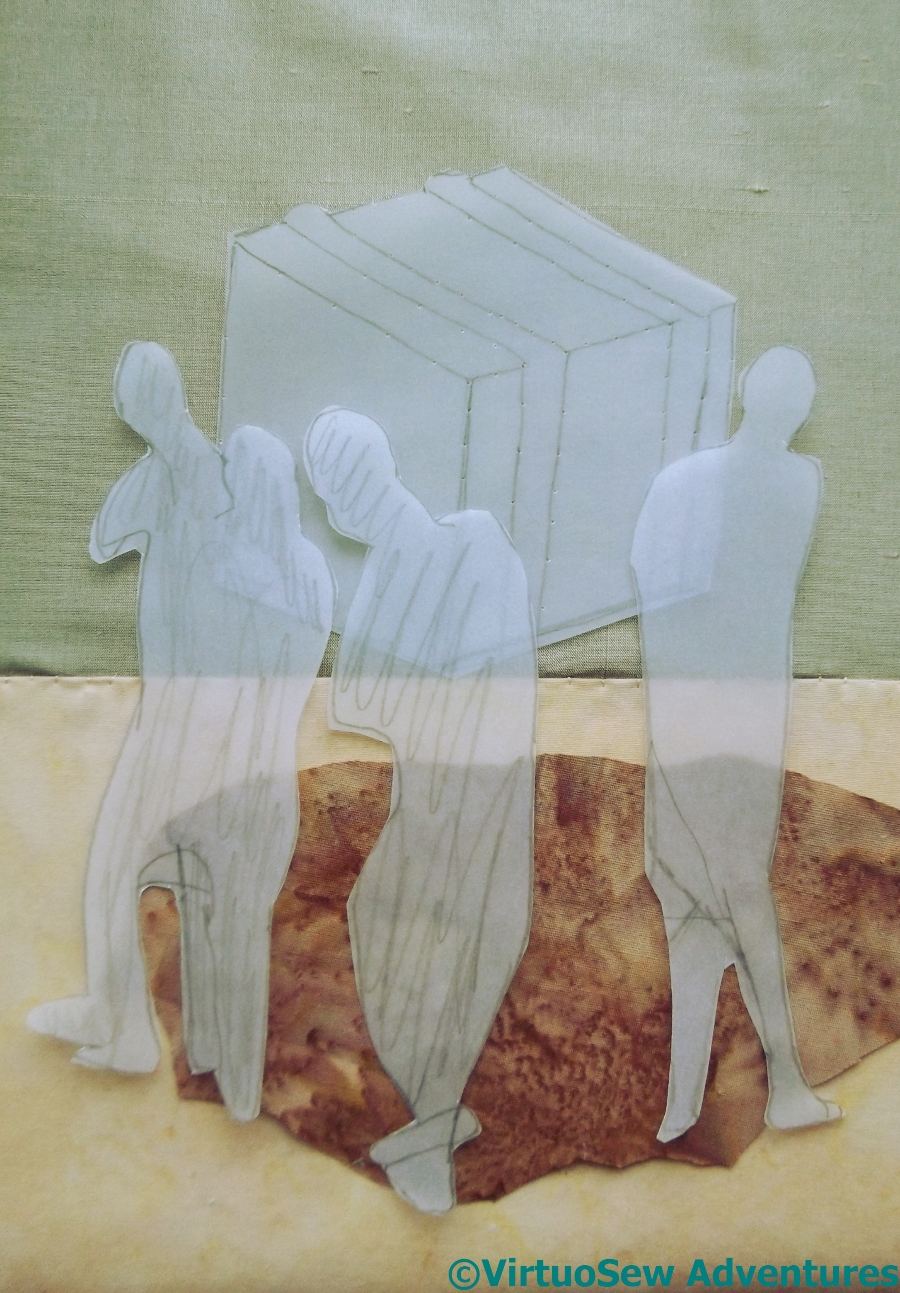
Testing Placement
While I was working on the packing case, which is the first embellished section I will be applying, it occurred to me that for those occasions when the light was a little marginal (grey-ish yellow is a difficult colour to stitch in poor light!) I could perhaps prepare a layer that would be applied to provide the shadow on the ground.
I traced the approximate shape and used the tracing as a pattern piece. The fabric is – as are most of them – a cotton from one of the plethora of quilting and patchwork stands I visited during last year’s Harrogate Knitting and Stitching Show. The print gives a sort of scrunch-dyed effect that I thought might help to create the appearance of broken, shadowed ground.
Then I realised that placing it sensibly demanded that I bear in mind the other main pieces. I’ve cut out the tracing I used for the packing case, and the forms I intend to use for the people, and spent a bit of time juggling the positions of each element.
The people, by the way, are not supposed to proper people shaped from an artist’s model. Some of the shapes have extra legs, and one of them is two people blended into one. They will be differentiated by their clothing, or at least so I hope!
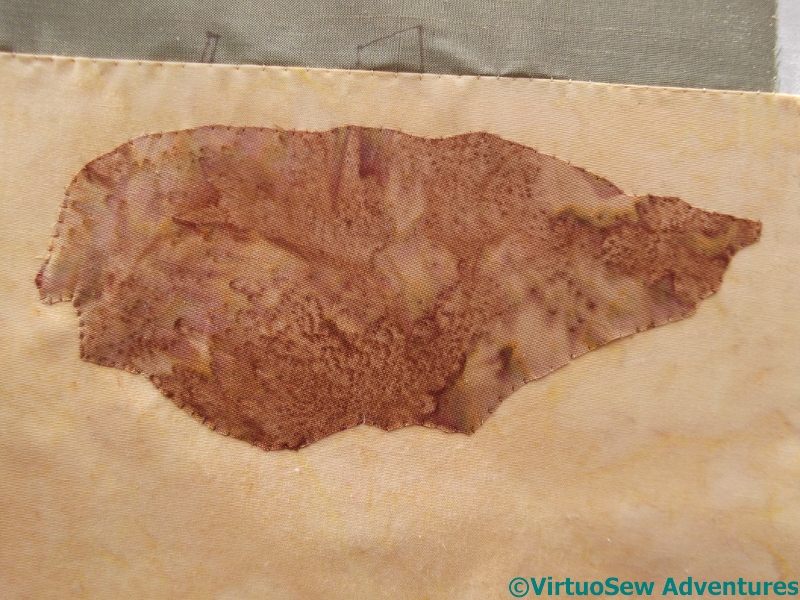
Shadow Attached
As it happens, attaching the shadow didn’t take as long as I expected. I decided that edging the fabric with blanket stitch would create a hard edge which would counteract the idea of the shadow going over broken ground. I may even choose to add stitching to break up the edges even more when the figures are in. I have learnt over the past few years not to overdo detail on one section of a piece like this until I have some sense of how the whole thing is going to turn out!
I am expecting to crop this piece very close, to concentrate attention on the figures and their burden, but I learnt with the Camberwell that it is easier to have some leeway around the edges of my project!
Loading the Felucca – starting on the packing case
Decisions Decisions
Since appliqué is a layered technique, I had to work forwards from the most distant object. For this subject – once the background was in place, that was the packing case.
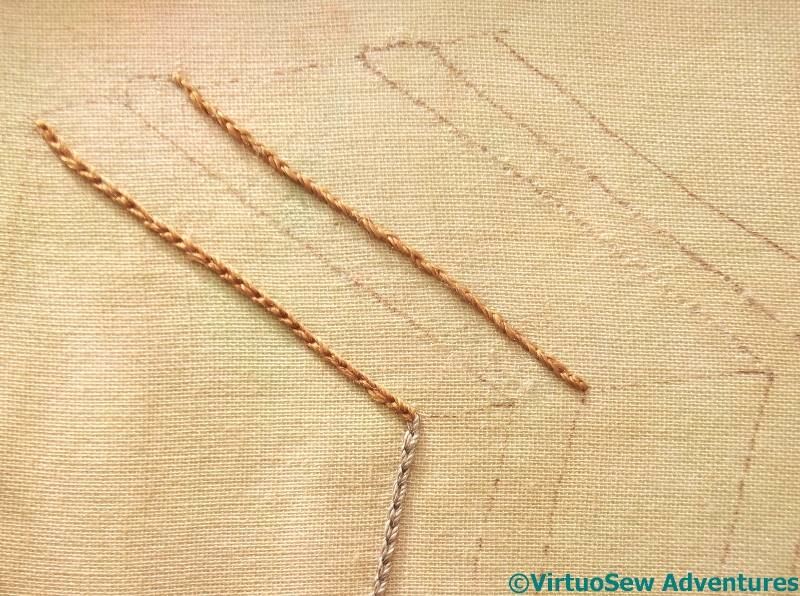
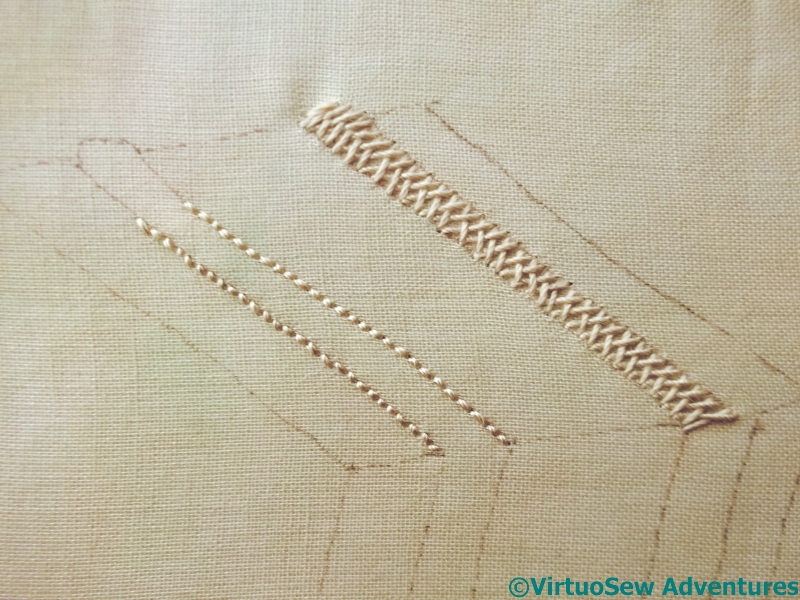
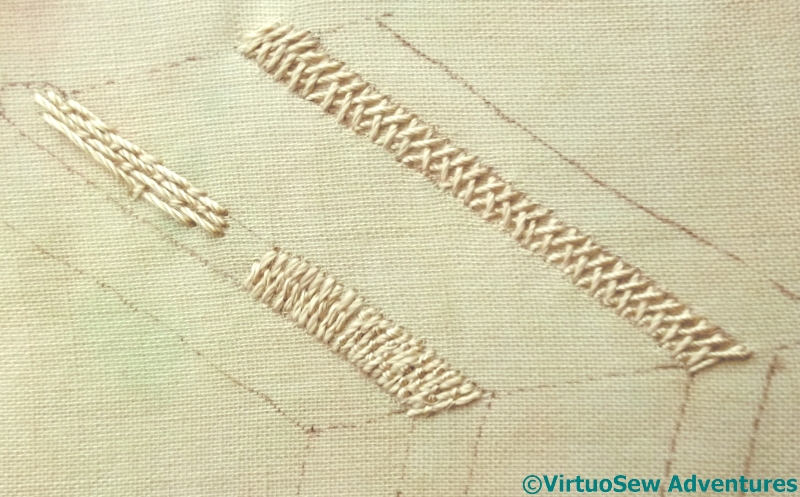
The first thing I had to do was to work out how I was going to represent the lengths of wood running as bracing all around the box. My first thought was to use reverse herringbone stitch, as I did for the contour lines on the Map of Amarna, but as I was stitching it I became less sure.
I worked the other band in ordinary herringbone stitch, then sat back and frowned at the frame for a while.
Still More Decisions
The result of my frowning cogitations was that I decided that I definitely didn’t like the reverse herringbone stitch, and wasn’t totally happy with the standard herringbone stitch either.
I tried variations on couching stitches – Bokhara Couching and Roumanian Couching, in the lower half of the nearer band – and was no happier.
Just as well I enjoy these puzzles, isn’t it!
Finally it occurred to me that the grain of the wood would be running lengthwise in these pieces of wood, while in the planks that make up the box, the grain would appear to run across the box. The stitching I had tried had given the impression of the grain running across the bracing struts. So I tried Bokhara Couching again, but running lengthwise.
That’s better, I think, but the next task is all that unpicking.
Loading the Felucca
Loading The Felucca
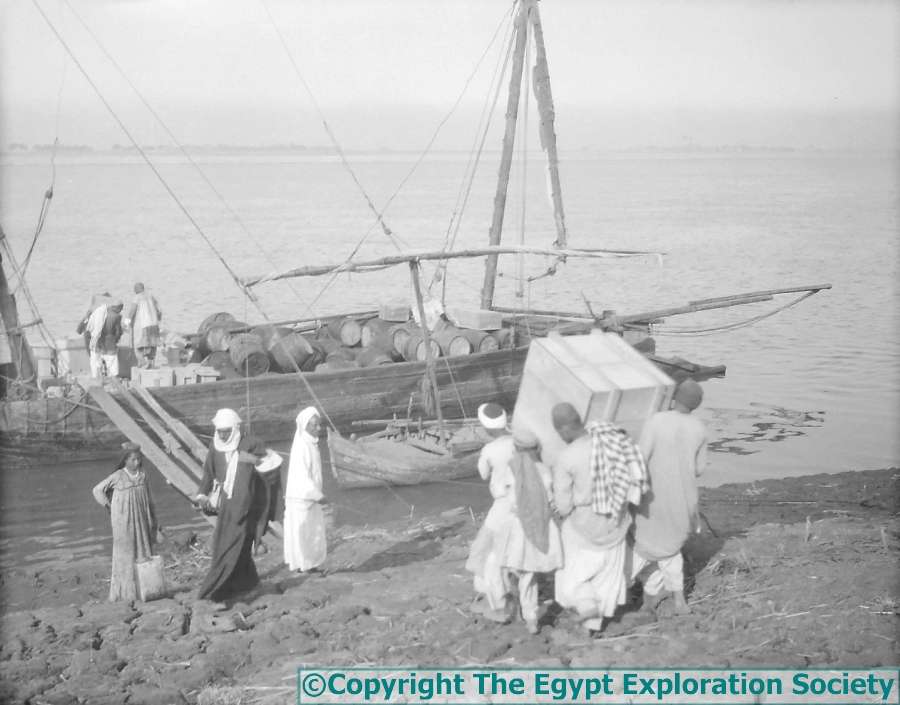
Here is another one of the photographs from the Egypt Exploration Society that I would like to represent in some way.
The expedition felucca was loaded with all the excavated finds and taken to Cairo so that the Cairo Museum Director could choose what would be retained for their collection. The carpenter spent weeks making special boxes to carry the more delicate finds, like Hatiay’s carved door lintel, and a large section of decorated wall plaster (more things for me to embroider!). Then everything had to be loaded on to the felucca…
First Layer
I’ve decided to concentrate on the group carrying the packing case. Partly this is because the whole photograph is a little confusing and difficult to decipher in places, and partly because they rather drew my eye, and I want to experiment with appliqué. What I hope to do is “dress” each figure, so the folds of the fabric I use creates the folds in the garment. I have no idea whether this will work, but if I don’t try I will never know!
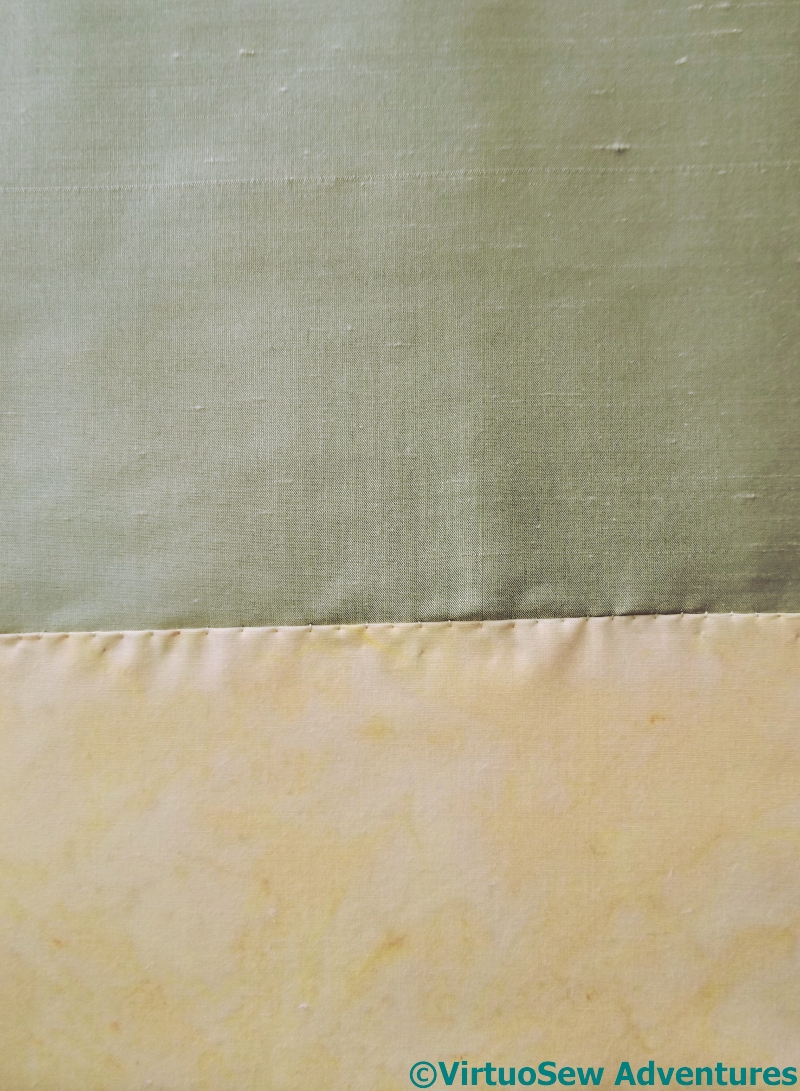
Last time I was at the Harrogate Show I found myself in unfamiliar territory, frequenting the patchwork stands, in search of suitable fabrics for the ground and the clothes. I’ve used a piece of silk dupion from The Silk Route for the river. It’s a pale grey-green, and I think I will have to find somewhere else to use it to pull it into the overall design properly, but it has a lovely subtle sheen that looks quite watery. I’ve attached it around the edges using strands pulled from the weft, because I have nothing else suitable. The ground is a sandy cotton, doubled because I could see the silk through the first layer, and attached using a single strand of stranded cotton from my stash.
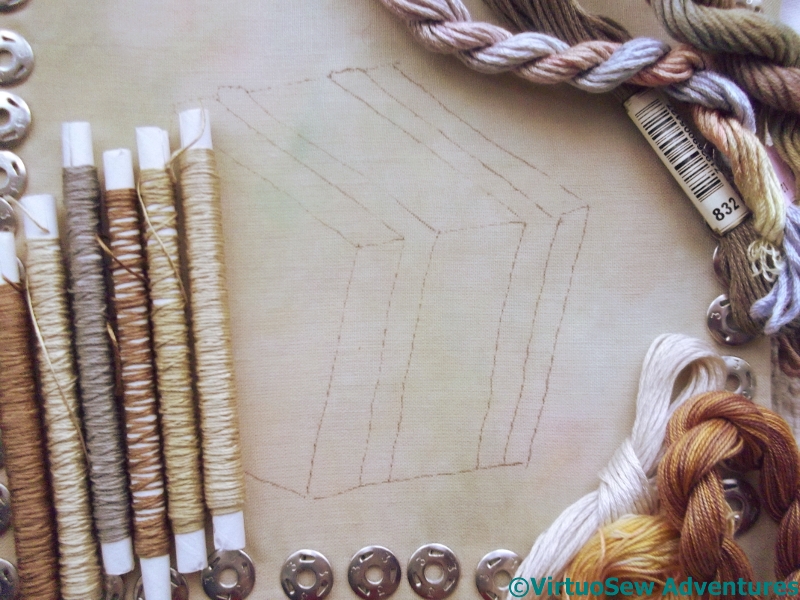
Threads For Packing Case
You last saw the fabric I chose for the packing case being used as the background for the Crock of Gold Hoard. It’s a flimsy overdyed turban cotton which won’t take much stitching without reinforcement, so I’ve backed it with a layer of white cotton to give it a bit more body.
Then I had a wonderful rummage in my stash, and pulled out a selection of silk and cotton threads to play with. The tubes are Mulberry Silks threads (also last seen in the Crock of Gold Hoard), and I’ve also laid out a linen thread, two Stef Francis stranded silks, and a couple of miscellaneous threads from I-Know-Not-Where.
This should be fun!
The Circle Skirt Finished – Maybe!

The Finished Circle Skirt – Perhaps!
This seems a good enough point at which to say the Circle Skirt is finished, although I may tweak and titivate further next winter.
Click on the picture to zoom in..
Some of the circles have been needlefelted, to greater and lesser extents, to help them to stay in place. Now I have my embellisher, I think that the next time I try this sort of thing, I will needlefelt very thoroughly, to try to help blend in the edges a little more. Once I have tried both ways I will feel that I am beginning to gain an understanding of how the embellisher affects the handle of the the fabric. I already know that it does, of course, but now I need to learn how to predict the effect and allow for it.
The skirt is now much more useful and wearable than it was. Unembellished, it was a strange light greyish colour that seemed just slightly “off” with everything I owned. Now, however, the burgundies, reds and greens tie in nicely with an assortment of tops, and the way the embellishment shrinks around the sides to the back helps to emphasize the kick-flare at the back.
In the right company, it’s a fabulous conversation starter, and it’s a wearable sampler as well. I’m rather looking forward to wearing it at the Knitting and Stitching Show in Harrogate in November!
Embellishing the Circles Skirt – Part Six
Crested Chain Stitch
I managed some really close close-ups here! This is the Crested Chain Stitch on one of the small circles on the back of the skirt, on the flaring panels.
The thread is a very ordinary stranded cotton, used straight off the skein – although as you can see, a couple of strands are making a bid for freedom, even so!
This picture also gives you a sight of the rainbow of colours involved in the tweed fabric I used for this particular circle – isn’t it lovely to see!
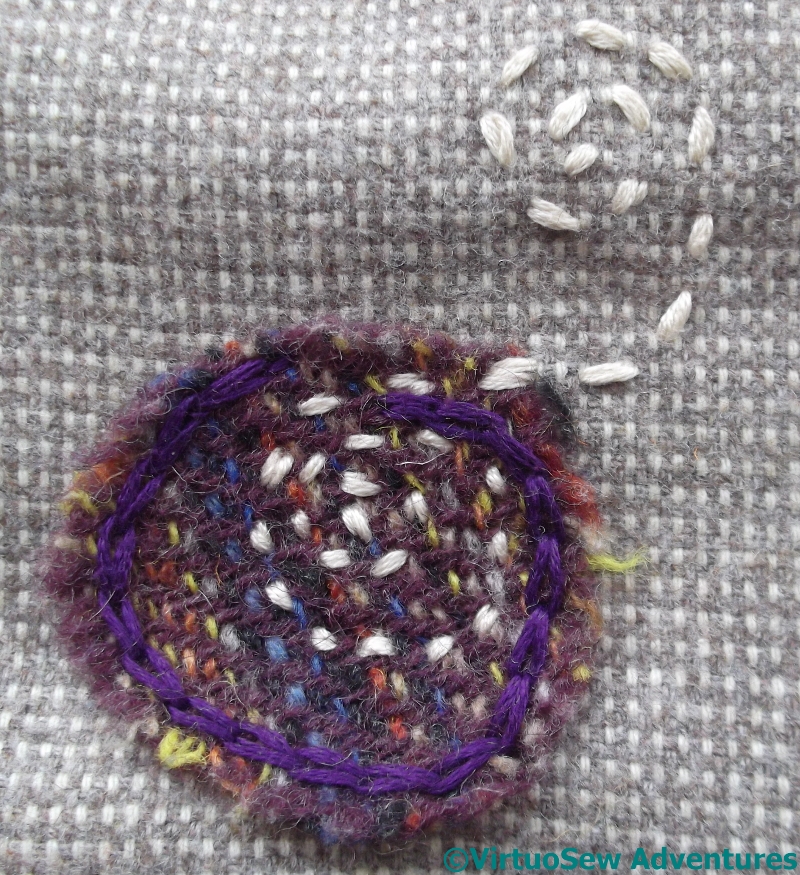
Trailing Spiral
The trailing spiral is high up on the front of the skirt, off to one side, and it was – in spite of the order of its appearance – one of the earliest elements which trailed off the circle and onto the fabric. I thought this would turn out to be quite important, to help link the various materials and create a cohesive whole. I had to work the spiral twice because the first time it barely showed at all. I’m all for the painter’s technique of “lost and found edges”, but there has to be something to find!
The purple chain stitch is there purely to make sure of the edges. If I had already bought the embellisher, I might have simply used that, very heavily, first.
Chainette Spiral
I love using rayon chainettes in this sort of experimental embellishment. As a one-time specialist in the industrial production of “novelty” yarns, I have a sentimental attachment to chainettes, chenilles, and eyelash yarns.
This particular chainette was striped, which echoed the twill weave of the tweed very nicely. It was also a real trial to stitch with – hence the simple running stitch. I simply didn’t have the energy for anything else..
Embellishing The Circles Skirt – Part Five

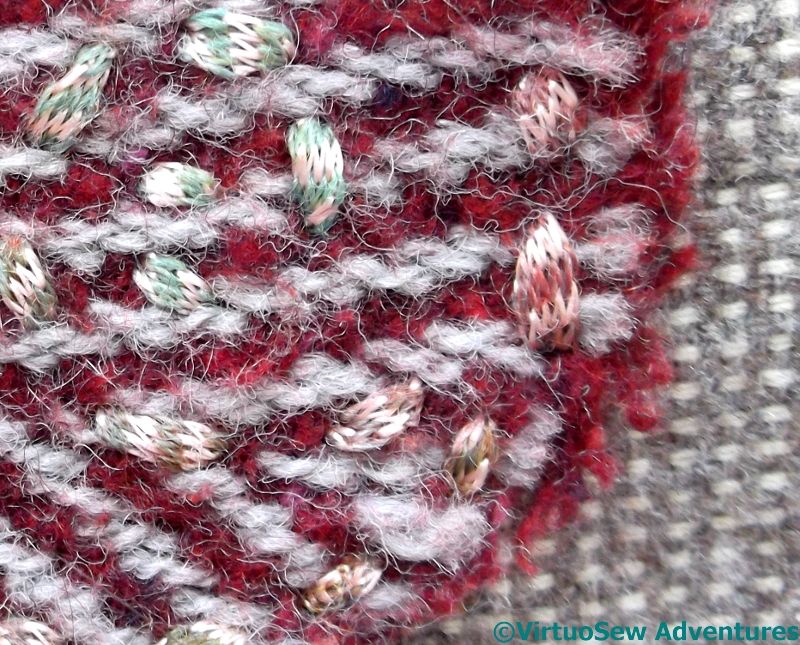
Blanket Stitch Wheel
I’ve recently bought myself an embellisher, and this is one of the circles I’ve used it on. The stitching is a simple blanket stitch wheel, which some small straight stitches between the spokes and French knots on the skirt fabric. The thread is wool, so I thought this one might be a good candidate. It has had the effect of making the stitches seem much more part of the tweed circle – almost drawn or painted on. In turn, that helps the French knots to seem a little more textural.

Change In Texture
Learning to use the embellisher – and in particular, how soon to stop! – is going to prove interesting. Here you can see that there is a less fuzzy texture at the centre of this tweed circle. That section has been more heavily treated with the embellisher. This was quite deliberate, because the very free ornamentation on this skirt allows me to experiment, and one thing I would like to know is – will this change in texture be permanent, or will this fabric become fuzzy again as the skirt is worn?

Couched Bouclé
In this case, I’m not sure I can even distinguish the effects of the embellisher! I couched a bouclé thread over the top of the tweed in this case, then ran the embellisher over the tweed and bouclé at random. There is extensive scope for investigation and experimentation here..
Incidentally, for those who’ve not heard of one before – an embellisher is something like a sewing machine, but it replaces the needle and thread with an assembly of barbed needle-felting needles. The barbs entangle the fibres of the fabric, creating new textures and joining the fabrics without stitching. So far I’ve only had a chance to experiment a little, but I think it might be a very useful tool when I start work on the Vision of Placidus!
Embellishing the Circles Skirt – Part Four

Shell Chain

Wavy Chain
Some of the suggested stitch variations in Edith John’s books have worked very well for the Circles Skirt, others rather less so. I think these two samples might help to show why.
Shell Chain Stitch worked beautifully. In the pearl cotton thread I used, there’s a nice, crisp sense of the stitch pattern, but the stitch is still flexible enough to curve around the circular shape I wanted it to, whereas Wavy Chain stitch, a variation upon it, is a very “stiff” stitch. It is wide, but each group of stitches stems from the same point, and even using a much finer thread and shortening the stitches really doesn’t make it any more flexible.
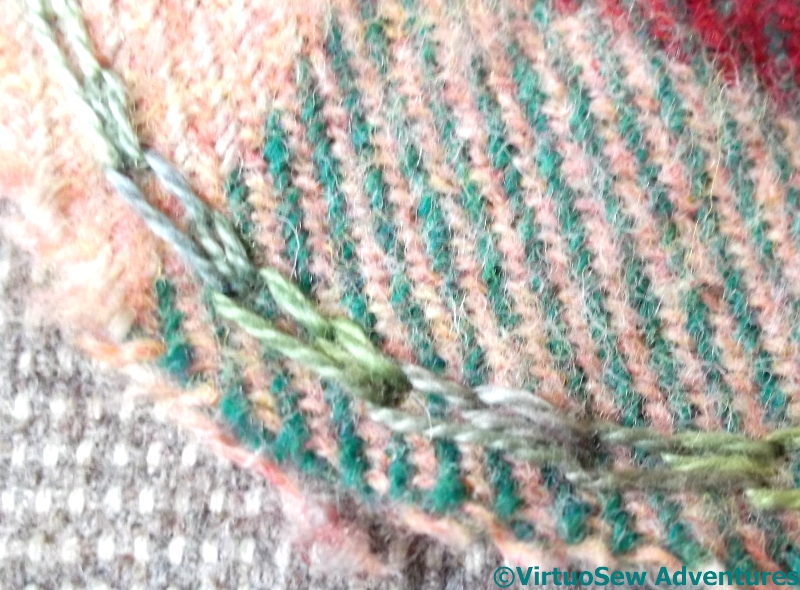
Shell Chain On Tweed
So here is Shell Chain on the skirt. It runs neatly around the edge of one of the checked circles, and although now I have worked the sample as well I might have preferred to shorten the stitches, it was fun to do, and easy to alter to match the curve.
I tried Wavy Chain several times in various places without managing to make it follow even the gentlest of curves, and eventually decided to give up until I’d thought it out some more, and maybe even done some practice.
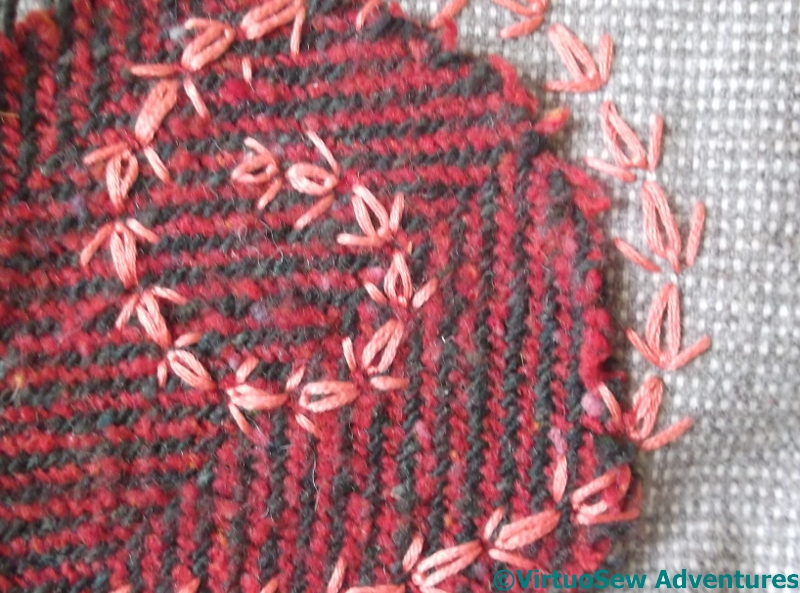
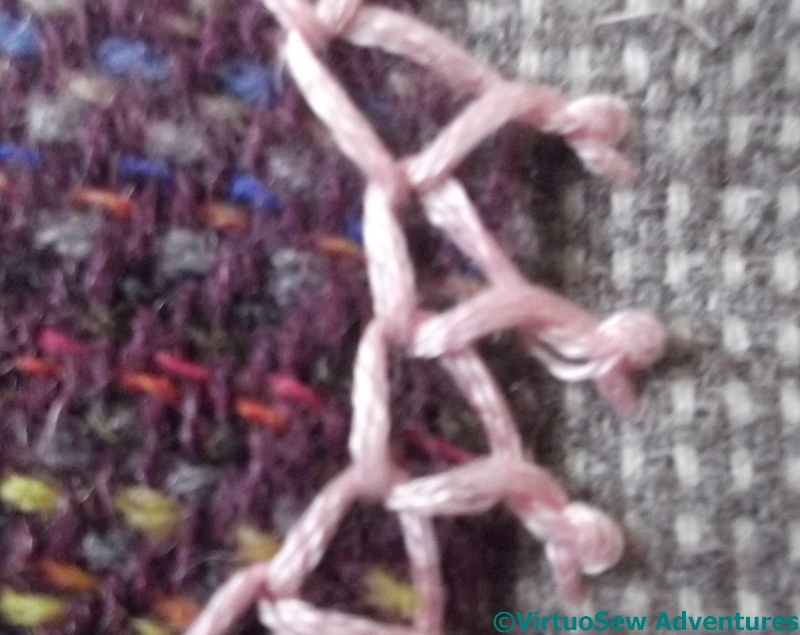
Wheatear Spiral
The Wheatear Spiral more than made up for my frustration.
It was a joy to do – the stitch itself is easy and effective, and the coral thread sings against the red and green tweed. Offsetting the spiral in comparison with the tweed also makes the whole thing more interesting, helping to connect the ground fabric and the embellishment. Maybe I should have swung the spiral further out over the base fabric, but this is what my needle wanted to do!