The Garden Scenes
You may have noticed my glee last week at the launch at the “Stitches” trade show of two more “Designs Inspired by Clarice Cliff“. I enjoy designing for other people as well as myself, and it is always so satisfying when all the thinking, the planning, and the scrambling around the floor picking colours finally reach their culmination in the launch of the new kits. I usually design counted cross stitch for publication because my embroidery gets reworked on the fly so often that timetables might sometimes be unacceptably stretched. I’m hoping that what I learn by thinking about my embroidery designs and writing about my designs will help me to develop my skills to the point where my designs for publication need not be in counted work!
Last year I worked on some designs for a second company producing counted cross stitch kits, EQS Limited. EQS are now UK distributors for Madeira threads, and each kit contains full spiral packs of each colour, which they hope will help to differentiate their offerings from all the other kits available. Some of these kits have been launched recently, and I’m so pleased with them that I wanted to share them with you.
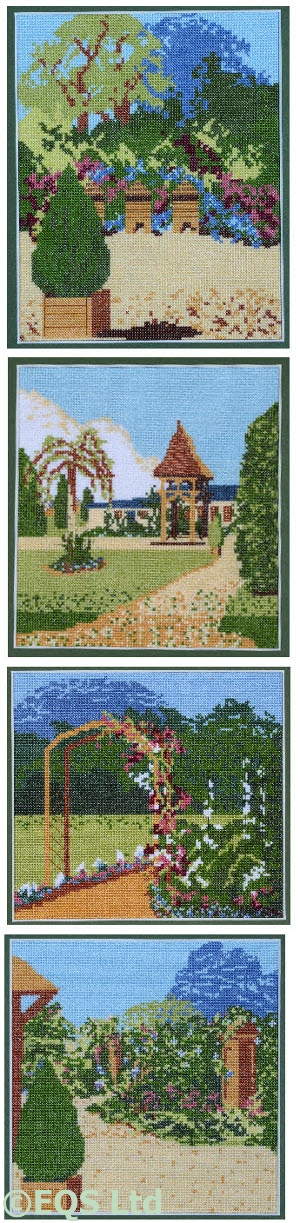
The four “Garden Scenes” were originally inspired by some of the gardens that were being developed at the Blists Hill Open Air Museum when I visited with my parents when I was in my early twenties. The designs no longer bear any resemblence to the gardens I saw at the time – in particular, there was nothing so grand as an orangery with a summerhouse in front of it, as there is in the second design – but they do provide some sunny pictures of summer gardens – scenes which were in short supply in England last summer!
The last design here was I think inspired by the front garden of the Doctor’s house, and the view into the garden through the railings. I added beehives to the first design because while I was working on the charts, there was so much in the news about the collapse of the bee population. Living as I do in a house with no garden at all I am in no position to keep real bees!
Naturally in working gardens such as the ones that were being developed at Blists Hill there would be very little lawn – a lawn takes considerable upkeep without actually providing anything in return – but in the stitched versions there needed to be something flat to contrast with the plants, so I’ve stretched reality rather considerably there.

Working Boats - the first two designs
I have produced a second range for EQS Limited as well, this one entitled “Working Boats“. As the grand-daughter, great-grandaughter (twice) and great-niece (four times) of merchant seaman, it seemed very appropriate for me to offer a homage to the merchant and fishing fleets that support our island nations, and have done for centuries. The first two designs show, firstly, a canal boat on the Llangollen canal – a local tourist attraction throughout my childhood, and in a way a link to the Gardens, because the canals provided vital inland transport during the industrial revolution and beyond. The second design shows a Clyde Puffer, a very particular design of coasting cargo vessel with a flat bottom so that it could run itself ashore to be unloaded in places where there was no quayside. The mast is a cargo hoist, rather than a support for sails, since the puffer was developed after the invention of the marine steam engine.
There are four more designs in the range which we expect will be launched in the coming year. All I need now is a local needlework shop to go to so I can get a quiet thrill from seeing my designs on sale!
Cotton And Satin
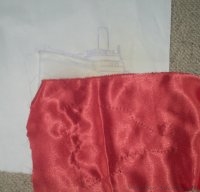
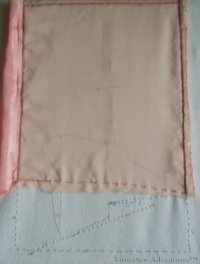
This shows the cotton twill with the basic outline transferred to it for embroidering. I decided that the whole ship would be made on this cotton twill and then the twill applied to the background fabric over the sky and sea fabrics, with some padding to raise it. I checked with my client (my cousin, remember!) to be sure that she was happy with raised and padded appliqué, rather than wanted something very flat, and on receiving an intrigued and enthusiastic “Go for it” started planning what would be padded and by how much.
The photo also shows the satin that I chose for the hull, with the design, again, outlined in running stitches.
Progress on the hull
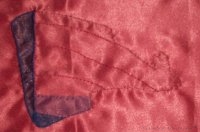
The next stage was to apply a layer of navy net and a layer of navy gauze to the satin where the hull was in shadow, and stitch over those edges in navy satin stitch. I built up several layers of net at the forefoot, with lines of stitching to add form.
Then I added a layer of tawny net to the light side of the hull to cloud the colour slightly and stitched along the main plating lines of the hull to help reveal the shape.
The next stage on this piece was to stitch over all the edges that will not be covered by other stitches and fabrics to ensure that no raw edges show. At various stages in the project I chose different stitches for this job, but in this particular case I used buttonhole stitch to make the edge crisp and clear.
Two New Designs Inspired by Clarice Cliff - Just Launched
Some of you may recall that this time last year I was very excited because some designs I produced for Classic Embroidery had just been launched.
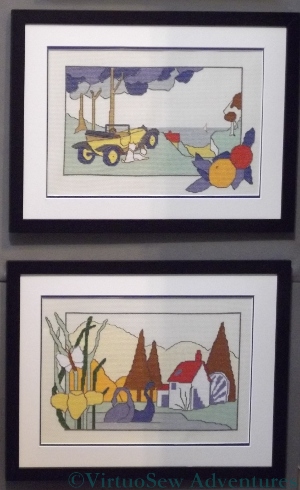
Well, over the past year I’ve created another two, “On Guard” and “Swimming Swans”. They’ve been charted and test-stitched, photographed and the kits prepared, and now they are launched.
I went down to the NEC in Birmingham last week, to the trade show, to look at the finished pieces and discuss further projects. The other four “Designs Inspired By Clarice Cliff” are still selling, and part of our discussion was also concerned with whether to create more designs in the range, or move on to something else.
We’ve decided that for now, the range is complete – there are four small(ish) square designs and two slightly larger rectangular designs. In each case the crisp geometry of the edges is broken by part of the design spilling out, and the colours are bright and clear.
As trade shows go, “Stitches”, as we all still call it, is a fun, friendly event. I remember the first time I ever went, introducing myself as new to the needlecraft world and being greeted with beaming smiles and welcoming handshakes on every stand. That hasn’t changed, although a good many years have passed and the show is now called “Craft, Hobby, and Stitch” and encompasses papercrafts and ceramics (among other crafts) as well as needlecrafts.
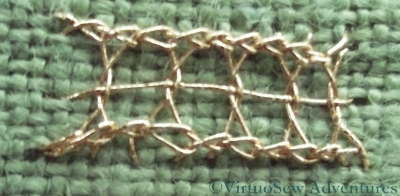
Interlaced On Ladder Stitch
The two stitches in Month Ten of the course are both based on Ladder Stitch foundations. You can see here that something went a little squiffy with the foundation for the Interlaced stitch. I ran out of thread in the needle and in bringing the new thread in, I didn’t keep the the tension quite right. It wasn’t clear until I took the photo with the macro lens, and cropped it to size. As it is only a practise, I shan’t lose any sleep over it – I’ll just make a mental note that Tension Matters.
The interlacing is just like the sort of interlacing I am familiar with from drawn thread work – I’ve not done it before, but it is a style I’m familiar with seeing and a construction I can understand. It would be quicker to practise the interlacing on a foundation of straight stitches, but I suspect (if only I had got the stitching right) the Ladder Stitch would create a more stable basis.
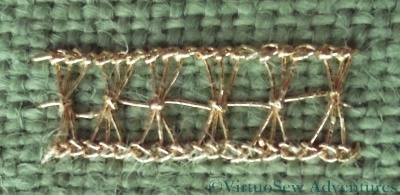
Wheatsheaf On Ladder Stitch
The second stitch worked on the Ladder Stitch foundation is another I recognise from drawn thread work. This is a wheatsheaf-style stitch. Other variants might include a knot instead of a mere wrap, or include two rows of interlacing in the same style. One of the advantages of this course is that it is pulling together many of the techniques I have seen before, but never had the opportunity to do.
It has also given me permission to “play”. I’m enjoying that!
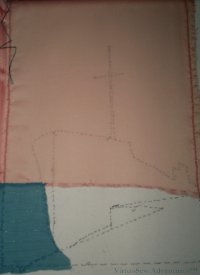
The Sky being sewn into place
I could have left the background until I had made some progress on the Camberwell herself, but I wanted to be sure I kept the design balanced, and having the background ready so I could lay the cut outs on it to think about seem the best way of achieving that.
The fabric for the sky is a pale apricot coloured georgette. At this stage I still had not decided whether there should be two layers, to create a deeper colour and more dramatic effect, but as I was going to be working on the ship herself on a separate piece of fabric and applying it later, that decision could be delayed. I used a zigzagged back stitch in rust coloured embroidery cotton to attach the georgette to the backing.
The Sea and Sky
The blue-green fabric I chose for the sea has a glittering thread running through it at intervals. I was hoping that this would create the effect of sunlight sparkling on the water, without drawing unnecessary attention to itself.
I also found a piece of white cotton twill – slightly lighter in weight than the material used in uniform “tropical whites” but very similar – which seems the perfect choice for the base fabric (for so many reasons). This fabric provided a sturdy basis for the superstructure and the hull, which would involve both fabric appliqué and embroidery.
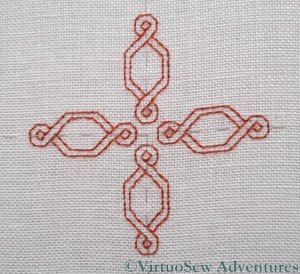
Tudor Pincushion - Stage One
It’s been rather chilly of late, and I couldn’t quite face sitting in the window working on the Spot Sampler, so I spent some time mounting the Tudor Pincushion on a bar frame, and started working on it.
The first thing I did was to part-colour the chart. I’ve never been comfortable with charts, and it’s easier to orientate myself if I have at least some elements coloured in to act as guides. Specifically, I have to colour them in myself, because I’m no happier with printed colour charts than printed black and white charts. I think that colouring the chart myself helps me to understand how the design is put together, and then I find it easier to stitch.
I’ve also tacked the centre lines in. This is something I rarely do – generally I just find the centre, work whatever is over it and then count from that. In this case, there’s no stitching at the absolute centre – not until I start on the metal thread work, anyway – so I made sure that the centre point was marked, at least for the first stage of outlining.
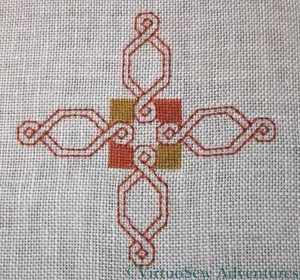
Tudor Pincushion - Stage Two
In fact, as you can see, I’ve already taken out the tacking. At least, I’ve left it in at the edges, but now I’ve got all four of the central outlined motifs in, and worked the first set of tent stitch blocks, everything else can be counted relative to the nearest landmark point that is already stitched.
Since the silk stitching is either in tent stitch or back stitch, it’s not difficult to do, although as it is on a very fine linen – 38 or 40 hpi (holes per inch), I think – I’ve been very glad of my magnifying spectacles!
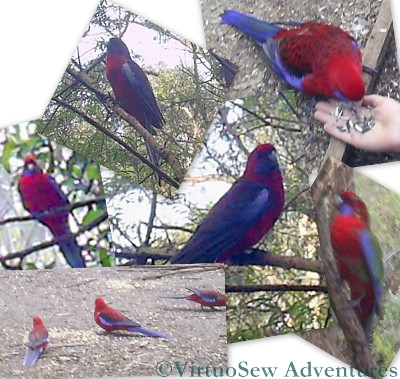
Rosellas
My life and personal circumstances are not often relevant to my embroidery, but in this case…
My husband is Australian, so we try to go to Australia to visit his family as often as we can, which is usually about every two years.
To someone brought up in Northern Europe, among the Oak and Ash and Thorn of Puck’s England (do you know “Puck of Pook’s Hill“?), the blue-green foliage of the Eucalyptus is a strange sight, and strolling through a reserve amid the smell of eucalypt and tea tree, spotting kookaburras, koalas and kangaroos, is an experience which never becomes over-familiar.
In addition, the Australian embroidery magazines have a completely different focus to those in the UK, and a huge variety of styles and projects, like nothing I see at home.
So perhaps it is not surprising that, although I haven’t yet worked an Australian project, I have a huge collection of photos I’ve taken as inspiration, and magazines I’ve bought to read, and re-read, and – frankly – gloat over. I’ve a book about working Australian flowers in Stumpwork, and one of these days I intend to work a bouquet of them…
In particular – being accustomed to rather more dun-coloured birds – I’ve been rather taken by the idea of working something depicting, or inspired by, a Rosella. I took a lot of photos on one of our visits a few years ago, and, as with all of my projects, I’ve been thinking about it on and off ever since.
During our visit at the beginning of this year (we had New Year’s Eve on the beach!), some of the ideas began to crystallise out a little more, and I have been writing them down to make sure I don’t lose them.
Watch this space!
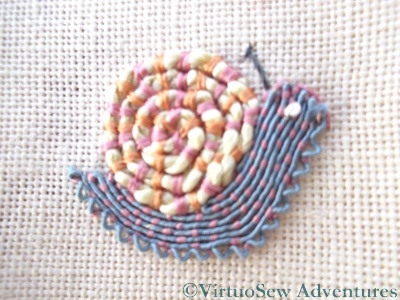
The Snail In Silk
So, bright-eyed, bushy-tailed, and full of enthusiasm, I sat down with my Glittering Snail Kit and got started. And, in fact, the silk gimp and silk-wrapped purl are not the only threads new to me, so it was great fun.
The pink and orange threads are both silk floss rather than spun silk. Occasionally I snagged the floss on the screw on the hoop, or a fingernail, or even on another bit of thread (how? don’t ask!), but I really enjoyed it, all the same.
The snail’s body is worked using the silk gimp and stretched silk-wrapped purl, couched with the pink floss. They were easy to work with – they felt gorgeous! – and I have a tiny bit left to play with a little while I think about how I might use them in my own embroidery. At the moment, nothing is really springing to mind, but I’m pretty sure that somewhere along the line some silk-wrapped purl will appear..
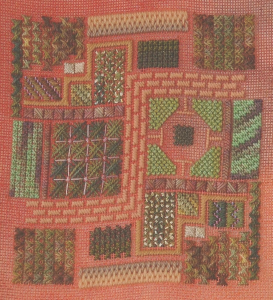
The Canvaswork Abstract Garden
Following on from the Knot Garden, I decided to play a little more with the idea of using the canvas as a background, rather than covering it entirely. Since I already knew the canvas would not be covered, I chose a piece of dyed canvas (from “Kate’s Kloths”, which I haven’t been able to find online).
The first element was the simple path in expanded brick stitch, worked in wool. The rest of the panel was then built up as a pattern of varying stitches and threads. There was no predetermined idea, simply the aim of keeping a sense of balance and rhythm in the pattern densities. You will notice that block sizes and shapes are repeated, reflected across the path which snakes across the centre.
I’m not particularly comfortable with abstract work or even with designing it, so this repetition and reflection of the blocks was a way to give myself a structure for the piece. Otherwise I find abstract work often feels rather chaotic and it doesn’t offer me the chance to puzzle out “a good stitch to represent such-and-such”, which is where a lot of the fun of the Persian Fantasy came from.
This was an interesting exercise, but like the Knot Garden, it has remained as a piece of canvas, not mounted, framed or incorporated into anything, because I really haven’t a clue what to do with it!
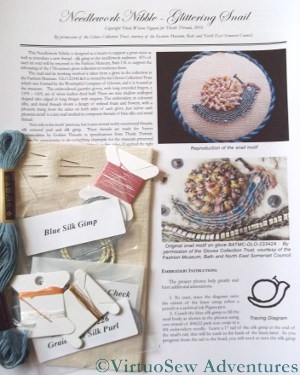
The Snail Kit Has Arrived In The Post
You may recall that in December I wrote about the Thistle Threads project to Stitch A Snail For Storage. We’ve been away for a while, but came back to find a huge pile of post which included a jiffy bag from Thistle Threads.
Since I’ve already printed out the instructions (as soon as I ordered the kit!), I can start just as soon as I’ve gathered my wits and drawn the design on the linen. Even though the basic concept of the design is simple, it will be complicated and probably a little tricky to do, because the snail is only about an inch from nose to tail!
Tricia had two reasons for developing the kit – one was to sell something in aid of the Fashion Museum in Bath, but the other was to introduce some new threads to us. So of course, the first thing I did was to rummage through to look at the the new threads, the silk gimp and silk wrapped purl. They look highly intriguing, and I am looking forward to playing with them…
