Month 11 Goldwork Stitches
So while I continue with the silkwork for the Spot Sampler and the Tudor Pincushion, here are the two new stitches for Month 11 of the course.
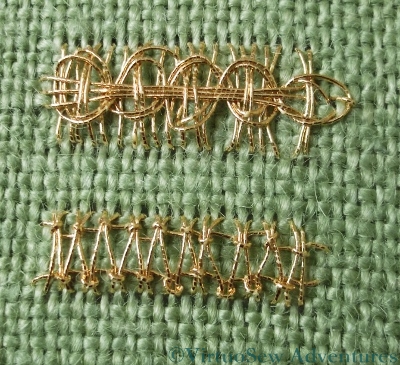
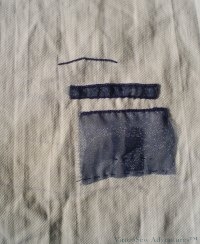
The two stitches are Guilloche on Ladder Stitch, and Hemstitch on Ladder Stitch. In both cases I have cheated and just worked a panel of straight stitch bars as the foundation. This is because I wanted to get a firm grip on the structure of the stitch, rather than spending my time on working the foundation.
As the stitches become more multi-phase and more complex, the green doodle cloth is becoming a less suitable foundation. While it makes things easier by making the stitches larger when using the counted diagrams for them, it also makes things more difficult by making the stitches larger! I find that I am having difficulty in getting tension and stitch length neat and correct – in fact, you can probably see that from the rather floppy loops on the Guilloche Stitch Of course when I come to work on the real fabric using the real gold and silver threads, this problem should be much reduced, but I think I will find myself using a stiletto or a laying tool to try to keep the thread under rather closer control, even so.
Gauze doubled over the sky
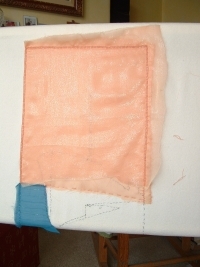
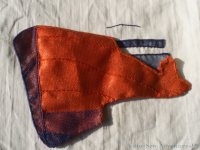
I finally decided that I wanted to use two layers of gauze for the sky. The apricot gauze has a slightly reflective surface, which would make the sky glow behind the ship.
I also worked blanket stitch around the outside edge of the panel. At this stage I intended to use a raised band stitch of some sort to frame the work, so the blanket stitch was to form the foundation of the final raised band.
Later I was to discover that the Camberwell herself had Other Ideas, and all of this was completely changed.
I think it is important to show some of the dead ends I investigated here, or at least to describe them. One thing that people who are at the early stages of their creative life always assume is that everyone else gets straight from “Germ of an Idea” to “Finished Design” without really passing through any points in between.
We don’t.
Any of us.
And we are not fair to them – and risk discouraging them – if we allow them to think that we do.
Oops. Rant over!
Camberwell - the Slip
This next photo shows further progress on the slip for the hull, in which I worked on the superstructure of the bridge and living quarters. I pierced the cotton drill where the anchor chains are lead through the hull and worked one of the portholes on the bridge in a raised satin stitch boss. Almost all the actual embroidery here used ordinary stranded cotton, although sometimes I blended colours in the needle.
Tudor Pincushion Progress
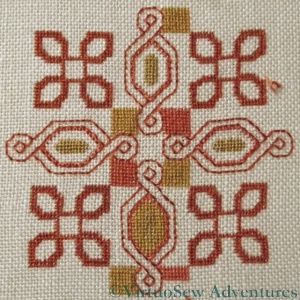
So here is the progress on the Tudor Pincushion.
There are two close shades of red and two close shades of tan in the design, – this will increase the appearance of rich, subtle colour variation in the final piece, which will provide a gorgeous background for the gold and silver threads. It also means that I have to be super-organised with my thread. As soon as I cut a length, it is wound onto a card with the thread number written on it, because even my daylight lamp sometimes isn’t enough to help distinguish the colours.
I’ve miscounted and had to restitch the corner motifs in a couple of places, but that is probably because, first, it is a very fine count of fabric, and second, tent stitch is an oriented stitch.

Tent Stitch - demonstrating edges with the orientation and against it
That is, because it creates a diagonal stitch, diagonal elements of the design look different when stitched, depending upon whether they slant with the stitch or in the opposite direction. This doesn’t cause a problem once the piece is finished – especially given how small the stitches are! – but it does mean that it isn’t so easy to know at a glance whether details are right. When the details are wrong, it becomes clear that they are wrong just as soon as you stop stitching, and then it becomes a matter of how much or how little needs to be unpicked.
Of course, I suppose I could interpret (probably correctly!) that as a sign that I’ve been stitching for too long and my eyes are tired…
Do you remember my Peacock Skirt? Megan of Elmsley Rose asked for some more close ups of the embroidery, and while I have been remodelling it (for a slightly less sylph-like waistline – I was a skinny teenager!) I took the opportunity to take some.
Close Up Of Branch
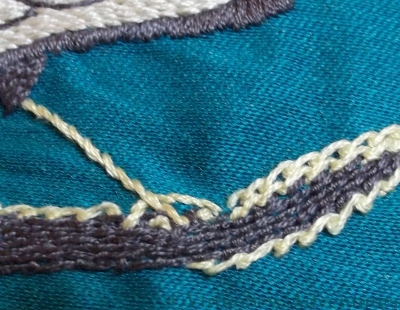
This, therefore, is a close up of the branch the peacock is standing on. I simply followed the instructions here, using coral stitch for the dark grey elements of the branch and scroll stitch for the pale yellow. I think that now if I were do something like this again, I would spend a bit of time tweaking the colours a little more, because I’m not sure I like having the peacock’s legs the same colour as the highlight on the branch!
You can see, too, that I struggled somewhat with tension and the fabric is a little puckered. This seems not to matter when I’m wearing the skirt – people still admire it!
Pekinese Stitch On The Peacock's Back
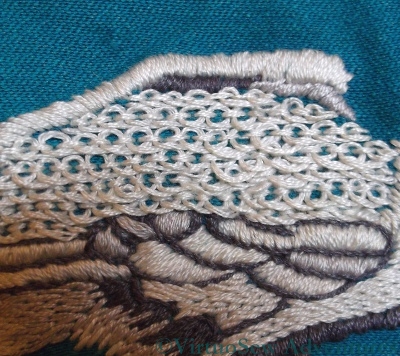
The instructions for the Peacock’s back said to work the Pekinese Stitch fairly loosely to create a slight variation on colour and texture. Since the embroidery was worked in two strands of stranded cotton, that too contributes to a slightly “fluffy” appearance. The satin stitch sections around where the wing should be are in slightly different shades of grey, and worked at slightly different angles, again to produce varying tones and textures.
Looking at this close up now, I think the rows of stem stitch used for some sections of the body represent the feathers of the bird more successfully (although, again, the design doesn’t attempt a photo-realistic representation) than the sections of satin stitch or pekinese stitch. I do admit, however, that it was the chance to work pekinese stitch that attracted me to the design!
Spiders Web Flower Centre
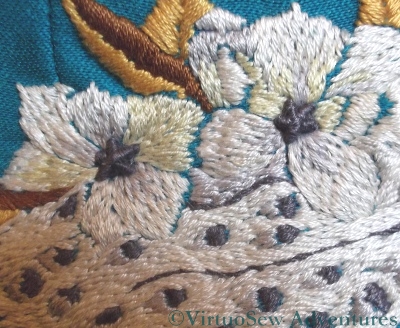
The centres of the flowers were worked using a Spiders Web Wheel. The instructions specified working as much thread into the stitch as possible to obtain a raised and highly textured effect. This contrasts very well with the long and short stitch flowers and the stem stitches on the peacock’s tail.
Again, coming back to these pieces years after stitching them, it’s fascinating to look at surprising details. The gold and russet leaves look as though they’ve been padded, but I’m quite sure they weren’t. I remember doing padded satin stitch for the first time quite recently and wishing I’d known about it earlier!
After finishing the text and the villages on the Map, I need to decide what to use for the cultivation… You may recall from my earlier post that I have decided on the stitch I’m going to use – tête de boeuf stitch – but that I’ve not quite worked out what thread to use.
Trial Patches On The Map
I’ve stitched a variety of trial patches, using stranded cotton, flower thread, pearl cotton, and several different silks, and now all (all!) I have to do is make a decision. I’ve propped up the fabric in the living room and stand staring at it every chance I get!
So far, I feel sure I won’t be using the pearl cotton (too chunky) or the flower thread (also too chunky), but that leaves me two variegated silks (one pale green shading to pinkish purple and one brighter green shading to terracotta) and two plain silks (one slightly darker than the colour of the fabric, and one the same colour as the stranded cottons I used for the contour lines. I’ve tried very hard to get a photo that does reasonable justice to the various threads and colours, but I don’t think that the one I’ve got here helps very much…
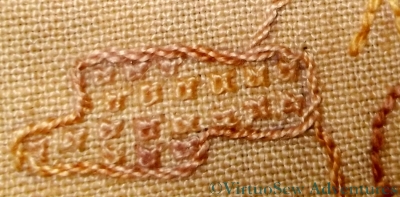
Sorbello Stitch Village
I chose Sorbello stitches to represent the modern villages. These are worked at a very small scale, as you can see from the thread count. Again, had I followed the cartographer’s symbols, I would have used something like Jacobean Couching, but I felt that this stitch in fact reflects the idea of buildings rather better. I’ve used the same gold-shading-to-purple thread for all the modern villages, both the names and the associated areas. It doesn’t draw the eye, in real life, quite as much as you might expect.
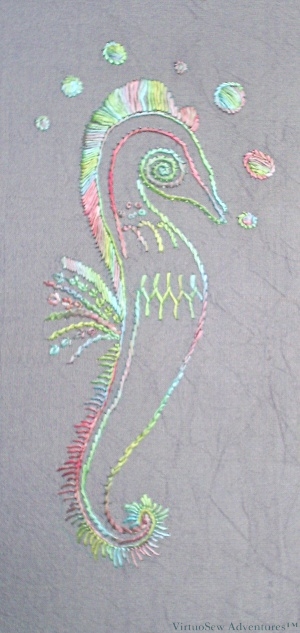
Small Seahorse in overdyed filament silk
Sometimes I play with threads for no other reason than to play with them. In this case Stef Francis gave me a skein of overdyed filament silk to play with. She tends to create a much more “freeform” style of embroidery than I do and she wanted to know what I thought of the thread.
I found a simple transfer that offered scope for several different stitches, and started playing. I had been concerned that it might twist up when I didn’t want it to, but it stayed fairly flat most of the time, and it is noticeable that the stitches look and feel different in a flat thread, as compared with a round one.
For example, in a round thread, the stem stitch line tends to be more textured, and the direction of slant is more obvious. Here, the slight flatness creates a smoother line. That same flatness makes the satin stitch smoother and cleaner looking. It also helps to mask any slight imperfections in the stitching!
On the other hand, that same slight “spread” of the filaments clouds the distinctiveness of the Wheatear Stitch in the fin on his back, so not an unalloyed success, but interesting and worth trying all the same.
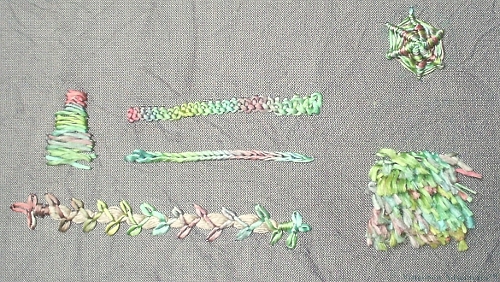
Silk Filament Experiments
Then I started just to play with stitches in a spare corner of fabric. The Braid Stitch (top row) works quite nicely, I think, and the Turkey work (bottom right hand corner) is better than I hoped, especially considering that I’ve not done it before. I can’t imagine what I would use that texture for in these colours, but Stef has a fabulous range of overdyed shades and I am sure that something would spring to mind for one of them. The little triangle of Closed Herringbone Stitch is hardly a success, but that may be a problem of scale. I don’t think the Braid Stitch would have worked if it had been any wider than it is here.
I don’t think this thread adds anything to the Reverse Chain Stitch, or to the Spider’s Web Wheel, but I do like the Chained Feather Stitch couching. In fact, that might have been better had I had the courage of my convictions and made the base that’s being couched about twice the width.
All in all, I had a lot of fun playing with this thread. I’ve now got a much better idea of What To Do and more importantly What Not To Do with it. One important thing to remember – make sure hands are smooth! Silk catches on everything and filament silk does so even more!
Gauze on the Superstructure
This shows the start of the work on the cotton twill which will form the basis for the hull and superstructure. I have used two layers of navy gauze where the shadows need to be darker and cut sections out of one of the layers where I want a lighter shade. The transferred outline – made using an iron-on transfer pencil – barely shows at all, and fades with age, so there is little risk of anything showing where it should not.
As the additional slip for the hull will cover the raw ends of the fabrics, I decided only to sew down firmly those elements that will be unprotected. I found that as I added embroidery and fabrics to my slips-in-preparation, they shrank – not something my books had ever mentioned, although it really should have occurred to me. That is why I ran the gauze down into the area which would be covered by the hull, although I only caught it down lightly. Although there will be padding under the hull, I was afraid that a strongly stitched line might show where it wasn’t wanted.
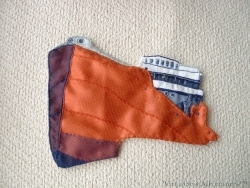
Camberwell Hull
It is hard to see what I’m aiming for in these photos of the work in progress, so in this picture I have overlaid the slip made for the hull on the cotton drill in approximately the correct place to show the general effect I hope to achieve.
It was at about this point that the project woke up and started talking to me.
Before you book my place in an asylum, let me explain: that’s how I describe the feeling of having a near-absolute certainty of what to do next or how to achieve the next stage. Some of my projects never really do wake up, but the Camberwell chattered incessantly for the next several months, even when I decided to undo and redo some elements. When I was in doubt, I found that if I could in some way lay out the choices, they became blindingly obvious as soon as they progressed from imagination to fabric.
That made the Camberwell enormous fun to work on!
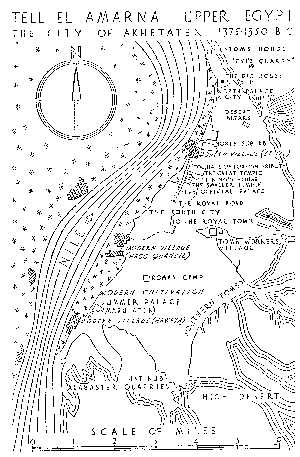
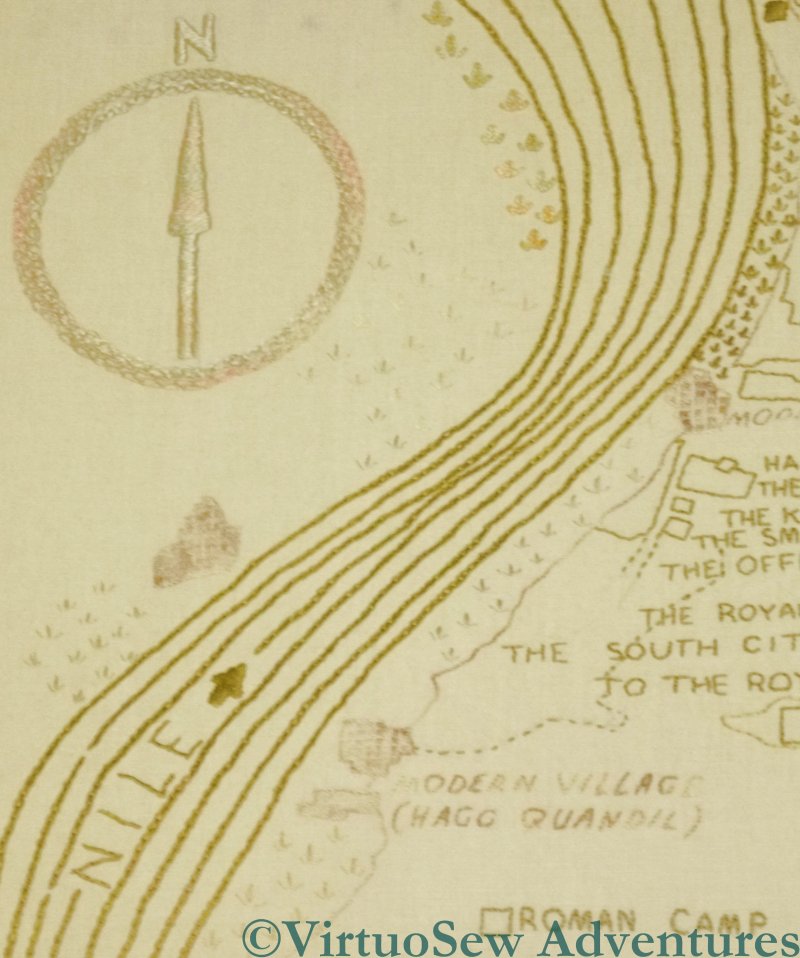
Map of the dig site at el-Amarna
You may recall that the first large element of the panels for Dreams of Amarna that I am stitching is a map of the site shown in Mary Chubb’s book.
It was easy to decide that I wanted to use reverse herringbone stitch for the contours of the high ground around the site, and unbroken lines of chain stitch for the Nile.
The compass rose and the titles were more difficult, although I made a decision eventually.
Now, however, I am near to finishing the text, and I can’t really put off my final decision any longer.
Areas of cultivation are shown on the original map using stars drawn roughly using four strokes. The obvious choice is to use Star Stitch, which exactly replicates the symbol used by the cartographer, but I don’t want to do that.
The aim of my stitching is not to reproduce a painting or a drawing, or even to reproduce those effects. I want to use embroidery techniques to produce impressions and effects that couldn’t be produced any other way, but that are inspired by the subject.
Tricky.
I finally settled on a stitch, after considerable thought and several hours leafing through my (never-ending shelf of) embroidery books – tête de boeuf stitch. But I’m still trying to work out what thread to use, and at what scale. So I’ve worked several test patches, and when I’ve finished the other stitching (the text and the villages), I’m going to wash and iron the whole thing and then sit back and look at them for a while…
This weekend I went to the exhibition “Tutankhamun – His Tomb and His Treasures” at the Museum of Museums near Manchester’s Trafford Centre. Partly just for fun, and partly because Mary Chubb mentions the huge excitement over Howard Carter’s discovery of Tutankhamun’s tomb as some of the “social background”, if you will, in her book “Nefertiti Lived Here”. I was hoping to catch some of the flavour of that excitement as well…

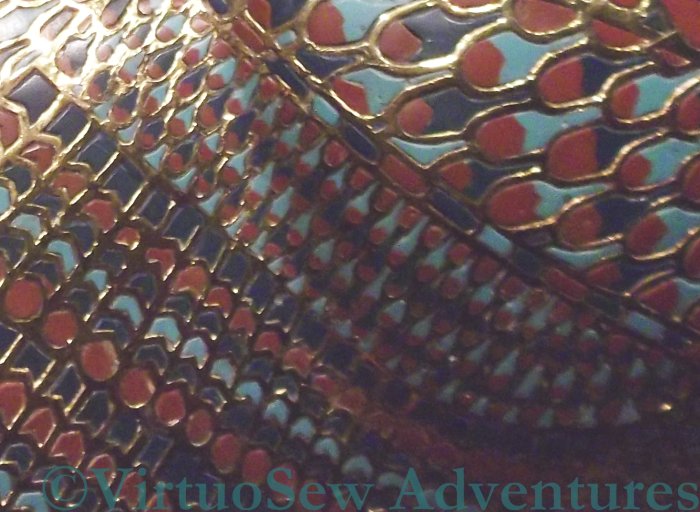
Cloisonne Feather Pattern on the Sarcophagus
It was an excellent exhibition. The usual introductory hall, with panels describing ancient Egypt and the development of Egyptology, but this one also included a reproduction of the Rosetta Stone. I knew that one of the languages was hieroglyphic and the other was Greek, but I hadn’t quite registered that the third was demotic, which was the “workday” script of ancient Egypt, as it were. Then there were films about Tutankhamun, and about Howard Carter, and then we turned a corner and found ourselves face to face with a reproduction of the antechamber of the tomb, just as Carter would have seen it. There is a British Museum page showing one of the original photos here. Except that doesn’t begin to give you any sense of the impact, because nearly every item is covered in gold. It speaks volumes for the self-discipline of Carter and his colleagues that the whole affair did not degenerate into a snatch and grab. I was too startled and overwhelmed to take a photo at this point, although non-flash photography was permitted.
Although I knew, of course, that the tomb contained a mixture of Amarna-period pieces and later pieces, I wasn’t aware that the cloisonné on the middle sarcophagus (close-up above) was an explicitly Amarna period design. So maybe I need to do a small patch using that pattern.
I took quite a lot of photos, which came out, on balance, much better than I expected them to, and may even turn out to be interesting and useful.
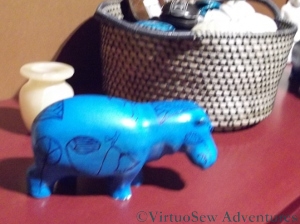
The Hippo In The Shop
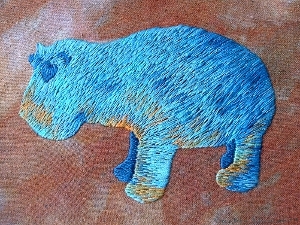
The Faience Hippo Finished
There was a short exhibition at the end which included some of Howard Carter’s watercolours – he was clearly a very fine archaeological artist and illustrator, and then we were sent out though the inevitable shop. Where I couldn’t fail to take one final photo…!

Glittering Snail Ornament
The Glittering Snail Ornament from Stitching A Snail For Storage is Finished!
He was a lot of fun to stitch. I was introduced to silk gimp and silk purl (as I’ve already said, I don’t know what I will use them for, but I’m sure I’ll find something!). I don’t think I’ve ever stitched anything quite so small, either.
Tricia provided the blue silk thread to make the cord, and a silk fabric to back the ornament, although I think I need more practice at making cord, since mine ended up a bit floppy! However, it has now ended up with the whole thing, from hanging loop to tassel, made from a single length of cord, and I am hanging it up in my living room to keep it from getting crushed.
My local art shop sells cutouts of mount-card, presumably for people to do papercrafts with, but I find they make perfect mounts for this sort of ornament. I used one card for the front and one for the back, lightly glued fine wadding to the card and then stretched the fabric over the top (using glue or thread to secure it, depending upon which seems most appropriate). Front and back are then held together and overstitched, and the stitching can be covered with cord.
I used almost exactly the same technique – on a larger scale – when I was mounting “Starbright” a couple of years ago.