
Tudor and Stuart Goldwork Masterclass – Month Nine
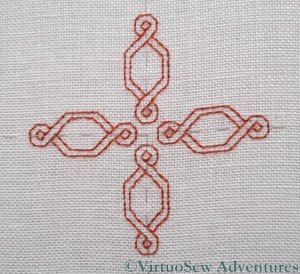
Tudor Pincushion - Stage One
It’s been rather chilly of late, and I couldn’t quite face sitting in the window working on the Spot Sampler, so I spent some time mounting the Tudor Pincushion on a bar frame, and started working on it.
The first thing I did was to part-colour the chart. I’ve never been comfortable with charts, and it’s easier to orientate myself if I have at least some elements coloured in to act as guides. Specifically, I have to colour them in myself, because I’m no happier with printed colour charts than printed black and white charts. I think that colouring the chart myself helps me to understand how the design is put together, and then I find it easier to stitch.
I’ve also tacked the centre lines in. This is something I rarely do – generally I just find the centre, work whatever is over it and then count from that. In this case, there’s no stitching at the absolute centre – not until I start on the metal thread work, anyway – so I made sure that the centre point was marked, at least for the first stage of outlining.
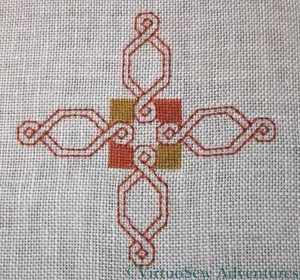
Tudor Pincushion - Stage Two
In fact, as you can see, I’ve already taken out the tacking. At least, I’ve left it in at the edges, but now I’ve got all four of the central outlined motifs in, and worked the first set of tent stitch blocks, everything else can be counted relative to the nearest landmark point that is already stitched.
Since the silk stitching is either in tent stitch or back stitch, it’s not difficult to do, although as it is on a very fine linen – 38 or 40 hpi (holes per inch), I think – I’ve been very glad of my magnifying spectacles!
ooooo….you’ve started.
Is it just me, or do the colours of the silk come up on screen (both here, and on the Thistle Threads website) as being a bit more orange than they are in real life?
In real life, they are more beige range and a true dark red, yeah? Or maybe it’s just how it stitches up……..
I took the full kit to my friend’s Ricky’s place, to show to her and Alison last Sunday. They ooo’ed and ah’ed over the silks, the brocade backing piece (“you mean you’re putting all those stitches on something THAT small?”), (we had Ricky’s Ipod to look at the finished sample at the same time) and couldn’t believe the Japanese needle.
I think I’ll copycat you (what you’ve done above) to start my pincushion, when I do, if you don’t mind. You know how much I am (not good at/hate) counted work. Those comments Mary C has been making about making up the 3 stitch disparity on her tiny piece (the Colbert piece, is it?) have been making me shiver in my woolly socks! (OK, it’s summer here in Oz but a funny cold one and I have perennially cold feet)
I love looking at work on such fine linen. It is so much more defined and delicate.
It’s interesting that you find the colouring process helpful – I may have to try that! 🙂
Oh, I love that graceful Tudor pattern!
I’m afraid that I am one of those “total grid”(tacked into squares) stitchers. I never used to be but then I became interested in Ukranian embroidery and since then it’s “total grid”.
I haven’t even opened the package for the pincushion. But, I love seeing your progress! Looks great.
40 holes per inch??????!!!!!!!!!!!!!!!!!!!!!!!!
¡Ay dios mio!
I would always do the tacking for fabric that fine. It would be so easy to veer off the straight and narrow. (What am I saying? I’ve never gone smaller than 32 count and that was very hard work!) Your colouring in is a great idea. I prefer colour to symbols, but can usually manage with just the symbols. However, one of the charts for the Christmas stockings I’ll be working this year was designed pre-computers, I think. The symbols seem to be drawn by hand and I wasn’t relishing the idea of doing it. Now I shall simply colour it in first! Thank you, Rachel!