Both Edges Reached
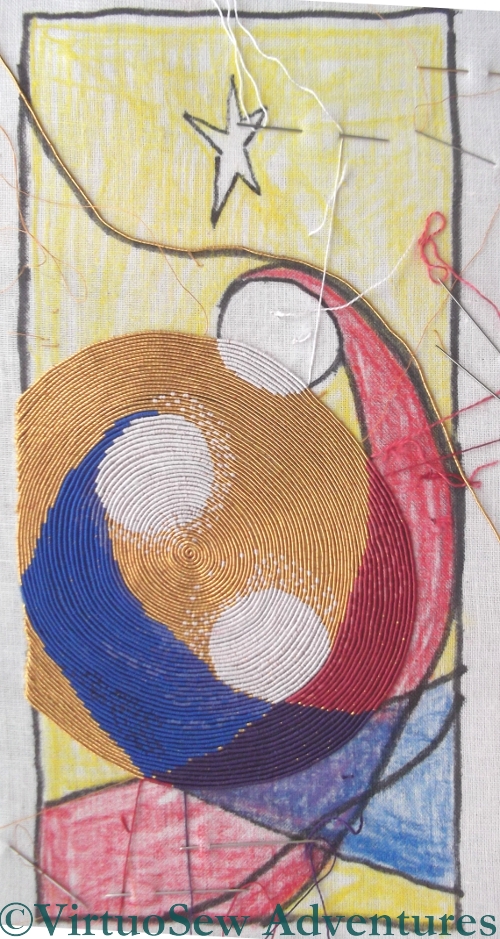
I’ve become rather obsessed with making progress on the Christus Natus Est panel. Now that the spiral is finished, and the gold couching only stretches from edge to edge, that progress becomes easier to see.
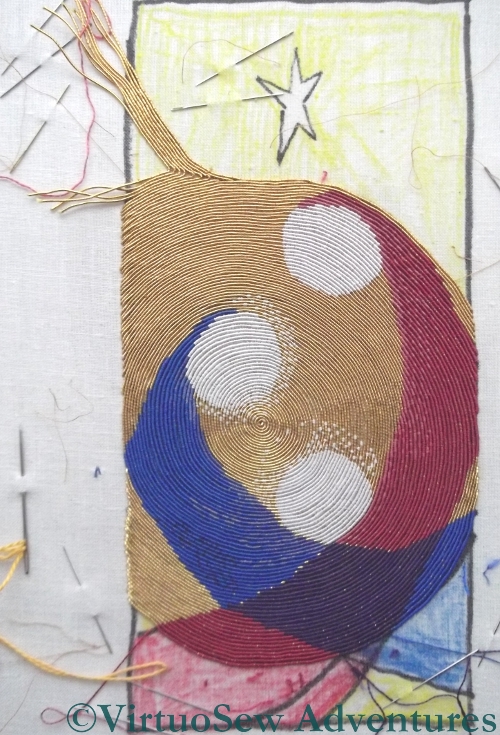
In particular, not only have I managed to finish the top of St Joseph’s head, and run two or three more rows across the bottom of the panel, but I’ve started to fill in the gap between the spiral and the breakaway line. In fact I’m not sure that I am entirely happy with it – I may have begun to use single threads on both sides of the triangular shape a little early, which leaves some gaps in the coverage.
I will have a lot of tidying up and corrective stitching to do, even when the whole fabric is covered with gold. I need to finish the Christ Child’s halo, and put St Joseph’s in place. I also need to correct the curve of the Virgin’s gown, which is a little flat and straight.
I don’t yet know whether I will stitch rays coming from the star. I think that decision will be made only when the rest of the piece is finished.
I’m beginning to think about the mounting and framing of this piece. I think it will need a wide mount, because such a vibrant piece will need plenty of air between itself and the frame. One possiblity involves a mount covered in cloth of gold or gauze, and trimmed with braid or crystals. If I can’t find a suitable fabric, I will have to hope for a mount card in the right shade of gold. A cream mount would look insipid, and a mount in one of the colours would contend for attention with the panel itself. It’s just as well we have a good framing shop nearby!
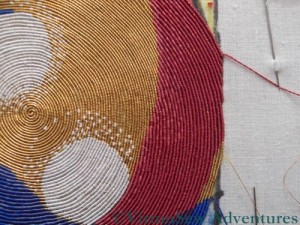
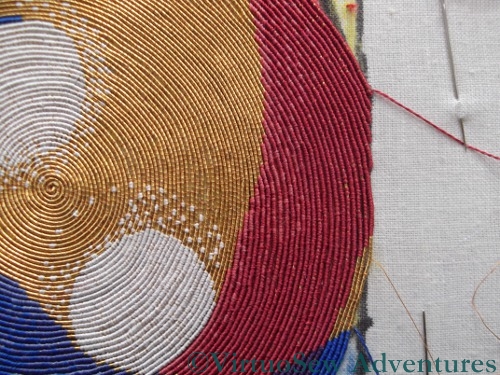
Close-up of the right-hand edge
I’ve been making more progress, and in fact passed another milestone this past week.
I’ve reached the right-hand edge and started to stitch just on the top section for a while. Suddenly it feels quicker, because although I’m making progress at the same rate as before (the stitching itself hasn’t speeded up!) I sometimes manage two or more rows in a session, and the sections of design that are covered are side-by-side, and thus more noticeable.
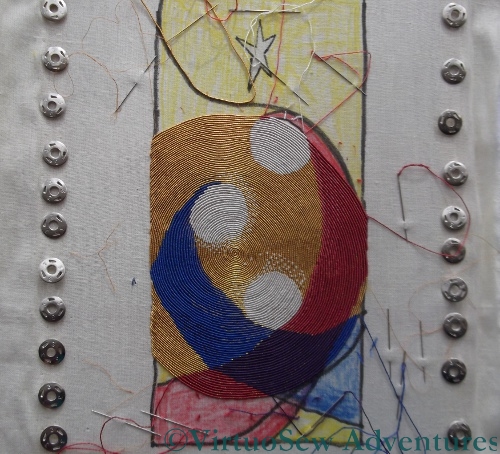
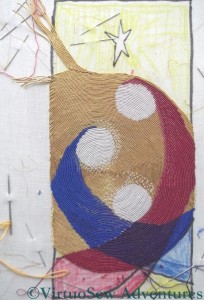
A View Of The Whole
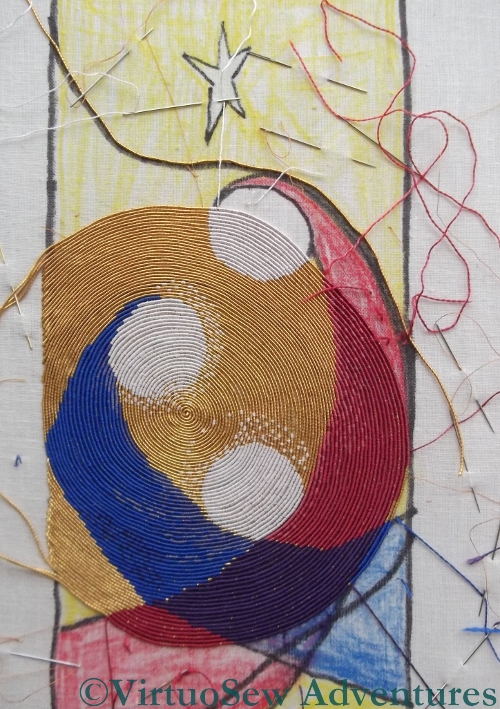
So here is the whole thing to show the progress that I’ve made. I’ve unpicked and removed the line of gold I put in following the black line, because in fact it isn’t running exactly where I want it to, even if it is running along the line I drew.
I sink the threads in batches at the end of a session, which means they don’t slow me down when I’m nicely “in flow”, but it looks neat and easy to understand when I get back to it. When I’ve reached the black line (the correct one!) I shall stop working on the top section and work on the bottom section until that is done, then I will have the last section to work which should go more speedily as there will only be one colour to stitch.
I’m beginning to have hopes of finishing this in time to use it as a Christmas card. Now I just need to work out how to frame it…!
Trial of Interlacing
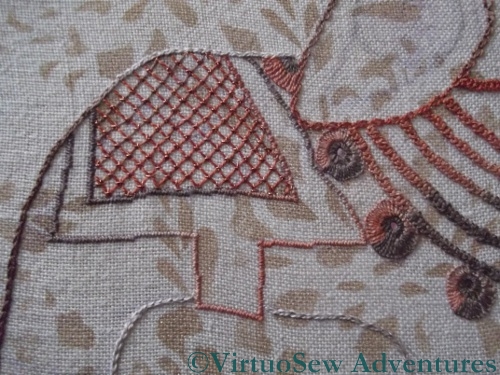
You may recall that last week I said I was thinking of working one of the new interlacing patterns on the Elephant’s saddlecloth. I ferreted around in my box of metallic threads and found several golds and coppers to choose from. Finally I chose a warm copper, and looked up the instructions for the interlacing.
I really didn’t like the look of it at all. Somehow it looked tangled and rather moth-eaten, instead of exotic. Not A Good Look, so out it came.

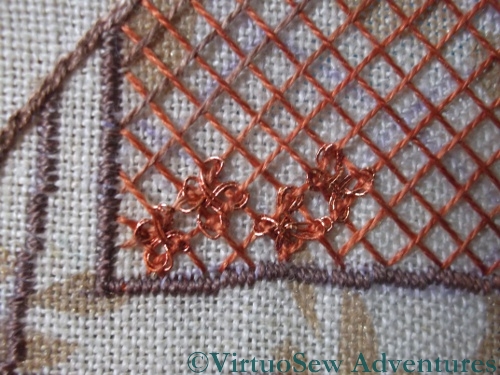
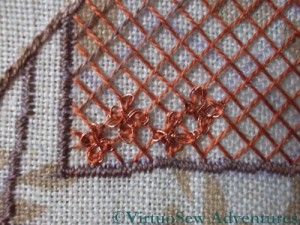
Final Decision
So in the end I decided to use ordinary trellis couching. The couching stitches are upright cross stitches in the copper thread, over a silk foundation. It looks a little dull in the photo, but in real life the little sparkle of copper “lifts” it nicely, and I think it will work well.
You might also notice that I’ve finished outlining him, using the thread that shades from brown to cream. It means that his edges aren’t always emphasised to the same degree, which I think is a good thing.
Artists talk of “light and shade”, and we usually interpret that as meaning simply that the patterns of tone are what build up a recognisable image. To an extent that is correct, in that if the tones are wrong, a picture won’t work well. When we are talking of a design of lines rather than shapes, however, it’s less obvious what we mean. I am trying to create a pattern of varying densities of stitching as well as colour, and in the end what I hope to have achieved is a pleasing rhythm for the eye to follow, not “sticking” anywhere, but not frantically jolting from one part of the design to the next.
Tricky!

Another Landmark on Christus Natus Est
I’ve got to the point where the lower ends of the robes of Mary and Joseph have both been started, which also brings me very close to the other edge of the panel.
It’s been a little slow of late, partly because the weather has been frightful – grey and overcast. Stitching goldwork in bright sunshine is a recipe for eye fatigue (learn from my mistakes, Gentle Reader!) but at the same time the rich red of Joseph’s robe and the purple of the Christ Child both become quite difficult as the day turns darker. I’m finding that if I want to make progress, everything else has to come second to doing a row or two when the light is good. Sometimes I’m so busy doing other things that I only realise quite late that I’ve missed the best of the light. Very frustrating!
The other reason it has been slow is that I have so many needles in operation – ten of them! Every change of colour means putting one needle aside and picking up another, and while this is a tangible demonstration of progress, and therefore welcome, it does rather slow me down!
I’ve been talking recently with a friend who has been trained in icon painting, and it’s fascinating to hear about the layers of meaning and symbolism in the materials, preparations and even in the process. I’m working so hard on developing a technique here, that I’m not necessarily managing to turn my version into a spiritual exercise as well, although I do sometimes feel that I’m not a million miles away from stitching-as-meditation.
Well, St Benedict said “Laborare est orare” (“To work is to pray”). So maybe I’m onto something, after all.
You can tell that the Elephant’s inspiration was the right one – suddenly he’s taken off!
The Elephant Collared
I’m using one set of variegated silk thread (shading from orange to brown) for the harness and headcloth and saddlecloth, and another (shading from cream to brown) for any small bits of the Elephant that show through all his finery. I shall have to redraw his head and headcloth – the transfer has rubbed off – but I’m pretty pleased with progress.
The collar is worked in six rows of braid stitch, which is a stitch that always looks better in a round yarn like this silk perlé. The roundels hanging from the collar are two rows of buttonhole stitch, and the roundels on the ear-covering are spiral trellis stitch – at the moment. I’m not quite sure that they are right. I first used Spiral Trellis on the Jacobean Work Panel, and really enjoyed stitching it, but I think these look too fussy. One big one might be better, and it would allow the colour change in the thread to show a little more.
I’m glad that I have worked out something to do next, as his anklets are giving me trouble.They are smooth and domed in the original model, but I think satin stitch might look a little ordinary.
I’ve used small satin stitches to outline the border of the saddlecloth, but only because I wanted something quiet to contain the excitement I intend to put inside it – I’m planning to use one of the complicated interlacings from the Tudor and Stuart Goldwork Masterclass for the saddlecloth, but extended to form an all-over pattern.
Watch this space…!
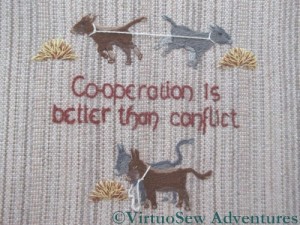
Cooperation is better than conflict
I suppose you could say I inherited this panel. A local embroideress died, and her daughter gave me (and I believe many others!) various bits of her stash. This was nearly, but not quite, finished. I’ve now finished it and haven’t the vaguest idea where to put it, as I’ve no wall space to spare!
It is based on one of the panels of the Quaker Tapestry, which is a fascinating piece of embroidery depicting the history and development of the Society of Friends. The woollen fabric was woven especially for the project, and the kit included not only the woollen fabric, but the cotton muslin backing that they recommend to stop the fabric puckering.

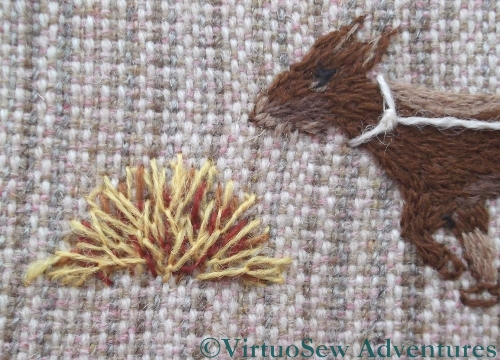
Fly Stitches For Hay
I was delighted that the lady was willing to give me this piece to finish, because we had seen the Tapestry (which, like the Bayeux Tapestry, is an embroidery!) during a visit to Kendal a few years ago, and I was fascinated by the variety of the stitches used, and very impressed by the general level of skill demonstrated, considering that it was embroidered by many groups of people.
In fact this kit doesn’t employ the whole variety of stitches used in the Tapestry, but I liked the use of Fly Stitches for the hay, and the use of the long taut straight stitch for the rope between the donkeys is just like my use of the same technique in the Camberwell’s rigging!

The Tulip Slip Pincushion Completed
I have finished the Tulip Slip Needlework Nibble. I used a sewing machine to attach the silk brocade backing to the silk velvet front, because my fingers were still shredded from finishing the Floral Glove Needlecase, and the velvet was very hard to stitch.
The amount of stuffing needed for even quite small items never ceases to astonish me. By the time I finally managed to finish stuffing this one I was wondering whether it opened into the Fourth Dimension!
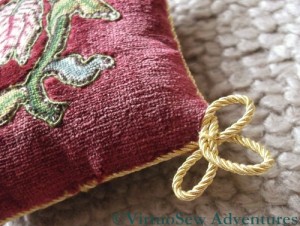
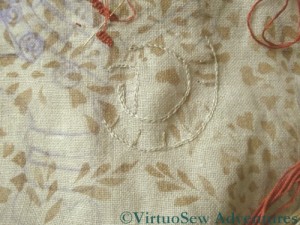
The Tulip Slip Pincushion - Corner Detail
The corner detail shows the trefoil shapes in gold cord used to finish the piece. Those, too, were rather a challenge. I was rather wishing for a third hand to help me hold the loops in place while I attached them, and as you can tell from looking at the whole thing, some of the loops are loopier than others.
The corner detail also shows more clearly the effect of the silk gimp outline which creates a crisp edge for the shape, and helps to keep the pile of the velvet from encroaching on the tent stitched Tulip.
This was rather fun to do, and it will make a great addition to my planned “winter decoration corner” of historical needlework projects…
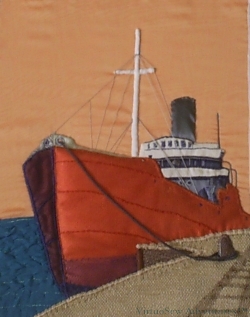
Moored At Last
There were a few final details to be added to the panel while we discussed the wording of the border, and tracked down suitable materials for working it. These are things like the radio mast and framework beside the superstructure which were worked in a mid-toned, matte grey cotton. The radio mast is in broad chain stitch, which produces a smooth and heavy line, while the framework is in whipped stem stitch which produces a more rounded effect.
Then even more importantly, there was the mooring line. In reality there would be one fore and aft and possibly another amidships, but there is such a thing as too much accuracy!
I tried several ideas, such as crochetted single chain, or even a heavy, single thread, but I finally made the mooring line with mid grey pearl cotton, using a lucet. This is an ancient technique which produces a strong, square braid. It was looped twice around the bollard (which is layered with gauze and padded), and then the free end was whipped to the standing end to simulate the looped cable that would be the first thrown to the quay on mooring. It is only attached at the ends (that is, where it is lead through the scuttle at the bows, and by the bollard about which it is wrapped). That means that it hangs in a fairly natural curve, although it is also both heavy and stiff enough that it has held that curve through the process of framing and transport of the finished article.
Can you tell that my grandfather, too, was a Master Mariner?
Needs More Thought
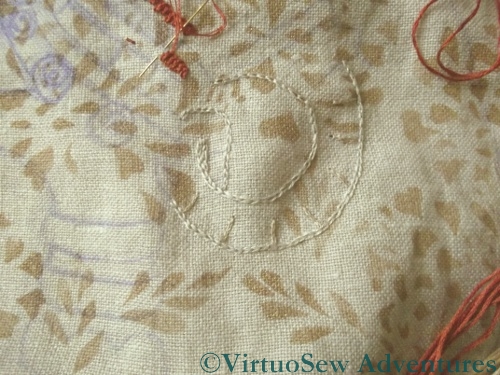
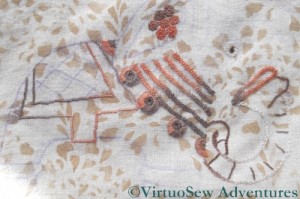
I originally decided to use plain stranded cotton for the Elephant Doorstop, in colours chosen to match the curtains in the living room as closely as possible.
However, once I started stitching I rapidly came to the conclusion that that just wasn’t going to work. We don’t want the Elephant to cover all my careful stencilling, but at the same time, he needs to show up. And he looks pretty hidden, here, as you can see. What’s more, I wasn’t enjoying it, and picking stitches was proving troublesome. I knew I wanted to stitch him – revisiting the original inspiration has been in the back of my mind for a while – but somehow, not like this.
There are two things I need to think about – the colours, and the weight of the thread. The creamy colours we chose are too light to show up well against the rather busy stencilled background, and although two threads of stranded cotton would be fine on this fabric, if it were a plain fabric, it is rather fine. Furthermore, one of the stitches I want to use is braid stitch, which is always a bit tricky in stranded cotton.
I’d already unpicked this section twice before I came to this conclusion, and I was beginning to feel rather anxious in case inspiration flagged completely. Then out of the blue, I was deafened by some triumphant trumpetings.
“I know what to do, I do!”, said he.
“What, then?” said I.
“Use some of those variegated silk perlés you’re always looking at. You can do any stitch that takes your fancy, the colours shading in and out will give you the lightness of effect you want, and – Ta-DA!”.
So now I’ve been told….!

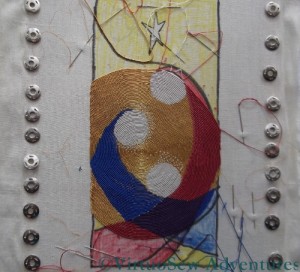
Christus Natus Est - More Progress
Since the Christus Natus Est panel seemed to be so popular, I thought I’d provide another update.
As you can see, the curves that indicate the Virgin’s robes aren’t right at all. I can correct that later, rather as I will correct the Christ Child’s halo – and indeed, put in St Joseph’s halo, which I decided not to attempt to include in the first stitching, because the other two haloes presented such challenges!
You can see that I have loads of needles working with all the different colours of silk and several sections of gold. It’s always more difficult working from the far end of a colour section (relative to the direction of the spiral) and using more than one colour on the robes has helped me there, because I’ve usually managed to have at least one of the colours placed in such a way as to help by catching the gold thread in place. Otherwise, because it is so springy, it’s hard to keep the curve smooth, and in a couple of places the thread is longer than it should have been and creates a slight gap with the line before.
Don’t those rows and rows of gold create a gorgeous background, though!