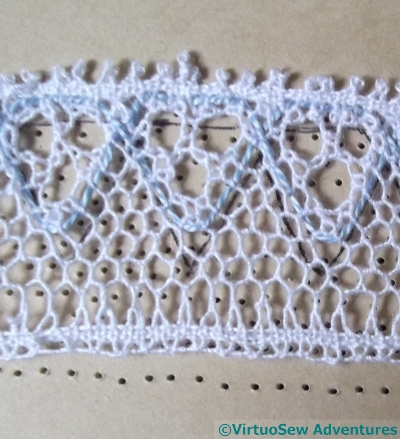
Sleeve Lace
Report Number Three, including a hiatus or two…
The choice of this lace pattern is teaching me to use two gimp threads and to create a honeycomb effect – training me for the more complicated lace for the edge of the dress. I had a bit of a problem with this as I have the designated pairs of 15 bobbins plus the gimp and seem to be one pair short in the ground. After taking it out three or four times, changing where I hung the bobbin pairs to see if that made things right, the problem didn’t disappear so I developed my own fudge which seems to work!
(Inset: I even asked for help on Twitter, and everyone was as flummoxed as we were!)
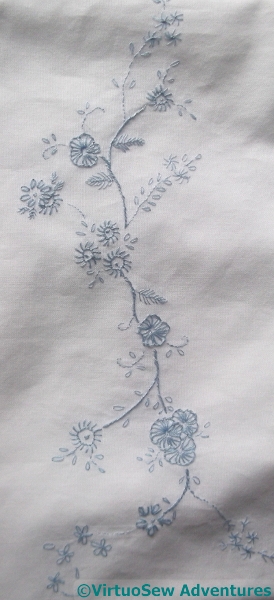
Embroidery For Dress
Despite the complications above, I completed the first stretch of fudged lace for the sleeve in two weeks! I think that is because I am now lace-oriented, so that instructions are more readable, need less working out! Obviously, I’ve misread something, or I wouldn’t have to fudge – maybe the second piece of lace will resolve the matter. This project is taking less time than I thought it would, though I can see the final stretch of lace for the dress itself taking a lot longer.
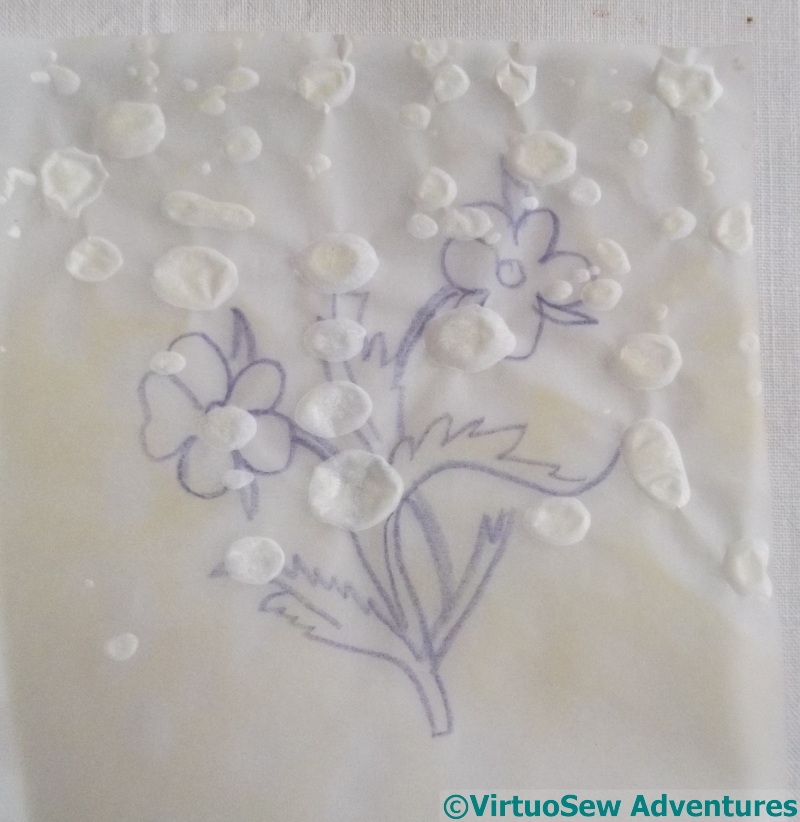
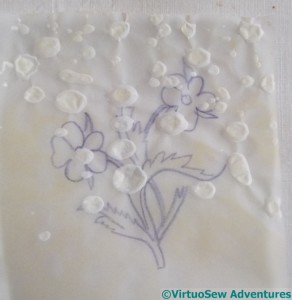
While I was working on the lace for the dress, I made and embroidered it. Topsy’s long dress is embroidered across the skirt and on the sleeves. I kept the embroidery on the dress simple. Blue is my favourite colour and it goes very well with her dark skin. The design is built up of small transfers arranged to give a pleasing flow – and the stitching not too varied. As she is a baby doll, a light touch in the design and in the stitching seems appropriate.
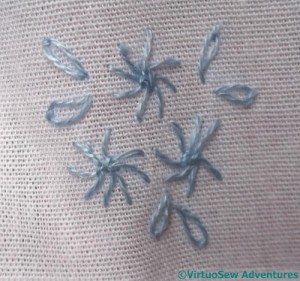
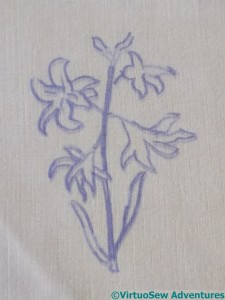
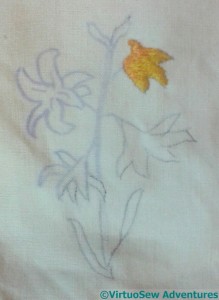
Sleeve Embroidery
So, the larger flowers are either Blanket Stitch or Reverse Blanket Stitch, the smaller ones suggested in Lazy Daisy, as are some of the leaves. The larger leaves are in Feather Stitch. The main stem is, not surprisingly, in Stem stitch while the thinner ones are Backstitched.
Long-standing readers may recognise the flower forms from the Flowered Blouse I embroidered using transfers from one of my issues of “The Needlewoman” inherited from Grandmama….!
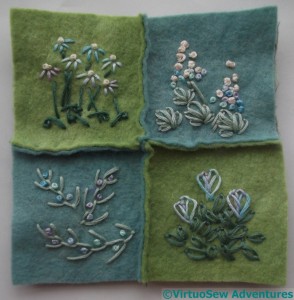
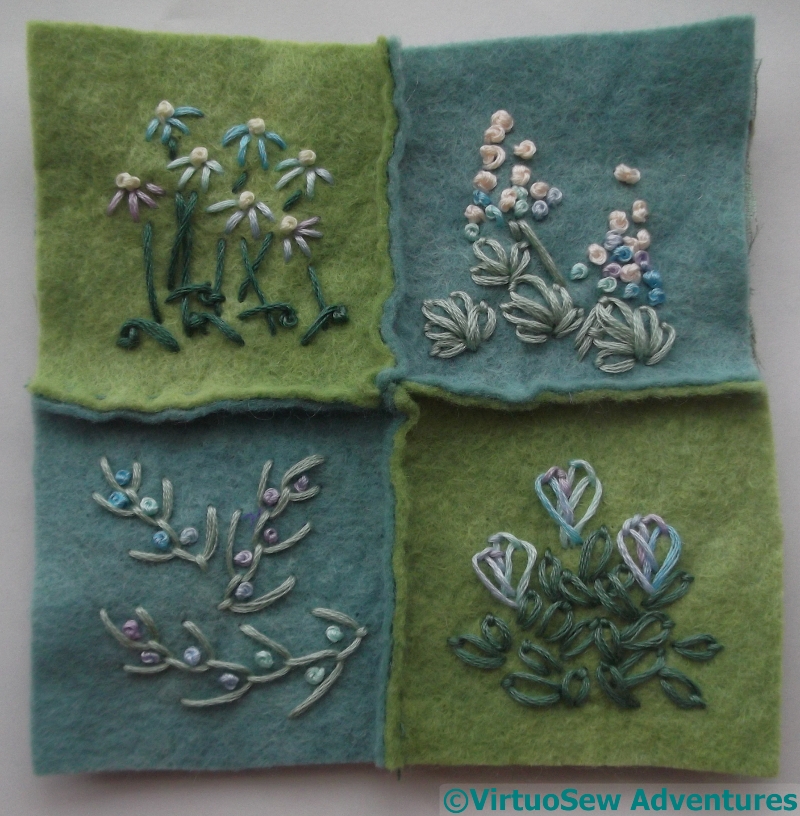
Four Stitched Panels
I decided to create a chequerboard effect for the pincushion. The four panels are stab-stitched together with the raw edges visible. I think that makes for an interesting effect, although it can be over-used.
The first panel has a few French Knots, lots of straight stitches, and some singleton scroll stitches around the base of the stems.
The second is lots of French knots, and palmate leaves made of lazy daisy stitches.
The third is primarily lazy daisy stitch, with the flowers made using blanket stitch.
The four panel is feather stitch with French Knots.
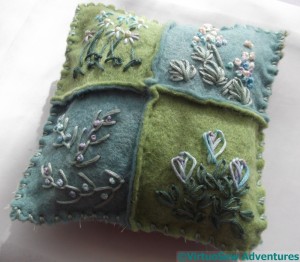
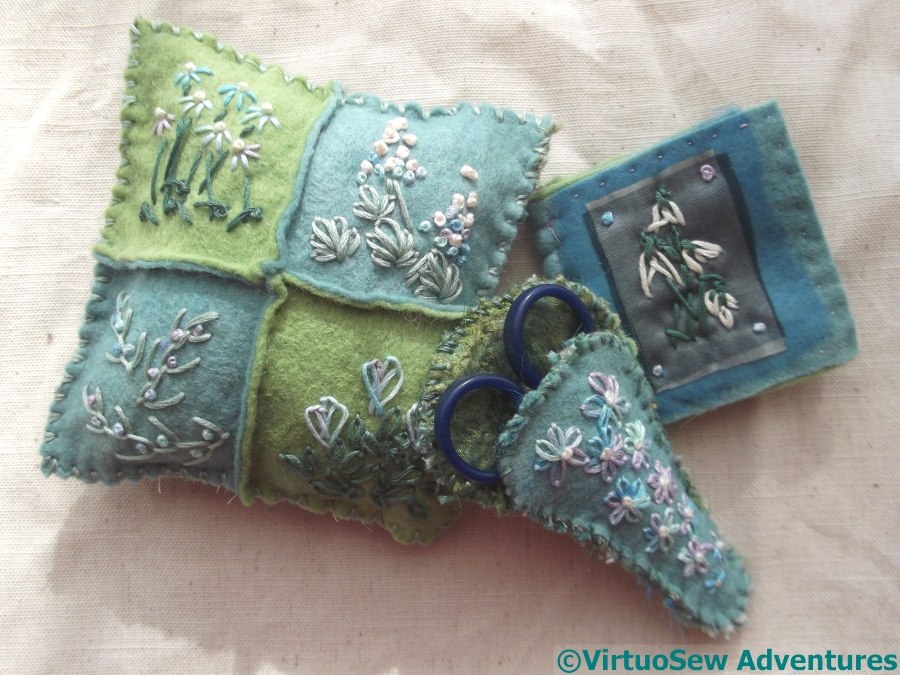
The pincushion
The pincushion is only lightly stuffed. I felt that somehow stuffing it to the point of solidity wouldn’t be quite right, although I don’t know why.
In this case I closed the edges with glove stitch. This is really a sort of variant on overcast stitch, so it isn’t difficult, but – even with shaggy bits of embellished fabric appearing around the edges! – it gives a slightly more “finished” effect.
One of those details that most people don’t consciously notice, but it still has an effect…
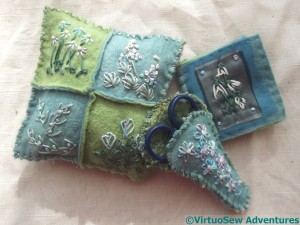
The Set
The finished set looks cheerful and springlike, in spite of the increasingly distant relationship between the stitchery and the spring flowers that inspired me.
I’m rather pleased; even if it took me months to find the inspiration, the final result makes me smile!
From The Back
I’ve reached a sort of sticking point with the Modern StitchOff project, so I’ve decided to pause and think about it.
I took the blanket outside (all four and three-quarter pounds of it!) and hung it on the washing line to stare at, and photograph for you.
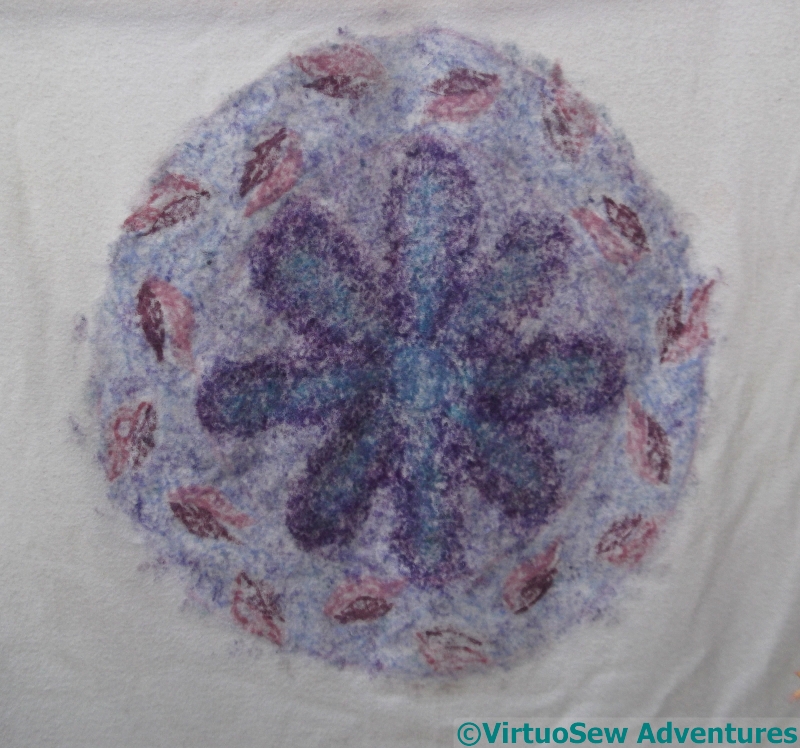
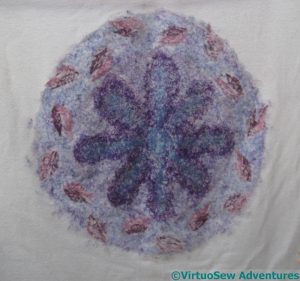
This is the reverse side – that is, the side you don’t see when sitting at the embellisher, trying not to break needles.
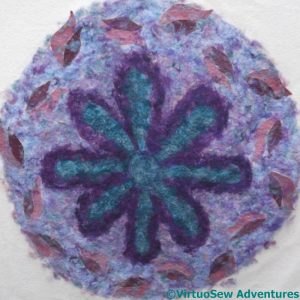
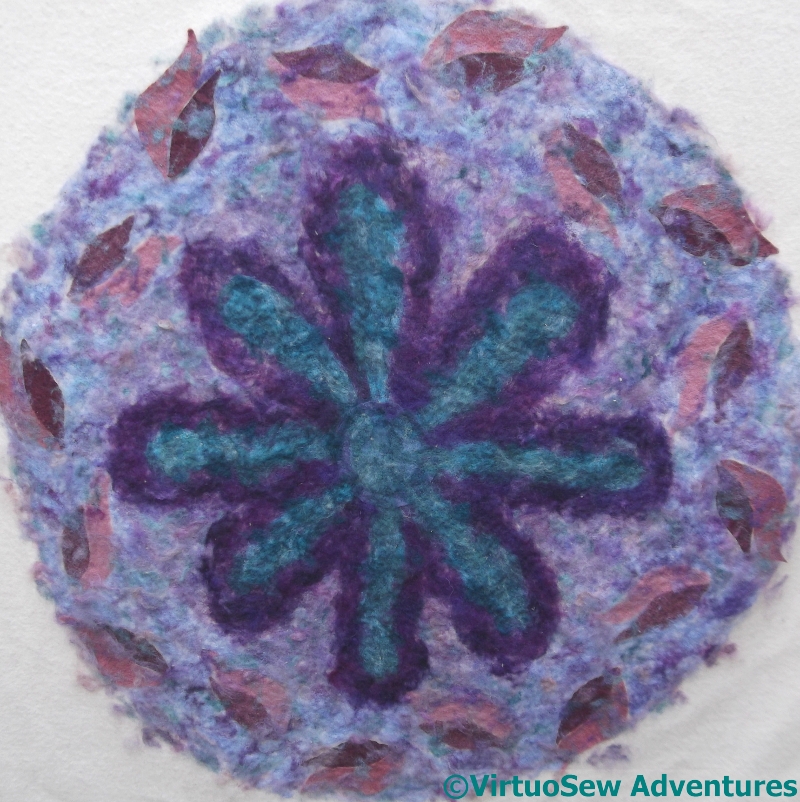
From The Front
This is the front. It can be quite fluffy – the hexagonal net keeps fibre in place while embellishing, but at the cost of sometimes failing to realise it hasn’t been firmly enough attached. I’m learning that I need to make a first pass with the net, trying to be thorough, but then take off the net and go over the same area again.
I’m also noticing that although I used two different types of felt for the leaf shapes, and they behave differently under the needles, the effect on front and back is sufficiently similar that in future I will pick the felt which felts easily (if you follow me!).
-
-
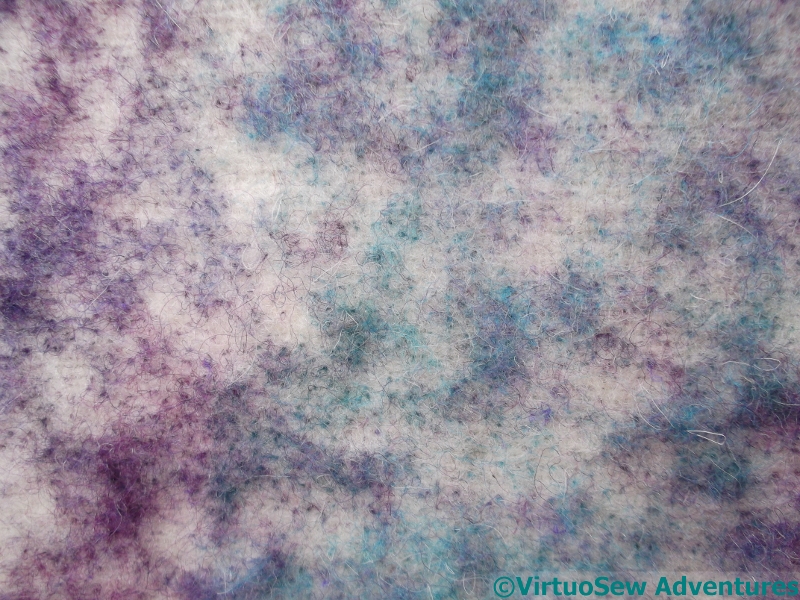
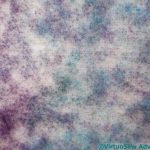
Detail – Back
-
-
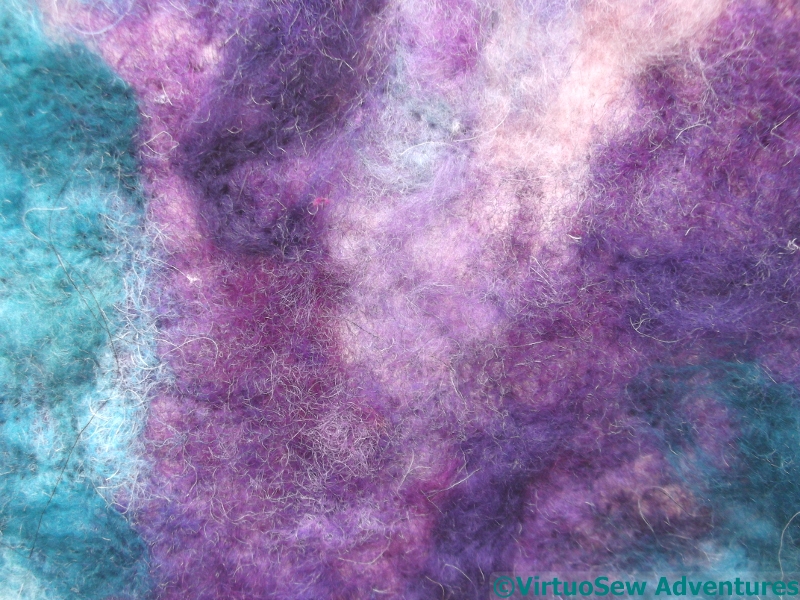
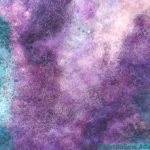
Detail – Front
The reverse has a rather intriguing spotty effect. When there’s only one layer of embellishing it is easy to see that it is one tiny dot of colour for every needle (which makes sense!). The front varies rather more, sometimes flat and densely textured by the needles, sometimes fluffy and fly away.
My challenge now is to work out how to extend the colour and texture to the rest of the blanket, and then to decide, do I add some lines of roving, and if so, how. Although if anyone suggests using a hand-embellisher, my howls of outrage will be heard by NASA’s “Juno”!
Don’t Do This
One of the few things that made being poorly tolerable when I was a small child was the way my food arrived – on the good china, on a tray, covered with a traycloth. A hand embroidered traycloth, no less!
It wasn’t enough to encourage me to malinger, I hasten to add. But anything to give the invalid a lift…
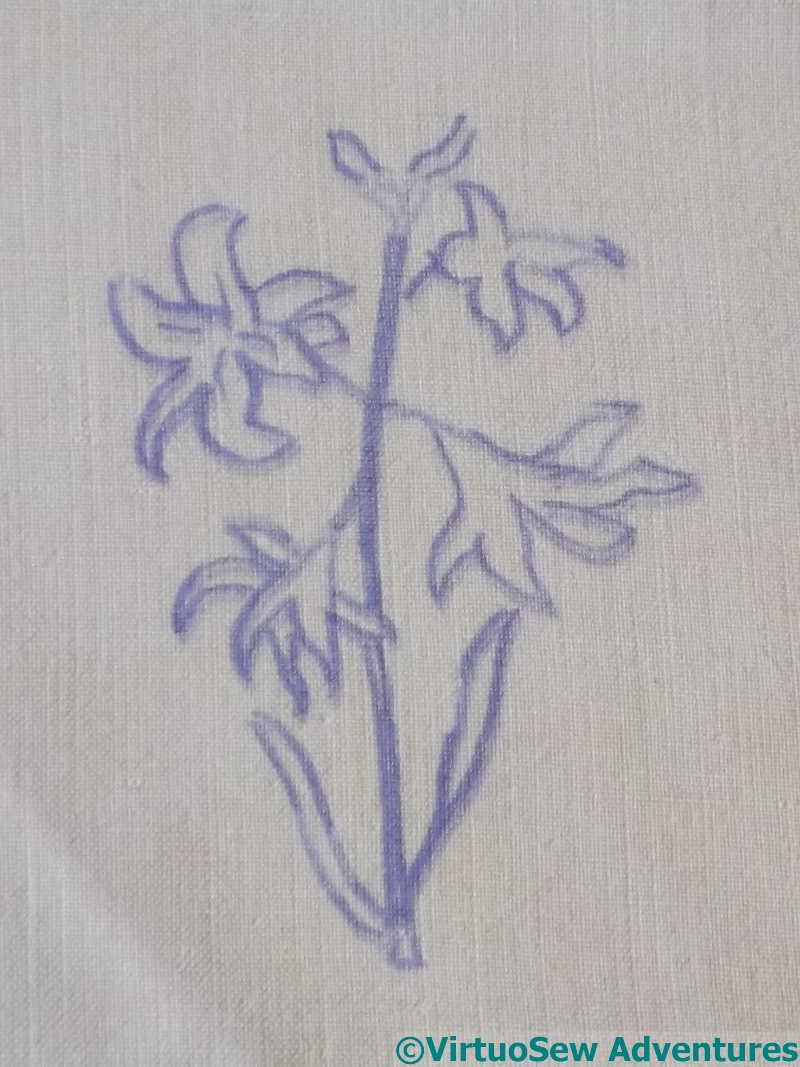
Not surprisingly, the family stock of traycloths is somewhat reduced since those days, many of those traycloths having disintegrated after long and faithful service, so I though that I would use some of the flower sprays found among the Lady’s Magazine Stitch Off patterns to embroider some more.
I decided to make my own transfers, and promptly discovered a forgotten hazard that I should have added to that post on Transferring Designs. Whatever you do, if you are using a steam iron, Switch Off The Steam! Not only is the transfer not usable again, it didn’t work the first time!
Flower Spray
Once I’d got the steam switched off, things improved, and I got two sprays transferred onto diagonally opposite corners of a traycloth I found lying around, unadorned. It’s linen, too, so I’m amazed it has taken me this long to embellish it!
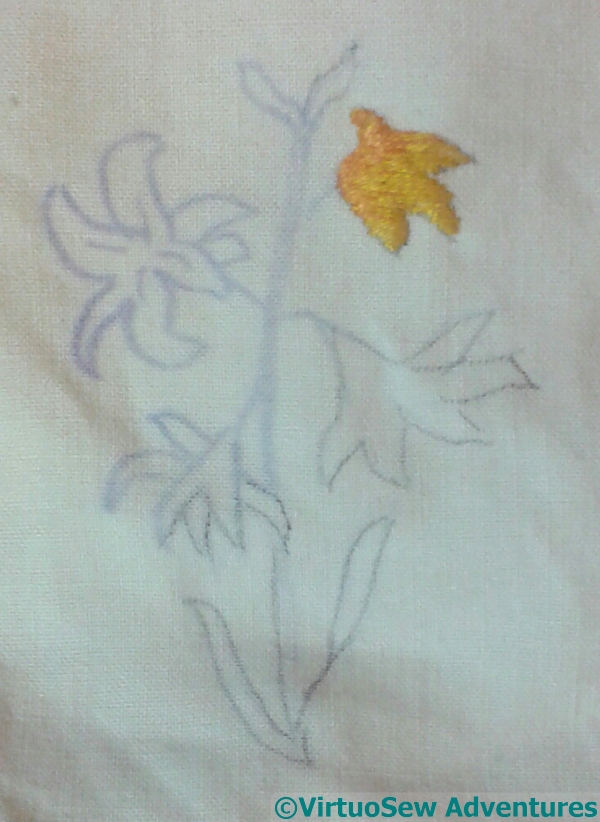
Starting The Spray
I’m no botanist, so I can’t hazard a guess at the flower this is intended to be. It may not be intended as anything up a pretty combination of shapes, of course, in which case any eccentricities of stitching are unlikely to matter very much..
I’ve decided to go for some bright, cheerful yellows – to cheer up any invalids who might see it!
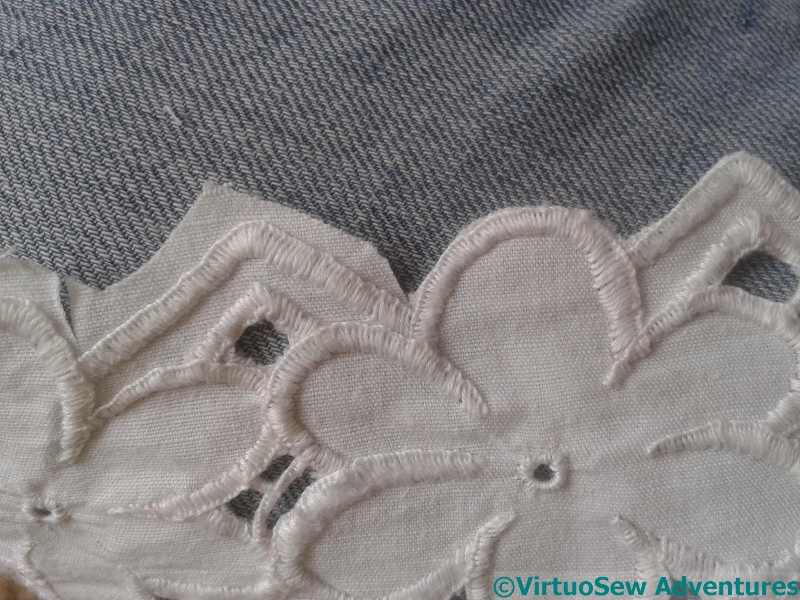
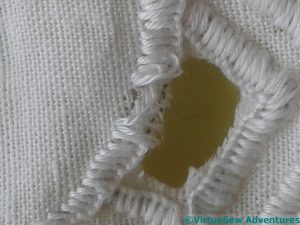
Stretching the Azorean Cutwork
It has taken a long time, but I have finally finished the miles of close blanket stitch, the buttonhole bars, and the eyelets on the Azorean Cutwork, which I began in 2013. The idea was that it would be a good travelling project, but it really wasn’t. White on white rather needs good light, and good light is one of the things I rarely get when travelling.
I threw it in the washing machine, and stretched it on a cork board as soon as it came out. Already it is looking better!

Stretching Azorean Cutwork – Second Time
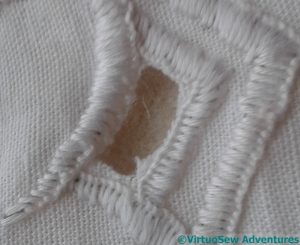
The next stage was to cut out all of the internal spaces, and then wash and stretch the piece again. The cutting is fiddly, and a bit anxious (what if I cut through one of those buttonhole bars? what if I cut through one of the edges?) and it seemed to me that it would be a good idea to be able to stretch it out to see whether I had damaged something. The edges allowed me to do that.
Some of the sections I was plainly too nervous to cut out well enough, so I was also hoping that agitation in the washing machine would help settle the stitching and slightly fray the edges that need more trimming.
Oh dear!
Repaired
Then there was some repairing to do. This wasn’t the only section that needed repair, and they actually didn’t take that long, but there were a few growls, all the same!
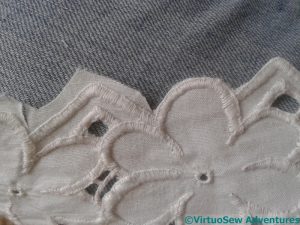
Trimming The Edge
Next I had to trim the edges. The challenge lay in finding the right pair of scissors. I have loads of pairs, but what I really need is a sharpener. So many of them are only sharp at one part of the blade, and then the fabric simply gets chewed. “The scissors ate my homework” may sound eccentric, but it certainly felt like that!
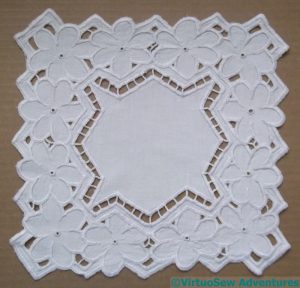
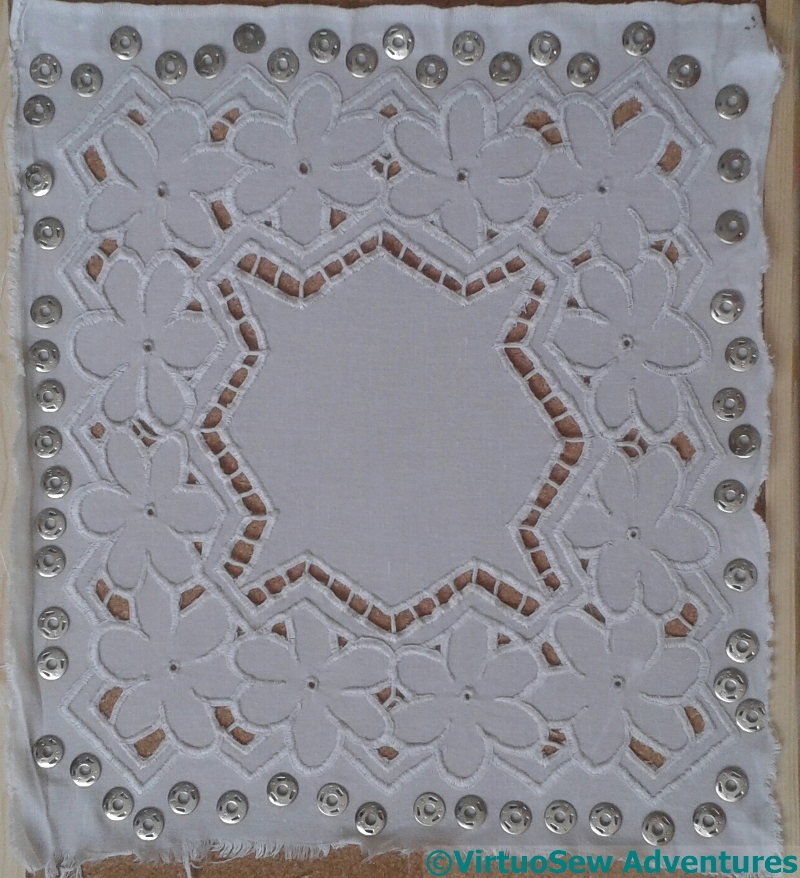
Azorean Cutwork Finished
Washed (yet again!) and ironed, I have finally finished it!
I may have some more repairs to do, when it’s had a little use, but in the meantime, it was an interesting exercise, if rather more fun in retrospect than it was at the time. I would do the buttonhole bars differently another time – they went too deeply into the borders, and caused a lot of muttering!
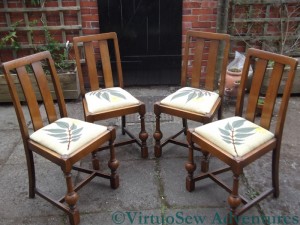
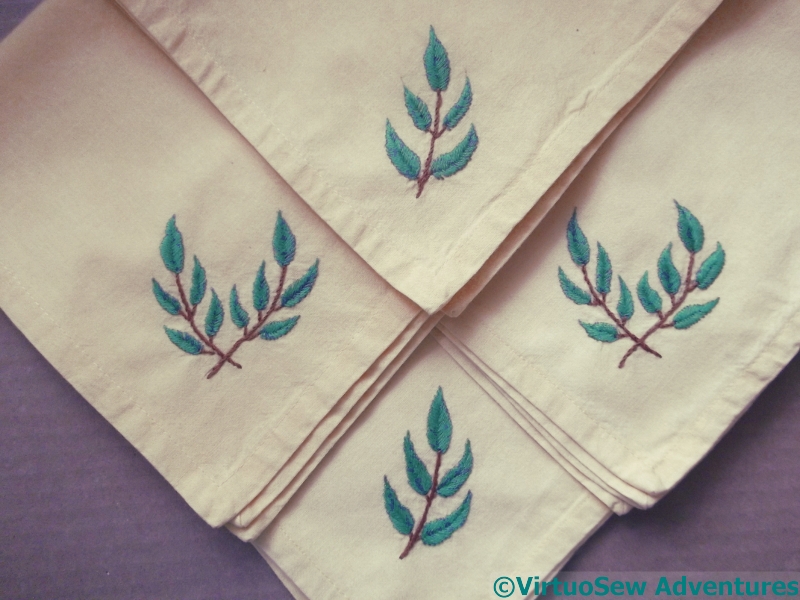
Finished Chairs
Some of you may remember the dining room chairs that I finally finished about four years ago. The Eucalyptus pattern – which is similar to a frieze I stencilled above the picture rail – is a nod to my husband The Australian, and I have been intending for some time to work some napkins echoing the pattern.
In fact, I found some yellow cotton napkins and bought them some time ago, but didn’t get around to doing the embroidery until now.
I only got around to it now, because my back went into spasm a couple of weeks ago and I’ve been alternating stretches with sitting still in hopes that it would recover. The blanket is too heavy, and I can’t sit upright at a frame, so I’ve been casting around for embroidery to do in the hand….
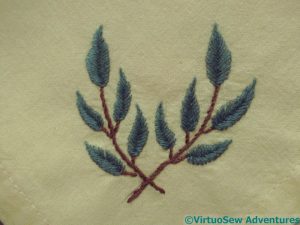
Double Branch Motif
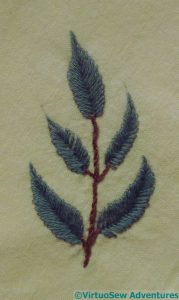
Single Branch Motif
Since there were four napkins, I’ve done two in a double branch motif, and two in a single branch motif, which I sketched out freehand, and then traced and transferred with prick and pounce.
The singles took an evening each, and I think the doubles took two – instagrammers will have seen them in progress.

Eucalyptus Napkins
What hasn’t worked at all is the photography. The napkins are a lovely bright, warm, golden-yellow, and I’ve not managed to get a true colour from either my smart phone or my camera.
But I assure you, they look delightful, and very appropriate in the dining room, echoing the golden yellow of the walls below the frieze, as they echo the pattern above it…

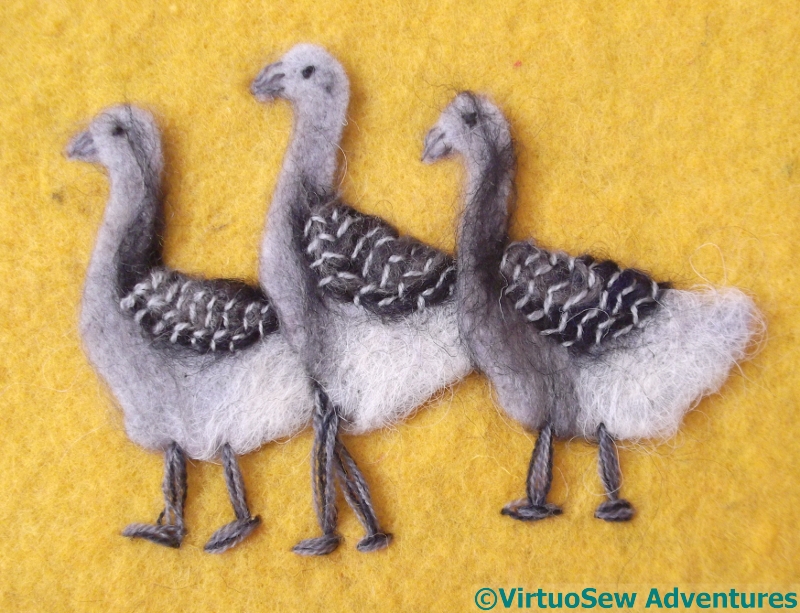
Detail Added To The Geese
I’ve started adding more detail with needle and thread. The chevron pattern, the eyes, and the detail on the beak are all made using straight stitches in single strands of Appletons wool. I can’t think where I got a whole series of greys, unless it’s from hand-me-downs. I’m glad I have them now, but it isn’t a colour I much like and I can’t imagine going out and buying them!
For the legs, I have used three different colours of wool in the needle. I can see that for all my staring at photographs and trying to sketch, I’ve not really got a clear or accurate idea of the details of goose anatomy! And somehow, for all my care in placing the cut out felt geese, they’ve ended up attached in not-quite-the-right place.

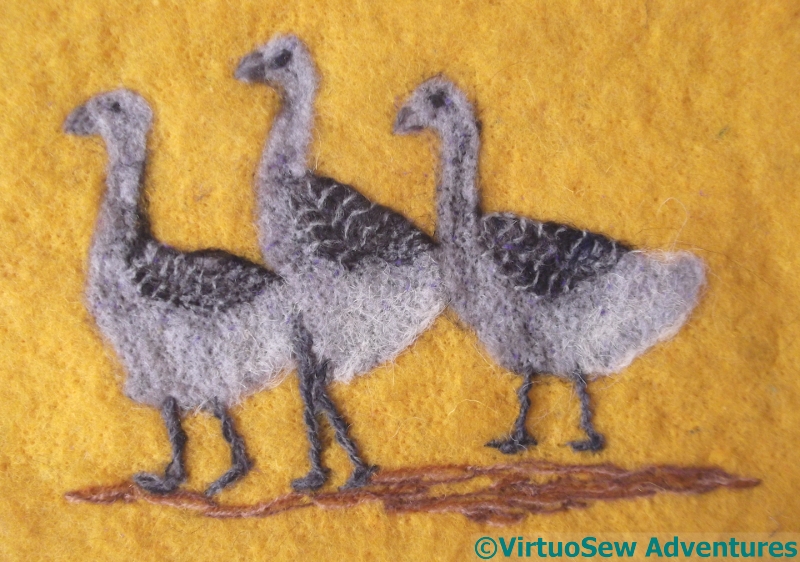
Geese Needlefelted
Still, let’s not despair.
I’ve also added some ground below the the geese. Three strands of different colours of wool, again. I did a sort of loopy knot stitch crossed with a split stitch, which I couldn’t reproduce if I tried. But it produces a very good broken-ground effect, so as long as I don’t decide I need more ground, we’ll be fine.
Then I sat down at the embellisher and tried to blend the fabrics together. This meant quite heavy embellishing, but fortunately the fabrics are none of them dense, so there was room for the fibres to mingle.
When I noticed that the legs weren’t getting caught in, I twisted some more threads around them. That’s better.
Then another pause. Do I add leaves, to match my vague memory, or shall I leave well alone?
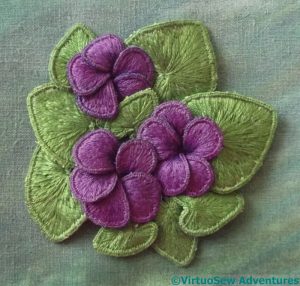
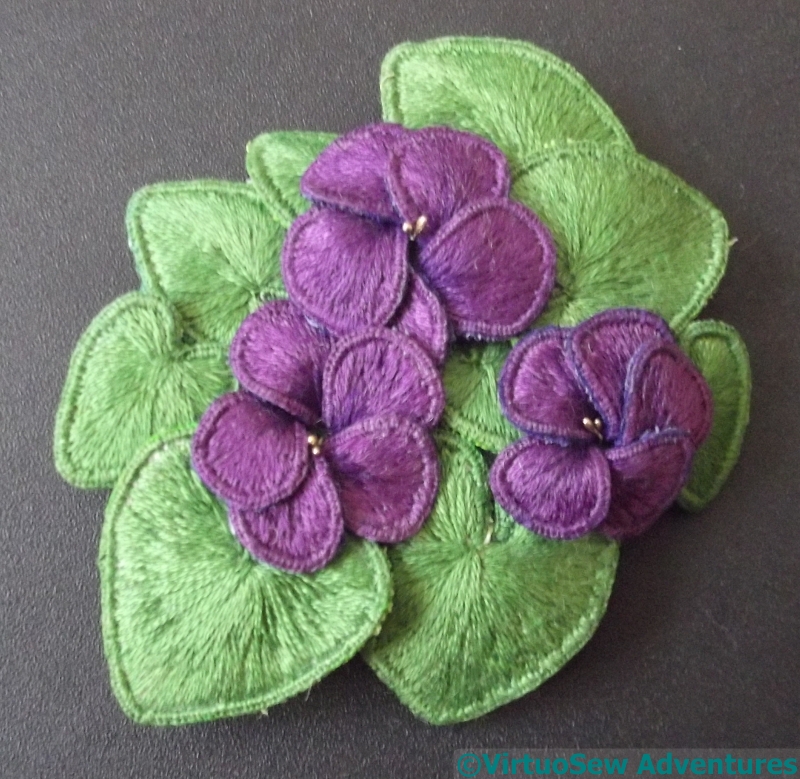
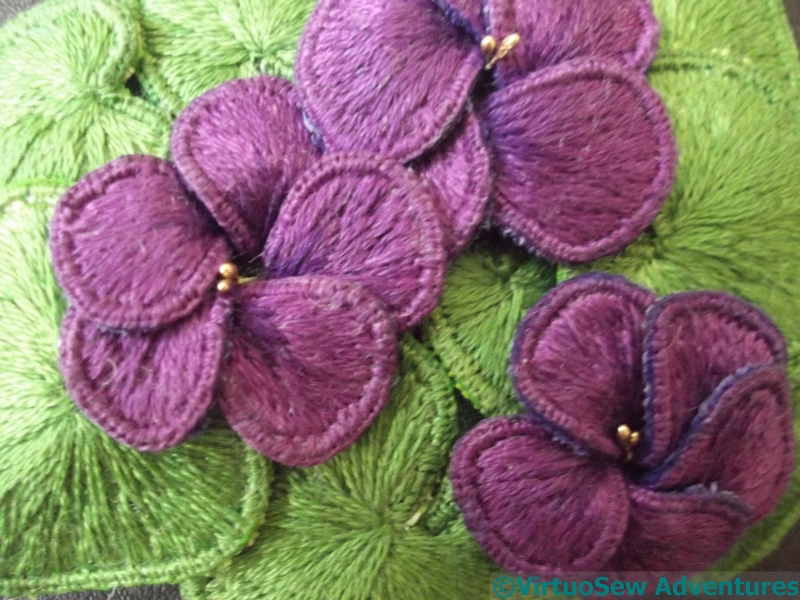
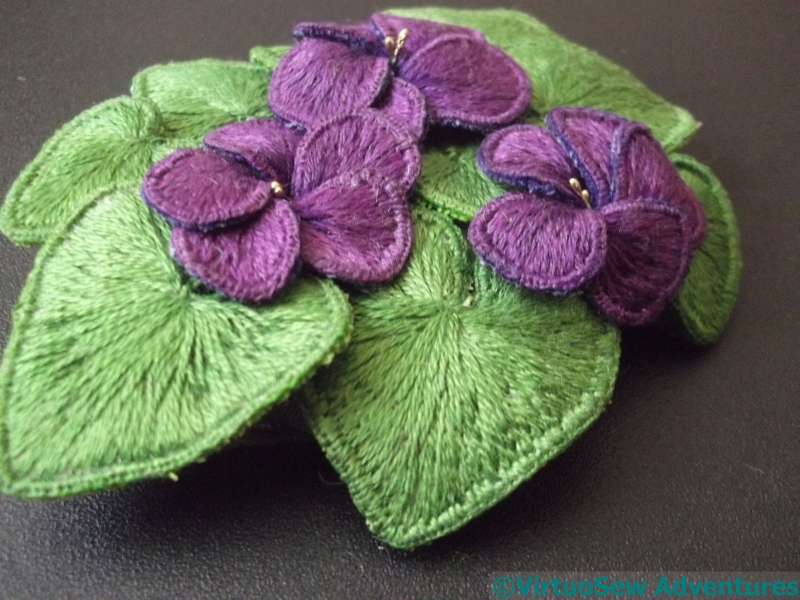
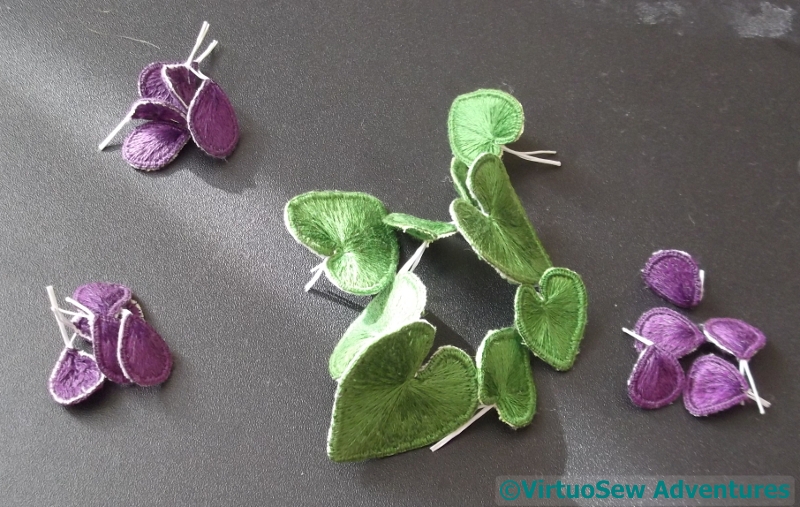
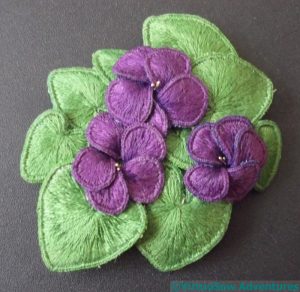
Assembled Violets
I wouldn’t care to do much real hand embroidery on a fabric “doped” (after the fashion of early aeroplane wings!), with the mixture of inktense and aloe gel. Once it had dried, the calico had something of the texture of a cheap printed furnishing fabric, and did not recover well from having holes poked in it. I suspect it would prove rather abrasive on more delicate threads, but in this case I was simply using stranded cotton.
And there were many holes poked in it – one for each of the elements. I turned back one of the two wires at the base of each, to help to support the curves I was trying to set into them, using the wires around the edge. The other wire I poked through a hole which was in turn poked through the fabric using a stiletto. Bending that wire back on itself should have kept the elements in the place, but as with all of my embroidery adventures – it wasn’t quite that easy!
Cut And Padded
When I fished out the packet of stamens from my second Frostings Box, I found that there were three strands of each of three types, and picked the most delicate gold ones, so as not to overpower the flowers. So that worked out nicely – one strand for each flower! – and caused three more holes in the calico..
The elements were still wriggling a bit, though, so I decided to put some padding behind the clump to help to entrap the wires, and also to enhance the domed effect that I was hoping for. That meant that it made sense to trim the padding and enclose it with the calico, creating a single, “free-standing” clump of violets. The elements are held in place with minimal stitching, the curves nestling together, and the wires and threads entrapped in the padding. It wouldn’t stand up to much handling, but then it won’t get any!
Click on the pictures to see them at full size – I think they give a good sense of the dimension and “loft” I managed to achieve.
Can you tell that I’m rather pleased with my violets?
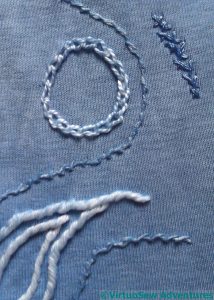
White Embroidery
I’m continuing to think about that quotation from Pliny, and considering how I might bring it to life. In the meantime, I’m trying to develop some familiarity with small-scale dyeing, rather than the huge machinery of my course, so when I heard that The Wild Dyery, not far away, was running an evening of indigo dyeing, I decided to go along.
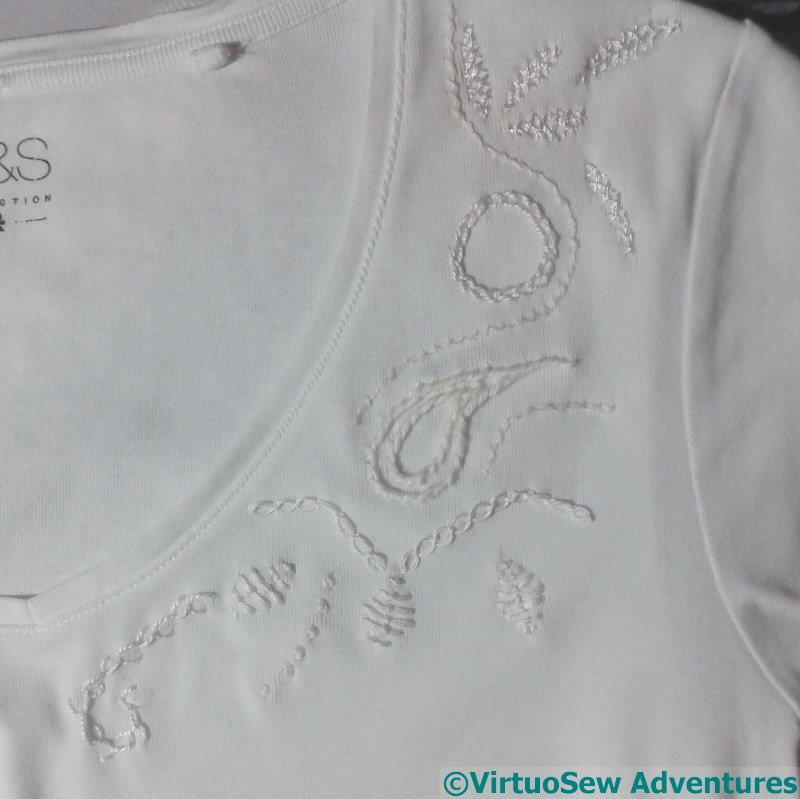
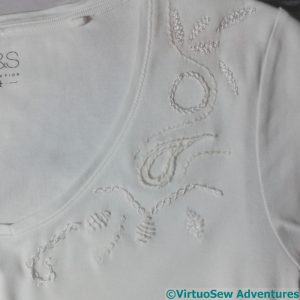
I found a cotton T-shirt in a charity shot, and proceeded to embroider it using every different white thread I could find. I want to see how the different threads respond, because it occurred to me that I could add to my adventures by embroidering with mordanted threads.
Ever the over-complicatrix of my own life….!
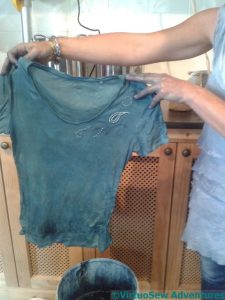
Out Of Dye Bath
Justine, owner, tutor, and guide in our adventure, kindly hauled everyone’s pieces out of the dyebath for them. As the dyeing process with indigo is an oxidation reaction, incautious splashings in the dyebath, even drips from a piece being removed, can compromise the dyebath by removing dye from it before it has a chance to bond with fabric.
Besides, as she commented – there’s no need for everyone to leave with blue hands!
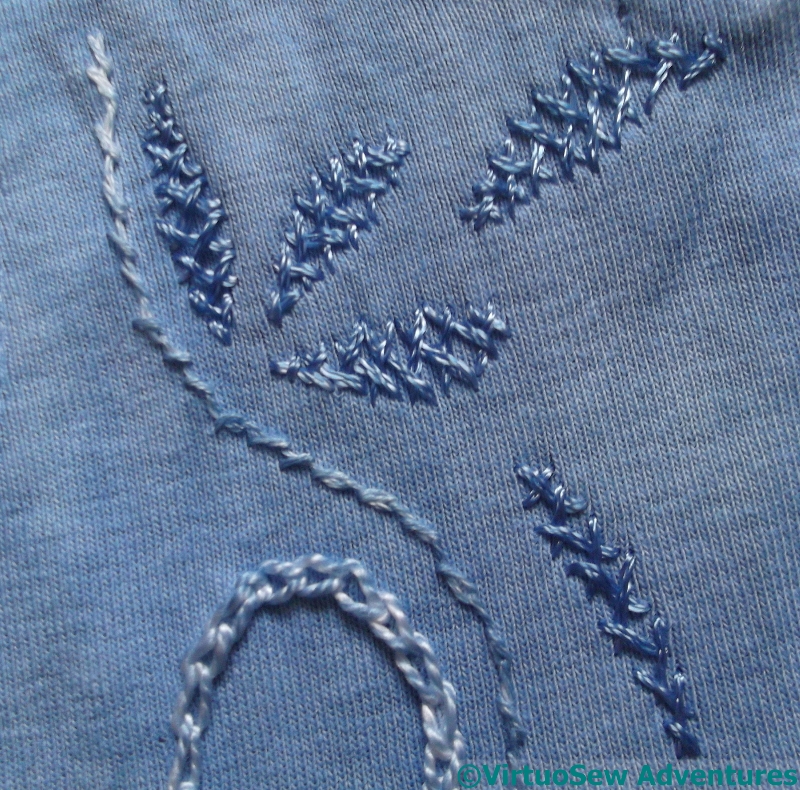
Brought home, rinsed, hand-washed and then left to dry, the T-shirt came out lighter, blue rather than turquoise, and with a few interesting discoveries made…
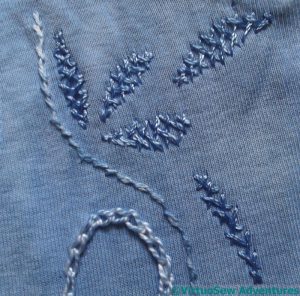
Top Section
Working from the top down…
The herringbone stitch leaf shapes are in Anchor Marlitt, and that seems to have taken the dye nicely. I’d expect that, I think, although the thread is so glossy I might have expect it to have some finishing treatment.
The line of twisted chain stitch is in that frustrating DMC linen. I didn’t enjoy stitching with it, as it it rough, stiff and lifeless. It’s taken the dye in a rather patchy fashion, and I suspect as I wear and wash the T-shirt, the dye will wear off even more.
The next, the circle of chain stitch, is pearl cotton, and this is such a popular thread with the companies that overdye threads that I was expecting it to take the colour much more strongly.
Middle Section
The next photo shows that circle in full, together with the twisted chain stitch in linen thread that curved around it.
The paisley shape in stem stitch is in soft embroidery cotton, and this absolutely astonished me. I was expecting at least some signs of attachment, but there are only the faintest suggestions that the dye was able to attach to the yarn.
Cotton usually takes dyes really well – just think of how easy it is to revive an old cotton shirt with a packet of dye – and if, anything I was expecting it to be one of the darker results. As it is, I think this will wear off in short order!
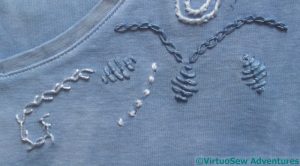
Lower Section
The line of cable chain stitch is more the colour I was expecting from the soft cotton. It’s a tightly twisted, stiff, mercerised crochet cotton, and it seemed to swallow the dye and hang on to it.
The diamonds of romanian couching stitch are stranded cotton. That has taken the dye well, too, although there are hints that whenever the threads have crossed each other there has been a resist effect, which may show more as the T-shirt is worn.
The feather stitch is pearl cotton and the trail of seed stitch is soft cotton, and they haven’t taken the dye any better than before.
Well, that’s given me something to think about, hasn’t it!
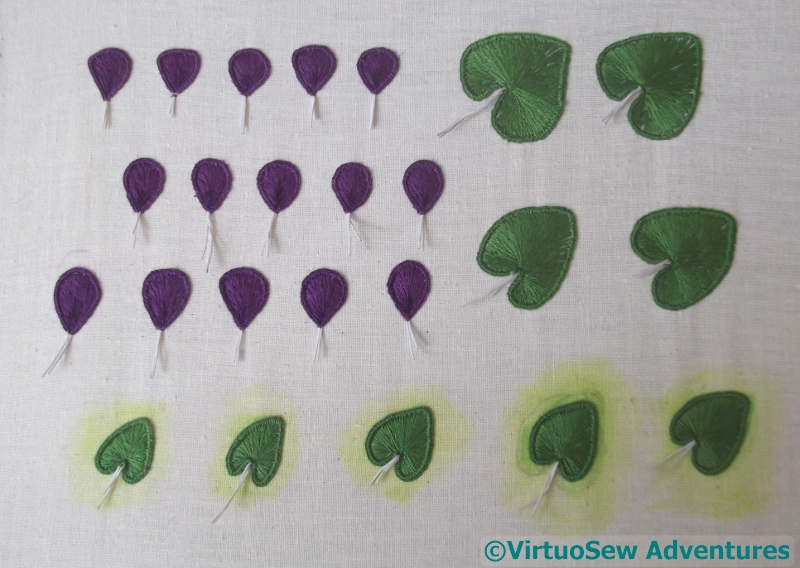
Array Of Petals And Leaves
I finally gave myself the necessary encouragement to get back to the Stumpwork Violets.
Er, that is to say, I spoke to myself very severely, and pointed out that it was looming over me and needed dealing with!
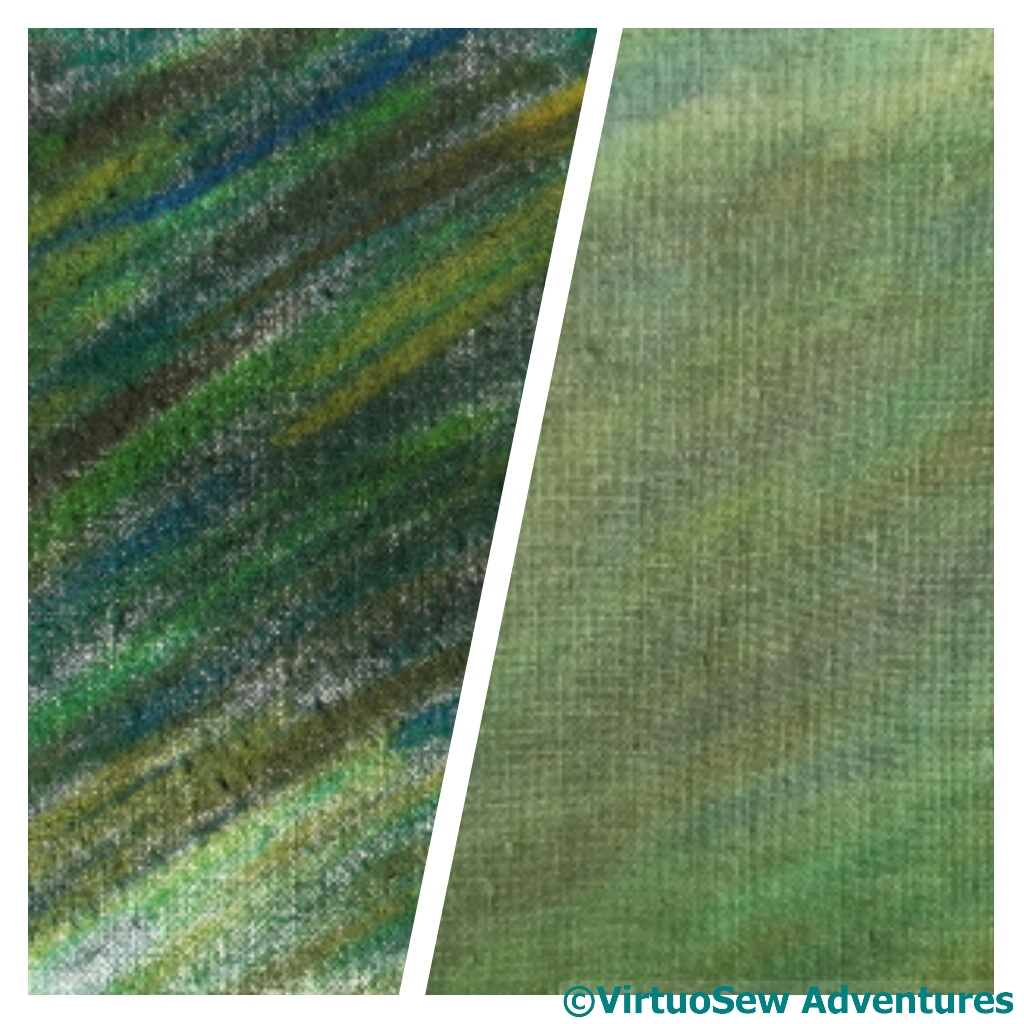
I used my new Inktense blocks to experiment with colouring the base fabric on the last few leaves, painting over the top with the aloe vera gel suggested by Deanna over at Eclectic Meanderings as a substitute for textile medium.

Background Inktense
I also used the aloe gel on the spare piece of calico I painted as a background for the clump of violets. I don’t intend any of this to be visible. It will just provide some dark green depths underneath the clump, rather than leaving me worrying that the fabric underneath might grin through if the leaves move. As with the clothing on Loading The Felucca, I don’t want to stitch everything down too much, so this will relieve a certain anxiety.
In this context, the effect of painting over the marks with the aloe gel, deadening the marks and blending the colours, is not a problem. I’m not keen on the overly blended effect with ordinary pastels, as it looks a little mannered, but as all I want is that a sense of depth behind the violets, I’m content. Given how much dust those few strokes created, I certainly would not want to have an un-fixed piece of fabric anywhere near the finished Dreams of Amarna panels!

Elements Cut Out
While the aloe-and-inktense blend was drying, I tackled cutting out the elements of the stumpwork.
In spite of all my care – and they do look lovely in the sunlight, don’t they! – I ended up with little white edges on all the pieces.
So, out came the inktense blocks and the aloe gel again, and I spent some time colouring the little white edges and then painting gel on them.
I wonder whether I might be avoiding the assembly process…?