
Tag: stitches
More on the Elephant of Infinite Charm
Trial of Interlacing
You may recall that last week I said I was thinking of working one of the new interlacing patterns on the Elephant’s saddlecloth. I ferreted around in my box of metallic threads and found several golds and coppers to choose from. Finally I chose a warm copper, and looked up the instructions for the interlacing.
I really didn’t like the look of it at all. Somehow it looked tangled and rather moth-eaten, instead of exotic. Not A Good Look, so out it came.
Final Decision
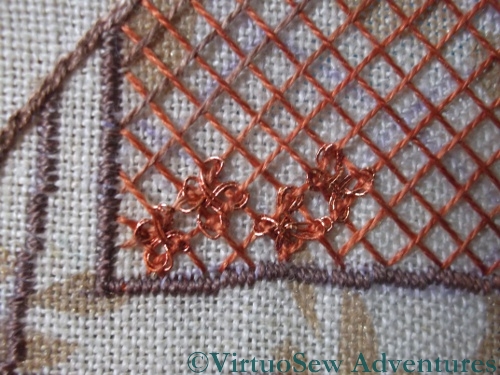
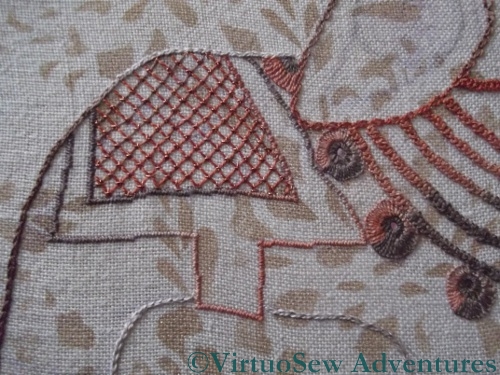
So in the end I decided to use ordinary trellis couching. The couching stitches are upright cross stitches in the copper thread, over a silk foundation. It looks a little dull in the photo, but in real life the little sparkle of copper “lifts” it nicely, and I think it will work well.
You might also notice that I’ve finished outlining him, using the thread that shades from brown to cream. It means that his edges aren’t always emphasised to the same degree, which I think is a good thing.
Artists talk of “light and shade”, and we usually interpret that as meaning simply that the patterns of tone are what build up a recognisable image. To an extent that is correct, in that if the tones are wrong, a picture won’t work well. When we are talking of a design of lines rather than shapes, however, it’s less obvious what we mean. I am trying to create a pattern of varying densities of stitching as well as colour, and in the end what I hope to have achieved is a pleasing rhythm for the eye to follow, not “sticking” anywhere, but not frantically jolting from one part of the design to the next.
Tricky!
One Collared Elephant
You can tell that the Elephant’s inspiration was the right one – suddenly he’s taken off!
The Elephant Collared
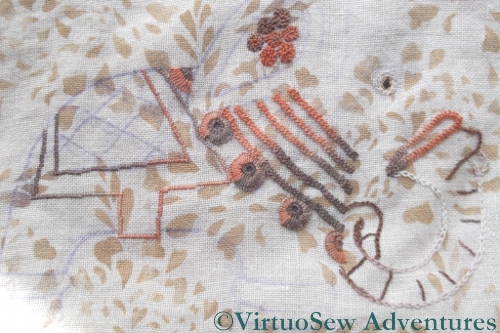
I’m using one set of variegated silk thread (shading from orange to brown) for the harness and headcloth and saddlecloth, and another (shading from cream to brown) for any small bits of the Elephant that show through all his finery. I shall have to redraw his head and headcloth – the transfer has rubbed off – but I’m pretty pleased with progress.
The collar is worked in six rows of braid stitch, which is a stitch that always looks better in a round yarn like this silk perlé. The roundels hanging from the collar are two rows of buttonhole stitch, and the roundels on the ear-covering are spiral trellis stitch – at the moment. I’m not quite sure that they are right. I first used Spiral Trellis on the Jacobean Work Panel, and really enjoyed stitching it, but I think these look too fussy. One big one might be better, and it would allow the colour change in the thread to show a little more.
I’m glad that I have worked out something to do next, as his anklets are giving me trouble.They are smooth and domed in the original model, but I think satin stitch might look a little ordinary.
I’ve used small satin stitches to outline the border of the saddlecloth, but only because I wanted something quiet to contain the excitement I intend to put inside it – I’m planning to use one of the complicated interlacings from the Tudor and Stuart Goldwork Masterclass for the saddlecloth, but extended to form an all-over pattern.
Watch this space…!
More Details on the Peacock Skirt
Do you remember my Peacock Skirt? Megan of Elmsley Rose asked for some more close ups of the embroidery, and while I have been remodelling it (for a slightly less sylph-like waistline – I was a skinny teenager!) I took the opportunity to take some.
Close Up Of Branch
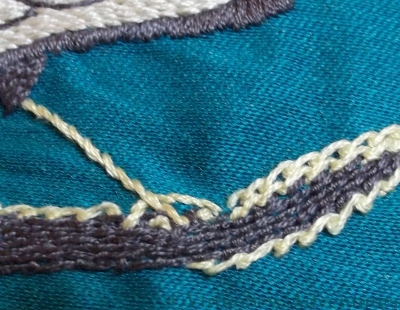
This, therefore, is a close up of the branch the peacock is standing on. I simply followed the instructions here, using coral stitch for the dark grey elements of the branch and scroll stitch for the pale yellow. I think that now if I were do something like this again, I would spend a bit of time tweaking the colours a little more, because I’m not sure I like having the peacock’s legs the same colour as the highlight on the branch!
You can see, too, that I struggled somewhat with tension and the fabric is a little puckered. This seems not to matter when I’m wearing the skirt – people still admire it!
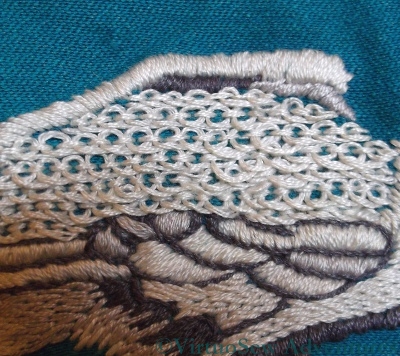
Pekinese Stitch On The Peacock's Back
The instructions for the Peacock’s back said to work the Pekinese Stitch fairly loosely to create a slight variation on colour and texture. Since the embroidery was worked in two strands of stranded cotton, that too contributes to a slightly “fluffy” appearance. The satin stitch sections around where the wing should be are in slightly different shades of grey, and worked at slightly different angles, again to produce varying tones and textures.
Looking at this close up now, I think the rows of stem stitch used for some sections of the body represent the feathers of the bird more successfully (although, again, the design doesn’t attempt a photo-realistic representation) than the sections of satin stitch or pekinese stitch. I do admit, however, that it was the chance to work pekinese stitch that attracted me to the design!
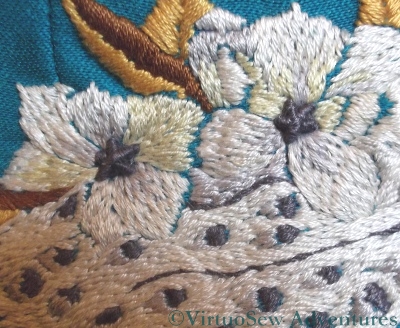
Spiders Web Flower Centre
The centres of the flowers were worked using a Spiders Web Wheel. The instructions specified working as much thread into the stitch as possible to obtain a raised and highly textured effect. This contrasts very well with the long and short stitch flowers and the stem stitches on the peacock’s tail.
Again, coming back to these pieces years after stitching them, it’s fascinating to look at surprising details. The gold and russet leaves look as though they’ve been padded, but I’m quite sure they weren’t. I remember doing padded satin stitch for the first time quite recently and wishing I’d known about it earlier!
Dreams of Amarna – The Patches on The Map
After finishing the text and the villages on the Map, I need to decide what to use for the cultivation… You may recall from my earlier post that I have decided on the stitch I’m going to use – tête de boeuf stitch – but that I’ve not quite worked out what thread to use.
Trial Patches On The Map
I’ve stitched a variety of trial patches, using stranded cotton, flower thread, pearl cotton, and several different silks, and now all (all!) I have to do is make a decision. I’ve propped up the fabric in the living room and stand staring at it every chance I get!
So far, I feel sure I won’t be using the pearl cotton (too chunky) or the flower thread (also too chunky), but that leaves me two variegated silks (one pale green shading to pinkish purple and one brighter green shading to terracotta) and two plain silks (one slightly darker than the colour of the fabric, and one the same colour as the stranded cottons I used for the contour lines. I’ve tried very hard to get a photo that does reasonable justice to the various threads and colours, but I don’t think that the one I’ve got here helps very much…
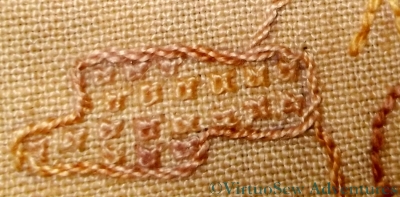
Sorbello Stitch Village
I chose Sorbello stitches to represent the modern villages. These are worked at a very small scale, as you can see from the thread count. Again, had I followed the cartographer’s symbols, I would have used something like Jacobean Couching, but I felt that this stitch in fact reflects the idea of buildings rather better. I’ve used the same gold-shading-to-purple thread for all the modern villages, both the names and the associated areas. It doesn’t draw the eye, in real life, quite as much as you might expect.
An Experimental Seahorse
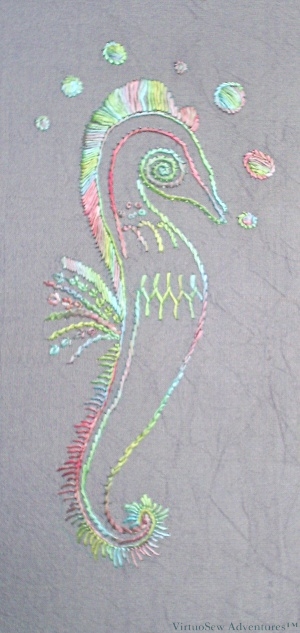
Small Seahorse in overdyed filament silk
Sometimes I play with threads for no other reason than to play with them. In this case Stef Francis gave me a skein of overdyed filament silk to play with. She tends to create a much more “freeform” style of embroidery than I do and she wanted to know what I thought of the thread.
I found a simple transfer that offered scope for several different stitches, and started playing. I had been concerned that it might twist up when I didn’t want it to, but it stayed fairly flat most of the time, and it is noticeable that the stitches look and feel different in a flat thread, as compared with a round one.
For example, in a round thread, the stem stitch line tends to be more textured, and the direction of slant is more obvious. Here, the slight flatness creates a smoother line. That same flatness makes the satin stitch smoother and cleaner looking. It also helps to mask any slight imperfections in the stitching!
On the other hand, that same slight “spread” of the filaments clouds the distinctiveness of the Wheatear Stitch in the fin on his back, so not an unalloyed success, but interesting and worth trying all the same.
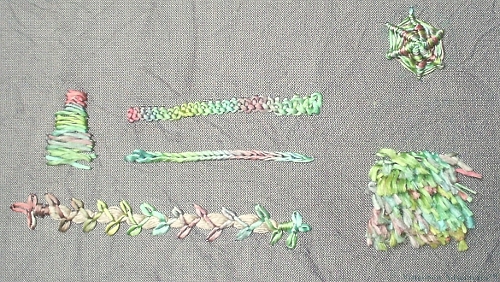
Silk Filament Experiments
Then I started just to play with stitches in a spare corner of fabric. The Braid Stitch (top row) works quite nicely, I think, and the Turkey work (bottom right hand corner) is better than I hoped, especially considering that I’ve not done it before. I can’t imagine what I would use that texture for in these colours, but Stef has a fabulous range of overdyed shades and I am sure that something would spring to mind for one of them. The little triangle of Closed Herringbone Stitch is hardly a success, but that may be a problem of scale. I don’t think the Braid Stitch would have worked if it had been any wider than it is here.
I don’t think this thread adds anything to the Reverse Chain Stitch, or to the Spider’s Web Wheel, but I do like the Chained Feather Stitch couching. In fact, that might have been better had I had the courage of my convictions and made the base that’s being couched about twice the width.
All in all, I had a lot of fun playing with this thread. I’ve now got a much better idea of What To Do and more importantly What Not To Do with it. One important thing to remember – make sure hands are smooth! Silk catches on everything and filament silk does so even more!
Dreams of Amarna – Approaching The Final Decision on the Map
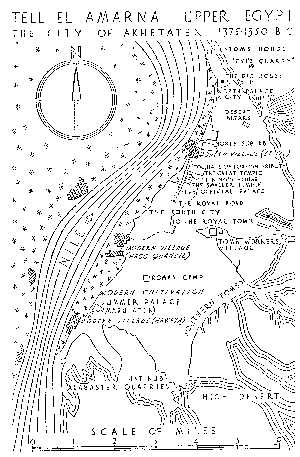
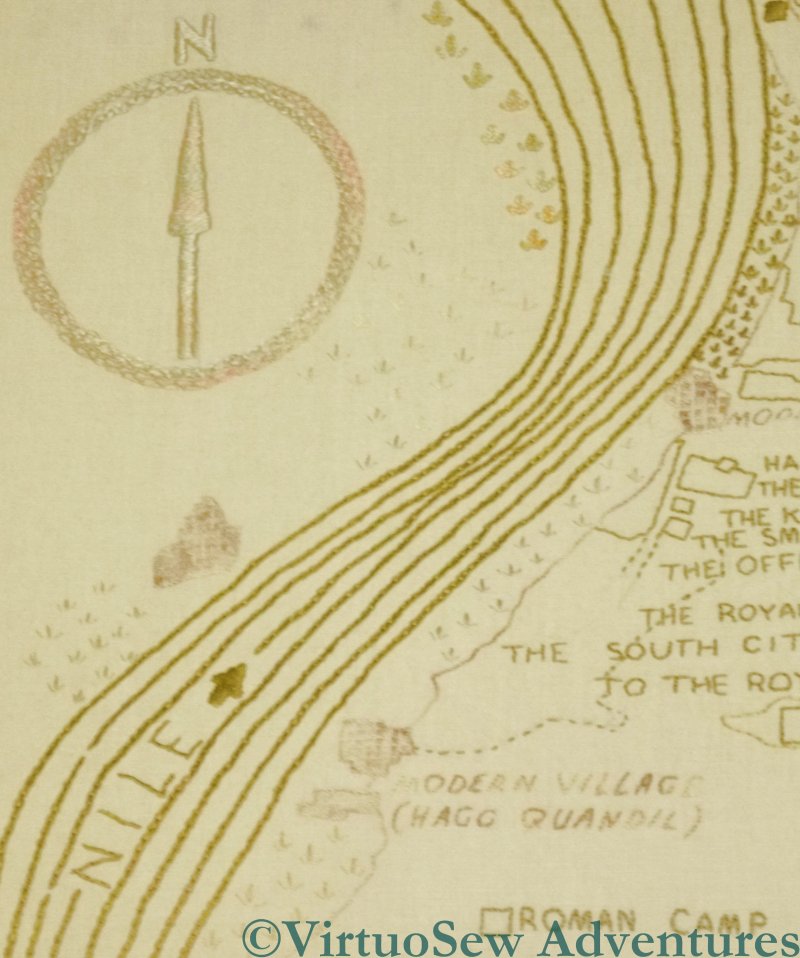
Map of the dig site at el-Amarna
You may recall that the first large element of the panels for Dreams of Amarna that I am stitching is a map of the site shown in Mary Chubb’s book.
It was easy to decide that I wanted to use reverse herringbone stitch for the contours of the high ground around the site, and unbroken lines of chain stitch for the Nile.
The compass rose and the titles were more difficult, although I made a decision eventually.
Now, however, I am near to finishing the text, and I can’t really put off my final decision any longer.
Areas of cultivation are shown on the original map using stars drawn roughly using four strokes. The obvious choice is to use Star Stitch, which exactly replicates the symbol used by the cartographer, but I don’t want to do that.
The aim of my stitching is not to reproduce a painting or a drawing, or even to reproduce those effects. I want to use embroidery techniques to produce impressions and effects that couldn’t be produced any other way, but that are inspired by the subject.
Tricky.
I finally settled on a stitch, after considerable thought and several hours leafing through my (never-ending shelf of) embroidery books – tête de boeuf stitch. But I’m still trying to work out what thread to use, and at what scale. So I’ve worked several test patches, and when I’ve finished the other stitching (the text and the villages), I’m going to wash and iron the whole thing and then sit back and look at them for a while…
The Canvaswork Abstract Garden
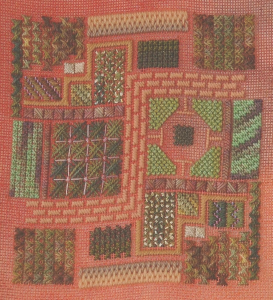
The Canvaswork Abstract Garden
Following on from the Knot Garden, I decided to play a little more with the idea of using the canvas as a background, rather than covering it entirely. Since I already knew the canvas would not be covered, I chose a piece of dyed canvas (from “Kate’s Kloths”, which I haven’t been able to find online).
The first element was the simple path in expanded brick stitch, worked in wool. The rest of the panel was then built up as a pattern of varying stitches and threads. There was no predetermined idea, simply the aim of keeping a sense of balance and rhythm in the pattern densities. You will notice that block sizes and shapes are repeated, reflected across the path which snakes across the centre.
I’m not particularly comfortable with abstract work or even with designing it, so this repetition and reflection of the blocks was a way to give myself a structure for the piece. Otherwise I find abstract work often feels rather chaotic and it doesn’t offer me the chance to puzzle out “a good stitch to represent such-and-such”, which is where a lot of the fun of the Persian Fantasy came from.
This was an interesting exercise, but like the Knot Garden, it has remained as a piece of canvas, not mounted, framed or incorporated into anything, because I really haven’t a clue what to do with it!
Steps in the Sun
Some years ago, I was asked by a magazine to design “my interpretation of buildings” in counted work. I produced three versions of the same thing – a set of steps in a Tuscan village, with plants in pots on the steps and a window looking over them. Then the magazine didn’t use them. Any of them. Sigh.
Never mind, I enjoyed doing them, and it was a very interesting exercise.
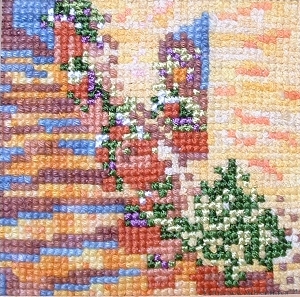
Steps in the Sun using various threads in counted cross stitch
The colours are inspired by Monet’s Rouen Cathedral series – strong, bright colours with purples and blues as the shadows. They are like impressionist oil paintings in another way, too – it’s not always entirely clear quite what the shapes are until you have looked for a while.
For Version One I used counted cross stitch in space dyed and other threads. The walls were worked using a cotton bouclé, and the steps in a range of soft unmercerised cottons. The terracotta plant pots were worked in stranded cottons (solid colour), and the plants themselves were worked in rayon, also in solid colours. The threads were rather heavier than stranded cottons, so I used 22 count linen and stitched over two threads. The bouclé battled every stitch of the way!
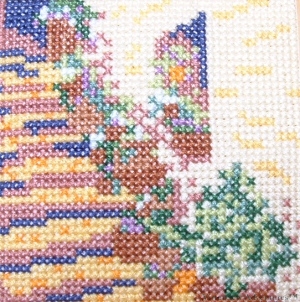
Steps in the Sun - Stranded Cotton counted cross stitch
For Version Two I used plain counted cross stitch in stranded cotton, chosen to reflect the colours of the overdyed cotton as well as I could manage. It is strange to see that the photograph gives the impression of the aida fabric showing through, which isn’t so obvious to the naked eye. This version actually is more successful in some ways than the first one, although I have them all three on the wall and I actually prefer Version One! Version Two is not so hectic, but still, it doesn’t “read” as clearly as I might like. Or at least, not to everyone. I see the steps in all three, but I know people who don’t.
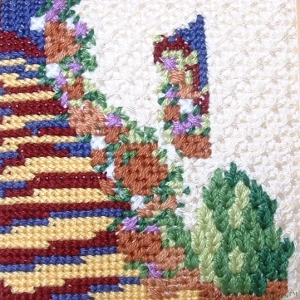
Steps in the Sun using canvaswork stitches in stranded cotton
In Version Three I became even more experimental – I knew the magazine wouldn’t go for this one, but thought it would make an intriguing exercise. The base fabric is ordinary aida, but I chose to use canvaswork stitches in stranded cotton. The bush in the bottom planter is worked in Leaf Stitch – oh, look, Leaf Stitch again! – and the steps are long-legged cross stitch. The wall is Double Straight Cross Stitch. I enjoyed this one the most, but at the scale of the piece (it is less than four inches square) there really is not enough space for most of the stitches to do their work properly.
An interesting exercise, all the same..
Dreams of Amarna – The Title on the Map
I described the first of the background panels I am planning for the Dreams of Amarna a few months ago. I will describe some of the other stitching I have done on it in another post, but I have been racking my brains since I began stitching, trying to work out how to embroider the title.
The challenge I am facing with the whole map is that I want it to be clear that it is embroidered, not screen-printed, but at the same time, I don’t want to show off every stitch I know or produce something that is so heavily stitched that it pulls the final pair of panels out of balance. So far, every time I have tried something it has been too prominent or too fiddly or Just Plain Wrong. While this is disheartening, one of the advantages of the butterfly mind is that I could stow the piece away and work on something else while waiting for inspiration.
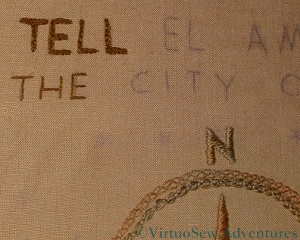
A Corner Of The Map Of Amarna
Then suddenly, a few days ago, the Gordian Knot was loosed. I’m using ordinary stranded cotton (two strands) in the darkest shade I am allowing myself. It’s not overdyed or textured, and I am using the same thread for both rows of text.
The large text uses the Chain Stitch with Buttonhole Edging that I learnt in Month Five of the Tudor and Stuart Goldwork Masterclass. I knew it would be useful as soon as I saw it! It is slightly fiddly to work at this scale, especially using stranded thread, but importantly, it doesn’t look fiddly when it is in place.
The smaller row of text below it is in split stitch. This provides a narrow, unbroken line, again clear enough to be readable, but equally not drawing attention to itself. If I decide later that this row is a little too unassuming I can always whip the split stitches!
This now means that I know what I am doing with this panel for a while yet, and can just get stitching on it. Unfortunately the transfer that I made has worn off the centre of the fabric so a large section of map will have to be retraced and reapplied, but that can wait until I have finished the titles.
I’m greatly relieved. I’ve now got plenty to work on while I think of the next idea…
Tudor and Stuart MasterClass Stitches – Month Six Stitches
Last time, I found the stitches rather tricky in the gold thread and tried them in pearl cotton afterwards to see whether that made them easier. I’m not sure it did, as a matter of fact, but it did show me that the relative scale of fabric and thread would also influence not only the appearance of the stitch, but also the experience of stitching it.
Cross Shaped Guilloche Stitch in pearl cotton
So this time I started with pearl cotton. I can’t say it was markedly easier, especially the Cross Shaped Guilloche Stitch Variation. This time I think the thread was too heavy for the stitch at the scale permitted by the fabric, and furthermore it turns out that both of my practice cloths may be plain weaves, but they are not in fact proper evenweave fabrics, even if they look as though they should be.
I counted very carefully, but somehow it looks as though it should be enclosed in a rectangle and not in a square. It also looks rather a tangle!
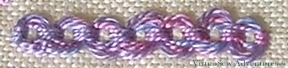
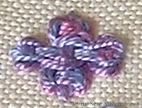
Guilloche Stitch Variation in pearl cotton
The Guilloche Stitch Variation here is in fact the one I have seen in some of my books on embroidery stitches, although those have been somewhat simplified by comparison. Still, I can imagine using it to create a braid effect, and I’m sure that I will think of something to use the cross-shaped variation for, once I’ve had a bit more of a play, and tried to find the right scale of thread to fabric.
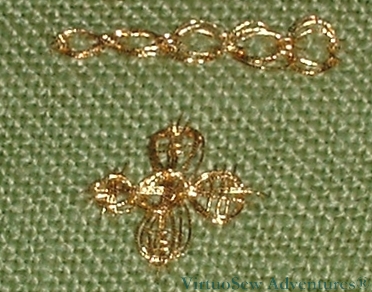
Month Six Stitches In Gold Thread
So, finally, here are the stitches in the gold thread. It’s harder than you might think to keep the thread in order, and in the end I decided to make a virtue of my difficulties and in the Guilloche Stitch variation I’ve got two of the sections showing a close, tight version of the wraps, while the other three are looser and more loopy.
In the Cross Shaped Variation, again I thought I had counted carefully, but again it didn’t come out quite square. I think I might try again but doing the stages in a different order so see whether that helps me in any way. I also found myself, in spite of all my efforts and in spite of having the instructions beside me, getting the thread wraps weaving over where they should have gone under and under where they should have gone over.
More practice needed, that’s for sure!
In fact, it occurs to me that there is a lot to be said for practising each of the stitches on the actual cloth before putting it in place on the sampler. Just as a final check. . .