
Tag: stitches
Stella’s Birds – design settled!
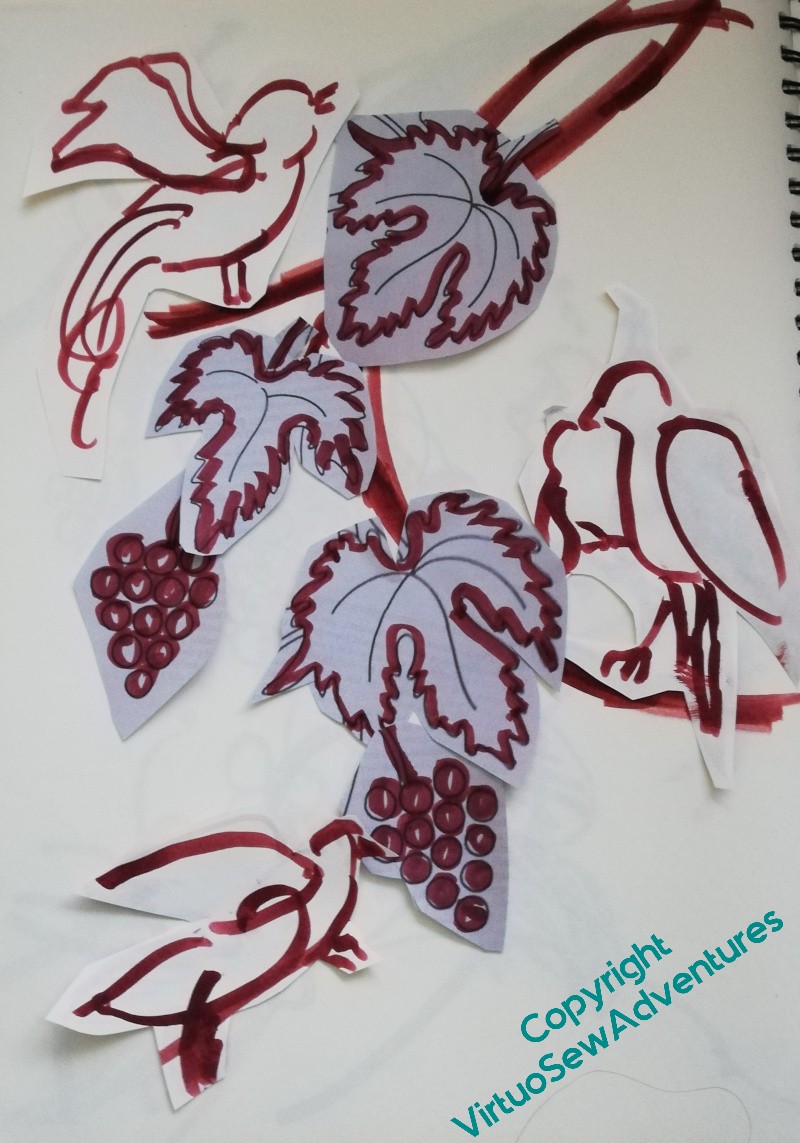
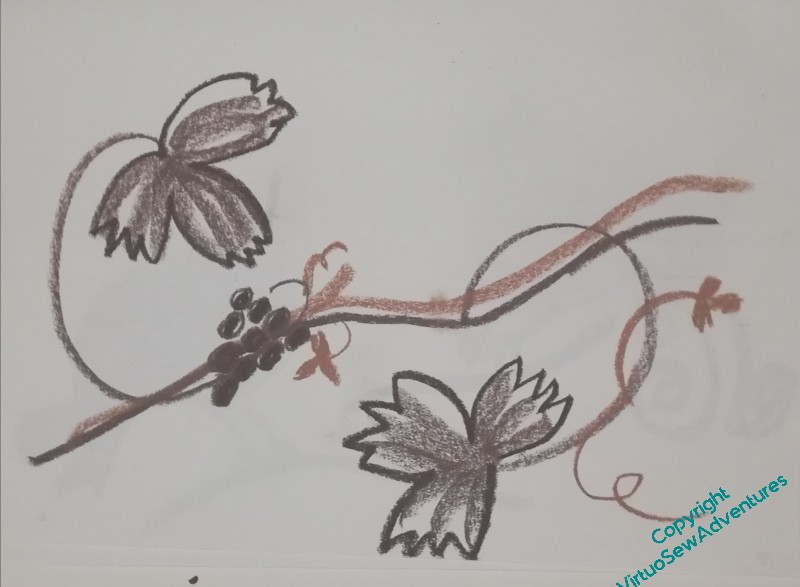
I took my problem with Stella’s Birds to my Mam, who pointed out that grapes hang downwards from the vines. You can tell I’m no gardener, can’t you! So I turned the triangular design upside down and started playing with curved branches. That immediately began to feel better.
Then I found a Delft tile of a bird in flight (still in the vaguely mad territory of the medieval inspiration) and that unlocked the headache I was having over the feeding bird. The placings for the birds were fairly straightforward – I’m simply alternating them and placing them in the right part of the design area. The leaves and grapes were trickier, because the angles they sat at were going to matter.
So – remember my Thread Talk? – back to paper cutouts! – I started playing around with cutouts of the leaves and bunches of grapes, to get the spacing to make a bit more sense, and finally decided to have three bunches of grapes, and three leaves, to go with the three birds (who have now been informally named Bitey Bird, Stabby Bird and Shouty Bird!).
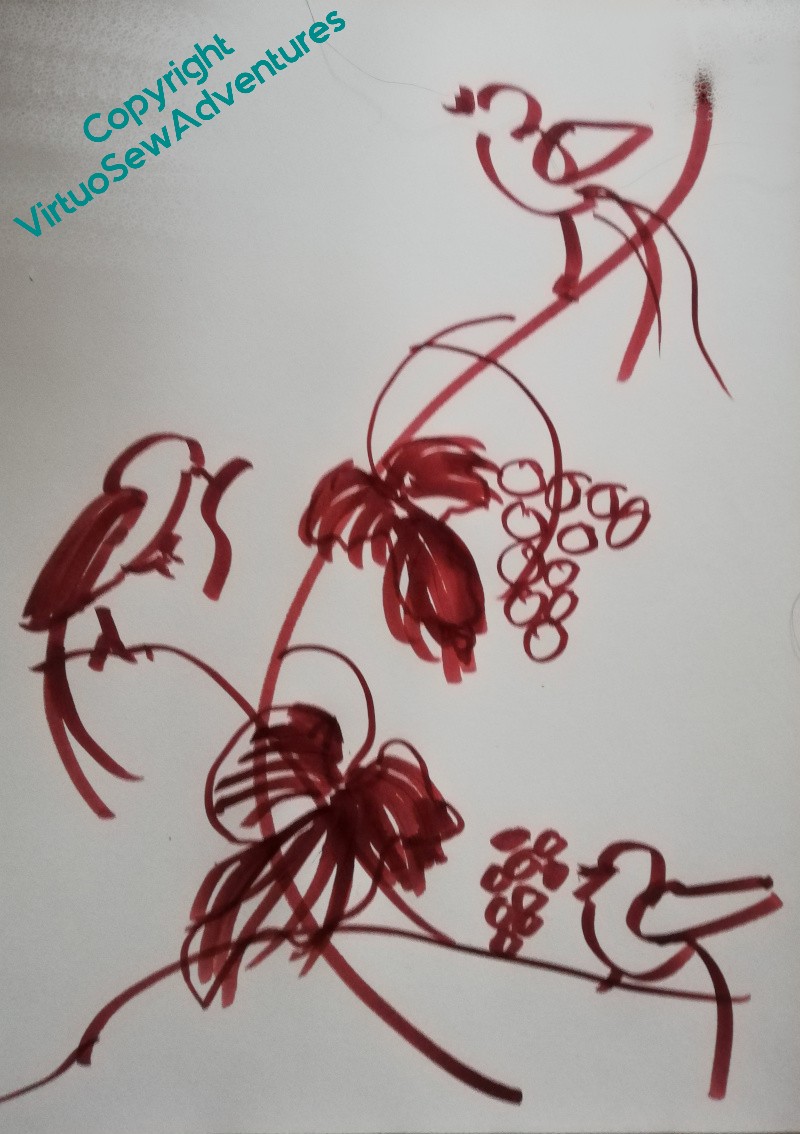
At which point, I found myself quoting from My Fair Lady : “By George, she’s got it!”.
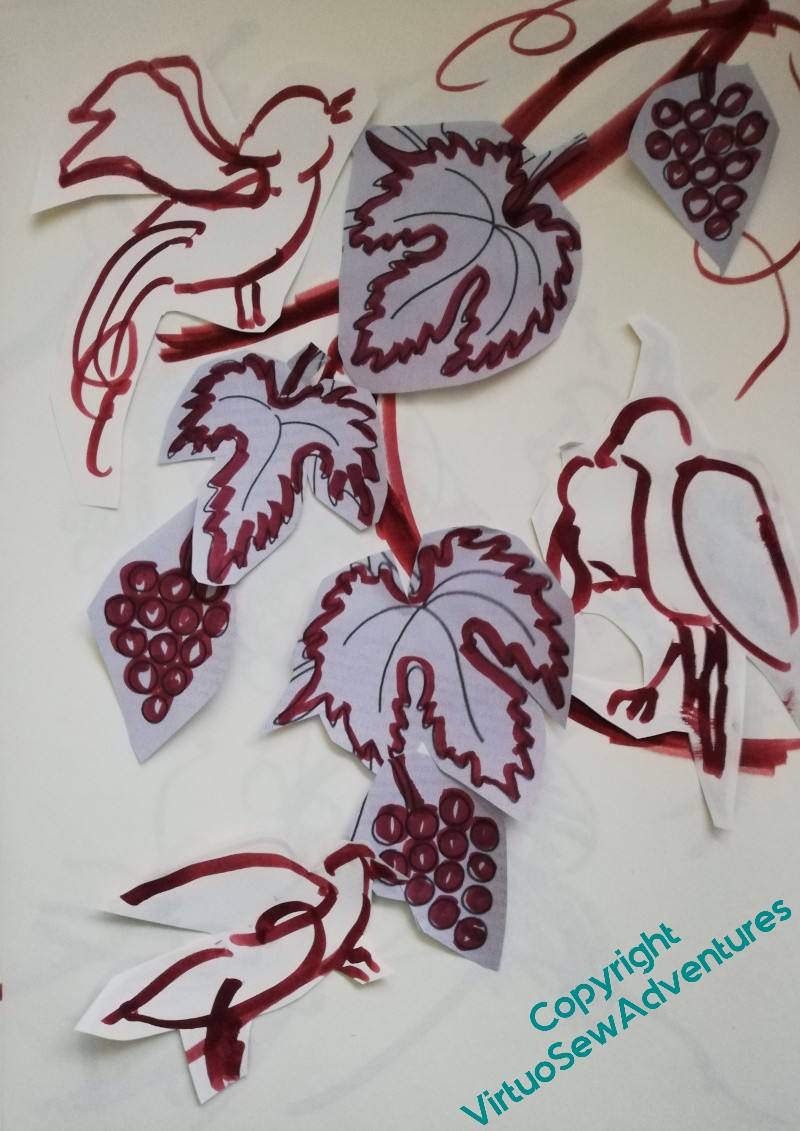
So, time to do a tracing, transfer it to my fabric, and then also transfer it to a piece of paper so that I could play with balancing the solid bits and more open bits of the design.
This is about as far as I can go without having the actual stitched textures in front of me. Solid emphasis on the vines, the grapes, and the leading edges of the wings – yes, I’m sure about that. Other details – maybe filling in half of the vine leaves, some of the details on the birds – they can wait.
Time to get stitching!
Back To Stella’s Birds
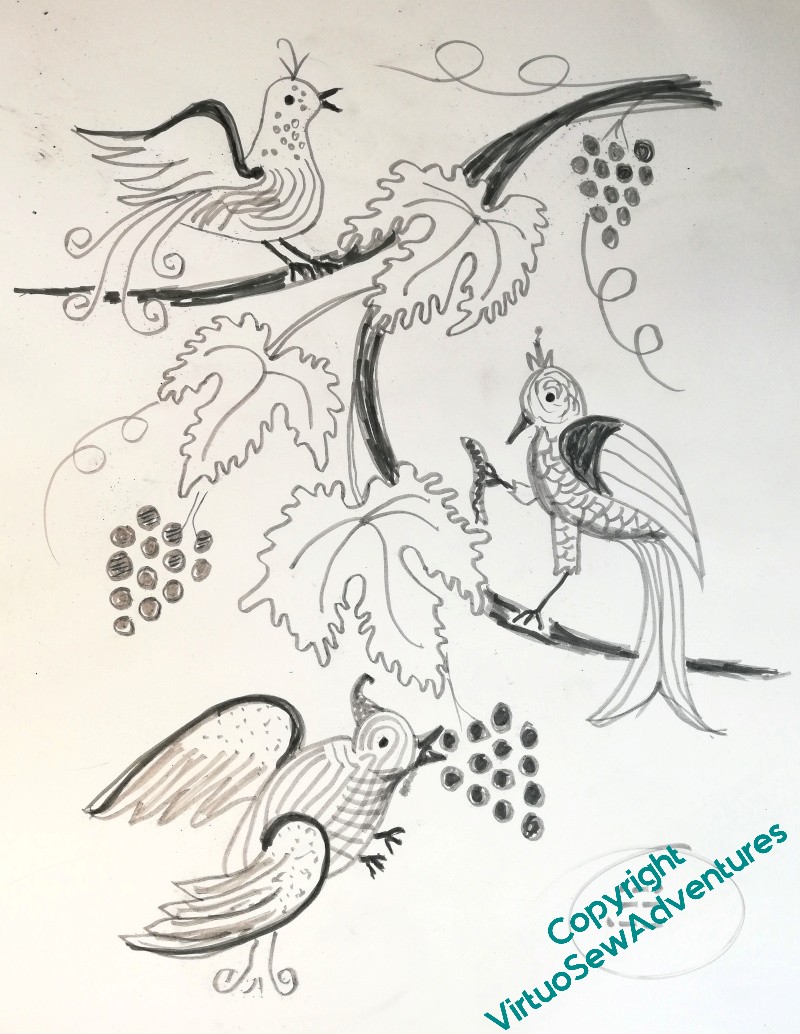
The design inspired by Elizabeth Goudge’s “Gentian Hill” is continuing to give me some difficulties. The stitchery itself will be inspired by Mountmellick work, although it’s not going to be anything even close to classical Mountmellick. You didn’t think it would, did you?
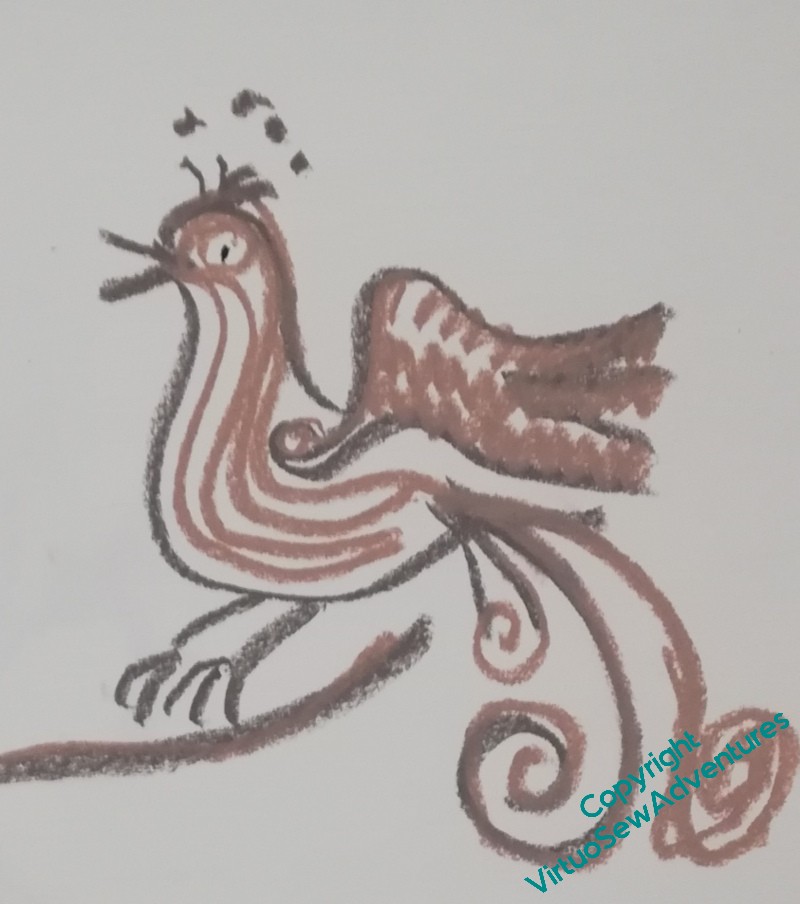
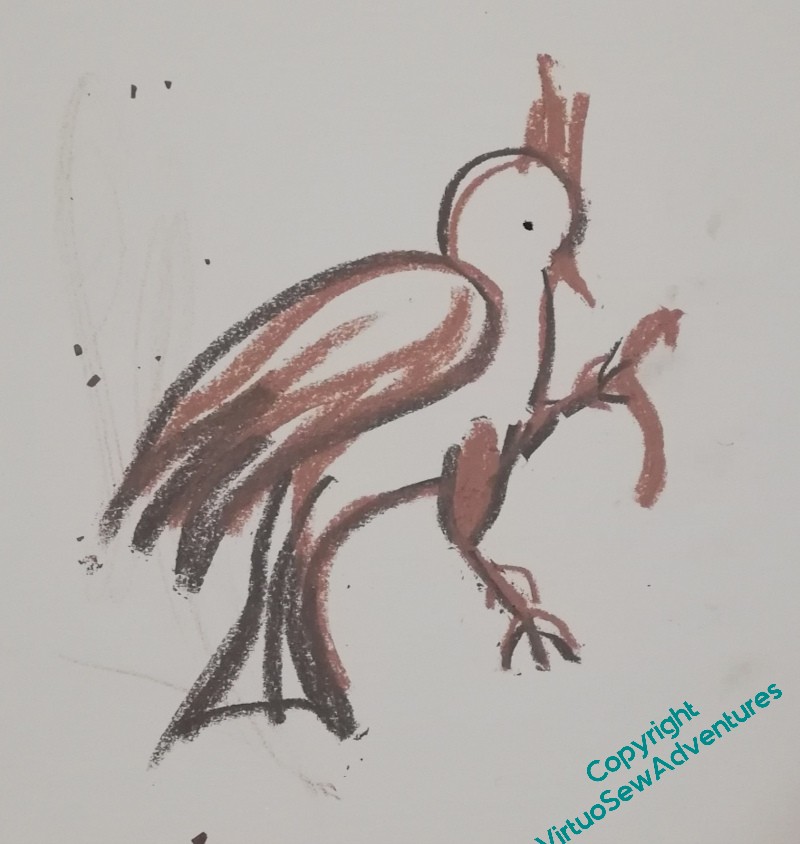
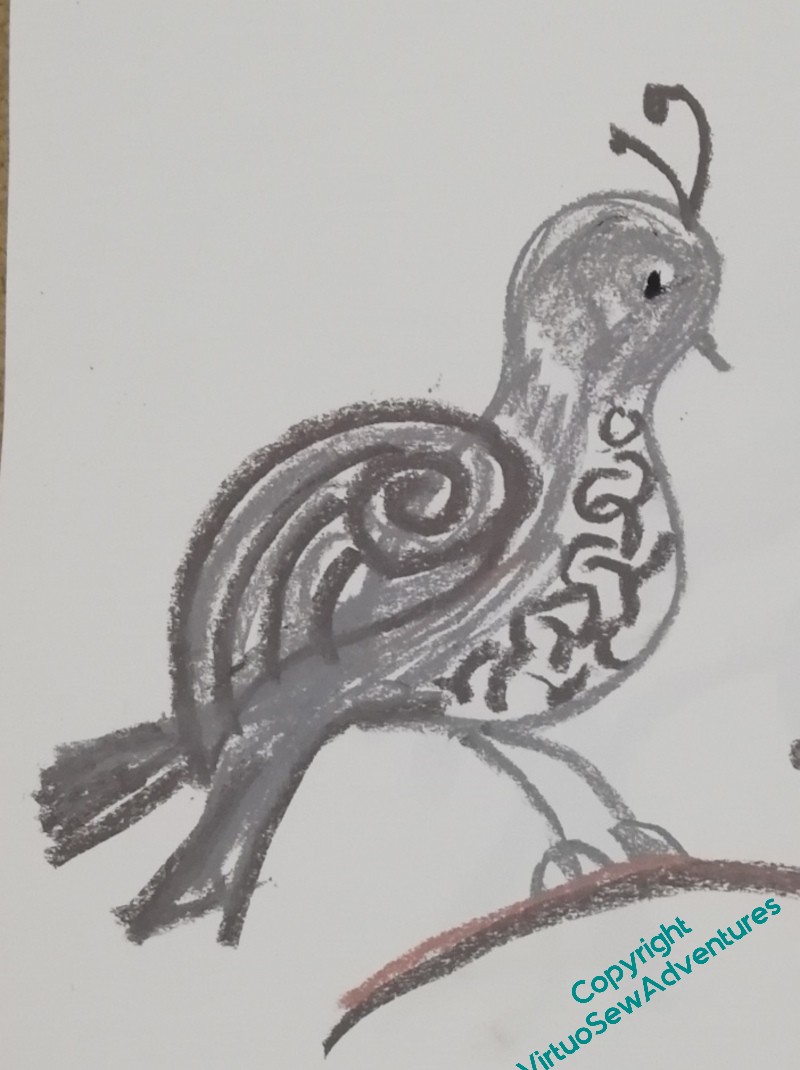
I was planning to use a vaguely medieval flavour for the birds, so they’ll be a bit mad, all curlicues and twiddles. The ones above are looking promising, I think. I will need to consider balancing solid stitching and line stitching, but that can wait until the design itself is settled. Keeping them mad once I start stitching may be a bit of a challenge, but we’ll see.
The branches they’ll be sitting on are worse. I’ve been trying two different styles – a rectangular design, and a triangular design. Both of them look a bit clumsy, and they’re somehow unsatisfying. Granted, neither of them is the whole design, the rectangular one is lacking the birds, and the triangular one is lacking curlicues and any sense of spacing. I’ll get there in the end, but it’s going to take a while.
What I am pleased with is that I’m getting better at doing scrappy, fast, thinking-with-a-pen drawings. Even a year ago, I don’t think I’d have had the freedom I felt as I was doing these.
Which is just to tell you, it’s never too late to start on drawing – or any other skill!
Dragonfly – first trial..
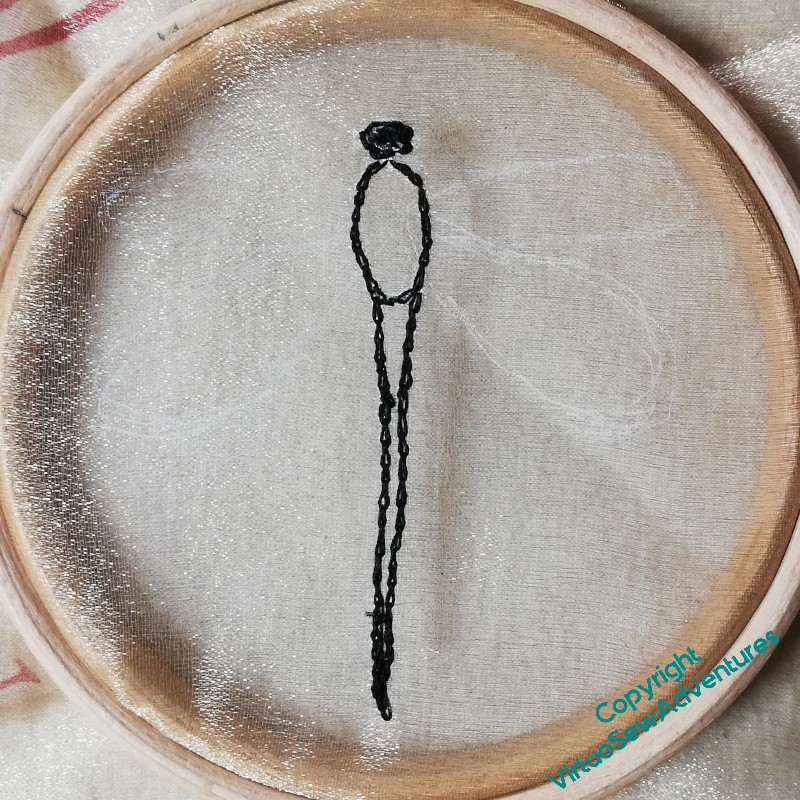
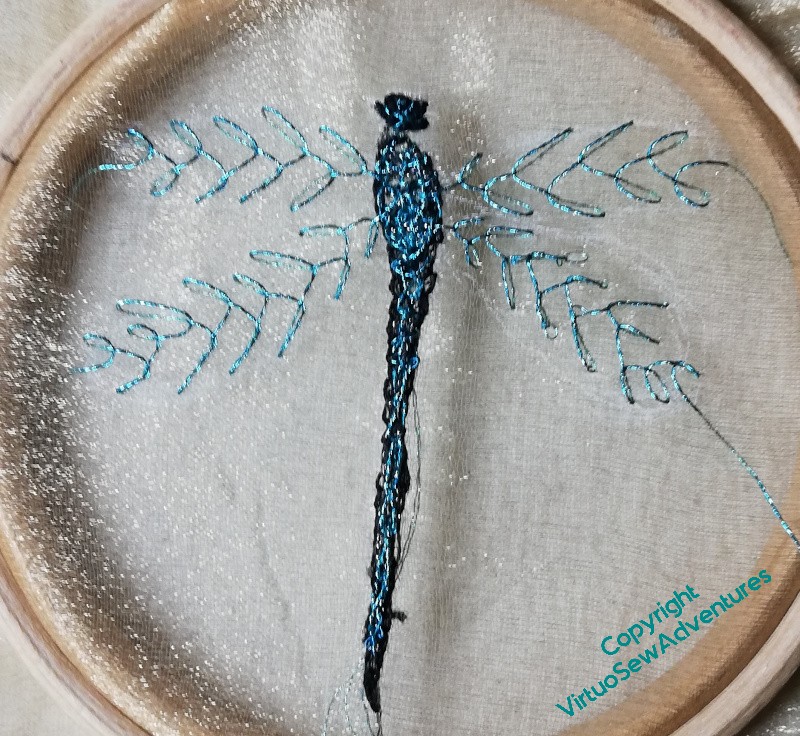
I find dragonflies and damselflies absolutely enchanting. I’m not entirely sure that I’ve got the right sense of delicacy and enchantment here – the threads are a little clunky, maybe, and the metallic thread wants a conditioner or something else to protect it as I work. I wanted to use a longish thread so that I didn’t have lots of tyings-off, but that just meant more opportunity for tangles.
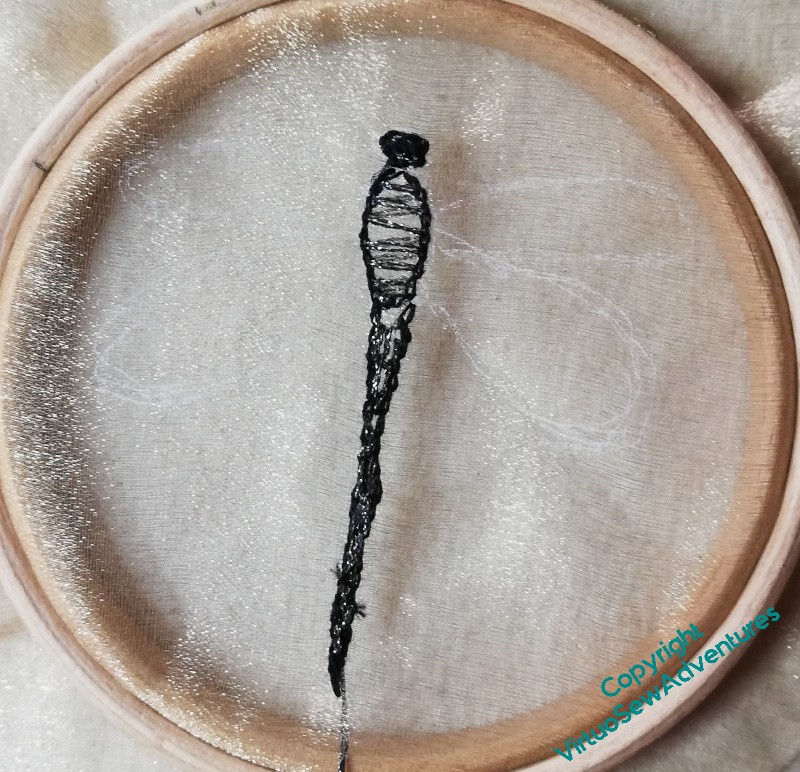
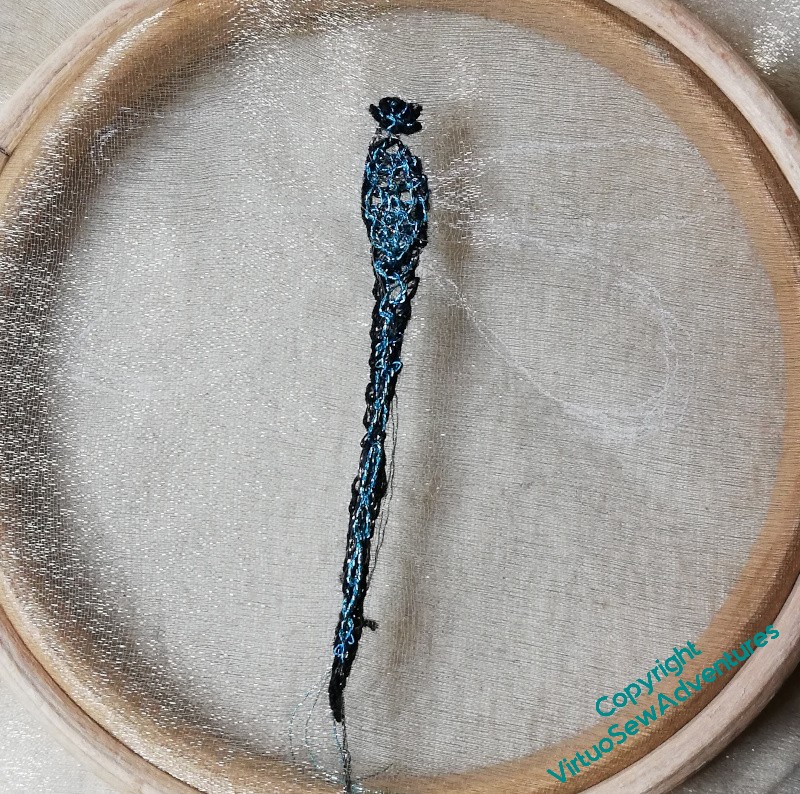
I outlined the body and then worked straight stitches across in a dark metallic thread. The intention was to work needlelace type stitches in the coloured thread, catching into the dark straight stitches. The idea was that that would modify the colour slightly.
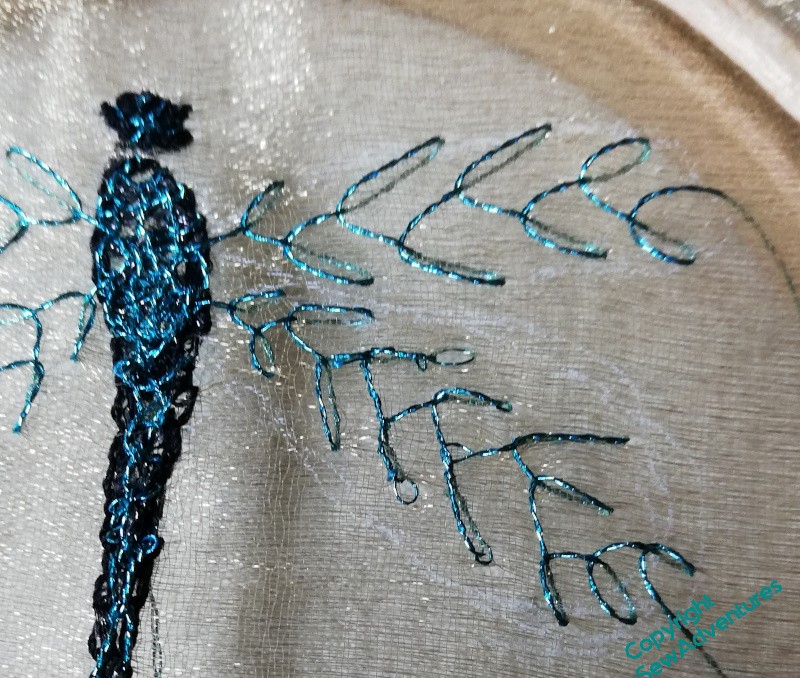
It has worked after a fashion, and the feather stitch veins on the wings also work after a fashion. But not quite.
I need to think of ways to finish off the veins in the wings so the stitches don’t unravel – glue? fraycheck? enclosure?
And I think I maybe need to do it again, smaller, and using a single strand.
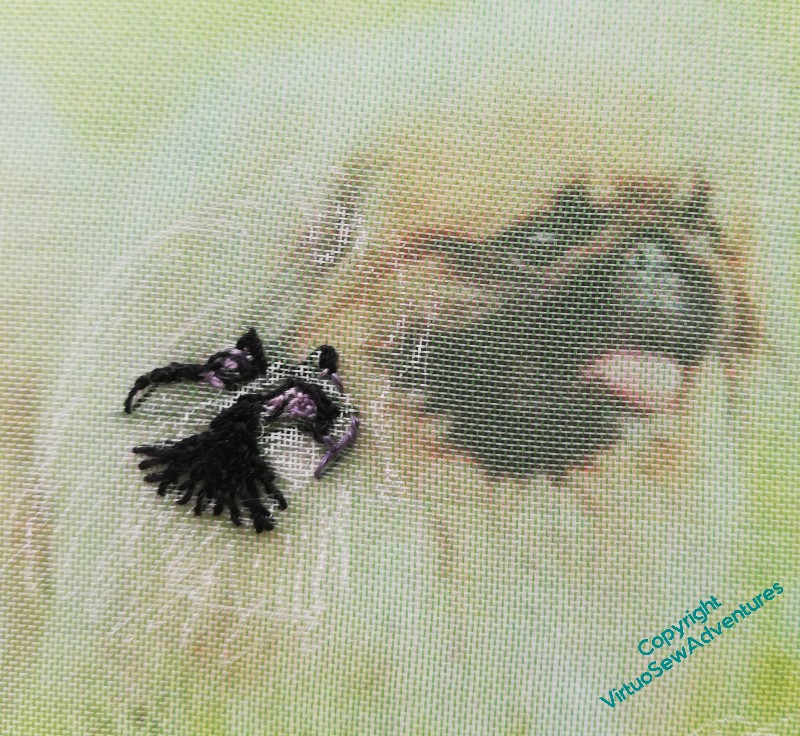
Mary The Pekinese again
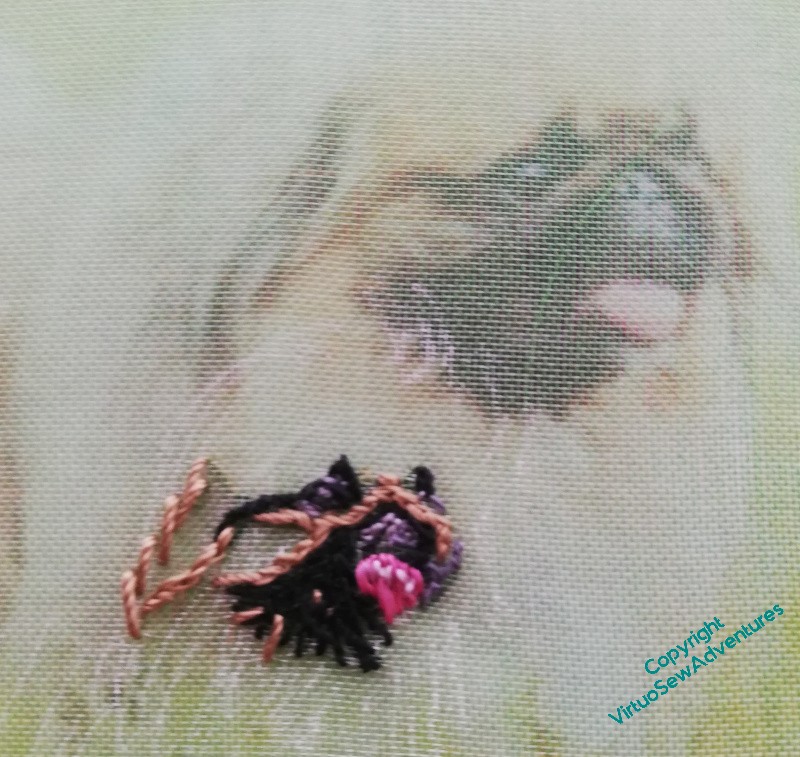
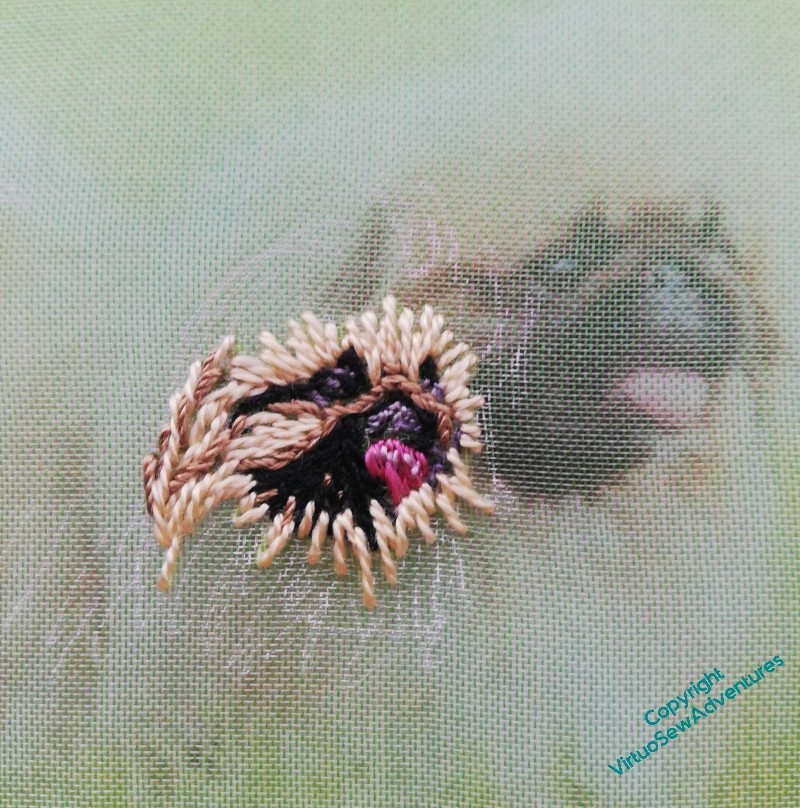

It’s quite hard to explain what I mean by the improvisatory, painterly approach I’m using for the assorted Animal Vignettes for the Conversion of Placidus project, so since Mary the Pekinese is relatively simple compared with some of the others – mostly straight stitches, rather than the tangle of Cretan I used, for example, for the little rabbit, I thought maybe a sequence of photos was the best way to show you what happens.
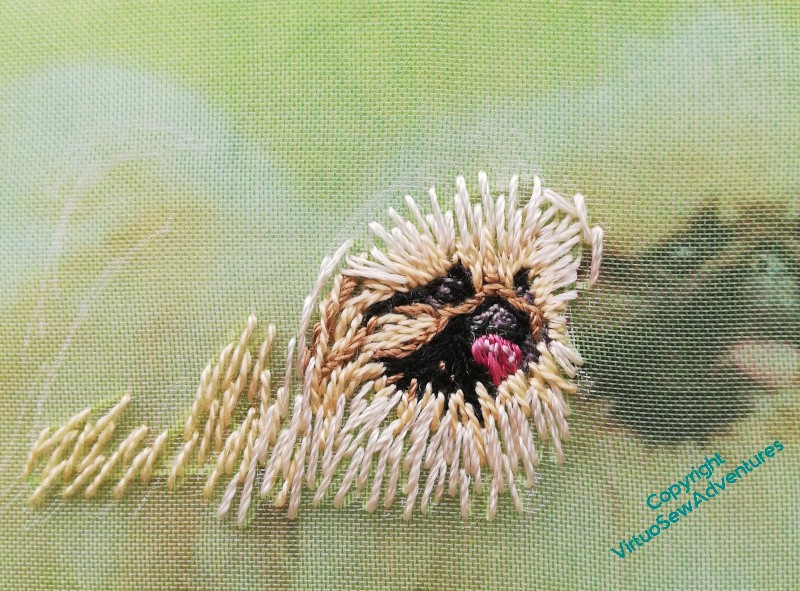
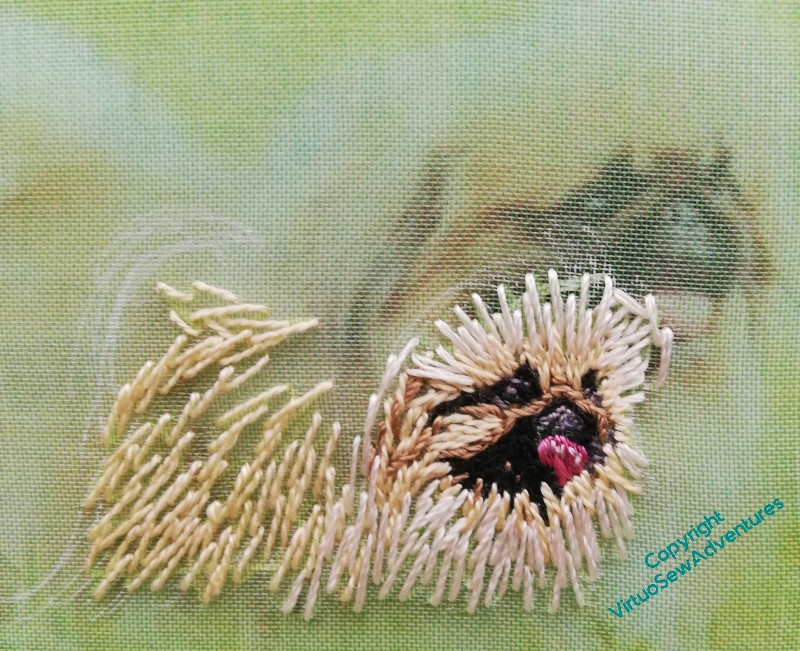
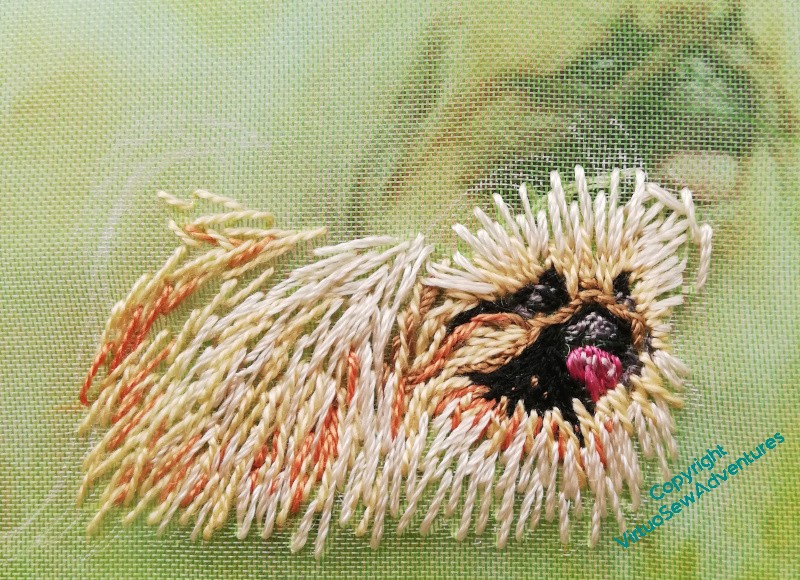
In each case I’ve put the frame on top of the photo I’m using. The finer, subtler details of the fur don’t really show through the gauze, but it does give you some sense of how I am selecting my threads to capture the impression of colour and texture that I’m working from. I’m not concerning myself at all with what fibre the thread is made from – if it does what I want it to do, I’m using it.
I’m also recollecting a quotation I found, attributed to the painter Edgar Degas : “If it were not difficult, it would not be fun!”
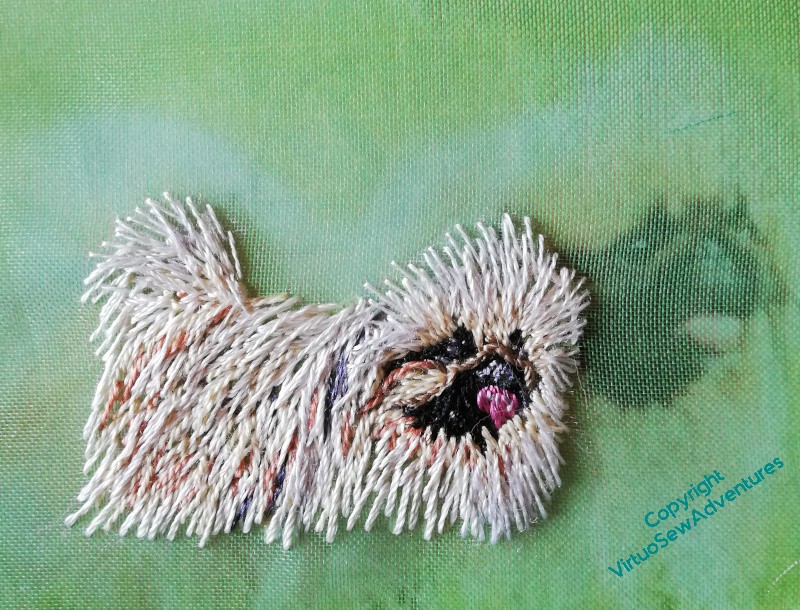
Worth the effort, though. I do think she’s turned out rather well!
Starting Mary the Pekinese

Now, although the starting impulse for the Placidus panel is the Pisanello painting (and I will be saying more about that in another post), it is also Elizabeth Goudge’s story, woven around an imagined version on an ancient wall. In the book, “The Herb of Grace”, the painting is already in the air, in your mind as you read, long before the mischievous young twins start pulling wallpaper off the pantry wall to reveal an ancient fresco.
So although I’m not intending any humans other than Placidus himself to be in the painting, the family dogs are definitely going to be in there, and I am starting with Mary the white pekinese.
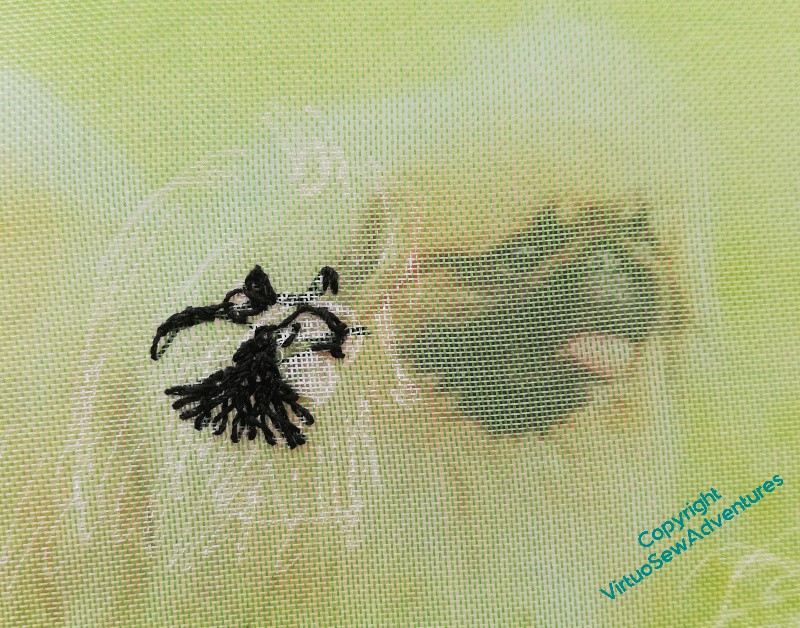
And here we go again – the sketchiest of outlines, a piece of gauze, and the sort of breathless pause you take when you Definitely Don’t Want To Ruin It.
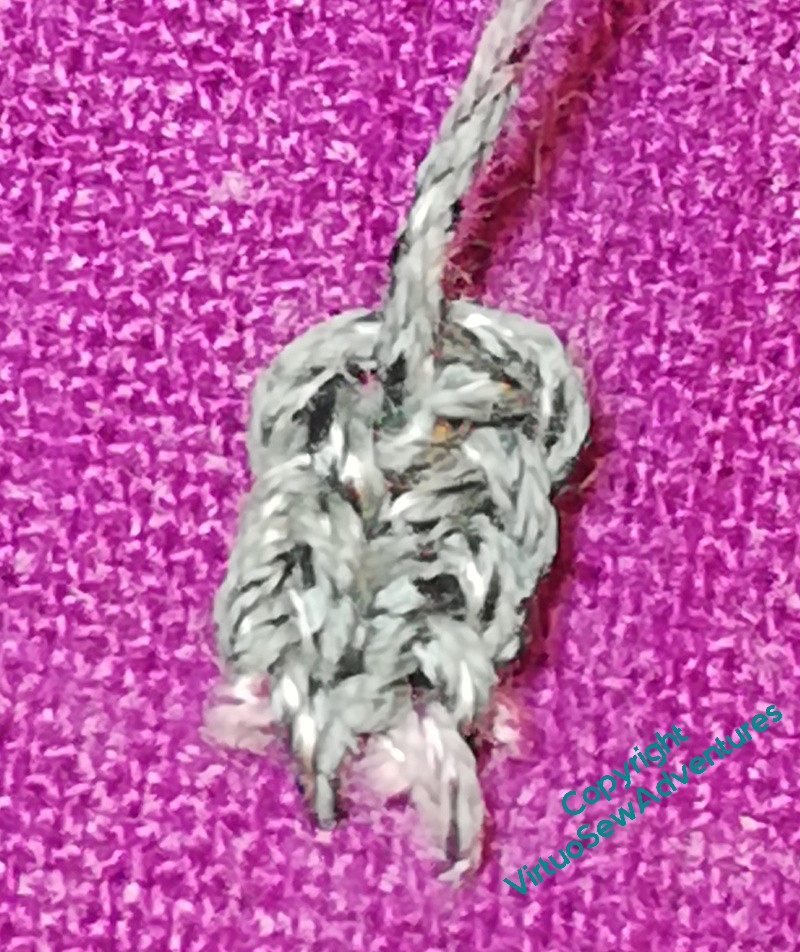
As you can see, the stitched version isn’t the same size as the source photo, so I can’t quite lay the gauze over the top to find where to stitch, but I can compare the shapes I’m creating. The black thread (good grief, I’m using black thread!!) is a fine silk, as used on the woodpecker.
The grey thread here in the highlights is from a gorgeous variegated silk eight strand thread. I think I may have bought it for “Leaving The Tyne“, but to be honest, at this stage I have no idea! It’s going to be useful, though, because I have several shades to pick from within a single length..
And I am already startled by how well Mary the Pekinese is looking.
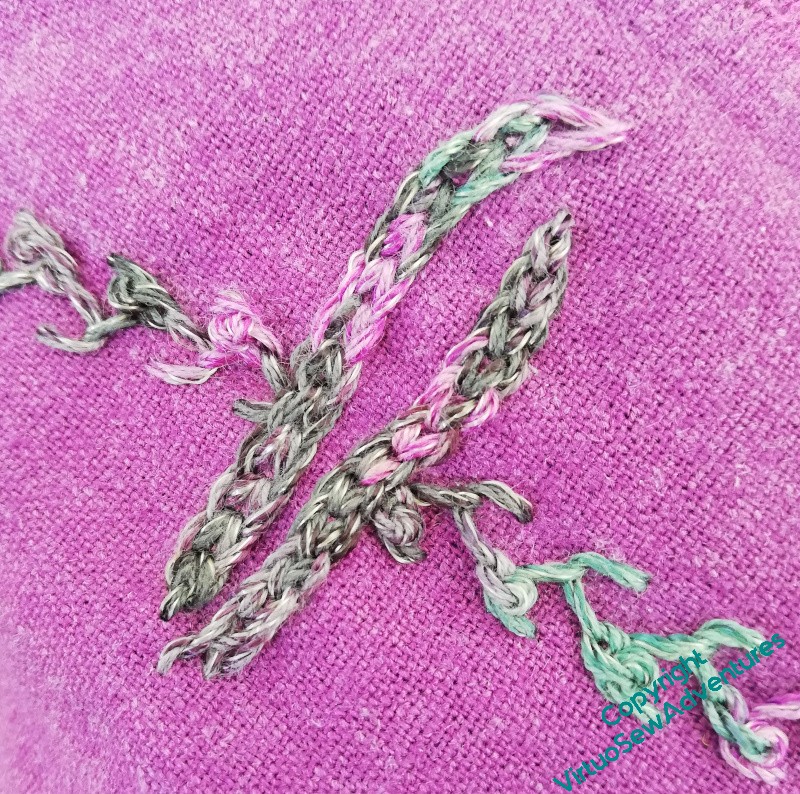
Another purple bag…
I thought I rather fancied tackling plaited braid stitch again, using the same variegated thread as for the chain stitch fernery. However, when I gave it a go, it turned out to be a poor thread for the stitch – too floppy, and too easily pierced. It’s not obvious, but there’s a glitter thread running through it, which interferes with the cohesion of the strands. Oh well, I’ll find somewhere else for the plaited braid stitch!
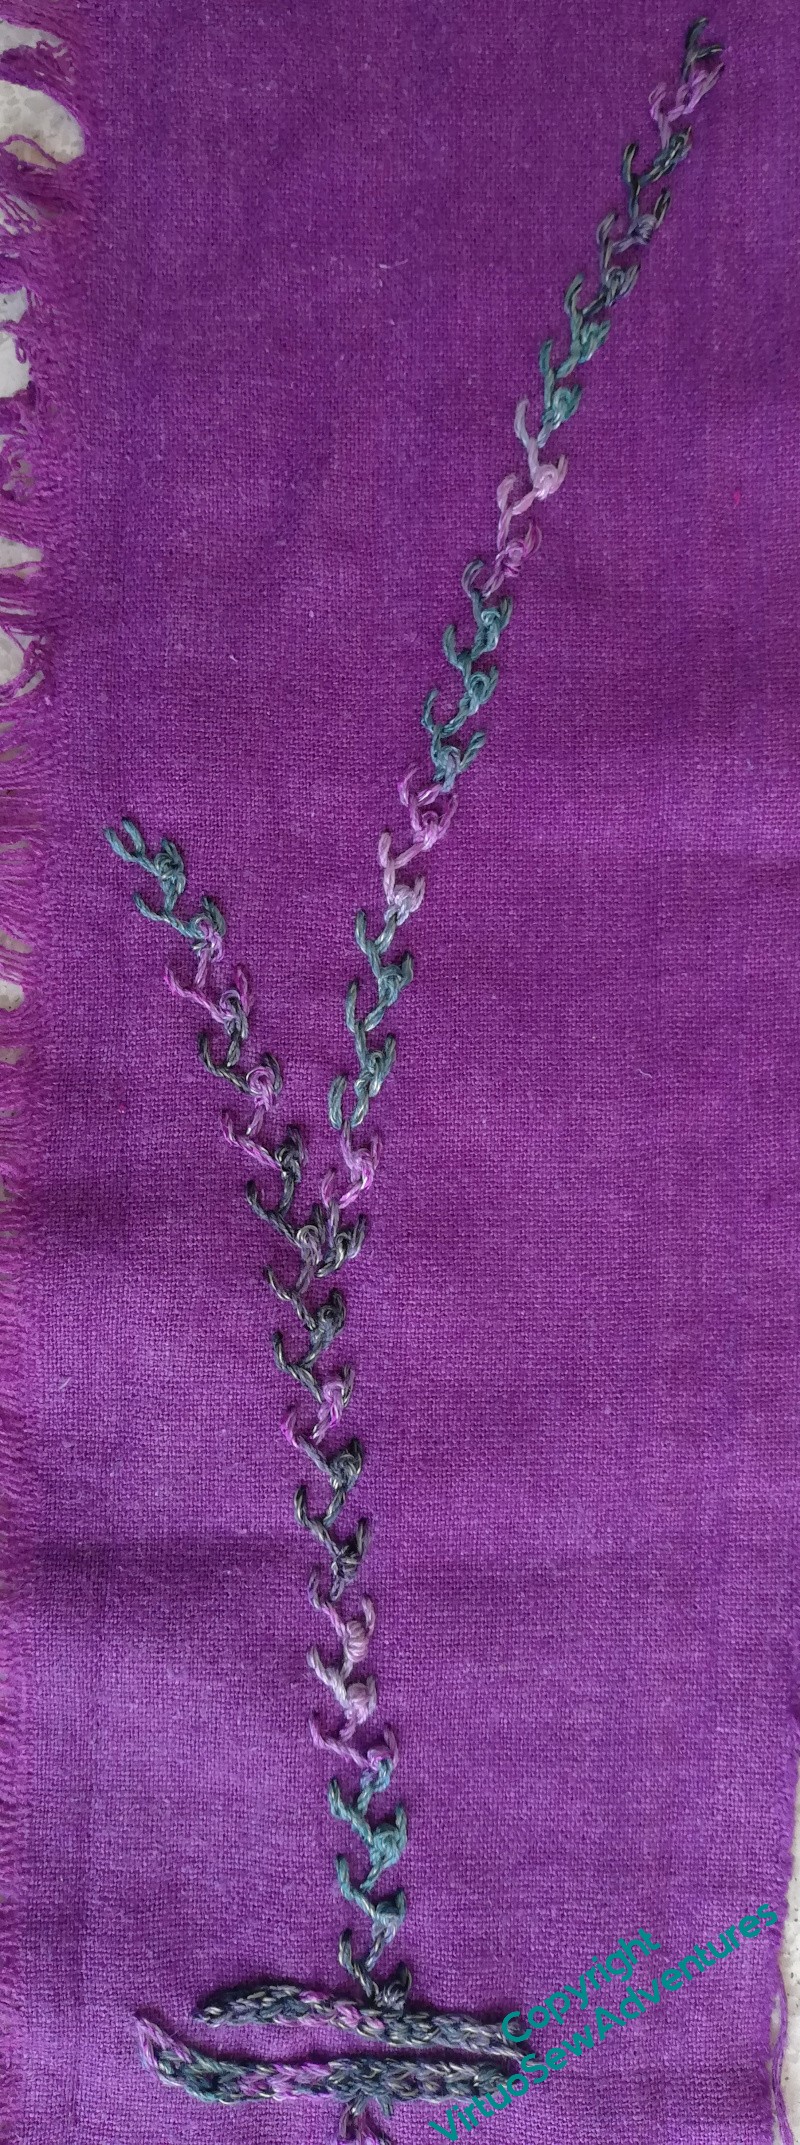
After some thought, I had a go at Mountmellick Thorn stitch.
That’s better. And this one isn’t going to be an all-over pattern like the fernery. Instead,I’ve done two vaguely treelike shapes, back to back, with Hungarian Braided Chain (I’ll get a braid in there somewhere!) providing the ground level.
Then I felt that maybe it would be useful to work the same Mountmellick Thorn stitch but at different proportions, so that I have a comparison. That’s in progress.
I’m also trying to work out how to line and assemble them neatly. I’m intending to use my little hand cranked Jones sewing machine, but as I’ve managed to bruise a couple of ribs and interfere with picking up that sort of awkward and heavy weight, I’m a bit unwilling to promise a prompt finish here!
There’s going to be a woodpecker, too..

I am going to start rereading the book again, at some point soon, but in the meantime, since I’ve rediscovered my “Vision of Placidus” notebook, I know that one of the birds I was going to include is a woodpecker.
I’m going to have to go to the shops and find some more gauze soon, as well, but while I can squeeze an animal in to the existing fabrics, I will do so.
I’ve commented before, I think, that getting a readable and workable design drawing onto gauze is a non-trivial exercise, but this opaque white line (a Posca pen) is pretty much the best I’ve found so far, and it also allows me to help myself by putting a few extra emphases on the lightest parts.
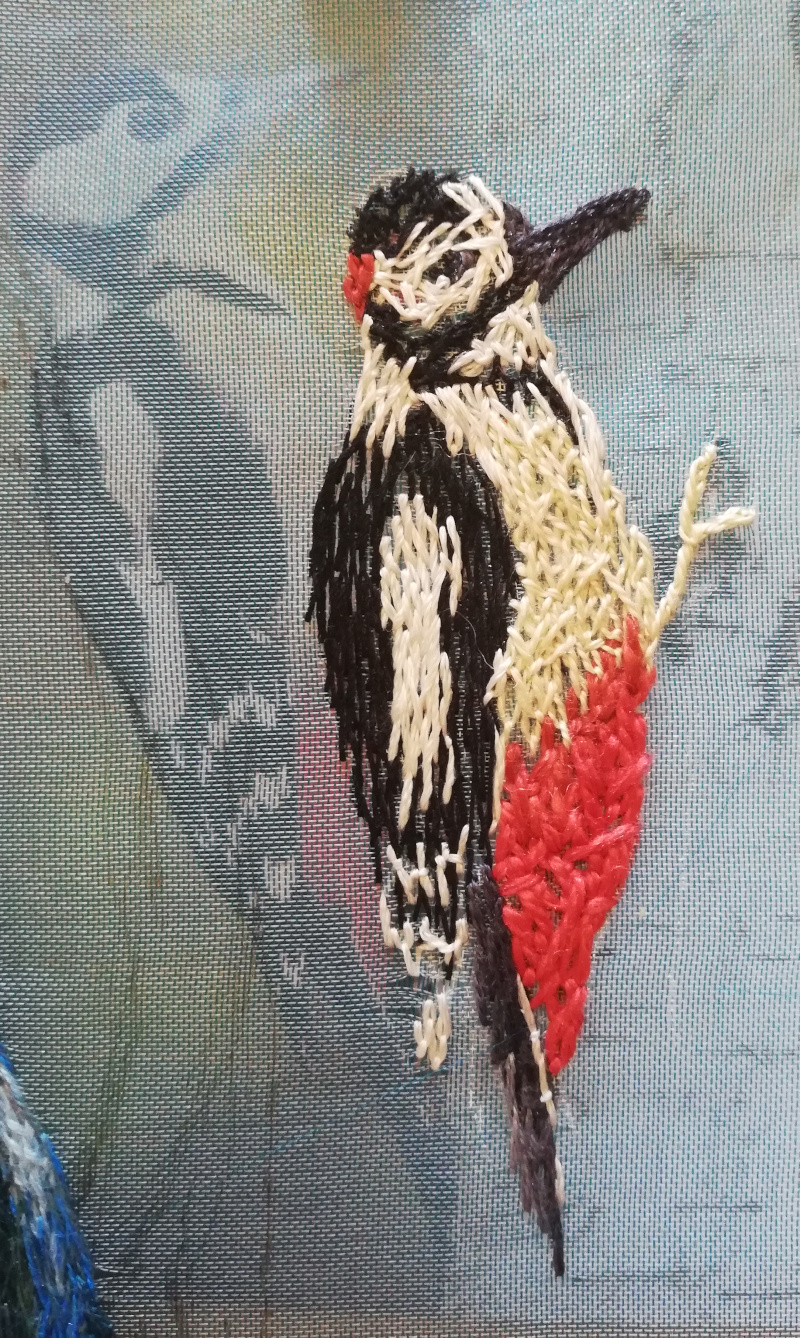
It’s amazing how quickly these little animals go, once I have a chance to get started. In fact, I was so entranced by how Woody was growing that I didn’t stop to take photos. In fact, I barely stopped to draw breath.
So this photograph shows a single afternoon’s work. I’ve used mostly fine silk threads, although his red breeches are a soft perle, and some of the white is probably cotton. As for approach – I simply tangle my stitches together, feather stitch variations, Cretan stitch variations, the occasional chain stitch or straight stitch. What I’m hoping is that the tangle of stitches will create a subtle variation in colour that will help the whole thing feel alive when it’s viewed from a reasonable distance.
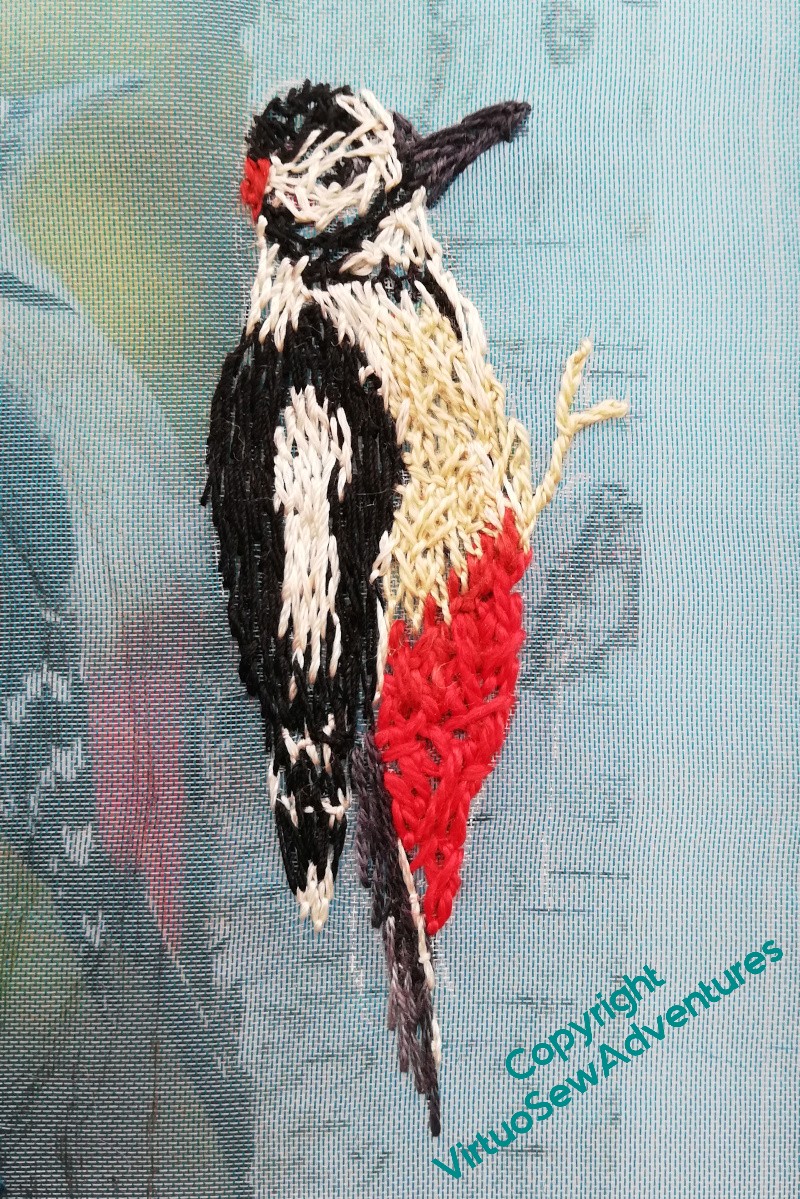
I didn’t have much I wanted to add, in the end. A few highlights, filling in the wings a little, and then really the woodpecker is done. I may add more when it comes to assembling the piece (remember all those seed stitches I added to the View of the Excavation once I started assembling the Dreams of Amarna panels?), but that can wait until I know what is being balanced with what.
I have been thinking, on and off, since I was asked about it after my talk, that assembling Placidus may prove to be an exceptionally challenging process. The panel I envisage is going to be about five foot by four foot, and I have a horrible feeling I’m going to be propping it against a wall or slinging it from hooks or even emulating one or other of the great Impressionists by somehow arranging a slot in the floor to drop it into while I tackle the top.
Maybe I shouldn’t be in too much of a hurry to finish this one…!
Un-idling My Hands
I would like to have a small pencil bag to take sketching, and I’ve been finding myself in the evening, fidgeting because I can’t concentrate on the complicated stuff and my crochet has fallen so far out of my head that I am contemplating pulling the whole lot out (most of one sock, from rib to the beginning of the toe) and starting again.
And yet I would like my hands not to be idle.
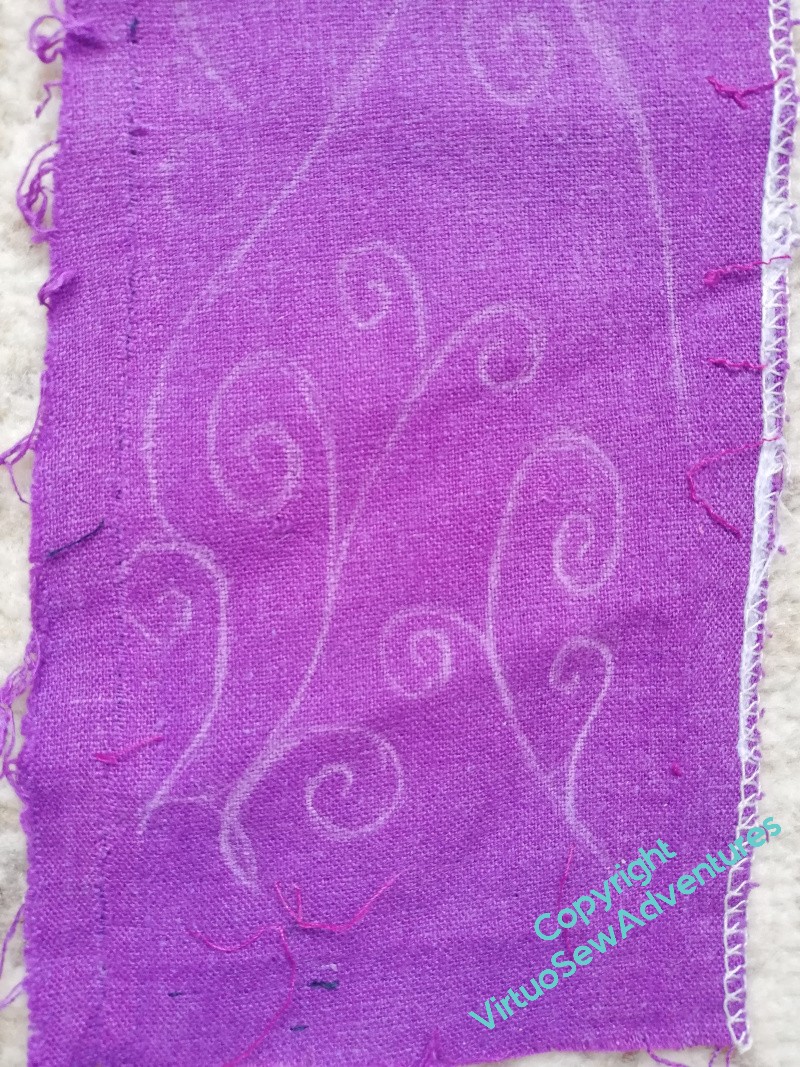
I’ve just taken a pair of side panels out of a skirt, so I’ve pressed one of those panels and drawn some rough fernlike curlicue things on the fabric in chalk – just freehand, nothing complex, no attempt at evenness, just a sense of balance and an all over pattern.
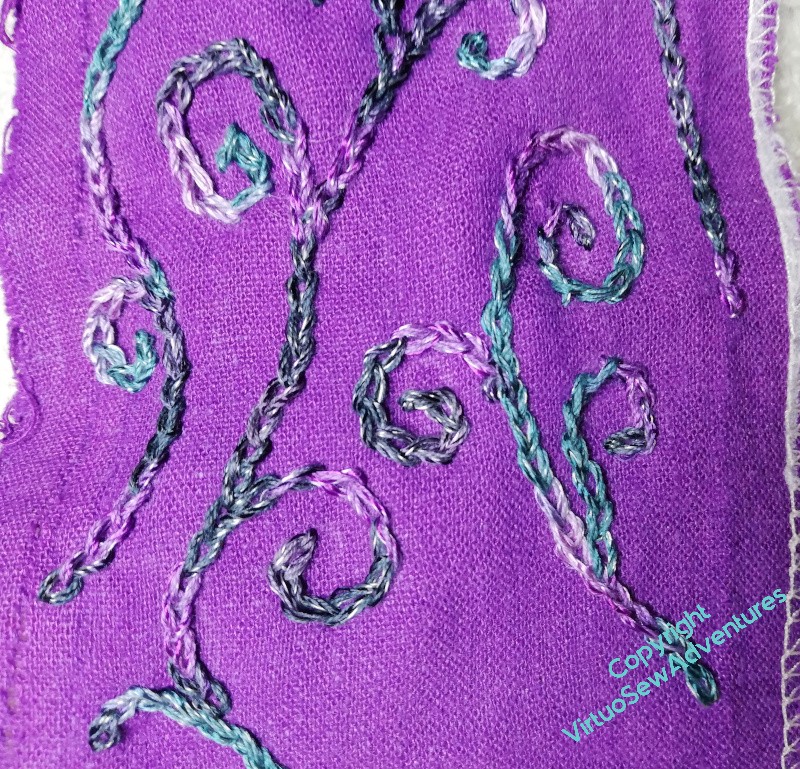
Then I went rummaging for a thread that would live happily on the fabric. This is quite a heavy thread on a cardboard spool, and I’ve not the vaguest idea where it came from. It varies from a very dark teal to a lighter version of the purple of the fabric, and it’s going well so far.
Strictly speaking that thread is on the heavy side for the fabric, and I may find that coming back to bite me, but for now, my little homage to the “Fernmania” that brought you the scrolls on custard creams is going well.
When I’ve done the whole length I will need to decide, do I line it with the other side panel or save that to make another bag with? Little drawstring bags are always useful, after all….
More on the Barn Owl
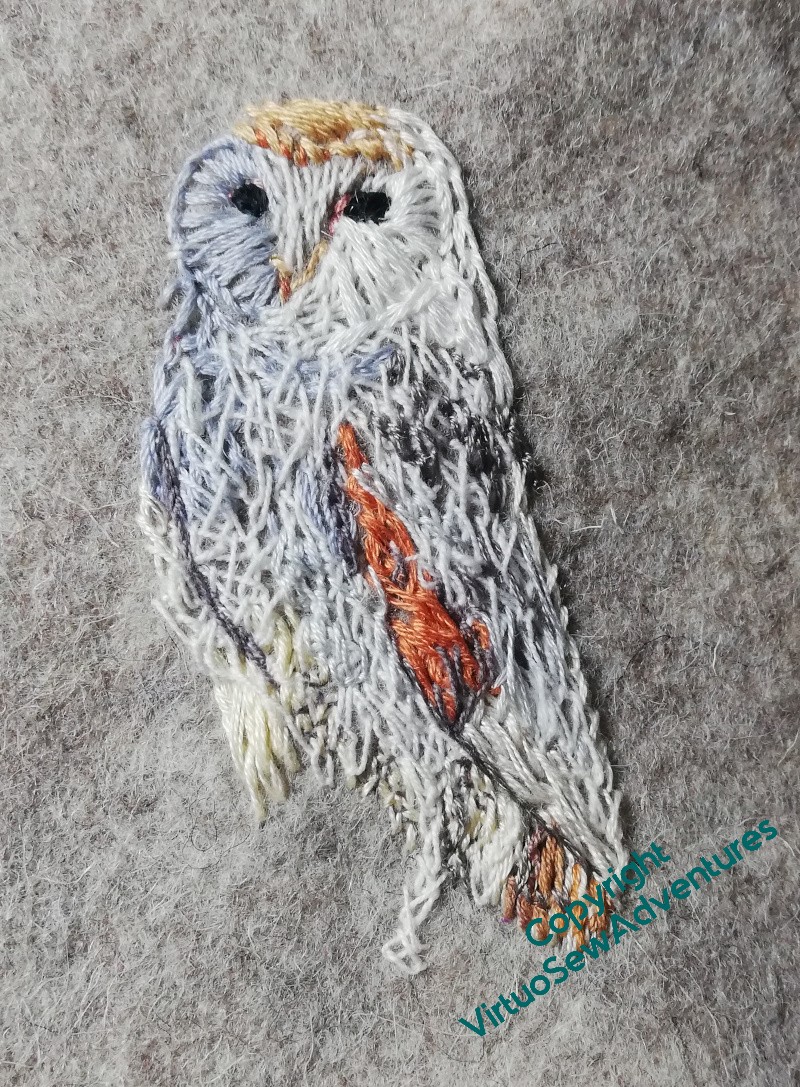
I’m on to the next layer of stitching now, changing the granularity of the colours, changing the balance of colour, trying to really see what my source is showing me.
I’m not quite sure where this refusal to do detailed planning drawings has come from, but for these Animal Vignettes I simply don’t. Partly, I think, because once the first layer is in you can’t see the details you want in the second layer, partly because I have become engrossed, if you like, in the challenge. When it works, it can work phenomenally well, and even when it doesn’t, as Hebe Cox puts it in her book about embroidery design, it has the virtue of spontaneity!
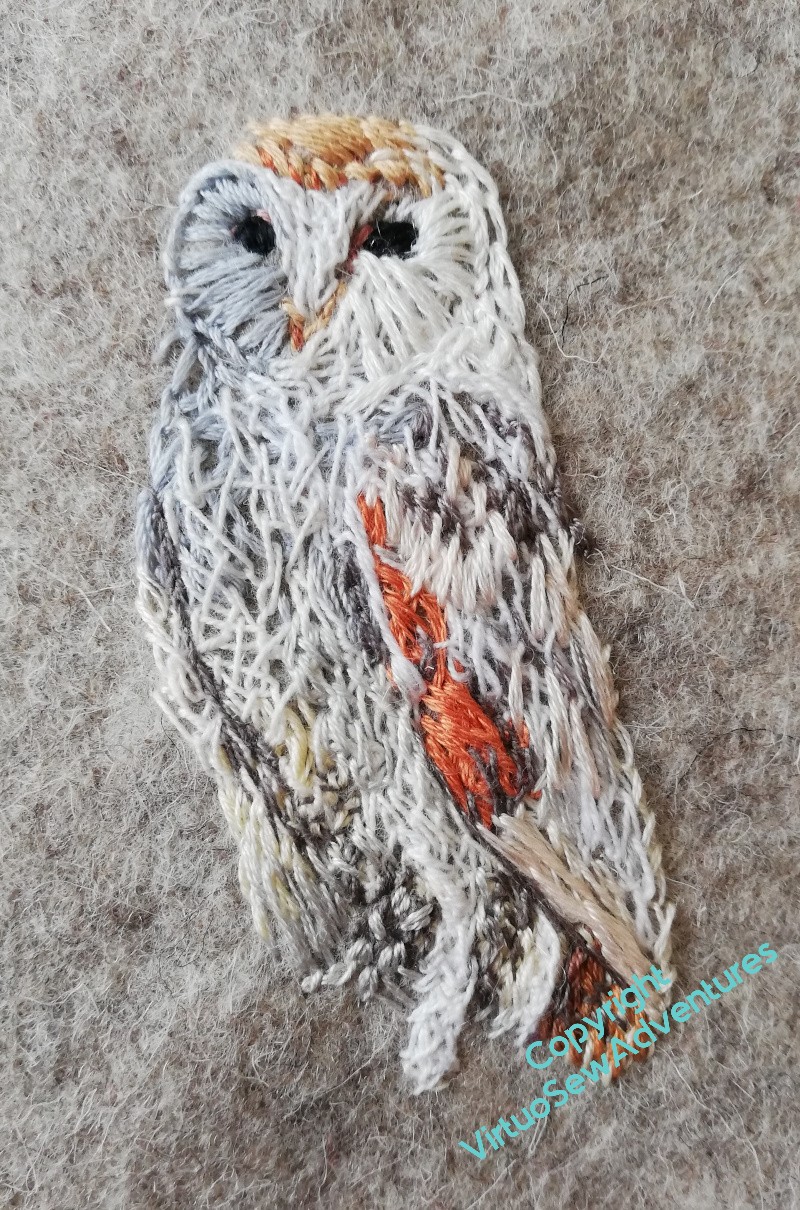
The owl is proving quite tricky. I’m not seeing the shapes and their relationships as well as I might, and I’m struggling to get the colours nicely combined.
However, I am also being reminded that in this way of tackling my stitching, I expect not to get it right first time. There are iterations, tacking from my stitching to my source and back again. Staring, stitching, trying to analyse the image, find the shadows, find the highlights. In fact, treating each fragment rather like a painting en plein air. Well, I’ve said before that if I fall into any artistic tradition, I’m an impressionist!

I’m not at all sure about this one. I think it’s done as far as I care to take it at the moment, and it’s certainly much better than it was. The fine layer of stitching – single strands of stranded cotton in a tangle of feather stitches and fly stitches – has made a considerable improvement on the breast, providing a contrast with the wing and some of the stitched shadows under the body. But I’m not sure that it’s right, I’m not at all sure that it’s finished, and I may very well find myself doing a new version of the owl later on, either because it’s too big for where I want it to sit in the final piece, or because I decide it’s got too much wrong with it and will draw the eye.
But then, this whole project is partly inspired by a fifteenth century masterpiece, and the anatomical exactitude of fifteenth century animal representations isn’t exactly perfect, so maybe my flaws of observation will contribute positively to the atmosphere?
Finishing The Penknife Case
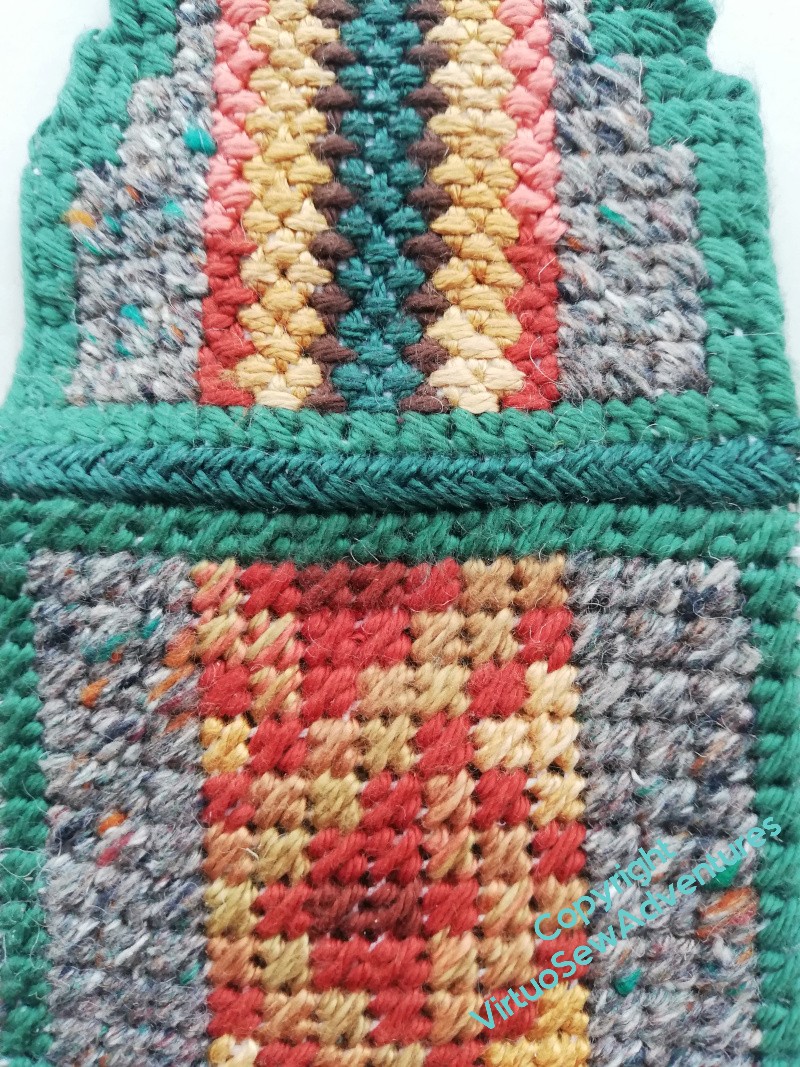
The penknife case came together fairly well in the end.
Some years ago I settled on a satisfactory way of joining two canvas pieces at an edge. It’s a sort of long armed cross stitch, which goes into each hole twice. That means it’s fairly secure, but doesn’t take security to excess, and it’s easy to do, even when I’m a bit weary.
I used the dark green thread I used on the front for the cross stitches, and I think the top, “hinge” seam has turned out well, if a little stiff.
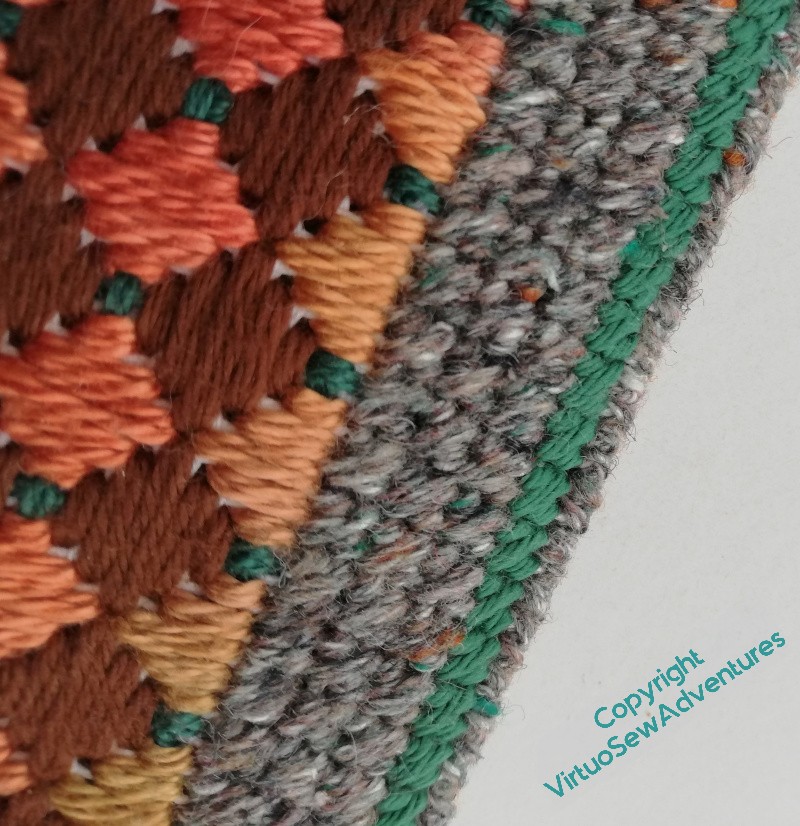
For the side seams, having run out of the green, I used the grey mottled thread.
That was a bit more of a challenge. I didn’t quite have to heave the needle through with pliers, but it was, nevertheless, quite an effort at time.
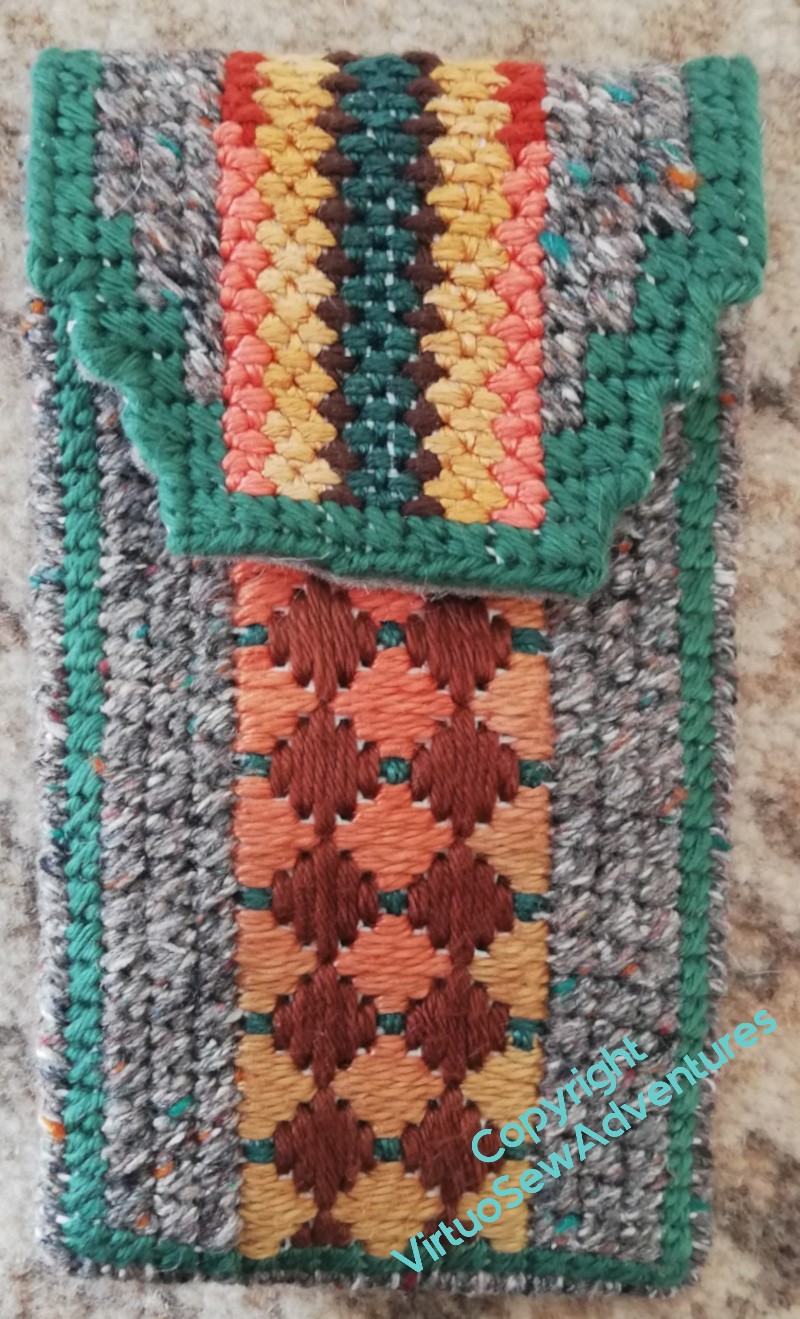
I don’t think this seam is going anywhere in a hurry!
However, it’s all nicely finished and secure now, and I didn’t buy any thread at all for it. Or canvas. Or felt to line it with.
Given how often avowedly “Stash Busting” projects turn into “Stash Growing” projects, I am going to take that as a significant win!
I believe that by now, anyone who signed up for my talk a couple of weeks ago should have received access to the recording.
Thank you to those who were there at the time, and thank you for the kind comments I’ve received. Please do ask more questions if they occur to you!