
Tag: Silk thread
A Glamorous Peacock
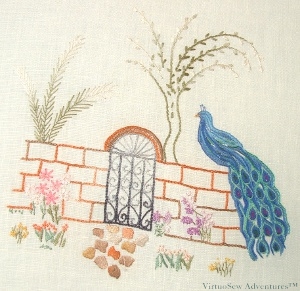
The Peacock
I’ve only recently begun to design my embroideries entirely for myself. To begin with I took painted canvases or transfers and worked them using a variety of stitches and thread combinations, depending on what I had to hand and what aspect of embroidery was catching my attention at the time.
I was attracted by this transfer of a peacock a long time ago, in fact I think I bought it when I was still a teenager. If I had paid attention to my whims I would have bought a good many canvases and transfers of peacocks over the years. In fact there is a painted canvas that I didn’t buy that I now would, if I were to see it somewhere!
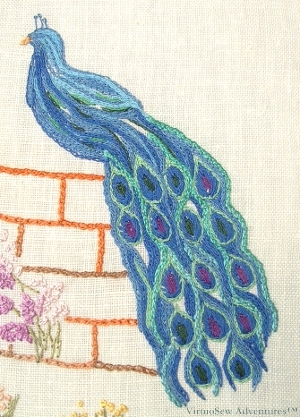
Peacock - Close Up
The fabric is a linen napkin, and the threads are a variety of silks bought when a needlework shop I worked in as a teenager closed. I got a very good discount, in gratitude for services rendered..
I didn’t actually get to begin stitching the Peacock until after I was married. He’s worked using chain stitch and heavy chain stitch, rows and rows and rows in blues and greens with a little purple in some of the eyes on his tail. I quite deliberately left some fragments unworked because it was beginning to feel rather congested, and although a peacock’s tail can look pretty bedraggled when it is closed, I wanted to bring to mind the glamour of the open tail and not the impediment of the closed one!
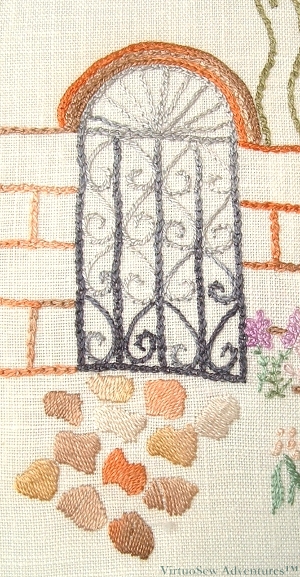
Gate - Close Up
Now I look at the design again, it is worked almost entirely in chain stitch and chain stitch variations. The olive green tree is worked in twisted chain, with detached chain stitch leaves.
The brick work is outlined in ordinary chain stitch, and the arch includes cable chain stitch, which is one of my favourite surface embroidery stitches. It looks much harder than it really is, produces a line which is slightly more marked than ordinary chain stitch, and can be tweaked and ornamented with French Knots or simple seed stitches inside the links.
I tried to make as much use as possible of the variation of colour in some of the threads, so the work in this piece is done by the colour variation rather than by trying to make excessive use of stitch texture changes. It is now stretched and mounted over padding and framed without glass, so that the textures and colours have the best chance of being seen, and hangs in our spare room. Whether our guests notice it is altogether a different matter!
Beginning the Tudor and Stuart Goldwork Masterclass
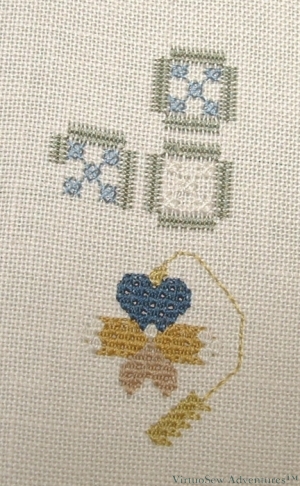
Starting the Spot Sampler
So now I am beginning to do the silk embroidery for the next Thistle Threads Online University Course, the Tudor and Stuart Goldwork Masterclass.
More gorgeous Au Ver A Soie silk thread to play with!
Furthermore, some new stitches! I’m not keen on counted work, so when I saw a chart in the instructions, my heart sank. Then I read the instructions and realised it was going to be a bit more fun than I had thought…
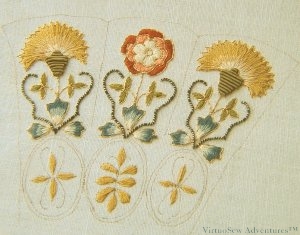
So, most of the silk stitching is to be in Queen Stitch, which I think I have done in canvaswork before, but never at this scale, and never changing its orientation or doing half queen stitches. The square motifs are bordered in Roman Stitch with Rice Stitch in the middle. Apparently in the historical pieces, Queen Stitches are often treated almost as pulled work, creating a lacy pattern of holes between the stitches. It’s quite difficult to pull tight enough, but as you can see from the navy blue petal, I’m beginning to get the hang of it.
The great attraction of this course for me is that we will have animations to show us the complex gold thread stitches that are the main focus of the course. At the end of the course, we’ll get a CD of these animations, so if I forget how to do one, I will be able to learn it again. Furthermore, some of Tricia’s recent posts on The Embroiderer’s Story mention that she has discovered some new stitches during her research trip and she is hoping to add them as a bonus!
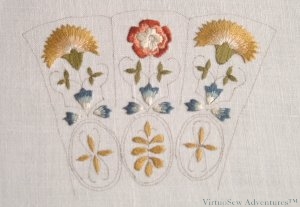
Floral Glove Needlecase – Month Three Finished!
Month Three Finished
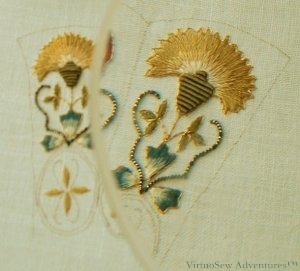
So, making progress here. All the silkwork is outlined in Elizabethan Twist, carefully following the suggested paths so as to have the smallest possible number of ends to sink.
Then the calyxs of the two carnations are covered with Olive smooth purl, cut to size and treated like a bead. This was fairly tricky because it was easy for the end of the purl (which is a very fine wire, coiled up) to catch on the silk thread being used to sew it down. In fact for the second calyx, I waxed the thread, which made the whole experience less fraught! I notice I didn’t quite get all the lengths or maybe spacings right for the first calyx, but for now I shall leave it as it stands.
Then I couched the striped thread curlicues. Again it was tricky to place the black couching thread where it would disappear into the thread being couched, but I think a few tweaks with a needle will fix that!
Through A Glass Clearly
Finally, I thought I would show what a difference a magnifier makes. As I think I have said before, it is the change in size that terrifies. I began by stitching without a magnifier and was reasonably happy doing so. I just felt that it would be a useful additional tool, especially given some of the other projects I have in mind.
My eyes become accustomed to regarding the magnified view as normal, then when I stop for a cup of tea, I push the magnifier to one side to have a “proper” view. At which point there’s a small squawk and my husband asks what’s wrong. “It’s gone all tiny”, I say, “Don’t tell me I stitched that!”. After the said cup of tea, ordinary views reassert themselves and it doesn’t seem quite so astonishing.
Which is really just as well. We don’t embroider to scare ourselves, after all!
Floral Glove Needlecase Course – Starting the Goldwork
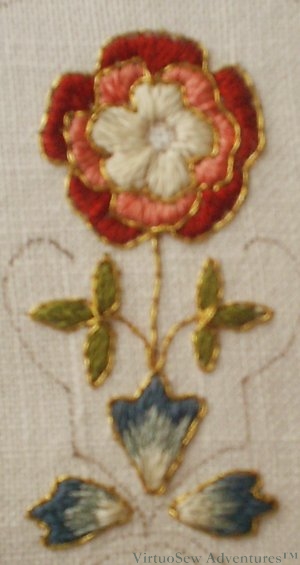
The Rose Outlined
The embroidery on the Floral Glove Needlecase is based around the tabbed cuffs of gloves which were often presented as gifts during the Elizabethan era. We’re only doing one side of one cuff, of course, but the additional historical material we get each month, with high-resolution pictures of some of the original gloves which remain in existence, give us a very fair idea of what Thistle Threads were aiming for!
There are several useful diagrams in the instructions showing where to start and end the gold thread, which is couched down with silk. Furthermore – brave lady indeed! – Tricia has even provided us with a view of the back of the embroidery. Miss Hunter would have looked at the back to check that it met her high standards – as students we are studying that photograph to try to garner more clues to how the work fits together. It gives a better idea of stitch lengths, for instance, because the eye isn’t dazzled by the goldwork and can study the couching.
It is very detailed, rather tiring work, so even with a good light (by the way – bright sunlight is not, in this context, a good light – it bounces off the gold thread and the magnifier and tires the eyes even more quickly) and a magnifier, I can’t do much at once. What you see here is two or three sessions’ work.
I’m pleased, though. There are several new techniques and materials still to try in this month’s session, and I think I am learning a great deal – not least, working at this scale turns out to be less hair-raising than I feared!
Trying Stumpwork
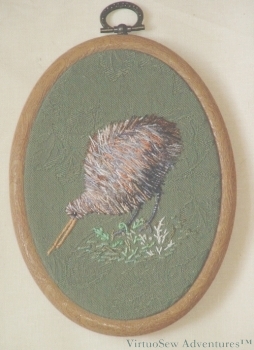
Kiwi In Stumpwork
As I’ve already mentioned, almost every embroidery technique I have done has been learnt from a book, or just developed by guesswork based upon something I have read.
In this case, I had been reading about 17th Century stumpwork, and had just returned from a half-business trip, half-holiday in New Zealand. And I had some rather gorgeous overdyed silk threads and wanted to experiment with them!
The body is worked in layers of straight stitches, using several different colours of the overdyed silks. I worked a slip, slightly smaller than the body, on a separate piece of fabric, then applied that piece over some padding, and used more straight stitches to cover the join – very thoroughly!
The legs and the beak are both worked by stitching very closely over a trailing thread of soft cotton. The background fabric is a sturdy cotton damask upholstery fabric, so the close stitchery did no harm. The ground is worked using still more straight stitches, with scroll stitch, coral stitch and fern stitch to create the fragmentary undergrowth.
This was intended just as a piece of fun, but I was happy enough with the outcome to mount it in a flexihoop frame. I’ve bought a couple of books on Stumpwork since I stitched this, but I don’t know that I would have thought of doing the Kiwi this way if I had read the books first.
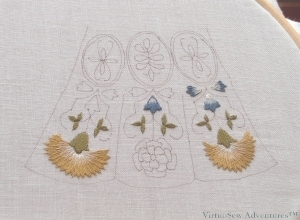
Floral Glove Needlecase Kit – Silk Work Finished!
Floral Glove Needlecase Kit - Silk Work Done
I’ve finished the silk work on the Needlecase Kit!
The new stand has been working well – it is very adjustable, so I can make it suit wherever I am sitting, and the magnifying glass has been very helpful too. The only slight hitch with the magnifier is that stitching away at magnification becomes normal and then when finishing off threads at normal vision, I get slightly spooked to realise how small the stitching is!
As I have said, I am not really a fan of satin stitch and long and short stitch, perhaps because I am self-taught. Both of these stitches look simple, but are difficult to execute well, and so are very dispiriting for someone learning from books, with no-one to give hints and tips for excellence. How I long to have had a Miss Hunter to help me!
Actually, the instructions that Tricia Wilson prepared for the course are very nearly as good as having her beside you. They are copiously illustrated with very high resolution photos, so that it becomes a matter of seeking to make the view through the magnifier match the printout.
I’m even coming to think I may enjoy satin and long and short stitch, in small doses!
The kit included whole spools of the silk thread, so I have plenty left to play with. I’m not expecting to go so quickly with the goldwork, but the instructions come nicely spaced out so there will be time to take stock and work on other projects as well.
Floral Glove Needlecase Kit – first stitching
Floral Glove Needlecase - Beginning To Stitch
So, here is my progress so far. I’ve ended up buying a floor standing frame with a clamp so I have it ready to hand and don’t have to hold the frame, and I have bought a magnifier on a clamp as well. I’ve not had them up and running for long enough to comment on whether they really help!
There will be some goldwork in the later stages, but the first month concentrates on the silk embroidery. I’ve never used silk thread before, but it’s a lovely thread to stitch with. The thread is six strands and separable, like stranded cotton, but the resemblance ends there. The silk thread is supple, soft and shiny, and while not being difficult to work, doesn’t feel as lifeless as cotton sometimes does.
The first scare was to read the instructions and discover that the chrysanthemums were to be outlined in stitches about a millimetre long. Eeek! Then again, long and short stitch is not my favourite way to fill a shape. I admire the silk shading one sees at Royal School of Needlework shows, but it doesn’t fire me with a desire to emulate it. Still, Grandmama could do it (I shall photograph some of her embroidery and blog about it later), so I really think I should have a stab at learning.
I’m running a little behind, because of deadlines in other work, but when I get a combination of an afternoon of good sunlight and time to stitch, I become a very happy girl!
Squeaks with Excitement!
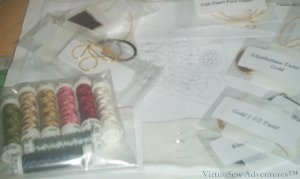
Floral Glove Course Kit
There was a gentle thud of a parcel through the letter box yesterday.
And Oh Frabjous Day, the Floral Glove Needlecase Course Kit has arrived!
What with hair-raising weather (in the UK and the US) and a much more popular course than the organisers anticipated (a great problem to have!) it has taken a little longer than anticipated for my kit to arrive. We’ve been kept very well informed, but of course once a parcel is in the system there is nothing anyone can do to speed it up…
It was worth the wait! There’s an intriguing variety of speciality metal threads, and some rather gorgeous looking silk. I’m planning to read all the instructions at least twice before even looking for a hoop – I’d like to do a good job on this, and I rarely use silks or metal threads at present.