
Tag: Silk thread
Close-ups on the Flowered Blouse – Part One
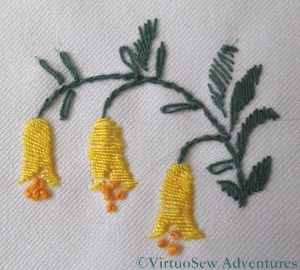
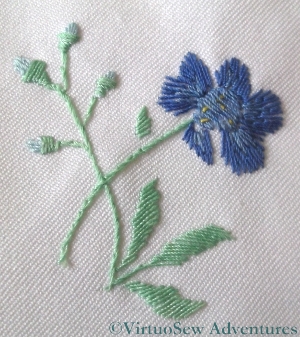
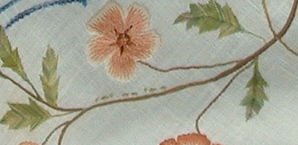
Flower 1 - Close up
You may recall, not so long ago, a post that I wrote about a blouse embroidered some years ago, during a particularly impoverished period in my life. Here are the promised close-ups of the floral motifs.
Or at least some of them. When the connection started slowing when I put all ten in one post (before I even started to add any text!), I decided to split them up. I’m hoping to put five per post and just write two posts…
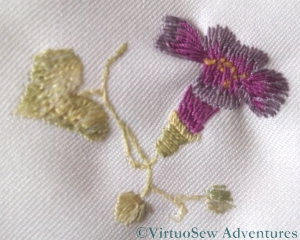
Flower 2 - Close Up
I’m no botanist, and if I am honest, I suspect the original designer wasn’t either. The various pictures and descriptions in the magazine did not suggest a slavish adherence to the natural colours of the flowers – even supposing one could be sure of their likely species!
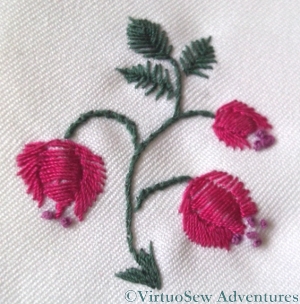
Flower 3 - Close Up
The polyester was not an easy fabric to embroider, and frankly the blouse wasn’t worth the effort I put into it, being a lot like a cheap school or office uniform blouse, but as I said in the original post, I didn’t really have a choice at the time. That said, I do still wear it, not without pleasure, so there is something to be said for all that effort, perhaps.
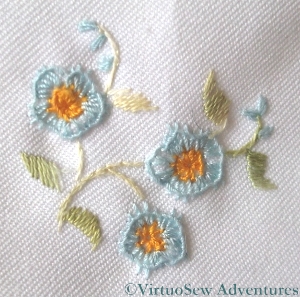
Flower 4 - Close Up
The stitches used were very simple ones, for the most part – satin stitch, fishbone stitch, stem stitch, blanket stitch, and the occasional French knot. The close ups show that the blanket stitch refused to settle properly and the spine of the stitch has rolled inwards from the edge, but that may simply be the result of years of wear and tear. The blouse goes in the washing machine when it needs a wash – inside a pillow case or lingerie bag, admittedly, but I don’t hand wash it.
Flower 5 - Close Up
When I was choosing the colours and the stitches was more concerned to balance the colours across the front of the blouse than to create accurate depictions of plants, but for all that, there are some motifs more reminiscent of the real thing than others!
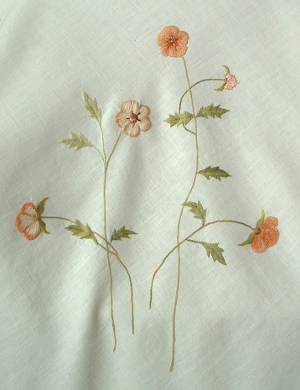
A flowered blouse
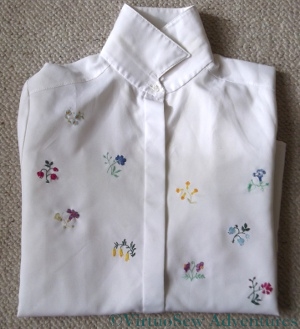
Blouse embroidered with flower sprigs
As Spring shows her head after the chill of Winter, I am beginning to fish out clothes other than bulky winter woollies. This is a simple polyester blouse I embroidered some years ago when I had time, an itch to embroider, but absolutely no money to buy fabric.
I used a Free Transfer from The Needlewoman of January 1934 (from the boxful that Grandmama gave me), showing sprigs of flowers which they suggested might be used for lavender bags, traycloths, handkerchiefs, or underwear (if only I had the time and skill to make lovely silk embroidered undies!). The silk threads came from my stash (even fifteen years ago my stash was extensive and varied!), and in fact I think the whole idea of the project was that I wanted to use those threads in particular.
I’m not really a “floral”-type person, or at least the florals I stitch tend to be quite heavily stylised, and I’m also not someone who likes perfect symmetry. So I snipped out some elements from the transfer and arranged them irregularly on the front of the blouse. Once they were transferred, I arranged the threads, so each colour appears on each side of the button placket, but not on the same flower sprig.
I will provide close ups in another post, when I have worked out how to format them!
An Experimental Seahorse
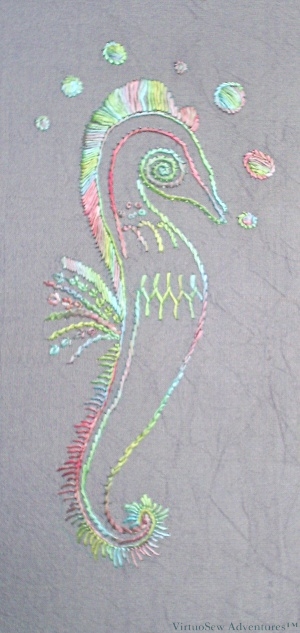
Small Seahorse in overdyed filament silk
Sometimes I play with threads for no other reason than to play with them. In this case Stef Francis gave me a skein of overdyed filament silk to play with. She tends to create a much more “freeform” style of embroidery than I do and she wanted to know what I thought of the thread.
I found a simple transfer that offered scope for several different stitches, and started playing. I had been concerned that it might twist up when I didn’t want it to, but it stayed fairly flat most of the time, and it is noticeable that the stitches look and feel different in a flat thread, as compared with a round one.
For example, in a round thread, the stem stitch line tends to be more textured, and the direction of slant is more obvious. Here, the slight flatness creates a smoother line. That same flatness makes the satin stitch smoother and cleaner looking. It also helps to mask any slight imperfections in the stitching!
On the other hand, that same slight “spread” of the filaments clouds the distinctiveness of the Wheatear Stitch in the fin on his back, so not an unalloyed success, but interesting and worth trying all the same.
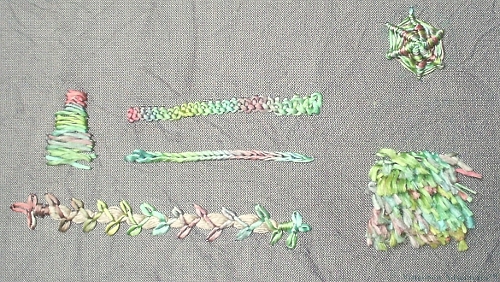
Silk Filament Experiments
Then I started just to play with stitches in a spare corner of fabric. The Braid Stitch (top row) works quite nicely, I think, and the Turkey work (bottom right hand corner) is better than I hoped, especially considering that I’ve not done it before. I can’t imagine what I would use that texture for in these colours, but Stef has a fabulous range of overdyed shades and I am sure that something would spring to mind for one of them. The little triangle of Closed Herringbone Stitch is hardly a success, but that may be a problem of scale. I don’t think the Braid Stitch would have worked if it had been any wider than it is here.
I don’t think this thread adds anything to the Reverse Chain Stitch, or to the Spider’s Web Wheel, but I do like the Chained Feather Stitch couching. In fact, that might have been better had I had the courage of my convictions and made the base that’s being couched about twice the width.
All in all, I had a lot of fun playing with this thread. I’ve now got a much better idea of What To Do and more importantly What Not To Do with it. One important thing to remember – make sure hands are smooth! Silk catches on everything and filament silk does so even more!
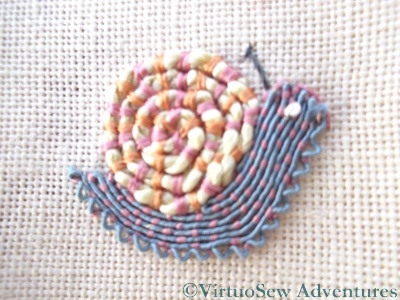
The Glittering Snail Finished!

Glittering Snail Ornament
The Glittering Snail Ornament from Stitching A Snail For Storage is Finished!
He was a lot of fun to stitch. I was introduced to silk gimp and silk purl (as I’ve already said, I don’t know what I will use them for, but I’m sure I’ll find something!). I don’t think I’ve ever stitched anything quite so small, either.
Tricia provided the blue silk thread to make the cord, and a silk fabric to back the ornament, although I think I need more practice at making cord, since mine ended up a bit floppy! However, it has now ended up with the whole thing, from hanging loop to tassel, made from a single length of cord, and I am hanging it up in my living room to keep it from getting crushed.
My local art shop sells cutouts of mount-card, presumably for people to do papercrafts with, but I find they make perfect mounts for this sort of ornament. I used one card for the front and one for the back, lightly glued fine wadding to the card and then stretched the fabric over the top (using glue or thread to secure it, depending upon which seems most appropriate). Front and back are then held together and overstitched, and the stitching can be covered with cord.
I used almost exactly the same technique – on a larger scale – when I was mounting “Starbright” a couple of years ago.
The Glittering Snail – part two
The Snail In Silk
So, bright-eyed, bushy-tailed, and full of enthusiasm, I sat down with my Glittering Snail Kit and got started. And, in fact, the silk gimp and silk-wrapped purl are not the only threads new to me, so it was great fun.
The pink and orange threads are both silk floss rather than spun silk. Occasionally I snagged the floss on the screw on the hoop, or a fingernail, or even on another bit of thread (how? don’t ask!), but I really enjoyed it, all the same.
The snail’s body is worked using the silk gimp and stretched silk-wrapped purl, couched with the pink floss. They were easy to work with – they felt gorgeous! – and I have a tiny bit left to play with a little while I think about how I might use them in my own embroidery. At the moment, nothing is really springing to mind, but I’m pretty sure that somewhere along the line some silk-wrapped purl will appear..
The Glittering Snail – part one
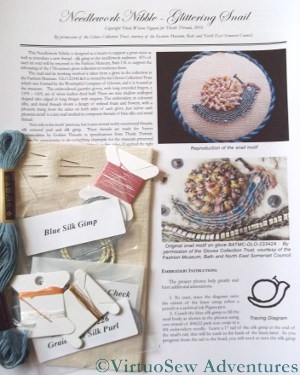
The Snail Kit Has Arrived In The Post
You may recall that in December I wrote about the Thistle Threads project to Stitch A Snail For Storage. We’ve been away for a while, but came back to find a huge pile of post which included a jiffy bag from Thistle Threads.
Since I’ve already printed out the instructions (as soon as I ordered the kit!), I can start just as soon as I’ve gathered my wits and drawn the design on the linen. Even though the basic concept of the design is simple, it will be complicated and probably a little tricky to do, because the snail is only about an inch from nose to tail!
Tricia had two reasons for developing the kit – one was to sell something in aid of the Fashion Museum in Bath, but the other was to introduce some new threads to us. So of course, the first thing I did was to rummage through to look at the the new threads, the silk gimp and silk wrapped purl. They look highly intriguing, and I am looking forward to playing with them…
Tudor and Stuart Goldwork Masterclass – More Post
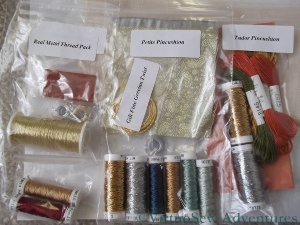
More Post From Thistle Threads
Yet more post from Thistle Threads – aren’t I a lucky girl!
This time, the post contained the real metal threads for the Spot Sampler, and the materials for two pincushions that also form part of the course. There’s a piece of silk brocade, and two pieces of linen, and even more silk threads… I’ve not caught up with printing the instructions yet, so I’m not quite sure what I’m going to be doing with them, although I have had a quick look, and there’s at least one new stitch variation in among them.
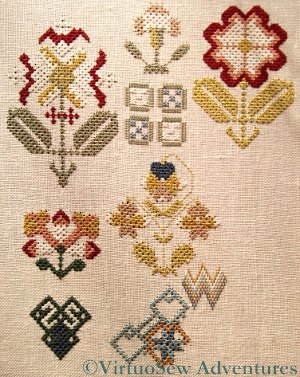
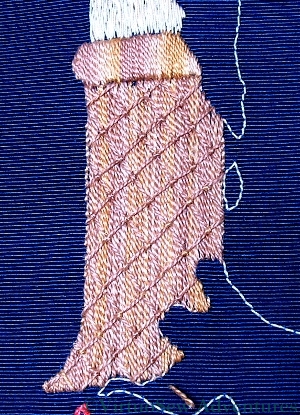
Progress So Far
And bear in mind, I still haven’t finished the silk work on the Spot Sampler, and that there are going to be even more ornamental stitches to learn. This photo shows my progress so far. Over the last couple of days I have finished the bargello motif and made a lot of progress on the central motif at the bottom. I once reckoned it took twenty minutes to do ten Queen Stitches, and was very depressed by that discovery, but I think I’m speeding up again!
It’s intriguing to see the new fabric created by the Queen Stitches. It’s not often that the effect of stitches is quite so clear. Instead of the ordinary square-woven fabric, the closely-worked Queen Stitches create a sort of heavy openwork lattice. It has a completely different texture to the basic fabric and when I finally finish the piece, I will have to make sure I frame it or mount it in such a way as to make that quite clear.
A final look at the Piano Shawl
Corner Motif on the Piano Shawl
The Piano Shawl was only a metre and a half square (only!), so there wasn’t really space for a stave in each corner, even if Elaine had wanted four melodies included! At the same time, there was enough space in the corners that without something there, the whole thing looked half-hearted and unbalanced.
So I had to do something. I traced some of the stems and devised a very light floral motif, consisting of four stems and a few leaves. The main stems are worked in Broad Chain Stitch, using a plain stranded linen thread, which I used in the stems on the main design elements too, but the shorter, smaller stems are worked in Portuguese Knotted Stem Stitch, using a variegated silk thread. I used several different variegated silk threads for the leaves throughout the Piano Shawl. Again this is by no means a naturalistic treatment – the flowers are something like dog-roses, but the leaves (all worked in Fishbone Stitch) aren’t like any I’ve ever seen in a garden before!
Initials in Morse Code on the Piano Shawl
My final picture is a shot to show my initials in Morse Code in one corner, pretending to be a caterpillar!
The picture also shows the centres of flowers, which were the same across the piece. The thread is a variegated, almost untwisted rayon thread, and it is used only in the centres of the flowers. It’s very like the thread I used for the headdress of the Prince’s Companion in the Persian Fantasy companion piece.
Now that I have seen the Piano Shawl in its destined place, I am happy with it. The overall effect is light-hearted without being entirely frivolous, and the time spent in Elaine’s music room pulling threads, and draping them over the furniture to make sure that they would all match nicely, wasn’t wasted.
However eccentric it might have seemed at the time!
Candlestick Bookmark Finished

Finished Candlestick Bookmark
I’ve finished the candlestick bookmark.
I worked the stitches on the candle vertically, and the stitches on the drips of wax diagonally, to try to create a slightly different effect. The light reflecting off the different angled stitches creates almost different colours, and certainly different shades.
The dense weave of the grosgrain ribbon has made stitching this really rather a trial. As I’ve commented already, sometimes I feared I would break the needle, and that has meant that it has required a real effort of will to complete the embroidery. Now it is finished, however, I’m pleased.
The Candlestick looks like engraved brass (with the eye of faith, anyway!), with the vertical stripes suggesting the reflection of other things around the room.
The wax doesn’t really look dribbly enough, but it is as dribbly as I am willing to make a bookmark. If this were to be a wall panel (tell me why I would do that?) I would use bullion knots to make the dribbles look more textured and dribbly. That would also make a bookmark too thick to use.
I think the flame is a real success, though. It is astonishing how such a simple shape, with simple colours and stitches, should be so evocative of the real thing.
More on the Candlestick
Second Stage of working the Candlestick
I wanted to create the appearance of engraved brass on my candlestick, so I began by laying long stitches vertically over the whole area. It didn’t occur to me for a moment to do the surface satin stitches horizontally. When you look at a shiny or patterned metal candlestick the reflected colours tend to blur out vertically, colours of the thread create vertical, slightly blurred stripes in the first layer.
Then I worked a basic laid work pattern over the top, with the diagonal threads couched down with an upright cross at the crossing points.
The background looks a little strange because the light was poor and I had to use a flash. It has washed out the detail of the stitching, and created a strange watermarked effect on the grosgrain ribbon. The weave is so tight that with every stitch I feared I would break the needle, especially at the edges with other layers of stitching to stitch through.
Now I move on to the dripping wax. No, I’ve not forgotten the wick. I just need the candle and the flame in place to weave the thread into the back!