
Tag: experiments
The Felucca Is Finished

The Felucca
I have finished the first trial of the Felucca design. As I always say of these design fragments, I do not yet know whether they will make it to the final piece.
You can barely see the stitching on the coastline – I used a fine thread and spaced the stitches far apart. For the cargo, I crammed the stitches as close to one another as I could. The sails are worked in Satin Stitches rather than darning, and the spars in Stem Stitches. I’ve decided I am happy with the pinkish tinge on the sails, and the greenish Nile is just as I imagined it would be.
I think it has worked. The reflections of the sails bring the whole piece to life, and I added some small stitches to provide an impression of a reflection of the spars.
Beginning the Felucca

The Felucca On Turban Cotton
I’ve begun to work on the Felucca design I have already described. As I am not at all sure about the colours or the stitching that I will want on the final panels (remember this is to be a design element for the edging panels I described a little while ago), or even the scale, I am thinking of working this design several times on different fabrics, with different threads and at different scales, to see which one I like best. I’m sure I will find something to do with any leftover pieces of embroidery!
This version is about two and a half inches by one and a half inches, and it is worked on turban cotton, just like the fabric I used for my earlier experiment with the Dig House. I’m using similar stiff overdyed linen threads as well, but this time I have learnt from the trouble I had with the Dig House. The fabric has been hooped up over a piece of calico, and although it is slightly irritating to have two layers to stitch through, it has a lot more body and is much easier to stitch.
I’ve put the design onto the fabric using a transfer pencil and began with the sky, using a sort of irregular darning stitch. Then I realised that if I were to work the sails first it might be easier to fill in the sky afterwards. I’m not entirely sure about the thread I am using for the sails – it may be a little too pink – but I think it will be hard to be sure before I have finished. I have a dark blue-green thread that will do the Nile perfectly (I hope), and I will be able to run lines of stitching in the hull and sail colours into the water section to make reflections.
This might become my evening stitching until I have finished it. Although it is small, the colours are distinct from one another, and the stitches don’t have to be as precise as they would if it were a counted piece.
EDIT: spelling improved!
Follow Up to the Lady By The Lake
Stitching showing colour changes
Several of the comments on my Lady By The Lake post asked me to show some close ups of how I achieved the colour changes on the skirt. I’ve not had enough light to get her down from the wall, so in the meantime I found a fragment of canvas and some tapestry wool and worked a couple of patches of stitching to show what I mean.
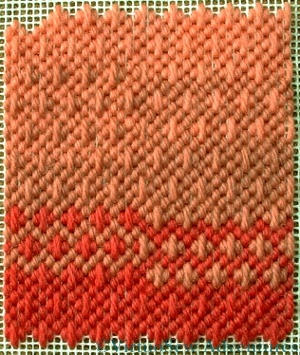
The stitch is a bordered Hungarian Stitch. I couldn’t find a diagram online, but I think it is fairly clear to see how the stitch fits together!
I was rather limited by the threads I had available, but I’ve tweaked the image in The Gimp, and I hope you can see that I’ve only used three colours of wool, but I’ve achieved seven variants of shade. In practice I think I would choose one or other of dark diamond and light border or light diamond and dark border, and stick with that choice, since changing between them is rather messy. That said, sometimes it’s worth the extra headache to get the precise effect you want. This stitch gave the Lady a slightly textured skirt with suitable shading without spending the earth on different thread colours.
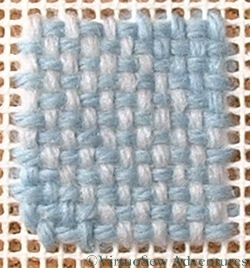
A Patch Of Linen Stitch
As this patch shows, you can blend colours with Linen Stitch as well, and I have done in the past, when the available colours weren’t quite right for the effect I wanted to achieve. I didn’t do so on the Lady, because I wanted to create the effect of a glossy silk satin blouse. So rather than creating softer colours by blending them, I wanted strong shadows and bright colours. The Lady’s canvas was a double thread canvas, so I could choose to work at two different scales. I wanted to reserve the finest scale for her skin, so everything else used the basic canvas count, and the skin and features were worked as petit point.
Hmm, I really do need to get her down and try photographing her again, don’t I. There’s loads more to say about the Lady by the Lake!
A Bear Called Paddington
A Bear Called Paddington
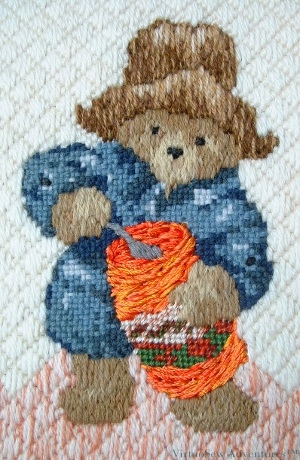
I’ve always had rather a weakness for Paddington Bear, and this painted canvas caught my eye a few years ago, hanging up in a market stall in Leeds when we were visiting friends. Immediately I saw in my mind’s eye how almost every section could be worked, starting with using rayon thread for the jar of marmalade. In fact, as I recall, the part of this canvas that gave me the greatest difficulty was the choosing a stitch for the background!
Paddington’s duffle coat is worked in Linen Stitch using ordinary tapestry wool, and his fur is worked in Appletons wool using a sort of random, closely packed long and short stitch. Looking at this piece analytically for the first time since I worked it, I’m really quite pleased with how the Linen Stitch works for the dull woolly fabric of the coat, and how believable the fur has turned out to be.

Paddington's Face
I’m also very pleased with how different the hat looks. It too is worked in long and short stitch, but I used longer stitches and Paternayan Persian wool. The difference lies in thickness of the individual strands and the different level of sheen – Persian wool strands are rather thicker and have a lovely muted sheen, whereas the Appletons wool produces a slightly duller surface. The tapestry wool, of course, is almost completely matte.
Look at that little face! The only thing I missed is a smudge of marmalade on his nose..
Paddington's Marmalade Jar
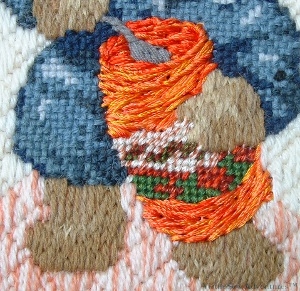
Then there is the jar of marmalade that first caught my eye in the first place. I worked that using six strands of rayon, mixing orange, red, and yellow strands in the needle, and working rows of stem stitch around the jar. It looks much glossier and stickier in real life!
Finally, after much head-scratching and puzzling, I worked the background in a slightly enlarged version of Hungarian Stitch, using Persian wool. I blended a second colour into the base to give a sort of grounding section so that Paddington wouldn’t be suspended in mid-air. I can’t think why the designers didn’t do that, as when I was a child (I’m assuming this was really intended for children and not for grown-ups!) I would have been rather worried by the character not having any ground beneath their feet!
Stripes!
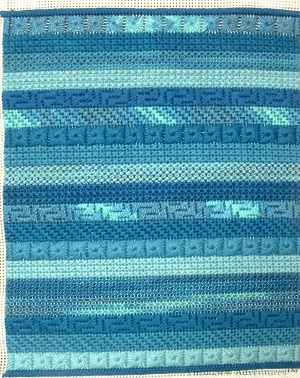
Stripes in canvaswork
This panel of canvaswork was originally intended to make a case for my husband’s beloved Psion palmtop computer. Alas, by the time I finished it, the Psion was no longer working.
The starting point was a wonderful Watercolours thread, graduated in shades of blue (not blue for a boy, blue for a redhead!), to which I added toning shades in soft embroidery cotton. It seems that this thread is not made any more, which I think is a pity. It used to provide a good alternative to tapestry wool, especially for those who don’t like working with wool in the summer, and – provided the right base fabric is chosen – a reasonable heavy but matte thread for surface embroidery. Almost all the threads now available are mercerised, and thus have a slight shine – but sometimes we don’t want any sheen on our stitches at all!
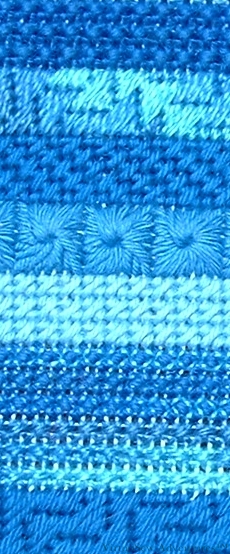
Stripes - Detail
I rotated through several different stitches, as well as the different colours, and made sure that the second layer in the fine Wildflower thread overlaid a different base colour each time. There were five threads (Watercolours plus four soft cotton) and six stitches, which ensured that they cycled round. The stitches I chose were Milanese, Diagonal Mosaic, Eye (not pulled), Mosaic, Rice (using the Wildflowers thread for the second layer of stitches) and Double Cross Stitch.
The full size piece shows how the position of the colour changes is different in each stitch, as well as showing the veiled effect of different colours each overlaid by the variegated thread in the different panels of Rice Stitch. For that reason it is a very interesting needlepoint panel, but I still have a completely finished and neatly-worked canvaswork sampler looking for an occupation!
Canvaswork Inspired by Clarice Cliff
"The Cat Who Walked By Himself" in canvaswork
The design in counted cross stitch that I created, “The Cat Who Walked By Himself” (now being re-issued by Classic Embroidery – remember how excited I was a few months ago?) was such a success that I experimented with other ways in which the basic design might be used.
First of all, in ordinary tent stitch at a large size. Pleasant enough, but rather dull – for me, at any rate.
Then, at the same size as the original cross stitch, but using ornamental canvaswork stitches. Originally I had in mind to run classes based on these designs, in one of the local shops, but the shop closed, life changed direction, and I’ve not done anything with it yet.
As I post more of my early canvaswork, you will probably notice some stitches recur. For example, I like Upright Cross Stitch – it is sturdy and heavily textured – and Milanese stitch (I think just because I like the name). I usually sneak in Leaf Stitch as well (remember the Elephant of Considerable Charm?). I’ve also used Jacquard Stitch, and Satin Stitch. The background was worked in Encroaching Gobelin Stitch.
I’ve not put the heavy outlines on yet. Tapestry wool would be too heavy – some of the areas are quite small – but on the other hand, I don’t want to use something that will draw too much attention to itself by being shiny..
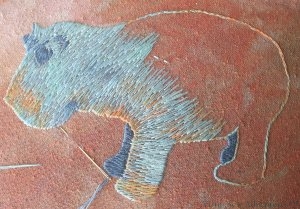
The Faience Hippo Finished
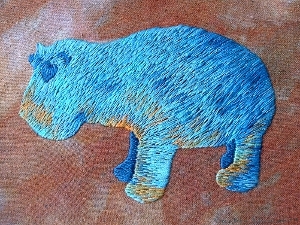
The Faience Hippo Finished
So here is the Faience Hippopotamus finished. That is, unless I decide to go over him with another layer of long and short stitch to break up some of the patterning even further…
I’m reasonably pleased with him, as a matter of fact. The loose weave of the base fabric was sometimes challenging to work on, and it isn’t at all a hardwearing piece – some of the stitches are half an inch long, which would be bound to catch on something – but as it will be part of a carefully protected wall panel if it makes the final piece, this is not going to be a problem.
I enjoyed doing it, as well. It was fascinating to see the colours change more subtly when I started using the thread turned end-for-end, and this vibrant turquoise/teal colour is one of my favourites.
And, yes, I did manage to work an entire piece in long and short stitch. It is fair to say, I think, that it will never be my favourite stitch, but it does have its place, and I am certainly happier to use it now I have had Tricia’s instructions on the Floral Glove Needlecase Course.
Dreams of Amarna – The Faience Hippopotamus, Second Stage
The reason I am calling this poor fellow an experiment is that I’m working him in long and short stitch. I have said that working on the Floral Glove Needlecase project has been illuminating and that I am warming to long and short stitch – well, we’ll see what I think when I’ve worked an entire piece in long and short stitch!
Half Done Hippo
In the meantime, here he is, half done. The darkest and lightest shades are ordinary stranded cottons, but the middle three use overdyed threads. One of them shades from turquoise blue to russett, and the others are both fairly subtle variations on a dark and a light turquoise.
I am using two strands, with one of them turned end-to-end in comparison with the other. I’ve never done this before, but it means that the shading of the overdyed colours is slightly more spread out and more subtle than it would be if I left them both as they came off the skein. It also means that the twist in one strand runs counterwise to the twist in the other so one strand shortens during stitching. I’ve chosen not to mind about that, but if you did happen to mind I think the way to achieve the same effect would be to buy two skeins and start them at different points in the cycle of colours.
I’m also working in slightly untidy sections of the body, with two or three needles ready to go, depending upon the colour I need. I’m using long stitches, and aiming to cover the fabric beneath without packing the stitches too closely.
I’m really pleased with this so far. The colours are working well, and the variations will give a bit of modelling without attempting to create a needle painting.
A Closer Look at Modern Goldwork – Five
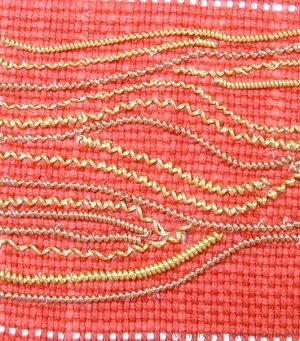
Bark Effect
For this panel, Tracy told us to think of tree bark and then to use stretched and unstretched pearl purl of different weights couched to create a bark pattern of light and heavy lines.
I really enjoyed this for some reason. The pearl purl is stiff and springy, and doesn’t feel as fragile as some of the other metallic materials.
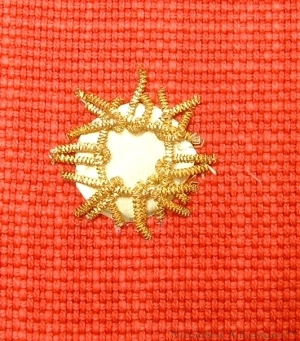
Shisha Variation
The second panel shows an adaptation of shisha work. The “mirror” is in fact a circle cut from a piece of metal foil, and the “stitches” holding it in place are made using check purl. This looks clumsier than I would have liked. Partly, no doubt, because it is not an easy technique even with the standard materials, and I leapt straight in with non-standard materials. Partly also, I think, because having decided to do this I should then have picked a finer purl to use for the “stitches”. It might have been easier to achieve the effect I want if I had thought through my choice of materials. I recall also that the metal foil was flexible and tricky to keep in place while I worked the “stitches” over it.
Note to self: Next time, try the standard technique using the classic materials before making life more difficult for yourself!
I think it is fair to say we all had a wonderful time on the course. Never having worked with metallic threads before, I think the Modern Goldwork course provided an entertaining introduction, whereas it is possible that going straight into classic goldwork might have proved a little scary!
Dreams of Amarna – The Faience Hippopotamus, First Stage
I have two Amarna projects already on the go (one of the backgrounds, and the Dig House) but they are both monochromatic, and you will have gathered that I like colour. So I thought I would experiment. Again!
Small Hippo Outlined
My rule for the panels and motifs is that I may only depict items that Mary Chubb mentions, or that she would have known about, or which were excavated in Amarna about the time she was there. That means that anything seen in Howard Carter’s excavation of the tomb of Tutankhamun or excavated by Flinders Petrie is also allowed. So a faience hippo is just about permissible, as they seem to have cropped up in a lot of excavations, not just those of the Egypt Exploration Society. I’ve also just purchased (courtesy of Alibris, since it is out of print) “Tell el-Amarna”, by JDS Pendlebury, who was Director of the Excavation when Mary was Secretary. It should give me more ideas about what was known or thought at the time, which in turn will help me to plan more illustrations.
The background fabric is an overdyed silk noil from Stef Francis, and I will be using some of her stranded cottons as well. I began by copying the outline onto tissue paper and then went over the outline in running stitch. I rather like this technique for marking designs, at least where the design is relatively simple (see Ruth O’Leary’s Spirograph hangings for a less than simple design using the same transfer method – eek!).
I then stitched around the edges using split stitch to make the edge of the design clear, and took a deep breath…