Lace Pillow
Another report from my mother on the project to clothe Topsy..
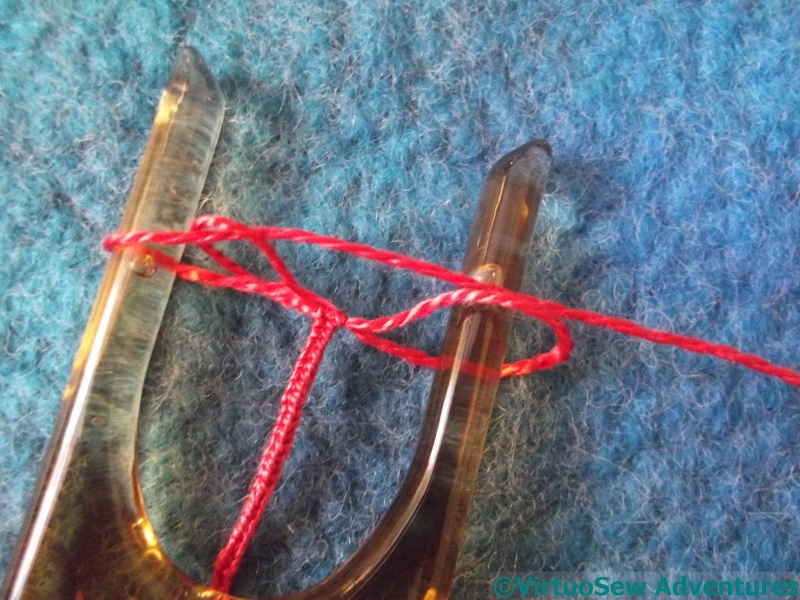
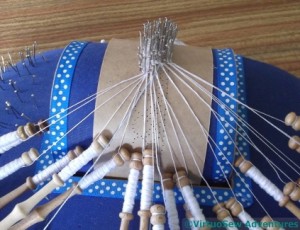
Topsy’s dress is going to give me a reason for stitching and lacemaking. I have done some torchon lace but I want to learn a new kind of lace – Bucks Point. Lace making looks far more complicated that it is, at least when using simple patterns. There’s lots of guidance, since the design is pricked out (literally) on stiff card, often with little symbol to help you remember which stitch you are doing. The bobbins’ weight provides the tension, hence the decorative beads, and in all the patterns I have used so far, I was working with only four bobbins at any one time, even though there may be twenty, thirty, forty bobbins in the design.
I have chosen the very simplest pattern, just the new “ground” and a “cloth” fan. For none-lacemakers, the ground creates that part of the design where you are just space filling, in this case it joins the fan to the footside (the straight edge which will be used to mount the lace on cloth). The cloth stitch is made by a weaver pair of bobbins going under and over the other threads just as if you are weaving cloth. The complication lies in remembering the sequence of stitches – it took an hour and a half to work out the sequence for one fan and attached ground. Since the design is a simple repeat, the next one took three quarters of an hour with much referring back to instructions. Six fans on, it takes half an hour with just occasional glances and I am looking forward to cutting down the time as I continue. There is a long way to go as this piece is to edge Topsy’s petticoat. I have more ambitious plans for the dress itself.
Petticoat Lace
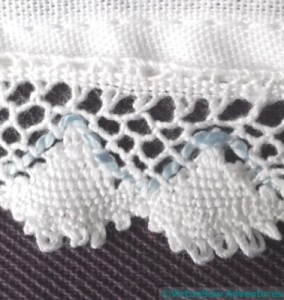
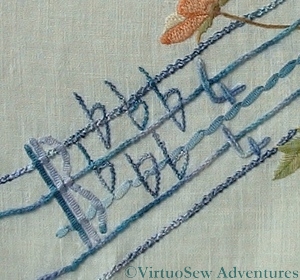
It took four months, but I completed the first length of lace and attached it to Topsy’s petticoat. And I am pleased with the result. It’s neat, decorative, not flamboyant – just what I wanted. The first two or three sections are a bit wobbly but thereafter the pattern becomes more crisp. The blue gimp will echo the embroidery on the dress.
I had some difficulty in remembering not to cover the pin in this style of lace making, since doing just that was an essential part of all the Torchon lace I have made. But once I’d mastered that, the ground became easy to do, and, of course, the fan was worked exactly as I had done in previous lace making. Heartened by this, I felt I was ready for something more complicated.
Stripy Cape
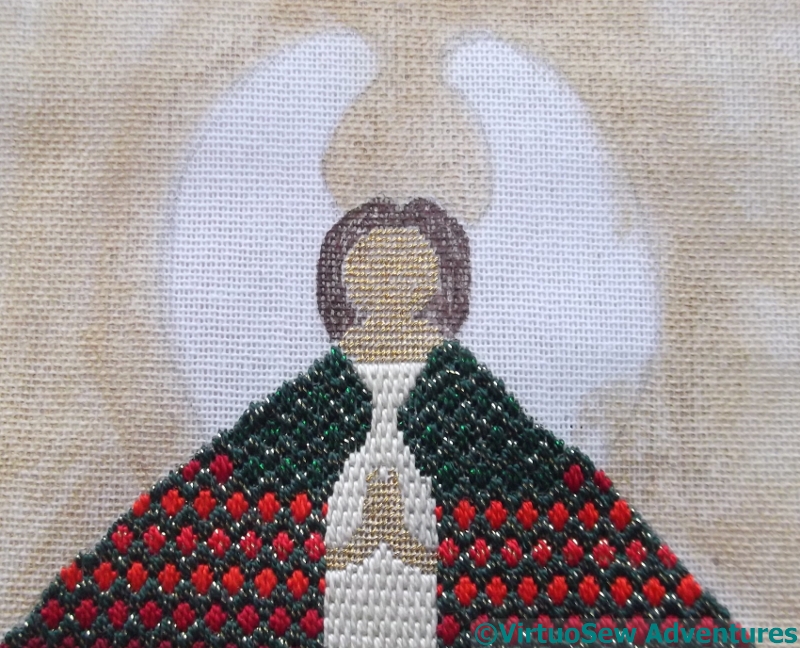
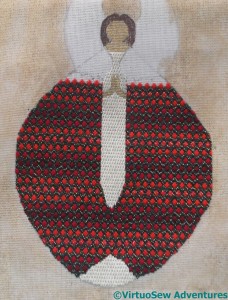
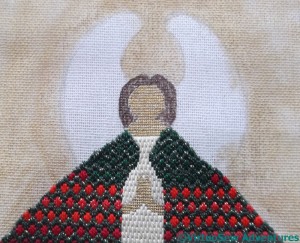
Rather than being stitched in time for Christmas, I found myself stitching the Christmas Angel over Christmas. About halfway through the stitching, I also coloured in the hair with brown pen. It helps keep the head distinct from the background and the wings, and somehow pulled the whole thing into focus.
My invented bargello pattern of various pearl cottons, including some with a metallic twist in them, has turned out fairly well, if redder than I expected.
Shoulder Cape
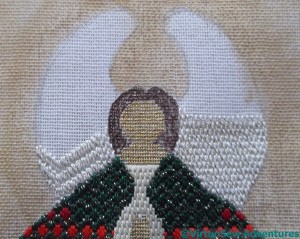
As a result, I chose to stitch the shoulder cape in greens. There are two variants here – green with a gold thread and green with a bright green thread. I’ve been using the green and gold as the striped “framework” for the Cape, so I simply used the green and green for the spots. The shoulder cape will be outlined to allow for a bit more shaping, using couched gold thread, but that’s one of the last elements of the design.
Decisions regarding the Wings
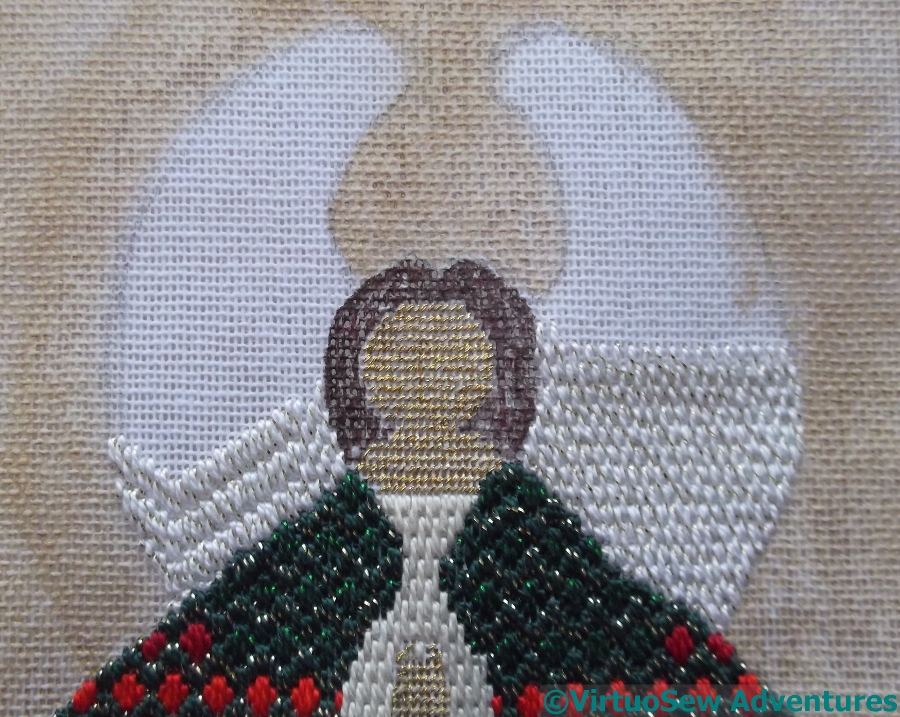
The next challenge was to decide how to work the wings. I started off wanting to create some sort of strong patterning, just with the stitches, but in the end I realised that, as the background is going to be strongly patterned, and the cape is so striking, the eye will need somewhere to rest.
So, plain brick stitch it is, although in another of those glitter-twisted pearl cottons, which are quite ridiculously tender and tricksy to stitch with, at least on this canvas. Even Gilt Sylke Twist and Gold Wyre seem robust by comparison!
Lower Block
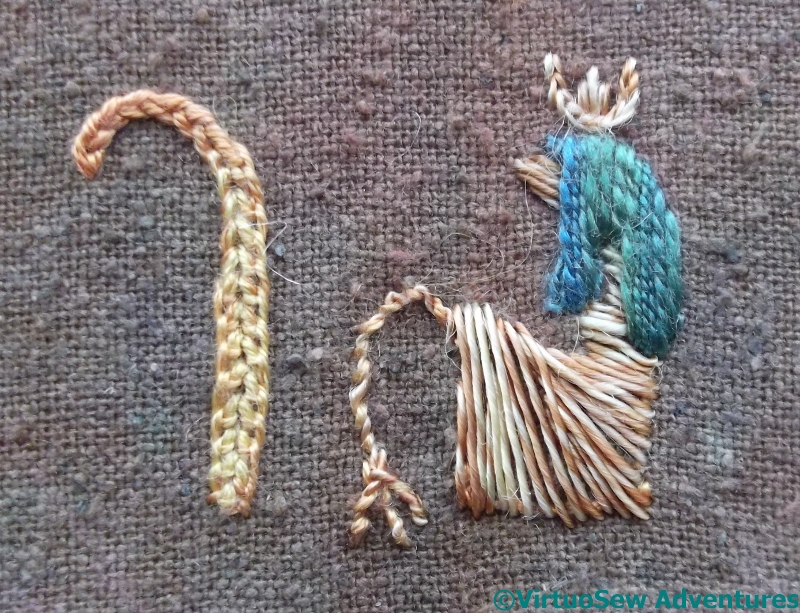
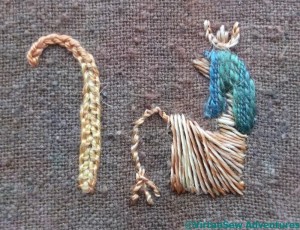
I need to learn to believe in myself more. As I was stitching this little seated figure, I was really very doubtful about it. I was twisting the sandy silk filament for every stitch, and it was being difficult, and looking rather odd and clunky.
Then I added the wig, in a variegated – and slightly slubby – silk perle, and suddenly I’m completely captivated!
The walking-stick like thing is a row of chain stitch with detached buttonhole stitch added to broaden the shaft. I think that works rather nicely, too.

Middle Block
False Start
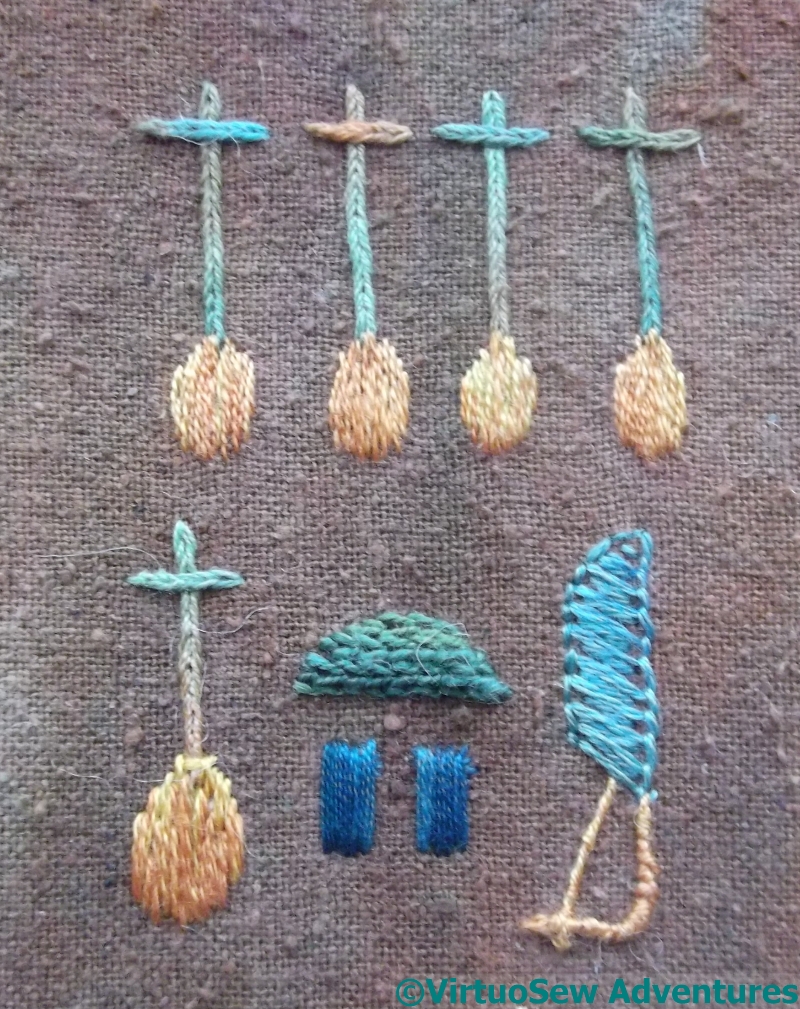
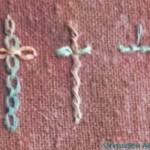
There was a slight false start with the row of spoon-like things. After I did the bottom row of this pair, ending with a crossed spoon in heavy chain stitch and long and short stitch, I wondered whether perhaps I should vary the stitches in the row above. An experiment in that direction soon proved me wrong, though!
The two little blocks started out as closed herringbone stitch, but that looked scrappy and a bit twisted. I left the closed herringbone stitch in place, and covered it with satin stitch, breathing a sigh of relief when it worked.
The fabric is the same as I used for the Faience Hippopotamus, and it’s frightfully difficult to photograph. No matter what I do, the colour careers around the spectrum, and the grey, overcast days aren’t helping, either.
Nor is it especially easy to stitch on. It doesn’t look like a loose weave, but it behaves like one, even though I’ve supported it with a piece of calico. Stitches that I like using are proving unsuccessful and behaving oddly. All in all, although I’m enjoying it, it feels most peculiar!

The Small Motifs end of the pashmina
If I were writing a report card for myself, I would write: Rachel has made a good attempt, but continued application is required to produce excellence.
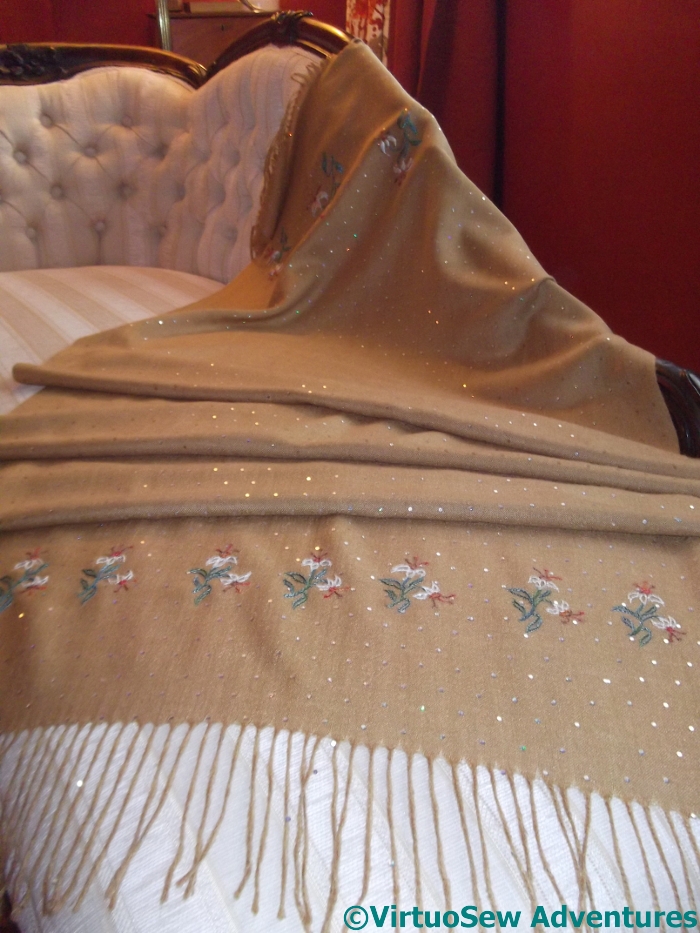
Finally, after much muttering, wrangling, and stitching, I have finished the pashmina I decided to embellish as a part of the Great Lady’s Magazine Stitch-Off. I’ve washed it (carefully, by hand) and pressed it (carefully, on a cool wool setting) and photographed it draped over my parents’ settee, which isn’t the right period, but does make a lovely backdrop..
Time alone will tell whether it is a practical piece that I enjoy wearing and don’t spend all my time repairing, but for now I am pleased. Although I must admit, rather more of the little paillettes flew off in the course of the stitching than I was expecting. It will only be dotty in patches!
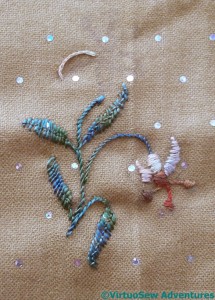
Small Motifs
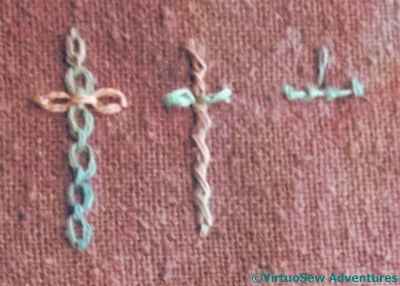
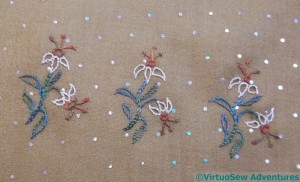
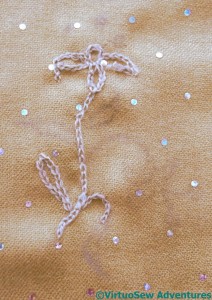
One end has a row of motifs, all the same size, and worked purely in outline. Primarily I have used stem stitch, although split stitch and chain stitch both make an appearance, too.
The small motifs were fairly quick to stitch, and didn’t require much self-discipline because I could see the progress I was making. I’m not good at repeated motifs – I lose interest quickly – so this was very good news.
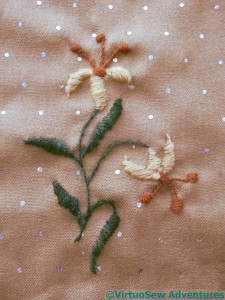
One of the large motifs
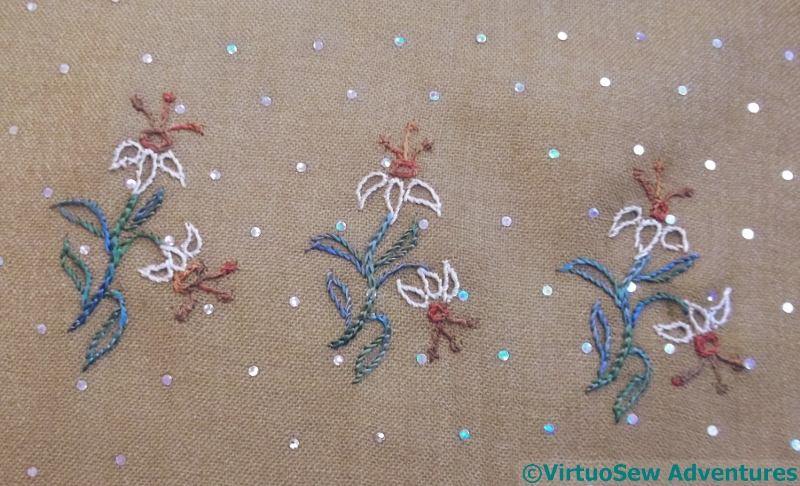
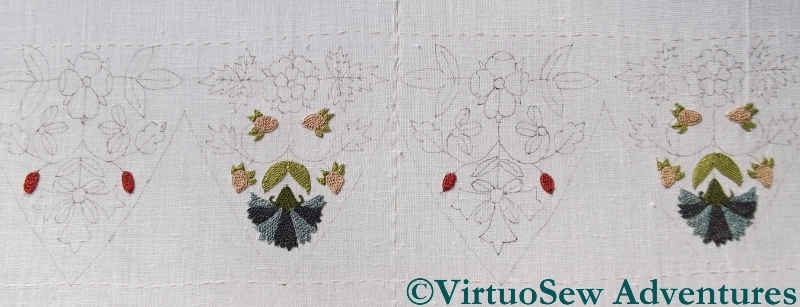
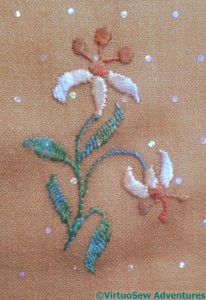
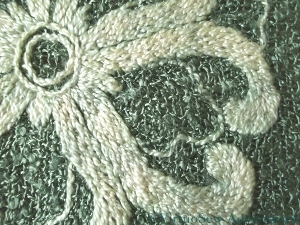
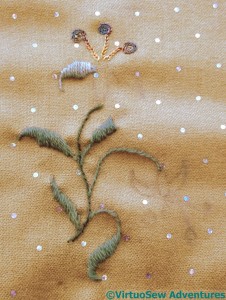
At the other end, the motifs are larger – in two different sizes in fact, two larger ones interspersed with three slightly smaller.
The larger motifs used a wider combination of stitches. Stem stitch for the stems – naturally! Satin stitch for the petals, worked over a split stitch outline, and using three strands of the stranded silk thread instead of two. It might have been better to use four, in terms of the coverage, but that would entail larger holes in the fabric, and I wasn’t willing to do that.
The leaves are worked in Romanian Couching, using the couching stitch to create a vein up the centre. Since the green thread is an unspun, indeed untwisted floss silk, it spread nicely. It has also got a mind of its own and unstitches itself unless finished off with great thoroughness.
One of the reasons the researchers wanted to extend the stitch-off project was to see whether they would gain any insights from it into the lives and work of the readers of The Lady’s Magazine. One thing I’m sure they will be reminded of anew is that the designs may be the same, but the treatments so different as to render them almost unrelated in appearance.

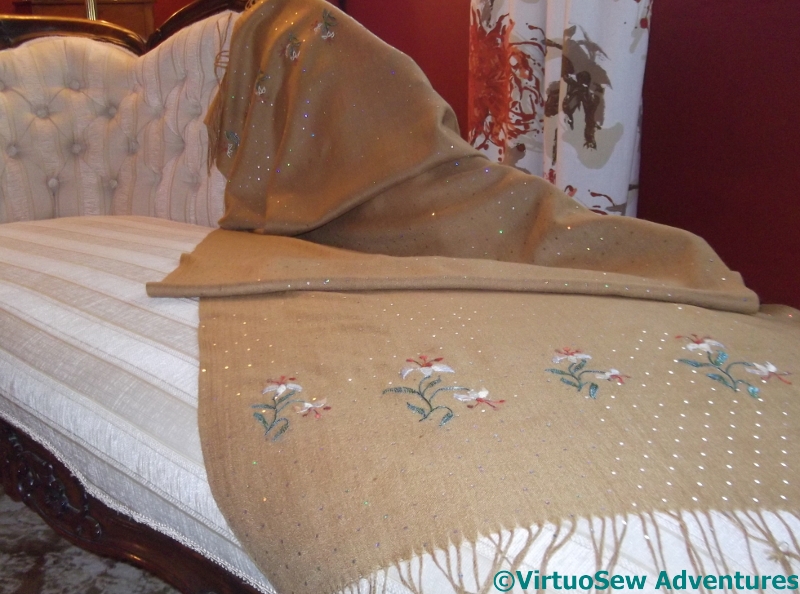
The Large Motifs end of the pashmina
As I said in my earlier post, I have a renewed respect for any lady who embroidered her own silks and muslins, but I should also highlight something I believe we are inclined to forget. I’m sure the general standard of embroidery was good – it was an expected accomplishment, after all, – but I don’t believe it was all as breathtakingly exquisite as what we see in some surviving pieces.
Textiles were extremely valuable until quite recently. They were reused, altered, left as bequests. The pieces that remain are either fortunate accidents of history (a forgotten trunk in an attic, say) or they were so remarkable as to be treasured. Embroidery worked at home for a day dress or other garment would have been worked quickly so that it could be worn, and in due course the dress cut down into something else, and finally, no doubt, sent for rags. The little aprons which protected expensive wool and silk dresses had to survive the washing of the day – pounding in a tub of boiling water – and again, when they could no longer be made respectable, became cleaning rags.
I wrote an entire post about transferring designs, but again, drawing was an expected and widespread skill. Many of the readers may have simply copied the design freehand onto their fabric, unconcerned about pinpoint accuracy, aiming only to provide an approximate guide for their needle. These are skills no longer as widespread, and we trust ourselves less than they would have done.
This isn’t evidence of one of my finest hours, but it is a perfectly competent piece of work, perhaps in the traditions I have just described, of work done quickly for a particular occasion or event. I am going to send it to Chawton House as a contribution to their exhibition celebrating the 200th anniversary of the publication of Jane Austen’s “Emma”.
Any book on embroidery will usually tell you about methods for transferring designs to the fabric. In fact, I think some of them are guilty of plagiarism – although from whom, in the best traditions of the circular firing squad, it would be hard to know.
Last week there was a discussion on Twitter relating to the Great Lady’s Magazine Stitch Off and particularly concerned with transferring the design once you’d chosen it, and I suddenly realised that not one of my shelf (ahem, shelves!) of embroidery books actually suggested which method might be most appropriate when, or what hazards or difficulties they present.
So I thought I would pull together what I’ve picked up and found out over the years…
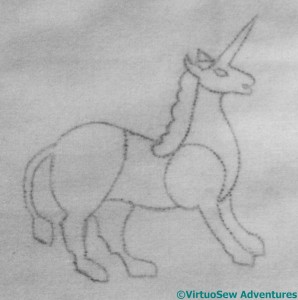
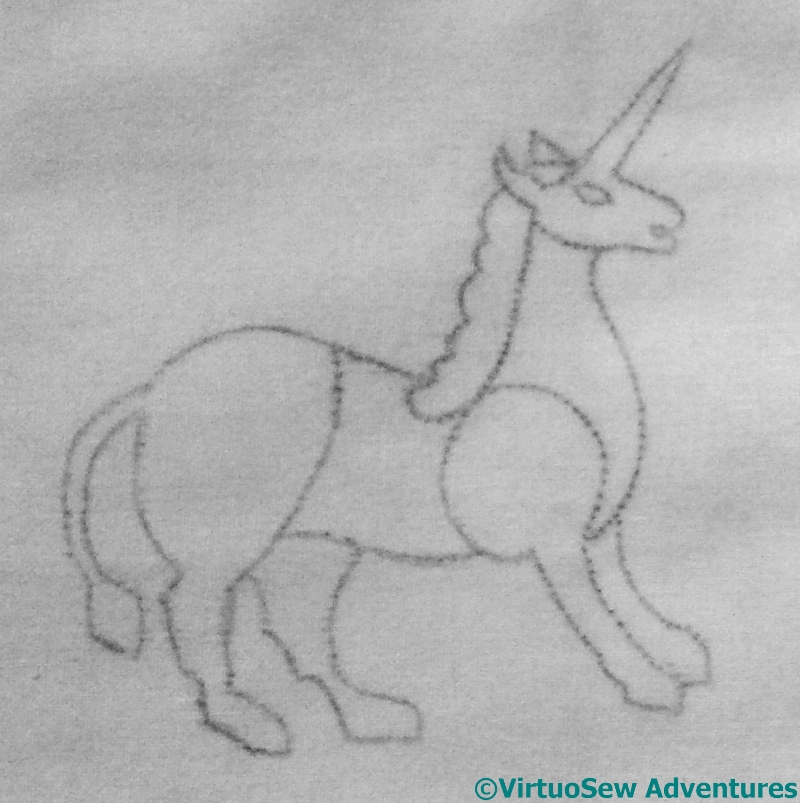
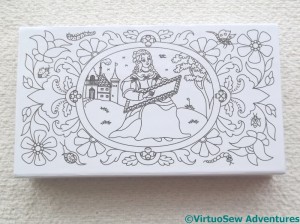
The Unicorn
First, Prick and Pounce. This is one of the oldest methods – almost certainly the only one available to the Lady’s Magazine subscribers. I’ve come to it relatively recently, but I use it a lot. It’s not good when my tennis elbow flares up, because pricking holes in the pattern is a slow and repetitive business, perfectly designed to produce a repetitive strain injury. It’s also not good – as I discovered with the pashmina for the Stitch Off – with a mobile fabric which is a little widely sett for the thickness of the constituent yarns. I had to reinstate the lines with a dressmaker’s chalk, which wasn’t nearly as precise as I would have liked!
Glittering Gentleman’s Nightcap – Month One
Next, the Light Box method. Actually, not having a light box, it’s a “tape it to the window and do your best” method. I did this with the Gentleman’s Glittering Nightcap, and it worked fairly well, but it’s limited to the size of your window or lightbox, whereas Prick and Pounce is limited by the size of your table! I also become nervous when using indelible ink such as the (recommended and provided) Pigma pen. I’m always terrified of inadvertently drawing a line somewhere I can’t cover it.
Five Flats on the Piano Shawl
Which leads me on to a caution. I’ve used quilter’s “disappearing” felt pens instead in the past, and had one of the scariest embroidery experiences I’ve ever had. First of all, the lines didn’t last quite long enough for a hand stitcher, and then…
When I washed the piece, the lines reappeared, and what’s more, they kept coming back. I can’t remember what it took to be rid of them, but certainly some prolonged soaking in detergent was involved.
Hair-raising doesn’t begin to describe it, and as mine is nearly a yard long, that’s no joke!
A Corner Of The Map Of Amarna
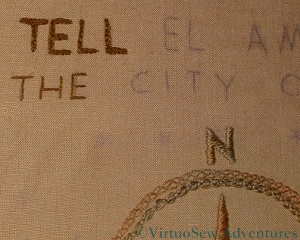
I used a Transfer Pencil for the Map of Amarna. This works nicely – provided you remember to reverse the pattern if it needs it! – if the fabric is a natural fibre. However, it can be hard to keep the transfer clean as you make it, and then there is a risk that you will transfer indelible smudges to the fabric.
I’ve also found that the lines sometimes spread as they transfer, which may or may not be a problem, depending on how detailed the design, and how much unembroidered fabric may be showing. As it always says on the packaging – test the whole process on your fabric before using it for anything important!
Transferring the Design
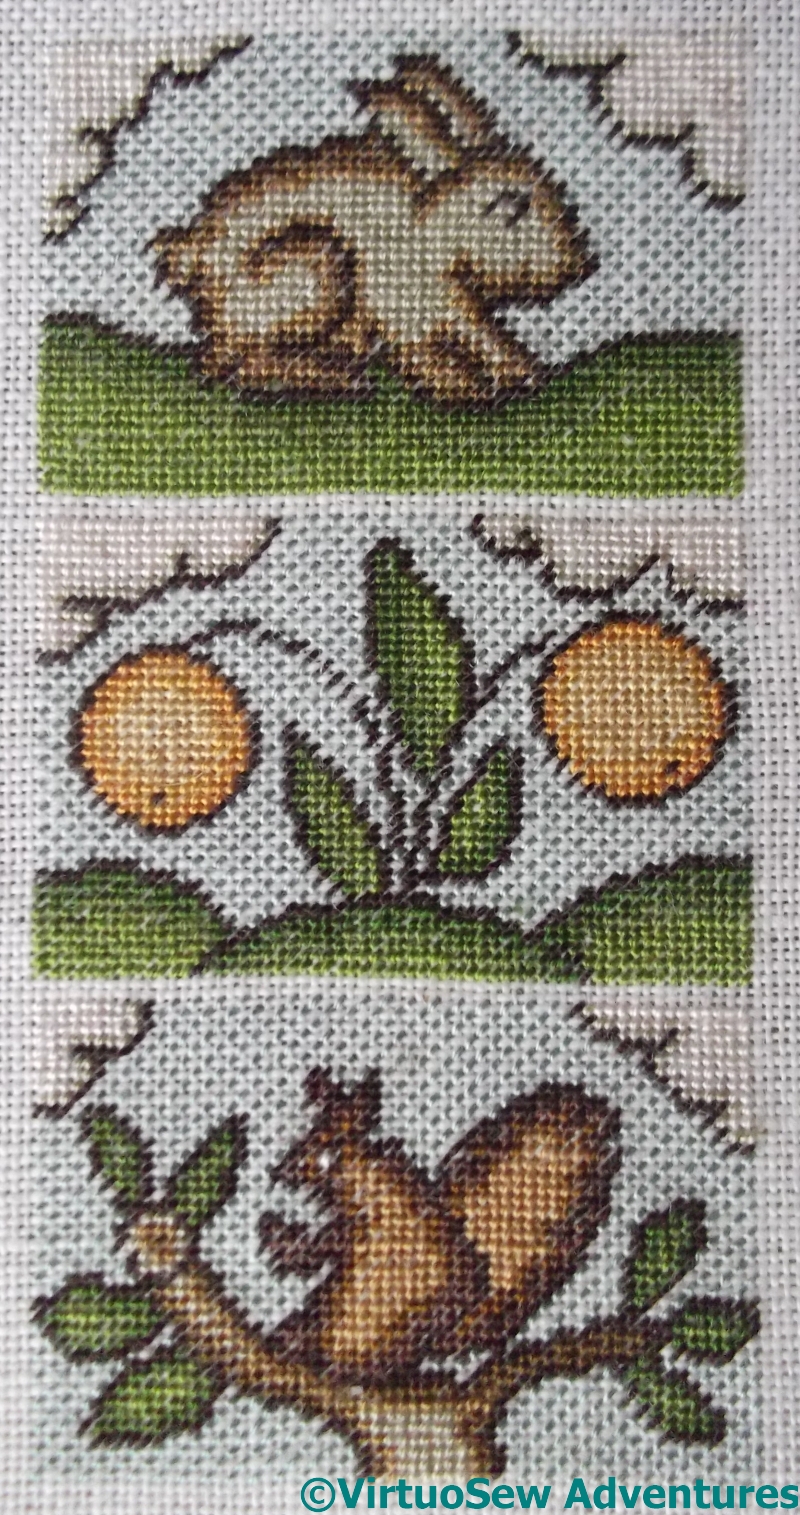
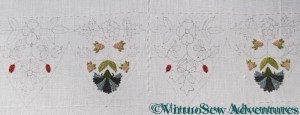
In the case of a really tricky fabric, such as the velvet for the Camberwell Panel, Running Stitch through tissue paper works really well. It’s rather time consuming, but then, I don’t think any method is especially swift.
Scarf Motif – CloseUp
There are soluble fabrics which I know many stitchers recommend, but I’ve only worked one piece using it, and the design drawn on the soluble film was hard to see, so I can’t describe it as an unalloyed success.
In truth, a stable natural fabric such as linen will probably happily accept anything thing you do, and the fragile, “difficult” ones will each require a different response. The trick is to remember to pause before starting, to make sure you pick a sensible method for the fabric and the design!

Progress on the spine
After all those good intentions, I’ve rather fallen behind with “Eve In The Garden Of Eden”. It’s not that it’s difficult – rather fine, requiring the use of the magnifier, but not especially difficult. Unfortunately I’ve only got as far as three of the five panels on the spine of the bookcover. There are two more little panels on the spine, and then two identical ornamental frames, back and front, showing Adam, Eve, the Tree Of Knowledge, and the Snake. And that’s before I start on the complicated bits!
Reasons/excuses for the delay? Well, I moved over to the Canvaswork Angel over Christmas (it seemed more appropriate somehow!), and then I was blindsided by the The Great Lady’s Magazine Stitch Off. Not that I am complaining, you understand – it’s been fascinating to begin finding out about the early days of periodicals and to see the designs provided for subscribers, especially as even more are beginning to come to light!

Another Parcel
And now I have been reminded that I really need to get on with it, because the finishing kit has arrived, including some rather lovely silk brocade, and some fancy threads I’ve not come across before.
Still, I need to finish that pashmina first…

Pincushion
Just before Christmas I was struggling with the “Dreams of Amarna” designs, but I still had itchy fingers from longing to stitch, and sore eyes from staring at “Eve In The Garden of Eden“, so I wanted something a bit less precise..
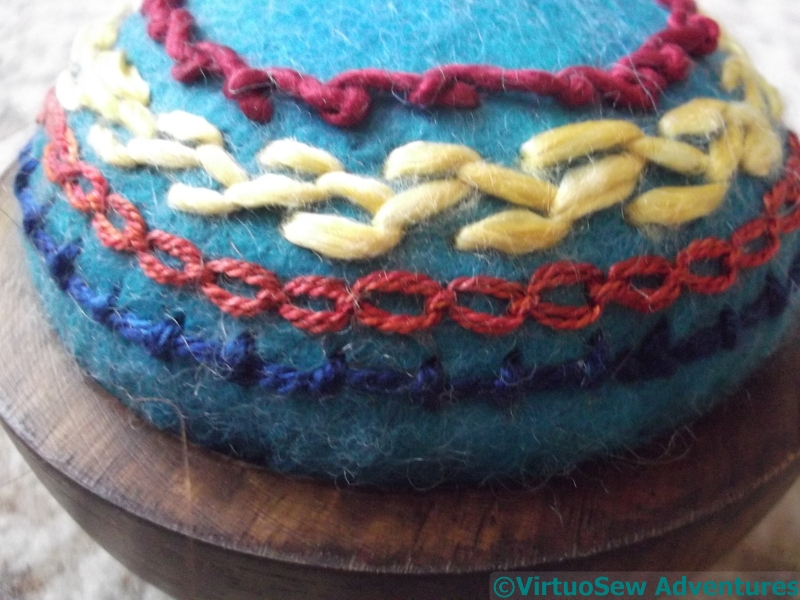
My Dad’s shaving cream comes in a rather nice wooden pot. There are refills, but sometimes the shop doesn’t have them, and consequently – since they’re much too nice to throw away – my parents have ended up with something of a stockpile. I’ve taken one of them off their hands, and turned it into a pincushion.
Coral Stitch
At the moment the lid is being used as a coaster, but I am open to suggestions for it!
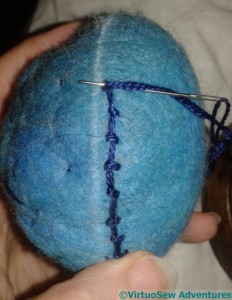
The threads are silks, bought at the Knitting and Stitching Show, worked on felt acquired at the same time. I created the shape of the pincushion itself with shaping stitches, stitching around and around the padding and the felt top layer, rather as doll and puppet makers do, and once I’d settled it into the bowl, I drew a chalk line around the waist, took the pincushion out, and started stitching.

Lucet
Coral Stitch, Cable Chain (do I ever do anything that Cable Chain doesn’t sneak into somehow?), Semi-Closed Feather Stitch, and Scroll Stitch, all stitched into the felt, catching as little of the stuffing as I could.
Then I decided to do make a scissors-keeper for my lovely Ernest Wright and Son Ltd scissors, so I started by using one of the threads, and my lucet, to make a cord for it. I’d forgotten some of the knack of lucetting, but it came back gradually, and it’s ever so satisfying!
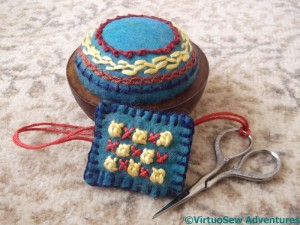
Finished Pair
The stitches on the scissors keeper are Sorbello Stitches (another favourite of mine) and Tied Cross Stitches, and the the pieces of felt are stitched together with ordinary blanket stitch. In silk!
Don’t they look good…!
Medici Yarn
Gumnut And Filament Silk
Sigh.
The pashmina, when it arrived, was a lovely caramel colour, with rather unanticipated silver spots on it, and it was a good deal flimsier than I was expecting. The others I have are all in fairly sturdy twill weaves. In truth, I’m not sure that would be easier, and if I ever finish this one, I may choose to find out..
Regular and long term readers of my blog will be aware that I have a thing about scale – scale of thread, scale of stitch, scale of weave. I’ve even discovered – much to my surprise – that the dreaded Plaited Braid Stitch isn’t always easier when it’s stitched wider and longer. So it will be no surprise that I spent a bit of time playing with various different threads to see what I thought of them, before settling on a final choice.
Silk – Filament And Stranded
Gumnut And Appletons
Scale isn’t the only concern, either. The right texture and sheen matter as well.
In the end I have settled on silks. The Medici yarn might have worked if I had had more of it, but I don’t think it is even made any more. The Appletons crewel wool was too heavy, and the Gumnut yarns (although I love them) somehow didn’t settle in comfortably.
Now I have to unpick my experiments and get started. I already have a newfound respect for any lady of the period who embroidered her muslin dresses, or her silk gauzes. There’s a story that Jane Austen embroidered a muslin dress with satin stitch spots, and the mere idea gives me cold shivers!
Although I doubt they had to contend with stuck-on paillettes!
Rummaging around on Twitter, I found a most intriguing idea. A research team at the University of Kent, headed by Dr Jennie Batchelor (@jenniebatchelor on Twitter), is investigating the content and development of an eighteenth century periodical, The Lady’s Magazine. The magazine was sold with pull-out song sheets – and pull-out designs for embroidery. Generally speaking, they don’t survive, having been pulled out and used as they were intended to be.
But recently, a bound volume of a half-year (1796) came to light, with some patterns included. A little more discussion, the idea arose of scanning those designs for modern stitchers to play with, and The Great Lady’s Magazine Stitch-Off was born. For more on that, visit the project’s blog post on the subject.
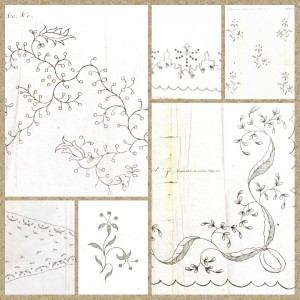
StitchOff Patterns
I couldn’t resist the idea. I’ve downloaded the first five designs, and started to stare at them thoughtfully. The project suggests that stitchers might like to work modern versions as well as in some cases working versions which are as historically accurate as possible, so there is going to be quite a variety to look at.
I’ve decided that I’m going to work the designs on a pashmina shawl, and while I am waiting for it to arrive, I’m contemplating what I might choose to do, from highly modern needle-felted versions, to more or less classical embroidery.
I wanted to share it with you before I started stitching, because the vagaries of the post may substantially delay my first stitch, and a few of you may want to join in. Do let the project know if you do, they’re really enjoying what they’ve been seeing!
Update: They have recently posted their first round-up of Stitch Off contributions and planned contributions.
Frostings Box
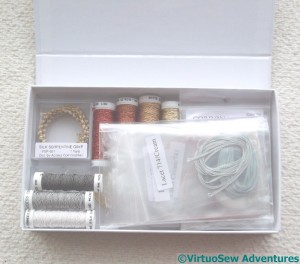
First View
Tricia, at Thistle Threads, has launched the Frostings Club, which is a thread club specifically concentrating on reconstructions of historic thread. She explains on the page I’ve linked to why she did so, and although historic embroidery isn’t my primary focus, thread is one of my deepest interests. So I joined up for the first session, partly because I want to contribute to the project, and partly because I expect that I will find a whole host of non-historical uses for them.
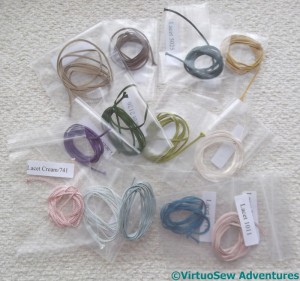
Lacet Threads
My first box has arrived – after a frustrating hold-up in Heathrow when I knew it was in the country and it wasn’t getting any closer to me! – beautifully packaged in a very solid cardboard box with a magnetic closure. I’ve been having a lovely rummage, puzzling over what I find and thinking about what I might choose to do with it when I get the chance…
I’m not at all sure what Lacet threads are, or what I might do with them, but Tricia has promised to release some designs and suggestions, so if I can’t think of something for myself, there will be suggestions a-plenty.
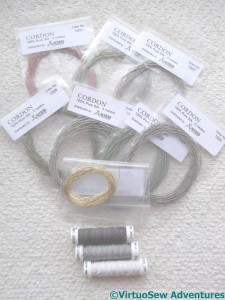
Cordon And Gimp
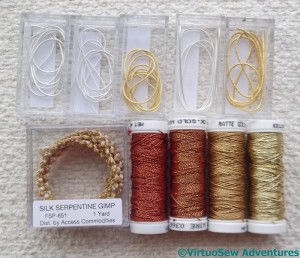
Metallic And Metal
The Cordon, Gimp and Metal and Metallic threads are possibly a little easier for me to make plans for. The metallic threads have fortuitously turned up in colours I was thinking of using for the wings of the Christmas Angel, so I may have in immediate use there.
But then again, once the Angel’s cape is in place, I may change my mind and who knows what will happen…?