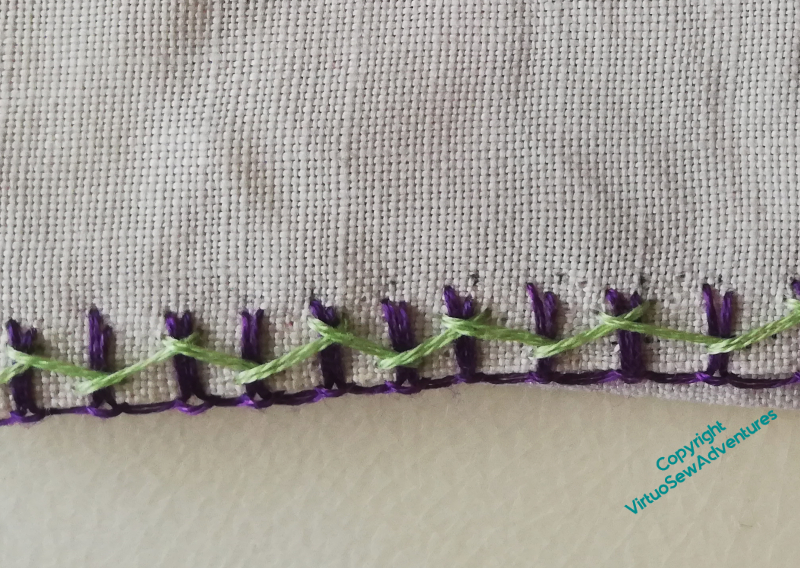
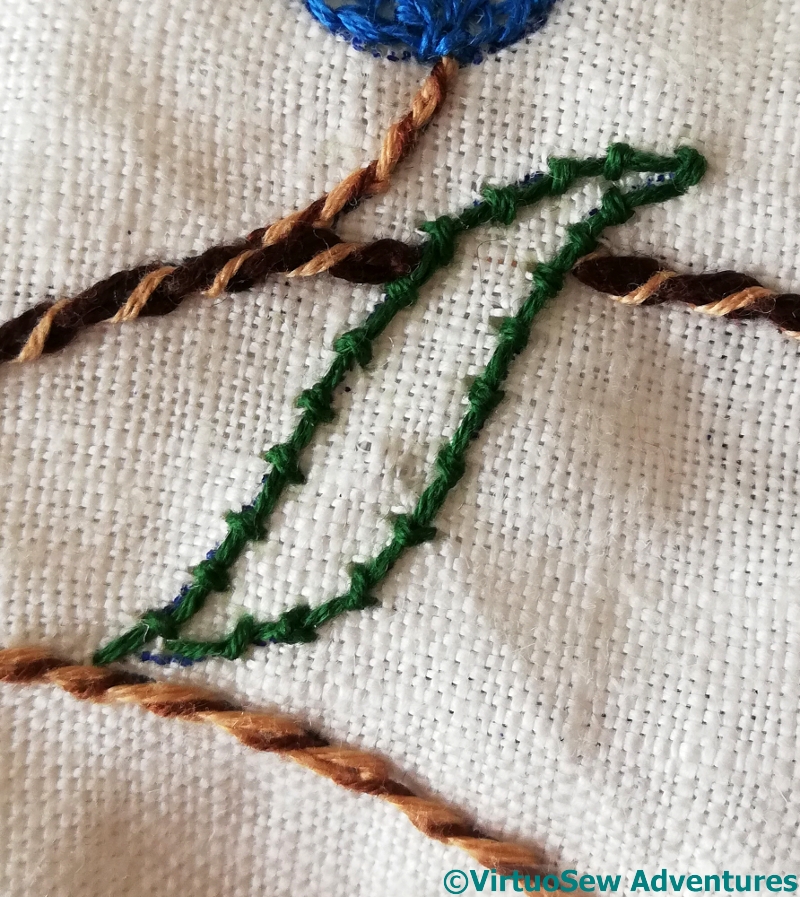
In a slight variation of what Grandmama did, I used Up and Down Blanket Stitch, which is one of my favourites, to work the purple section of the edging. It’s not as comfortable to work as an edging stitch as it is as a surface stitch, but I enjoyed it (as usual), and I’m pleased with how it looks.
Green Herringbone
The second layer of the edging was in herringbone stitch, just as Grandmama worked it, but using a pale apple green instead of the pink. It will work much better in Mam’s room that way.
I’ve used two strands of cotton, which is what Grandmama did. I suspect that’s why the edging has collapsed in spite of not being used for decades!
Darn In Place
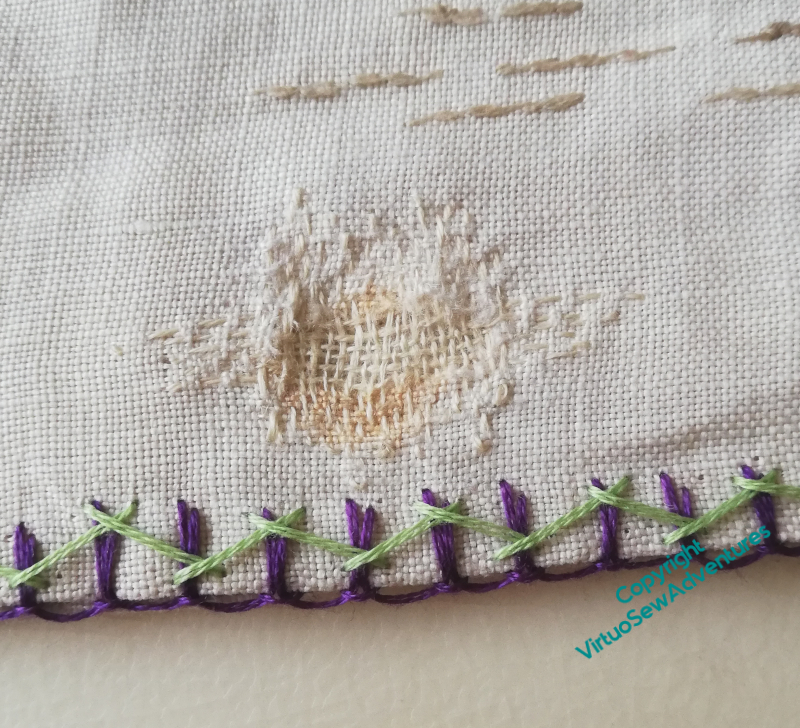
I’m not as satisfied with the darn, but I think it should stop the hole getting worse, and I’ve had a variety of suggestions for tracking down a suitable material to patch it with. At the best of times, that would be a tricky task, and in the current situation, it may well be years before I find something!
Progress continues in other areas, too – Episode Nineteen of SlowTV Stitchery is now up. It concerns, among other things, flyaway thread and the importance of writing things down…
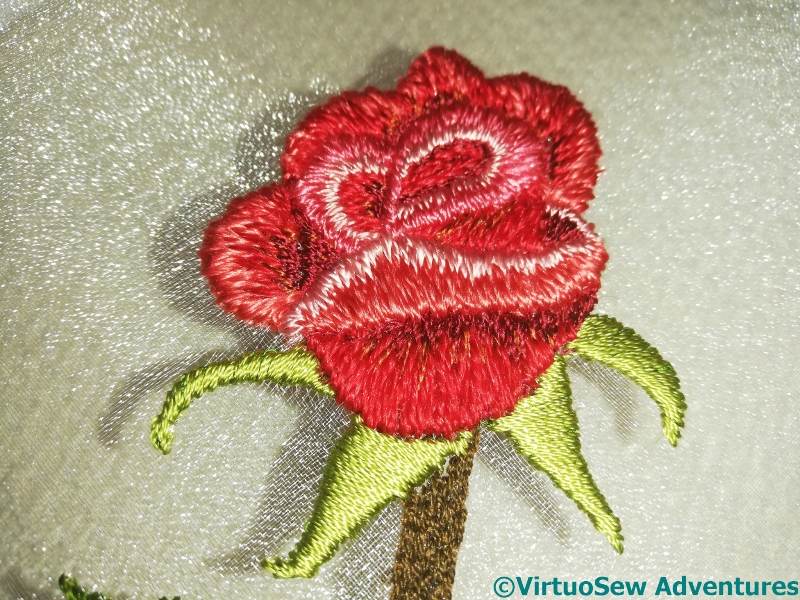
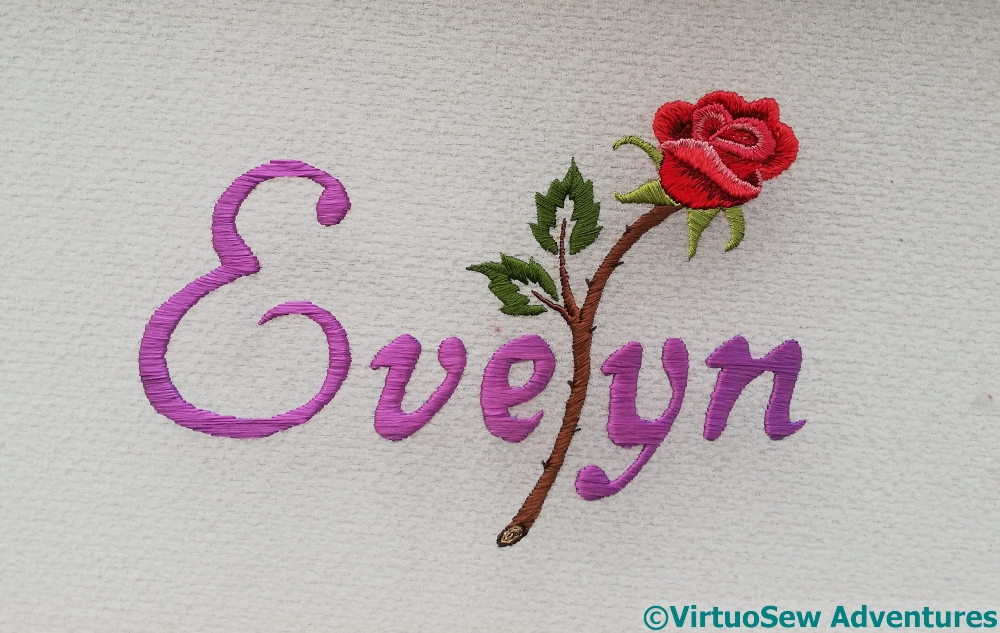
I’ve only just realised you’ve not seen the finishing of Evelyn Rose – I wrote the post then didn’t schedule it!
Rose Shadows
The glint of the gauze shows up particularly well in this photograph of the rose, and you can see, too, the various different silk threads I’ve used to get the effect and shade I wanted. Tricky, because I didn’t want a naturalistic, Redouté-style rose, but – because, as I said, they don’t work with stems – I didn’t want a canal-art style rose, either. I think I got it right, and I’m rather pleased!
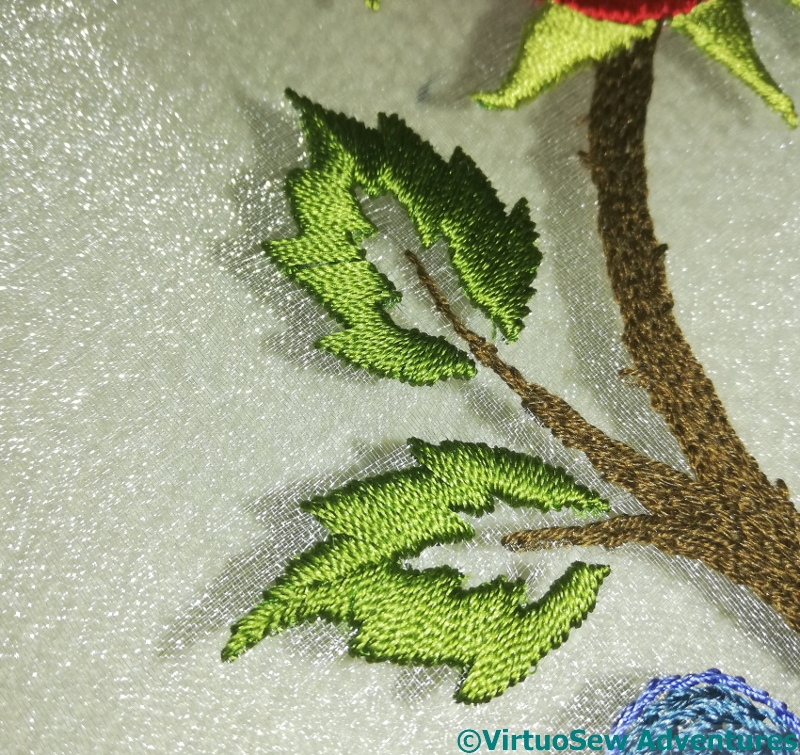
Leaf Shadows
This slightly “stencilled” type of leaf helps to keep the balance between “naturalistic” and “stylised”. It also provides an opportunity for some rather striking shadows when the light is right, and I was delighted, throughout the stitching, to have moments like this, when it became clear that the idea was going to work just as I had hoped!
Evelyn Rose Finished
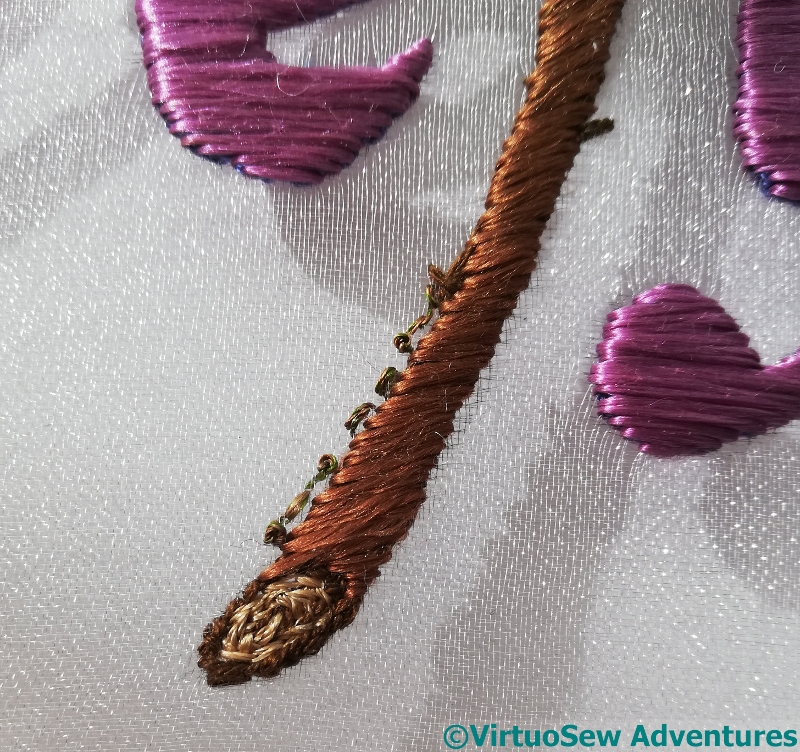
Signature Caterpillar
I knew that Evelyn’s father, in particular, would be very disappointed if he discovered later about my usual Morse Code signature, and I hadn’t done it for Evelyn, but making it small enough, and neat enough, and showing the stitches at the back as little as possible, was a little tricky. I twisted together several colours to get a fine, caterpillary thread, and worked my stitches as close to the stem as I could get them. In real life, it’s very hard to see my signature, but I promise you, it’s there!
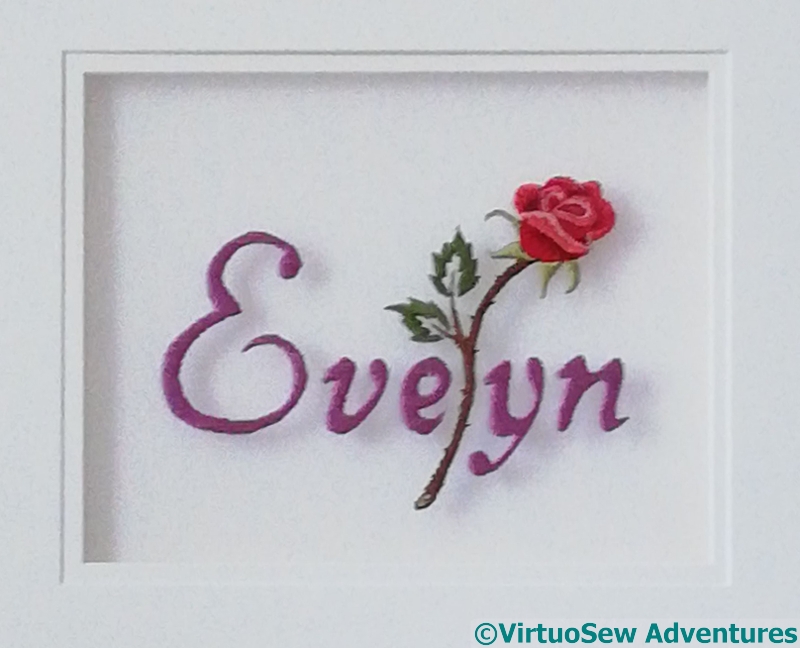
Evelyn Rose, double mounted and casting a shadow
The next challenge was to mount it. All this was happening only just pre-lockdown, so I went to see my wonderful framer, who goes by the (entirely deserved) name of Framing Genius. Between us, we came up with a way to create a sort of “sealed unit” of the embroidery and the mounts, so that I could post it overseas to our friends, who would then have something displayable until they can find a framer when such things are possible again.
Now, the next post in SlowTV Stitchery is now live – Episode Eighteen – on the desirability of imperfection and the likeness of mathematicians to cats!
It’s arguable that I’ve created a sampler rather than a tablecloth, but as I’ve got closer to finishing it and laid it on the floor to look for any missing bits, it’s looking cheerful, and that is really all I ask of it.
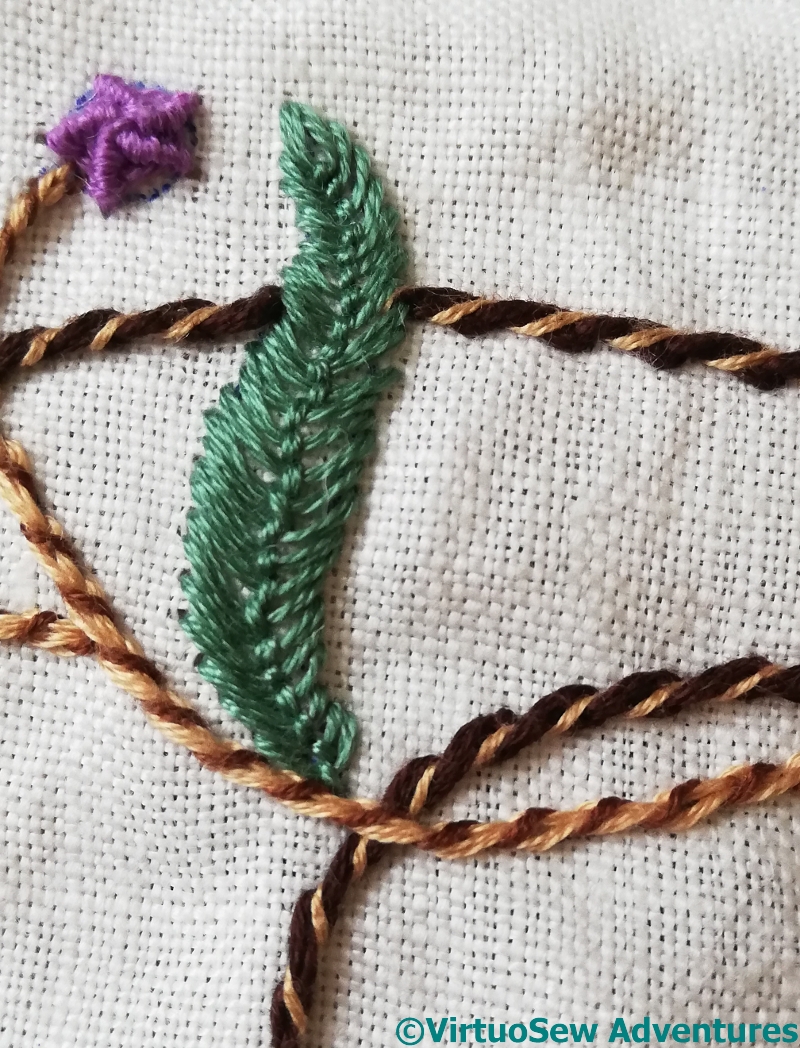
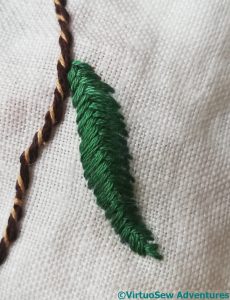
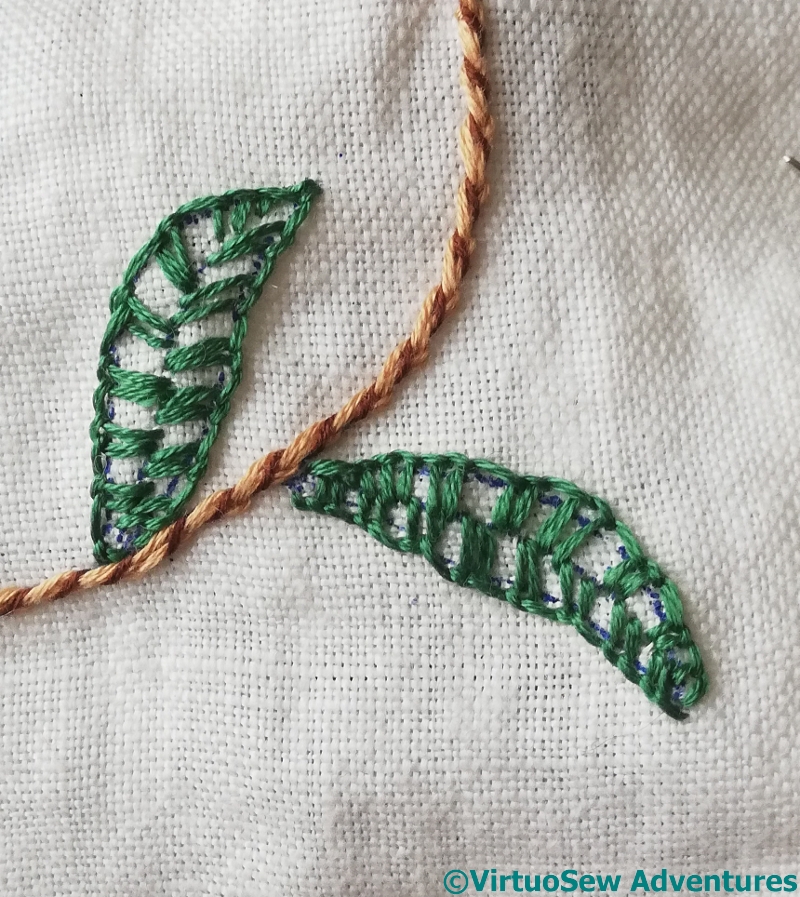
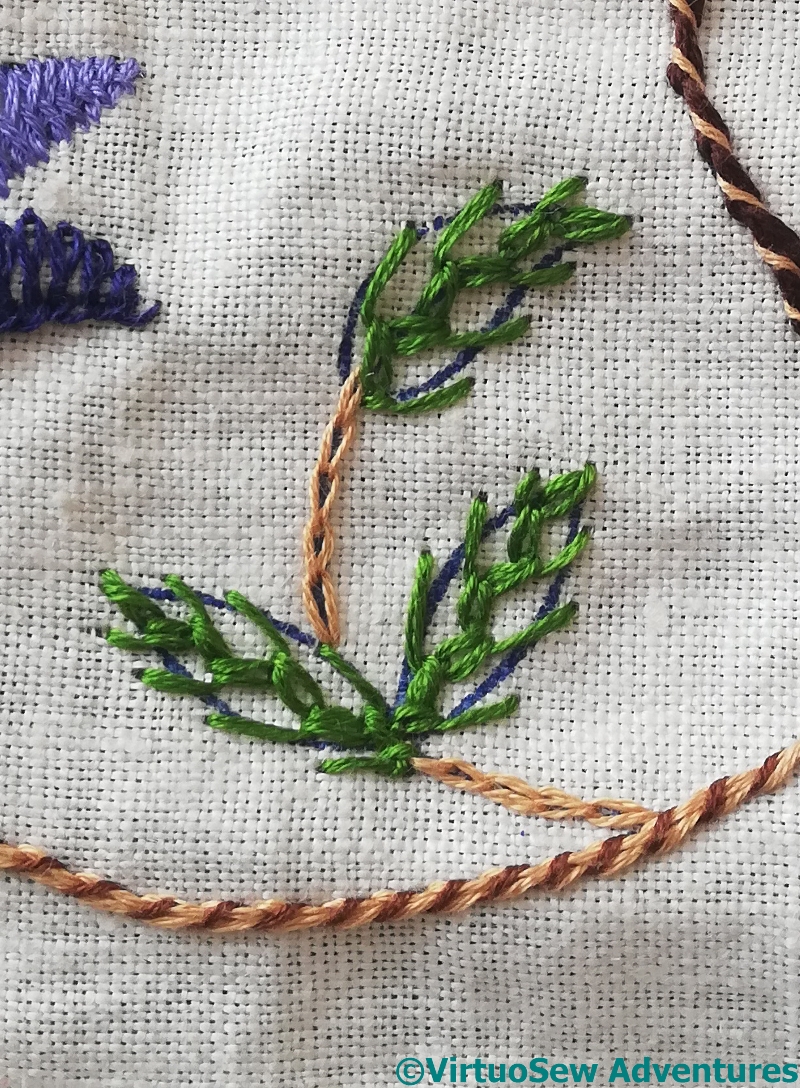
Mountmellick Thorn Stitch is an old friend, strongly textured but contained. It’s not entirely straightforward to shape it to the leaf shape of the design, but I think it works rather well!
Nested Fly Stitch
Nested Fly Stitch is another old friend, although one I’m not on such good terms with as some others. In the dim and distant past I worked two 2-foot high trees in Nested Fly Stitch (on the Persian Fantasy Screen) and they drove me nearly demented! However, it does create a solid coverage that isn’t fishbone stitch or satin stitch, and I wanted to make sure that the various leaves varied in coverage and tone. This is the “Heavy” end of the scale!
Stem And Chain
And this is the “Light” end of the scale – just outlines, in stem or chain stitch. These flow beautifully around curves, of course, and are really good for organic shapes, but I do need to remind myself that I don’t have to use obscure stitches all the time, and I’m allowed to choose the obvious ones occasionally!
The next episode – Episode Seventeen – of SlowTVStitchery is now up, and concerns mainly the little girls and some planning of Nefertiti..
While I was stitching round and round in circles, I was also thinking about the rest of the design, and about what else it might be showing.
I had a thought that it might be nice to make a reference to the Cretan art that was so influential for the art of the Amarna period. One of the conventions of the art of ancient Crete was that women were depicted as light-skinned, while the men were shown as tanned, so I thought I would give that a little twist, and work the three daughters as light-skinned, and Akhenaten and Nefertiti as tanned, thus “bookending” the scene.
Daughter in Plain Light Silk
So I blended a lighter colour and got started on Daughter Number 1.
Only to decide I really didn’t like it, order some more flat silk, and try again. This is the lighter shade of Akhenaten’s skin colour, and as you can see, it is too light. It barely shows against the gold, and at that, the photo shows it better than it showed in real life – I had real trouble seeing it to stitch.
So that wouldn’t do, would it?
Daughter Unpicked Again
The next thing I tried was a blend of the light and dark skintones, and as you can see, there isn’t even a photo of that!
Sigh.
Unpicked again.
The videos are of course somewhat beyond this point – Episode 16 – “On the satisfaction of pattern building and the avoidance of confusion” is now available. Do have a look!
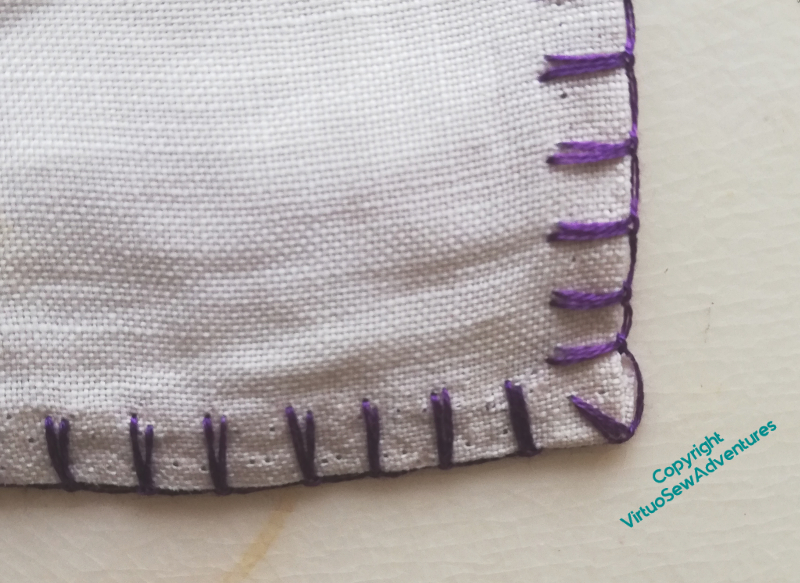
Grandmama worked this pyjama case for my mother when she was a little girl. It’s beautifully worked, but slightly faded now, and the decorative stitching over the edges has all but disintegrated. Mam has asked me to reinstate that stitching.
It’s a good thing that my collection of stranded cotton includes some of Grandmama’s threads and that of various great aunts. That gives me a chance of finding something not a million miles removed!
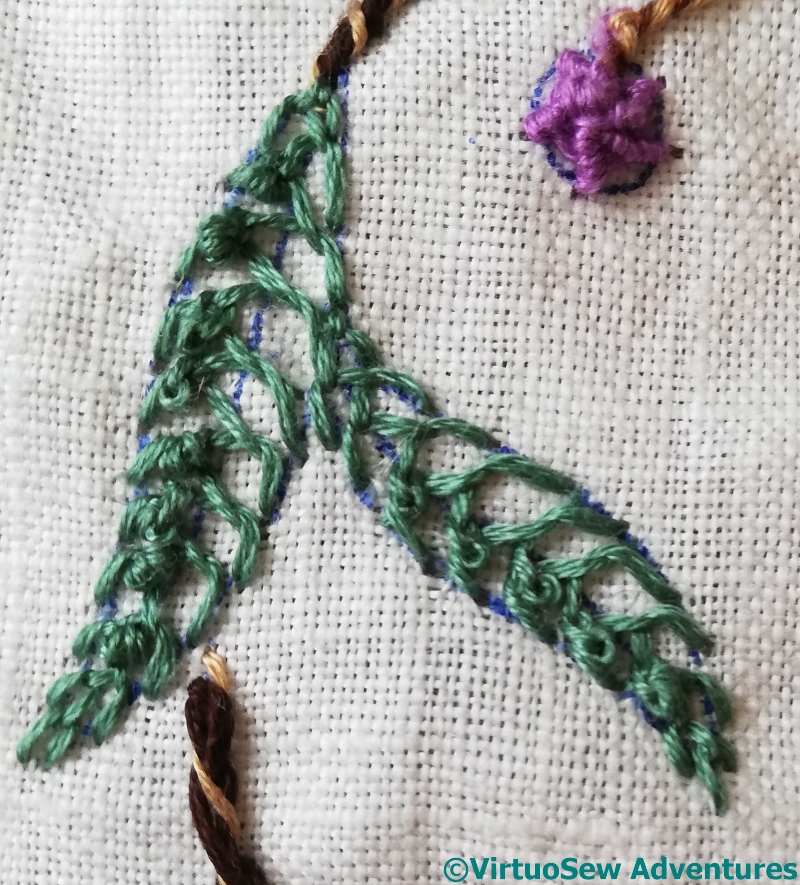
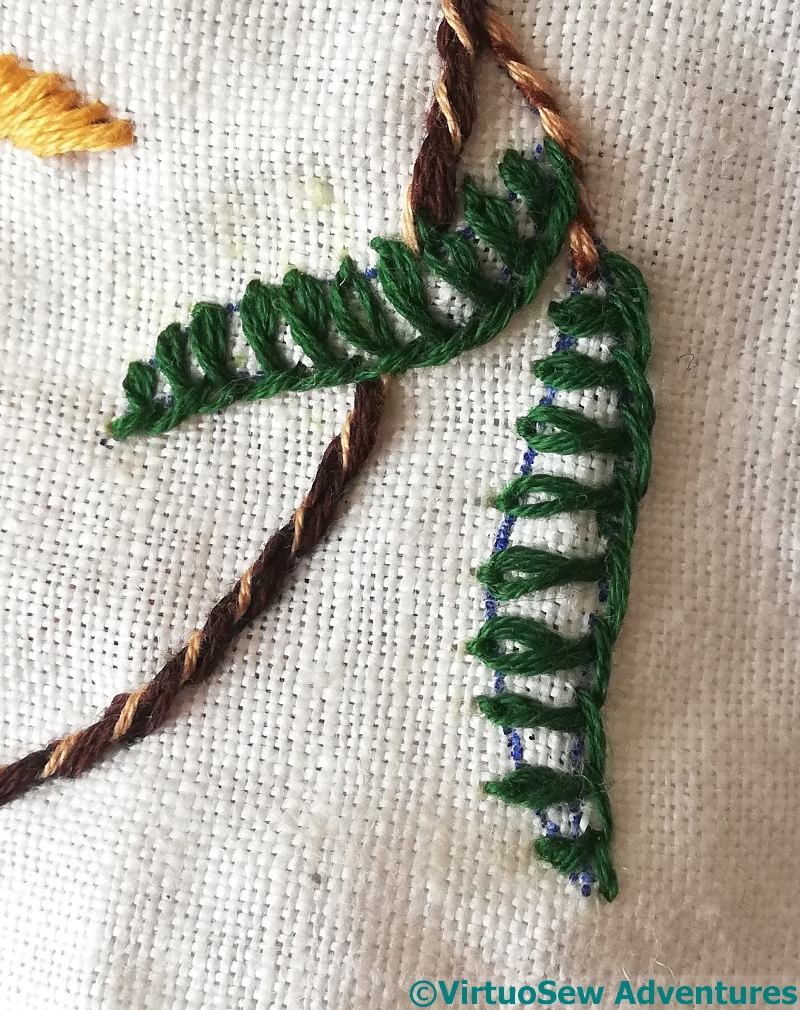
Damage To Repair
There’s some damage to repair as well. I’m not quite sure how I’m going to do so – there’s nowhere with spare threads to repair to attempt an invisible darn. So for now, I have outlined the area in split stitch, and I am going to concentrate – or try to concentrate – on putting in place a suitable border. The original was purple blanket stitch overlaid with pink herringbone, but we’ve decided that purple overlaid with green will work better in the room it will live in.
Multithread Edging
But we’ve already made a discovery. This slightly Art Deco looking border is the internal edging. It’s still undamaged, and I’m leaving well alone, but my Mam says she never remembers registering the detail here when she was a little girl!
We are pretty sure that the legendary Miss Hunter was involved in the stitching of this, so I’ve got a lot to live up to!
Meanwhile, in other news, Episode Fifteen of SlowTVStitchery is available, and concerns ideas for managing details, and the management of Very Long Projects.
In the end, I unpicked both of the previous attempts, and used a mass of French knots, worked again in hand twisted silk, this time combining some of the very fine silk from a Frostings box with my Japanese Flat silk.
I think these work well, especially at the small scale of the piece.
Lotus Flower
I’d been rather dreading the large lotus flower, representing the shaped endpieces of a broad collar necklace, because I was remembering the struggle I’d had with the “Fragment of Tile That Started It All“.
Then I had an epiphany of my own, and used the difference in appearance and reflectance of twisted silk compared with flat silk to help distinguish the shapes of the petals and bring the foremost ones forwards. I’m very pleased with how that turned out!
Finished Faience Necklace
And now, finally, it’s done!
This one is almost certainly going to be one of the “spots” around one of the big panels, because although I like it, and it represents what I want it to, I don’t think it has the visual strength to stand alone.
But then, if all the pieces could stand on their own, I wouldn’t be able to assemble the panels I want to, would I!
Finally, Episode 14 of SlowTV Stitchery is now live, discussing design thoughts, music and musicians. Do drop in and see how I’m getting on!
Each time I decide how to do a particular element, I do all four appearances. I decided on this very early on, because I knew that working a whole side and then copying it three times would drive me absolutely mad!
Raised fishbone stitch creates a nicely embossed effect, providing a good contrast with all the open stitches I’ve used. It requires a bit of concentration – this is a little raggier than I’d like – but at this point, I want the wretched tablecloth done, so I’m likely to just move on..
Grouped Blanket Stitch
I’ve been looking at other embroidery styles of late – one can’t be wallowing in gold all the time, and one of these days I will be able to think of doing something else – and I’ve been reminded of just how effective groupings of blanket stitch or buttonhole stitch can be. This is the simplest variant I could think of, but I must remember that simple stitches like blanket stitch offer endless possibilities for variation..
Feathered Zig Zag Chain Stitch
One of the attractions of surface embroidery is the possibility for stitches to evolve themselves into being. I’m calling this one “Feathered Zig Zag Chain Stitch”. I can’t believe I’ve invented it, but neither can I remember having seen it before, and I think it works rather well. It certainly flowed familiarly off the needle, like an old friend.
The photograph has reminded me, however, that I need to finish whipping my chain stitch stems!
And new in SlowTVStitchery, Episode Thirteen is now up. In which, at long last, a Decision is made….
You may recall this tablecloth, which I won in a job lot of things in an auction on eBay, a long time ago. I regarded it as my “traveling project” for a while, but didn’t travel much, or when I got there, found I couldn’t settle to it, and it’s been lingering and hanging over my head rather. It may well be that the current situation will give me the opportunity to get it finished. It will make a change from the details of the Amarna Family Group!
So, since I’d forgotten what I’d planned (or if I’d planned!), I laid it out on the floor and played around with skeins of cotton, to see what I could come up with.
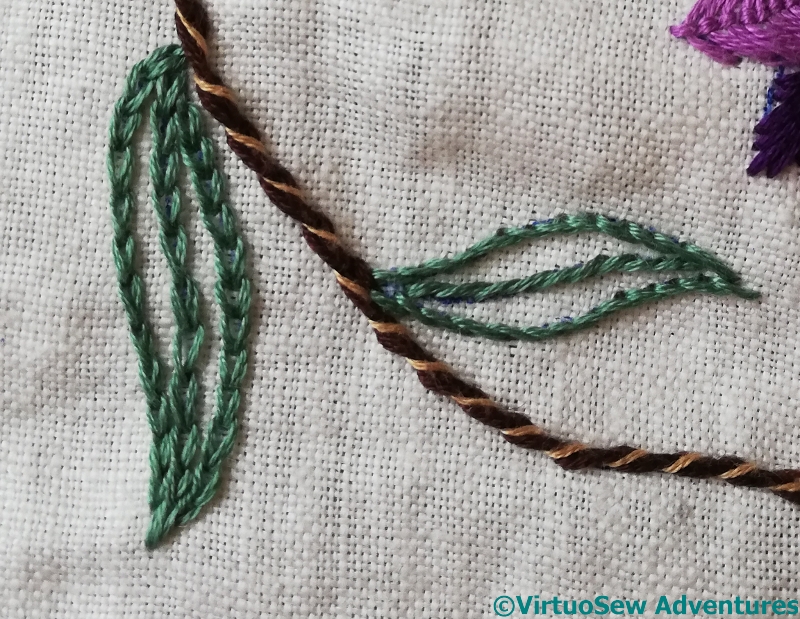
Basque Stitch
The way I’ve worked on the tablecloth is that as I’ve what to do with each motif, I’ve worked each instance, and that way the whole tablecloth advances at once.
The Basque Stitch of these leaves is rather more spaced out than in the previous appearance of that stitch in the tablecloth – spacing, as well as scale, plays a part in altering the appearance and emphasis of a stitch.
Coral Stitch Outline
Coral Stitch is nice and simple. Such a nice rest…
Yes, I know the concept of or nué is simple, but the execution isn’t, believe me!
And, speaking of or nué, Episode 12 of SlowTVStitchery is up! Do go and have a quiet half hour with me…
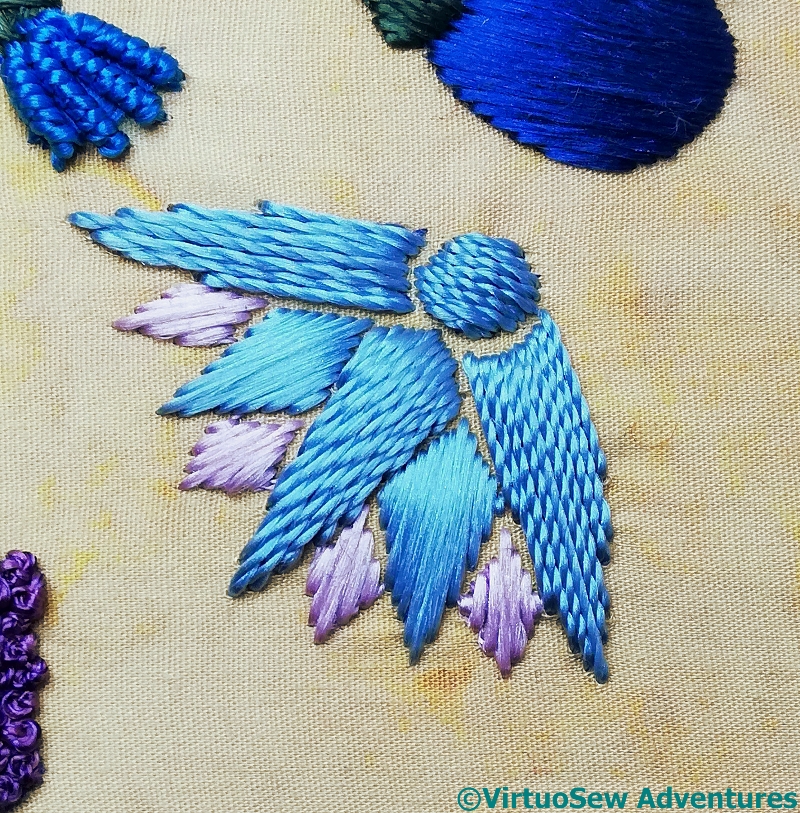
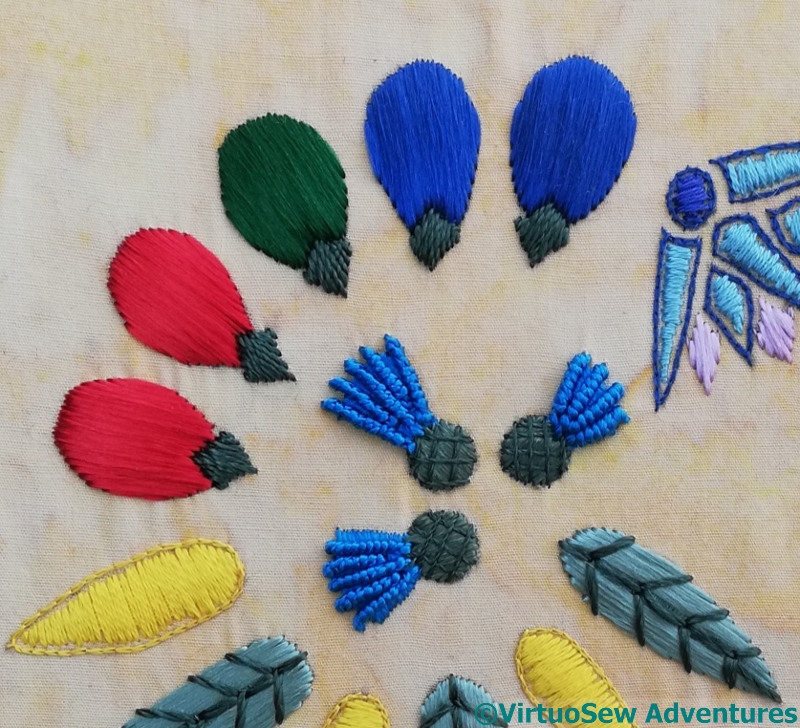
The necklace description that Mary Chubb was asked to transcribe, after her epiphany in the cellar, includes a row of dates in a repeating colour pattern of two red, one green, two blue.
So here they are, in satin stitch in flat silk for the main fruit, and more satin stitch, but this time using hand-twisted threads, for the stem. I found a rich and vibrant green for the main green fruit and used a greyish-green for the stem. Again, I’m trying to balance echoing the faience with echoing the real fruits, leaves and flowers, which is making for some interesting puzzles!
First Lotus Petal Trial
I wanted to try blending the silk filaments for one of the elements, to help recall the slightly iridescent effect of some glazes, and spent a wonderfully painstaking (exasperating!) afternoon splitting my silk. And then recombining it, and using it to stitch the first of the lotus petals in long-and-short stitch.
Only to sit back and glare at it. It’s looking congested, chunky, and not at all what I was looking for. What’s more, it’s buckling the fabric in spite of the calico support.
Snip, snip, out it comes, and now I need to think again.
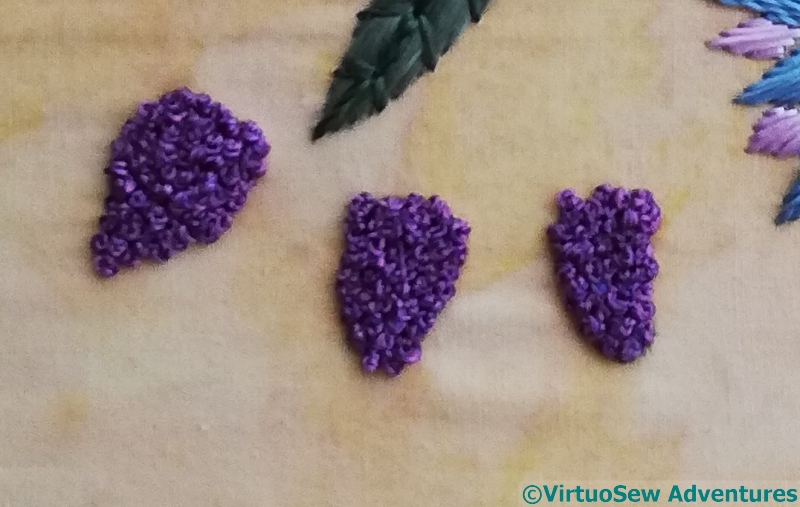
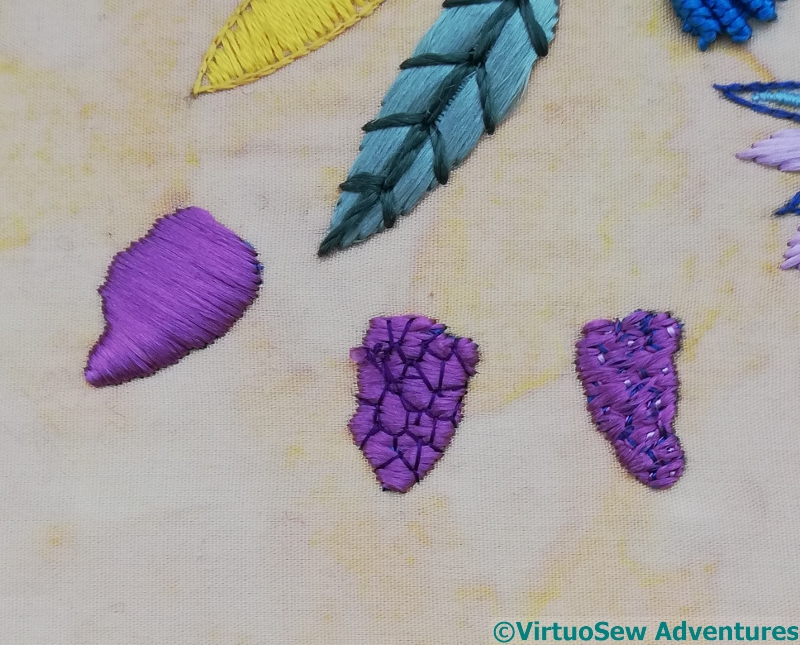
Faience Grapes Compared
Meanwhile I have another element to think about as well. You can see the underlayer of satin stitch on the shapes which are supposed to be recollections of bunches of grapes, and then two attempts to give them a more defined appearance. I think I prefer the middle version, which was the second I did.
That, however, means I have to unpick my first attempt. Sigh.
There was a problem with uploading my video last week, so here it is, somewhat delayed: Episode 10 of SlowTVStitchery. And, just so we don’t get too far behind ourselves: Episode 11 as well!
I recall from both the Hittite Amulet and Christus Natus Est that Or Nué projects are rather difficult to write about. They’re a little like those novels in which Nothing Happens, because one edges slowly forward, with the piece growing imperceptibly – until all of a sudden, it gallops to a conclusion. I am nowhere near that point as yet, but for the benefit of those who prefer reading to watching, I will attempt to provide occasional updates…
Progress So Far
Here is one of the progress shots.
There are a few details I will have to come back to, as you will see if you click through to the larger image. I may have to adjust Akhenaten’s arm, for a start, and the pale blue I used to mark the creases on his kilt isn’t dark enough to do the job, so I will have to do find another thread and add some stitches.
However, the metal thread on the front of Akhenaten’s headdress shows up rather better than I feared it might. Although, as I said on one of the videos, gold thread couched with gold thread is pretty much Peak Ancient Egypt. Even Louis XIV, never an advocate of moderation in design, would take a step back, crying, “Here, I say, steady on!”
To which I reply, I am steadying on – it’s staying in!
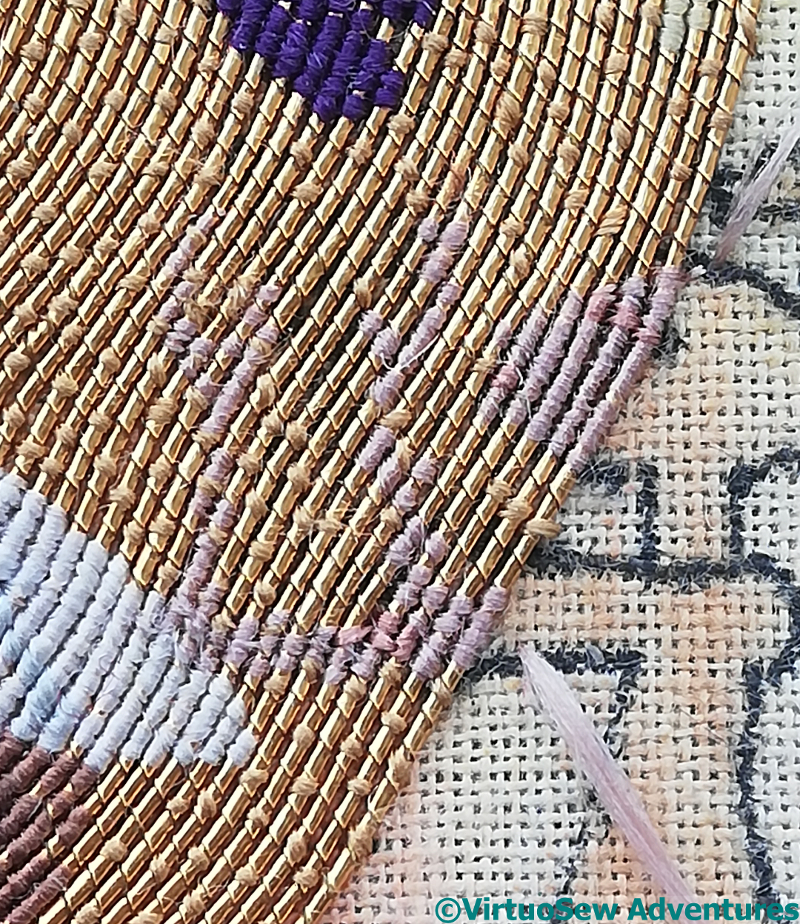
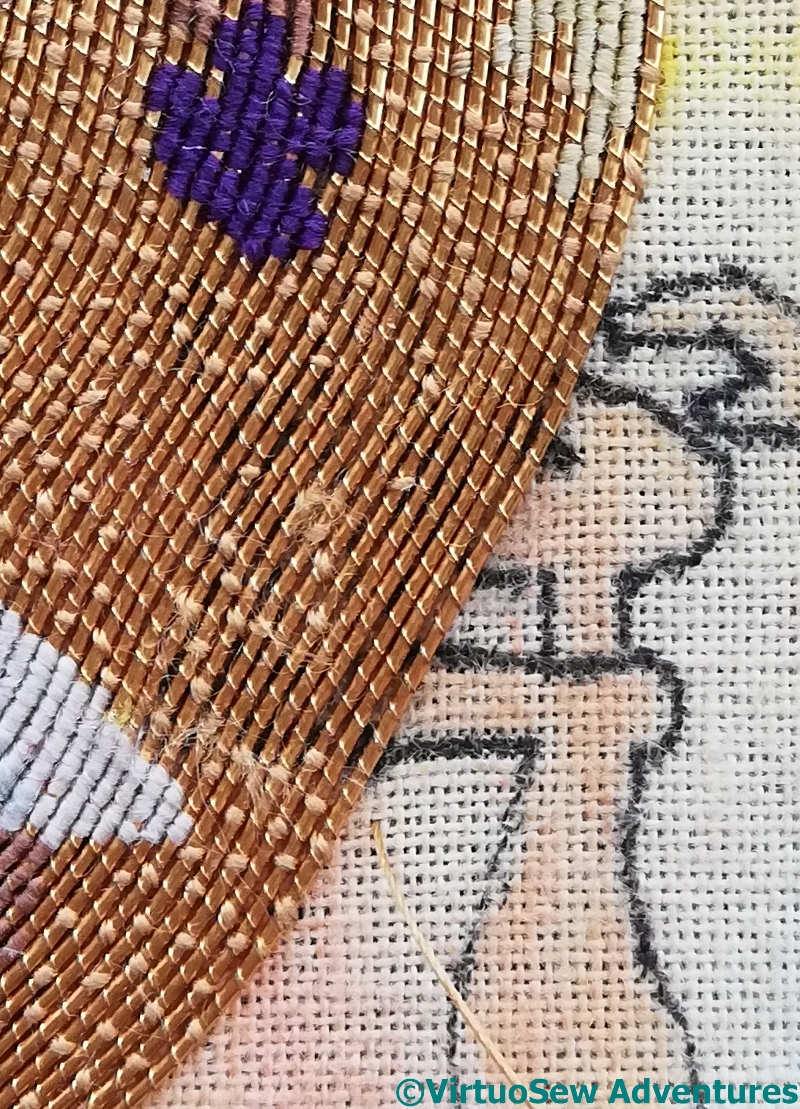
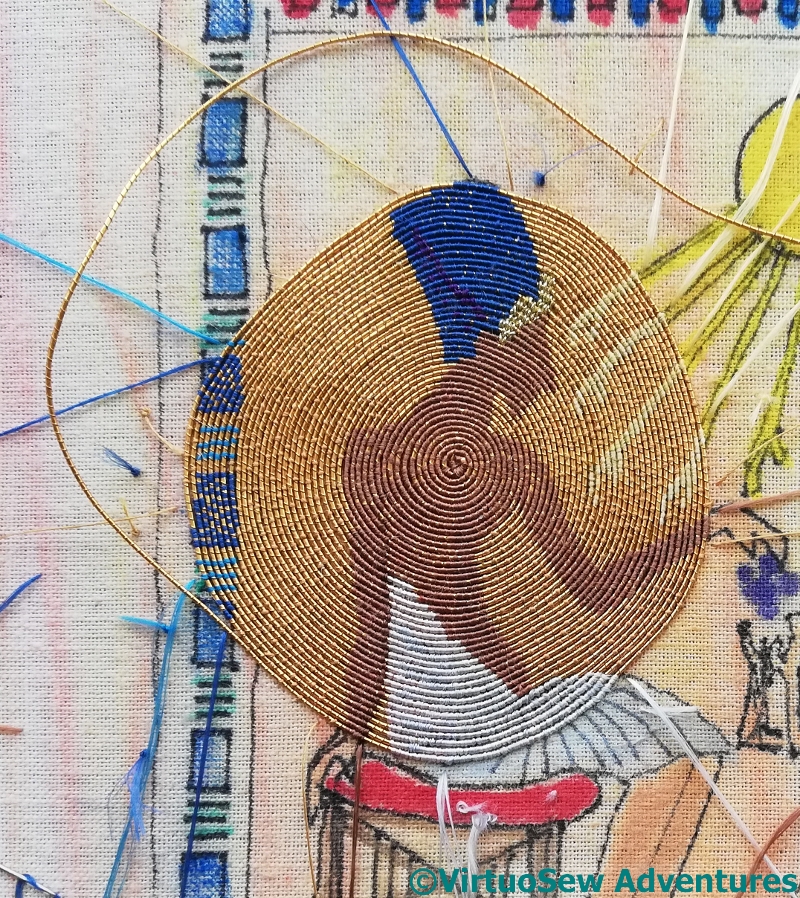
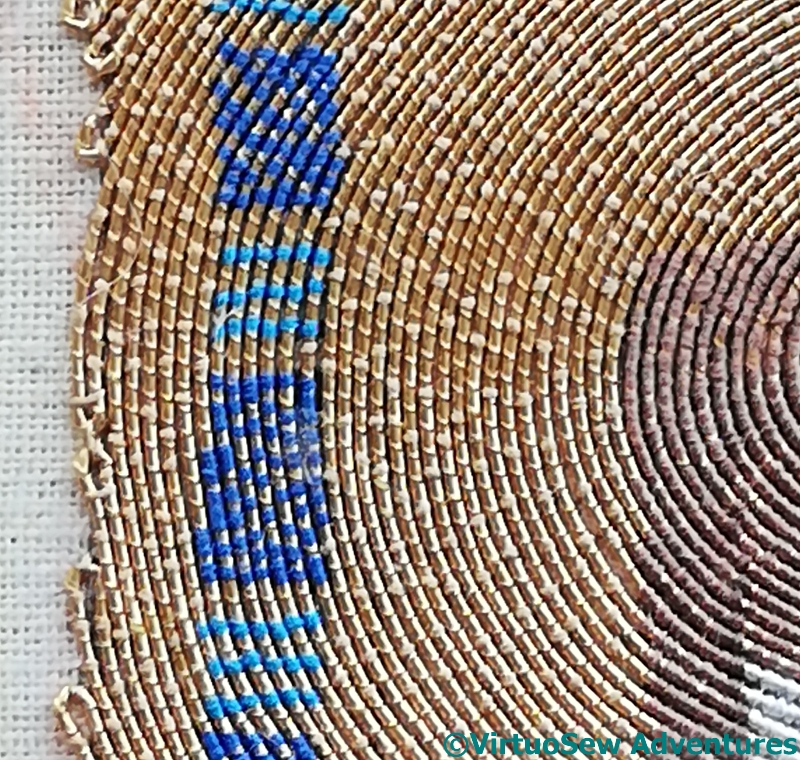
Half-Tone Border
This is a close up from slightly more recently. You can see that I’ve reached the designated edge of the design, and that rather than cutting and plunging my threads, I’m doubling back on myself, so all the gold remains on the surface. My intention is that this will be edged with some sort of braid when it is complete, and attaching a braid through the gold as it stands will be quite hard enough, without attaching it through plunged ends as well!
I’m also leaving the royal blue blocks in a sort of half-tone, with some of the gold showing through. I may decide, when the whole thing is finished, that the border designs need to be full strength if they are to frame the scene properly, but I felt that this might work, and would be an interesting experiment.
But, occasional reservations aside, I think this is going to be a very successful piece!