
About Rachel
View all posts by Rachel
Embellishing The Circles Skirt – Part Three

Spanish Knotted Feather Stitch
Naturally some of the threads I chose to use were from my extensive stash of variegated and over-dyed yarns. The Spanish knotted feather stitch running around the edge here is stitched using one of Stef Francis’s pearl cotton type yarns. This one has very little sheen, unlike the more standard pearl cottons, but the colour change brings up the texture of the stitch beautifully. I think this is the first time I’ve ever used that stitch, and I really enjoyed it.
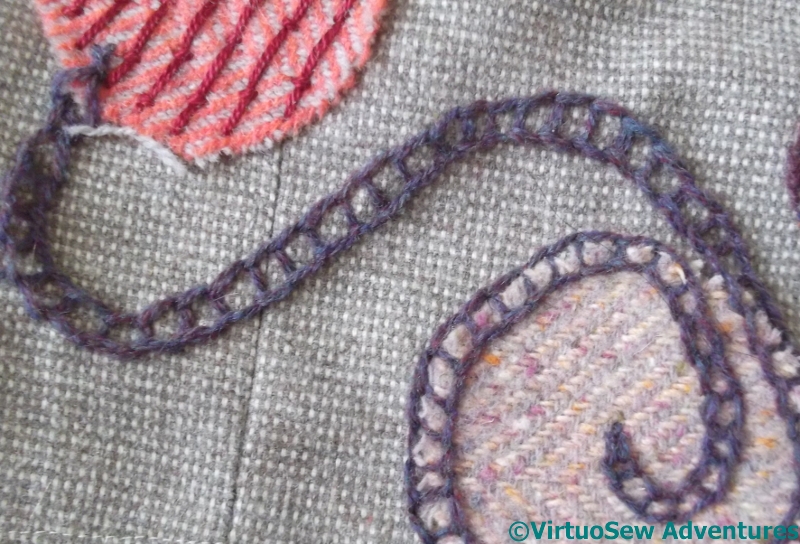
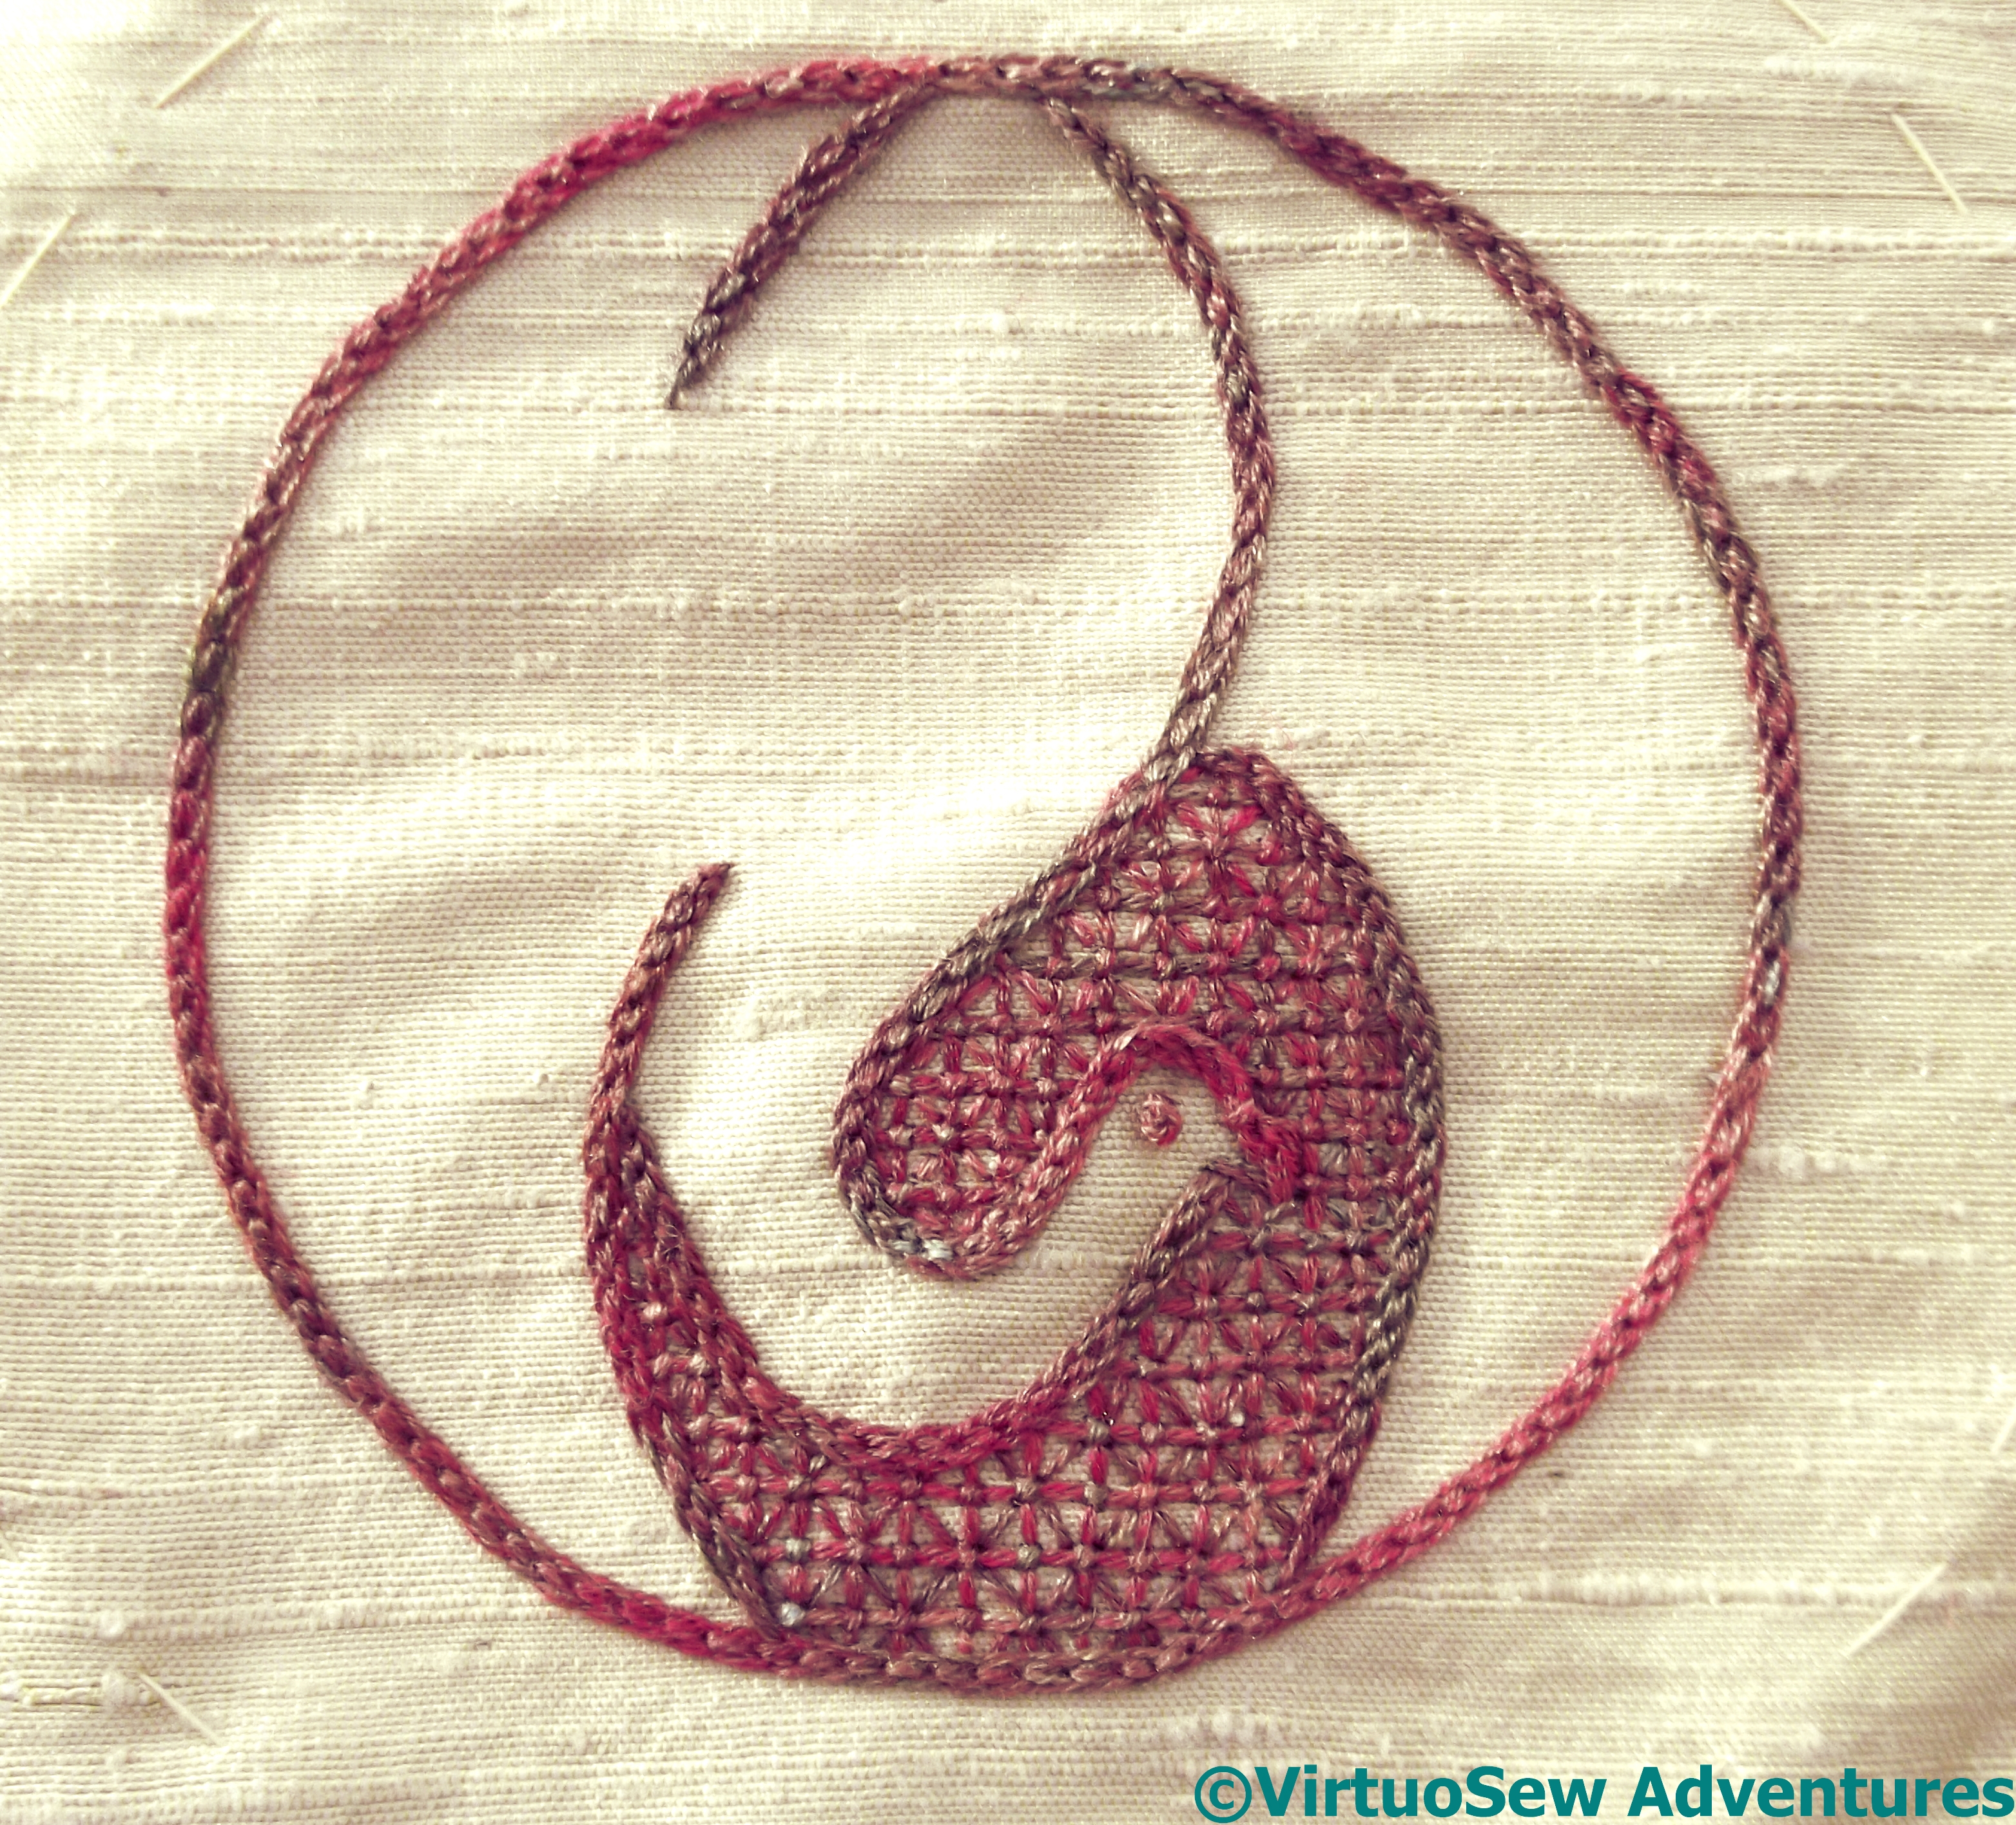
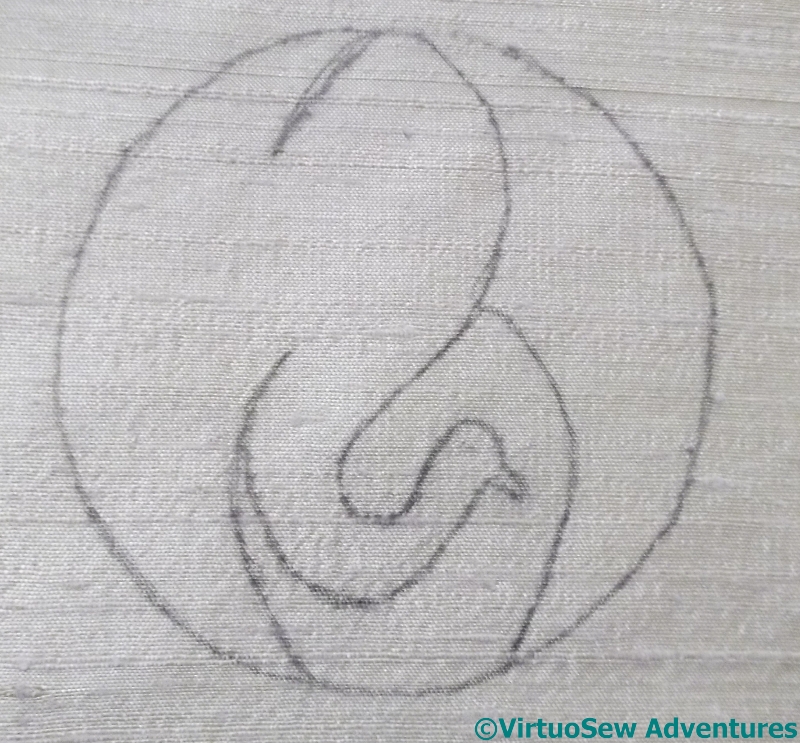
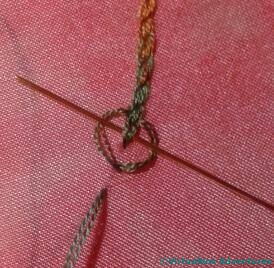
Spiral Of Ladder Chain
I realised that I had fallen somewhat into the trap of stitching around the edges of the circles, and wanted to create some sort of variation, so when it came to the pinky circle, I added a layer of widely-spaced burden stitch to alter the colour and effect a little. Then I used ladder chain stitch to join that circle to another.
I continued the Ladder Chain across the skirt fabric and around the rim of another circle, spiralling around it and then into the centre.
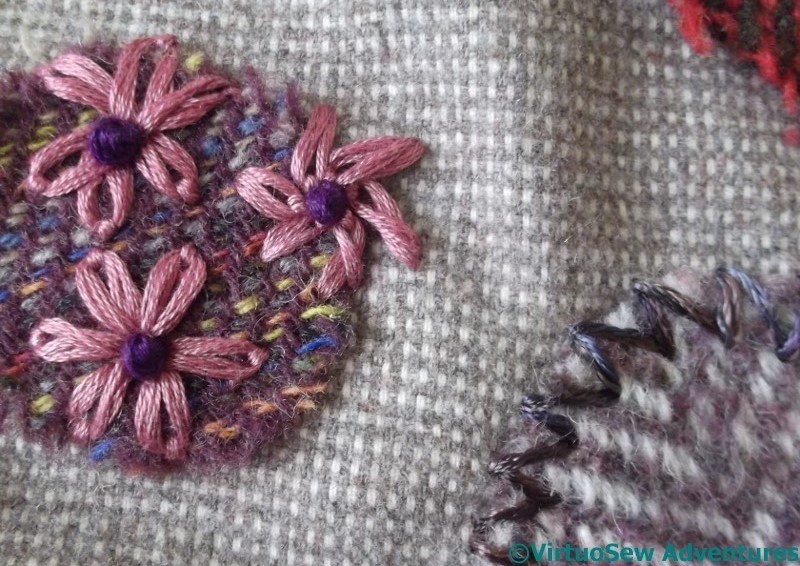
Glove Stitch And Daisies
More daisies, this time on one of the smallest circles. I may add to the grouping in due course, but for now, there are just the three pinkish ones with dark centres, one of them falling off the edge of the circle.
The shiny rayon in stormy colours around the edge of the other circle is glove stitch. It was surprisingly hard to bend the stitch around the circle. I expected it would be easier, since with a name like “Glove Stitch” you would expect the stitch to be intended to run around fingertips, which are much more tightly curved than this circle!
The Crazy Canvaswork Cushion – Part 2
First Section
Once I had managed to get the canvas mounted on the frame, I could start stitching. Although the project is inspired by Crazy Patchwork, and is supposed to be random in feel, I always find it easier if I can give my randomness some structure, so I have worked out a few guidelines for myself:
- At least two colours in each patch
- Heathering will be permitted, but confined to the middle of the cushion
- Try to use crossed, slanted and straight stitch patterns in equal measure
- Don’t try to straighten lines – use partial stitches.

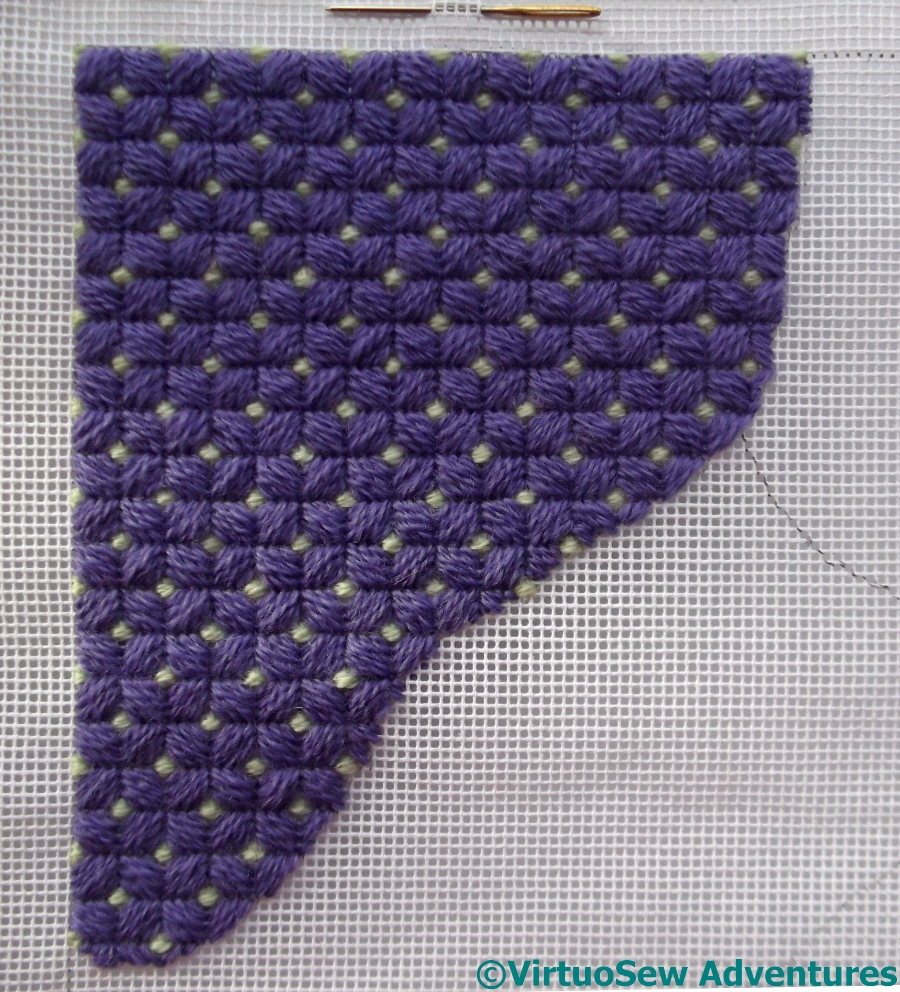
Brighton Stitch
They are only guidelines and I may ignore or break the rules later on!
The first section is worked in purple and pale minty green, using Brighton Stitch. I like this stitch. It creates a neat, geometric effect, covers the canvas well, and can be made as subtle or as dramatic as you like.
I’m also keeping track of the amount of thread I use. It will give me some sense, as I get nearer to completing the cushion, of whether or not I am likely to reach the end of the cushion or the stash first!
Florentine Stitch
For the second section, I decided to use the simplest and most basic of Florentine Stitch patterns. Only two colours, and a simple, regular zigzag.
I’ve found that three strands of the Paternayan are necessary for this stitch to cover the canvas, whereas for the Brighton Stitch I only needed two strands. The basic Florentine stitch is also terrifyingly quick to do. I realise this is an odd thing to say, but I want this project to last me a while, and if the sections turn out to be really quick, it won’t.
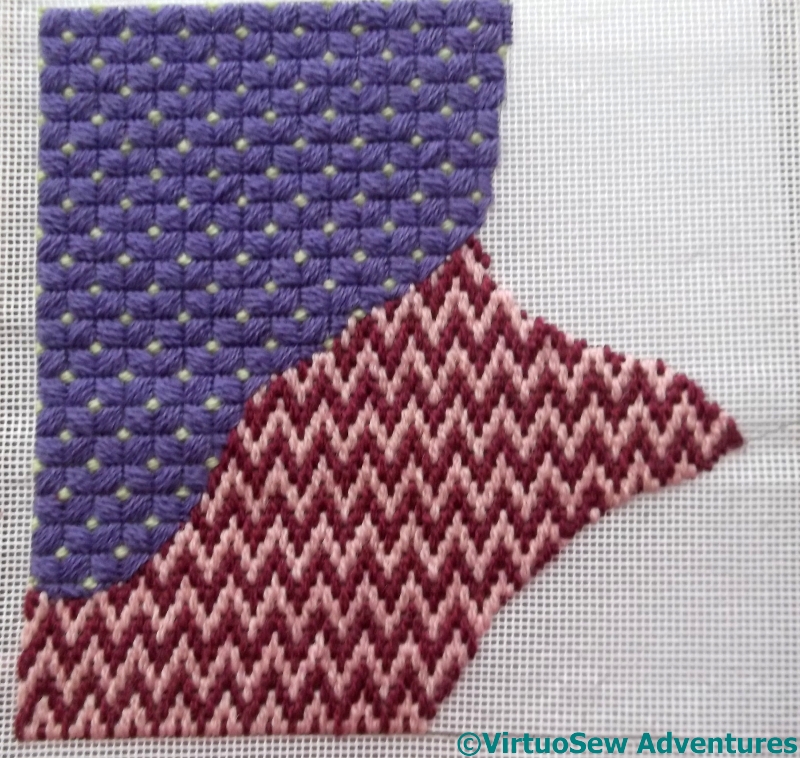
Second Section Added
It’s too early to draw any conclusions, but the first two sections also used about the same number of strands taken from the skein, even though in one case the lengths were used whole while in the other, two lengths from the skein produced three needlefuls!
I have yet to decide whether I will emphasize the joins, either by creating some sort of seam embellishment, or simply by back stitching in grey thread to make the edges seem crisper and sharper. That decision can wait until I’ve finished, not least because I suspect that I will need to see the whole thing at once before I decide!
Slow Progress on the Glittering Nightcap
Just as it does every winter, my work on my current Thistle Threads project has slowed to a crawl. The bay window where I have a decent light to work by is too cold to be inviting, and the grey, overcast, and rainy days result in very poor light even at the best of times. Given the effects of this past winter on other parts of the UK, the lack of light to embroider by is a very minor matter – but it does explain why canvaswork became so very appealing to me!

Gilt Sylke Twist Finished
However – trumpets, please! – I have now finished all of the Gilt Sylke Twist on the brim of the Glittering Nightcap! The photograph above does enlarge if you click on it, but I’ve noticed that it is slightly blurred at the edges. That isn’t surprising, as it is quite a long piece, and it was quite hard to get all of it in the frame at once.
Half Of Design
So – to make it easier to look at – here is one half of the design as I have stitched it up. You will remember that I decided to work the brim slightly differently to the main section of the cap, so that when it was finished it would be even more of a sampler of techniques than it is already.
All the detached buttonhole with return was worked in the style I found in Jacquie Carey‘s book Elizabethan Stitches, in which the border of the stitch is integral to it. This in fact makes it rather easier to stitch – once you have a grip on how it works! – because you aren’t trying to stitch into a chain stitch border, so the thread isn’t quite so mauled about and the gilt wire doesn’t break quite as often.
I also substituted satin stitch for the sepals to create a change of reflectance. I’m now wondering whether the little scarlet buds should be taken out and worked in double padded satin stitch, too, maybe even in the silk thread used in the trellis stitch pomegranate centres, rather than the gilt sylke twist.
Poppies and Wheat – Another of Grandmama’s Pieces (Introduction)

Tray – Poppies And Wheat
The design for this tray was embroidered by my Grandmama during the period when she and her sister and all their children were evacuated to Burton in Westmorland during the Second World War.

Signed On The Back
We know that because it has been signed on the back!
Besides, my mother remembers it being used on ceremonial occasions. It was always a trial – it’s very heavy (because of the glass), rather slippery (glass again) and doesn’t have much of a rim to keep what’s on it safe. Especially with four children and a dog in the house.
In fact Grandmama, and now my mother, both resorted to propping it up somewhere and using it as a cross between a picture and an ornament. It makes a rather large ornament, too. I’ve seen mirrors over fireplaces that weren’t much bigger!
And of course – again because of that wretched glass – most of the time you can’t really see the embroidery for the reflections. Which is a pity, because it is exquisitely worked, probably one of the pieces overseen by Grandmama’s embroidery teacher, Miss Hunter. Recently my mother decided to take it out of the tray, find some way of cleaning it of some of the discoloration, and mount it properly as an embroidery. Naturally we will find some way to remount the signature from the back as well.
Needless to state, this turned out not to be as easy as we might have hoped.
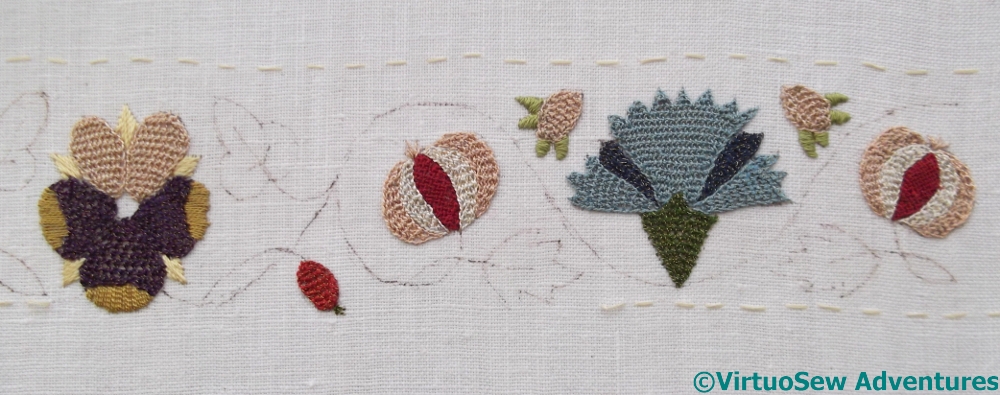
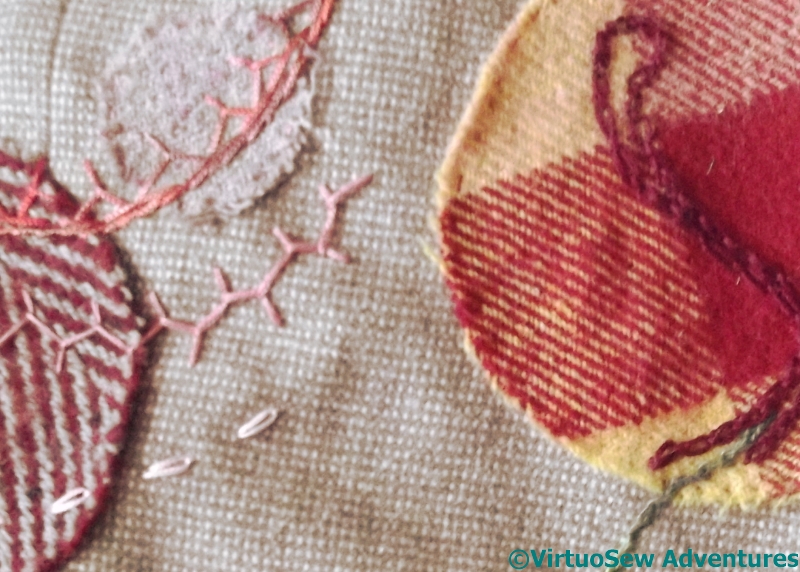
Embellishing the Circles Skirt – Part Two
There are a lot of circles to embroider, and since even though I’ve done a lot, I’m not sure I’ve finished, it will be some time before I show you the skirt complete. In the meantime, though, I’ll continue to describe some of the circles and the embroidered embellishment as it has developed.
Three More Circles
The light chain stitch around the edge of the darkest tweed circle looks a little stark, and I may have to do something else to break it up a little. Edith John’s various suggestions may help there!
The stranded cotton I used for the blocks of straight stitch on the pinkish tweed is actually too close in weight to the threads in the tweed, and at some angles in relation to the weave, it sinks in a little too much. I like the effect of the sheen of the cotton against the matte wool, but another time I might choose to separate and recombine the strands.
The lilac tweed shows what happens when you improvise. I started with a ring of French knots about half a centimetre in from the edge, decided it wasn’t enough, and turned alternate French knots into flowers with a ring of straight stitches. It turned out that I was one French knot short of a complete ring!
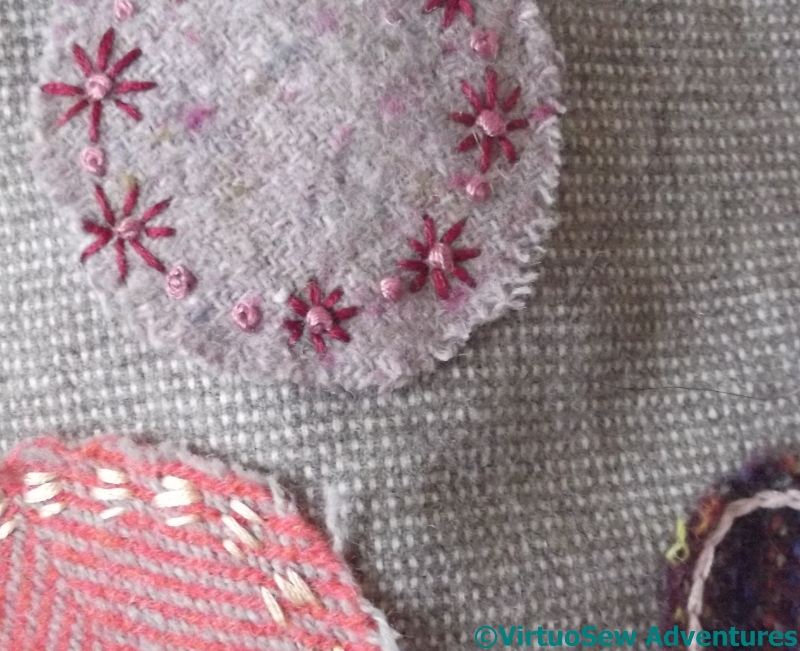
Cretan and Interlaced Running Stitch
The small, dark tweed circles are predominantly at the back of the skirt, on the sections that flare out slightly. By and large, I’ve not done anything too dramatic in embellishing them, either. I want the patterning to reach all around the skirt, but it doesn’t have to be equally heavy or equally detailed at every point.
The cretan stitch is worked in a fine but quite rough silk thread. I liked the combination before I stitched it, but the silk thread wasn’t easy to work through the tweed fabrics, so I was very glad it was only a small circle!
The second circle is ringed with double interlaced running stitch using a medium weight pearl cotton. The pearl cotton sits up above the tweed, and the shine contrasts nicely with the matte silk thread on the other circle.
The Crane – playing with silken thread, Part Two
Japanese Crane Design
Here is the Crane design, finished and ready to be mounted for display.
I picked a wooden pot from Framecraft Ltd. People who have been stitching for a long time may remember them as “Framecraft Miniatures”, and they were always a good source of silk gauze and other supplies for people interested in furnishing dolls’ houses. They also supply a huge variety of other items with spaces for inserting embroidery – you might remember my Homage To The Opal, if you’ve been reading my blog for a while.

View Of Crane Pot
Framecraft supply a plastic cover to protect the embroidery, but as my cousin isn’t the type of person to maul a piece of embroidery with sticky fingers, I decided she would probably prefer to see the embroidery properly. They also supply padding, but it is a light foam, and I substituted two layers of a very fine cotton wadding instead. The cotton wadding has a bit more substance to it, and created a nice firm dome, which looks much better when the embroidery is displayed without a plastic cover.

Crane In Place
The colour changes and textural stitches keep the design from looking too stiff, but because the silk thread has a slightly matte appearance it looks soft and doesn’t dazzle the eye.
When my cousin took it home, she strolled around her house asking the Crane where he wanted to live. He chose the bedside table in the spare room, where his colours talk nicely with the wallpaper and the bedspread, and the wooden pot echoes the dark wooden bedhead and wardrobe.
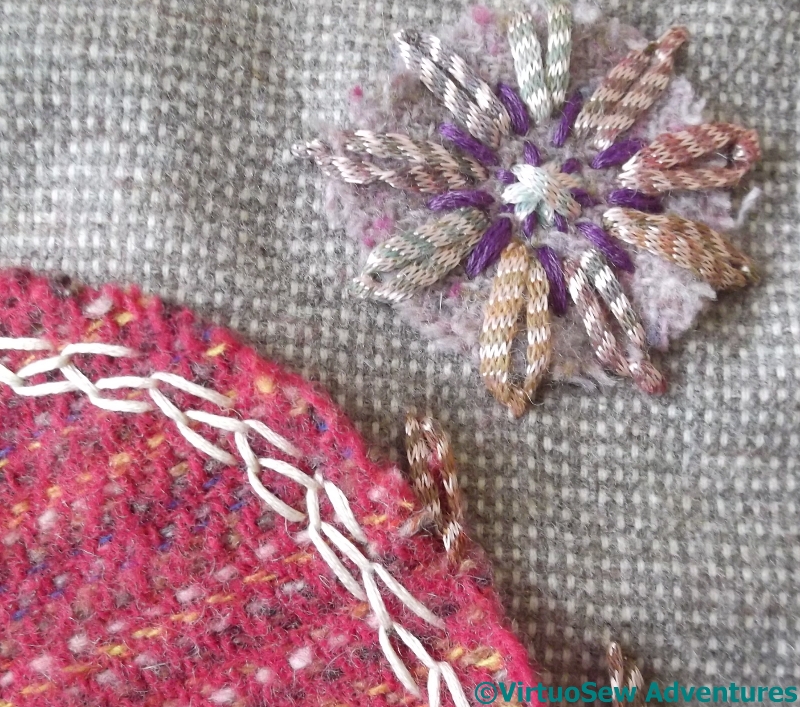
Another Needlepoint Project – The Crazy Canvaswork Cushion

The Old Form
I very much enjoyed working the Stones of Venice footstool last year. It was really lovely to have something that I could pick up as a relief from the fine silk and metallic threads in the Hittite Amulet, and my various Thistle Threads courses. Furthermore, at this time of year, something I can enjoy in the evening without switching on my daylight lamp is a good choice for those days when I haven’t managed to stitch during the day but have been longing to.
Naturally, I’ve been casting around various family homes, looking for a destination for the canvaswork once completed. And I’ve found it – in her studio, my mother has an old form (a bench) which she remembers from her childhood home in Westmorland. It’s shabby and tired now, but giving it a good sand down and a fresh coat of paint will work wonders, and a long cushion will make it altogether more comfortable to sit on.
Welding Canvas
We’ve decided that this, too, will be a stash-buster, insofar as that is possible, so I’m going to have to weld my canvas together (bear with me!) and the inspiration for the canvaswork itself is to be Crazy Patchwork. I’ve been told to make it look Cheerful.
It is fairly simple, but a little time-consuming to “weld” canvas together. Create an overlap, lining the canvas up to match the holes, then stitch together by making several lines of whip stitching along the length of the join. Trim off any superfluous selvedges, and you should find you have a secure join that is almost unnoticeable once the decorative stitching is applied.

Design Outlines
Since I am trying to use up a rather peculiar collection of wools, the leftovers of an assortment of projects that were never intended to live together, the theme of Crazy Patchwork seemed the most promising.
What it wasn’t, was Easy To Plan. You can see that in the top variation I ended up trying something very much more formal, a sort of paisley pattern layout. I like it, but not for the purpose of this particular cushion. It might work better for a piano stool or something in a similarly formal setting.
Then I tried a layout with straight edges, and was less than happy with it – there’s not enough sense of rhythm or flow in the design. The layout with wiggly lines works rather better, and I’ve settled on that, drawn it onto the canvas, and attached my canvas to a frame.
The form is nearly a metre and a half long, and about 20 centimetres wide. I’m now wondering whether I have a stash big enough for the task!
The Crane – playing with silken thread, Part One
Japanese Bird
I decided to make a “Useful Pot For Putting Things In”, as Winnie-The-Pooh would have called it, for my cousin for Christmas. In fact, I cheated and merely embroidered a design for a lid!
I found the motif in the Japanese section of “Pattern Motifs: A Sourcebook” by Graham Leslie McCallum. I think it’s a crane. The design is very pared-down, and I thought it would make a good way to show off some of the superfine silk thread from Stef Francis, maybe even an excuse to use some more unusual stitches to see how the threads show them off.
Hungarian Braided Chain Stitch
Those of you who follow me on Twitter may recall that I tweeted this picture of the stitch I eventually chose to use. It’s called Hungarian Braided Chain, and I found it in one of those books by Edith John that I mentioned when I began embellishing the Circles Skirt. If you think of it as Heavy Chain with the needle weaving over and under the threads as shown here, you will get the idea.
I’m very taken with the stitch, in fact. It creates a fascinating textured line, and colour changes in an over-dyed thread bring it to life even more. I can imagine using it in plain thread as an indication of braid on clothing, or ropes on a ship, or even simply in side-by-side rows to create a textured effect.
This is the first – so far unfinished version, in superfine silk on silk habotai. The relatively short colour changes in this thread create subtle changes from stitch to stitch, emphasizing the structural patterning and texture. When the destined pot arrived I decided the combination looked altogether too hot and bothered, and went rummaging in my stash again…

Close Up Of Stitching On The Crane
The fabric I finally chose is a rough dupion from The Silk Route, in a golden cream colour which is extraordinarily difficult to photograph, and I picked a slightly different silk thread, more restricted in colour range. Using four strands of thread produced a lovely cable-like appearance, which you will see if you open the photo at full size.
The dark section of the design, behind the bird’s head, I worked in a dense version of trellis stitch, with horizontal, vertical, and diagonal lies all tied down with tiny cross stitches. Even working in a hoop or frame, trellis stitch cane be a bit of a challenge to stitch, but I made it in the end!
Embellishing the Circles Skirt – Part One
I have two books by Edith John, “Creative Stitches” and “New Stitches for Needlecraft”, and in the latter, she in turn quotes from another book “Needlework through the Ages” by Mary Symonds and Louisa Preece, who say
“It should be remembered that it is not the stitch itself, but the manner of its use which constitutes the art of embroidery”.
I’m going to have to think about that. I think – I would like to think – that in my embroidery the “manner of use” of a stitch is an important element of my approach, but I want to think a little bit more about the How and the Why of some of my stitch choices. It might involve a little more practice stitching, but since it’s the process of stitching that appeals to me as much as the finished result, that probably won’t be a problem!
Much of Edith John’s introductory text is concerned with encouraging experimentation – not something I need much encouragement in! – but one thing she does emphasize is the delight that can be gained purely from stitchery. The whole idea of this skirt is that it should look as though I had fun with it. This is probably not a project in which the answer to Why is likely to be anything other than Because.
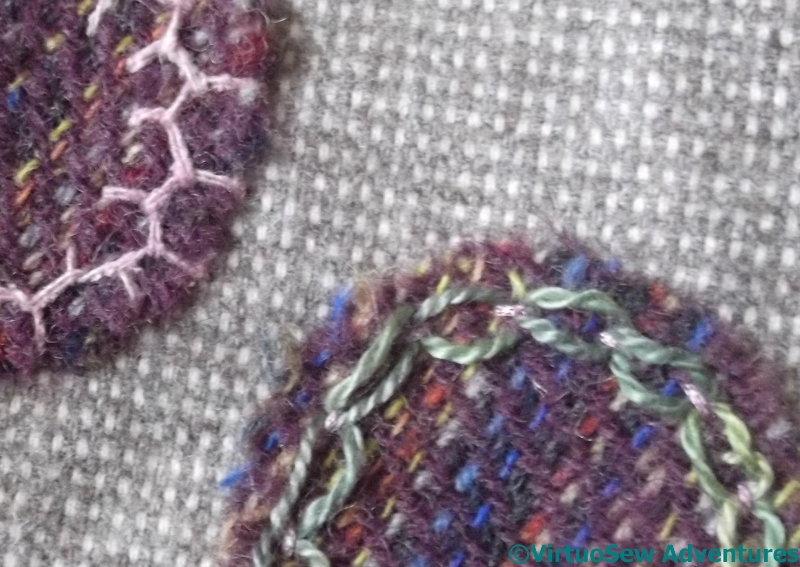
Ghost Circles
Some of the circles will be embroidered within their edges, some will have embroidered elements that extend beyond there edges, and some are ghost circles, linking several of the tweed circles together. In the top left corner of this first picture, you can see part of a series of concentric ghost circles, using solitary chain stitches, cretan stitch, stem stitch and half-chevron stitch.
The large checked circle is joined to a nearby one using some cable chain and twisted chain stitches, set out to suggest that the stitching is itself a stitch, running underneath the main fabric and onto the tweed.
Feather And Lazy Daisy
One of the smaller circles acquired a Lazy Daisy in chainette ribbon, with a couple of falling petals on the main fabric. I’ve emphasized the centre – a circular boss using the same chainette in star stitch – using a darker stranded cotton.
I’ve learnt over the past few years that sometimes a design is best created using layers of detail. The darker stranded cotton was added after I’d done a few other circles. I came back to it, and wanted to point up the petals a little. Since the tones are all very similar, the darker thread helps. I may yet come back and add some more.
The large crimson circle is very simple at present, with a single row of closed feather stitch around the edge. That may yet change…
The Circles Skirt

Layout For The Skirt
You may recall that I bought some rather gorgeous Donegal tweed at the Harrogate Knitting And Stitching Show, with the intention of embellishing a skirt. I decided that this time I would use simple circles, and cut some paper patterns in circles of different sizes, to decide on placement. Here is the result. Most of the drama is at the front, where the skirt is a simple A-line shape. The back of the skirt flares out a little in the centre, so the patterning tails out there, but the pattern is asymmetrical, which is why I’ve chosen to show you a sort of all-round view.

Skirt Partly Arranged
It seemed to me that the easiest way to decide what went where was to sneak up on it. I stared at the layout for a while, picked a fabric for a particular placement, cut it out, pinned it on in place of the paper circle, and then stared again. Repeat…

Skirt Layout completed
I’ve needlefelted the circles to the fabric – that seemed the best way to attach them more or less permanently so I won’t be stabbed with pins when I’m adding the embroidery. Now there will be a lot more cycles of staring at it and doing something, staring at it and doing some more.
And since the circles are firmly attached, I can in fact wear it now if I decide to!