
Tag: Tudor Pincushion
A tree for the trinkets..
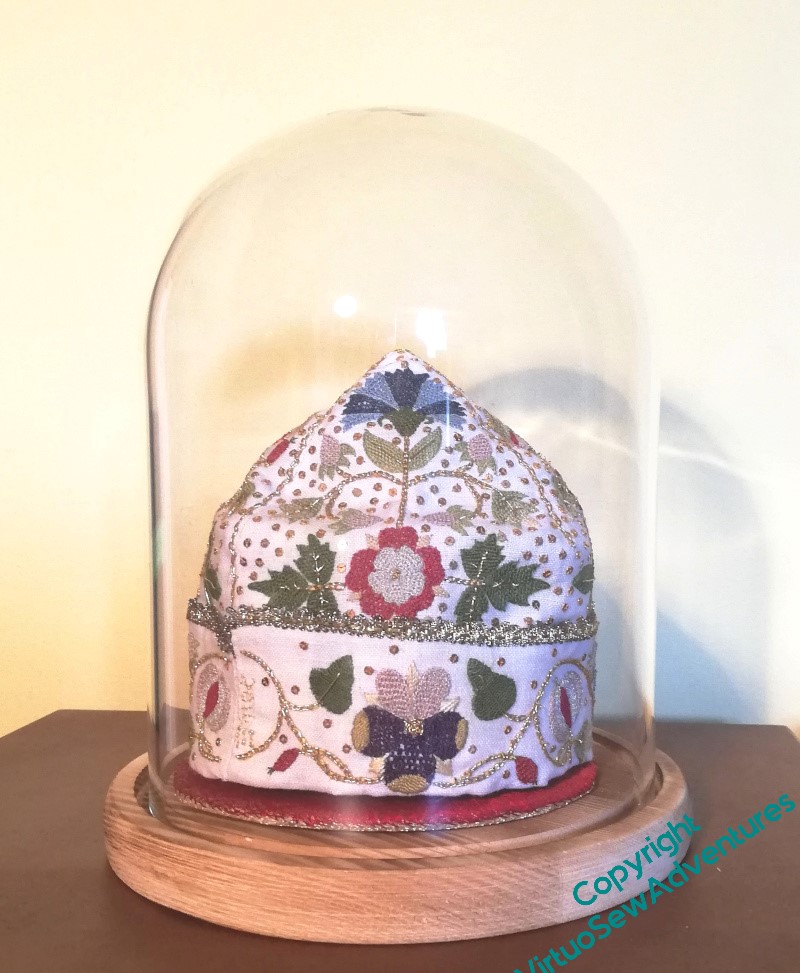
When I had the idea about using a parlour dome for the Violets and for the necklace, I realised that I would need to play with how I displayed them, trialled the Tudor Nightcap in the dome and realised that I could now put it on display.
So what about all the other Thistle Threads pieces?
Well, it turns out you can get parlour domes that aren’t round, so I got the largest I could bring myself to buy and then stopped to think…
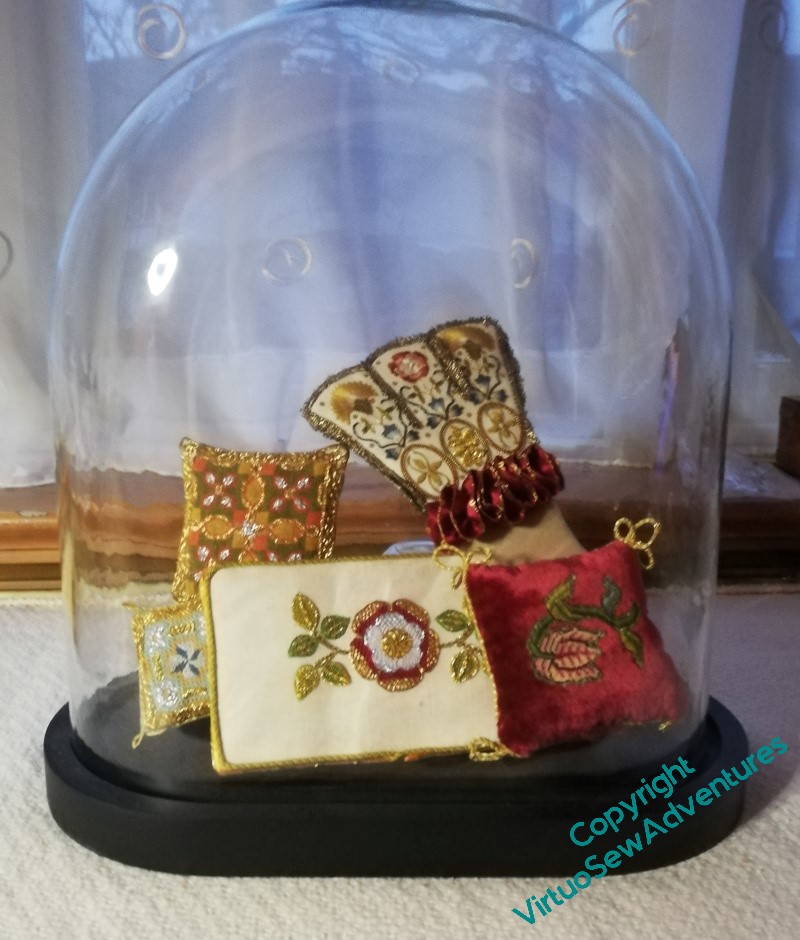
I started by playing around with propping the various pieces I’ve been planning for that Winter Decoration Corner against one another within the dome. It’s a flattened oval, and quite high, but anything I could improvise seemed not to have the height I wanted without taking up all the display space.
I think this shows the idea will work, but it doesn’t really have the presence that the pieces deserve.
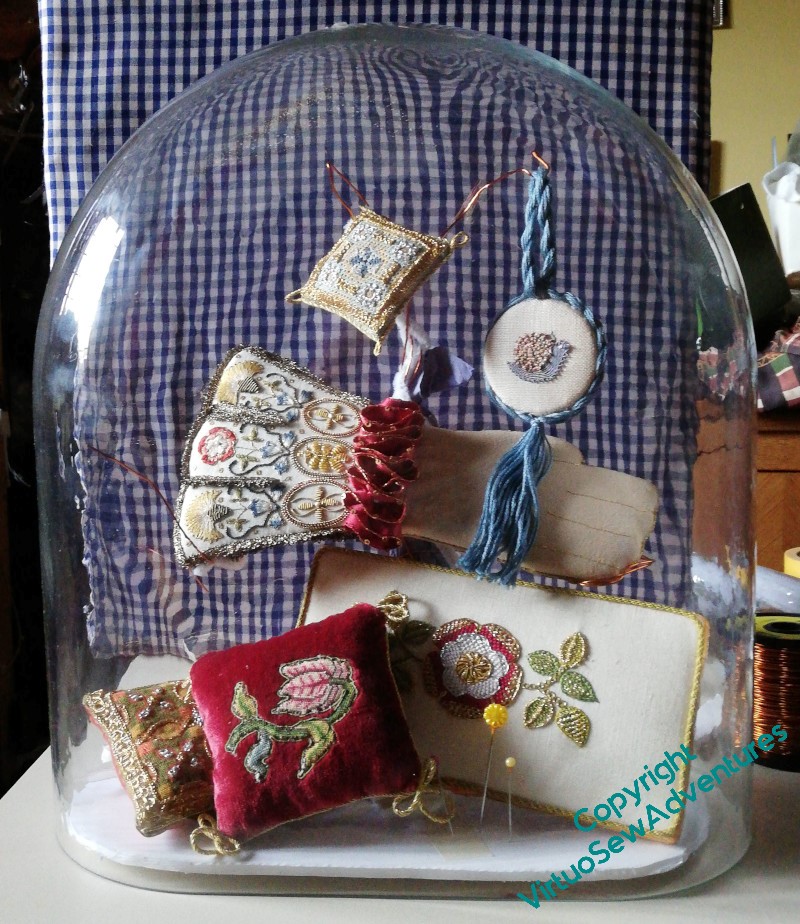
This is better. I’ve used offcuts of the foamcore that I bought to help me with Nefertiti and Akhenaten to create the base that will sit inside the glass, sandwiching the beginnings of the wires forming the tree between two layers. I’ve built up a support for the green and orange cushion at the back using smaller bits of foamcore, and wrapped pipe cleaners around the wires.
It’s not perfect, but I’ve set it up in the hall where I will pass it every day, to work out whether I like it. Then the idea is that I will have a lovely messy hour or so covering the wire with papier mache, allow it to dry, and paint the whole thing gold.
The Tudors were as fond of bling as the ancient Egyptians, after all!
Tudor and Stuart Masterclass – Beginning the Petite Pincushion
Starting The Petite Pincushion
There were two additional projects included in the Tudor and Stuart Goldwork Masterclass, to provide further opportunities to use some of the stitches we are learning. The Tudor Pincushion was one, and this “Petite Pincushion” is the second. The materials include a piece of silk brocade for the backing, some gold cord to provide an ornamental edge, and more spools of assorted metal threads for the goldwork stitches.
Whereas the silk stitchery for the Tudor Pincushion was in primarily in Tent Stitch, most of the silk work on the Petite Pincushion is in Queen Stitches. I’ve not done any since I finished the silkwork on the sampler, and I am finding that I am having to remind myself to pull them tight to create the openwork effect. I will have to remember to line the embroidered side of the pincushion or the stuffing will poke out through the gaps!
I stitched centre lines on the fabric, but as you can see, once I had the first stitch placed I snipped out the middle stitches and pulled them back out of the way.
I’ve already finished with two of the silk colours, which appear only in the central starburst. Now I just have to do rows of strapwork in the other two colours, as well as the four blocks of tent stitches that provide a basis for a rather intriguing-looking interwoven stitch which will probably be nearly the last element I add.
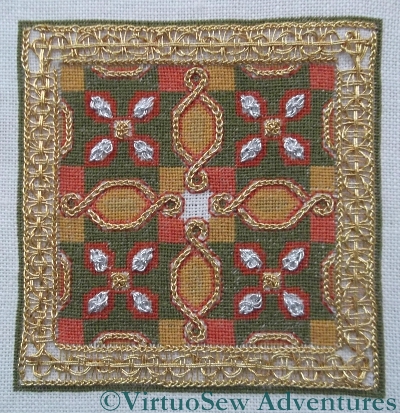
Tudor Pincushion Finished
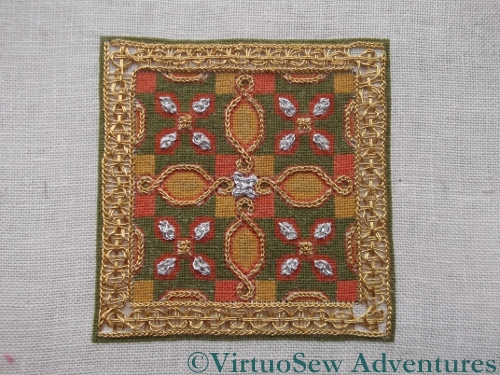
Tudor Pincushion Final Stitch In Place
The final stitch in the Tudor Pincushion was the central boss in Four Sided Interlacing Stitch, which slotted nicely into place after I received the instructions for Month 16.
I decided – after staring at it intermittently while I’ve waited for the stitch to turn up – that I was happy enough with the border and did not need to unpick it. So the next phase was to attach the silk backing and stuff the pincushion.
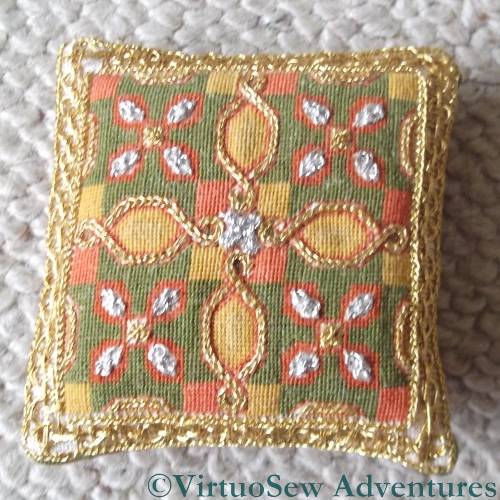
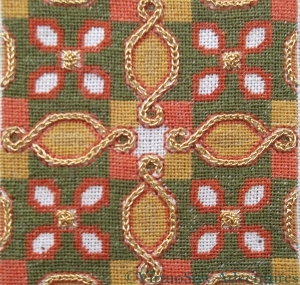
Finished Tudor Pincushion
I’ve tried not to over-stuff it, since I intend to use it as a decoration and not as a pincushion, but I still found myself pushing more stuffing in than I expected. Unlike the Tulip Slip Pincushion, where the velvet was so tough that I used a sewing machine, this one is finished entirely by hand, and stuffed enough to look plump and fat, but not so much that the fabric is strained.
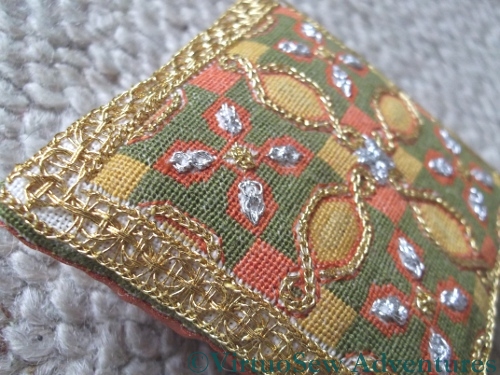
Close Up Of Pincushion
I’m finding with Tricia’s various pieces that photographing them from an angle sometimes produces a much clearer view of the stitching. There is certainly less likelihood of “glare” from the metal threads. Besides, after all that effort, I’m more than happy to show off a little…!
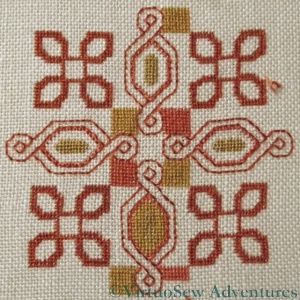
Tudor and Stuart Goldwork Masterclass – Update on the Tudor Pincushion
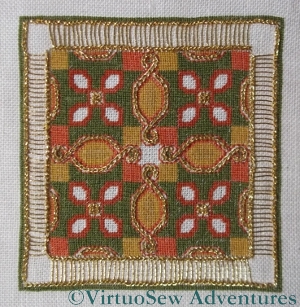
First Stage Of Border
I’m making reasonably good progress with the Tudor Pincushion which is part of the Tudor and Stuart Goldwork Masterclass. The silkwork was finished a while ago, and now there are several different isolated stitches, and a continuous border.
Silver Guilloche Close Up
I’m not using the real metal thread for this. I rather like the rich, vibrant colour of this thread, wrapped around a cotton core, and as I am planning to create a sort of winter “corner decoration” using all of my historical embroidery pieces, there is something positive to be said for the idea of using as many different shades of gold and silver as I can to create a really rich, varied impression.
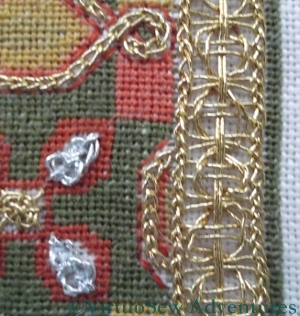
Border Close Up
The small sections of silver Guilloche Stitch have worked well, although I still have reservations about my gold Spider’s Web stitches, especially when I look at close-up photos of them!
The border is a Guilloche Stitch variation worked on a Ladder Stitch base. As it turned out, I didn’t get quite the right number of rungs on the ladders, so rather than being a neat continuation of the Guilloche Stitch, the corner elements are rather improvisatory.
Tudor Pincushion - Almost Finished
This doesn’t worry me. At the moment, I am still waiting for the instructions for the central ornamental stitch, and if, by the time I have that stitch, I’ve decided that I really must redo it, I will do so then. By that time I will be still more practised at working with metal threads, and it should go more swiftly and easily.
In the meantime, I can go on to play with more new stitches, and even, perhaps, start work on the real metal threads to add them to the Spot Sampler!
Tudor Pincushion Progress
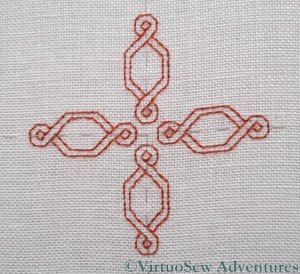
Tudor Pincushion Silkwork Finished!
Finally, I have finished the silkwork on the Tudor Pincushion, which is part of the Tudor and Stuart Goldwork Masterclass course I am following.
I think I need to find something that is less fine stitching than this, to give me a rest from all these tiny stitches!
Still, you can see that the final pattern is simple enough in concept, and there is just enough subtle variation in the colours to make the design interesting. The final effect is almost one of a woven fabric, as though the goldwork were embellishing a genuine tapestry. Remember that a real tapestry is woven (the Gobelins ateliers in France are the best known, historically, although a lot of tapestries I’ve seen have been from the Netherlands). A real tapestry is not worked in tent stitch on canvas, whatever the kit manufacturer says, and the Bayeux Tapestry is in fact an embroidery!
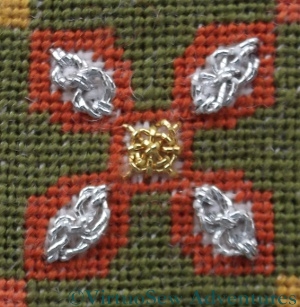
First Stage of Goldwork
I’ve also begun to work on the goldwork stitches. The small gold spots are worked in Eight Legged Spider’s Web Stitch which I first encountered in Month Four, and which is a great trial at the size it needs to be on the pincushion. I’ve not quite persuaded myself that I need to restitch them, as they didn’t markedly improve over the four I’ve done, but I am certainly considering the possibility.
The channels between the back stitches are filled with Reverse Chain Stitch, which I first encountered at the very beginning of the goldwork section of the course. This is an easy stitch to do, and very satisfying to see it build.
The course materials have included two Japanese hand made needles, which I was hoping to experiment with at this point, but I can’t even thread them! The eyes are much too fine for the thread, which is awkward, since I may be wasting quite a bit of gold thread unnecessarily because my ordinary needles strip the gold from its core.
There has to be a better way…
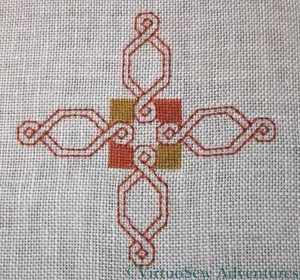
Tudor And Stuart Masterclass – Pincushion Progress
Tudor Pincushion Progress
So here is the progress on the Tudor Pincushion.
There are two close shades of red and two close shades of tan in the design, – this will increase the appearance of rich, subtle colour variation in the final piece, which will provide a gorgeous background for the gold and silver threads. It also means that I have to be super-organised with my thread. As soon as I cut a length, it is wound onto a card with the thread number written on it, because even my daylight lamp sometimes isn’t enough to help distinguish the colours.
I’ve miscounted and had to restitch the corner motifs in a couple of places, but that is probably because, first, it is a very fine count of fabric, and second, tent stitch is an oriented stitch.

Tent Stitch - demonstrating edges with the orientation and against it
That is, because it creates a diagonal stitch, diagonal elements of the design look different when stitched, depending upon whether they slant with the stitch or in the opposite direction. This doesn’t cause a problem once the piece is finished – especially given how small the stitches are! – but it does mean that it isn’t so easy to know at a glance whether details are right. When the details are wrong, it becomes clear that they are wrong just as soon as you stop stitching, and then it becomes a matter of how much or how little needs to be unpicked.
Of course, I suppose I could interpret (probably correctly!) that as a sign that I’ve been stitching for too long and my eyes are tired…
Tudor and Stuart Goldwork Masterclass – Month Nine
Tudor Pincushion - Stage One
It’s been rather chilly of late, and I couldn’t quite face sitting in the window working on the Spot Sampler, so I spent some time mounting the Tudor Pincushion on a bar frame, and started working on it.
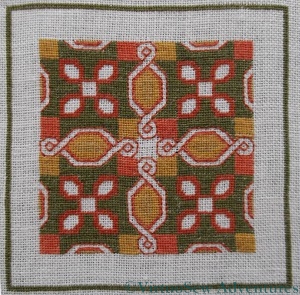
The first thing I did was to part-colour the chart. I’ve never been comfortable with charts, and it’s easier to orientate myself if I have at least some elements coloured in to act as guides. Specifically, I have to colour them in myself, because I’m no happier with printed colour charts than printed black and white charts. I think that colouring the chart myself helps me to understand how the design is put together, and then I find it easier to stitch.
I’ve also tacked the centre lines in. This is something I rarely do – generally I just find the centre, work whatever is over it and then count from that. In this case, there’s no stitching at the absolute centre – not until I start on the metal thread work, anyway – so I made sure that the centre point was marked, at least for the first stage of outlining.
Tudor Pincushion - Stage Two
In fact, as you can see, I’ve already taken out the tacking. At least, I’ve left it in at the edges, but now I’ve got all four of the central outlined motifs in, and worked the first set of tent stitch blocks, everything else can be counted relative to the nearest landmark point that is already stitched.
Since the silk stitching is either in tent stitch or back stitch, it’s not difficult to do, although as it is on a very fine linen – 38 or 40 hpi (holes per inch), I think – I’ve been very glad of my magnifying spectacles!